

Page 1

LP 2 FLASH
LP 2 FLASH
QUICKSTART GUIDE
ENGLISH ( 1 – 5 )
GUÍA DE INICIO RÁPIDO
ESPAÑOL ( 6 – 10 )
GUIDE D’UTILISATION SIMPLIFIÉ
FRANÇAIS ( 11 – 15 )
GUIDA RAPIDA
ITALIANO ( 16 – 20 )
KURZANLEITUNG
DEUTSCH ( 21 – 25 )
SNELSTARTGIDS
NEDERLANDS ( 26 – 30 )
Page 2

Page 3
QUICKSTART GUIDE
BOX CONTENTS
LP2FLASH
Slipmat
USB Cable
Software CD
Quickstart Manual
Safety & Warranty Information
INTRODUCTION
Thank you for purchasing this product. The LP2FLASH is the fastest and easiest way to convert music from vinyl recordings or
line-level external audio sources to an SD card or USB storage device (such as a thumb drive).
You can also conveniently record vinyl directly to your computer using the software we have included. We have included
several software applications to aid you in converting your records to digital music:
EZ Vinyl/Tape Converter* (PC only) or EZ Audio Converter (Mac only) is the quickest and easiest way to turn your
recordings into digital media. The software conveniently saves your recordings in your iTunes** library. Novice users
may find this application preferable. On the CD, we have included a handy Software Quickstart Guide with step-by-step
instructions on software installation and operation.
Audacity (PC and Mac) is intended for the advanced user. This application allows for advanced audio editing and
processing, such as normalization, noise removal and automatic track separation. The Audacity Software Guide can be
found on the included CD – please refer to this guide as you are working with Audacity.
* A version of EZ Vinyl/Tape Converter with Gracenote MusicID is available for download at your product’s page at www.ion-audio.com.
** iTunes and iPod are trademarks of Apple, Inc., registered in the U.S.A. and other countries.
TOP PANEL FEATURES
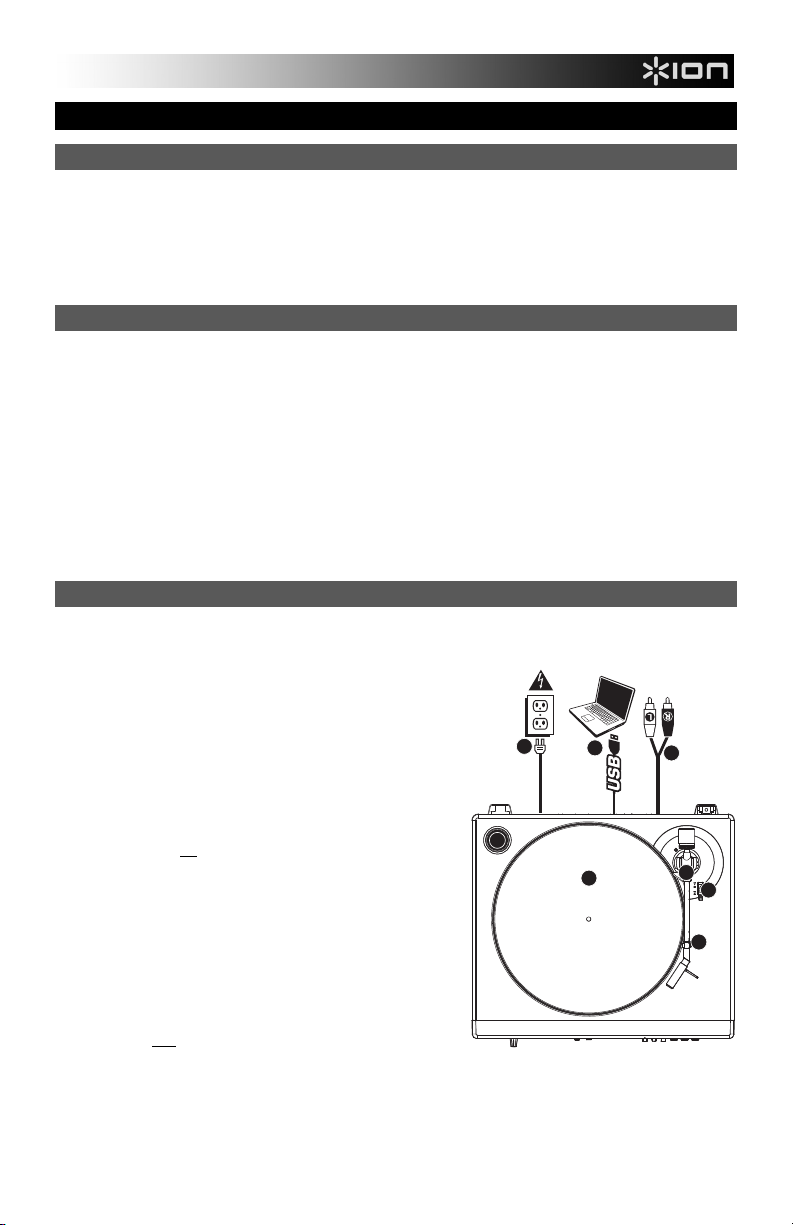
1. PLATTER - Put the record you would like to play here.
2. TONEARM – The LP2FLASH comes with a ready to use pre-balanced TONEARM and cartridge. The TONEARM can
be raised and lowered by hand, or by pressing the RAISE / LOWER
LEVER. Please note that the TONEARM needs to be moved away
from resting position (on the TONEARM CLIP) for the turntable
motor to activate. When the TONEARM is placed back in its
resting position, the turntable motor will deactivate.
3. RAISE / LOWER LEVER – Raises and lowers the TONEARM.
4. TONEARM CLIP – Use this clip to secure your TONEARM when
storing and transporting the unit.
5. 45 RPM ADAPTER HOLDER - Holds the included 45 RPM
adapter. When not using the adapter, please place it in this holder.
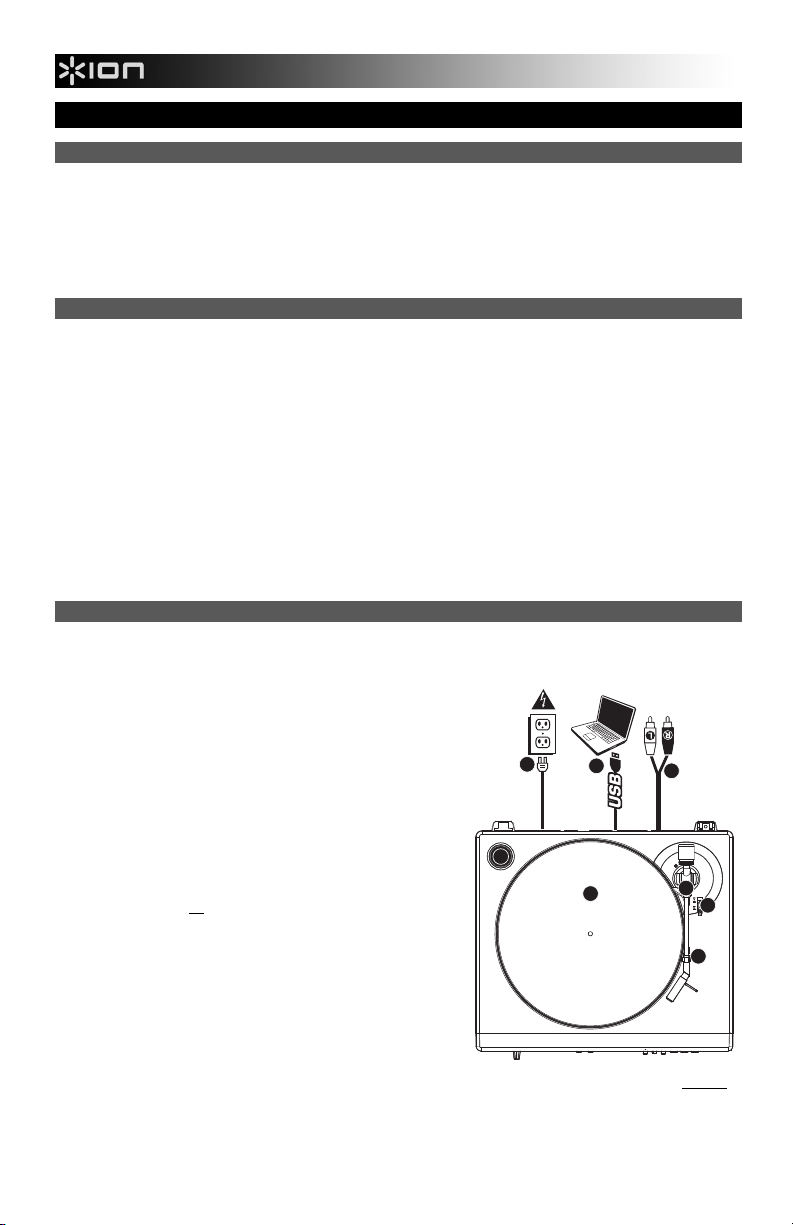
6. RCA OUTPUT CABLE – Connect the attached cable to a line-level
RCA input (on a mixer, for instance).
WARNING: Do not attempt to connect the LP2FLASH to a phonolevel input.
7. USB AUDIO OUTPUT – Use the included USB Cable to connect
your turntable to your computer. For transferring your vinyl records
to your computer, we have provided two different software
packages on the included CD. EZ Vinyl / Tape Converter or EZ
Audio Converter is the easiest and quickest way to transfer your
vinyl records and should be used if you are a beginner.
Alternatively, if you are an advanced user you may wish to install
and use the Audacity software, which allows you to take advantage
of advanced audio editing features, such as audio normalization,
noise removal and automatic track separation.
8. POWER CABLE – This power cable should be plugged into a wall
receptacle after all audio connections are made.
L
R
8
7
6
5
1
2
3
4
1
Page 4
FRONT PANEL FEATURES
16
12
9
10
11
18
8
17
3
7
1
6
4
5
13
14
15
2
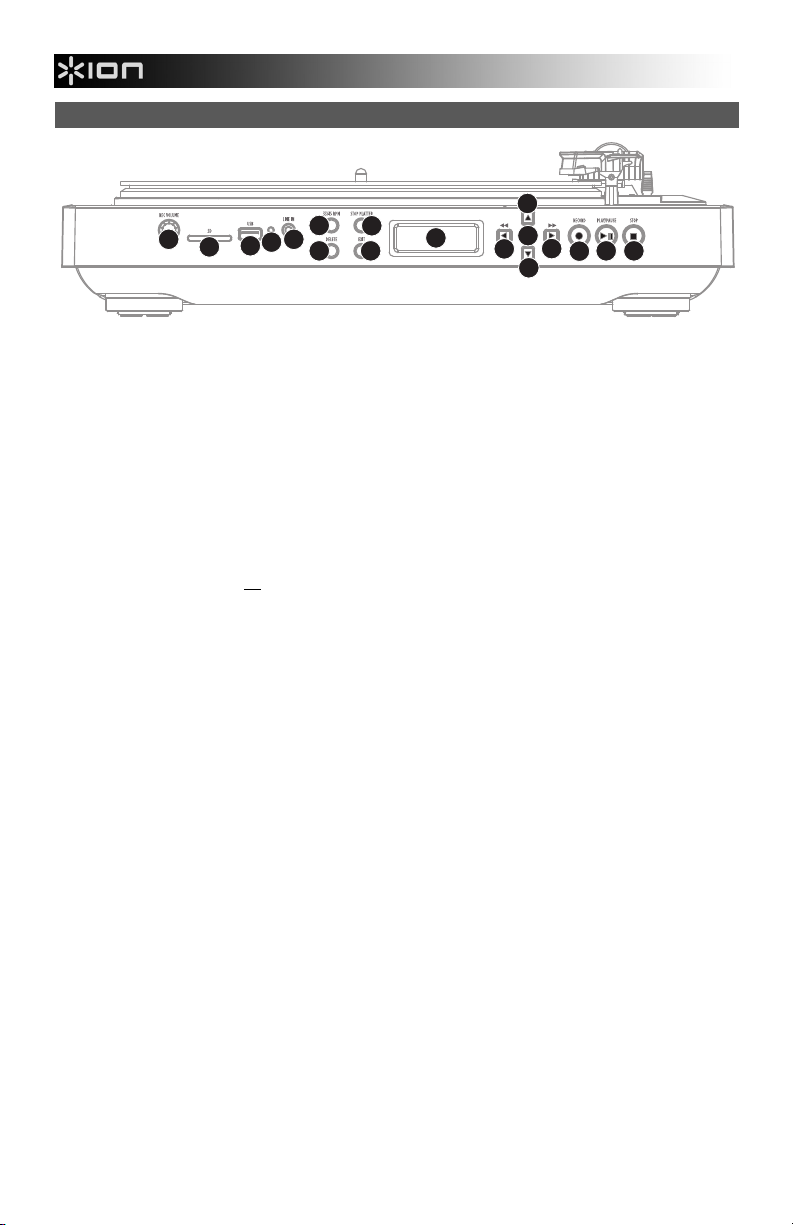
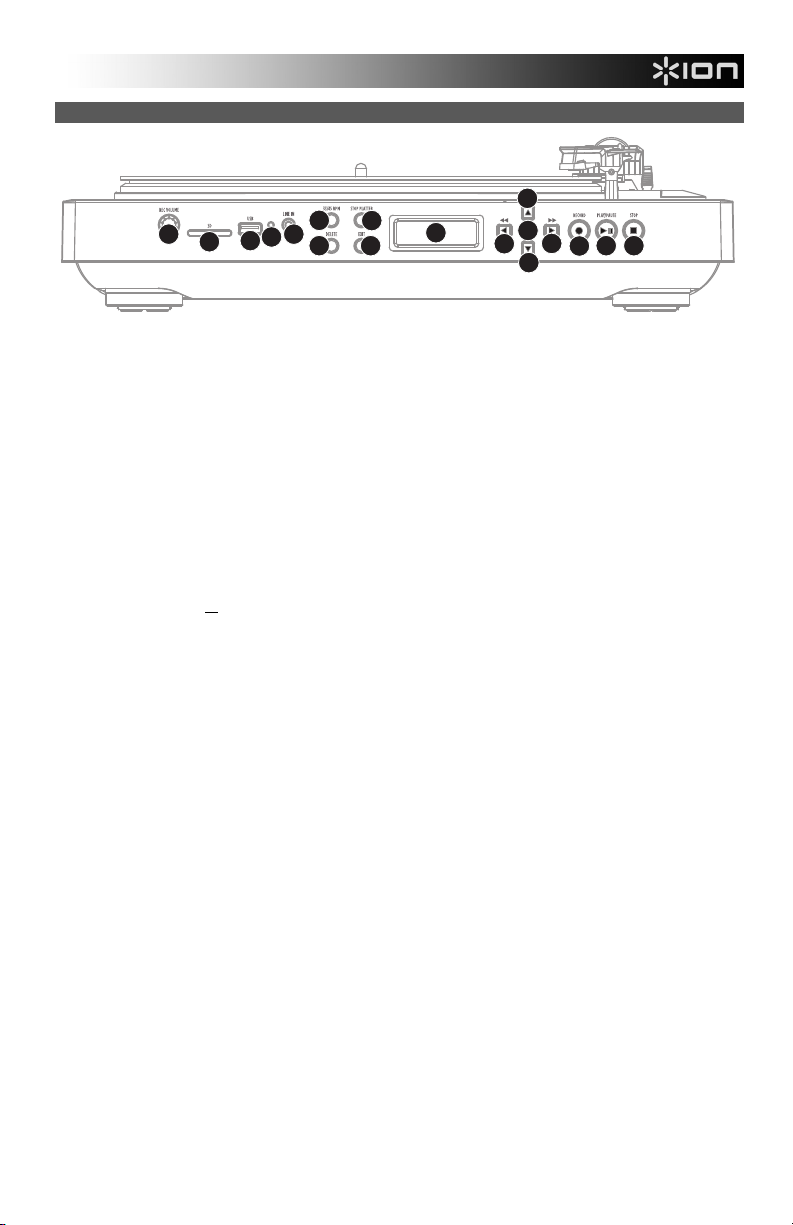
1. DISPLAY – Shows information pertinent to unit operation.
2. DOWN BUTTON – This button is used to move down through lists of available options on the DISPLAY.
3. UP BUTTON – This button is used to move up through lists of available options on the DISPLAY.
4. RIGHT BUTTON – When a selected option shows a “>” symbol in the DISPLAY, this button may be used to enter and
display available sub-items. When playing music from an attached USB or SD media device, this button functions as a
Skip Forward button, allowing you to skip to the next available track.
5. LEFT BUTTON – When a selected option shows a “<” in the DISPLAY, this button may be used to go back to the
previous set of options. When playing music from an attached USB or SD media device, this button functions as a Skip
Back button, allowing you to skip to the beginning of the track, or to the previous track, if pressed again.
6. SELECT BUTTON – This button selects the option highlighted on the DISPLAY.
7. EXIT – This button returns you to the main set of options (main page).
8. DELETE – Press this button to delete the selected recording.
9. SD CARD SLOT – Insert SD card into this slot.
10. USB SLOT – Insert USB thumb-drive or connect USB hard-drive (FAT16 or FAT32 only) to this input.
Note: The LP2FLASH does not support USB hubs.
11. USB STATUS INDICATOR – This LED will light when a USB drive is connected.
12. RECORD VOLUME – This knob adjusts the recording level. As you adjust the recording level, keep an eye on the audio
meters on the DISPLAY.
13. RECORD – Press this button to enter Record Mode. Record Mode allows you to record music from the turntable platter,
or from external audio devices connected to the LINE IN, directly to a connected USB or SD device.
14. PLAY / PAUSE – Press this button to play. While playing, press again to pause. While paused, press again to resume
playback.
15. STOP – Press this button to stop playback (or recording).
16. 35 / 45 RPM BUTTON – This button controls the RPM of the PLATTER. A number on the upper-right-hand corner of the
DISPLAY indicates which RPM mode has been selected.
17. STOP PLATTER – This button returns the TONEARM to its resting position and stops the turntable motor. If the button
is not functioning, make sure the Motor Drive Belt is properly installed (see ATTACHING THE DRIVE BELT).
18. LINE IN – Connect a tape player, reel-to-reel machine, or other audio source to this input using a 1/8” stereo cable. Any
signal entering this input will be included in the playback or recording mix.
2
Page 5
PLAYING MUSIC FROM A USB DRIVE / SD CARD
To play music directly from your USB device (FAT16 or
FAT32 only) or secure digital (SD) card, follow these
instructions.
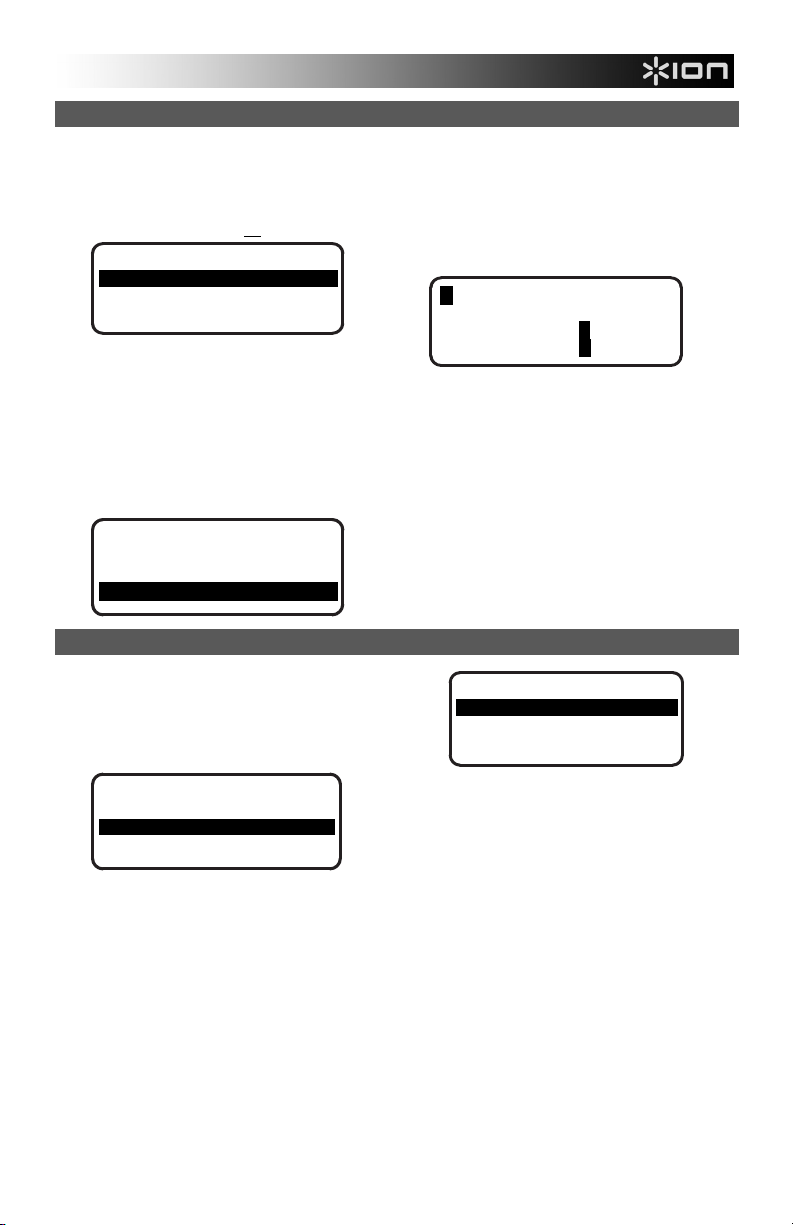
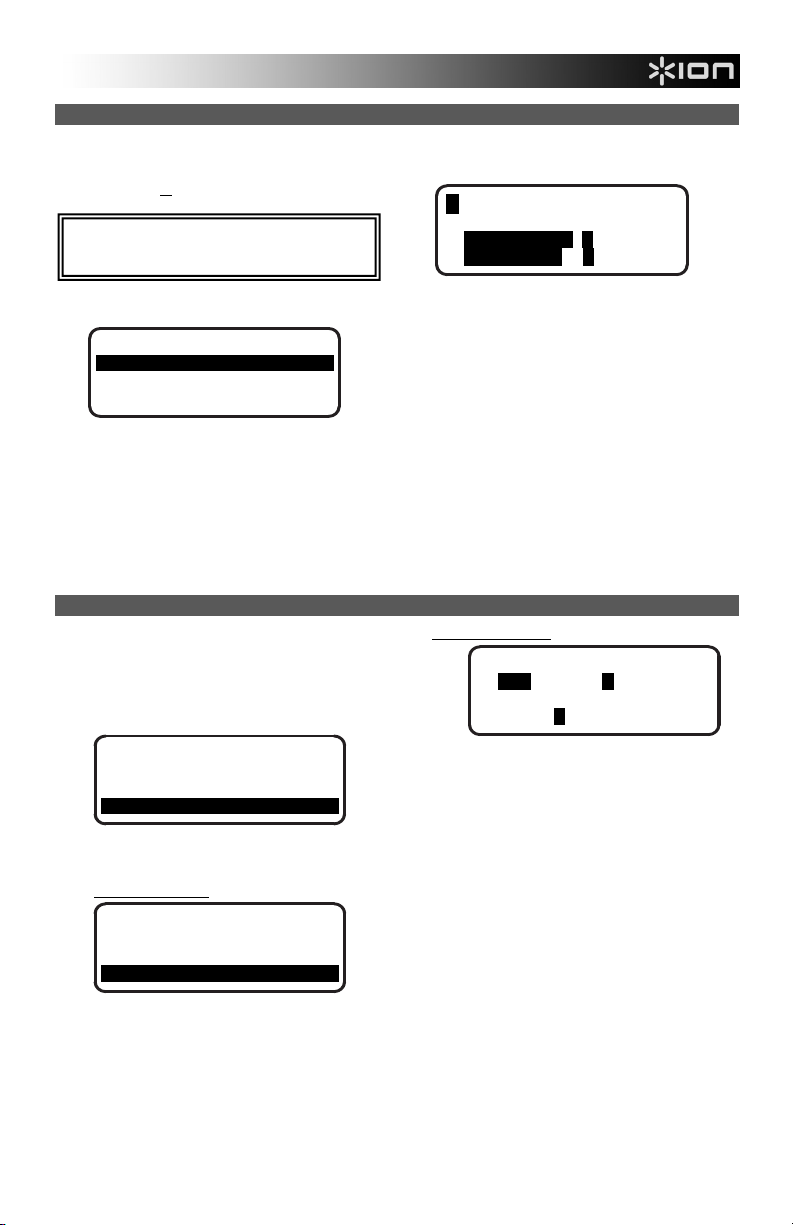
1. Insert your USB drive or SD card into the
appropriate slot. The main page should appear.
Note: The LP2FLASH does not support USB hubs.
LP2FLASH
Play Music >
Play Settings >
Record Settings
2. Make sure Play Music is highlighted, then press the
RIGHT or SELECT BUTTON.
3. Use the UP and DOWN BUTTONS to highlight the
USB drive or SD card containing the music you want
to play, then press the RIGHT or SELECT BUTTON.
4. The DISPLAY will list the files and folders stored on
the attached device. You can enter any folders on
your device by using the UP and DOWN BUTTONS
to highlight it and pressing the RIGHT or SELECT
BUTTON. Music files that you can play with the
LP2FLASH will be marked with a musical note (“♪”)
and an “.MP3” extension.
>
UFD-1
< CONFIG >
< RECORD >
< ♪ SONG01.MP3 >
5. Use the UP and DOWN BUTTONS to highlight the track
you want to play, then press the RIGHT, SELECT, or
PLAY BUTTON.
6. Underneath the file name, you will see the Time Elapsed
(in Hours : Minutes : Seconds). Underneath the Time
Elapsed, you will see two numbers. The first refers to
where in the list of files in the selected folder or drive the
song appears. The second is the number of playable
song files in that folder or drive.
Play | UFD-1
< SONG01.MP3 >
00 : 01 :58 L||||
0001/0009 R|||||||
You can use the following controls while playing music:
PLAY / PAUSE: Starts, pauses, or resumes a track.
STOP: Stops a track.
RECORD: Stops a track and enters Record Mode.
LEFT BUTTON: Functions as a Skip Back button.
Press and hold it to rewind the current track.
RIGHT BUTTON: Functions as a Skip Forward
button. Press and hold it to fast-forward through the
current track.
UP BUTTON: Press this to skip to the previous track.
DOWN BUTTON: Press this to skip to the next track.
EXIT: Stops a track and returns to the initial display
screen.
ADJUSTING THE PLAY SETTINGS
To adjust the settings of how the LP2FLASH plays tracks
from a USB drive (FAT16 or FAT32 only) or SD card, follow
these instructions:
1. On the main page in the DISPLAY, use the UP and
DOWN BUTTONS to highlight Play Settings, then
press the RIGHT or SELECT BUTTON.
LP2FLASH
Play Music >
Play Settings >
Record Settings >
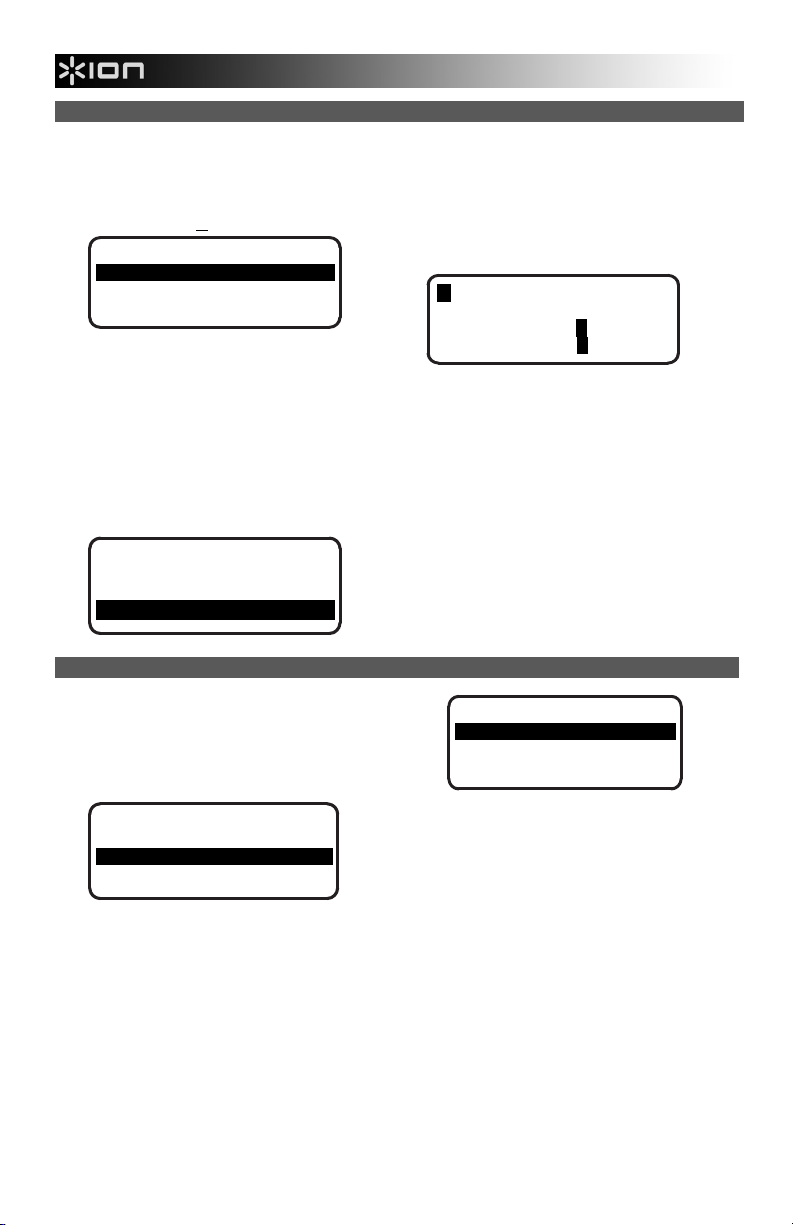
2. Use the UP and DOWN BUTTONS to scroll through
the menu. Highlight the setting you want:
3. After you have highlighted the setting you want, press
Play Options
< Normal
< Shuffle
< Repeat One Song
Normal: Tracks will play in alphabetical order by file
name (the way they are listed on your USB drive or
SD card).
Shuffle: Tracks will play in random order.
Repeat One Song: Whatever track you select will
repeat until you stop it or skip to a different track.
the LEFT or EXIT BUTTON to return to the main page.
3
Page 6
RECORDING MUSIC TO A USB DRIVE / SD CARD
To record music directly from LPs to your USB device
(FAT16 or FAT32 only) or secure digital (SD) card, follow
these instructions.
Note: The LP2FLASH does not support USB hubs.
Note: When recording to SD cards, the LP2FLASH
only records to SD Cards with storage capacities less
than 2GB.
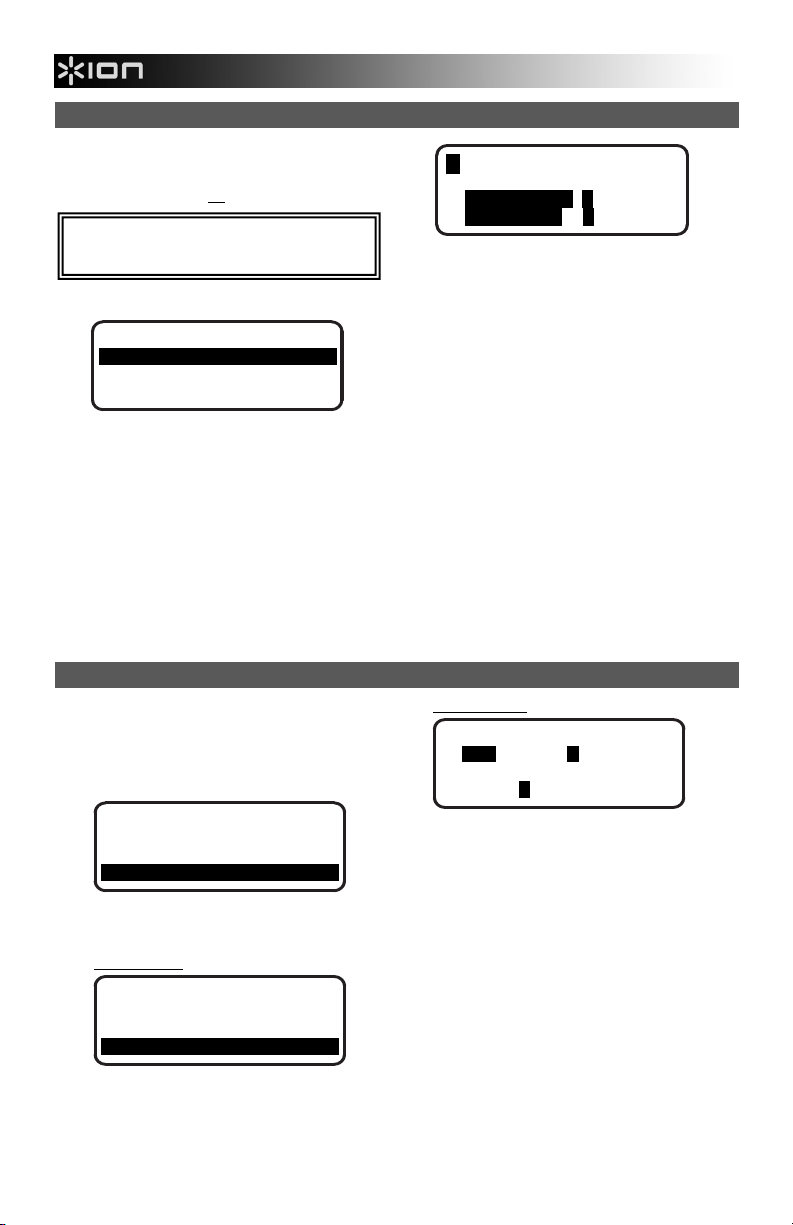
1. Insert your USB drive or SD card into the appropriate
slot. The main page should appear.
LP2FLASH
Play Music >
Play Settings
Record Settings
2. Press RECORD.
3. Use the UP and DOWN BUTTONS to highlight the
USB drive or SD card to which you want to record,
then press the RIGHT or SELECT BUTTON. The
DISPLAY will prompt you to check the recording
volume.
4. Play the track you want to record and adjust the
RECORD VOLUME knob to set an appropriate
recording level. You can use the level meters that
appear on the DISPLAY to gauge this. Return to the
beginning of the track when you are done checking
the recording level.
Note: If the recording level is too high, the level
meters will display the word “CLIP.” Reduce the
recording level by adjusting the RECORD VOLUME
knob.
>
>
|| Record | UFD-1
<Adjust Volume Now >
Press Play L||||
To Record R|||||||
5. Press the PLAY BUTTON. The DISPLAY will change to
show the Time Elapsed (in Hours : Minutes : Seconds),
which will remain at “zero” until recording begins.
6. Play the track you want to record. Depending on the
Auto Record settings (see ADJUSTING RECORD
SETTINGS), the LP2FLASH may begin recording once it
receives an audio signal from a source (e.g. the needle
dropping onto the vinyl or signal entering the LINE IN
input).
You can use the following controls while recording
music:
Play / Pause: Pauses the recording while the Platter
keeps rotating. Press it again to resume recording.
Stop: Stops the recording while the Platter keeps
rotating. From here, you can press Record to record
on the next track, press Play to hear the recording
you just made, or Exit to exit Record Mode and to
return to the main page.
7. The LP2FLASH will automatically name the file and
append a 3-digit number.
ADJUSTING RECORD SETTINGS
To adjust the settings of how the LP2FLASH records tracks
from a USB drive (FAT16 or FAT32 only) or SD card, follow
these instructions:
1. On the main page in the DISPLAY, use the UP and
DOWN BUTTONS to highlight Record Settings,
then press the RIGHT or SELECT BUTTON.
LP2FLASH
Play Music >
Play Settings >
Record Settings >
2. Use the UP and DOWN BUTTONS to scroll through
the menu. Highlight Record Quality or Auto
Recording and press the RIGHT or SELECT
BUTTON.
Record Quality:
Record Quality
< Best (192k)
< Better (160k)
< Good (128k)
Use the UP and DOWN BUTTONS to choose
between three levels of recording quality: Good
(128kbps), Better (160kbps), and Best (192kbps).
Remember that a recording at a higher bitrate will
take up more space on your storage device.
3. After you have highlighted the settings you want, press the
4
Auto Recording:
Auto Record Level
< Off LowX High
Split Time (seconds)
0 1x 2 3 4
Use the UP and DOWN BUTTONS to set the Auto Record
level. When the option you want is highlighted, press the
SELECT BUTTON. An “X” should appear next to the option
you have selected:
Off: Auto Record is disabled.
Low: Recording starts automatically when the
LP2FLASH detects a lower input signal.
High: Recording starts automatically when the
LP2FLASH detects a higher input signal.
Use the UP and DOWN BUTTONS to set the Split Time. An
“X” should appear next to the option you have selected:
0: Auto Record starts after 50 milliseconds
1: Auto Record starts after 1 second
2: Auto Record starts after 2 seconds
3: Auto Record starts after 3 seconds
4: Auto Record starts after 4 seconds
LEFT or EXIT BUTTON to return to the main page.
Page 7
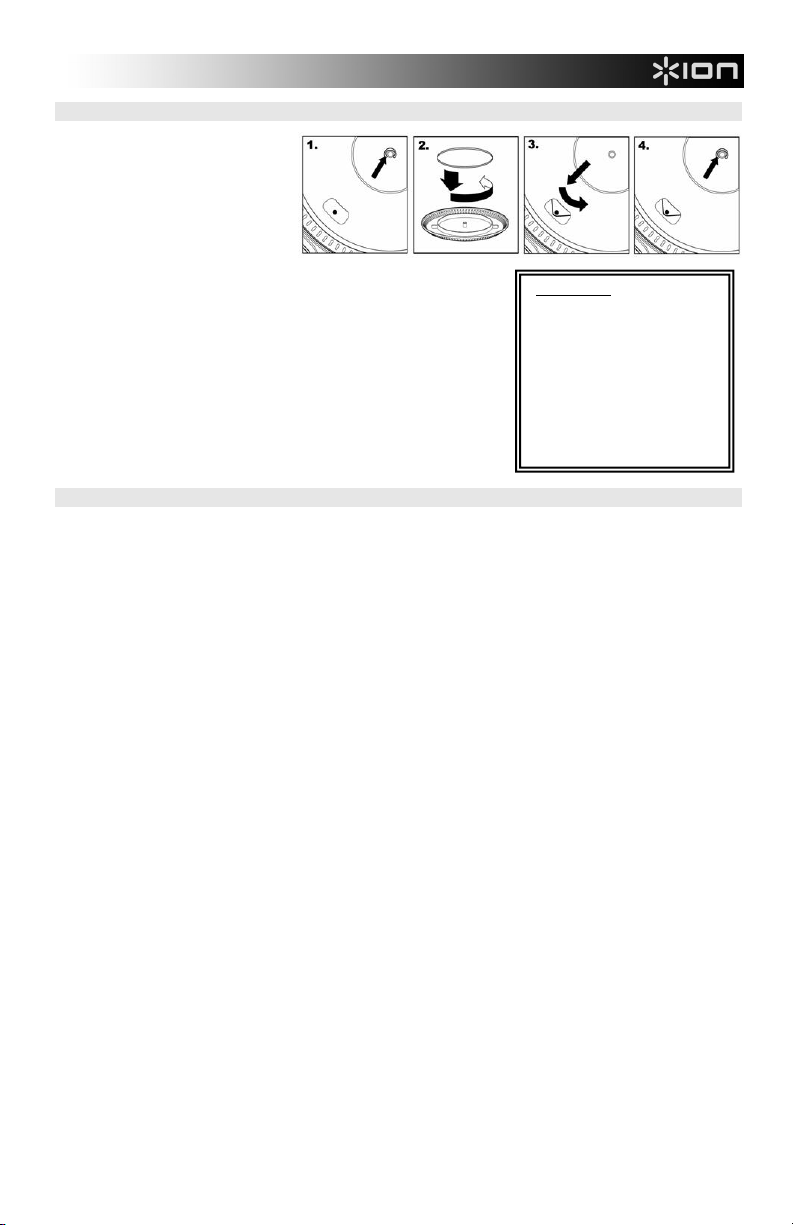
ATTACHING THE DRIVE BELT
The ION LP2FLASH platter is driven by a
rubber drive belt attached to the turntable
motor. In some rare cases, this belt may
slip off, causing the turntable platter to
stop spinning. If the turntable does not
begin spinning when you lower the
TONEARM, the most likely cause is the
belt. Please follow the instructions below
in order to properly re-attach the belt to
the motor and the platter.
1. Begin by removing the clip which secures the PLATTER to the center
spindle. After you have removed the clip, remove the PLATTER.
2. Turn the PLATTER upside down. Place the rubber drive belt around the
inner bottom ring of the turntable PLATTER, making sure that the rubber
belt is not twisted.
3. Place the PLATTER back onto the center spindle and rotate it so that you
can see the motor spindle through the hole on the platter. Now reach into
the hole, pull the rubber drive belt off the inner ring and install it over the
motor spindle, as shown in the illustration. Be careful not to twist the belt
during this step.
4. Lastly, replace the clip onto the center spindle to secure the PLATTER.
IMPORTANT!
Make sure that the slipmat is
always placed on top of the
platter while using the turntable.
Failure to use the grip mat may
damage your media as well as
damage to the turntable.
Remove the plastic cartridge
cover (needle cover) before
operating the turntable.
CONVERTING YOUR 78RPM VINYL
To convert your 78RPM records, you will need to install and use the Audacity application. This application can be found on the
CD included in the box. Please install Audacity and follow the instructions below to record your 78RPMs. For Audacity
troubleshooting, refer to the Audacity Software Guide included on the CD.
1. Connect your turntable to your computer’s USB port.
2. Open Audacity.
3. In Audacity, go to EDIT -> PREFERENCES and set the Recording Device to ‘USB Audio Codec’ – this is your USB
turntable (select 2 channels to record in stereo).
4. Select your computer’s soundcard as the Playback Device. Note that the device name will vary from computer to
computer but should never be set to ‘Microsoft Sound Mapper’.
5. Lastly, check ‘Software Playthrough’ so you can hear the music through your audio device while recording.
6. You are now ready to record. Press the RECORD button in Audacity to begin recording.
7. Play your 78RPM at 33 or 45RPM.
8. Once you have recorded the desired material, press STOP in Audacity.
9. Click on EDIT menu, then click on SELECT, then click on ALL (shortcut: “CTRL-A”).
10. Click on the EFFECT menu, click on CHANGE SPEED.
11. When the CHANGE SPEED box opens, you will see Standard Vinyl RPM selections. The “from” should be set to 33 or
45 RPM (depending on the speed you selected on your turntable), and the “to” should be set to 78 RPM.
12. Click on PREVIEW to hear your recording converted to the correct speed of 78 RPM. Click on OK to finalize the
conversion to 78 RPM.
13. Once you are finished, you can save your file by going to FILE -> EXPORT AS WAV. This will save the recording as a
.WAV audio file.
14. Pick a destination on your computer, a name for your recording, and click SAVE.
15. The recording can now be found in the location where you saved it in the previous step.
5
Page 8
GUÍA DE INICIO RÁPIDO
CONTENIDO DE LA CAJA
LP2FLASH
Alfombrilla
Cable USB
CD de software
Manual de inicio rápido
Información sobre la seguridad y la garantía
INTRODUCCIÓN
Gracias por comprar este producto. El LP2FLASH es la forma más fácil y rápida de convertir música de discos de vinilo o
fuentes de audio externas de nivel de línea a una tarjeta SD o dispositivo de almacenamiento USB (como una unidad
miniatura).
También puede grabar vinilos directamente en su computadora usando el software que hemos incluido. Hemos incluido varias
aplicaciones de software para ayudarle a convertir sus discos en música digital:
EZ Vinyl/Tape Converter* (sólo PC) o EZ Audio Converter (Mac únicamente) es la forma más rápida y fácil de
convertir las grabaciones en medios digitales. Este software guarda convenientemente sus grabaciones en la biblioteca
de iTunes.** Es posible que los usuarios novicios prefieran esta aplicación. En el CD, incluimos una práctica Guía de
inicio rápido del software con instrucciones paso a paso sobre la instalación y la operación del mismo.
Audacity (PC y Mac) está previsto para el usuario avanzado. Esta aplicación permite la edición y procesamiento
avanzados de audio, tales como la normalización, la remoción de ruido y la separación automática de pistas. La Guía
del software Audacity puede encontrarse en el CD incluido — consúltela cuando trabaje con Audacity.
* Una versión de EZ Vinyl / Tape Converter con Gracenote MusicID está disponible para su descarga en la página de su
producto en www.ion-audio.com.
** iTunes e iPod son marcas registradas de Apple, Inc., registradas en EE.UU. y otros países.
CARACTERÍSTICAS DEL PANEL SUPERIOR
1. PLATO – Ponga aquí el disco que desea reproducir.
2. BRAZO - El LP2FLASH viene con un BRAZO DE LECTURA y una cápsula previamente balanceados listos para usar.
El BRAZO DE LECTURA se puede subir y bajar a mano o presionando la palanca RAISE / LOWER (Subir/Bajar).
Tenga en cuenta que es necesario sacar el BRAZO DE LECTURA
de la posición de reposo (clip del brazo) para que se active el motor
del giradiscos. Cuando el BRAZO DE LECTURA se coloca de
nuevo en su posición de reposo, el motor del giradiscos se
desactiva.
3. PALANCA DE SUBIR / BAJAR – Levanta y baja el BRAZO DE
LECTURA.
4. CLIP DEL BRAZO DE LECTURA - Utilice este clip para proteger su
BRAZO DE LECTURA cuando guarde o transporte la unidad.
5. SOPORTE DEL ADAPTADOR DE 45 RPM – Sostiene el adaptador
de 45 RPM incluido. Cuando no use el adaptador, póngalo en este
soporte.
6. CABLE DE SALIDA RCA – Conecte el cable incluido a una entrada
RCA de nivel de línea (en un mezclador, por ejemplo).
ADVERTENCIA: No intente conectar el LP2FLASH a una entrada
de nivel de línea.
7. SALIDA DE AUDIO USB - Use el cable USB incluido para conectar
el giradiscos a su computadora. Para transferir sus discos de vinilo
a la computadora, proporcionamos dos paquetes de software
diferentes en el CD incluido. EZ Vinyl / Tape Converter o EZ Audio
Converter es la manera más rápida y sencilla para transferir sus
discos de vinilo y los principiantes deben usar este software. En
cambio, es conveniente que el usuario avanzado instale y use el
software Audacity, que le permite aprovechar las características
avanzadas de edición de audio, tales como normalización de audio,
remoción de ruido y separación automática de pistas.
8. CABLE DE ALIMENTACIÓN - Este cable de alimentación se debe enchufar a un tomacorriente en la pared después
de que se hagan todas las conexiones de audio.
8
5
1
L
R
7
6
2
3
4
6
Page 9
CARACTERÍSTICAS DEL PANEL FRONTAL
16
12
18
11
10
9
17
8
7
1
3
6
4
5
2
13
14
15
1. PANTALLA – Muestra información pertinente al funcionamiento de la unidad.
2. BOTÓN DE BAJAR – Este botón se usa para bajar a lo largo de las listas de opciones disponibles en la PANTALLA.
3. BOTÓN DE SUBIR – Este botón se usa para subir a lo largo de las listas de opciones disponibles en la PANTALLA.
4. BOTÓN DE IR A LA DERECHA – Cuando una opción seleccionada muestra un símbolo “>” en la PANTALLA, este
botón se puede usar para introducir y mostrar los sub-elementos disponibles. Cuando se reproduce música desde un
dispositivo de medios USB o SD conectado, este botón funciona como salto hacia adelante, permitiéndole saltar a la
siguiente pista disponible.
5. BOTÓN DE IR A LA IZQUIERDA – Cuando una opción muestra un “<” en la PANTALLA, este botón se puede usar para
volver al conjunto anterior de opciones. Cuando se reproduce música desde un dispositivos de medios USB o SD
conectado, este botón funciona como salto hacia atrás, permitiéndole saltar al comienzo de la pista o a la pista siguiente
si se pulsa nuevamente.
6. BOTÓN DE SELECCIÓN – Este botón selecciona la opción resaltada en la PANTALLA.
7. SALIR – Este botón permite volver al conjunto principal de opciones (página principal).
8. ELIMINAR – Pulse este botón para eliminar la grabación seleccionada.
9. RANURA PARA TARJETA SD – Inserte la tarjeta SD en esta ranura.
10. RANURA USB SLOT – Inserte la unidad miniatura USB (sólo FAT16 o FAT32) a esta entrada.
Nota: El LP2FLASH no es compatible con los hubs USB.
11. INDICADOR DE ESTADO DE USB – Este LED se enciende cuando hay una unidad USB conectada.
12. VOLUMEN DE GRABACIÓN – Esta perilla ajusta el nivel de grabación. Mientras ajusta el nivel de grabación, no pierda
de vista los medidores de audio de la PANTALLA.
13. GRABAR - Pulse este botón para entrar al modo de grabación. Este modo le permite grabar música desde el plato del
giradiscos o desde dispositivos de audio externos conectados a la entrada LINE IN, directamente en un dispositivo USB
o SD conectado.
14. REPRODUCIR / PAUSA – Pulse este botón para reproducir. Mientras reproduce, púlselo nuevamente para hacer una
pausa. Mientras está en pausa, púlselo nuevamente para reanudar la reproducción.
15. PARAR – Pulse este botón para detener la reproducción (o la grabación).
16. BOTÓN DE 35 / 45 RPM – Este botón controla las RPM del PLATO. Un número de la esquina superior derecha de la
PANTALLA indica qué modo de RPM se ha seleccionado.
17. PARAR EL PLATO – Este botón lleva el BRAZO DE LECTURA a su posición de reposo y detiene el motor del
giradiscos. Si el botón no funciona, asegúrese de que la correa de transmisión del motor esté correctamente instalada
(consulte COLOCACIÓN DE LA CORREA DE TRANSMISIÓN).
18. ENTRADA DE LÍNEA – Conecte a esta entrada un reproductor de casetes, una máquina de cinta u otra fuente de audio,
usando un cable estéreo de 1/8”. Cualquier señal que entre por esta entrada se incluirá en la mezcla para reproducción
o grabación.
7
Page 10
CÓMO REPRODUCIR MÚSICA DESDE UNA UNIDAD USB O TARJETA SD
Para reproducir música directamente desde su dispositivo USB
(sólo FAT16 o FAT32) o tarjeta digital segura (SD), siga estas
instrucciones.
1. Inserte su unidad USB o tarjeta SD en la ranura
apropiada. Debe aparecer la página principal.
Nota: El LP2FLASH no
es compatible con los hubs USB.
LP2FLASH
Play Music >
Play Settings
Record Settings
2. Asegúrese de que se resalte Play Music (Reproducir
música) y pulse el botón de ir a la DERECHA o de
SELECCIÓN.
3. Use los botones de SUBIR y BAJAR para resaltar la
unidad USB o tarjeta SD que contenga la música que
desea reproducir y pulse el botón de ir a la DERECHA o
de SELECCIÓN.
4. Aparecerá en la PANTALLA una lista de los archivos y
carpetas almacenados en el dispositivo conectado.
Puede entrar a cualquier carpeta de su dispositivo
usando los botones de SUBIR y BAJAR para resaltarla y
pulsando el botón de ir a la DERECHA o de
SELECCIÓN. Los archivos musicales que se pueden
reproducir con el LP2FLASH están marcados con una
nota musical (“•”) y una extensión “.MP3”.
>
>
UFD-1
< CONFIG >
< RECORD >
< ♪ SONG01.MP3 >
5. Use los botones de SUBIR o BAJAR para resaltar la pista que
desea reproducir y pulse el BOTÓN de ir a la DERECHA, de
SELECCIÓN o REPRODUCIR.
6. Debajo del nombre del archivo, verá el tiempo transcurrido
(en Horas : Minutos : Segundos). Debajo del tiempo
transcurrido, verá dos números. El primero se refiere al lugar
de la lista de archivos de la carpeta o unidad seleccionada
donde aparece el tema. El segundo es la cantidad de
archivos de temas reproducibles que contiene esa carpeta o
unidad.
Play | UFD-1
< SONG01.MP3 >
00 : 01 :58 L||||
0001/0009 R|||||||
Mientras reproduce la música, puede usar los siguientes
controles:
REPRODUCIR / PAUSA: Para arrancar, hacer una pausa
o reanudar una pista.
PARAR: Para detener una pista.
GRABAR: Para detener una pista y entrar al modo de
grabación.
BOTÓN DE IR A LA IZQUIERDA: Funciona como botón
de salto hacia atrás. Púlselo y reténgalo para rebobinar la
pista actual.
BOTÓN DE IR A LA DERECHA: Funciona como botón
de salto hacia adelante. Púlselo y reténgalo para avanzar
rápidamente por la pista actual.
BOTÓN DE SUBIR: Pulse este botón para saltar a la
pista anterior.
BOTÓN DE BAJAR: Pulse este botón para saltar a la
pista siguiente.
SALIR: Para detener una pista y volver a la pantalla
inicial.
CÓMO AJUSTAR LOS PARÁMETROS DE LA REPRODUCCIÓN
Para ajustar los parámetros de la forma en que el LP2FLASH
reproduce las pistas de una unidad USB (sólo FAT16 o FAT32) o
tarjeta SD, siga estas instrucciones:
1. En la página principal de la PANTALLA, use los
BOTONES de SUBIR y BAJAR para resaltar Play
Settings (Parámetros de reproducción) y pulse el
BOTÓN de ir a la DERECHA o de SELECCIÓN.
LP2FLASH
Play Music >
Play Settings >
Record Settings >
2. Use los BOTONES de SUBIR y BAJAR para desplazarse
por el menú. Resalte el parámetro que desea:
3. Después de resaltar el parámetro que desea, pulse el
Play Options
< Normal
< Shuffle
< Repeat One Song
Normal: Las pistas se reproducen en orden alfabético por
nombre de archivo (la manera en que están listadas en su
unidad USB o tarjeta SD).
Shuffle (entremezclar): Las pistas se reproducen en
orden aleatorio.
Repeat One Song (Repetir un tema): La pista que
seleccione se repetirá hasta que la detenga o salte a una
pista diferente.
BOTÓN de ir a la IZQUIERDA o de SALIR para volver a la
página principal.
8
Page 11
CÓMO GRABAR MÚSICA EN UNA UNIDAD USB O TARJETA SD CARD
Para grabar música directamente desde LP en su dispositivo
USB (sólo FAT16 o FAT32) o tarjeta digital segura (SD), siga
estas instrucciones.
Nota: El LP2FLASH no
Nota: Cuando se graba en tarjetas SD, el LP2FLASH sólo
graba en tarjetas con capacidades de almacenamiento
inferiores a 2 GB.
1. Inserte su unidad USB o tarjeta SD en la ranura
apropiada. Debe aparecer la página principal.
es compatible con los hubs USB.
LP2FLASH
Play Music >
Play Settings >
Record Settings >
2. Pulse RECORD (Grabar).
3. Use los botones de SUBIR y BAJAR para resaltar la
unidad USB o tarjeta SD en la que desea grabar y pulse
el botón de ir a la DERECHA o de SELECCIÓN. La
PANTALLA le indicará que verifique el volumen de
grabación.
4. Reproduzca la pista que desee grabar y ajuste la perilla
RECORD VOLUMEN (Volumen de grabación) para
ajustar un nivel de grabación apropiado. Puede usar los
medidores de nivel que aparecen en la PANTALLA para
calibrar esto. Vuelva al comienzo de la pista cuando
termine de verificar el nivel de grabación.
Nota: Si el nivel de grabación es demasiado alto, los
medidores de nivel mostrarán las palabra “CLIP.” Reduzca el
nivel de grabación ajustando la perilla RECORD VOLUME.
|| Record | UFD-1
<Adjust Volume Now >
Press Play L||||
To Record R|||||||
5. Pulse el BOTÓN REPRODUCIR. La PANTALLA cambia
para mostrar el tiempo transcurrido (en Horas : Minutos :
Segundos), que permanecerá en “cero” hasta que comience
la grabación.
6. Reproduzca la pista que desea grabar. Según los
parámetros de Auto Record (Grabación automática) (consulte
CÓMO AJUSTAR LOS PARÁMETROS DE GRABACIÓN), el
LP2FLASH puede comenzar a grabar una vez que reciba una
señal de audio de una fuente (por ejemplo, que la púa cae en
el vinilo o entra la señal por la entrada LINE IN).
Mientras graba la música, puede usar los siguientes
controles:
Reproducir/Pausa: Hace una pausa en la grabación
mientras el plato sigue girando. Púlselo nuevamente para
reanudar la grabación.
Parar: Detiene la grabación mientras el plato sigue
girando. Desde aquí, puede pulsar Record para grabar la
pista siguiente, Reproducir para escuchar la grabación
que acaba de hacer o Exit para salir del modo de
grabación y volver a la página principal.
7. El LP2FLASH asigna automáticamente nombre al archivo y le
adjunta un número de 3 dígitos.
CÓMO AJUSTAR LOS PARÁMETROS DE GRABACIÓN
Para ajustar los parámetros de la forma en que el LP2FLASH
graba las pistas de una unidad USB (sólo FAT16 o FAT32) o
tarjeta SD, siga estas instrucciones:
1. En la página principal de la PANTALLA, use los
BOTONES de SUBIR y BAJAR para resaltar Record
Settings (Parámetros de grabación) y pulse el BOTÓN
de ir a la DERECHA o de SELECCIÓN.
LP2FLASH
Play Music >
Play Settings >
Record Settings >
2. Use los BOTONES de SUBIR y BAJAR para desplazarse
por el menú. Resalte Record Quality (Calidad de
grabación) o Auto Recording (Grabación automática) y
pulse el BOTÓN de ir a la DERECHA o de SELECCIÓN.
Calidad de grabación:
Record Quality
< Best (192k)
< Better (160k)
< Good (128k)
Use los BOTONES de SUBIR y BAJAR para elegir entre
tres niveles de calidad de grabación. Good (Bueno) (128
kbps), Better (Mejor) (160 kbps) y Best (Óptimo) (192
kbps). Recuerde que una grabación a una velocidad de
bits más alta ocupará más espacio en su dispositivo de
almacenamiento.
Grabación automática:
Auto Record Level
< Off LowX High
Split Time (seconds)
0 1x 2 3 4
Use los BOTONES de SUBIR y BAJAR para ajustar el nivel de
grabación automática. Cuando esté resaltada la opción que
desea, pulse el BOTÓN DE SELECCIÓN. Debe aparecer una “X”
junto a la opción que seleccionó:
Off (Desactivada): Se desactiva Auto Record.
Low (Baja): La grabación comienza automáticamente cuando
el LP2FLASH detecta un nivel de señal bajo.
High (Alta): La grabación comienza automáticamente cuando
el LP2FLASH detecta un nivel de señal alto.
Use los BOTONES de SUBIR y BAJAR para ajustar el Split Time
(Tiempo de división). Debe aparecer una “X” junto a la opción
que seleccionó:
0: La grabación automática comienza después de 50
milisegundos
1: La grabación automática comienza después de 1 segundo
2: La grabación automática comienza después de 2 segundos
3: La grabación automática comienza después de 3 segundos
4: La grabación automática comienza después de 4 segundos
Después de resaltar los parámetros que desea, pulse el
BOTÓN de ir a la IZQUIERDA o de SALIR para volver a la
página principal.
9
Page 12

CÓMO COLOCAR LA CORREA DE TRANSMISIÓN
El plato ION LP2FLASH es impulsado por una correa de transmisión de goma conectada al motor de giradiscos. En algunos
casos poco frecuentes, esta correa puede patinar, haciendo que el plato del giradiscos deje de girar. SI el giradiscos no
comienza a girar cuando usted baja el brazo, la causa más probable es la correa.
1. Comience por desmontar la grapa que asegura el plato al eje central. Después de desmontarla, retire el plato.
2. Coloque el plato boca abajo. Instale la correa de transmisión de goma alrededor del aro inferior interno del plato,
asegurándose de que no quede retorcida.
3. Coloque el plato nuevamente en el eje central y gírelo de modo que pueda ver el eje del motor a través del orificio del
plato. Acceda al orificio, tire de la correa para extraerla del aro interno e instálela sobre el eje del motor, como se
muestra en la ilustración. Tenga cuidado de no retorcer la correa durante este paso.
4. Finalmente, vuelva a instalar la grapa en el eje central para sujetar el plato.
CÓMO CONVERTIR SU VINILO DE 78 RPM
Para convertir sus discos de 78 RPM, es necesario que instale la aplicación Audacity. Esta aplicación se puede encontrar en
el CD incluido en la caja. Instale Audacity y siga las instrucciones de más abajo para grabar sus discos de 78 RPM. Para
solucionar los problemas de Audacity, consulte la Guía del software Audacity incluida en el CD.
1. Conecte su giradiscos al puerto USB de la computadora.
2. Abra Audacity.
3. En Audacity, vaya a EDIT -> PREFERENCES (Editar > Preferencias) y configure Recording Device (Dispositivo de
grabación) como ‘USB Audio Codec’ (Códec de audio USB) —éste es su giradiscos USB (seleccione 2 canales para
grabar en estéreo).
4. Seleccione la tarjeta de sonido de la computadora como Playback Device (Dispositivo de reproducción). Tenga en
cuenta que el nombre del dispositivo varía según la computadora pero nunca debe configurarse como ‘Microsoft Sound
Mapper’.
5. Por último, marque ‘Software Playthrough’ (Reproducción pasante), de modo que pueda oír la música a través de su
dispositivo de audio mientras la graba.
6. De esta forma, está listo para grabar. Pulse el botón RECORD (Grabar) en Audacity para comenzar la grabación.
7. Reproduzca su disco de 78 RPM a 33 ó 45 RPM.
8. Una vez que haya grabado el material deseado, pulse STOP (Parar) en Audacity.
9. Haga clic en el menú EDIT, luego en SELECT (Seleccionar) y finalmente en ALL (Todos) (atajo: “CTRL-A”).
10. Haga clic en el menú EFFECT (Efectos) y en CHANGE SPEED (Cambiar velocidad).
11. Cuando se abra el cuadro CHANGE SPEED, verá las seleccione de RPM para vinilos estándar. El campo “from”
(desde) debe configurarse como 33 ó 45 RPM (según la velocidad que haya seleccionado en su giradiscos) y el “to”
(hacia) como 78 RPM.
12. Haga clic en PREVIEW (Vista preliminar) para oír su grabación convertida a la velocidad correcta de 78 RPM. Haga clic
en OK (Aceptar) para finalizar la conversión a 78 RPM.
13. Una vez que termine, puede guardar su archivo yendo a FILE -> EXPORT AS WAV (Archivo > Exportar como WAV).
De esta forma, la grabación se guarda como archivo de audio .WAV.
14. Seleccione un destino en la computadora, un nombre para la grabación y haga clic en SAVE (Guardar).
15. La grabación puede encontrarse ahora en el lugar en que la guardó en el paso anterior.
10
Page 13

GUIDE D'UTILISATION SIMPLIFIÉ
CONTENU DE LA BOÎTE
LP2FLASH
Tapis
Câble USB
CD logiciel
Guide d'utilisation simplifié
Consignes de sécurité et information concernant la garantie
INTRODUCTION
Merci d’avoir choisi notre produit. Le LP2FLASH est la façon la plus rapide et la plus simple de convertir des enregistrements
vinyles ou de sources audio à niveau ligne externes sur une carte mémoire flash ou sur un dispositif de stockage USB, tel
qu’une clé USB.
De plus, il est également possible d'enregistrer les vinyles directement sur un ordinateur à l’aide du logiciel inclus. Nous avons
inclus plusieurs logiciels afin de vous aider à convertir vos disques vinyles au format numérique :
L’EZ Vinyl/Tape Converter* (PC seulement) ou l’EZ Audio Converter (pour Mac seulement) est la façon la plus rapide
et la plus simple de convertir vos enregistrements au média numérique. Le logiciel permet de sauvegarder vos
enregistrements dans votre bibliothèque iTunes.** L'utilisateur débutant préférera peut-être cette application pour sa
simplicité d'utilisation. Sur le CD, nous avons inclus un pratique guide d’utilisation simplifié afin de vous guider à travers
toutes les étapes de l’installation et du fonctionnement du logiciel.
Audacity (PC et Mac) vise l'utilisateur plus expérimenté. Cette application permet d'utiliser des fonctions d'édition
évoluées, telles que la normalisation, la suppression du bruit et la séparation automatique des pistes. Le Guide
d'utilisation du logiciel Audacity se trouve sur le CD inclu, veuillez le consulter.
* Une version de EZ Vinyl / Tape Converter avec Gracenote MusicID est disponible en téléchargement sur la page web de votre produit à
www.ion-audio.com.
** iTunes et iPod sont des marques de commerce enregistrées de Apple, Inc., enregistrées aux États-Unis et dans d'autres pays.
CARACTÉRISTIQUES DU PANNEAU SUPÉRIEUR
1. PLATEAU – Placez le disque que vous désirez faire jouer ici.
2. BRAS DE LECTURE – Le LP2FLASH est doté d’un bras de lecture équilibré et d’une cartouche. Le BRAS DE
LECTURE peut être levé ou abaisser manuellement ou en utilisant le BOUTON DU LEVIER DE COMMANDE.
Veuillez noter que le BRAS DE LECTURE doit être déplacé du
support (sur le SERRE-BRAS) afin que le moteur de la table
tournante soit activé. Lorsque le BRAS DE LECTURE est à
nouveau sur le support, le moteur se désactive.
3. LEVIER – Permet de lever ou abaisser le BRAS DE LECTURE.
4. SERRE-BRAS – Permet d'attacher le BRAS DE LECTURE afin
qu'il reste en place lors de l'entreposage ou du transport.
5. EMPLACEMENT DE L’ADAPTATEUR 45 tr/min – Permet de
ranger l’adaptateur pour disques 45 tr/min. Lorsqu’il n’est pas
utilisé, veuillez mettre l'adaptateur dans cet emplacement.
6. CÂBLE DE SORTIE RCA – Branchez ce câble à une entrée RCA
à niveau ligne, telle qu’une console de mixage.
MISE EN GARDE : Ne pas tenter de brancher le LP2FLASH à une
entrée phono.
7. SORTIE AUDIO USB – Utilisez le câble USB inclus pour brancher
la table tournante à un ordinateur. Afin que vous puissiez
transférer vos disques vinyles sur ordinateur, nous avons inclus
deux logiciels différents sur le CD. L’EZ Vinyl / Tape Converter ou
EZ Audio Converter est la façon la plus simple et la plus rapide de
transférer vos disques vinyles et nous vous recommandons de
l’utiliser si vous êtes un utilisateur débutant. Par contre, si vous
êtes un utilisateur d’expérience, nous vous recommandons
d’installer le logiciel Audacity qui vous permet d’utiliser des fonctions d'édition évoluées, telles que la normalisation
audio, la suppression du bruit et séparation automatique des pistes.
8. CÂBLE D’ALIMENTATION – Ce câble d’alimentation doit être branché à une prise électrique murale uniquement
avoir fait toutes les connexions audio.
après
L
R
8
5
7
1
6
2
3
4
11
Page 14

CARACTÉRISTIQUES DU PANNEAU AVANT
3
16
12
18
11
10
9
17
8
7
1
6
4
5
2
13
14
15
1. ÉCRAN D’AFFICHAGE – Indique l’information pertinente au fonctionnement de l’appareil.
2. FLÈCHE VERS LE BAS – Cette touche permet de parcourir les listes d’options disponibles sur l’ÉCRAN.
3. FLÈCHE VERS LE HAUT – Cette touche permet de parcourir les listes d’options disponibles sur l’ÉCRAN.
4. TOUCHE DROITE – Lorsque l’option sélectionnée est identifiée à l’écran par un « > », cette touche peut être utilisée
pour accéder aux sous-menus. Lorsque de la musique provenant d’un appareil USB ou d’un dispositif de stockage, cette
touche fonctionne comme une touche d’avance rapide qui permet de passer directement à la prochaine piste disponible.
5. TOUCHE GAUCHE – Lorsque l’option sélectionnée est identifiée à l’écran par un « < », cette touche peut être utilisée
pour accéder aux options précédentes. Lorsque de la musique provenant d’un appareil USB ou d’un dispositif de
stockage, cette touche fonctionne comme une touche de retour rapide qui permet de passer au début de la piste, ou en
appuyant de nouveau, à la piste précédente.
6. TOUCHE DE SÉLECTION – Cette touche permet de sélectionner l’option en surbrillance à l’écran.
7. EXIT – Cette touche permet de retourner aux options principales (page principale).
8. DELETE – Ce bouton permet de supprimer l’enregistrement sélectionné.
9. EMPLACEMENT POUR CARTE MÉMOIRE FLASH – Permet d’insérer une carte mémoire flash.
10. PORT USB – Permet d’insérer une clé USB (FAT16 ou FAT32 seulement).
Remarque : Le LP2FLASH ne prend pas en charge les répéteurs USB.
11. INDICATEUR D’ÉTAT USB – Cette DEL s’allume lorsqu’un appareil USB est branché.
12. REC VOLUME – Permet d'ajuster les niveaux d’enregistrement. Lorsque vous réglez les niveaux d’enregistrement,
gardez un oeil sur les vumètres à l'écran.
13. RECORD – Permet de passer au mode d’enregistrement. Le mode d’enregistrement permet d’enregistrer de la musique
de la table tournante, ou provenant d’une source externe branchée à l’entrée LINE IN, directement sur un appareil USB
ou une carte mémoire flash branché.
14. PLAY / PAUSE – Cette touche permet de lancer la lecture. Appuyer de nouveau permet de faire un arrêt de lecture
momentanée. Appuyer de nouveau permet de relancer la lecture.
15. STOP – Ce bouton permet de faire un arrêt de lecture (ou d’enregistrement).
16. TOUCHE 35 / 45 RPM – Cette touche permet de modifier la vitesse du plateau. Le nombre dans le coin supérieur droit
de l’écran indique quelle vitesse a été sélectionnée.
17. STOP PLATTER – Cette touche permet de retourner le bras de lecture sur son support et d'arrêter le moteur de la table
tournante. Si la touche ne fonctionne pas, assurez-vous que la courroie d'entraînement du moteur est correctement
installée (voir la section INSTALLATION DE LA COURROIE D’ENTRAÎNEMENT).
18. LINE IN – Permet de brancher un lecteur de cassettes, un magnétophone ou une autre source audio à l’aide d’un câble
stéréo 1/8 po. Tout signal entrant par cette entrée sera inclus dans le mix de lecture ou d’enregistrement.
12
Page 15

FAIRE LA LECTURE DE MUSIQUE À PARTIR DE LECTEUR USB/CARTE MÉMOIRE FLASH
Pour jouer de la musique à partir d’un appareil USB (FAT16 ou
FAT32 seulement) ou d’une carte mémoire flash, suivez les
consignes suivantes :
1. Insérez le lecteur USB ou la carte mémoire flash dans
l’emplacement approprié. La page principale devrait
s’afficher.
Remarque : Le LP2FLASH ne prend pas
répéteurs USB.
en charge les
LP2FLASH
Play Music >
Play Settings
>
Record Settings >
2. Assurez-vous que l’option Play Music est en
surbrillance, puis appuyez sur la flèche de droite ou sur
la touche de sélection.
3. À l’aide des flèches du haut et du bas, mettez en
surbrillance le lecteur USB ou la carte de mémoire
contenant la musique que vous désirez faire jouer, puis
appuyez sur la flèche de droite ou sur la touche de
sélection.
4. Les dossiers et les fichiers sauvegardés sur le dispositif
branché devraient s’afficher. Pour accéder à un des
dossiers sur le dispositif, appuyez sur les flèches du haut
et du bas afin de le mettre en surbrillance, puis appuyez
sur la flèche de droite ou sur la touche de sélection. Les
fichiers audio qui peuvent être lus par le LP2FLASH sont
identifiés par une note de musique (« ♪ ») et ont « .MP3 »
comme extension.
UFD-1
< CONFIG >
< RECORD >
< ♪ SONG01.MP3 >
5. À l’aide des flèches du haut et du bas, mettez en
surbrillance la piste que vous désirez faire jouer, puis
appuyez sur la flèche de droite, la touche de sélection ou la
touche PLAY.
6. Sous le nom du fichier s’affiche le temps écoulé (heures :
minutes : secondes). Sous le temps écoulé s’affichent deux
numéros. Le premier identifie à quel endroit dans la liste de
fichiers du dossier ou lecteur sélectionné la chanson se
trouve. Le second est le nombre de fichiers chansons qui se
trouvent dans ce dossier ou lecteur.
Play | UFD-1
< SONG01.MP3 >
00 : 01 :58 L||||
0001/0009 R|||||||
Les commandes suivantes peuvent être utilisées lors de la
lecture de la musique :
PLAY / PAUSE : Permet de lancer, faire un arrêt de
lecture ou encore de relancer la lecture.
STOP : Permet d'arrêter la lecture.
RECORD : Permet d'arrêter la lecture et de lancer
l’enregistrement.
FLÈCHE GAUCHE : Fonctionne telle une touche de
retour rapide. Maintenez enfoncée afin de retourner au
début de la piste en cours.
FLÈCHE GAUCHE : Fonctionne telle une touche
d’avance rapide. Maintenez enfoncée afin de parcourir la
piste en cours.
FLÈCHE DU HAUT : Appuyez sur cette touche pour
revenir à la piste précédente.
FLÈCHE DU BAS : Appuyez sur cette touche pour
avancer à la piste suivante.
EXIT : Permet d’arrêter la lecture et de retourner à l’écran
initial.
RÉGLAGE DES PARAMÈTRES DE LECTURE
Pour régler les paramètres du LP2FLASH pour faire la lecture de
pistes provenant d’un appareil USB (FAT16 OU FAT32
seulement) ou d’une carte mémoire flash, suivez les consignes
suivantes :
1. À partir du menu principal, utilisez les flèches du haut et
du bas pour mettre en surbrillance l’option Play Settings,
puis appuyez sur la flèche de droite ou sur la touche de
sélection.
LP2FLASH
Play Music >
Play Settings >
Record Settings >
2. Utilisez les flèches du haut et du bas pour parcourir à
travers les pages du menu. Mettez en surbrillance le
réglage désiré :
LP2FLASH
Play Music >
Play Settings >
Record Settings >
Normal : Les pistes jouent dans l’ordre alphabétique
selon le nom de fichier (l’ordre dans lequel les fichiers
apparaissent sur le lecteur USB ou sur la carte de
mémoire).
Shuffle : Les pistes jouent de façon aléatoire.
Repeat One Song : La piste sélectionnée est répétée
jusqu’à ce que vous l’arrêtiez ou avanciez sur une autre
piste.
3. Après avoir sélectionné le réglage désiré, appuyez sur la
flèche gauche ou sur la touche EXIT afin de retourner à la
page principale.
13
Page 16

y
FAIRE L'ENREGISTREMENT DE MUSIQUE SUR LECTEUR USB/CARTE MÉMOIRE FLASH
Pour enregistrer de la musique à partir de disques 33 tr/min sur
un appareil USB (FAT16 ou FAT32 seulement) ou d’une carte
mémoire flash, suivez les consignes suivantes :
Remarque : Le LP2FLASH ne prend pas
USB.
Remarque : Lors d’enregistrement sur carte mémoire flash,
le LP2FLASH ne peut sauvegarder que sur une carte
mémoire flash a
1. Insérez le lecteur USB ou la carte mémoire flash dans
ant 2 Go d'espace et moins.
l’emplacement approprié. La page principale devrait
s’afficher.
en charge les répéteurs
LP2FLASH
Play Music >
Play Settings
Record Settings
2. Appuyez sur la touche RECORD.
3. À l’aide des flèches du haut et du bas, mettez en
surbrillance le lecteur USB ou la carte de mémoire sur
lequel vous désirez enregistrer, puis appuyez sur la flèche
de droite ou sur la touche de sélection. L’écran vous invite
à vérifier les niveaux d’enregistrement.
4. Faites jouer la piste que vous désirez enregistrer et réglez
les niveaux d’enregistrement à l’aide de bouton REC
VOLUME. Vous pouvez utiliser les vumètres qui
apparaissent à l’écran pour faire le réglage. Retournez au
début de la piste lorsque vous aurez terminé de vérifier
les niveaux d’enregistrement.
REGLAGE DES PARAMÈTRES D’ENREGISTREMENT
Pour régler les paramètres du LP2FLASH pour l’enregistrement
de pistes provenant d’un appareil USB (FAT16 ou FAT32
seulement) ou d’une carte mémoire flash, suivez les consignes
suivantes :
1. À partir du menu principal, utilisez les flèches du haut et
du bas pour mettre en surbrillance l’option Record
Settings, puis appuyez sur la flèche de droite ou sur la
touche de sélection.
>
>
LP2FLASH
Play Music >
Play Settings >
Record Settings >
2. Utilisez les flèches du haut et du bas pour parcourir à
travers les pages du menu. À l’aide des flèches du haut et
du bas, mettez en surbrillance l’option Record Quality ou
Auto Recording, puis appuyez sur la flèche de droite ou
sur la touche de sélection.
Record Quality :
Record Quality
< Best (192k)
< Better (160k)
< Good (128k)
À l’aide des flèches du haut et du bas, sélectionnez entre
les trois niveaux de qualité d’enregistrement : Good
(128 kb/s), Better (160 kb/s), et Best (192 kb/s).
Rappelez-vous que l’enregistrement fait avec un taux de
compression plus élevé nécessite plus d’espace sur votre
dispositif de stockage.
Remarque : Si les niveaux d'enregistrement sont trop élevés,
les vumètres affichent le mot « CLIP ». Diminuez les niveaux
d’enregistrement en réglant le bouton REC VOLUME.
|| Record | UFD-1
<Adjust Volume Now >
Press Play L||||
To Record R|||||||
5. Appuyez sur la touche PLAY. L’écran devrait maintenant
indiquer le temps écoulé (en heures : minutes : secondes),
qui demeure à « zéro » jusqu’à ce que commence
l’enregistrement.
6. Faites jouer la piste que vous désirez enregistrer. Selon les
paramètres Auto Record (voir la section RÉGLAGE DES
PARAMÈTRES D’ENREGISTREMENT), le LP2FLASH
commence l’enregistrement lorsqu’il reçoit le signal audio de
la source audio (p. ex., l’aiguille se dépose sur le vinyle ou le
signal acheminé à l’entrée LINE IN).
Les commandes suivantes peuvent être utilisées lors de
l’enregistrement de la musique :
PLAY / PAUSE : Permet de faire un arrêt
d’enregistrement alors que le plateau continu de tourné.
Appuyer de nouveau permet de relancer l’enregistrement.
STOP : Permet de faire un arrêt d’enregistrement alors
que le plateau continu de tourné. Vous pouvez appuyer
sur la touche RECORD afin d’enregistrer la piste suivante,
appuyer sur la touche PLAY afin d’écouter
l’enregistrement que vous venez de faire, ou encore, sur
la touche EXIT afin de quitter le mode d’enregistrement et
de retourner à la page principale.
7. Le LP2FLASH nomme automatiquement le fichier et modifie
le numéro de trois chiffres.
Auto Recording :
Auto Record Level
< Off LowX High
Split Time (seconds)
0 1x 2 3 4
À l’aide des flèches du haut et du bas, sélectionnez le réglage de
l’option Auto Record : Lorsque l’option que vous désirez est en
surbrillance, appuyez sur la touche de sélection. Un « X » devrait
apparaître à côté de l’option que vous avez sélectionnée :
Off : La fonction Auto Recording est désactivée.
Low : L’enregistrement débute automatiquement lorsque le
LP2FLASH détecte un signal d’entrée plus faible.
High : L’enregistrement débute automatiquement lorsque le
LP2FLASH détecte un signal d’entrée plus fort.
À l’aide des flèches du haut et du bas, sélectionnez le réglage de
l’option Split Time : Un « X » devrait apparaître à côté de l’option
que vous avez sélectionnée :
0 : La fonction Auto Record est lancée après 50 millisecondes
1 : La fonction Auto Record est lancée après 1 milliseconde
2 : La fonction Auto Record est lancée après 2 millisecondes
3 : La fonction Auto Record est lancée après 3 millisecondes
4 : La fonction Auto Record est lancée après 4 millisecondes
3. Après avoir mis en surbrillance les réglages désirés, appuyez sur
la flèche gauche ou sur la touche EXIT afin de retourner à la page
principale.
14
Page 17

FIXATION DE LA COURROIE
Le plateau du ION LP2FLASH est entraîné par une à courroie de caoutchouc fixée au moteur du tourne-disque. Dans certains
cas, cette courroie peut glisser et arrêter le plateau du tourne-disque de tourner. Si le tourne-disque ne commence pas à
tourner lorsque vous abaissez le bras de lecture, la courroie en est probablement la cause. Veuillez suivre les instructions cidessous afin de réinstaller correctement la courroie au moteur et au plateau.
1. Commencez par retirer la bague qui fixe le plateau à l'axe central. Après avoir retiré le clip, retirez le plateau.
2. Tournez le plateau à l'envers. Placez la courroie en caoutchouc autour de l'anneau intérieur inférieur du plateau en vous
assurant que la courroie n'est pas torsadée.
3. Replacez le plateau sur l'axe central et tournez-le pour que vous puissiez voir l'axe du moteur à travers le trou du
plateau. Attrapez la courroie en caoutchouc à travers le trou et retirez-le de l'anneau intérieur inférieur et installez-le sur
l'axe du moteur, tel qu'illustré. Faites attention de ne pas torsader la courroie lors de cette étape.
4. Puis replacez le clip sur l'axe central afin de fixer le plateau.
CONVERSION DU VINYLE 78 TR/MIN
Pour convertir les disques 78 tr/min, vous devez installer et utiliser l'application Audacity. Cette application se trouve sur le CD
inclus dans la boîte. Veuillez installer Audacity et suivre les indications ci-dessous pour l'enregistrement des 78 tr/min. Pour
toute question concernant Audacity, veuillez consulter son guide d'utilisation inclus sur le CD.
1. Branchez le tourne-disque au port USB de l'ordinateur.
2. Lancez Audacity.
3. Dans Audacity, allez à EDIT -> PREFERENCES et réglez Recording Device USB Audio Codec « USB Audio Codec »,
ceci représente votre tourne-disque (sélectionnez 2 canaux pour enregistrer en stéréo).
4. Sélectionnez la carte de son de votre ordinateur comme appareil de lecture par défaut. Veuillez noter que le nom de
l'appareil peut varier d'un ordinateur à l'autre, mais ne sélectionnez pas « Microsoft Sound Mapper ».
5. Puis, cochez « Software Playthrough » afin de pouvoir écouter la musique à partir de l'appareil audio durant
l'enregistrement.
6. Vous êtes maintenant prêt à enregistrer. Appuyez sur la touche RECORD dans Audacity pour lancer l’enregistrement.
7. Faites jouer le 78 tr/min à 33 tr/min ou 45 tr/min.
8. Une fois l'enregistrement du matériel désiré terminé, appuyez sur la touche STOP dans Audacity.
9. Cliquez sur le menu EDIT, puis sur SELECT, et ensuite sur ALL (raccourci : « CTRL-A »).
10. Cliquez sur le menu EFFECT et ensuite sur CHANGE SPEED.
11. Lorsque la fenêtre CHANGE SPEED s'ouvre, vous verrez les choix de vitesse pour les vinyles standard. Le réglage
« from » régler à 33 tr/min ou 45 tr/min, selon la vitesse que vous avez sélectionnée, puis « to » à 78 tr/min.
12. Cliquez sur la touche PREVIEW pour entendre l'enregistrement reconverti à la bonne vitesse de 78 tr/min. Cliquez sur
OK pour finaliser la conversion à 78 tr/min.
13. Une fois terminé, vous pouvez sauvegarder le fichier en allant à FILE -> EXPORT AS WAV. Ceci permet de
sauvegarder l'enregistrement en fichier audio .WAV.
14. Sélectionnez un répertoire sur l'ordinateur, nommez le fichier et cliquez sur SAVE.
15. L'enregistrement se trouve dans le répertoire où vous l'avez sauvegardé dans l'étape précédente.
15
Page 18

GUIDA RAPIDA
CONTENUTI DELLA CONFEZIONE
LP2FLASH
Tappetino
Cavo USB
CD recante il software
Manuale rapido
Istruzioni di sicurezza e garanzia
INTRODUZIONE
Grazie per aver acquistato questo prodotto. L'LP2FLASH è il modo più rapido e veloce di convertire musica da registrazioni su
vinile o sorgenti audio esterne a livello di linea su una scheda SD o un dispositivo di memoria USB (quali un thumb drive).
Si può anche comodamente registrare il vinile direttamente sul computer servendosi del software in dotazione. Per aiutarvi
nella conversione dei dischi in vinile in musica digitale, abbiamo incluso diverse applicazioni software:
EZ Vinyl/Tape Converter* (unicamente per PC) o EZ Audio Converter (solo Mac) è il modo più facile e veloce di
trasformare le tue registrazioni in media digitali. Il software salva comodamente le tue registrazioni nella libreria
iTunes.** Questa è probabilmente l’applicazione preferibile per gli utenti alle prime armi. Sul CD, abbiamo allegato una
comoda Guida Rapida Software con istruzioni passo passo circa l’installazione e l’uso del software.
Audacity (per PC e Mac) è il software destinato agli utenti esperti. Questa applicazione permette modifiche e processo
dell’audio avanzati quali normalizzazione, rimozione dei rumori e separazione automatica delle tracce. La Guida per il
software Audacity si trova sul CD in dotazione: fare riferimento a quest’ultima quando si lavora con Audacity.
* Una versione di EZ Vinyl / Tape Converter con convertitore di Gracenote MusicID è disponibile per il download presso il sito web per il
tuo prodotto a www.ion-audio.com.
** iTunes e iPod sono marchi di fabbrica di Apple, Inc., registrati negli Stati Uniti e in altri Paesi.
CARATTERISTICHE PANNELLO SUPERIORE
1. PIATTO - Collocare qui il disco che si desidera riprodurre.
2. BRACCIO – L’LP2FLASH è dotato di un BRACCIO e di una cartuccia pre-bilanciati pronti per l’uso. Il BRACCIO può
essere alzato e abbassato a mano, oppure premendo la LEVETTA di SOLLEVAMENTO / ABBASSAMENTO. Va
notato che il BRACCIO deve essere allontanato dalla posizione di riposo (sul FERMABRACCIO) affinché il motore del
giradischi si attivi. Quando il BRACCIO viene nuovamente collocato
in posizione di riposo, il motore si disattiva.
3. LEVETTA di SOLLEVAMENTO / ABBASSAMENTO – Alza e
abbassa il BRACCIO.
4. FERMABRACCIO – Servirsi di questo dispositivo per fissare il
BRACCIO al momento di riporre o trasportare l’apparecchio.
5. SUPPORTO ADATTATORE 45 GIRI - Regge l’incluso adattatore per
45 giri. Quando l'adattatore non è in uso, può essere collocato a
questo livello.
6. CAVO DI USCITA RCA – Collegare il cavo fissato ad un ingresso
RCA a livello di linea (ad un mixer, ad esempio).
AVVERTENZA: non tentare di collegare l’LP2FLASH ad un ingresso
a livello phono.
7. USCITA AUDIO USB – Servirsi del cavo USB in dotazione per
collegare il giradischi al computer. Per il trasferimento dei dischi in
vinile al computer, abbiamo previsto due diversi pacchetti software nel
CD incluso. L’EZ Vinyl / Tape Converter o EZ Audio Converter è il
modo più semplice e veloce di trasferire i vostri dischi in vinile ed è
preferibile da utilizzare per i principianti. Alternativamente, utenti
avanzati possono installare e utilizzare il software Audacity, che
permette di sfruttare funzioni avanzate di editing audio, quali la
normalizzazione dell’audio, la rimozione dei rumori e la separazione
automatica delle tracce.
8. CAVO DI ALIMENTAZIONE – Questo cavo di alimentazione va
inserito in una presa a muro DOPO aver effettuato tutti i collegamenti
audio.
8
5
L
R
7
1
6
2
3
4
16
Page 19

CARATTERISTICHE DEL PANNELLO ANTERIORE
3
16
12
18
11
10
9
17
8
7
1
6
4
5
2
13
14
15
1. DISPLAY – Mostra informazioni pertinenti all’uso dell’apparecchio.
2. TASTO GIÙ – Questo tasto serve per scendere lungo gli elenchi delle opzioni disponibili che appaiono a DISPLAY.
3. TASTO SU – Questo tasto serve per salire lungo gli elenchi delle opzioni disponibili che appaiono a DISPLAY.
4. TASTO DESTRO – Quando un’opzione selezionata mostra un simbolo “>” a DISPLAY, questo tasto può essere
utilizzato per entrare e visualizzare a display le sotto-voci disponibili. Quando si riproduce musica da un dispositivo USB
o SD media, questo tasto funge da tasto di Avanzamento rapido, permettendovi di passare alla successiva traccia
disponibile.
5. TASTO SINISTRO – Quando un’opzione selezionata mostra un “<” a DISPLAY, questo tasto può essere utilizzato per
tornare alla serie di opzioni precedenti. Quando si riproduce musica da un dispositivo USB o SD media, questo tasto
funge da tasto di Riavvolgimento rapido, permettendovi di tornare all’inizio della traccia o, se premuto nuovamente, alla
traccia precedente.
6. TASTO SELECT – Questo tasto seleziona le opzioni evidenziate a DISPLAY.
7. EXIT – Questo tasto fa tornare al set di opzioni principali (pagina principale).
8. DELETE (cancella) – Premere questo tasto per cancellare la registrazione selezionata.
9. SLOT SCHEDA SD – Inserire la scheda SD in questo slot.
10. PORTA USB – Inserire il thumb-drive USB (unicamente FAT16 o FAT32) a questo ingresso.
Nota bene: l’LP2FLASH non
11. INDICATORE DI STATO USB – Questo LED si accende quando viene collegato un drive USB.
12. VOLUME DI REGISTRAZIONE – Questa manopola regola il volume di registrazione. Man mano che si regola il livello di
registrazione, tenere d’occhio i misuratori audio sul DISPLAY.
13. RECORD (registra) – Premere questo tasto per entrare in modalità Record. La modalità di registrazione vi permette di
registrare musica dal piatto del giradischi o da dispositivi audio esterni collegati all’ingresso LINE IN direttamente su un
dispositivo USB o SD collegato.
14. PLAY / PAUSE – Premere questo tasto per la riproduzione. Durante la riproduzione, premere nuovamente per mettere
in pausa. In pausa, premere il tasto ancora una volta per riprendere la riproduzione.
15. STOP – Premere questo tasto per interrompere la riproduzione (o la registrazione).
16. TASTO 35 / 45 GIRI – Questo tasto controlla i GIRI del PIATTO. Un numero posto nell’angolo superiore destro del
DISPLAY indica quale modalità di GIRI è stata selezionata.
17. FERMA PIATTO – Questo tasto fa tornare il BRACCIO in posizione di riposo e ferma il motore del giradischi. Se il tasto
non funziona, assicurarsi che la cinghia di trazione motore sia ben installata (vedi FISSAGGIO DELLA CINGHIA DI
TRAZIONE).
18. LINE IN (ingresso di linea) – Collegare un lettore nastro o reel-to-reel (bobina) o altre sorgenti audio a questo ingresso
servendosi di un cavo stereo da 1/8”. Qualsiasi segnale che entra in questo ingresso sarà incluso nella riproduzione o
nel mix di registrazione.
supporta gli hub USB.
17
Page 20

RIPRODURRE MUSICA DA UN DRIVE USB / SCHEDA SD
Per riprodurre musica direttamente dal dispositivo USB
(unicamente FAT16 o FAT32) o dalla scheda digitale (SD),
seguire le presenti istruzioni.
1. Inserire il drive USB o la scheda SD nello slot
adeguato. Appare la pagina principale.
Nota bene: l’LP2FLASH non supporta gli hub USB.
LP2FLASH
Play Music >
Play Settings
>
Record Settings >
2. Assicurarsi che Play Music sia evidenziato, quindi
premere il tasto DESTRO o SELECT.
3. Servirsi dei tasti SU e GIÙ per evidenziare il drive
USB o la scheda SD che contiene la musica che si
desidera riprodurre, quindi premere il tasto DESTRO
o SELECT.
4. A DISPLAY verranno elencati i file e le cartelle
memorizzati sul dispositivo collegato. Si può
selezionare qualsiasi cartella del dispositivo
servendosi dei tasti SU e GIÙ per evidenziarli e
premere il tasto DESTRO o SELECT. I file musicali
che possono essere riprodotti con l’LP2FLASH
saranno contrassegnati con una nota musicale (“•”)
e avranno estensione “.MP3”.
UFD-1
< CONFIG >
< RECORD >
< ♪ SONG01.MP3 >
5. Servirsi dei tasti SU e GIÙ per evidenziare la traccia che
si desidera riprodurre, quindi premere il tasto DESTRO,
SELECT o PLAY.
6. Sotto al nome del file si vede il Tempo trascorso (in Ore :
Minuti : Secondi). Sotto al Tempo trascorso appaiono
due numeri. Il primo fa riferimento a dove compare la
canzone nell’elenco di file nella cartella o nel drive
selezionato. Il secondo è il numero di file di canzoni
riproducibili presenti in quella cartella o drive.
Play | UFD-1
< SONG01.MP3 >
00 : 01 :58 L||||
0001/0009 R|||||||
Durante la riproduzione della musica, si possono
utilizzare i seguenti comandi:
PLAY / PAUSE: avvia, interrompe o riprende la
riproduzione di una traccia.
STOP: interrompe una traccia.
RECORD: interrompe una traccia ed entra in
modalità di registrazione.
TASTO SINISTRO: funziona come tasto di
riavvolgimento. Tenerlo premuto per riavvolgere la
traccia corrente.
TASTO DESTRO: funziona come tasto di
avanzamento rapido. Tenerlo premuto per avanzare
rapidamente lungo la traccia corrente.
TASTO SU: premere questo tasto per tornare alla
traccia precedente.
TASTO GIÙ: premere questo tasto per passare alla
traccia successiva.
EXIT: interrompe una traccia e torna alla schermata
iniziale.
REGOLAZIONE DELLE CONFIGURAZIONI DI RIPRODUZIONE
Per regolare le configurazioni di come l’LP2FLASH
riproduce tracce da un drive USB (unicamente FAT16 o
FAT32) o da una scheda SD, seguire le presenti istruzioni:
1. Sulla pagina principale a DISPLAY, servirsi dei tasti
SU e GIÙ per evidenziare Play Settings
(configurazioni di riproduzione), quindi premere il
tasto DESTRO o SELECT.
LP2FLASH
Play Music >
Play Settings >
Record Settings >
2. Servirsi dei tasti SU e GIÙ per scorrere lungo il
menu. Evidenziare la configurazione desiderata:
3. Dopo aver evidenziato le configurazioni desiderate,
Play Options
< Normal
< Shuffle
< Repeat One Song
Normal: le tracce vengono riprodotte in ordine
alfabetico per nome del file (il modo in cui sono
elencati nel drive USB o nella scheda SD).
Shuffle: le tracce verranno riprodotte in ordine
casuale.
Repeat One Song: qualunque traccia venga
selezionata, verrà riprodotta fino a quando non viene
fermata o non si passa ad una traccia diversa.
premere il tasto SINISTRO o EXIT per tornare alla
pagina principale.
18
Page 21

REGISTRARE MUSICA SU UN DRIVE USB / SCHEDA SD
Per registrare musica direttamente da LP sul dispositivo
USB (unicamente FAT16 o FAT32) o su scheda digitale
(SD), seguire le presenti istruzioni.
Nota bene: l’LP2FLASH non supporta gli hub USB.
Nota: al momento di registrare su schede SD,
l’LP2FLASH registra unicamente su schede SD dalla
capacità di memoria inferiore a 2GB.
1. Inserire il drive USB o la scheda SD nello slot
adeguato. Appare la pagina principale.
LP2FLASH
Play Music >
Play Settings
Record Settings >
2. Premere RECORD.
3. Servirsi dei tasti SU e GIÙ per evidenziare il drive
USB o la scheda SD su cui si desidera registrare,
quindi premere il tasto DESTRO o SELECT. Il
DISPLAY indicherà di verificare il volume di
registrazione.
4. Riprodurre la traccia che si desidera registrare e
regolare la manopola del VOLUME di
REGISTRAZIONE per stabilire un livello di
registrazione adeguato Per misurarlo si possono
utilizzare i misuratori di livello che appaiono a
DISPLAY. Tornare all’inizio della traccia una volta
finito di verificare il livello di registrazione.
>
Nota bene: se il livello di registrazione è
eccessivamente alto, i misuratori mostreranno “CLIP” a
display. Ridurre il livello di registrazione regolando la
manopola RECORD VOLUME (volume di registrazione).
|| Record | UFD-1
<Adjust Volume Now >
Press Play L||||
To Record R|||||||
5. Premere il TASTO PLAY. Il DISPLAY cambia per
mostrare il Tempo trascorso (in Ore : Minuti : Secondi),
che rimarrà a “zero” fino all’inizio della registrazione.
6. Riprodurre la traccia che si desidera registrare. A
seconda delle impostazioni di registrazione automatica
(vedi REGOLAZIONE CONFIGURAZIONI DI
REGISTRAZIONE), l’LP2FLASH può iniziare a
registrare non appena riceve un segnale audio da una
fonte (ad es. la puntina che scende sul vinile o il segnale
che entra nell’ingresso LINE IN).
Durante la registrazione della musica, si possono
utilizzare i seguenti comandi:
Play / Pause: interrompe la registrazione mentre il piatto
continua a girare. Premere nuovamente il tasto per
riprendere la registrazione.
Stop: interrompe la registrazione mentre il piatto
continua a girare. Da qui si può premere Record per
registrare la prossima traccia, Play per ascoltare la
registrazione appena effettuata o Exit per uscire dalla
modalità di registrazione e tornare alla pagina principale.
7. L’LP2FLASH nominerà automaticamente il file e vi
apporrà un numero a 3 cifre.
REGOLAZIONE DELLE CONFIGURAZIONI DI REGISTRAZIONE
Per regolare le configurazioni di come l’LP2FLASH registra
tracce da un drive USB (unicamente FAT16 o FAT32) o da
una scheda SD, seguire le presenti istruzioni:
1. Sulla pagina principale a DISPLAY, servirsi dei tasti
SU e GIÙ per evidenziare Record Settings
(configurazioni di registrazione), quindi premere il
tasto DESTRO o SELECT.
LP2FLASH
Play Music >
Play Settings >
Record Settings >
2. Servirsi dei tasti SU e GIÙ per scorrere lungo il
menu. Evidenziale Record Quality (qualità di
registrazione) o Auto Recording (registrazione
automatica) e premere il tasto DESTRO o SELECT.
Record Quality (qualità di registrazione):
Record Quality
< Best (192k)
< Better (160k)
< Good (128k)
Servirsi dei tasti SU e GIÙ per scegliere tra tre livelli
di qualità di registrazione: Good (128 kbps), Better
(160 kbps) e Best (192 kbps). Bisogna ricordarsi che
una registrazione ad un bitrate più elevato occuperà
più spazio a livello del dispositivo di memoria.
Auto Recording (registrazione automatica):
Auto Record Level
< Off LowX High
Split Time (seconds)
0 1x 2 3 4
Servirsi dei tasti SU e GIÙ per impostare il livello di
registrazione automatica. Quando l’opzione desiderata è
evidenziata, premere il TASTO SELECT. Una “X” appare
accanto all’opzione selezionata:
Off: la funzione di registrazione automatica è disattivata.
Low: la registrazione inizia automaticamente quando
l’LP2FLASH individua un segnale d’ingresso più basso.
High: la registrazione inizia automaticamente quando
l’LP2FLASH individua un segnale d’ingresso più elevato.
Servirsi dei tasti SU e GIÙ per impostare lo Split Time
(tempo di suddivisione). Una “X” appare accanto all’opzione
selezionata:
0: La registrazione automatica inizia dopo 50 millisecondi
1: La registrazione automatica inizia dopo 1 secondo
2: La registrazione automatica inizia dopo 2 secondi
3: La registrazione automatica inizia dopo 3 secondi
4: La registrazione automatica inizia dopo 4 secondi
3. Dopo aver evidenziato le configurazioni desiderate, premere
il tasto SINISTRO o EXIT per tornare alla pagina principale.
19
Page 22

COLLEGAMENTO DELLA CINGHIA DI TRASMISSIONE
Il piatto dell’ION TTUSB05XL è guidato da una cinghia di trasmissione in gomma collegata al motore del giradischi. In alcuni
rari casi, la cinghia potrebbe scivolare fuori dal suo alloggiamento: in questo caso, il piatto del giradischi smette di girare. Se il
giradischi non inizia a girare quando si abbassa il braccio, la causa più probabile è la cinghia. Seguire le istruzioni di cui sotto
per ricollegare correttamente la cinghia al motore e al piatto.
1. Iniziare rimuovendo la clip che fissa il piatto all’asse centrale. Dopo aver rimosso la clip, rimuovere il piatto.
2. Voltare il piatto. Porre la cinghia in gomma attorno all’anello interno inferiore del piatto del giradischi, assicurandosi che
non sia torta.
3. Riposizionare il piatto sull’asse centrale e farlo ruotare in modo che si veda l’asse motore attraverso il foro sul piatto
stesso. Ora, attraverso il foro, tirare la cinghia di trasmissione in gomma dall’anello interno e installarla sull’asse motore,
come mostrato nell’illustrazione. Fare attenzione a non torcere la cinghia durante questa fase.
4. Infine, riposizionare la clip sull’asse centrale per fissare il piatto.
CONVERSIONE DEI VINILI A 78 GIRI
Per convertire i vostri dischi a 78 giri, sarà necessario installare e utilizzare l’applicazione Audacity. Questa si trova sul CD
contenuto nella
confezione. Installare Audacity e seguire le istruzioni di cui sotto per registrare i vostri 78 giri. Per la risoluzione di eventuali
problemi con Audacity fare riferimento alla relativa Guida inclusa nel CD.
1. Collegare il giradischi alla porta USB del computer.
2. Lanciare Audacity.
3. In Audacity, recarsi su EDIT -> PREFERENCES (Modifica – Opzioni) e impostare il dispositivo di registrazione su ‘USB
Audio Codec’: questo è il vostro giradischi USB (selezionare 2 canali per registrare in stereo).
4. Selezionare la scheda audio del computer come Playback Device (dispositivo di riproduzione). Il nome del dispositivo
varierà da computer a computer, ma non deve mai essere impostato su ‘Microsoft Sound Mapper’.
5. Infine, spuntare “Software Playthrough” in modo da poter ascoltare la musica tramite il dispositivo audio mentre si
registra.
6. Si è ora pronti a registrare. Premere il pulsante RECORD in Audacity per avviare la registrazione.
7. Riprodurre i dischi a 78 giri a 33 o 45 giri.
8. Una volta registrato il materiale desiderato, premere STOP in Audacity.
9. Cliccare sul menu EDIT, quindi su SELECT, e infine su ALL (scorciatoia: “CTRL-A”).
10. Cliccare sul menu EFFECT (effetti), quindi su CHANGE SPEED (modifica velocità).
11. Quando si apre la finestra CHANGE SPEED, si vedranno le opzioni del numero di giri dei vinili standard. Il valore “from”
(da) va impostato su 33 o 45 giri (a seconda della velocità impostata sul giradischi), e il valore “to” (a) va impostato su 78
giri.
12. Cliccare su PREVIEW (anteprima) per ascoltare la registrazione convertita alla giusta velocità di 78 giri. Cliccare su OK
per finalizzare la conversione a 78 giri.
13. Una volta terminato, si può salvare il file recandosi su FILE -> EXPORT AS WAV. Questo comando salverà la
registrazione sotto forma di file audio in formato .WAV.
14. Scegliere una destinazione sul computer, un nome per la registrazione e cliccare su SAVE (salva).
15. Le registrazioni possono ora essere trovate nella cartella in cui sono state registrate durante il passaggio precedente.
20
Page 23

KURZANLEITUNG
INHALT DER VERPACKUNG
LP2FLASH
Plattentellerauflage (Slipmat)
USB Kabel
Software CD
Kurzanleitung
Sicherheits- und Garantiehinweise
EINFÜHRUNG
Wir danken Ihnen, dass Sie sich für dieses Produkt entschieden haben. Der LP2FLASH bietet auf schnelle und einfache
Weise die Möglichkeit, Musik von Vinylschallplatten oder externen Linepegel Audiogeräten auf eine SD Card oder ein USB
Speichermedium (USB Stick) zu übertragen.
Außerdem können Sie mit der beiliegenden Software Ihre Schallplatten bequem auf dem Computer aufnehmen. Dazu heben
wir verschiedene Programme, die Ihnen beim Überspielen behilflich sind, zu diesem Gerät gepackt:
Mit der EZ Vinyl/Tape Converter* Software (nur PC) oder EZ Audio Converter (nur Mac) ist es am leichtesten und
schnellsten, Schallplatten in das digitale Format umzuwandeln. Die Software speichert Ihrer Aufnahmen ganz bequem
in Ihrer iTunes** Musiksammlung. Unerfahrene Anwender werden diese Softwareanwendung bevorzugen. Auf der CD,
eine Schritt-für-Schritt Software Anleitung hilft Ihnen bei der Installation und Verwendung der Software.
Für erfahrene Anwender steht die Software Audacity (PC und Mac) bereit. Dieses Programm ermöglicht
weiterführende Audiobearbeitungen, wie Normalization, Rauschentfernung und automatische Titelaufteilung. In der
Audacity Software Anleitung, die auf der beiliegenden CD enthalten ist, finden Sie weitere Hinwiese zur Verwendung der
Audacity Software.
* Eine Version der EZ Vinyl / Tape Converter mit Gracenote –Software steht zum Download auf der Web-Seit für Ihr Produkt auf www.ionaudio.com.
** iTunes und iPod sind geschützte Marken von Apple, Inc., registriert in den U.S.A. und anderen Länder.
ÜBERSICHT ÜBER DIE VORDERSEITE
1. PLATTENTELLER – Legen Sie die Schallplatte, die Sie spielen möchten, hier auf.
2. TONARM – Der LP2FLASH wird mit einem betriebsfertigen, ausbalanciertem TONARM mit System ausgeliefert. Der
TONARM lässt sich per Hand anheben und absenken oder alternativ durch Drücken des TONARMLIFTS betätigen.
Beachten Sie bitte, dass der TONARM von der Ablage (siehe TONARM
CLIP) bewegt werden muss, damit der Schallplattenmotor aktiviert wird.
Wird der TONARM zurück auf seine Ablage gelegt, deaktiviert sich der
Motor.
3. TONARMLIFT – Hebt und senkt den TONARM.
4. TONARM CLIP – Verwenden Sie diesen Clip, um den TONARM bei
Transport oder Nichtverwendung des Gerätes zu sichern.
5. 45 RPM ADAPTER ABLAGE – Ablage für den beiliegenden 45 RPM
Adapter. Lagen Sie den Adapter hier ab, wenn Sie ihn nicht verwenden.
6. CINCH (RCA) AUSGANGSKABEL – Schließen Sie dieses Kabel an
einen Linepegel Cinch (RCA) Eingang (einen Mixer, zum Beispiel) an.
WARNUNG: Verbinden Sie den LP2FLASH nicht mit einem Phonolevel
Eingang.
7. USB AUDIO AUSGANG – Verwenden Sie zur Verbindung des
Plattenspielers mit dem Computer das mitgelieferte USB Kabel. Zur
Übertragung Ihrer Vinylschallplatten auf Ihren Computer finden Sie
verschiedene Softwareprogramme im Lieferumfang des Gerätes. EZ
Vinyl / Tape Converter oder EZ Audio Converter bietet als
Einsteigersoftware die schnellste und einfachste Möglichkeit, Schallplatten
zu digitalisieren. Erfahrene Anwender, die erweitere
Audiobearbeitungsmöglichkeiten, wie Normalization, Rauschentfernung
und automatische Titeltrennung nutzen wollen, werden die Audacity
Software installieren und verwenden.
8. NETZKABEL – Dieses Netzkabel wird, nachdem alle Audioverbindungen hergestellt wurden, mit einer Steckdose
verbunden.
L
R
8
7
5
1
6
2
3
4
21
Page 24

ÜBERSICHT ÜBER DIE VORDERSEITE
3
16
12
18
11
10
9
17
8
7
1
6
5
2
4
13
14
15
1. DISPLAY – Zeigt alle im Betrieb relevanten Informationen an.
2. AB TASTE – Diese Taste wird dazu verwendet, sich abwärts durch eine Liste verfügbarere Optionen im Display zu
bewegen.
3. AUF TASTE – Diese Taste wird dazu verwendet, sich aufwärts durch eine Liste verfügbarere Optionen im Display zu
bewegen.
4. RECHTS TASTE – Falls eine gewählte Option ein “>” Symbol im DISPLAY anzeigt, kann diese Taste zur Ansicht und
zum Zugriff auf verfügbare Unteroptionen verwendet werden. Wird Musik von einem angeschlossenen USB oder SD
Speicher abgespielt, arbeitet diese Taste als Nächste Titel Taste, die den nächsten verfügbaren Titel wählt.
5. LINKS TASTE – Falls eine gewählte Option ein “<” Symbol im DISPLAY anzeigt, kann diese Taste zur Ansicht und zum
Zugriff auf verfügbare Unteroptionen verwendet werden. Wird Musik von einem angeschlossenen USB oder SD
Speicher abgespielt, arbeitet diese Taste als Vorherige Titel Taste, die den vorherigen verfügbaren Titel wählt.
6. SELECT TASTE – Diese Taste wählt die gewählte und hervorgehobene Option im DISPLAY aus.
7. EXIT – Diese Taste ermöglicht die Rückkehr in die Hauptanzeige der Optionen (Hauptseite).
8. DELETE – Drücken Sie diese Taste, um eine gewählte Aufnahme zu entfernen.
9. SD CARD SLOT – Hier schieben Sie die SD Card ein.
10. USB SLOT – Schließen Sie an diesen USB Port einen USB Stick an (FAT16 oder FAT32).
Hinweis: USB Hubs werden vom LP2FLASH nicht unterstützt.
11. USB STATUS ANZEIGE – Diese LED leuchtet bei angeschlossenem USB Laufwerk.
12. RECORD VOLUME – Mit diesem Regler stellen Sie die Aufnahmelautstärke ein. Behalten Sie bei der Einstellung des
Aufnahmepegels die Aussteuerungsanzeigen im DISPLAY im Auge.
13. RECORD – Mit dieser Taste gehen Sie in den Aufnahmemodus. Im Aufnahmemodus können Sie die Musik einer
Schallplatte oder einer externen Signalquelle, die am LINE IN Eingang angeschlossen ist, direkt auf ein
angeschlossenes USB oder SD Gerät aufnehmen.
14. PLAY / PAUSE – Drücken Sie die Taste zur Wiedergabe. Drücken Sie diese Taste beim Abspielen, um die Musik zu
unterbrechen. Während der Pause führen Sie durch nochmaliges Drücken der Taste die Wiedergabe fort.
15. STOP – Drücken Sie diese taste, um die Wiedergabe oder die Aufnahme zu beenden.
16. 35 / 45 RPM Taste – Diese Taste steuert die Geschwindigkeit des PLATTENTELLERs. In der oberen rechten Ecke des
DISPLAYs zeigt die gewählte Umdrehungsgeschwindigkeit an.
17. STOP PLATTER – Diese Taste führt den TONARM auf die Ablageposition zurück und stoppt den Motor des
Plattenspielers. Falls diese Taste nicht richtig funktioniert, überprüfen Sie, dass der Antriebsriemen richtig aufgelegt ist
(siehe MONTAGE DES ANTRIEBSRIEMENS).
18. LINE IN – Schließen Sie an diesen 3,5 mm Stereoklinkeneingang ein Kassettendeck, eine Bandmaschine oder andere
Audioquellen an. Jedes hier anliegende Signal wird in die Wiedergabe oder die Aufnahme integriert.
22
Page 25

MUSIK VON USB FESTPLATTE/ SD CARD ABSPIELEN
Zur Musikwiedergabe direkt von Ihrem USB Gerät (FAT16 oder
FAT32) oder einer Secure Digital (SD) Card, gehen Sie wie folgt
vor:
1. Schließen Sie am jeweiligen Slot eine USB Festplatte an
bzw. schieben Sie eine SD Card ein. Danach sollte im
Display die Hauptseite angezeigt werden.
Hinweis: USB Hubs können am LP2FLASH nicht
verwendet werden.
LP2FLASH
Play Music >
Play Settings >
Record Settings >
2. Achten Sie darauf, dass Play Music unterlegt ist und
drücken Sie danach die RECHTS oder SELECT TASTE.
3. Wählen Sie mit den AUF und AB TASTEN die USB
Festplatte oder die SD Card, welche die abzuspielende
Musik enthält, aus und drücken Sie danach die RECHTS
oder SELECT TASTE.
4. Im DISPLAY sehen Sie eine Liste aller Dateien und
Ordner des angeschlossenen Gerätes. Sie können in die
Ordner Ihres Gerätes gehen, indem Sie einen Ordner mit
den AUF und AB TASTEN hinterlegen und die RECHTS
oder SELECT Taste drücken. Die Musikdateien, die der
LP2FLASH wiedergeben kann, werden mit einer
Musiknote (“♪”) und der “.MP3” Erweiterung markiert.
UFD-1
< CONFIG >
< RECORD >
5. Markieren Sie mit den AUF und AB TASTEN den
abzuspielenden Titel und drücken Sie dann die RECHTS,
SELECT oder PLAY TASTE.
6. Unter dem Dateinamen sehen Sie die vergangene Zeit (in
Stunden : Minuten : Sekunden). Darunter wiederum sehen
Sie zwei Zahlen. Die erste bezieht sich darauf, wo in der Liste
des Ordners sich der Titel befindet. Die zweite zahl zeigt an,
wie viele abspielbare Songs in diesem Ordner oder auf dem
Speichermedium enthalten sind.
Play | UFD-1
< SONG01.MP3 >
00 : 01 :58 L||||
0001/0009 R|||||||
Während der Musikwiedergabe lassen sich die folgenden
Bedienelemente verwenden:
PLAY / PAUSE: Startet, unterbricht und fährt mit der
Wiedergabe eines Titels fort.
STOP: Beendet einen Titel.
RECORD: Beendet einen Titel und wechselt in den
Aufnahmemodus.
LINKS TASTE: Arbeitet als Zurück Taste. Halten Sie die
Taste gedrückt, um im Titel zurückzuspulen.
RECHTS TASTE: Arbeit als Vorwärts Taste. Halten Sie
die Taste gedrückt, um im Titel vorzuspulen.
AUF TASTE: Springt zum vorherigen Titel zurück.
AB TASTE: Springt zum nächsten Titel vor.
EXIT: Beendet die Wiedergabe eines Titels und kehrt zur
ursprünglichen Displayanzeige zurück.
< ♪ SONG01.MP3 >
WIEDERGABEINSTELLUNGEN ÄNDERN
Um die Wiedergabeeinstellungen des LP2FLASH zu ändern,
folgen Sie diesen Anweisungen:
1. Drücken Sie zur Auswahl von Play Settings auf der
Hauptseite des DISPLAYs die AB und AUF TASTEN und
danach die RECHTS oder SELECT TASTE.
LP2FLASH
Play Music >
Play Settings >
Record Settings >
2. Bewegen Sie sich mit den AUF und AB TASTEN durch
das Menü. Wählen Sie die gewünschte Einstellung aus:
3. Nachdem Sie die gewünschte Option durch Unterlegen
Play Options
< Normal
< Shuffle
< Repeat One Song
Normal: Titel werden in alphabetischer Reihenfolge nach
Titelnamen (wie sie in der Liste der Dateien auf ihrer
festplatte oder der SCD Card angezeigt werden)
abgespielt.
Shuffle: Die Titel werden in zufälliger Reihenfolge ab
abgespielt.
Repeat One Song: Der gewählte Titel wird wiederholt, bis
Sie ihn stoppen oder zu einem anderen Titel wechseln.
gewählt haben, drücken Sie die LINKS oder EXIT TASTE, um
zur Hauptseite zurückzukehren.
23
Page 26

MUSIK AUF USB FESTPLATTE / SD CARD AUFNEHMEN
Zur direkten Aufnahme von LPs auf Ihre USB Festplatte (FAT16
oder FAT32) oder Secure Digital (SD) Card folgen Sie diesen
Anweisungen.
Hinweis: USB Hubs können am LP2FLASH nicht verwendet
werden.
Hinweis: Bei der Aufnahme auf SD Cards akzeptiert der
LP2FLASH nur SD Cards mit einer Speicherkapazität bis
2GB.
1. Schließen Sie am jeweiligen Slot eine USB Festplatte an
bzw. schieben Sie eine SD Card ein. Danach sollte im
Display die Hauptseite angezeigt werden.
LP2FLASH
Play Music >
Play Settings >
Record Settings >
2. Drücken Sie die RECORD Taste.
3. Verwenden Sie die AUF und AB TASTEN, um die USB
Festplatte oder die SD Card, auf welche Sie aufnehmen
möchten, auszuwählen. Drücken Sie danach die RECHTS
oder SELECT TASTE. Das DISPLAY fordert Sie auf, den
Aufnahmepegel zu überprüfen.
4. Spielen Sie den Titel, den Sie aufnehmen möchten, und
stellen Sie mit dem RECORD VOLUME Regler die
Aufnahmelautstärke ein. Sie können die im DISPLAY
erscheinenden Aussteuerungsanzeigen dabei zu Hilfe
nehmen. Kehren Sie nach der Pegeleinstellung zum
Anfang des Titels zurück.
Hinweis: Falls der Aufnahmepegel zu hoch ist, zeigen die
Aussteuerungsanzeigen das Wort “CLIP” an. Reduzieren
Sie dann die Aufnahmelautstärke mit dem RECORD
VOLUME Regler.
|| Record | UFD-1
<Adjust Volume Now >
Press Play L||||
To Record R|||||||
5. Drücken Sie die PLAY TASTE. Das DISPLAY zeigt die die
Vorübergehende Zeit (in Stunden : Minuten : Sekunden an,
die zunächst auf Null bleibt, bis die Aufnahme beginnt.
6. Spielen Sie den Titel, die Sie aufnehmen möchten, ab.
Abhängig der Auto Record Einstellung (siehe
AUFNAHMEEINSTELLUNGEN DEFINIEREN), beginnt der
LP2FLASH mit der Aufnahme, wenn ein Audiosignal einer
Soundquelle (z.B. wenn die Nadel auf die Schallplatte
gesenkt wird oder wenn über den LINE IN Eingang ein Signal
kommt) empfangen wird.
Sie können die folgenden Tasten während der
Musikaufnahme verwenden:
Play / Pause: Unterbricht die Aufnahme, während sich
der Plattenteller weiter dreht. Drücken Sie die Taste noch
einmal, um mit der Aufnahme fortzufahren.
Stop: Beendet die Aufnahme, während sich der
plattenteller weiterdreht. Nun können Sie entweder einen
neuen Track aufnehmen (drücken Sie dazu die RECORD
TASTE), mit der PLAY TASTE den gerade
aufgenommenen Titel abhören oder mit EXIT den
Aufnahmemodus verlassen und zurück zur Hauptseite
wechseln.
7. Der LP2FLASH benennt die Datei automatisch und hängt
eine dreistellige Nummer an den Namen an.
AUFNAHMEEINSTELLUNGEN DEFINIEREN
Bitte folgen Sie diesen Anweisungen, um die einzustellen, wie
der LP2FLASH Titel auf USB Festplatte (FAT16 oder FAT32)
oder SD Card aufnimmt:
1. Wenn im DISPLAY die Hauptseite angezeigt wird, wählen
Sie mit den AUF und AB TASTEN Rekord Settings aus.
Drücken Sie danach die RECHTS oder SELECT TASTE.
LP2FLASH
Play Music >
Play Settings >
Record Settings >
2. Navigieren Sie mit den AUF und AB TASTEN durch das
Menü. Wählen Sie Record Quality oder Auto
Recording aus und drücken Sie dann auf die RECHTS
oder SELECT Taste.
Record Quality:
Record Quality
< Best (192k)
< Better (160k)
< Good (128k)
Definieren Sie mit den AUF und AB TASTEN die
gewünschte Aufnahmequalität. Ihnen stehen drei
Optionen zur Wahl: Good (128kbps), Better (160kbps)
sowie Best (192kbps). Behalten Sie dabei im Hinterkopf,
dass eine höhere Bitrate mehr Speicherplatz auf Ihrem
Speichermedium einnimmt.
Auto Recording:
Auto Record Level
< Off LowX High
Split Time (seconds)
0 1x 2 3 4
Stellen Sie mit den AUF und AB TASTEN den Auto Record Pegel
ein. Wenn die gewünschte Option angewählt ist, drücken Sie die
SELECT Taste. Ein “X” zeigt an, dass die entsprechende Option
gewählt wurde:
Off: Auto Record ist deaktiviert.
Low: Die Aufnahme startet automatisch, wenn ein leises
Eingangssignal vom LP2FLASH erkannt wird.
High: Die Aufnahme startet automatisch, wenn ein lauteres
Eingangssignal vom LP2FLASH erkannt wird.
Definieren Sie mit den AUF und AB TASTEN die Split Time. Ein
“X” zeigt an, dass die entsprechende Option gewählt wurde:
0: Auto Record startet nach 50 Millisekunden.
1: Auto Record startet nach 1 Sekunde.
2: Auto Record startet nach 2 Sekunden.
3: Auto Record startet nach 3 Sekunden.
4: Auto Record startet nach 4 Sekunden.
3. Nachdem Sie Ihre Einstellungen vorgenommen haben, drücken
Sie die LINKS oder EXIT Taste, um zur Hauptseite
zurückzukehren.
24
Page 27

MONTAGE DES ANTRIEBSRIEMENS
Der Plattenteller des ION LP2FLASH
wird durch einen Gummiriemen
angetrieben, der mit dem Motor des
Plattenspielers verbunden ist. Unter sehr
seltenen Umständen kann dieser Riemen
abspringen, wodurch sich der
Plattenteller nicht mehr dreht. Sollte der
Plattenteller sich nicht mehr drehen,
wenn Sie den TONARM absenken, ist
meistens der abgesprungene Riemen die Ursache dafür. Folgen Sie bitte den
folgenden Anweisungen, um den Riemen neu zu montieren:
1. Beginnen Sie, indem Sie den Clip, der den PLATTENTELLER an der
Mittelspindel sichert, entfernen. Nachdem Sie den Clip entfernt haben,
nehmen Sie den PLATTENTELLER ab.
2. Drehen Sie den PLATTENTELLER um. Legen Sie den Riemen um den
inneren Bodenring des Plattentellers und achten Sie darauf, dass der
Gummiring dabei nicht verdreht wird.
3. Setzen Sie den PLATTENTELLER zurück auf die Mittelspindel auf und
drehen Sie ihn, bis Sie durch das Loch im PLATTENTELLER die
Motorspindel sehen können. Greifen Sie nun in das Loch, heben Sie den
Riemen vom inneren Ring an und ziehen Sie den Gummiriemen über die
Motorspindel, wie in der Abbildung gezeigt. Achten Sie in diesem Schritt
darauf, den Riemen nicht zu verdrehen.
4. Montieren Sie zum Schluss den Clip auf die Mittelspindel, um den
PLATTENTELLER zu sichern.
WICHTIG!
Achten Sie darauf, dass sich die
Plattentellerauflage (Slipmat)
immer auf dem Plattenteller
befindet, wenn Sie den
Plattenspieler verwenden, da Sie
ansonsten Ihre Schallplatten
oder den Plattenspieler
beschädigen könnten.
Entfernen Sie vor dem Betrieb
des Plattenspieler die
Nadelabdeckung aus Plastik.
UMWANDELN VON 78RPM SCHALLPLATTEN
Wenn Sie Ihre Schallplatten mit 78RPM auf Ihrem Computer aufnehmen möchten, müssen Sie die Audacity Software
installieren und verwenden. Dieses Programm finden Sie auf der mitgelieferten CD. Installieren Sie Audacity und folgen Sie
dann den nachstehend beschriebenen Schritten. Eine Fehlerbeschreibung zu Audacity finden Sie in der Audacity
Softwareanleitung, die ebenfalls auf der CD enthalten ist.
1. Verbinden Sie Ihren Plattenspieler mit einem USB Port Ihres Computers.
2. Öffnen Sie Audacity.
3. Gehen Sie innerhalb Audacity‘s auf BEARBEITEN -> EINSTELLUNGEN und bestimmen Sie den ‘USB Audio Codec’ –
das ist Ihr USB Plattenspieler – als Aufnahmegerät. Stellen Sie unter Kanäle 2-Stereo ein.
4. Definieren Sie die Soundkarte Ihres Computers als Wiedergabegerät. Die Bezeichnung der Soundkarte unterscheidet
sich von Computer zu Computer. Sie sollten aber nie ‘Microsoft Sound Mapper’ wählen.
5. Alternativ können Sie auch den “USB Audio Codec” verwenden, falls Sie das Audiosignal über die RCA Ausgänge Ihres
Plattenspielers ausgeben wollen.
6. Markieren Sie bitte die ‘Software Playthrough’ Option, damit Sie Ihre Musik während der Aufnahme hören können.
7. Nun können Sie mit der Aufnahme beginnen. Drücken Sie die RECORD Taste in Audacity, um den Vorgang zu starten.
8. Spielen Sie Ihre 78RPM Schallplatte mit 33 oder 45RPM ab.
9. Nachdem Sie die Aufnahme des gewünschten Titels abgeschlossen haben, drücken Sie in Audacity die STOP Taste.
10. Klicken Sie dann auf EDIT und wählen Sie ALLES AUSWÄHLEN (Tastaturbefehl: “STRG-A”).
11. Klicken Sie auf EFFEKT in der Menüleiste und wählen Sie CHANGE SPEED.
12. Wenn das Dialogfeld CHANGE SPEED geöffnet ist, sehen Sie die Standard Vinyl RPM Auswahl. Im “from” Feld sollte
(je nach Aufnahmegeschwindigkeit) 33 oder 45 RPM stehen. Das “to” Feld sollte auf 78 RPM gesetzt werden.
13. Klicken Sie auf den VORHÖREN Taster, um zu überprüfen, dass Ihre Aufnahme in die richtige Geschwindigkeit
gewandelt wird. Zum Anwenden der Änderung klicken Sie auf OK.
14. Nachdem Sie diese Bearbeitung vollzogen haben, speichern Sie ihren Titel über DATEI -> EXPORTIEREN ALS
WAV. Dadurch wird Ihre Musik als WAV Audiodatei gespeichert..
15. Wählen Sie ein Speicherziel auf Ihrem Computer aus, vergeben Sie einen Namen für Ihren Titel und klicken Sie auf
SPEICHERN.
Die Aufnahme finden Sie nun in dem Ordner auf Ihrer Festplatte, an dem Sie ihn im vorhergehenden Schritt gespeichert
haben.
25
Page 28

SNELSTARTGIDS
INHOUD VERPAKKING
LP2FLASH
Slipmat
USB-kabel
Software-CD
Snelstarthandleiding
Veiligheids- en garantie-informatie
INLEIDING
Bedankt voor uw aanschaf van dit product. De LP2FLASH is de snelste en gemakkelijkste manier om muziek vanaf platen of
externe geluidsbronnen van lijnniveau naar een SD-kaart of USB-opslagmedium (zoals geheugenstick) te converteren.
U kunt ook gemakkelijk vanaf vinyl direct naar uw computer opnemen met de meegeleverde software. Er worden diverse toepassingen meegeleverd om u te helpen bij het converteren van uw platen naar digitale muziek:
EZ Vinyl/Tape Converter* (alleen voor PC) of EZ Audio Converter (alleen voor Mac) is de snelste en meest
eenvoudige manier om uw opnamen om te zetten naar digitale media. De software bewaard je opnames in de iTunes**bibliotheek. Voor nieuwe gebruikers geniet deze toepassing de voorkeur. Op de CD, er wordt een handige snelstartgids
meegeleverd met stap-voor-stap-instructies voor installatie en werking van de software.
Audacity (PC en Mac) is bedoeld voor de gevorderde gebruiker. Deze toepassing voorziet in geavanceerde aanpassing
en verwerking van audio, zoals normalisatie, ruisverwijdering en automatische nummerscheiding. De Audacity softwaregids staat ook op een meegeleverde CD; raadpleeg deze gids bij het werken met Audacity.
* Een versie van EZ Vinyl / Tape Converter met Gracenote MusicID is beschikbaar voor download op de pagina van uw product op
www.ion-audio.com.
** iTunes en iPod zijn handelsmerken van Apple, Inc., geregistreerd in de V.S. en andere landen.
FUNCTIES BOVENPANEEL
1. PLATEAU - Plaats de plaat die u wilt afspelen op het plateau.
2. TOONARM – De LP2FLASH wordt geleverd met een direct bruikbare, voorgebalanceerde TOONARM met patroon.
Deze TOONARM kan met de hand of door indrukken van hendel OPTILLEN/NEERLATEN worden opgetild en
neergelaten. Vergeet niet dat de TOONARM uit de rustpositie (op de TOONARMKLEM) genomen dient te worden
voordat de motor van de draaitafel geactiveerd wordt. Wanneer de
TOONARM teruggeplaatst wordt in rustpositie, wordt de motor van de
draaitafel gedeactiveerd.
3. HENDEL VOOR OPTILLEN/NEERLATEN – Tilt de TOONARM op en
laat deze neer.
4. TOONARMKLEM – Gebruik deze klem om de TOONARM vast te zetten
bij opslag en transport van de unit.
5. 45 TPM ADAPTERHOUDER – Voor de meegeleverde 45 TPM-adapter.
Wanneer de adapter niet gebruikt wordt, kan deze in de houder worden
geplaatst.
6. RCA-UITGANGSKABEL – Sluit de bevestigde kabel aan op een RCA-
ingang van lijnniveau (bijvoorbeeld een mixer).
WAARSCHUWING: Probeer de LP2FLASH niet aan te sluiten op een
ingang van phono-niveau.
7. USB-AUDIOUITGANG – Gebruik de meegeleverde USB-kabel voor
aansluiten van de draaitafel op uw PC. Voor het overzetten van uw vinyl
platen naar de PC worden twee verschillende pakketten meegeleverd op
de CD. EZ Vinyl / Tape Converter of EZ Audio Converter is de gemakkelijkste, snelste manier voor overzetten van vinyl voor beginners. Daarnaast kunt u, wanneer u een gevorderde gebruiker bent, het pakket
Audacity installeren, waarmee u geavanceerde audio-aanpassingen
zoals normalisatie, ruisverwijdering en automatisch scheiden van
nummers tot uw beschikking hebt.
8. STROOMKABEL – Deze dient in een stopcontact te worden gestoken nadat alle audioverbindingen zijn gelegd.
L
R
8
5
7
1
6
2
3
4
26
Page 29

FUNCTIES BOVENPANEEL
16
12
9
10
11
18
8
17
3
7
1
6
4
5
13
14
15
2
1. DISPLAY – Geeft informatie m.b.t. bediening van de unit.
2. KNOP NEER – Deze knop wordt gebruikt om naar beneden te bladeren door beschikbare opties op het DISPLAY.
3. KNOP OP – Deze knop wordt gebruikt om naar boven te bladeren door beschikbare opties op het DISPLAY.
4. KNOP RECHTS – Wanneer een geselecteerde optie een ">"-symbool in het DISPLAY laat zien, kunnen met deze knop
beschikbare subonderdelen worden ingegeven en weergegeven. Bij het afspelen van muziek van een aangesloten USBof SD-apparaat functioneert deze knop als knop voor vooruitspoelen, waardoor het volgende beschikbare nummer overgeslagen wordt.
5. KNOP LINKS – Wanneer een geselecteerde optie een "<"-symbool in het DISPLAY laat zien, kan met deze knop
worden teruggekeerd naar de vorige set opties. Bij het afspelen van muziek van een aangesloten USB- of SD-apparaat
functioneert deze knop als knop voor terugspoelen, waardoor u terugkeert naar het begin van hetzelfde nummer, of het
vorige - na nog een keer indrukken.
6. KNOP SELECTEREN – Deze knop selecteert de optie die wordt benadrukt in het DISPLAY.
7. BEËINDIGEN – Met deze knop keert u terug naar de hoofdset van opties (de hoofdpagina).
8. VERWIJDEREN – Druk op deze knop om de geselecteerde opname te verwijderen.
9. SLEUF SD-KAART – Steek SD-kaart in deze sleuf.
10. USB-SLEUF – Steek USB-stick (alleen FAT16 of FAT32) in deze ingang.
N.B.: De LP2FLASH ondersteunt USB-hubs niet.
11. USB STATUSINDICATOR – Deze LED licht op wanneer een USB-station aangesloten is.
12. OPNAMEVOLUME – Deze knop stelt het opnameniveau bij. Houd bij het instellen van het opnameniveau de geluidsme-
ters op het DISPLAY in de gaten.
13. OPNEMEN – Druk op deze knop om te schakelen naar opnamemodus. Opnamemodus stelt u in staat muziek op te
nemen vanaf de draaitafel of externe geluidsapparatuur die aangesloten is op LIJN IN, direct naar een aangesloten
USB- of SD-apparaat.
14. AFSPELEN / PAUZEREN – Druk op deze knop om af te spelen. Tijdens het afspelen opnieuw op de knop drukken
pauzeert het nummer; in pauzestand opnieuw op de knop drukken hervat het afspelen.
15. STOP – Druk op deze knop om het afspelen (of de opname) te stoppen.
16. KNOP 35 / 45 TPM – Deze knop bestuurt de TPM van het PLATEAU. Een cijfer aan de rechter bovenzijde van het
DISPLAY geeft aan welke TPM geselecteerd is.
17. STOP PLATEAU – Deze knop laat de TOONARM terugkeren naar rustpositie en stopt de motor van de draaitafel. Als
de knop niet functioneert, controleer dan of de aandrijfriem van de motor juist is geïnstalleerd (zie BEVESTIGEN VAN
AANDRIJFRIEM).
18. LIJN IN – Sluit een cassettedeck, bandrecorder of andere geluidsbron aan op deze ingang met een 1/8" stereokabel. Elk
signaal dat door deze ingang gaat wordt meegenomen in de mix van afspelen of opnemen.
27
Page 30

AFSPELEN VAN MUZIEK VANAF USB-DRIVE/SD-KAART
Om muziek direct vanaf een USB-apparaat (alleen FAT16
of FAT32) of SD-kaart (Secure Digital) af te spelen volgt u
deze instructies.
1. Plaats de USB-drive of SD-kaart in de juiste sleuf.
De hoofdpagina zou moeten verschijnen.
N.B.:De LP2FLASH ondersteunt USB-hubs niet.
LP2FLASH
Play Music >
Play Settings >
Record Settings >
2. Zorg ervoor dat Play Music (afspelen muziek)
oplicht en klik dan op knop RIGHT of SELECT.
3. Gebruik knoppen OP en NEER om de USB-drive of
SD-kaart te selecteren die de af te spelen muziek
bevat en druk op knop RECHTS of SELECTEREN.
4. Het DISPLAY zal alle bestanden en mappen weergeven die op het aangesloten apparaat opgeslagen
zijn. U kunt alle mappen op uw apparaat benaderen
met de knoppen OP en NEER om ze te selecteren
en knop RECHTS of SELECTEREN voor selecteren.
Muziekbestanden die met de LP2FLASH af te spelen zijn worden gemarkeerd met een muzieknoot
(“♪”) en extensie “.MP3”.
UFD-1
< CONFIG >
< RECORD >
< ♪ SONG01.MP3 >
5. Gebruik knoppen OP en NEER om het af te spelen
nummer te selecteren en druk dan op knop RECHTS,
SELECTEREN of AFSPELEN.
6. Onder de bestandsnaam staat de verstreken tijd (in uren
: minuten : seconden). Onder de verstreken tijd staan
twee cijfers. Het eerste verwijst naar de plaats waar het
nummer staat in de bestandenlijst in de geselecteerde
map/op de drive. Het tweede cijfer is het aantal afspeelbare nummers in die map of op die drive.
Play | UFD-1
< SONG01.MP3 >
00 : 01 :58 L||||
0001/0009 R|||||||
U kunt de volgende bedieningselementen gebruiken
tijdens het afspelen van muziek:
AFSPELEN / PAUZEREN: Begint, pauzeert of hervat
een nummer.
STOP: Stopt een nummer.
OPNEMEN: Stopt een nummer en schakelt naar
opnamemodus.
KNOP LINKS: Functioneert als knop voor terugspoe-
len. Indrukken en ingedrukt houden laat het huidige
nummer terugspoelen.
KNOP RECHTS: Functioneert als knop voor vooruit
spoelen. Indrukken en ingedrukt houden laat het huidige nummer vooruitspoelen.
KNOP OP: Druk op deze knop om terug te gaan naar
het vorige nummer.
KNOP NEER: Druk op deze knop om door te
spoelen naar het volgende nummer.
BEËINDIGEN: Stopt een nummer en keert terug
naar het initiële weergavescherm.
INSTELLINGEN VOOR AFSPELEN INSTELLEN
Om de instellingen van de LP2FLASH voor het afspelen
van nummer van een USB-drive (alleen FAT16 of FAT32)
of SD-kaart aan te passen volgt u de volgende instructies:
1. Op de hoofdpagina in het DISPLAY gebruikt u de
knoppen OP en NEER om Play Settings (instellingen afspelen) te selecteren; druk daarna op knop
RECHTS of SELECTEREN.
LP2FLASH
Play Music >
Play Settings >
Record Settings >
2. Gebruik knoppen OP en NEER om door het menu te
bladeren. Selecteer de gewenste instelling:
Play options
< Normal
< Shuffle
< Repeat One Song
Normal: Nummers worden in alfabetische volgorde
op bestandsnaam (zoals ze in de lijst van USB-drive
of SD-kaart) staan.
Shuffle: Nummers worden in random volgorde
afgespeeld.
Repeat One Song: Het geselecteerde nummer wordt
herhaald tot er gestopt wordt of overgeslagen naar
een ander nummer.
3. Nadat de gewenste instelling is geselecteerd kan op
knop LINKS of BEËINDIGEN worden gedrukt om terug
te keren naar de hoofdpagina.
28
Page 31

Split Ti
OPNEMEN VAN MUZIEK NAAR USB-DRIVE/SD-KAART
Om muziek direct vanaf LP naar USB-apparaten (alleen
FAT16 of FAT32) of SD-kaart (Secure Digital) op te nemen
volgt u deze instructies.
N.B.: De LP2FLASH ondersteunt USB-hubs niet.
N.B.: Bij opnemen naar SD-kaarten neemt de
LP2FLASH alleen op naar SD-kaarten met een opslagcapaciteit tot 2 GB.
1. Plaats de USB-drive of SD-kaart in de juiste sleuf. De
hoofdpagina zou moeten verschijnen.
LP2FLASH
Play Music >
Play Settings >
Record Settings >
2. Druk op OPNEMEN.
3. Gebruik knoppen OP en NEER om de USB-drive of
SD-kaart te selecteren die de af te spelen muziek
bevat en druk op knop RECHTS of SELECTEREN.
Het DISPLAY zal vragen om controle van het
opnamevolume.
4. Speel het nummer af dat opgenomen moet worden
en gebruik knop OPNAMEVOLUME om een correct
opnameniveau in te stellen. U kunt de niveaumeters
die op het DISPLAY verschijnen, gebruiken om dit te
meten. Keer terug naar het begin van het nummer
nadat het opnameniveau gecontroleerd is.
N.B.: Als het opnameniveau te hoog is, geven de
niveaumeters het woord “CLIP” aan. Verlaag het
opnameniveau door knop OPNAMEVOLUME in te
stellen.
INSTELLEN OPNAME-INSTELLINGEN
Om de instellingen van de LP2FLASH voor het opnemen
van nummer van een USB-drive (alleen FAT16 of FAT32) of
SD-kaart aan te passen volgt u de volgende instructies:
1. Op de hoofdpagina in het DISPLAY gebruikt u de
knoppen OP en NEER om de Record Settings
(instellingen opnemen) te selecteren; druk daarna op
knop RECHTS of SELECTEREN.
LP2FLASH
Play Music >
Play Settings >
Record Settings >
2. Gebruik knoppen OP en NEER om door het menu te
bladeren. Selecteer Record Quality of Auto Recor-
ding en druk op knop RECHTS of SELECTEREN.
Opnamekwaliteit:
Record Quality
< Best (192k)
< Better (160k)
< Good (128k)
Gebruik de knoppen OP en NEER om te kiezen
tussen de drie niveaus van opnamekwaliteit: Good
(goed, 128 kbps), Better (beter, 160 kbps) en Best
(beste, 192 kbps). Houd er rekening mee dat een
opname op een hoger niveau meer ruimte op het
opslagapparaat in beslag zal nemen.
|| Record | UFD-1
<Adjust Volume Now >
Press Play L||||
To Record R|||||||
5. Druk op knop AFSPELEN. Het DISPLAY schakelt naar
weergave van de verstreken tijd (in uren : minuten :
seconden), die op nul blijft staan tot de opname begint.
6. Speel het nummer dat moet worden opgenomen, af.
Afhankelijk van de instellingen voor automatisch
opnemen (zie INSTELLEN OPNAME-INSTELLINGEN)
zal de LP2FLASH beginnen met opnemen wanneer het
een geluidssignaal van een opnamebron ontvangt (zoals
de naald die het vinyl raakt of een signaal in ingang LIJN
IN).
U kunt de volgende bedieningselementen gebruiken
tijdens het afspelen van muziek:
Afspelen / Pauzeren: Pauzeert de opname terwijl
het plateau blijft draaien. Druk opnieuw om het
opnemen te hervatten.
Stop: Stopt de opname terwijl het plateau blijft
draaien. Vanaf dit punt kunt u op Opnemen drukken
om het volgende nummer op te nemen, op Afspelen
om de zojuist gemaakte opname terug te luisteren of
Beëindigen om de opnamemodus te verlaten en
terug te keren naar de hoofdpagina.
7. De LP2FLASH zal het bestand automatisch een naam
geven en een nummer van 3 cijfers toevoegen.
Auto Recording (automatisch opnemen):
Auto Record Level
< Off LowX
High
me
Gebruik de knoppen OP en NEER om het niveau voor
automatisch opnemen in te stellen. Wanneer de
gewenste optie geselecteerd is, druk dan op knop
SELECTEREN. Er dient een "X" te verschijnen naast de
geselecteerde optie:
Off: Automatisch opnemen is uitgeschakeld.
Low: Opname start automatisch wanneer de
LP2FLASH een lager ingangssignaal detecteert.
High: Opname start automatisch wanneer de
LP2FLASH een hoger ingangssignaal detecteert.
Gebruik de knoppen OP en NEER om de tijd voor
splitsen in te stellen. Er dient een "X" te verschijnen naast
de geselecteerde optie:
0: Automatisch opnemen start na 50 milliseconden
1: Automatisch opnemen start na 1 seconde
2: Automatisch opnemen start na 2 seconden
3: Automatisch opnemen start na 3 seconden
4: Automatisch opnemen start na 4 seconden
3. Nadat de gewenste instellingen zijn geselecteerd kan op
knop LINKS of BEËINDIGEN worden gedrukt om terug te
keren naar de hoofdpagina.
29
Page 32

BEVESTIGEN VAN DE AANDRIJFRIEM
Het ION LP2FLASH-plateau wordt aangedreven door een rubberen aandrijfriem
die bevestigd wordt aan de motor van de
draaitafel. In zeldzame gevallen kan deze
riem losraken, waardoor het plateau niet
meer draait. Als de draaitafel niet gaat
draaien wanneer de TOONARM naar beneden wordt gebracht, is de meest logische oorzaak de aandrijfriem. Volg
onderstaande instructies om de riem op
juiste wijze opnieuw te bevestigen aan
motor en plateau.
1. Begin met het verwijderen van de klem die het PLATEAU aan de centrale
as vasthoudt. Nadat de klem verwijderd is, wordt het PLATEAU verwijderd.
2. Draai het PLATEAU ondersteboven. Plaats de rubberen aandrijfriem rond
de onderste binnenring van het PLATEAU; er dient voor gezorgd te worden
dat de riem niet gedraaid wordt.
3. Plaats het PLATEAU terug op de centrale as en draai deze zodat de
motoras door het gat op het plateau zichtbaar is. Reik in het gat, trek de
rubberen aandrijfriem van de binnenring en installeer deze over de motoras,
zoals getoond in de afbeelding. Wees voorzichtig om de riem tijdens deze
stap niet te draaien.
4. Plaats als laatste de klem opnieuw op de centrale as om het PLATEAU vast
te zetten.
BELANGRIJK!
Zorg ervoor dat de vilten slipmat
altijd op het plateau ligt bij gebruik van de draaitafel. Het niet
gebruiken van deze slipmat kan
zowel uw media als de draaitafel
beschadigen.
Verwijder het plastic elementkapje (naaldbescherming) voor
gebruik van de draaitafel.
CONVERSIE VAN 78 TOERENPLATEN
Om 78-toerenplaten te converteren is het nodig de Audacity-software te installeren en te gebruiken. Deze toepassing staat op
de meegeleverde CD. Installeer Audacity en volg onderstaande instructies om de 78-toerenplaten op te nemen. Voor
probleemoplossing in Audacity raadpleegt u de op de CD meegeleverde Softwaregids voor de Audacity-software.
1. Sluit de draaitafel aan op de USB-poort van de computer.
2. Open Audacity.
3. In Audacity gaat u naar EDIT -> PREFERENCES (voorkeuren) en stelt het Recording Device (opnameapparaat) in op
‘USB Audio Codec’ – dit is uw USB draaitafel (selecteer 2 kanalen om in stereo op te nemen).
4. Selecteer de geluidskaart van de computer als afspeelapparaat. De naam van het apparaat zal per computer verschillen
maar mag nooit ingesteld worden op 'Microsoft Sound Mapper'.
5. Als laatste vinkt u ‘Software Playthrough’ (afspelen via software) aan zodat u de muziek via uw audioapparaat kunt
beluisteren tijdens het opnemen.
6. U bent nu klaar voor opnemen. Druk op knop RECORD in Audacity op te beginnen met opnemen.
7. Speel de 78-toerenplaten af op 33 of 45 TPM.
8. Nadat het gewenste materiaal is opgenomen drukt u in Audacity op STOP.
9. Klik op menu EDIT, daarna op SELECT en dan op ALL (snelkoppeling: “CTRL-A”).
10. Klik op menu EFFECT en klik op CHANGE SPEED (snelheid wijzigen).
11. Wanneer het venster CHANGE SPEED (snelheid wijzigen) zich opent ziet u de standaard TPM-selecties voor platen.
"from" dient ingesteld te worden op 33 of 45 TPM (afhankelijk van de instelling op de draaitafel) en "to" dient ingesteld te
worden op 78 TPM.
12. Klik op PREVIEW om uw opname geconverteerd naar de juiste snelheid van 78 toeren te horen. Klik op OK om de
conversie naar 78 toeren af te ronden.
13. Wanneer u klaar bent kunt u het bestand opslaan door te gaan naar FILE -> EXPORT AS WAV (bestand, opslaan als
.WAV). De opname zal bewaard worden als .WAV geluidsbestand.
14. Kies een bestemming op uw computer, een naam voor de opname en klik op SAVE (bewaren).
15. De opname is nu terug te vinden op de locatie waarnaar u deze in de voorgaande stap hebt opgeslagen.
30
Page 33

31
Page 34

Specifications (ION LP2FLASH)
Manual Version: 1.3
Requirements for Computer Recording:
PC
y Windows 98SE, 2000, ME, XP, Vista
y 500 MHz Pentium class processor or better
y QuickTime 7.1.6 or later
y 256MB RAM (minimum)
y 250MB available Hard Drive space (minimum)
y One available USB1.1 port or higher
y CD-ROM drive or better
y Windows-compatible sound card
Mac
y OS X 10.3.9 or later or OS X 10.4.7 or later
y 500MHz G3 processor or better
y QuickTime 6.5.2 or later
y 256MB RAM (minimum)
y 250MB available Hard Drive space (minimum)
y One available USB1.1 port or higher
y CD-ROM drive or better
y Mac-compatible sound card
Part List:
y ION TTUSB Turntable
o Counterweight for tonearm
o Platter w/belt
o Slipmat
o Cartridge pre-mounted on Headshell
o RCA Cable connected
y USB Cable Included
y 45 RPM Adapter Included
y Software CD including EZ Vinyl/Tape Converter (PC) and Audacity (MAC/PC)
y Software User Manual
y Hardware Quick Start Guide
Turntable Weight: 8 lbs
Master CTN dimensions (W x D x H): 16.57” x 15.35” x 4.88”
Motor: Belt Drive
Speed: 33 1/3 RPM or 45 RPM operation
Inputs: 1/8” stereo line level
Outputs: RCA (LINE/PHONO), USB Audio.
Mp3 Recording Bitrate: 128 – 192 kbps
Device Compatibility: USB Thumb Drive* (FAT 16 and FAT32 format only); SD Card (< 2GB capacity)
* USB hard drives are not supported.
ION Audio, LLC
Tel: (U.S.) 401.658.3743
Email: support@ion-audio.com
Page 35

Page 36

www.ion-audio.com
www.ion-audio.com
 Loading...