

ion science PhoCheck Plus 1000Ex, PhoCheck Plus 2000EX, PhoCheck Plus 3000Ex, PhoCheck Plus 5000Ex User Manual
Page 1

PhoCheck+ Instrument User Manual V2.5
PhoCheck+ 1000Ex, PhoCheck+ 2000Ex, PhoCheck+ 3000Ex, PhoCheck+ 5000Ex
PhoCheck+ Instrument User Manual part number: 845221
Register your instrument online
to receive your Extended 2 Year
Warranty. See page 38 for
details.
Page 2

PhoCheck+ 1000, 2000, 3000 & 5000 Ex Ion Science Ltd
Page 1 of 41
Page 3

PhoCheck+ 1000, 2000, 3000 & 5000 Ex Ion Science Ltd
Page 2 of 41
Declaration of conformity
Manufacturer: Ion Science Ltd, The Way, Fowlmere, Cambridge, England. SG8 7UJ
Product: PhoCheck+ 1000, 2000, 3000 and 5000
Product description: Intrinsically safe photo-ionisation detector for detecting volatile organic compounds
Directive 94/9/EC ATEX
Identification: II 2 G Ex ia IIC T4 (-20°C ≤ Ta ≤ +60°C)
Notified Body: Baseefa Ltd, 1180, Buxton, UK
EC Type Examination Certificate(s)
Baseefa03ATEX742 latest supplement Baseefa03ATEX742/8X issued 1st July 2009
Ref Baseefa Cert Report 03(c)0400, 05(c)0007
IECEx BAS 04.0033 latest revision no.5 issued 3rd July 2009
IECEx Test Report UK/Bas 04/0642 05/0007 GB/BAS/EX TR09.0116/00
Standards
BS EN 60079-0:2006 Electrical Apparatus for Potentially Explosive Atmospheres – General Requirement
BS EN 60079-11:2007 Explosive Atmospheres – Equipment Protection by Intrinsic Safety I
BS EN 61010-1:2001 Safety requirements for electrical equipment for measurement, control and
Laboratory use – General requirements
Directive 2004/108EC Electrical Equipment – Electromagnetic Compatibility (EMC)
BS EN 61326-1:2006 Electrical equipment for measurement, control and laboratory use – EMC
Requirements (Class B and General Immunity)
Other Standards
BS EN ISO 9001:2000 Quality Management Systems – Requirements
BS EN 13980:2002 Potentially Explosive Atmospheres – Application of Quality Systems
On behalf of Ion Science Ltd, I declare that, on the date this product accompanied by this declaration is placed on the
market, the product conforms to all technical and regulatory requirements of the above listed directives.
Name: Mark Stockdale Position: Technical Director
Signature: Date: 20th November 2009
Page 4

PhoCheck+ 1000, 2000, 3000 & 5000 Ex Ion Science Ltd
Page 3 of 41
Contents Page
Declaration of Conformity . . . . 2
Statements . . . . . 4
Responsibility for use . . . 4
Warnings . . . . 4
Caution . . . . . 4
Quality Assurance . . . 4
Disposal . . . . 4
Calibration Facility . . . 4
Ion Science Contact Details . . 4
Introduction to PhoCheck+. . . . 5
Getting Started . . . . . 6
Instrument Functions . . . . 7-9
Function Locations . . . 8
How the PhoCheck+ Menu Works . 9
Quick Reference. . . . 10-11
Instrument Display . . . . 12-13
Symbols Explained . . . 12
Graphical Screen. .. . . 13
Digital Display . . . 13
Function Menu . . . . 13
Instrument Menu . . . . . 14-19
Data logging . . . . 14
View Data . . . . 14
Zone Maintenance . . . 15
PC Communication . . . 15
Alarm . . . . . 16
Sound (Confidence Beep) . . 16
Calibration . . . . 16
Back-light . . . . 18
Date / Time . . . . 18
PID Gas Selection . . . 18
PID Lamp . . . . 18
Unit Selector . . . . 19
Data Log Memory Alarm . . . 19
Application (Health & Safety). . . 19
Application (Survey) . . . 19
Security . . . . 19
IonPC Software . . . . . 20-27
PC Requirement . . . . 20
Connecting PhoCheck+ to PC . . 20
Starting IonPc . . . . 20-21
Downloading Data . . . 21
Calibration . . . . 22
Menu Set-up and Settings . . 23-26
Software Disclaimers . . . 27
Batteries . . . . . . 28-29
Diagnostics . . . . . 30-31
Maintenance . . . . . 32-33
Accessories . . . . . 34
Protective/Decontamination Cover . 35-36
Upgrade Options . . . . . 37
Instrument Warranty and Service . . . 38
Technical Specification . . . . 39-40
Page 5

PhoCheck+ 1000, 2000, 3000 & 5000 Ex Ion Science Ltd
Page 5 of 41
Introduction to PhoCheck+_
________________________________________
PhoCheck+ is a portable gas detector, suitable for the detection of a large range of Volatile Organic
Compounds (VOC's), which are dangerous from both a poisoning and explosive perspective. Total VOC‟s are
detected using PID (Photo Ionisation Detection) technology.
The PhoCheck+ versions are fully upgradeable in the field (i.e. PhoCheck+ 1000 to a 5000 or a 2000 to a
3000 etc). See page 37 for more details relating to upgrade options.
PhoCheck+ has two principle modes of operation; Survey and Health & Safety. Health & Safety mode is
available on 3000 and 5000 versions.
Survey is the default mode of operation. This mode is often used in applications such as Head Space
Sampling and Leak Detection where several areas (or Zones) are to be monitored and readings data logged.
All sensor readings are real time measurements and alarm levels are set manually.
Health & Safety mode is used to check for conformity of short-term exposure levels (STEL) or time-weighted
averages (TWA) that are specific for particular hazardous environments (for example EH40 in the UK and
OSHA in the USA). In this mode of operation STEL's and TWA's are continually calculated and compared to
levels set in the instrument‟s gas table. For more information on these modes of operation please see page
19.
PhoCheck+ versions 2000, 3000 and 5000 automatically data log the readings every second. These readings
are stored in the instrument's memory with a date and time stamp. For more information please see page
18.
Page 6

PhoCheck+ 1000, 2000, 3000 & 5000 Ex Ion Science Ltd
Page 6 of 41
Getting started _____
1. Rechargeable Batteries
PhoCheck+ instruments leave the factory fully charged, however prolonged periods of storage may result in
the battery pack discharging. We recommend charging the instrument for 12 hours before use. See the
battery section of this manual page 28.
2. Alkaline Batteries
Fit the battery pack supplied with the PhoCheck+. For more information please see the battery section of
this manual page 28.
3. Selecting a gas from the internal gas table
PhoCheck+ instruments leave Ion Science pre-set for gas type TVOC (total volatile organic compounds).
Instruments are factory calibrated against isobutylene and all response factors are equivalent to this. By
changing the gas from the gas table all readings will be given using that gases response factor. To change
the selected gas please see page 18.
Turn the instrument on by pressing the key.
Press and hold the key and check the correct gas, alarm levels and zero mode are selected.
The screen will flash for 1 minute while the detector warms up – check for a reading on the display
Between 0.2ppm and 2ppm.
Replace the probe and filter with the blue carbon filter – check for a reading from 0.0 to 0.2ppm.
Remove the carbon filter and replace the probe and filter.
If the results are not as expected, perform a custom calibration first ensuring the correct gas is
selected.
4. Setting alarm levels
We recommend that alarm levels are set to user specifications as soon as possible before being used for the
first time. Please see page 16 for details of how to set alarm levels.
5. Setting date and time
We recommend that the correct local date and time be set to the instrument as soon as possible before
being used for the first time. Please see page 18 for details on how to set the date and time.
Page 7
PhoCheck+ 1000, 2000, 3000 & 5000 Ex Ion Science Ltd
Page 7 of 41
Instrument Functions _
Keypad function descriptions
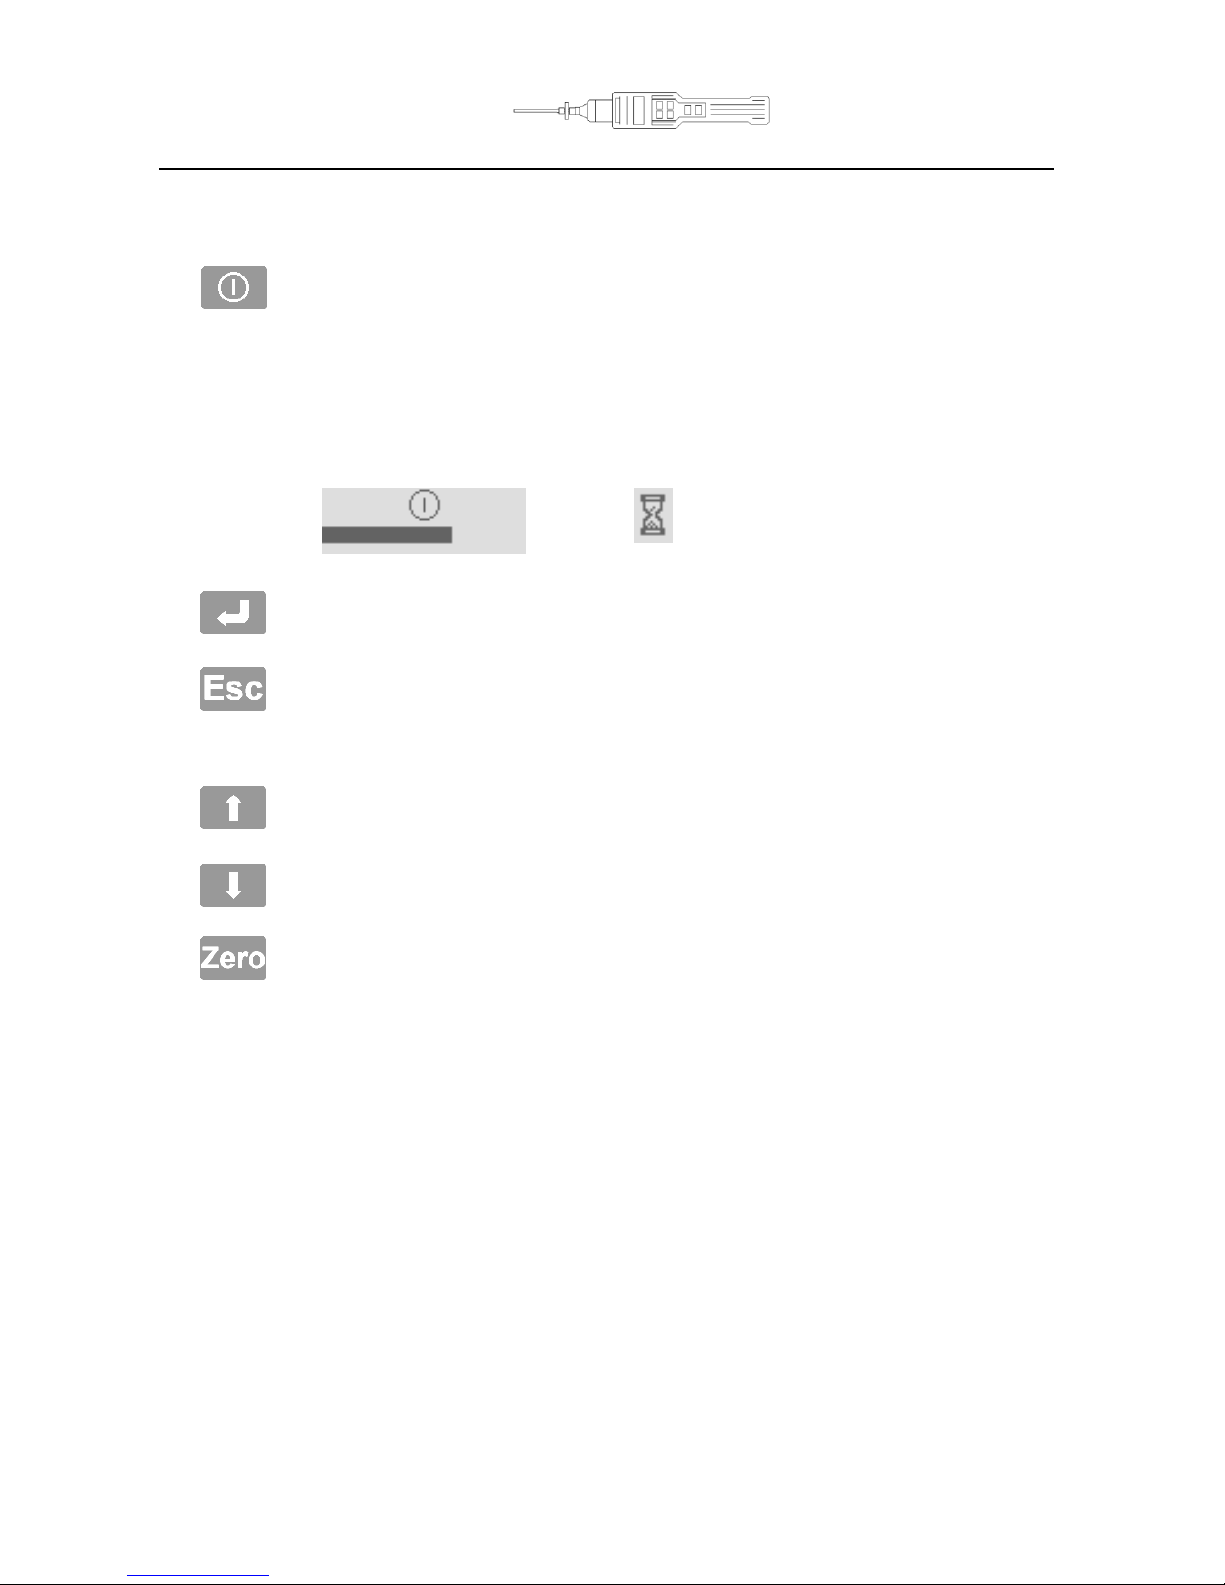
ON/OFF
To switch the PhoCheck+ instrument ON - Press the ON/OFF key.
To switch the PhoCheck+ instrument OFF - Ensure you are on the „DISPLAY/FUNCTION
SELECTION SCREEN‟ or a Display screen. Press and hold the ON/OFF key. A TIMER
symbol will appear and a line will travel across the bottom on the screen, release the
ON/OFF button once the line has travelled the length of the screen. The DELAY symbol
will briefly appear before the instrument turns OFF completely. This procedure has been
designed to avoid accidental switch OFF.
ENTER
This key selects options and confirms settings.
ESCAPE
This key is used to return the display to the previous screen and to abort an adjustment.
Repeated pressing of this key will return the display to the DISPLAY/FUNCTION
SELECTION SCREEN.
UP
Use to scroll up or change selection
DOWN
Use to scroll down or change selection
ZERO
Pressing the Zero key Zeros-out background readings. See the „INSTRUMENT DISPLAY‟
section of this manual for more detail (Page 12)
Wait
Symbol
Page 8
PhoCheck+ 1000, 2000, 3000 & 5000 Ex Ion Science Ltd
Page 8 of 41
Instrument Functions _____
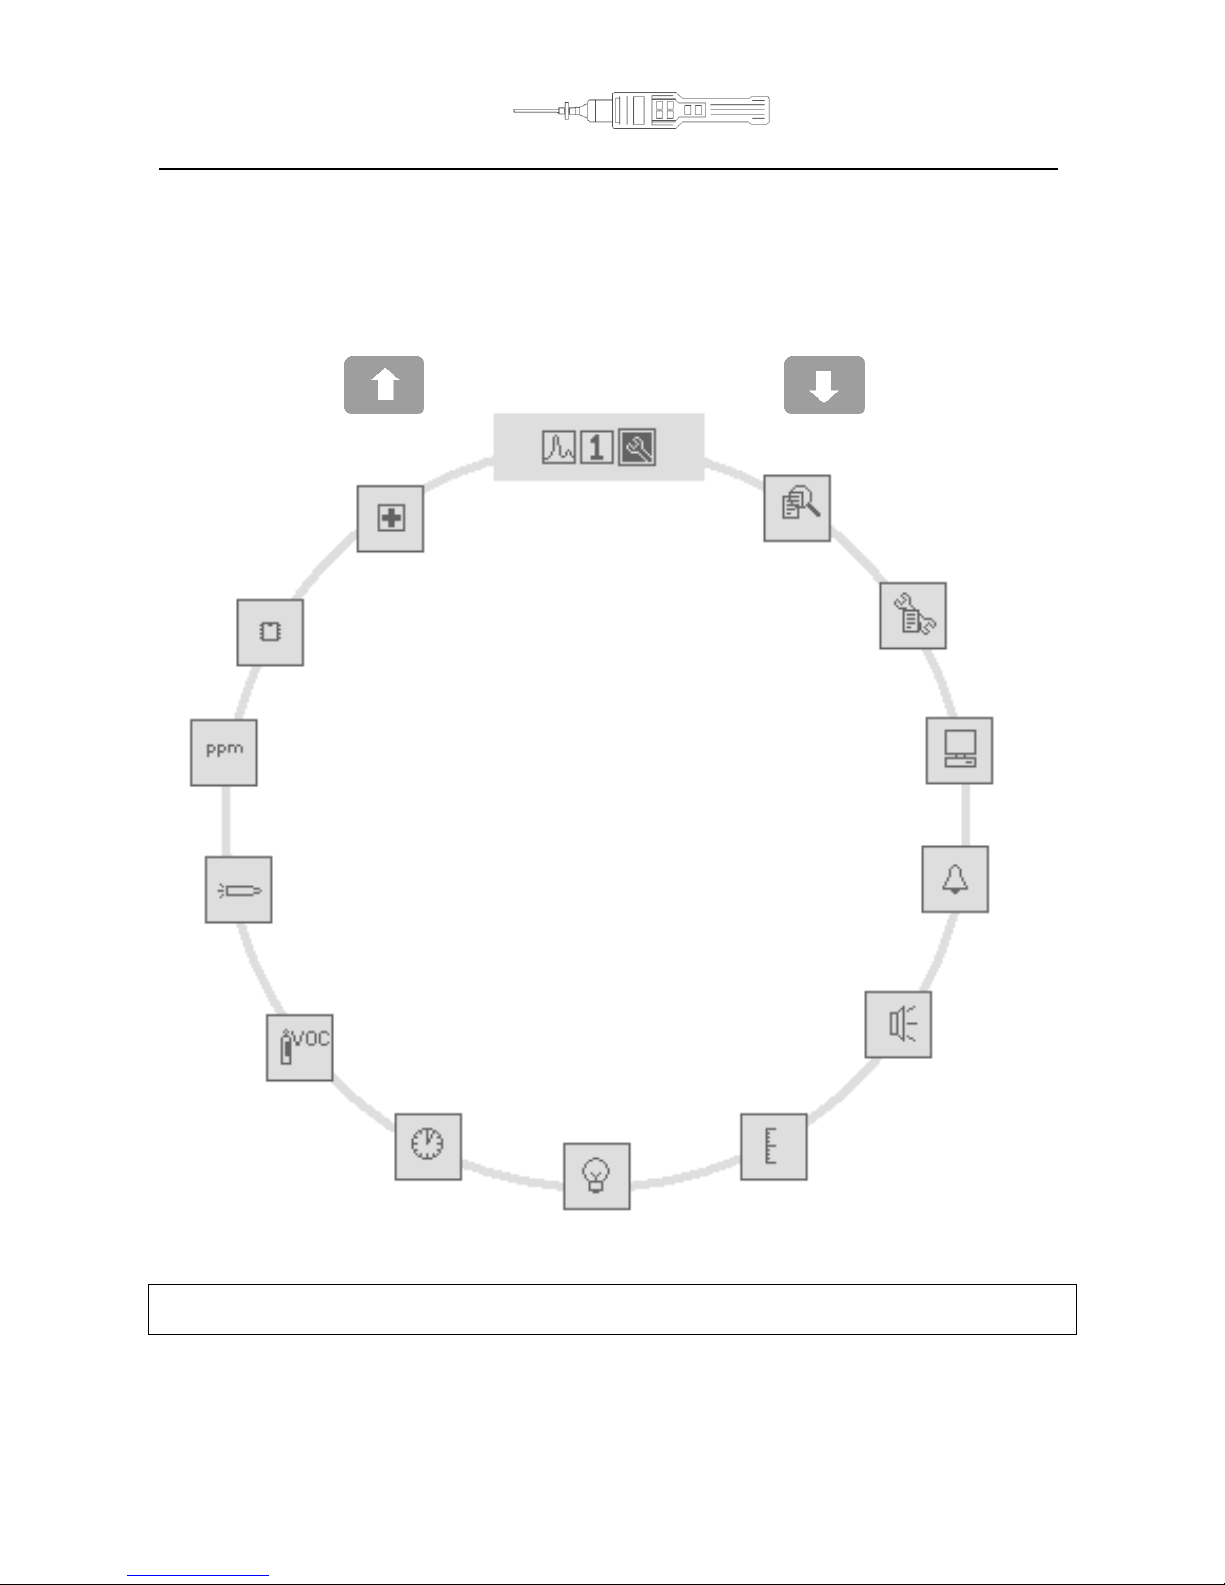
Function locations
From the DISPLAY/FUNCTION SELECTION screen highlight the function menu icon then press ENTER, use
the UP/DOWN keys to view the available functions then press ENTER to select the function options
LEL Gas Selection (P26)
Display/Function
Selection (P 12)
View Data (P 14)
Zone Maintenance (P 15)
PC Communication (P 15)
Alarm (P 16)
Calibration (P 16)
Back-light (P 18)
Date & Time (P 18)
Gas Selection (P 18)
PID Lamp (P 18)
Units (P 19)
Data Log Memory Alarm
(P 19)
Application mode -
H & S or Survey (P 19)
Sound (P 16)
Page 9
PhoCheck+ 1000, 2000, 3000 & 5000 Ex Ion Science Ltd
Page 9 of 41
Instrument Functions _____
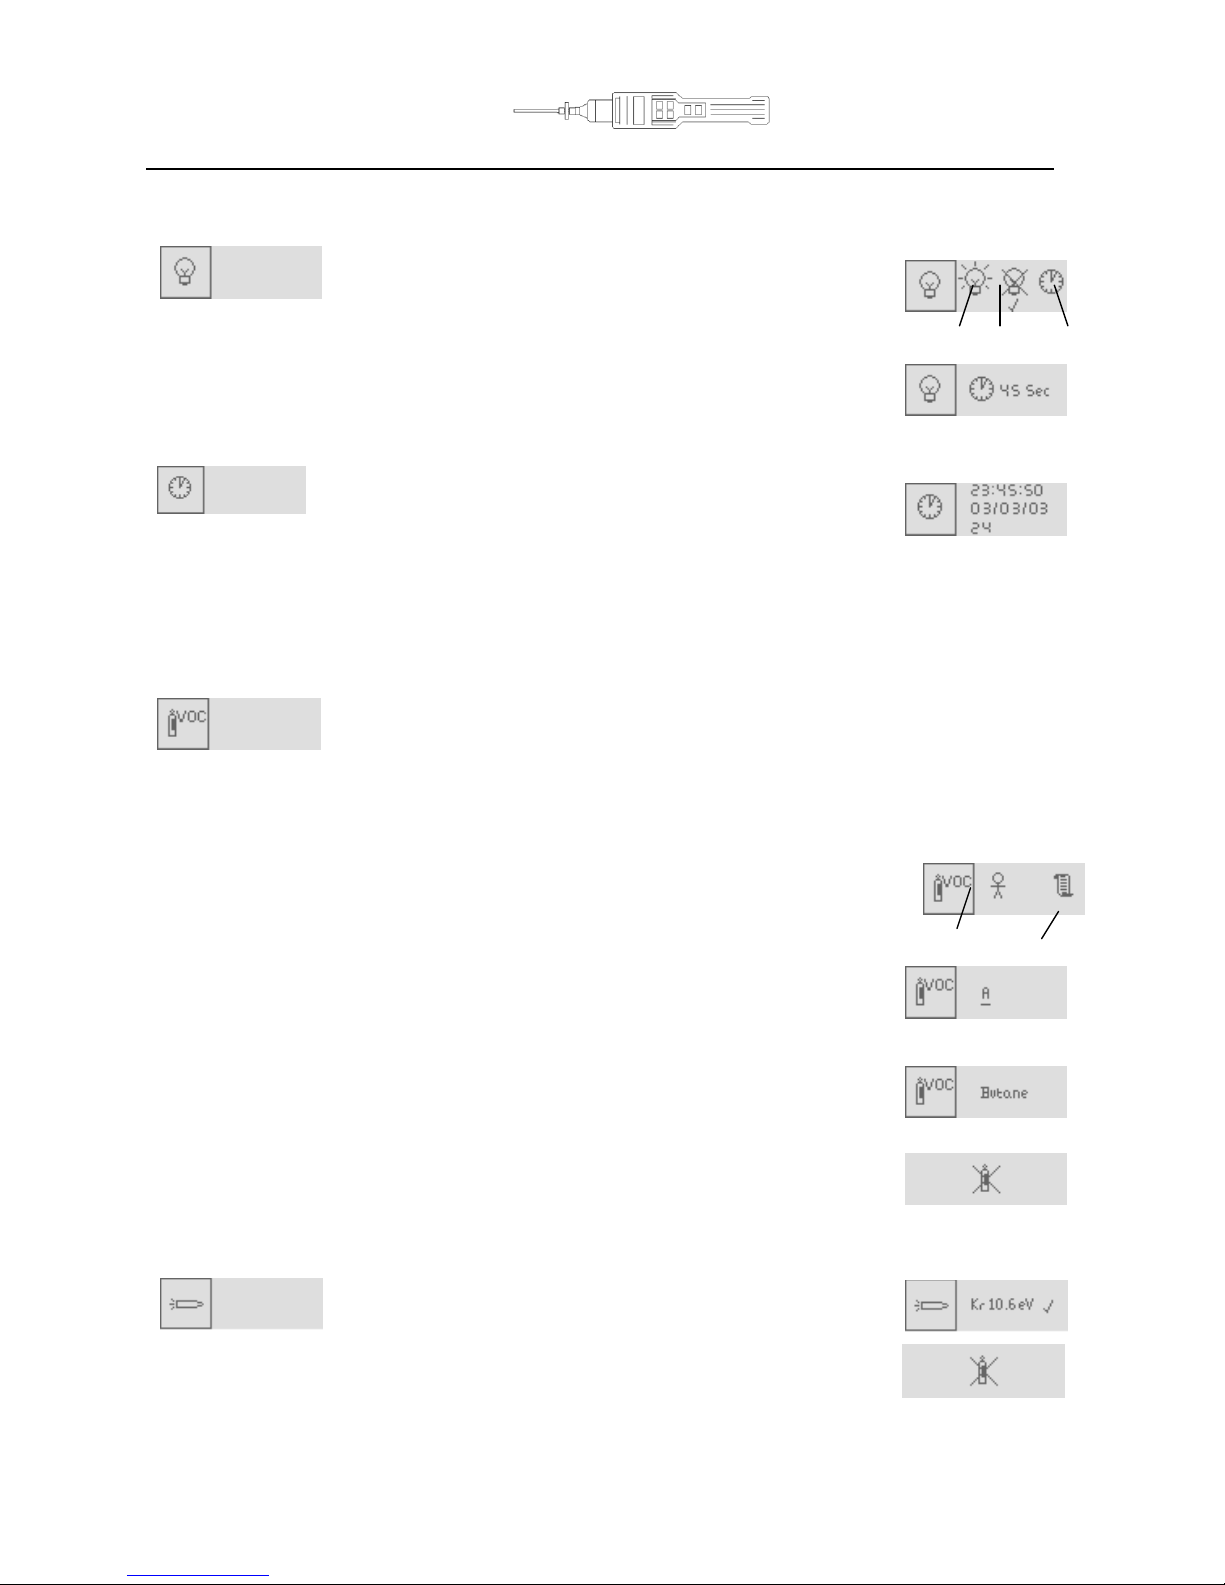
How the PhoCheck+ Menu Works
Once in the function menu with the function-symbol you require on the screen press
the ENTER key to select it. (See Figure 1.)
A cursor (highlighted symbol or number) can be moved from one selection
to another by using the UP and DOWN keys. (See Figure 2.) Pressing 'Enter'
will cause the selection to flash. When flashing use the UP and DOWN keys to adjust it.
When you have adjusted the parameter to an acceptable level press the ENTER key. The adjusted
parameter will be stored. In many cases a tick () will appear to confirm the action.
Although there is a variation in complexity of some functions, this basic concept of selection, adjustment and
confirmation is common throughout this instrument.
You can abort a selection by pressing the ESCAPE (Esc) key.
Fig 1
Fig 2
Page 10

PhoCheck+ 1000, 2000, 3000 & 5000 Ex Ion Science Ltd
Page 10 of 41
Quick Reference _____
This quick reference indicates which functions are relevant to which instruments.
Display/Function Selection (Page 12)
PhoCheck+1000, 2000, 3000, & 5000
Allows the user to view detected VOC levels in either graph or number
format and to adjust the instrument functions and parameters.
View Data (Page 14)
PhoCheck+2000, 3000 & 5000
Allows viewing of stored data in the instruments internal memory.
Zone Maintenance (Page 15)
PhoCheck+2000, 3000 & 5000
Allows the creation, selection and deletion of Zone names.
Data Transfer (Page 15)
PhoCheck+1000, 2000, 3000 & 5000
Enables data transfer between instrument and PC/laptop.
Alarm (Page 16)
PhoCheck+1000, 2000, 3000 & 5000
Allows the adjustment of upper and lower Alarm levels in survey mode.
Sound (Page 16)
PhoCheck+1000, 2000, 3000 & 5000
Allows the selection of audible indicators including a confidence beep.
Calibration (Page 16)
PhoCheck+1000, 2000, 3000 & 5000
Allows the selection of Factory or Custom calibration.
Page 11

PhoCheck+ 1000, 2000, 3000 & 5000 Ex Ion Science Ltd
Page 11 of 41
Quick Reference _____
Back-light (Page 18)
PhoCheck+1000, 2000, 3000 & 5000
Allows the selection of back-light options.
Date / Time (Page 18)
PhoCheck+2000, 3000 & 5000
Allows the adjustment of the date and time.
PID Gas Selection (Page 18)
PhoCheck+ 1000, 2000, 3000 & 5000
Allows the selection of gases from the internal gas table.
PID Lamp (Page 18)
PhoCheck+1000, 2000, 3000 & 5000
Allows the selection of different PID lamps.
Units (Page 19)
PhoCheck+1000, 2000, 3000 & 5000
Allows the selection of ppb, ppm or mg/m3 as measurement units.
Data log Memory Alarm (Page 19)
PhoCheck+2000, 3000, & 5000
Allows the setting of an alarm to warn the user when the data logging
memory is full.
Application (Page 19)
PhoCheck+3000 & 5000
Allows the selection of modes of operation, „Health and Safety‟ for STEL and
TWA monitoring or „Survey‟ for general use. The PhoCheck+ 1000 & 2000
instruments do not have Health & Safety mode as standard and are Survey
instruments only, however Health and Safety mode is an upgradeable
feature.
Page 12

PhoCheck+ 1000, 2000, 3000 & 5000 Ex Ion Science Ltd
Page 12 of 41
Instrument Display
Display/Function Selection Screen
The DISPLAY/FUNCTION SELECTION SCREEN or Top Menu is found by repeatedly pressing the ESCAPE
(Escape) key. The DISPLAY/FUNCTION SCREEN allows the user to switch between the graphical readings,
the digital readings and the Tools Menu. The symbols shown on this screen can be selected using the UP
and DOWN keys. The highlighted symbol appears as shown in the example below for the function menu.
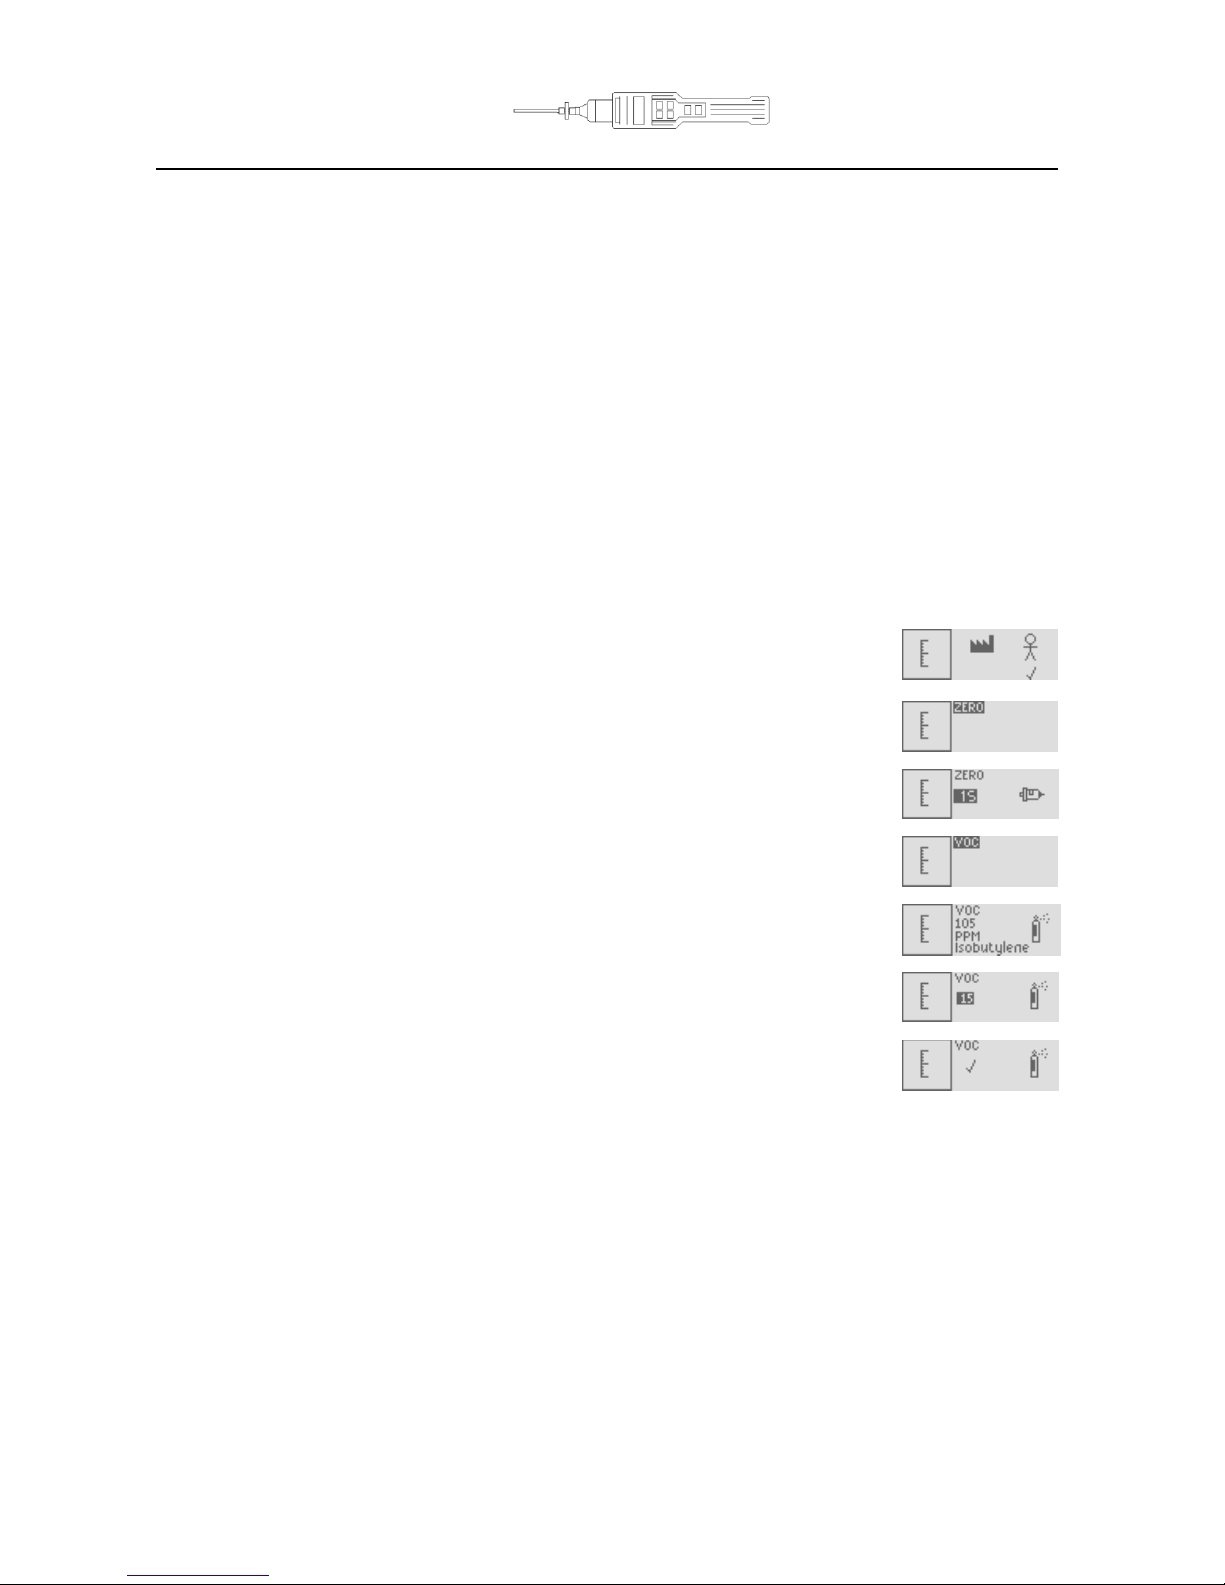
Instrument Symbols Explained
Symbols are used to indicate features in the menu. Please see an explanation of each below.
Bump Test
This symbol of a gas bottle can be set via the IonPC software to be displayed once a week when the
instrument is turned on. This is to remind the user to test the instrument responded accurately when it is
supplied with gas. See page 20of the software section for more information.
Battery Status
The battery status indicator can be accessed by pressing and holding on the graphical and the digital
displays.
Peak Hold
The number to the right of this symbol indicates the highest gas concentration reached by the instrument
since being switched ON. This PEAK reading can be reset by pressing and holding the ENTER key for 5
seconds.
Background Zero Reference
When in SURVEY mode pressing the ZERO key alternates
between RELATIVES and ABSOLUTE modes. There is always
some volatile gas in ambient air, which is detectable with
PhoCheck+. ABSOLUTE mode displays the entire sensor signal.
RELATIVE mode REMOVES the ambient signal and sets the
ZERO point at an artificial level.
Graph Screen
Large Number Screen
Function menu
Charged
Discharged
Relative
Absolute
Page 13

PhoCheck+ 1000, 2000, 3000 & 5000 Ex Ion Science Ltd
Page 13 of 41
Instrument Displays _____
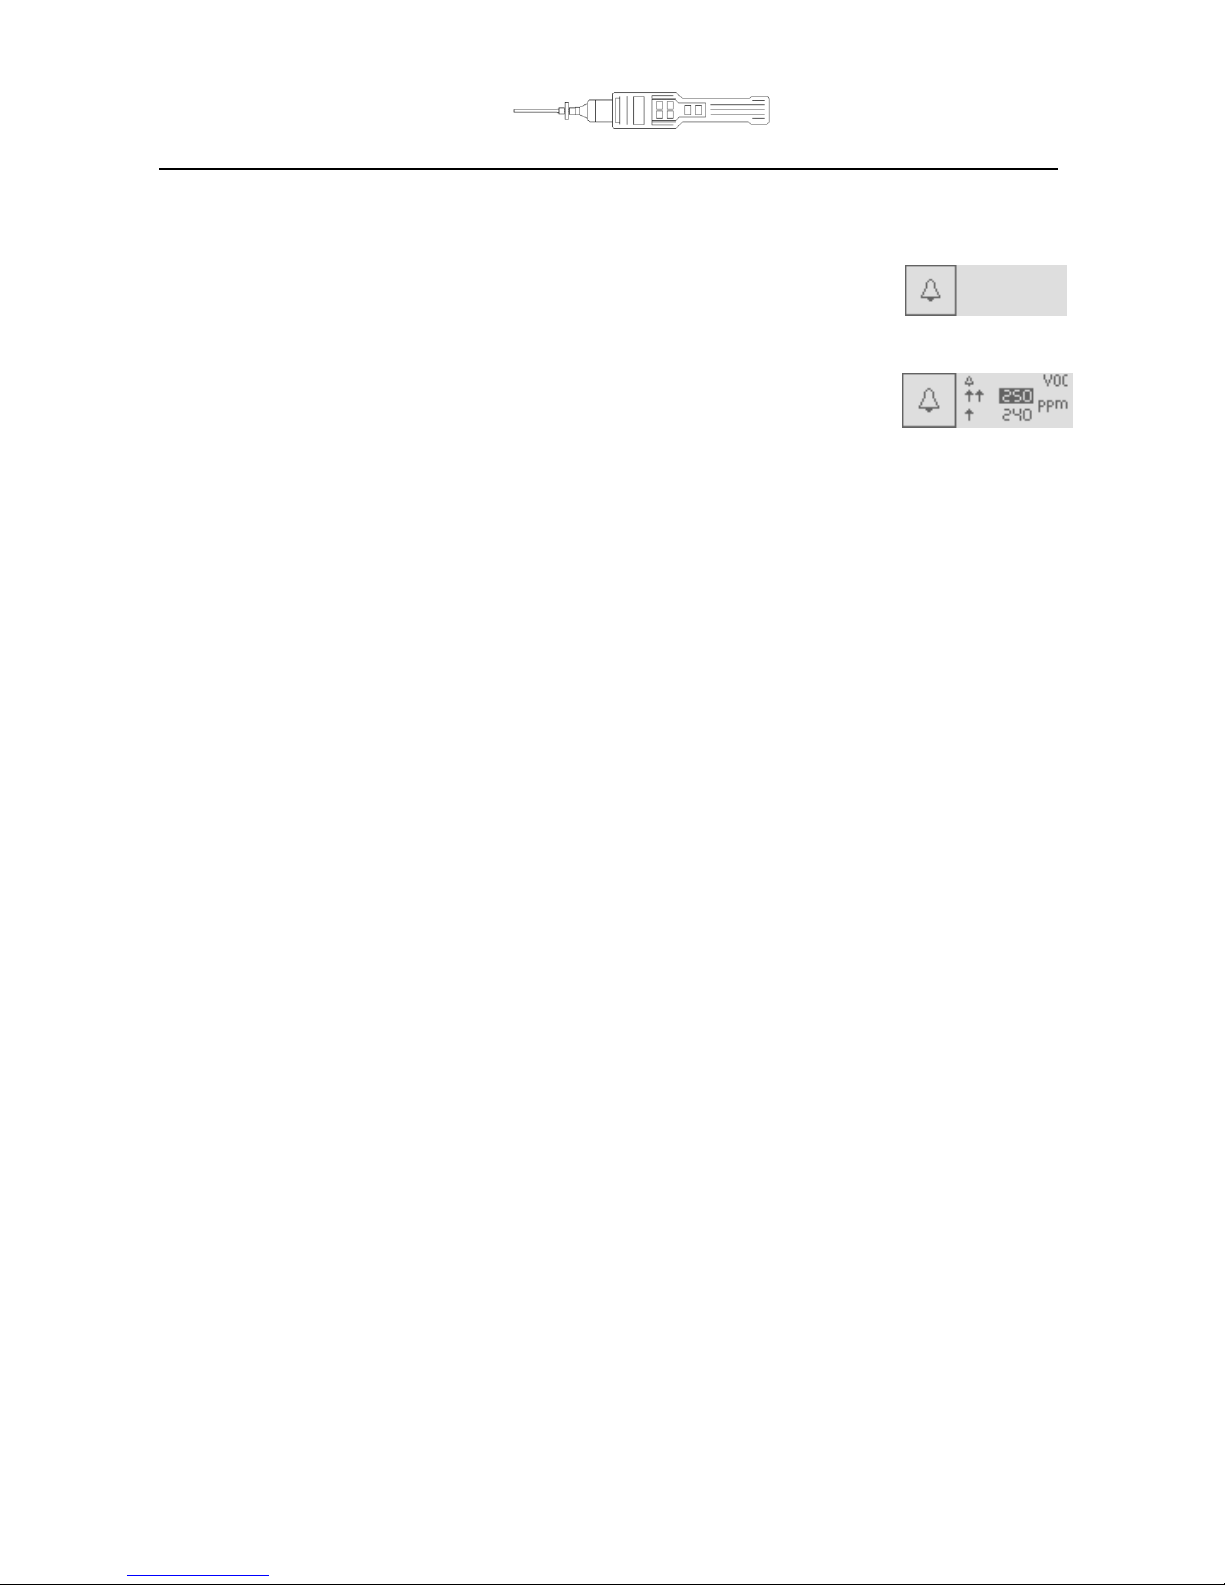
Alarm arrows
The arrows represent the importance level of the alarm. The single arrow represents the lower alarm and
the two arrows represent the upper alarm.
Application (PhoCheck+ 3000 & 5000)
When the symbol is present the instrument is in HEALTH & SAFETY mode. When it is absent the instrument reverts
to SURVEY mode. Please see Application section of this manual for more information (page 19).
Display Screens Explained (PhoCheck+ 1000, 2000, 3000 & 5000)
Graphical Display
Allows the viewing of real-time measurements in graph format
relative to the set alarm levels.
When in SURVEY mode the type of gas being
detected, the measured units, the peak hold and real-time
readings are also displayed.
Additional information such as alarm levels and battery status
can be viewed by pressing and holding the ENTER key.
When in HEALTH & SAFETY mode (see page 19) the on screen information is slightly
different as STEL and TWA calculations are displayed in figures and the graph
remains in real time. Again additional information can be viewed by pressing and
holding the ENTER Key.
Digital Display
Enables the viewing of real time measurements in large numerical format for easy
viewing in varied light conditions.
Additional information such as alarm levels, battery status and a
peak hold reading can be viewed by pressing and holding the ENTER
key.
When in HEALTH & SAFETY mode the STEL and TWA alarm
levels and calculated values are shown when holding the ENTER key. (PhoCheck 3000
& 5000)
Function Menu
Once selected use the UP and DOWN keys to highlight the function you require and
press ENTER to select. Many features can be adjusted in this section including gas
selection, zone maintenance, data transfer and alarm levels. Details of these and
other functions are to be found from page 12.
Indicates that 'Health & Safety' mode is selected
Upper and lower
alarm levels
Function menu
Page 14

PhoCheck+ 1000, 2000, 3000 & 5000 Ex Ion Science Ltd
Page 14 of 41
Zone
Instrument Menu _____
In the Tools Menu use the UP and DOWN keys to find the function you require. To select the function, press
the ENTER key.
Data Logging, Zones & Files (PhoCheck+ 2000, 3000 & 5000)
PhoCheck+ automatically data log the instruments readings every second. These readings are stored in the
instrument's memory with a date and time stamp. The instrument has been designed to continuously store
data; once the memory has reached its full capacity (8 Mb) it will automatically begin to overwrite previous
readings. An alarm can be set (see page 16) to inform the user that this is due to happen, giving time to
download any data that may be over written.
Stored data can be viewed on the PhoCheck+ instrument or it can be downloaded to a PC for analysis and
to be archived. Ion Science recommends downloading saved readings once a week.
In some applications readings need to be recorded in many different locations leading to many hundreds of
stored files. PhoCheck+ was designed with these requirements in mind and has the facility to store files into
ZONES. The PhoCheck+ has a default Zone called Zone 0 (which can not be deleted), unless specified all
readings will automatically be stored under this Zone. The PhoCheck+ has an additional 199 Zones which
the user can name themselves, either direct via the instrument or by using the IonPC software.
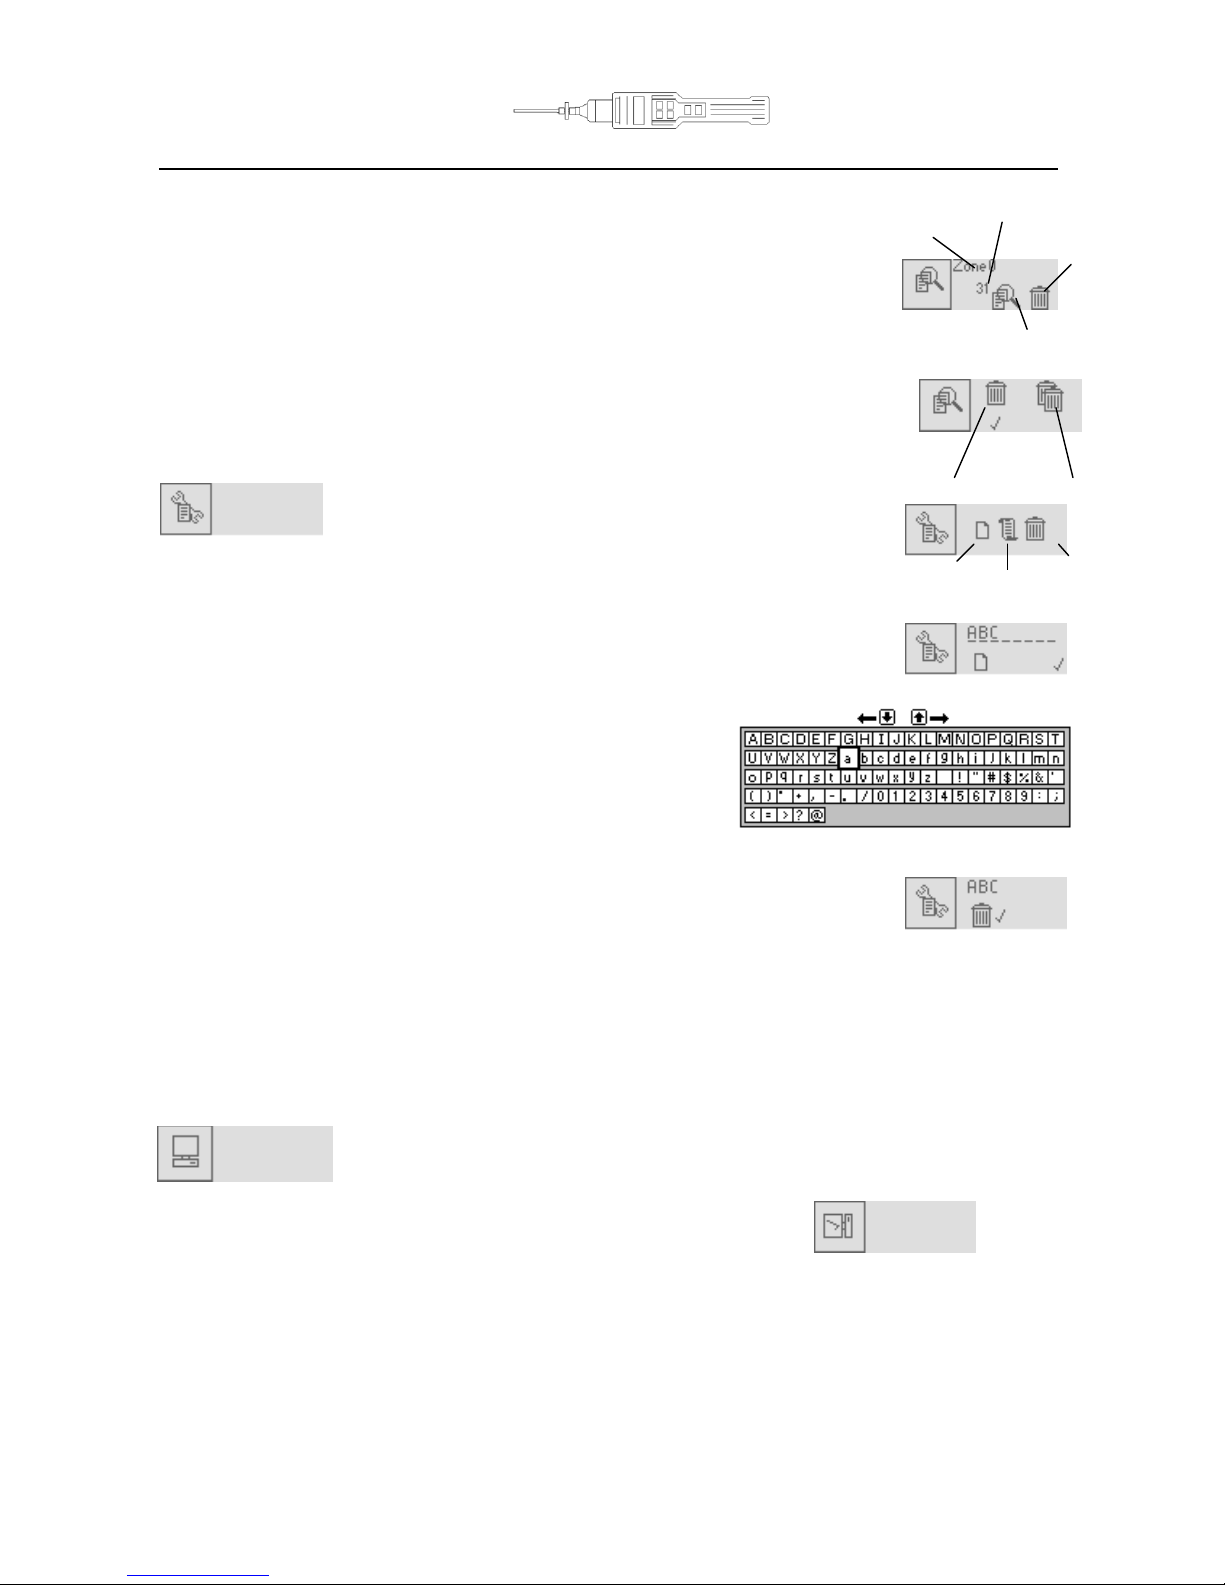
View Data (PhoCheck+ 2000, 3000 & 5000)
This function allows the stored data to be viewed or deleted
First select the Zone of interest by moving the cursor using the
UP and DOWN keys, press ENTER to select it.
Then select the required File in the same way. Now select the View Data symbol,
this will show the first reading logged with a date and time stamp
and the number of logged readings within the selected file.
To view the stored data in a graphical form press the ENTER key.
A graph representing the stored readings within the selected file
will be displayed.
The flashing cursor can be moved along the graph
to a reading of interest.
When the cursor stops the reading will be displayed in the units selected,
press the ENTER key to see the date and time stamp of that reading if required.
The Alarm Indicator dotted line is present on a graph to show that this is the exact
point at which an alarm was set off. The instrument will continue to alarm until the
alarm is acknowledged by the user by pressing the ENTER key, this is shown on the
graph as a dashed line (Alarm acknowledgement).
Delete
Date/Time
Number of logged
readings
Reading
Alarm Indicator
Cursor
View Data
File
Page 15
PhoCheck+ 1000, 2000, 3000 & 5000 Ex Ion Science Ltd
Page 15 of 41
Instrument Menu _____
Deleting a File (PhoCheck+ 2000, 3000 & 5000)
Should you wish to delete a File, select the Zone and file to be deleted
as if you were about to view the data. Now select the delete symbol
(Trash can) in the View Data screen. Options are given to delete the
currently selected File or All Files.
WARNING: Selecting All Files will delete all files stored in all Zones.
A tick '' confirms the function has been carried out.
Zone Maintenance ( PhoCheck+ 2000, 3000 & 5000)
Zones can be created, selected or deleted in this
function. Select the NEW symbol to create a
new zone name, the LIST symbol to select an
existing ZONE and the Delete symbol to delete an existing
zone name.
Selecting the NEW symbol allows the creation of Zone names made
up of 8 characters consisting of letters, numbers and symbols. Use
the up and down keys to choose the characters and press enter
to confirm your selection. Letter order on the instrument is
shown on the right, the highlighted A is the start letter.
Selecting the LIST symbol allows you to view existing Zone
names, and to select the zone under which you wish to save
data.
Selecting the DELETE symbol allows the previously created Zone names to be
deleted. A tick '' confirms a Zone has been deleted.
Please note that when deleting a zone all data saved under this zone will be deleted. If you wish to keep the
data ensure you download it to a PC before it is deleted. Zones can also be added, edited and deleted via
the IonPC software.
PC Communication (PhoCheck+ 1000, 2000, 3000 & 5000)
When this menu option is selected the instrument is ready to communicate with a PC.
To begin communication between the instrument and the computer
select the Data Transfer option. When the instrument is
communicating with a PC a '' will be displayed in the data transfer
symbol and when not communicating an X will be shown. Place the instrument on its side with its infrared
window a few inches from the PC's IRDA . To exit the data transfer option press the ESC key.
Single File All Files
New List Delete
Zone
Delete
File
Page 16

PhoCheck+ 1000, 2000, 3000 & 5000 Ex Ion Science Ltd
Page 16 of 41
Instrument Menu
Alarm (PhoCheck+ 1000, 2000, 3000 & 5000)
When in SURVEY mode, upper and lower alarm
levels can be set by the user to indicate particular
levels of detection specific to their needs.
Both alarms give an audible and visible output (flashing LED) but with increased urgency with the upper
alarm. An alarm state indicates that PhoCheck+ has detected the user set alarm level which has been
exceeded. The alarm will continue to sound and flash until the user acknowledges the alarm by pressing
ENTER. Please note that it is the user’s responsibility to respond appropriately to an alarm
condition.
Upper and lower alarm levels in survey mode are simple to set via the instrument. Use the up and down keys
to select the Alarm graphic in the function menu and press Enter. Then select the alarm you wish to adjust
(Upper or Lower), press enter again then use the up and down keys to change the alarm setting. These
alarms can also be easily adjusted on a PC via the Gas Table in the IonPC software. Please note that for
safety reasons the lower alarm cannot be set above the upper alarm and the upper alarm cannot be set
below the lower alarm.
When in Health and Safety mode, alarms are triggered by STEL and TWA alarm levels pre-programmed
into the instrument‟s gas table. An Alarm in Health & Safety mode indicates the user has been exposed to
levels exceeding those set within the gas table. When PhoCheck+ alarms in Health and Safety mode, the
relevant TWA or STEL figure shown on the display will flash. These values cannot be changed either via the
instrument or the IonPC software.
Sound (PhoCheck+ 1000, 2000, 3000 & 5000)
Audible outputs can be selected to indicate
functions. When Signal is selected, the rate at
which the instrument BEEPS increases with the detected gas. When Confidence is selected the instrument
BEEPS every few seconds to indicate it is functioning. This feature can be useful if the instrument is out of
sight. When Key is selected the instrument BEEPS when a key on the keypad is pressed. Alarm can only be
adjusted using the IonPC software to avoid the accidental switch off.
Calibration (PhoCheck+ 1000, 2000, 3000 & 5000)
'Factory calibration' is set by Ion Science during
instrument manufacture. 'Custom calibration' can be
set by the instrument user.
General description
Due to the linear output of the Ion Science PID detector , PhoCheck+ instruments only require a two-point
calibration. The PhoCheck+ scales its linear output across a ZERO level (clean air reference) and the SPAN (a
user defined gas concentration).
Factory Calibration
'Factory' calibration offers a safe set of calibration data. This should be used if the custom calibration fails
and will keep the unit working until a good custom calibration is completed.
ION Science recommends an annual service and calibration for users who require a traceable calibration.
During this service the lamp and detector is brought back to factory specifications and new Factory
Calibration data is stored.
Factory Custom
Signal Confidence Key Alarm
Page 17
PhoCheck+ 1000, 2000, 3000 & 5000 Ex Ion Science Ltd
Page 17 of 41
Instrument Menu _____
Calibration (continued)
Custom calibration
For increased accuracy you can perform a Custom Calibration. You will need a cylinder of calibration gas and
a regulator. 100ppm Isobutylene calibration gas at a flow rate above 250ml/min. PhoCheck+ allows you to
custom calibrate using any gas from the Gas Table and any concentration from 10ppm. Use the IonPC
software to adjust the desired gas and concentration.
Custom Calibration Procedure
Have a cylinder of gas, regulator and zero carbon filter on hand before starting this procedure. The LAMP
calibration is only really necessary if the instrument is to be used for ppb applications on PhoCheck 5000.
Custom Calibration Procedure
Please ensure you are familiar with this entire calibration procedure before attempting to calibrate the
PhoCheck+ instrument.
Note: The calibration of the PhoCheck+ instrument must be carried out in a clean air environment. Ensure
all parts of the calibration kit are available and ready for use.
1. Select Custom Calibration procedure – a tick '' will appear to confirm the
selection. Pressing Enter allows the user to enter the Custom calibration
menu.
2. Scroll down and select the flashing ZERO
3. Remove the caps from both ends of the carbon canister included in the Cal Kit
Sample supplied with your PhoCheck+, remove the probe and filter from the
instrument and fit the carbon canister. Alternatively a known clean air supply can
be used. Note – the carbon canister simply pushes onto end fitting - do not force
and no turning is required.
4. Press the Enter key to start the ZERO process. A counter will count down showing
how long the canister needs to remain connected.
5. At the end of the count down a tick '' will appear, indicating that the Zero has
been accepted. Press Escape.
6. Disconnect the carbon canister and replace the cap ends. The useful life of the
carbon canister will be shortened if the canister is open to atmosphere for
prolonged periods.
7. Scroll down and select the flashing VOC.
8. The next screen shows the gas and gas concentration you have previously set up
via the IonPC software. Select Enter.
9. A screen will show VOC, a gas bottle and a flashing highlighted number.
10. Present the instrument with the calibration gas and press enter, the number will
begin to count down showing how long the instrument needs to be presented
with the gas. A tick '' will appear indicating that the calibration has been
accepted. Escape out of the calibration menu.
11. Now replace the instruments filter and probe ready for use.
12. Carry out a Bump Test to ensure calibration was successful. Instrument is now
ready for use.
If you are not successful in calibrating the instrument check the following points:-
The carbon canister may be contaminated
The calibration gas may be low or empty
If using a connector pipe there may be a kink restricting the flow of gas
PID lamp may require cleaning
PID lamp may need replacing
1.
2.
4.
7.
8.
9.
10.
Page 18
PhoCheck+ 1000, 2000, 3000 & 5000 Ex Ion Science Ltd
Page 18 of 41
Instrument Menu
Back-light (PhoCheck+1000, 2000, 3000 & 5000)
The instrument display can be illuminated when in low light
conditions. When On is selected the back-light is on when ever
the instrument is switched on. When Off is selected the back-light is permanently off.
When Timed is selected the back-light illuminates for a pre-set time after every key
press. When timed is selected pressing enter allows the user to adjust the on time
from 1 to 60 seconds. This menu options is also available on the IONpc software.
Date / Time (PhoCheck+2000, 3000 & 5000)
The Date / Time function allows the adjustment of the time and
date used within the PhoCheck+ internal clock. The internal
clock is used for the data logging date / time stamp. When readings are being stored
for download and future use and record keeping ensure that the clock and date are accurately set.
The 12/24 hour time format is also adjustable. Ion Science recommends that you set your date and time
before using your instrument for the first time. This menu options is also available on the IONpc software.
PID Gas Selection (PhoCheck+1000, 2000, 3000 & 5000)
The PhoCheck+ photo ionisation detector (PID) is non-selective. Although
many VOC gases are detectable, the PhoCheck+ PID cannot differentiate
between the gases. When you select the VOC gas you wish to measure from the PhoCheck+ internal
gas list, the instrument will calculate the equivalent level for that selected gas against an isobutylene
calibration. Please note that there may be other detectable gases present that may effect the
measurement.
Custom offers a quick route to the last 10 selected gases. When selected, use the UP
and DOWN keys to change the gas then press ENTER to select.
List allows selection of any gas from within the gas table held in the PhoCheck+
memory.
After selecting the List symbol, select the first letter of the gas you wish to select and
press ENTER. The PhoCheck+ will then list all gases starting with that letter. WMD
gases are prefixed with the letters WMD.
Alarm levels that are set in the Gas table will be automatically selected. Should a gas be
selected that is not compatible with the selected lamp the following symbol will appear
to highlight the incompatibility.
PID Lamp (PhoCheck+1000, 2000, 3000 & 5000)
An alternative lamp to the Krypton 10.6eV (standard) can be
purchased, fitted and selected. A tick '' confirms the selection.
Should a Lamp be selected that is not compatible with the selected
gas the following symbol will appear to highlight the incompatibility. This menu
option is also available on the IONpc software.
Custom List
On Off Timed
Page 19

PhoCheck+ 1000, 2000, 3000 & 5000 Ex Ion Science Ltd
Page 19 of 41
Instrument Menu
Unit Selector (PhoCheck+1000, 2000, 3000 & 5000)
The PhoCheck+ photoionisation detector can be selected to
measure VOC's in either ppm (Parts per million, by volume),
ppb (Parts per billion) or mg/m
3
(Milligrams per cubic meter).
NB: the ppb option is available on the PhoCheck+ 5000 and is upgradeable on the 1, 2 and 3000 versions.
This menu option is also available on the IONpc software.
Data Log Memory Alarm (PhoCheck+2000, 3000 & 5000)
PhoCheck+ has been designed to continuously store data. Once
the memory has reached its full capacity (8 Mb) it will
automatically begin to over write previous readings. An alarm can be set to inform the user that this is due
to happen giving the user time to download any data that may be over written if they wish to do so. This
menu option is also available on the IONpc software.
Application - Survey Mode (PhoCheck+1000, 2000, 3000 & 5000)
SURVEY is the default mode of operation whenever the HEALTH & SAFETY mode is NOT selected. All
functions can be adjusted or selected in this mode unless the SECURITY mode is set via the IonPC software.
SURVEY mode is often used in applications where several areas (or Zones) can be monitored and readings
data logged. Saved data can then be downloaded to a PC for long-term storage and review. High and low
alarm levels can be set.
Application - Health & Safety Mode (PhoCheck+3000 & 5000)
Modes of operation are selected to suit how the instrument is
being used. Health & Safety mode is used to check for
conformity of short-term exposure levels (STEL) or time-weighted averages (TWA)
that are specific for particular hazardous environments (for example EH40 in the UK
and OSHA in the USA). In this mode of operation STEL‟s and TWA‟s are continually
calculated and compared to levels set in the instruments gas table. You can not
adjust settings or parameters of the instrument while in Health & Safety mode as
these could effect the ongoing calculations. Should you want to proceed with an
adjustment a WARNING screen will appear. You have the option to continue with
the adjustment by pressing Enter or abort and continue monitoring by pressing the
ESC key. Continuing with the adjustment will reset the instrument, calculations will
begin again from 0 once back in Health & Safety mode.
Security
When the PhoCheck+ is connected to a PC via the PhoCheck+ software package (see page 20), the
instrument can be locked in the Menu Settings area of the software package. This facility allows the
instrument to be set-up by a qualified or competent person. locked and then handed to an operator for use.
When in secure mode the PhoCheck+ functionality cannot be changed or adjusted. The user can only view
the display screens and switch the instrument On and Off.
When selected
Page 20

PhoCheck+ 1000, 2000, 3000 & 5000 Ex Ion Science Ltd
Page 20 of 41
IonPC Software _____
PC Requirements
IonPC Software must be used in conjunction with a PC/laptop using Windows XP. An IRDA port is required
for communication with the instrument. Many laptops are supplied with this facility. Alternatively IRDA
modules can be purchased from most computer retailers for use with your instrument. Before connecting
your PhoCheck+ to a PC for the first time, confirm that the PC‟s IRDA works correctly with another devise.
Installation of IonPC Software
1. Insert Ion Science software CD into your CD rom drive
2. The CD will automatically start up
3. Click on the Download Software button
4. The IonPC setup wizard will start.
7. Follow the instructions on screen.
8. The installer will automatically create a folder in your C drive to save IonPC into if you do not want
to save it there Browse for the location you would like it to be saved in and click Next
9. Select Next again and on to install the software
10. The software will take a few seconds to install then click Finished
11. You will now be able to open your IonPC software from the Icon on your desk top or from your Start
Menu/Programs/IonPC
Connecting PhoCheck+ with a PC
Switch on your PhoCheck+ instrument, enter the function menu and select the Data Transfer symbol by pressing
the enter key. When communicating with a computer the PhoCheck+ displays a '' within the data transfer
symbol. When not communicating an X will appear.
Place the PhoCheck+ on its side with the instruments infrared window a few
inches from the PC IRDA, then start the IonPC software.
Starting IonPC Software
Start the IonPC software either from your desktop via the shortcut or from the Start menu/Programs/Ion PC.
The instrument has 8Mb of memory, which is divided into 1Mb segments. When a segment becomes full,
data is then stored in the next segment.
Each time the user starts data logging, a new file is created. So, for example, six data logging sessions will
create six data files.
When a data logging session records data which spans across two or more 1Mb segments, a corresponding
number of files will be created and stored within the instrument and will apply to that particular data logging
session only. So, for example, two 1Mb segments spanned will result in two files created.
When the data is to be downloaded via the IonPC software, any files that have spanned two or more 1Mb
segments (i.e. two or more files) will be recognised and downloaded as a single file.
Page 21

PhoCheck+ 1000, 2000, 3000 & 5000 Ex Ion Science Ltd
Page 21 of 41
IonPC Software
IonPC software has many features allowing the transfer for data and function specifications to and from the
instrument and the PC.
Downloading data logged readings
PhoCheck+ should always be presented to the IRDA
port before the IonPC software is run.
When the software is opened like this it will immediately
begin communicating with the instrument and will give
you the option to download data logged readings, as
shown here.
Select FINISHED if you do not wish to download the data.
If you do wish to download data, highlight the files you
require, and then select Download data. The screen on the right
will appear.
The data will then download from your PhoCheck+ to your
PC in numerical and graph format. Once the download is
complete select Finished. You then have the ability to zoom in
on the graph data for a closer look by double clicking anywhere
on the graph. You can also store the data for future reference.
Page 22

PhoCheck+ 1000, 2000, 3000 & 5000 Ex Ion Science Ltd
Page 22 of 41
IonPC Software
File
Allows the printing of files downloaded from your PhoCheck+
instrument.
Calibration
Refers to the CUSTOM calibration of PhoCheck+. Enables the
download of calibration data from the instrument to a PC, the
erasing of the Custom calibration settings, the opening of
previously saved calibration settings and the adjustment of the
CUSTOM Calibration Setup.
Calibration Setup
The gas table provided with the software will be shown. However if you wish to use a different gas
table previous selections will be shown on the drop down menu; or click BROWSE and search for and
select the table you require.
You can now choose to set up your Custom calibration to your specific gas and concentration
requirements. Click APPLY to send your specifications to the instrument. You are now ready to
calibrate your PhoCheck+, see page 16for details. The greyed out areas apply to the FirstCheck
software, required if you upgrade your instrument.
Data
Data logged information can be cleared from your instrument or downloaded from
the instrument to your PC. Once downloaded to your PC files can be saved for future
reference and exported as CSV files.
Page 23

PhoCheck+ 1000, 2000, 3000 & 5000 Ex Ion Science Ltd
Page 23 of 41
IonPC Software
Gas Table (including setting alarm levels)
Select a gas table stored in the PhoCheck+ directory. You are able to modify this
table and then download it to your instrument. If you wish to add new gases to the
table ensure you use the next available line, leaving no spaces as shown below.
Upper and lower alarm levels in Survey mode can be adjusted via the gas table.
Type the desired alarm level in the appropriate column (either high or low alarm)
against the gas you wish to change. Use the tick boxes beside each gas to select /
deselect the gases to be downloaded to your PhoCheck+ then select SEND TO
INSTRUMENT from the dropdown menu shown above.
Always save modified gas tables under a different file name, keeping the original complete.
Instrument
Instrument details such as serial number and data logged memory used can be
downloaded from your PhoCheck+ to your PC. Instrument upgrade allows the
upgrade of your instrument to other PhoCheck+ variants once you have
purchased the pass code from ISL. Firmware upgrade allows you to upgrade your
actual instrument software directly should an upgrade be made available. 'Menu
Set-up' allows you to change PhoCheck+ settings from your PC. These settings can be saved for future use.
Menu Set-up
Adjustable features found on your PhoCheck+ instrument can also be changed via your PC along with some
additional features. These features can be adjusted and then downloaded to your instrument by selecting Apply.
Page 24

PhoCheck+ 1000, 2000, 3000 & 5000 Ex Ion Science Ltd
Page 24 of 41
IonPC Software
Settings
Within this tab there are a number of additional
features including the clock (24 hr or 12 hr), sound
controls on signal, confidence (a beep sounds every
15 seconds), on key press and on alarm. When
selected the Enable Bump Test sets the instrument to
show a gas bottle image once a week when the
instrument is turned on as a reminder to test the
instruments response. Memory full alarm will ensure
an alarm sounds if the PhoCheck+ data log memory
is full to enable you to download the data or continue
and overwrite previously saved data. Cycle screen is
blocked out as this is an upgrade feature on the
FirstCheck.
Lamp
Enables the selection of different lamp types you may
have purchased to use with your instrument.
Application
Enables the selection and de-selection of Health & Safety
mode and the selection of ppm, ppb or mg/m3. In Health &
Safety mode STEL and TWA timings can be adjusted to
reflect the changes in legislation between the US and
Europe.
The instrument can be set to security mode which enables
the locking of the user interface so that the instrument functions can not be changed manually. To de-select
security mode, switch the instrument Off then On, you then have 2 minutes from 'switch on' to connect your
instrument to a PC and select Instrument / Menu set up. This will automatically place your instrument in PC
mode ready for download or further adjustment.
VOC smoothing relates to the PID reading and is used to have a dampening affect on the measurements for
high gain factor gases. In effect increasing the T90 time to create a smoother graph. This affect can only be
applied when in SURVEY mode it does not apply in Heath & Safety.
Page 25

PhoCheck+ 1000, 2000, 3000 & 5000 Ex Ion Science Ltd
Page 25 of 41
IonPC Software
Backlight
Gives you the option of turning the back light
on or off permanently or setting it on a timer
after every key press.
Clock
Set the instruments clock and date for the purposes of
data logging. Either set it manually or if your PC clock is
correct you can simply set your instrument to the same
time as your PC clock.
File
Allows you to save the settings you have created to your
PC for future use. It also enables you to open previously
saved settings to then download to your instrument.
Page 26

PhoCheck+ 1000, 2000, 3000 & 5000 Ex Ion Science Ltd
Page 26 of 41
IonPC Software
Calibration
The calibration settings can also be adjusted under the Menu Settings and it is the same layout as described
on page 16.
Once you have selected all of your settings you can either choose to APPLY them, which will download the
information straight to the instrument and leave the screen open, or select OK, and they will be transferred to
the instrument and the screen will close automatically.
Zones
Clear / Delete existing Zones from your instrument or
create new Zones for download to your PhoCheck+.
Please note data files stored within a Zone to be deleted
will be lost. Always download Data from your instrument
before deleting Zones.
View
Select or hide the IonPC software toolbar or status bar.
Help
Offer advice on the use of IonPC software.
Page 27

PhoCheck+ 1000, 2000, 3000 & 5000 Ex Ion Science Ltd
Page 27 of 41
IonPC Software _________________
Software Disclaimers
Termination of Software Licence
This License is effective until terminated. This License will terminate automatically without notice from Ion
Science Ltd if you fail to comply with any provision of this License. Upon termination, you agree to destroy,
delete or purge the written materials and all copies of the SOFTWARE, including modified copies, if any.
PhoCheck+ is a portable gas-detector suitable for the detection of; volatile organic compounds (VOC's) using
PID (Photo Ionisation Detection) technology.
Disclaimer of Warranty
The SOFTWARE and accompanying materials (including the user‟s manual) are provided “as is” without
warranty of any kind including the implied warranties of merchantability and fitness for a particular purpose,
even if Ion Science Ltd have been advised of that purpose. Furthermore Ion Science Ltd does not warrant,
guarantee, or make any representation regarding the use, or the results of the use, of the SOFTWARE or
written materials in terms of correctness, accuracy, reliability, current revision, or otherwise. Ion Science Ltd
specifically does not warrant the SOFTWARE after you assume operation. If the SOFTWARE or written
materials are defective, you and not Ion Science Ltd or its dealers, distributors, agents, or employees,
assume the entire risk and costs of all necessary servicing, repair, or correction, except as stated below.
Defective CD
As the only warranty under this Agreement, Ion Science Ltd warrants, to the original Licensee only, that the
CD(s) on which the software is recorded is free from defects in materials and workmanship under normal
use and service for a period of ninety (90) days from the date of delivery as evidenced by a copy of the
Receipt. This limitation will apply where allowed.
Replacement of Defective CD
Ion Science Ltd entire liability and the original Licensee‟s exclusive remedy under this agreement are at Ion
Science Ltd discretion, to either (a) return of payment as evidenced by a copy of the Receipt, or (b)
replacement of the disk that does not meet Ion Science Ltd limited warranty and which is returned to Ion
Science Ltd with a copy of the Receipt. If failure of the disk has resulted from accident, abuse, or
misapplication, Ion Science Ltd will have no responsibility to either replace the disk or refund payment. Any
replacement disk will be warranted for the remainder of the original warranty period or thirty (30) days,
whichever is longer. This warranty gives you limited, specific legal rights. You may have other rights in some
places.
No Right to Rely
No oral or written information or advice given by Ion Science Ltd, its dealers, distributors, agents or
employees will create a warranty or in any way increase the scope of Ion Science Ltd obligations under this
agreement, and you may not rely on any such information or advice.
Limitation of Liability
Ion Science Ltd will not be liable for any direct, indirect, consequential or incidental damages (including
damages for loss of business profits, business information, possibility of such damages). The above
limitation will apply where allowed under local laws.
Governing Law
The laws of the United Kingdom govern this Agreement.
Page 28

PhoCheck+ 1000, 2000, 3000 & 5000 Ex Ion Science Ltd
Page 28 of 41
Batteries
Note: Ion Science recommends keeping your PhoCheck+ on charge at all times when not in use, as
batteries can loose power over time. Loss of battery power can result in the instrument‟s charge indicator
showing a NON-CHARGING status when trying to charge the unit. If this occurs, leave the charger
connected for two minutes, then remove and reconnect the charger as soon the timer symbol disappears.
You will now see the instrument charge as normal.
WARNING:
For reasons of Intrinsic Safety, batteries MUST NOT be charged or replaced within potentially
flammable areas. Ensure you are in a SAFE area before carrying out any type of maintenance on your
PhoCheck+ instrument.
Non-rechargeable battery types to be used
For Intrinsic Safety of T4 rating and reduced risk of explosion you must only use Duracell Standard,
Procell Alkaline, Zinc Carbon R6, R6B, or R6PP batteries. DO NOT mix old / used batteries or batteries
from different manufacturers.
Rechargeable battery instruments*
Ensure rechargeable PhoCheck+ instruments are charged for at least 12 hours before using it for the
first time. To ensure optimum charging the charger should be attached to the PhoCheck+ when the
instrument is switched off. The instrument should be charged in a non hazardous environment only.
When the instrument is on charge the screen will display the instruments charging status.
When the battery power is very low the following symbol will appear.
*NB: Only use the charger supplied with your PhoCheck+ to charge your instrument.
Page 29
PhoCheck+ 1000, 2000, 3000 & 5000 Ex Ion Science Ltd
Page 29 of 41
Batteries
Replacement of Non-rechargeable batteries
1. Ensure the PhoCheck+ is switched Off.
2. Using the battery cover removal tool provided, remove
the battery cover at the rear of the instrument casing.
This reveals a set of 4 x AA cells contained in a
removable battery clip.
3. Remove the battery clip.
4. Replace the exhausted batteries using the
guidelines stated above.
5. Check all batteries have the correct polarity before
reconnecting the clip to the instrument.
WARNING: Fitting batteries or connecting the clip with the
wrong polarity may result in damage to the instrument!
NB: When loading batteries check for correct battery polarity before connecting them.
Removable
battery clip
Page 30

PhoCheck+ 1000, 2000, 3000 & 5000 Ex Ion Science Ltd
Page 30 of 41
Diagnostics
Basic faults or diagnostics are presented as symbols with a more detailed description of the fault
indicated by the number in the top right hand corner of the display. Should a fault occur correct the
issue and then press ENTER or ESC to clear the fault message.
General fault
1. Main PCB failure.
Return the instrument to manufacturer.
Pump
1. Pump failure
Check the probe, filter and cell cap are fitted.
If the error persists return the instrument to the manufacturer.
2 & 3. Sample gas flow is low.
Check the probe and filter for signs of blockage.
if the fault persists send the instrument to your distributor for service.
Remove the lamp and blow out the detector with a can of computer
duster.
Battery
Battery is low or:
1. Not charging.
Check charger is connected and switched ON at supply.
2. Slow charge current is low.
Check the battery settings.
3. Slow charge current is high.
Disconnect the charger immediately and contact ISL.
4. Fast charge current is low
Check the battery settings.
5. Fast charge current is high.
Disconnect the charger immediately and contact ISL.
With all battery related faults, if the fault persists send the instrument to
your distributor for service.
Sensor
1. Detector fuse has blown.
If the error persists return the instrument to the manufacturer.
2. dirty detector cell
If the PhoCheck+ is used without its filter or filters are not replaced on a
regular basis, particles of dust or dirt can cause a range of effects.
Gas Selection
The gas being selected is not compatible with the selected lamp.
The lamp being selected is not compatible with the selected gas.
Press Esc and select a compatible gas and lamp.
Page 31
PhoCheck+ 1000, 2000, 3000 & 5000 Ex Ion Science Ltd
Page 31 of 41
Diagnostics
Health & Safety
When in Health & Safety mode the selected gas has no STEL or TWA alarm
values. This provides a warning in Health & Safety mode that the change
you are making could effect the ongoing calculations. You can proceed with
the adjustment by pressing enter or return to the display screens by
pressing Esc.
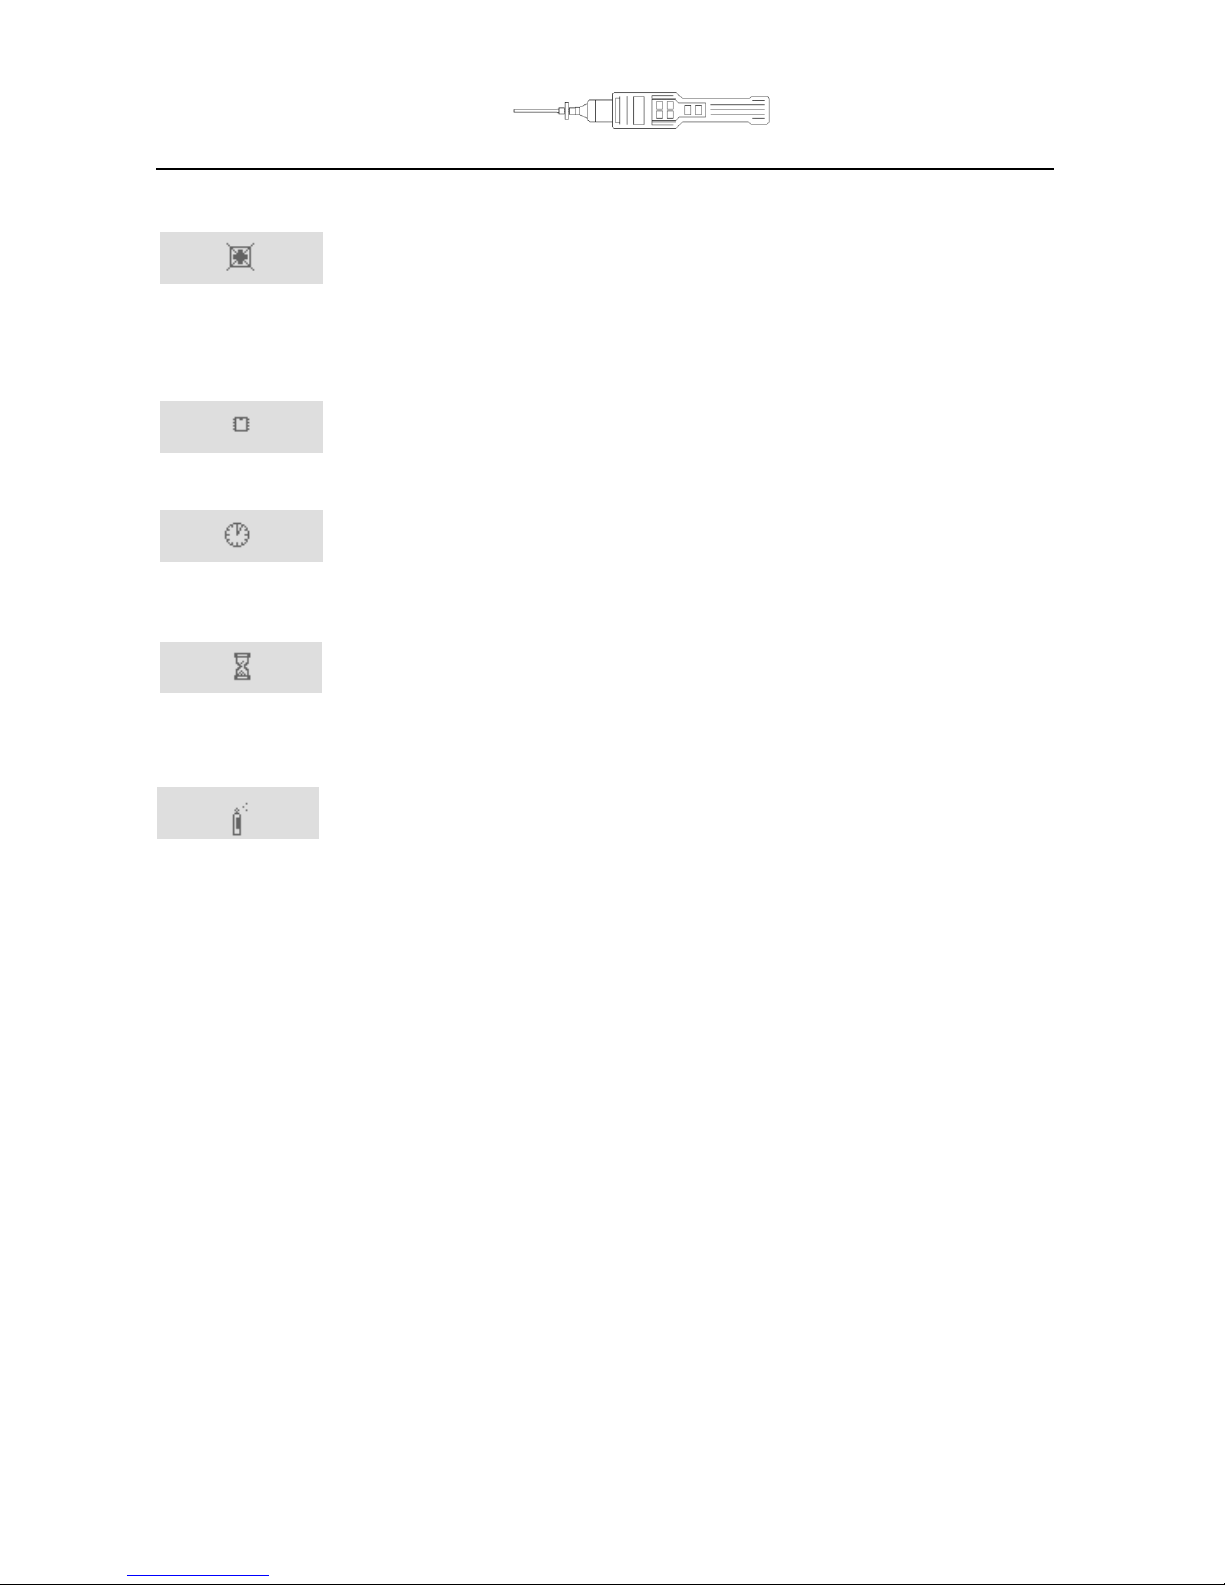
Memory Alarm
The data logging memory is full and will begin to overwrite previous
readings. Will only show if the data logging memory alarm has been set to
ON (see page 19). Press Esc and either continue (and previous readings
will be over written) or download saved data to a PC before continuing.
Clock
The internal clock has failed.
Return the instrument to the manufacturer.
Delay
This symbol will appear during the manual adjustment and selection of
functions of the instrument. It indicates that data within the memory is
being moved. Please wait and the symbol will disappear after a few
seconds depending on the change being made.
Bump test
This symbol will appear on switch on if the Enable Bump Test setting has
been selected via IonPC software The symbol is a prompt that will appear
once a week to remind the user to test the instrument responds accurately
when supplied with gas.
Page 32
PhoCheck+ 1000, 2000, 3000 & 5000 Ex Ion Science Ltd
Page 32 of 41
Maintenance
Blowing out the PID Cell will fix 99% of maintenance problems
When using the PID instrument in conditions of high ambient humidity, the
PID may show unexpected readings appearing to increase. This occurs due
to dust or other small particles within the detector becoming hydrated with
humidity. This causes these particles to conduct a signal between the
electrodes. This issue can be resolved by the user in the field using the
following procedure and a can of computer duster air.
First remove the lamp, following the instructions on lamp removal from the
cleaning the lamp section below (steps 1 – 6). Using a can of computer
duster, spray air down the small metal tube. Replace the lamp and cap and
test the instrument.
1. Keep the PID detector lamp window clean.
2. Replace the sample filters on a regular basis.
Frequency of cleaning the detector lamp and replacement of the filter depends
on the type of gas being detected and the quality of the background air.
3. Secondary Probe Filter
Designed to strengthen the instrument response, even in condensing
environments.
If the instrument background reading is high, change the main probe filter
first. If the readings remain high it will be necessary to change the secondary
probe filter as follows;
a) Using an 11mm (7/16”) spanner unscrew the probe fitting from the end
of the PID detector nozzle.
b) Remove and discard the secondary probe filter.
c) Insert a new secondary probe filter into the probe fitting.
d) Screw the probe fitting back onto the nozzle and tighten using the
11mm (7/16”) spanner.
CAUTION: DO NOT OVERTIGHTEN THE PROBE FITTING
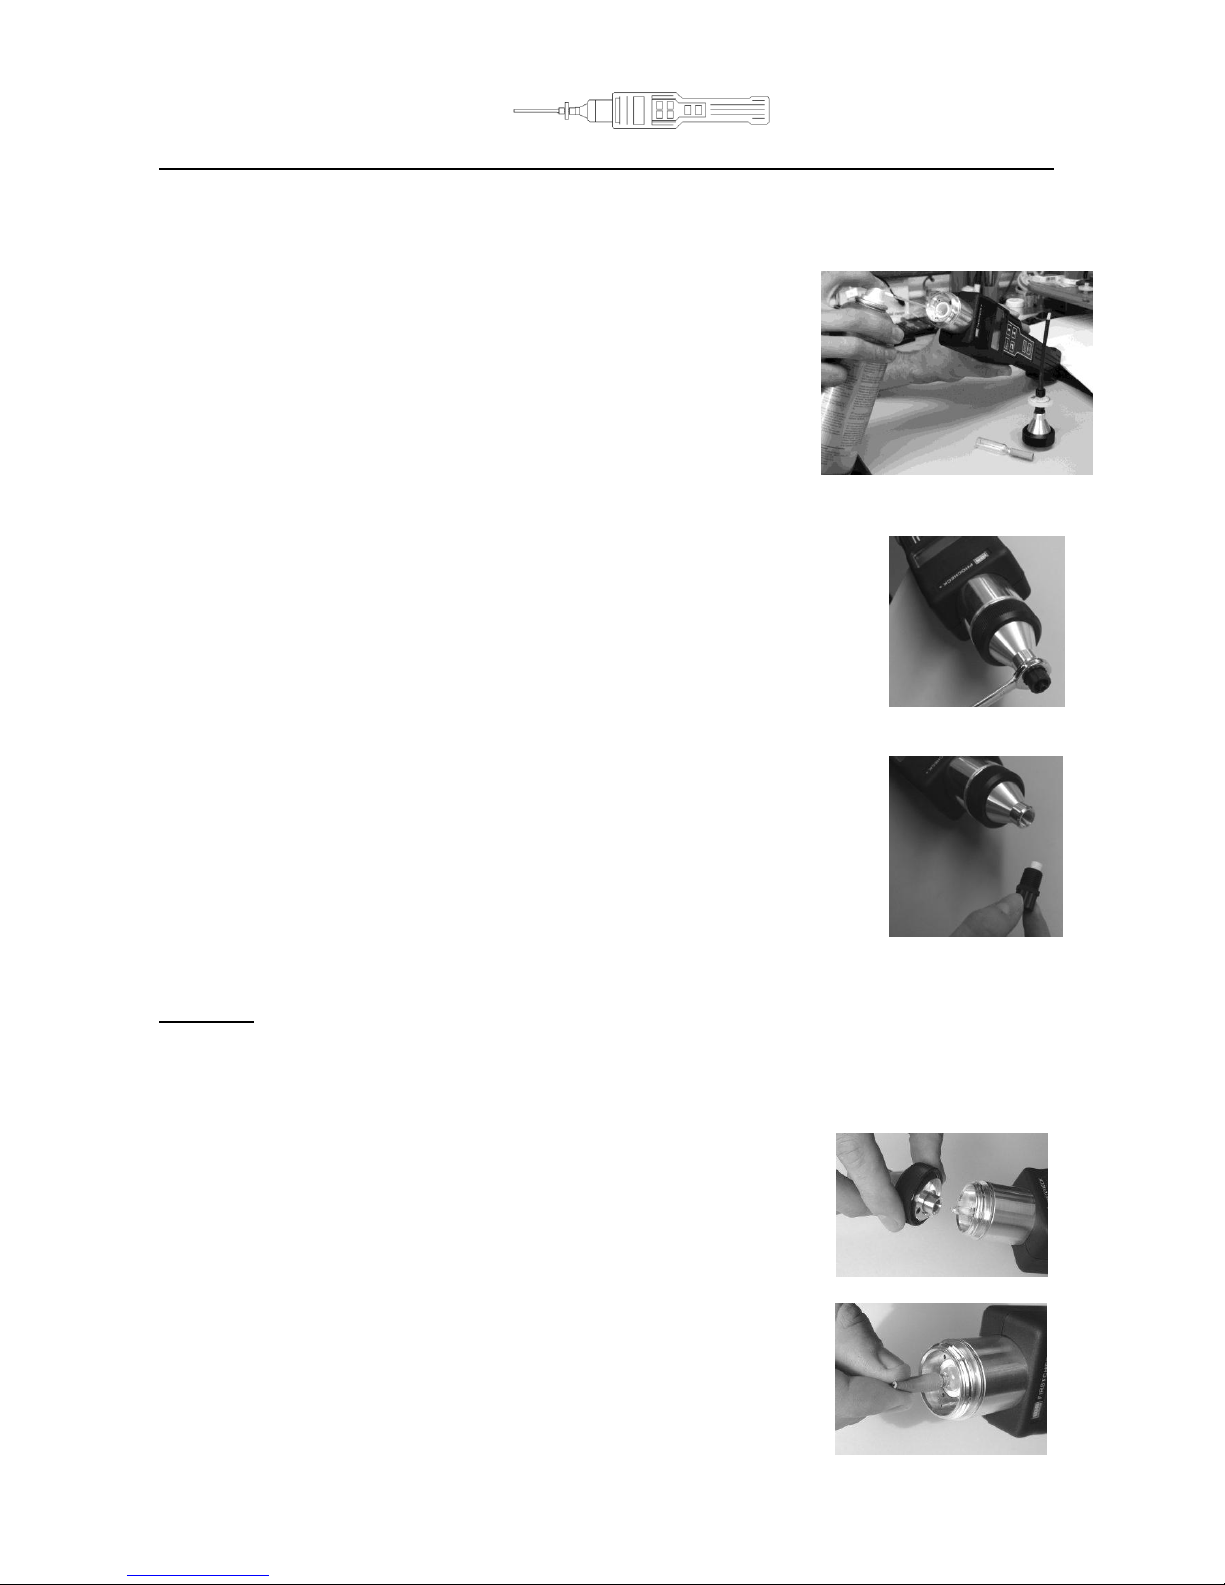
Cleaning the PhoCheck+ Lamp
The PhoCheck+ PID relies on an ultraviolet light source ionising VOC gases as they pass across the lamp
window. This process may result in a very fine layer of contamination appearing on the detector window that
must be removed on a regular basis.
CAUTION!
The PhoCheck+ is a sensitive detector. Internal components must be
handled with clean hands and clean tools. The PhoCheck+ lamp is fragile.
Handle with great care!
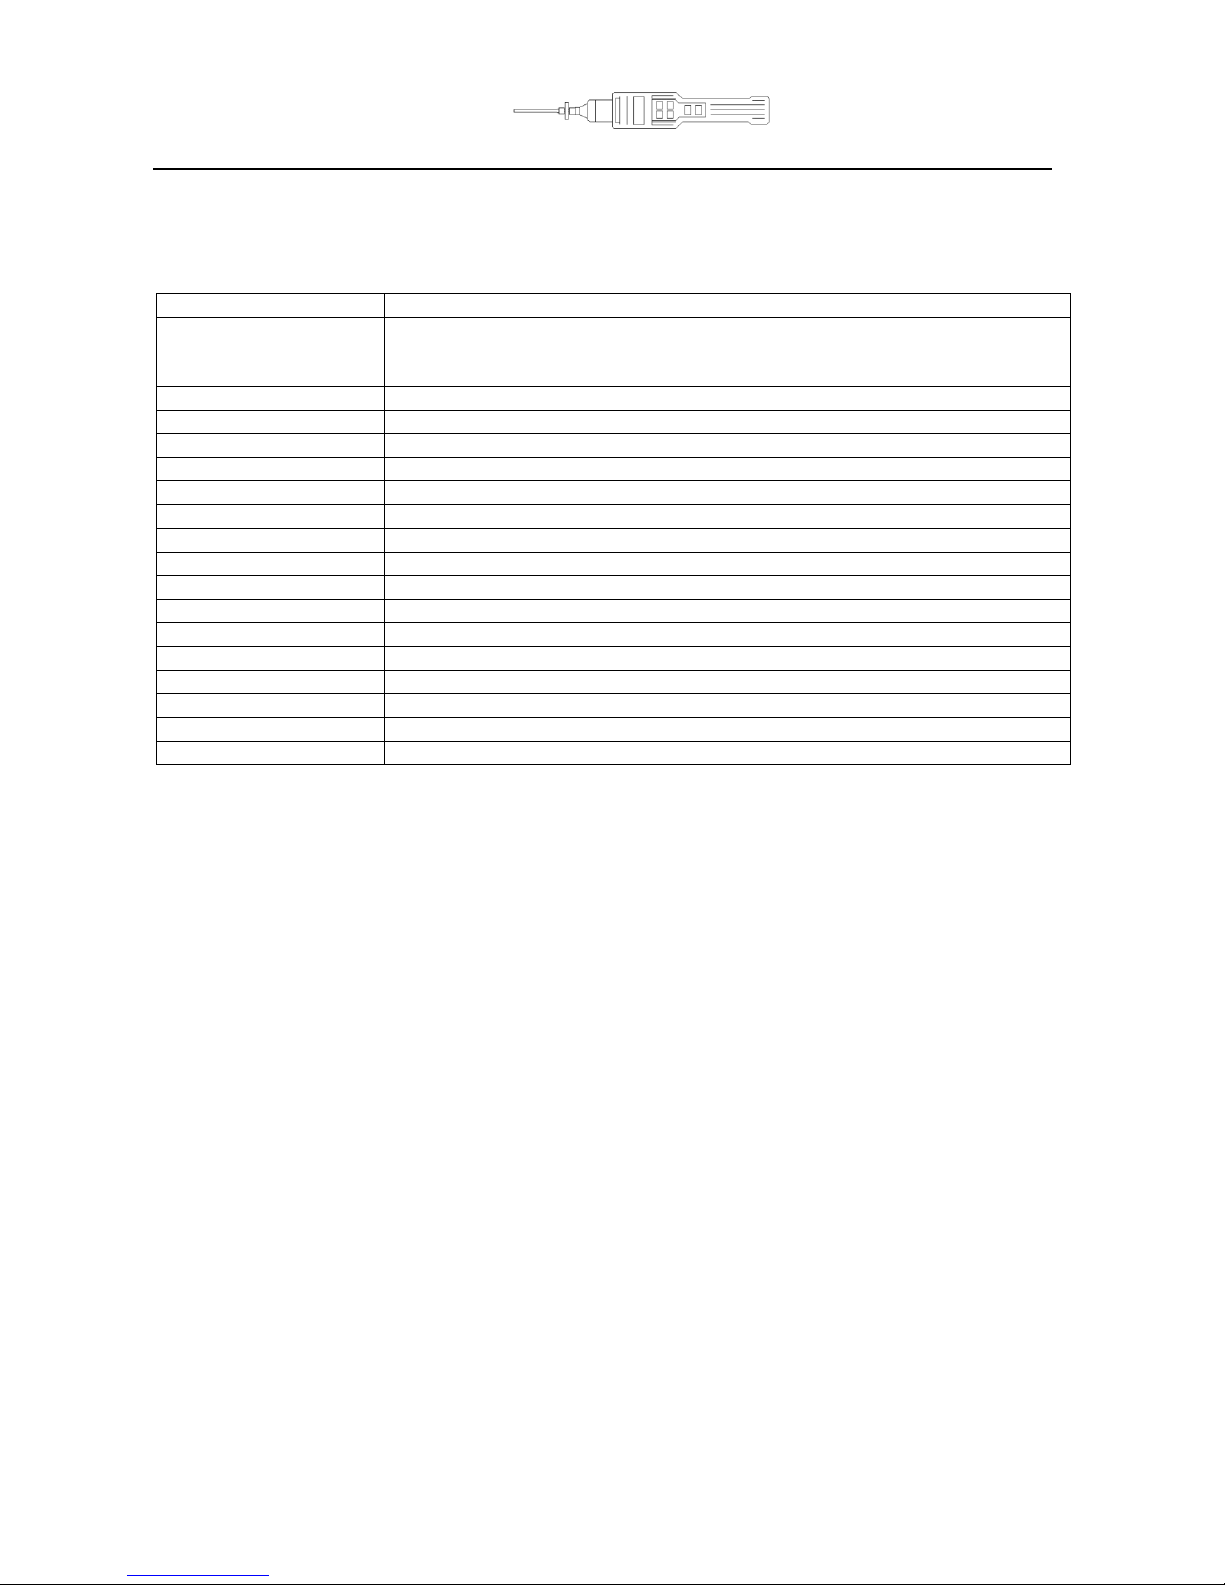
1. Ensure that the PhoCheck+ is switched OFF.
2. Remove the probe and filter. Unscrew the black knurled ring to
expose the detector lamp.
3. Push a lamp-removing sleeve over the end of the lamp. This
allows the user to grip the glass.
Page 33

PhoCheck+ 1000, 2000, 3000 & 5000 Ex Ion Science Ltd
Page 33 of 41
Maintenance
Cleaning the PhoCheck+ Lamp (continued)
4. Extract the lamp from its socket by pulling it in a straight line away from
The PID cell. Force is only required when pulling the lamp past the O
ring. Once past the O ring the lamp will move freely.
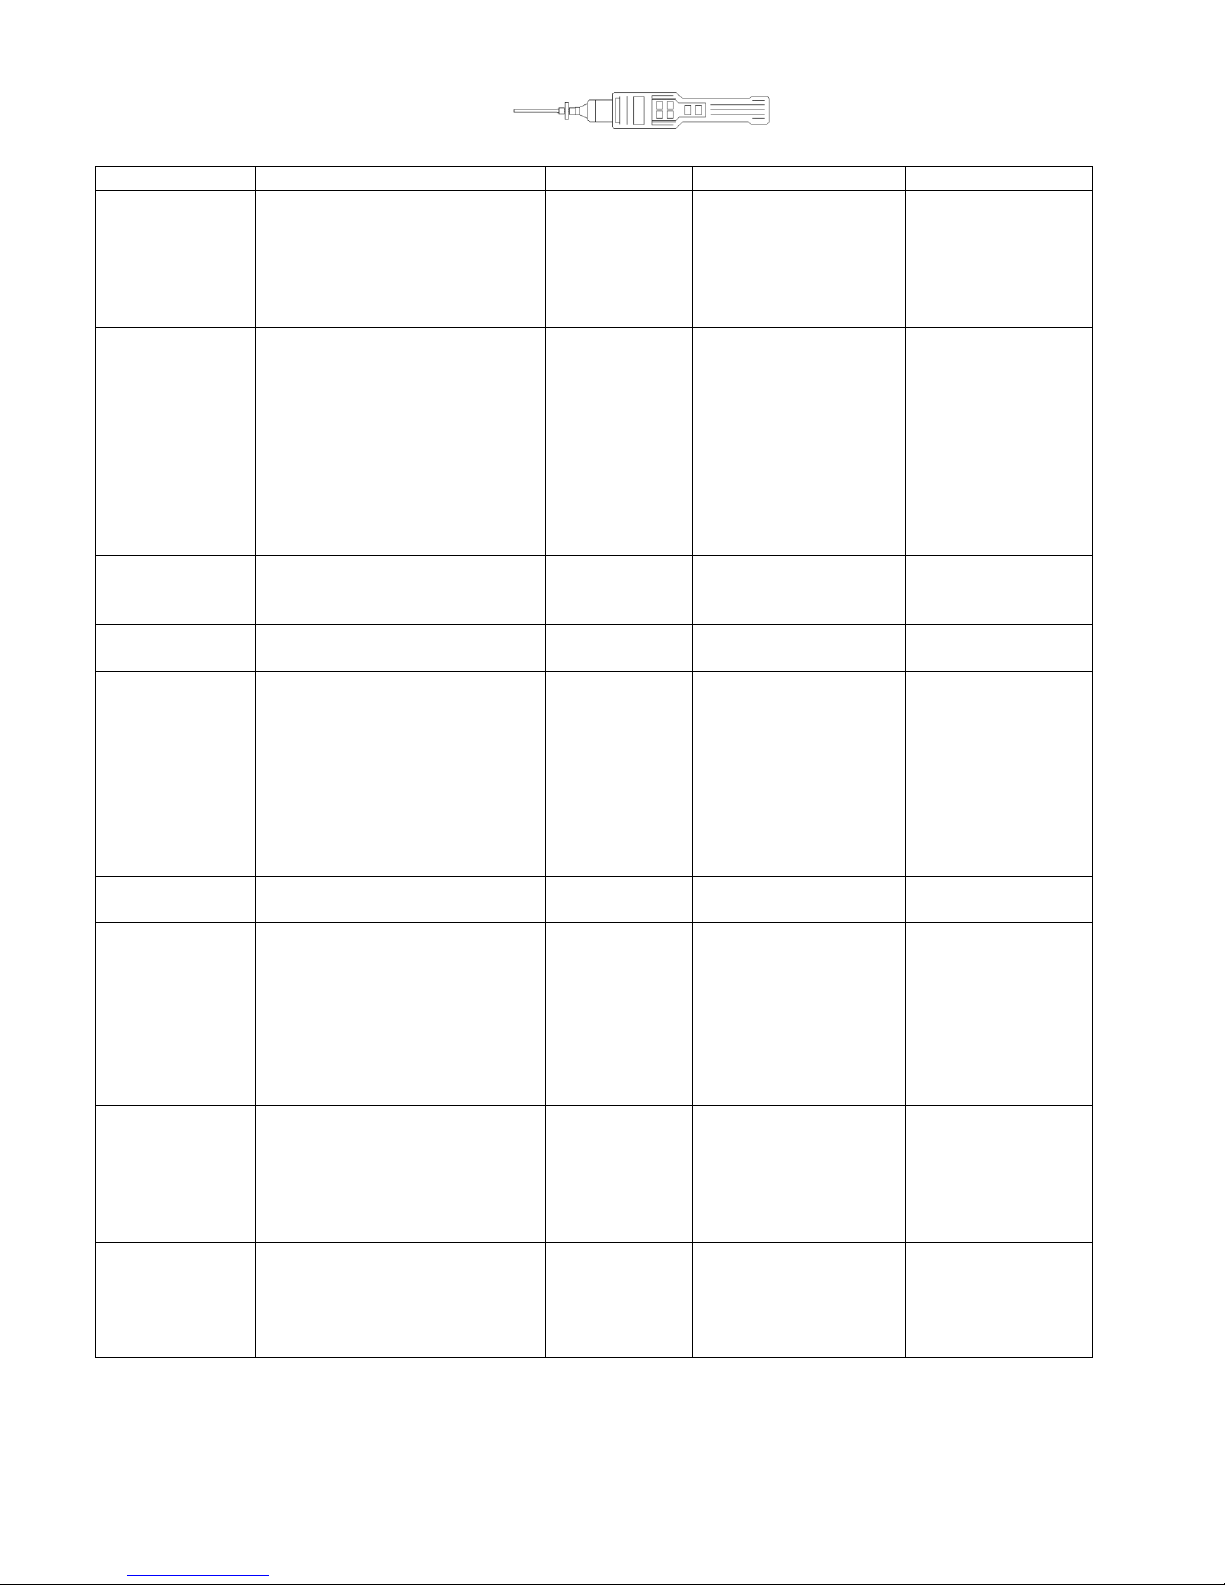
5. Inspection of the lamp may reveal a layer of contamination on the
detection window that presents itself as a 'blue hue.' To check for
contamination, hold the lamp in front of a light source and look across
the window surface.
6. Inspection of the lamp may reveal a layer of contamination on the
detection window that presents itself as a „blue hue.‟ To check for
confirmation, hold the lamp in front of a light source
and look across the window surface.
WARNING! NEVER REFIT A DAMAGED LAMP!
USE of PID lamp cleaning kit A-31063
The vial of cleaning compound contains Aluminium Oxide as a very fine
power (CAS Number 1344-28-1). A full material safety data sheet MSDS is
available on request from Ion science ltd. The key issues are listed below:
Hazard identification:
May cause irritation of respiratory tract and eyes.
Handling:
Do not breathe vapour/dust. Avoid contact with skin, eyes and clothing
Wear suitable protective clothing
Follow industrial hygiene practices: Wash face and hands thoroughly with soap and water after use and
before eating, drinking, smoking or applying cosmetics.
The Compound has a TVL(TWA) of 10 mg/m
3
Storage:
1. Keep container closed to prevent water adsorption and contamination.
2. Open the vial of Aluminium Oxide polishing compound.
With a clean cotton bud collect a small amount of compound.
3. Use this cotton bud to polish the PID lamp window. Use a circular action applying light pressure to clean the
lamp window. Never touch the lamp window with fingers.
4. Continue polishing until an audible “squeaking” is made by the cotton bud with
compound moving over the window surface. (usually within 15 seconds)
5. Remove the residual powder with short blast of air from the can of air duster.
6. The instrument MUST now be re-calibrated.
Past the O-ring
Move freely in a straight line
Page 34
PhoCheck+ 1000, 2000, 3000 & 5000 Ex Ion Science Ltd
Page 34 of 41
Accessories
Ion Science has developed an exclusive range of high quality accessories to compliment the PhoCheck+.
Please find a list of accessories below. For the full range, contact Ion Science.
Part Number
Accessory Description
A-830206
IS Protective Cover II 1 G EEx ia IIC T4/
II 2 G EEx iad IIC T4
Baseefa 02ATEX0093X, Baseefa 03ATEX0742X PK of 10
A-845213
Calibration Kit
A-31064
25mm (1") diameter 0.5 micron probe filter PK of 5
A-31066
Std probe attachment PK of 5
A-31063
PID Lamp Cleaning Kit (20 Cleans)
A-30555
5 m (16 ft) flexible extension hose
A-30556
10 m (33 ft) flexible extension hose
A-31146
Secondary Probe Filters (pack of 5)
A-31153
Exhaust barb, Tedlar bag connector
A-31057
Carbon filter
30618
PID lamp, type 8.4 eV Xenon
30620
PID lamp, type 10.6 eV Krypton
30621
PID lamp, type 11.7 eV Argon
31052
Leather instrument jacket
40052
Leather instrument jacket with magnetic attachment
1/VS-18
Universal 9 volt power supply without plug
1/VS-20
9 V multi head universal power supply adaptor
Contact Ion Science or your local Distributor for more information.
Page 35

PhoCheck+ 1000, 2000, 3000 & 5000 Ex Ion Science Ltd
Page 35 of 41
Protective / Decontamination Cover
Description
This unique accessory enhances the base intrinsically safe approval of Ion Science instruments, including
FirstCheck and PhoCheck, from category 2 (Zone 1) to category 1 (Zone 0) classification. The cover also
increases instrument's ingress protection rating to IP66 allowing the instruments to be used in applications
where the instruments are likely to get wet such as arson investigation, emergency response and in heavy
rainfall.
The cover being very low in cost has the advantage when used in HazMat applications, including possible
WMD exposure, in that it is simply removed after use and replaced with a fresh one keeping both the user
and instrument safe from exposure long after the event.
NB: the IS protective cover must be used only once. If it becomes torn or damaged the intrinsically safe
certification and ingress protection ratings revert to that of the instrument inside it.
Technical Specifications
Made from anti-static material
Baseefa02ATEX0093X / Baseefa03ATEX0742X
ll 1G, EEx ia llC T4 (-20 C Ta +60 C)
Dimensions: 430 mm (L) x 126 mm (W)
Please note double sided sticker adhisive must be applied in a dry atmosphere which
is > 5 C, it will then remain effective down to -20 C.
Page 36

PhoCheck+ 1000, 2000, 3000 & 5000 Ex Ion Science Ltd
Page 36 of 41
Protective/Decontamination Cover
Fitting Instructions
1. Insert instrument into the IS protective cover ensuring that the
probe tip exits through the small slit at the top of the cover and
that the cover labelling and stickers are on the reverse of the
instrument.
2. Seal the cover at its base and lay the instrument on a flat
surface with the label and stickers facing upwards.
3. Peel off the backing to the large section of double-sided tape in
the middle of the instrument.
4. Gather the excess plastic on one side of the instrument and stick it
on the midway point of the double-sided tape.
5. Gather the excess plastic on the other side of the instrument and
stick it to the remainder of the double-sided tape.
6. Now remove the backing from one of the small pieces of tape and
secure it to the side of the instrument.
7. Remove the final piece of backing and secure it to the other side of the
instrument.
8. The instrument is now ready to use in Category 1 (zone 0) areas and in
applications where it is likely to get wet or contaminated.
Page 37

PhoCheck+ 1000, 2000, 3000 & 5000 Ex Ion Science Ltd
Page 37 of 41
Upgrade Options
All PhoCheck+ instruments have the ability to be upgraded in the field to higher versions throughout
the range (1000-5000). The table below indicates if your model can be upgraded.
Contact your local Ion Science distributor for pricing.
The upgrade process is easy and the instrument does not need to be returned to the distributor or
manufacturer.
After ordering the upgrade for your instrument a code will be sent to you by e-mail. Use the IonPC
software to enter the code and your instrument instantly becomes the new version.
PhoCheck
+ 1000
PhoCheck+
2000
PhoCheck+
3000
PhoCheck+
5000
PhoCheck+
1000
Upgrade
Upgrade
Upgrade
PhoCheck+
2000
Upgrade
Upgrade
PhoCheck+
3000
Upgrade
PhoCheck+
5000
Page 38

PhoCheck+ 1000, 2000, 3000 & 5000 Ex Ion Science Ltd
Page 39 of 41
Technical Specifications _____
Detector Range Response Time*
PID (VOC detector) 1 ppb - 10,000 ppm (5000Ex) T90 < 1 second
0.1 ppm – 10,000 ppm (3000Ex)
0.1 ppm – 4,000 ppm (1000Ex and 2000Ex)
Accuracy +/- 5% displayed reading +/- one digit**
Linearity +/- 5% displayed reading +/- one digit**
Battery 4 x AA size Specified Alkaline or 1.2V
Rechargeable NiMH
Alarm Flashing LED and 90 dBA (10 cm)
audible sounder
Flow Rate (Approx) 220 ml/min or 220 cc/min
Temperature Operating -20 to 60 C (-4 to 140 F)
Storage -25 to 60 C (-13 to 140 F)
Dimensions Instrument 340 x 60 x 50 mm
Standard Carry Case: 420 x 320 x 97 mm
Weight Instrument 0.640 kg (1.4 lb)
Packed in case 3.1 kg (6.8 lb)
Materials Instrument Conductive carbon-loaded
polypropylene-based resin
casing.
Standard Carry Case Polypropylene, with a
polyester foam insert
*Response time of the instrument is affected by the use of a length of tubing in applications such as
confined space entry. The following response times show the affect on the PID detector based on 213
ml/min with a filter attached with a tube internal diameter of 1.6 mm at 20 C:
Length of tube Flow ml/min Response time in seconds
Standard probe 213 0.1
1 m 212 0.8
2 m 212 1.7
3 m 211 2.6
5 m 209 4.3
10 m 199 9.0
20 m 190 19.0
30 m 172 32.0
** Assumes constant environmental conditions
Page 39

PhoCheck+ 1000, 2000, 3000 & 5000 Ex Ion Science Ltd
Page 40 of 41
Technical Specifications
Expected lifetime of parts
Batteries
On the condition of normal use battery capacity will be reduced to approximately 70% after 250 full
battery cycles or 1 year (whichever comes first).
New fully charged (rechargeable) batteries at 20 C > 10 hours normal use.
Affects on battery capacity:
10% less per 10 C drop in temperature.
As the batteries age they may self discharge to half capacity from fully charged state.
At 25 C – 50 days
37 C – 25 days
48 C – 5 days
60 C – 1 day
The back light will consume an additional 50% power and significantly reduce the instrument „on
time‟.
Filter
The filter should be changed every 100 hours of use. This frequency should be increased for dusty or
moisture laden environments.
PID Lamps
10.6 eV and 8.4 eV expected life of 3 years and 11.7 eV 1 month. Lamps are very fragile; please
handle with care at all times, never touch the window and do not drop! Lamp cleaning for normal use
is every 100 hours of use (based on 30 ppm for 100 hours). Reduce this if used in heavily gas
contaminated environments. Please note that some esters, amines and halogenated compounds may
accelerate window fouling; cleaning may be required for every 20 hours of use. Cleaning frequency
will also depend upon alarm levels set and prevailing environmental conditions.
PID Cell
Electronic cell has an indefinite life however it may suffer contamination problems – it is essential that
a clean filter is attached during use. Some gases such as methylene chloride in high concentrations
may condense onto the walls of the cell. In these cases the instrument should be returned to an
Authorised Service Centre for thorough cleaning.
NB: PID specifications relate to an isobutylene 100 ppm in air calibration at 20 C and 90% RH.
Page 40
PhoCheck+ 1000, 2000, 3000 & 5000 Ex Ion Science Ltd
Page 41 of 41
Manual Version
Amendment
Date Updated
Instrument Firmware
PC Software
PhoCheck+ V1.6
Ion Science recommends
keeping your PhoCheck fully
charged at all times, in some
circumstances batteries can
loose power overtime while not
in use. Updated to V1.7
V51
V1.24
PhoCheck+ V1.7
If batteries are extremely low
the instrument will not turn on
and indicates the battery is fully
charged. To remedy this leave
charger connected for 2
minutes, then remove charger
and reconnect as soon as the
hour glass disappears. You will
now see the instrument charge
as normal. Updated to V1.8
9/6/08
V51
V1.24
PhoCheck+ V1.8
Add information for IS
Protective Cover. Updated to
V1.9
18/6/08
V51
V1.24
PhoCheck+ V1.9
Add new software installation
routine. Updated to V2.0
24/10/08
V51
V1.24
PhoCheck+ V2.0
• Declaration of conformity
updated
• Include note regarding lamp
cleaning i.e. Blowing out the
lamp will resolve 95% of
contamination issues
• Additional bump test after
custom calibration
Updated to V2.1
27/11/08
V51
V1.24
PhoCheck+ V2.1
Log added to back of manual.
Updated to V2.2
09/01/09
V51
V1.24
PhoCheck+ V2.2
• Secondary Probe Filters added
to Packing List (pg8)
• Secondary Probe Filter
maintenance added to list
(pg43)
• Secondary Probe Filter added
to Accessories List (pg 47)
Updated to V2.3
24/03/09
V51
V1.24
PhoCheck+ V2.3
Complete rewrite of Manual.
Changes made to reflect new
version of software V53.
Any mention of Deuterium or
10.2 eV lamp has been removed
Updated to V2.4
14/07/09
19/05/10
V53
V53
V1.24
V1.24
PhoCheck+ V2.4
Warranty added on cover page
Declaration of Conformity
updated
Warranty updated on page 38
Contents page updated
22/07/10
V53
V1.24
Page 41

PhoCheck+ 1000, 2000, 3000 & 5000 Ex Ion Science Ltd
Page 42 of 41
Page 42

Thank you for reading this data sheet.
For pricing or for further information, please contact us at our UK Office, using the details
below.
UK Office
Keison Products,
P.O. Box 2124, Chelmsford, Essex, CM1 3UP, England.
Tel: +44 (0)330 088 0560
Fax: +44 (0)1245 808399
Email: sales@keison.co.uk
Please note - Product designs and specifications are subject to change without notice. The user is responsible for determining the
suitability of this product.
 Loading...