

Page 1
mono
monomono
mono
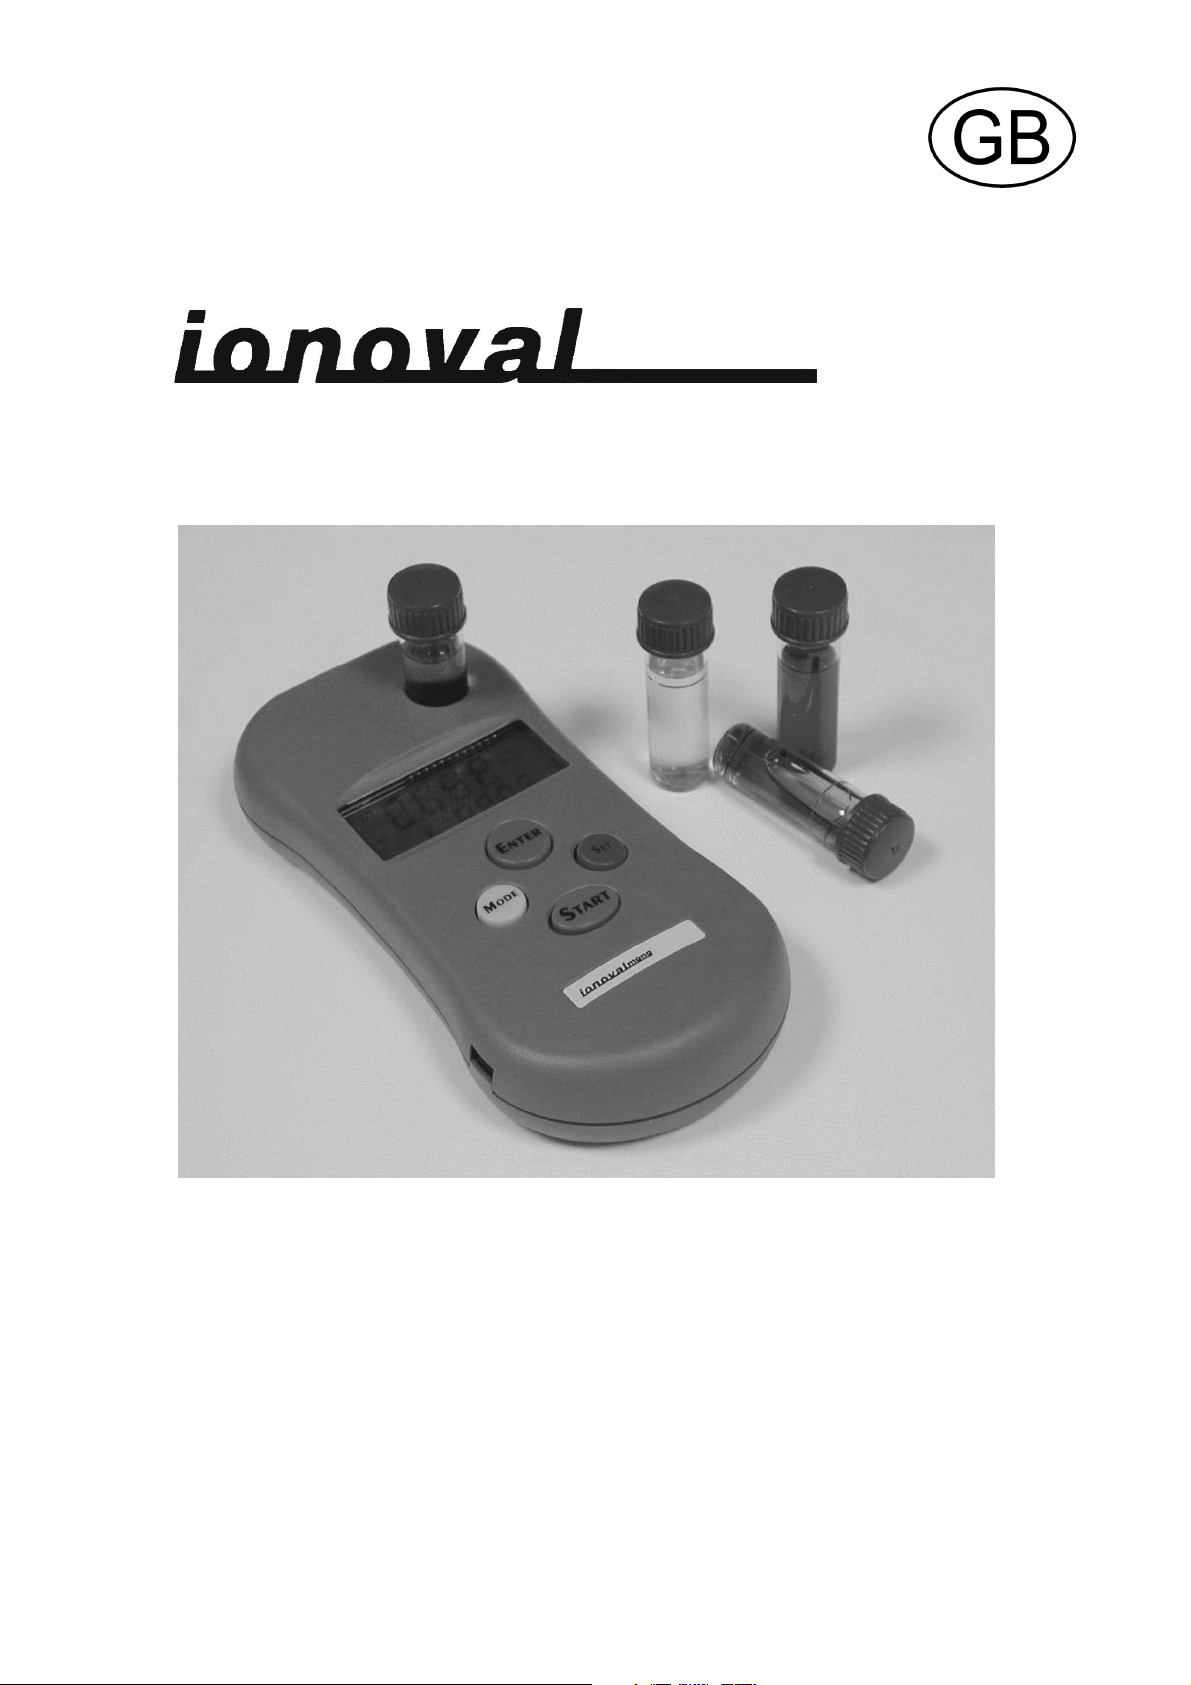
Ozone photometer
Operating Instructions
Page 2

Contents
1.
Important Safety Information
1.1 Notes and symbols used in these instructions
1.2 Intended use
1.3 Staff qualifications
1.4 Warning notices in these instructions
1.5 Further documents
2. Pay Particular Attention to
2.1 General instructions
2.2 Commissioning
2.3 Operation
2.4 Cleaning
2.5 Disposal
3. Scope of Delivery
3.1 Optional accessories
4. Performance Specifications
4.1 Performance features
5. Instrument View
5.1 Position of the operating element
6. Description of Display and Operating Elements
7. Commissioning
7.1 General instructions
7.2 Settings of the measuring instrument
8. Advance Functions
9. Calibrating
9.1 Inserting the test cell and calibrating
9.2 Calibration error Err1
10. Measuring
10.1 Inserting the test cell and measuring
10.2 Possible measuring errors and their remedy
11. Overview of Available Parameters
12. Software Installation and Description
12.1 Installing the software
12.2 IR interface connection
12.3 Starting the software
12.4 Description of functions
13. Replacing the Battery
14. Technical Data
2 / 13
Page 3

1. Important Safety Information
1.1 Notes and symbols used in these instructions:
K Operator instructions
Always observe / warning
Please read the operating instructions carefully and thoroughly prior to working with the instrument.
These operating instructions must be passed on to the new owner should ionoval mono change hands.
Ensure that the operating instructions are always available to all users.
Always adhere to hazard warnings and safety tips when using reagents, chemicals and cleaning agents.
Please refer to the respective safety data sheet!
Download safety data sheets for the supplied reagents at http://www.heyl.de .
Non-compliance with these instructions can result in personal injuries and/or damage to the
instrument and a loss of warranty rights.
1.2 Intended use
ionoval mono is a photometer for determining the concentration of water contents (see table under point
11.).
Always adhere to the limits specified in chapter “Technical Data”.
To ensure correct and intended usage, the instructions, especially the “Important Safety Information”,
have to be read and understood.
The instrument is not used as intended if
it is used in application areas not stated in these instructions.
it is used in conditions which deviate from the ones described in these instructions.
K
Trouble-free operation of the ionoval mono instrument is only guaranteed when using
Faults or problems resulting from the use of other reagents will not be accepted as a warranty or fair
ealing claim! (Comment: Other reagents can only be calibrated and used with ionoval FM-A!)
HEYL reagents!
1.3 Staff qualifications
Only fully qualified staff or authorised individuals supervised by a specialist are allowed to operate the
instrument or use chemicals.
1.4 Warning notices in these instructions
The warning notices in these instructions warn the user about potential dangers to individuals and property
resulting from incorrect handling of the instrument. Warning notices are structured as follows:
Description of type and source of the danger
Description of the consequences resulting from non-observance
Preventive measures. Always follow these preventive measures.
3 / 13
Page 4

1.5 Further documents
Please also observe the safety data sheets, operating instructions and handling instructions of the chemicals
being used.
2. Pay Particular Attention to
2.1 General instructions
Adhere to national health and safety regulations as well as environmental protection regulations in the
country of use.
Do not modify or tamper with the instrument.
Do not carry out any actions at the instrument which are not described in these instructions;
adhere to these instructions will negatively affect any warranty claims that you make thereafter.
2.2 Commissioning
Remove the switch-on guard (white plastic part at the power supply connection)
2.3 Operation
Please remove the battery from the instrument if it is not going to be used for a longer period (several
months).
You can switch the battery off by inserting the switch-on guard if the instrument is not going to be used
for a short period.
2.4 Cleaning
Only use a dry, lint-free cloth for cleaning.
2.5 Disposal
Dispose of the old batteries and the instrument in accordance with national regulations.
3.
Scope of Delivery
1 portable lab
1 ionoval mono measuring instrument
(incl. battery)
2 test cells
1 operating instructions
3.1 Optional accessories
Optional IR interface with corresponding
software
Power supply unit
Instrument case, power supply unit, IR interface,
test cells and reagents
failure to
4 / 13
Page 5
4. Performance Specifications
ionoval mono is a photometer for determining the concentration of water contents (see table under point
11.). The microprocessor-controlled instrument functions photometrically (LED) and is primarily used in the
fields of water treatment, sewage water, swimming pools and drinking water. The highly integrated
electronics, simple operation and large digital display enable quick and precise analytical determination. The
basic version is powered via a 9 V battery. The last 100 measuring results can be stored with a consecutive
number, the measuring point, parameters and the time and date.
4.1 Performance features
Large, easy-to-read display
Simple menu structure
Save up to 100 measuring values in a ring buffer (can be switched off)
(measurement no., measuring point, parameters, measuring value, time and date)
Delete saved measurements
View saved data directly at the instrument
Read saved data via the IR interface 1
Read and adjust the settings (store, beep, timer) via IR interface 1
Real-time clock (set the time and date directly at the instrument)
Transfer the PC system time and date via IR interface 1
Output of a beep when pressing keys (can be switched off)
Timer with time display (countdown) and acoustic signal output once the reaction time of the reagent
has expired (can be switched off)
Display in ppm or mg/l
Measuring point (can be set from 1-9)
Battery voltage display
Energy saving mode (instrument switches off automatically after 5 minutes)
Measuring range (see table under 11.)
Operation with power supply unit (9V DC), (optionally available)
1
only with optionally available IR
interface
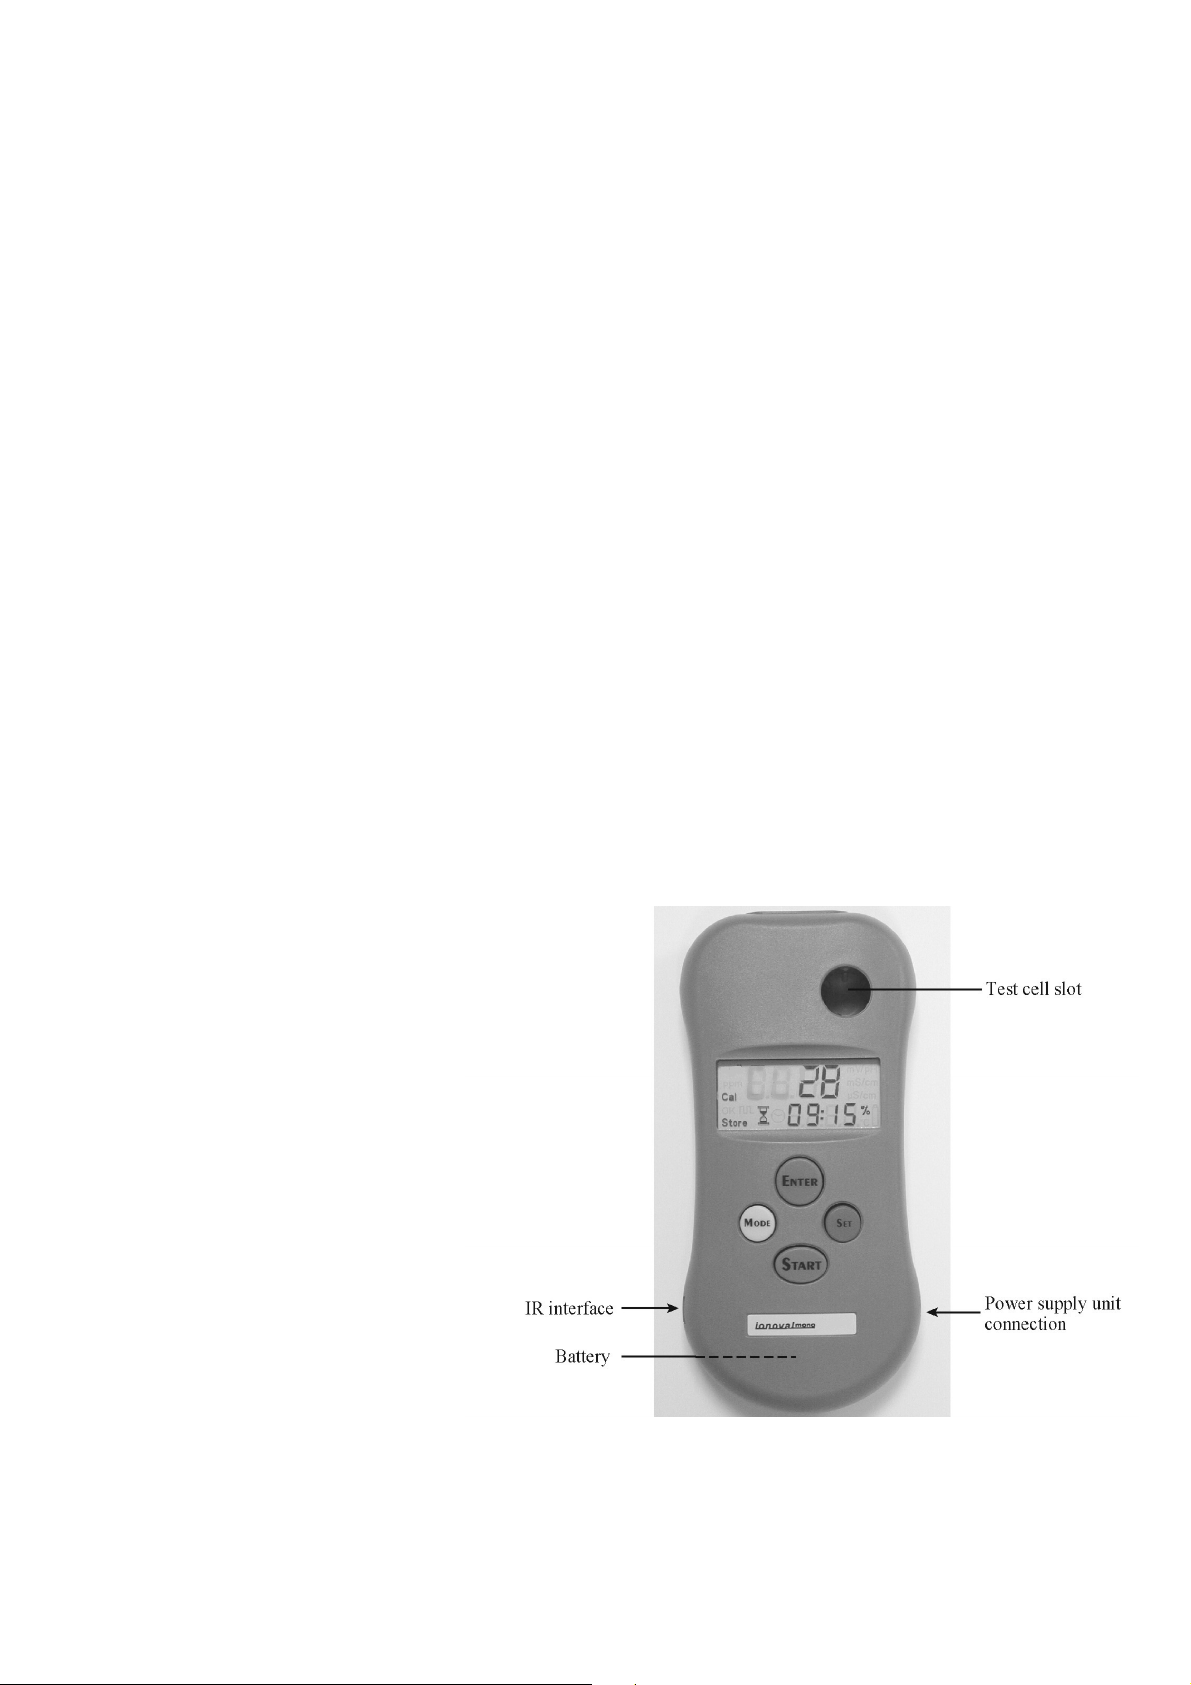
5. Instrument View
5.1 Position of the operating
elements and connections
5 / 13
Page 6
6. Description of Display and Operating Elements
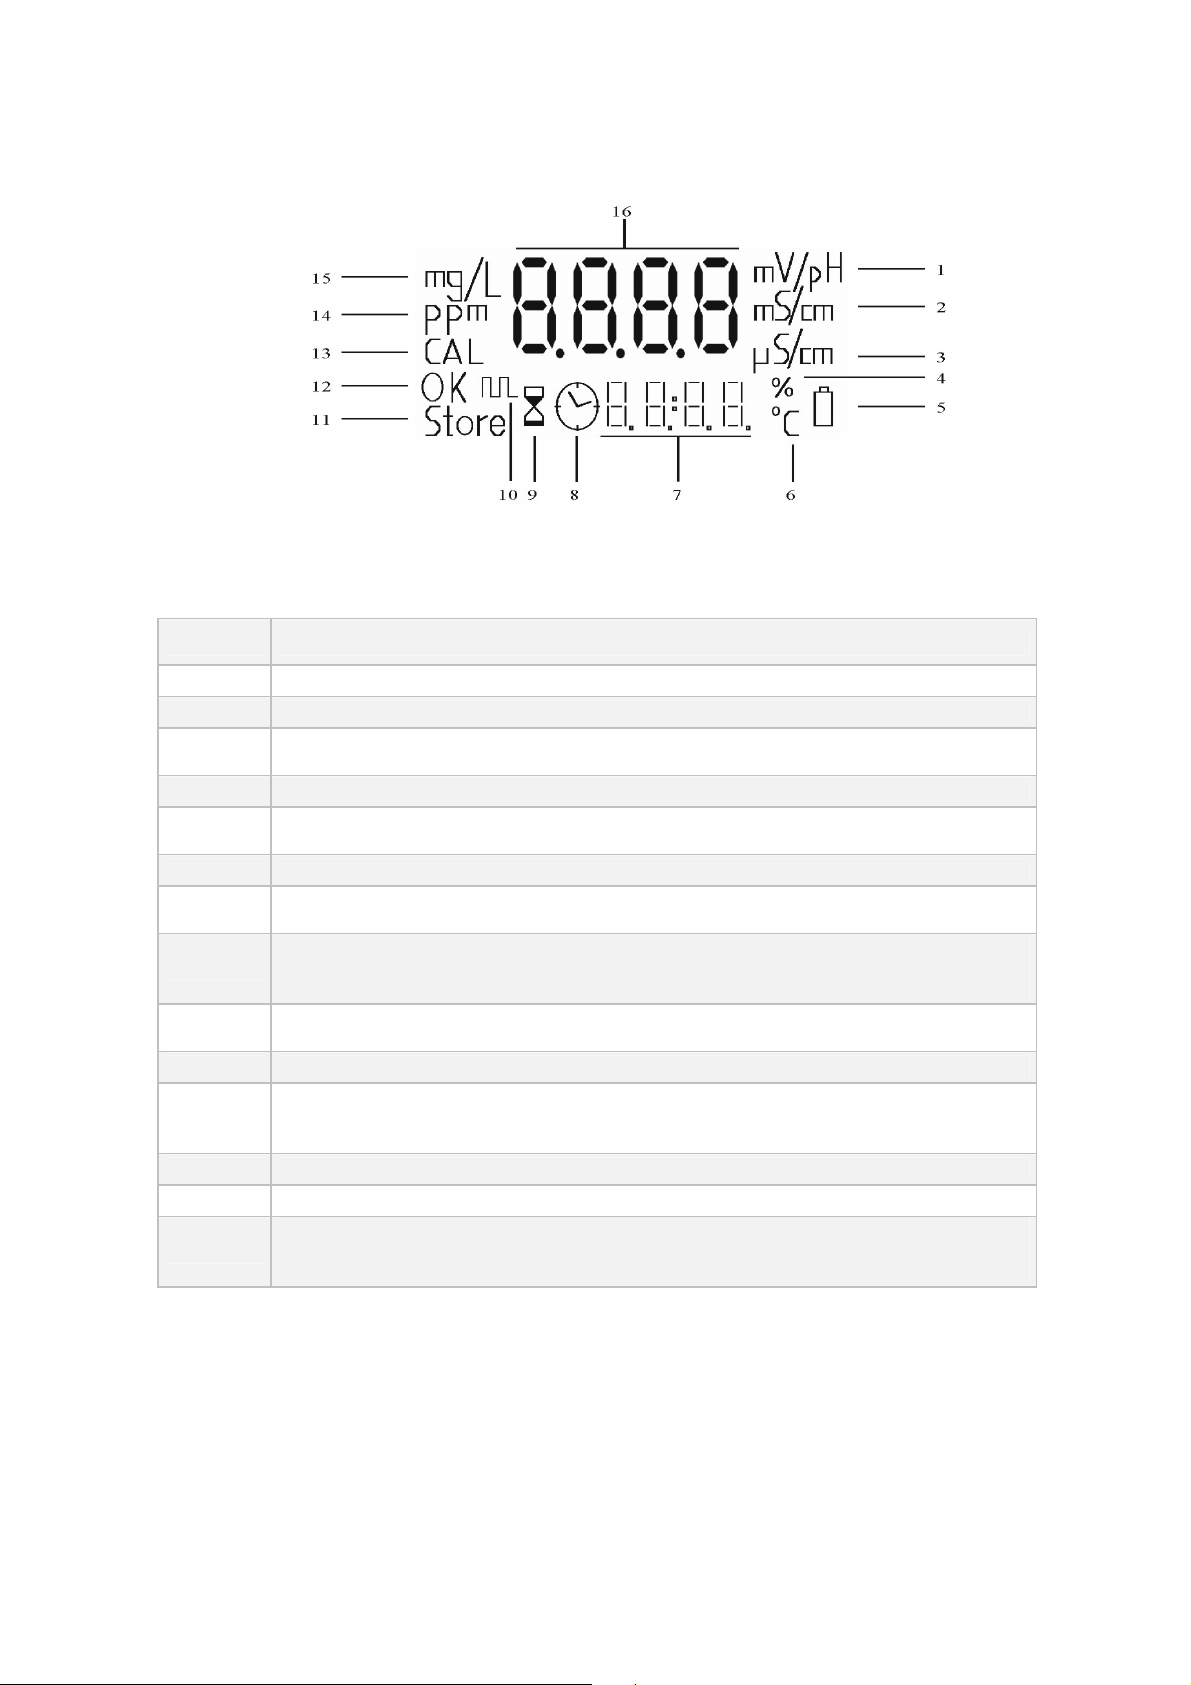
Digit Meaning
1,2,3 Not used
4 Not used
5
6 Not used
7
8 Not used
9
10
11
12 Not used
13
14 Displays the unit
15 Displays the unit
16
Battery display
Flashing signal indicates the battery must be replaced
Multi-functional display 2
Displays time, measuring point (displays saved measuring results
Timer display
Displays that the timer is switched on
PC mode
Displayed if menu item PC mode is selected
Displayed if PC mode is active
Display Store (buffer)
Displays that measurements are being saved
Display CAL
Display flashes once the instrument has been switched on and requests calibration
Displayed if instrument is in calibration mode
Multi-functional display 1
Displays measuring results, parameters, date (displays saved measuring results),
CAL (during calibration), DATA (if PC mode is active) and error messages (Err 1-5)
6 / 13
Page 7
7. Commissioning
After removing the switch-on guard (white plastic part at the power supply connection), the instrument is
switched on in battery mode. The instrument is always in measuring mode after switching it on. The
instrument will switch off automatically (energy saving mode) (except when in PC mode) if it is not operated
or no key is pressed for 5 minutes. If a power supply unit is used, the inserted battery is switched off.
Note: If the instrument is operated without an inserted battery but with a power supply unit and is
disconnected from the mains, the instrument will be in exactly the same mode as before disconnection once
the power is reconnected. If the instrument is in sleep mode (automatic switch off), press any key to switch it
on again.
7.1 General instructions
Only operate the instrument in the ambient conditions (e.g. temperature) specified in the chapter entitled
“Technical Data”. Always protect the instrument against moisture. It should never come into contact with
condensation or splash water. The instrument should only be used for its specified intended purpose.
7.2 Settings of the measuring instrument
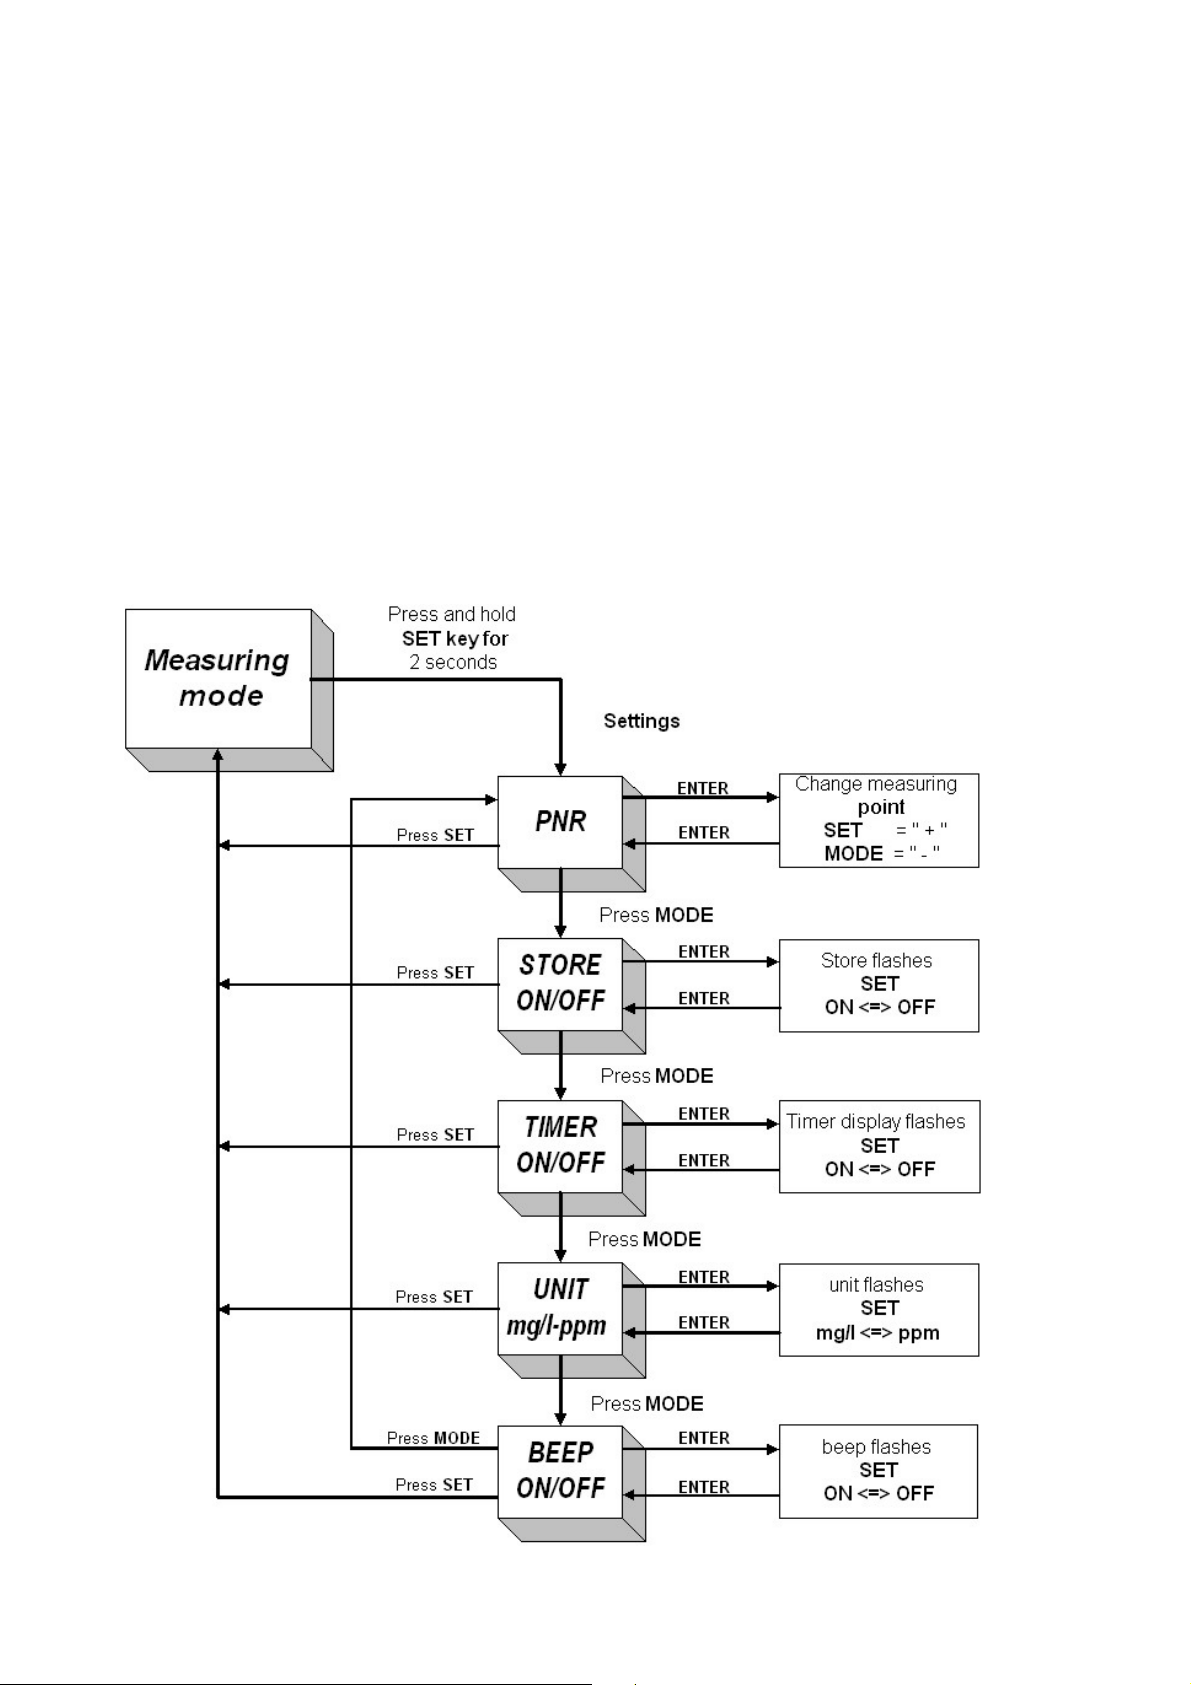
It is recommended to carry out instrument settings during initial commissioning. These settings are saved
and can be changed at any time if required. They are divided into the following settings and advanced
functions.
7 / 13
Page 8
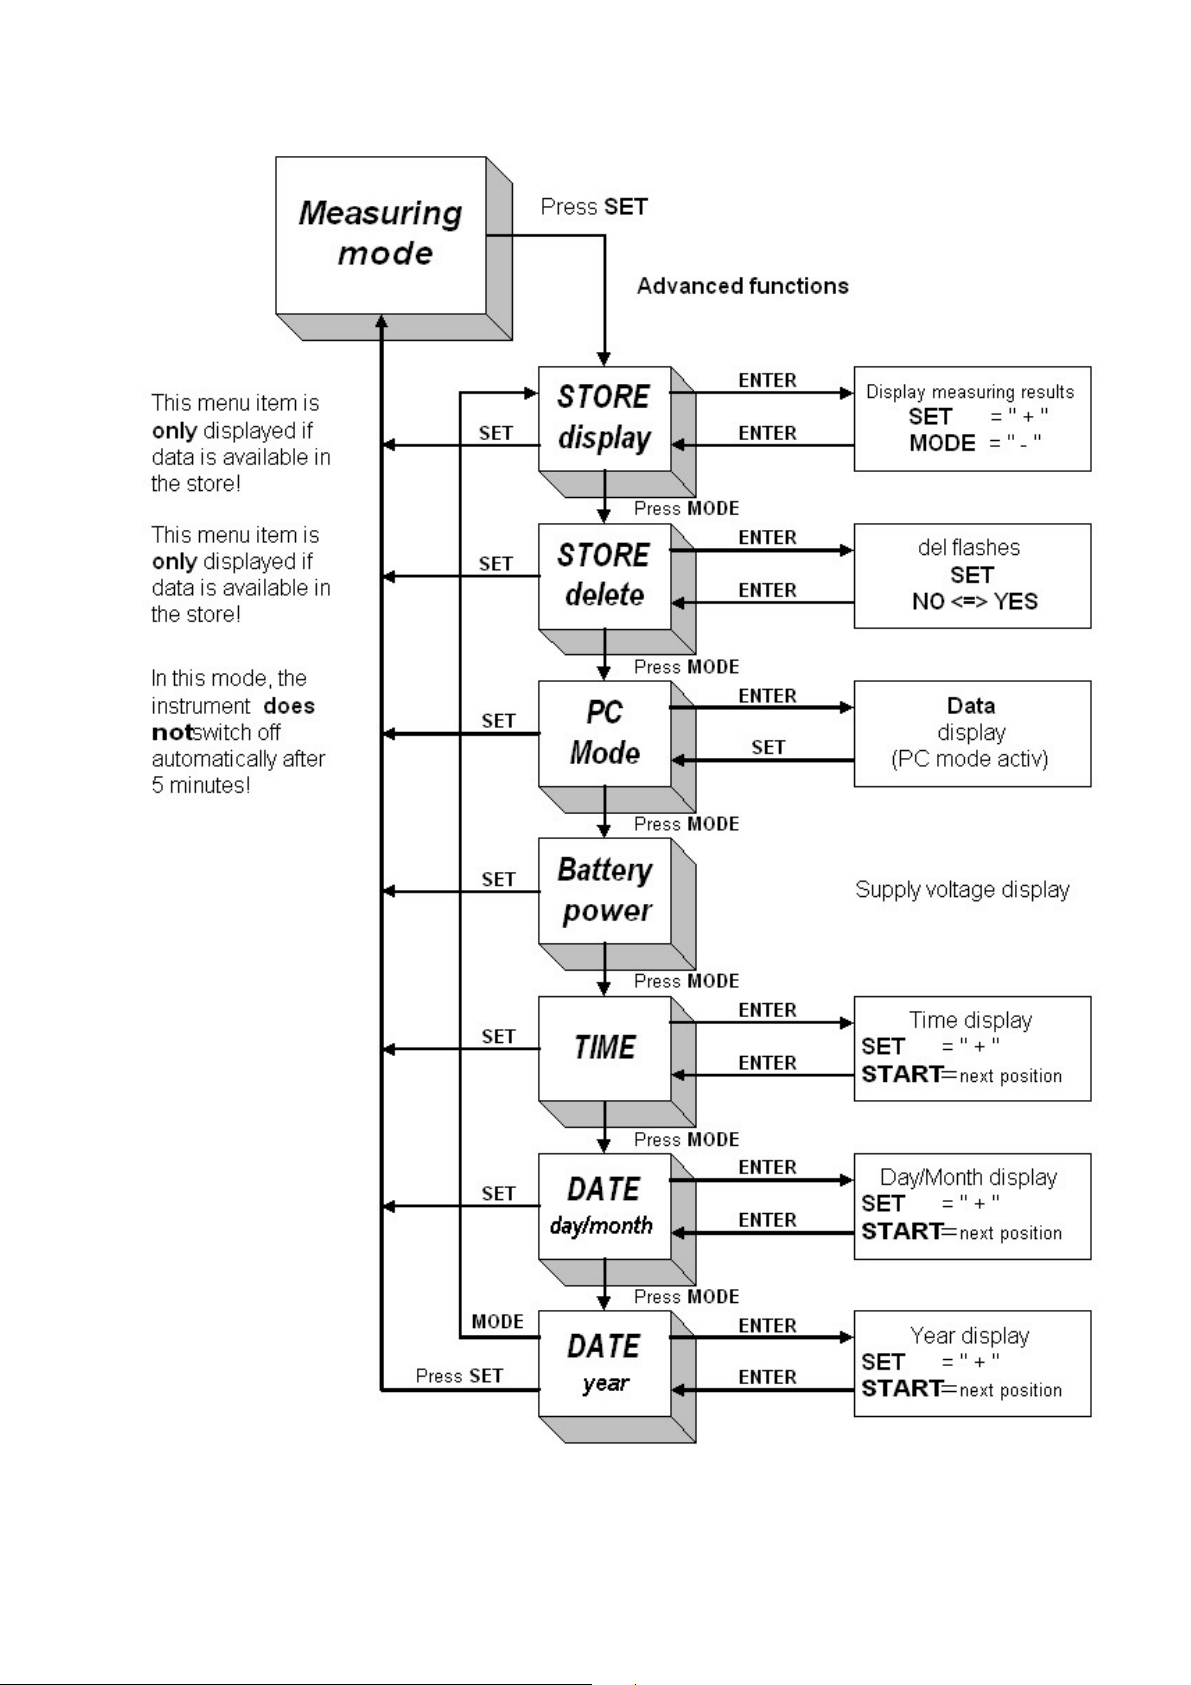
8. Advanced Functions
8 / 13
Page 9
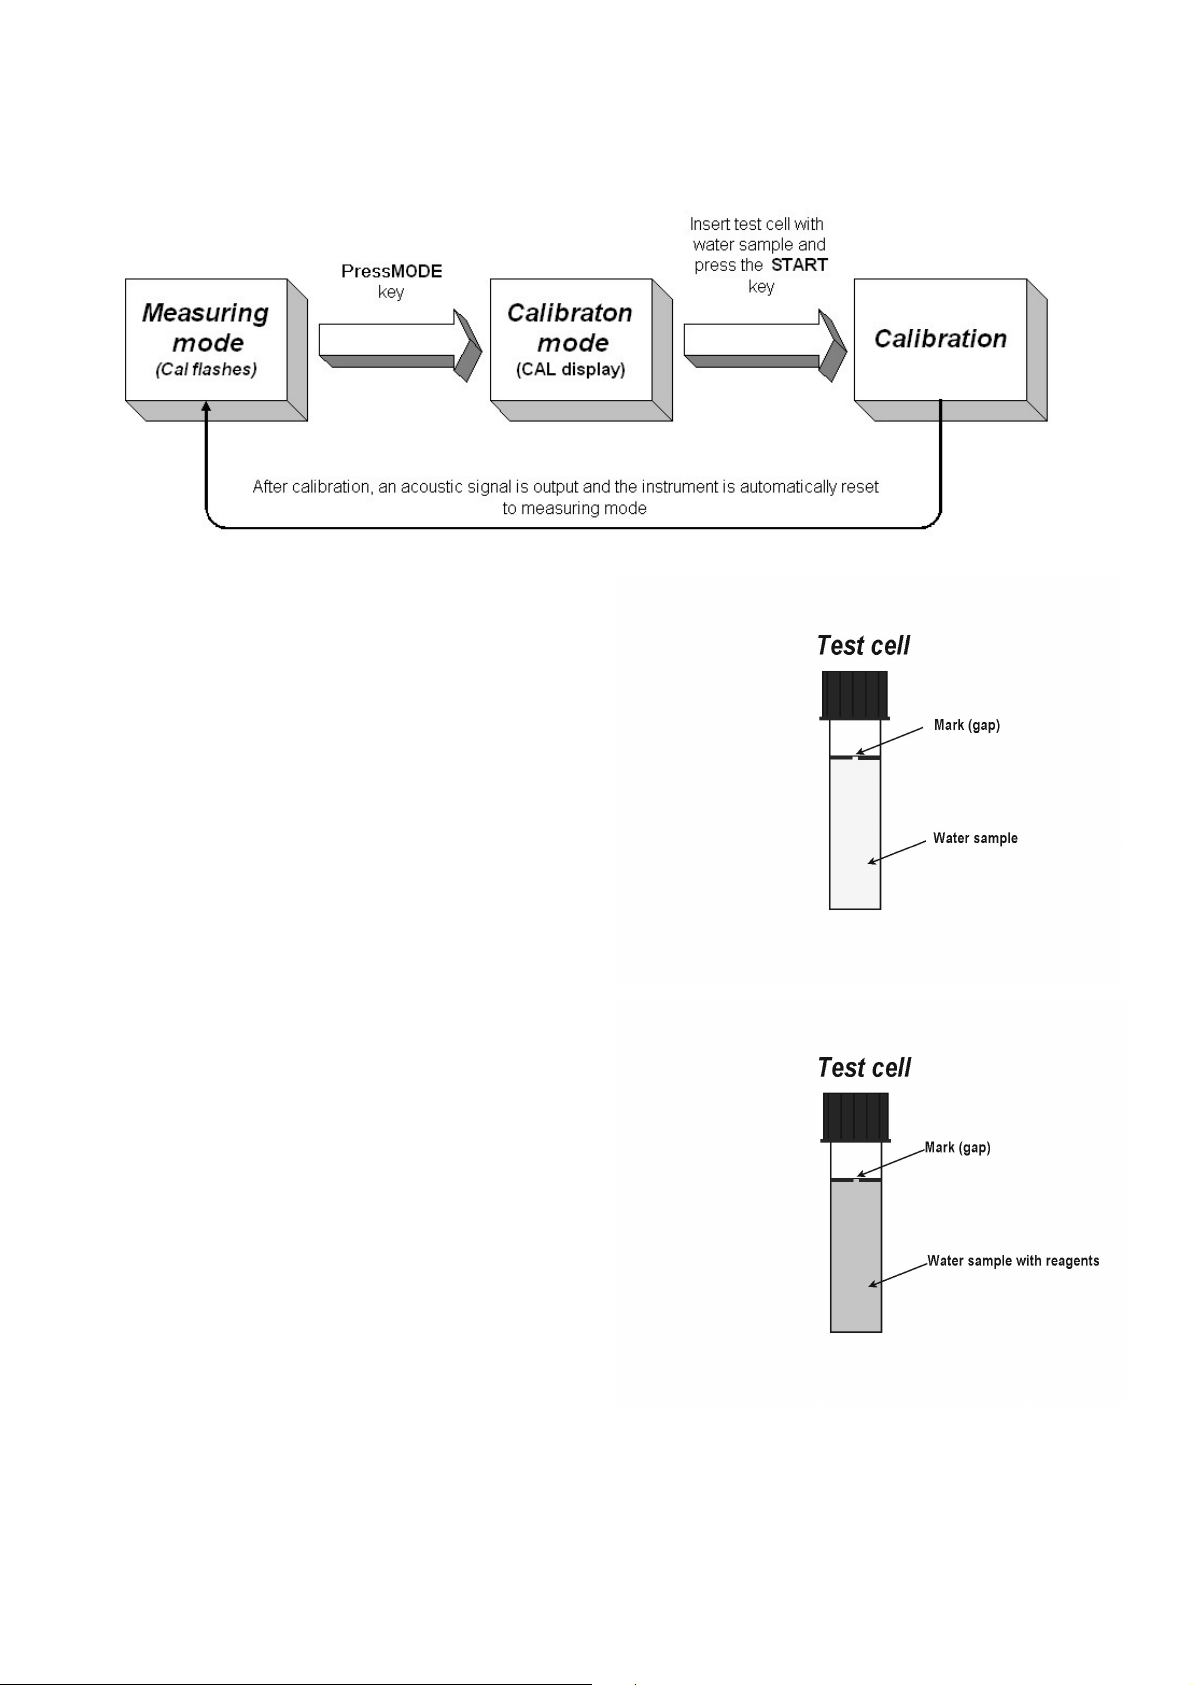
9. Calibration
Every time the instrument is switched on the CAL symbol on the display flashes as a reminder that
calibration must be carried out.
9.1 Inserting the test cell and calibrating
Take a test cell from the portable lab, rinse it with the water sample
(without reagents) and fill it up to the mark.
When using the test cell please observe the following:
- The test cell should be clean and dry
- When inserting the test cell the gap in the mark must face
towards the display
9.2 Calibration error "Err1"
If the error message "Err1" is displayed, a calibration error has
occurred (e.g. test cell is soiled). The instrument remains in
calibration mode and after reinserting the test cell the calibration
process can be continued by pressing the START key.
10. Measuring
10.1 Inserting the test cell and measuring
Empty the test cell after calibration (see 9.1), add 6 drops of
reagent A and 2 drops of reagent B and fill the test cell up to
the mark with the water sample. Screw the cap onto the test
cell and swirl gently until everything has dissolved.
When inserting the test cell into the instrument, ensure that
the mark (gap) of the test cell faces towards the display to
achieve consistent measuring results.
Insert the test cell into the test cell slot and press the START
key to commence measuring. After pressing the START key
and if the timer has been set, the measured value is automatically
displayed once the reaction time has expired. The one-minute
reaction time is shown on the display.
Press the SET key to interrupt the timer and to cancel the measurement. If the store has been activated, the
current storage location number is displayed for each measurement. If the timer has been switched off, a
reaction time of one minute has to be adhered to. Once the reaction time has expired, press the START key
to trigger measuring.
9 / 13
Page 10

10.2 Possible measuring errors and their remedy
If Err2 appears, the reagent being measured is "lighter" than the liquid used for calibration. Please check
whether calibration has been carried out with the correct liquid; if necessary, recalibrate and subsequently
repeat the measurement. If Err2 is still displayed, check your reagent and, if necessary, renew it.
Subsequently carry out a new measurement.
The measuring range is exceeded if the water sample briefly turns red or if Err4 appears on the display after
the measurement. In this case, the water sample should be diluted with distilled water in advance.
To achieve this, multiply the measured value displayed by the instrument with the dilution factor.
11. Overview of Available Parameters
Parameter Measuring range
Aluminium 0 - 1 mg/l 320181 410651
Ammonium 0 - 1 mg/l 320182 410681
Bromine 0 – 5 mg/l 320183 410521
Chlorine dioxide 0,01 – 1 mg/l 320171 410525
Chloride 0 - 200 mg/ 320172 410527
Chromate 0 - 1 mg/l 320173 410533
Iron L 0 - 1 mg/l 320178 410548
Iron H 0 - 10 mg/l 320179 410545
Hydrazine 0 - 1 mg/l 320184 410557
Copper 0 - 2 mg/l 320185 410563
Manganese L 0 - 0,25 mg/l 320186 410661
Instrument
article no.
Reagent article
no.
Manganese H 0 - 20 mg/l 320180 410569
Nitrate 0 - 10 mg/l 320187 410671
Nitrite 0 - 1 mg/l 320188 410581
Ozone 0 - 1,5 mg/l 320189 410517
Phosphate 0 - 10 mg/l 320191 410593
Silicate 0 - 2 mg/l 320192 410623
Sulphite 0 - 10 mg/l 320193 410635
If you require new reagents, please order the corresponding parameter refill packs under the
specified reagent article number!
10 / 13
Page 11
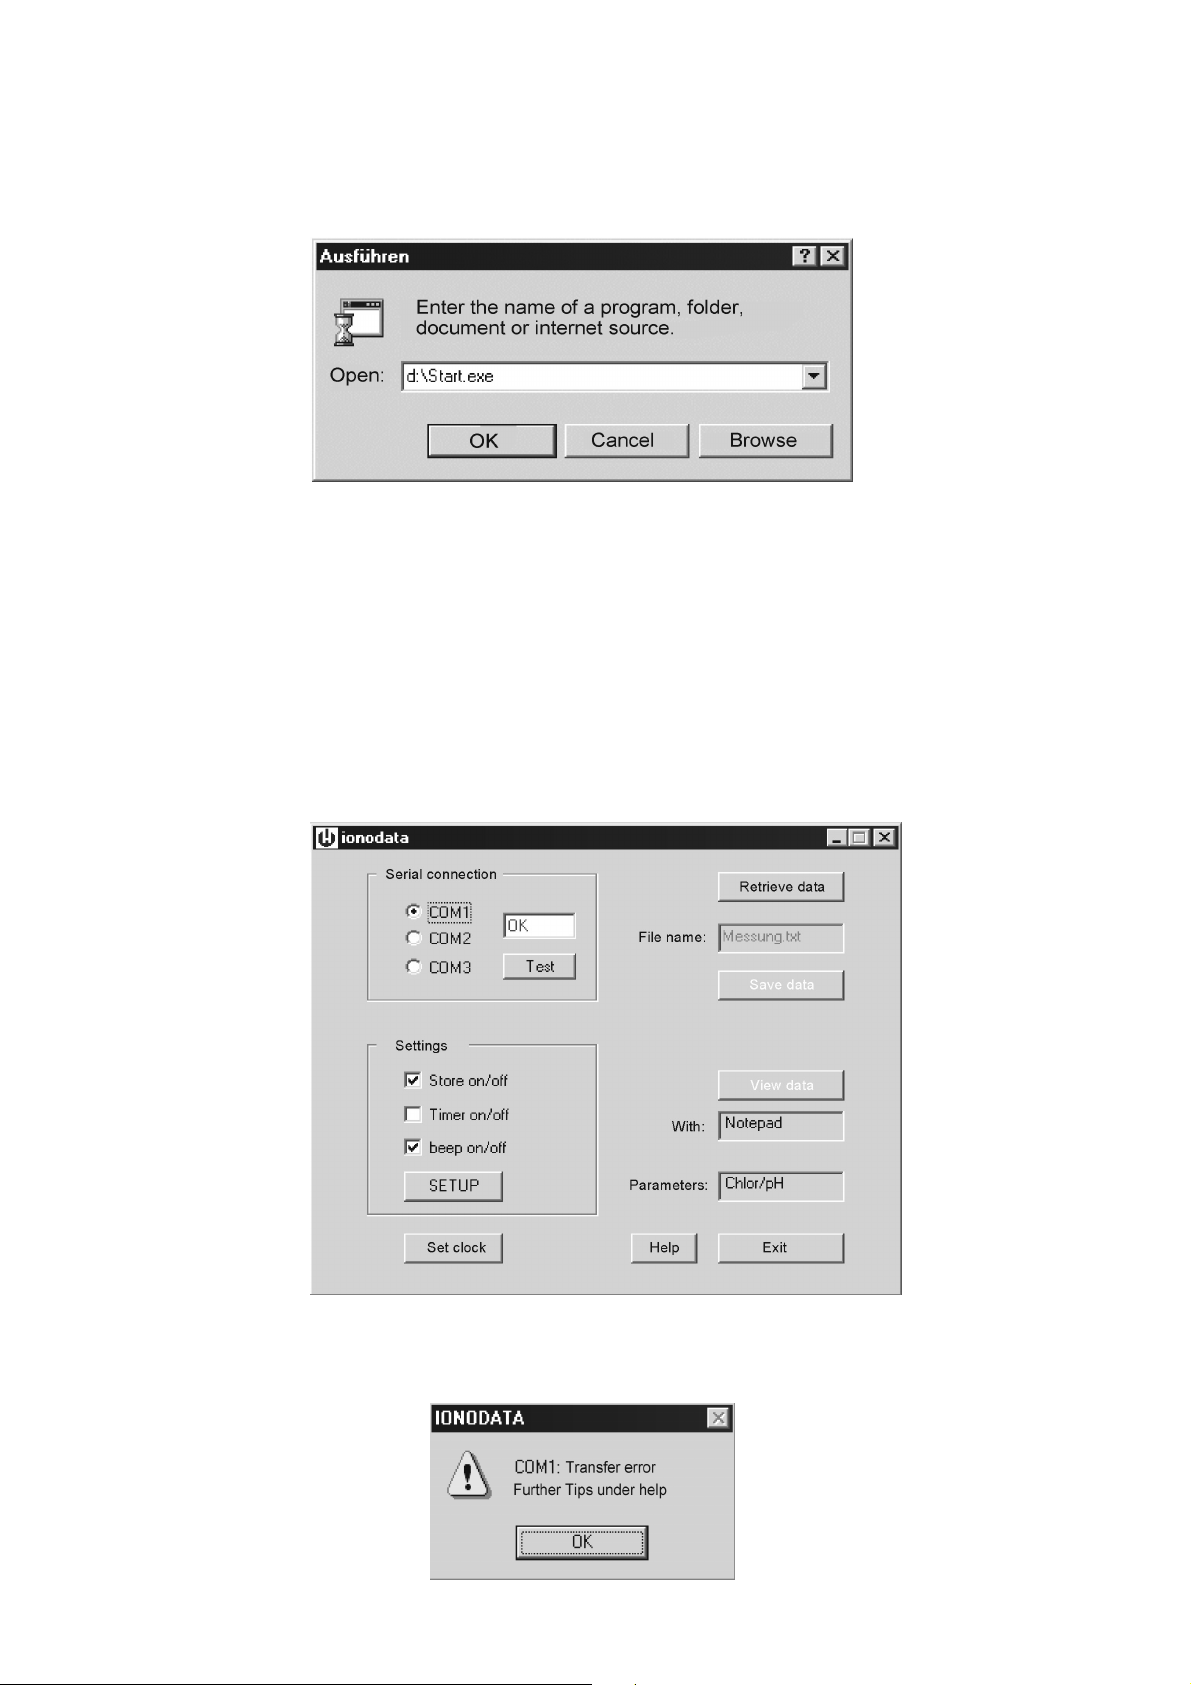
12. Software Installation and Description
12.1 Installing the software
Please insert the installation CD into your CD-ROM drive to install the data transfer software ionodata. If the
installation program does not start automatically, click on Start and then on Run… . Enter d:\Start.exe and
click on OK.
The installation wizard will guide you through the installation process.
12.2 IR interface connection
Please connect the IR interface to a free serial port (COM port) of your computer.
12.3 Starting the software
Before starting the software, activate PC mode at ionoval mono and align the IR interface to the small red
window of the ionoval mono. Click on Start, then on Programs and subsequently on ionodata to start the
program. The following window should appear:
If the IR interface has not been correctly aligned during program start-up or is more than 1 metre away from
the instrument, the following message is displayed:
11 / 13
Page 12
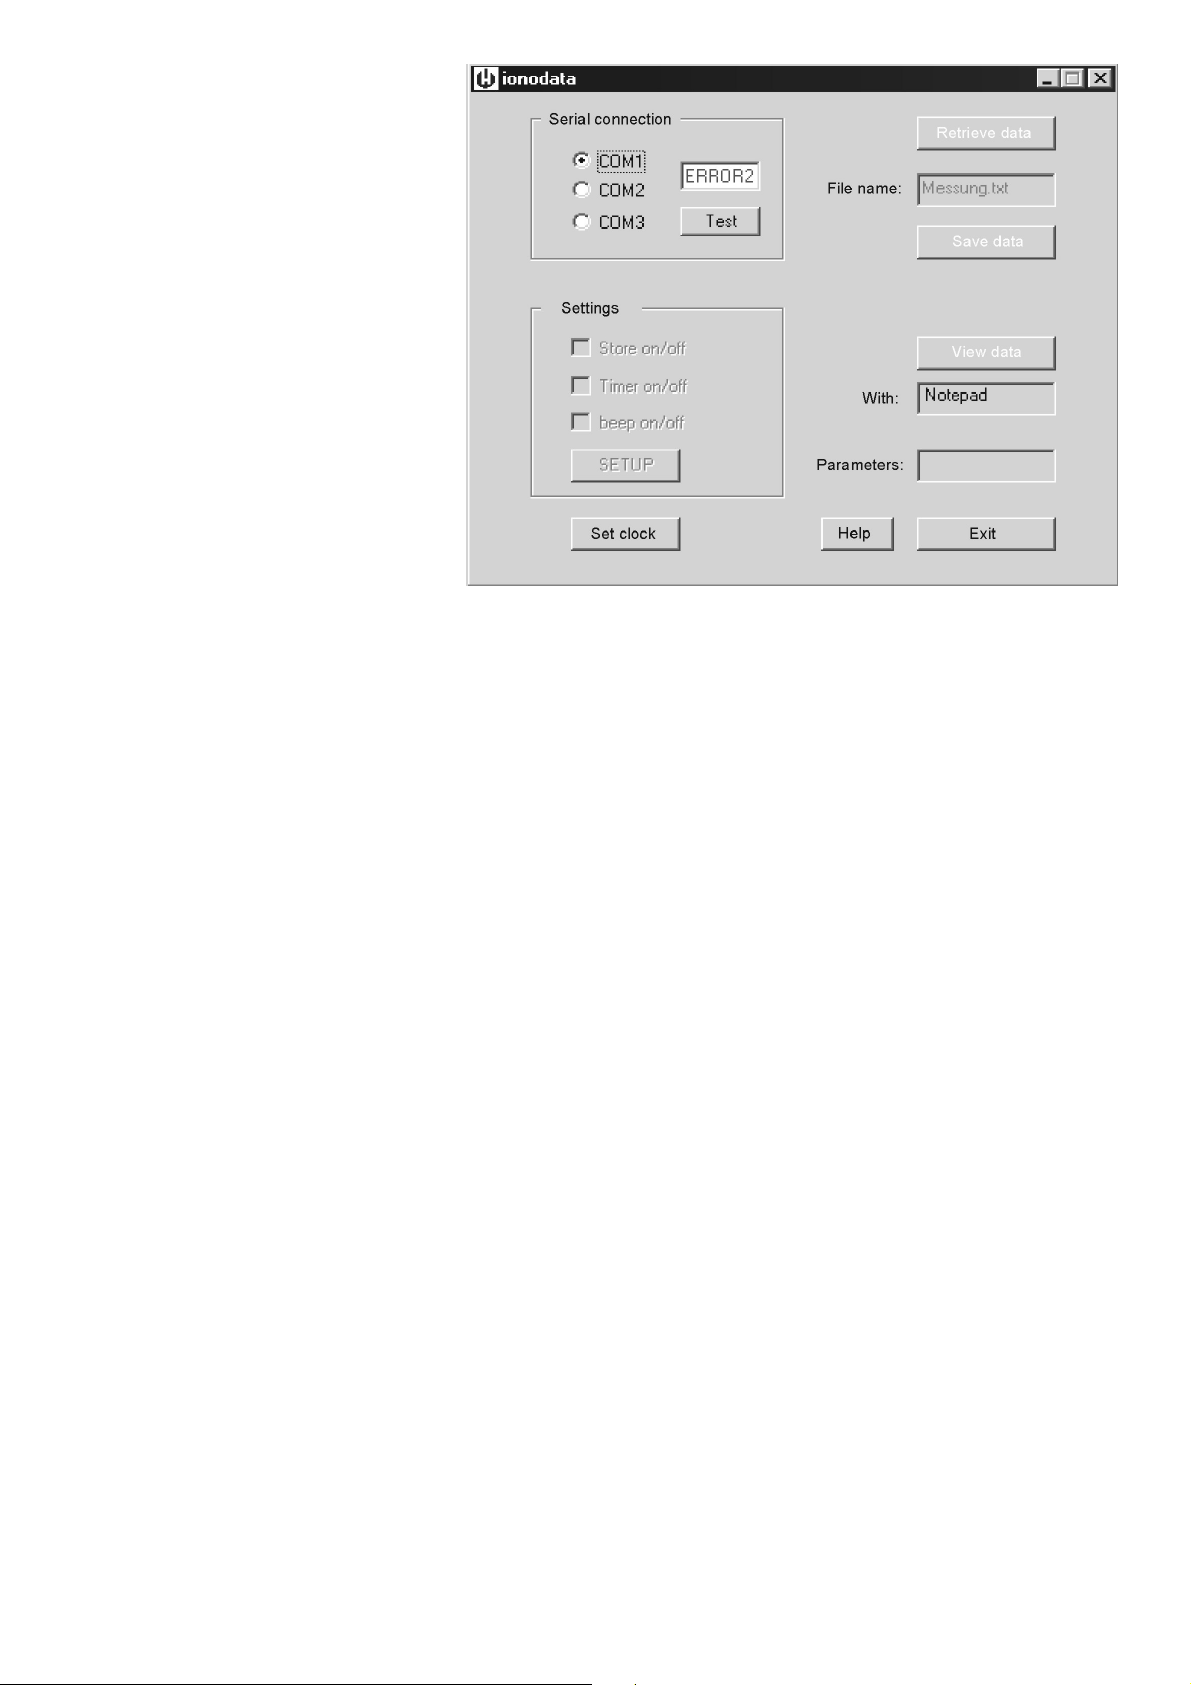
After confirming this message the
following window appears:
Please check your serial connection
and, if necessary, set the respective
COM port. Click on Test to establish
the correct connection to ionoval
mono.
12.4 Description of functions
COM1: Click on COM1 if your IR interface is connected to the first serial port.
COM2: Click on COM2 if your IR interface is connected to the second serial port.
COM3: Click on COM3 if your IR interface is connected to the third serial port.
The window above the Test button can output the following messages:
OK: Data transfer was successful.
DATA: Data transfer is active.
ERROR (1-3): An error has occurred. Detailed description under Help.
Test: Click on Test to check the data transfer.
Settings
Store on/off: Activate/Deactivate the ionoval mono store.
Timer on/off: Activate/Deactivate the ionoval mono timer.
Beep on/off: Activate/Deactivate acoustic signal when pressing ionoval mono keys.
SETUP: Click on SETUP to transfer settings to ionoval mono.
Set clock: Click on Set clock to transfer the system time and date from the PC to ionoval mono.
Retrieve data: Click on Retrieve data to transfer saved measuring data from ionoval mono to the PC.
It is possible to enter a file name for the measurements to be saved in the window above the Save data
button.
Save data: Click on Save data to save data under your entered file name in the installation directory,
subfolder ionoval measuring data.
View data: Click on View data to open the saved file with the program displayed in the window below the
View data button. The Notepad editor has been preset. A different editor can be selected by replacing the
Notepad entry in the file ionodata.ini in the installation directory.
The Parameters window displays the parameter of your ionoval mono.
Exit: Click on Exit to close the application.
12 / 13
Page 13

13. Replacing the Battery
Please loosen the two screws on the base of the instrument to change the battery. Insert the new battery
(9V alkaline), always observe correct battery polarity. Subsequently reassemble the housing.
Dispose of the old battery in accordance with national regulations.
14. Technical Data
Voltage supply : 9V DC battery
Power supply unit : 9V DC, optional
Measuring range : 0 -1.5 mg/l ozone
Display : 4 digits
Measured value store : 100 measured values
Real-time clock : yes
Timer for reaction time : yes
Energy saving mode : yes
IR interface : optional
Software for interface : optional
Ambient temperature : 0 - 45 °C
Weight : Approx. 0.9 kg or 1.25 kg (with optional accessories)
We reserve the right to make technical changes without notice in the interest of constantly improving our
products!
ionoval_mono_Ozon_GB090209_D.doc
13 / 13
 Loading...