

Page 1
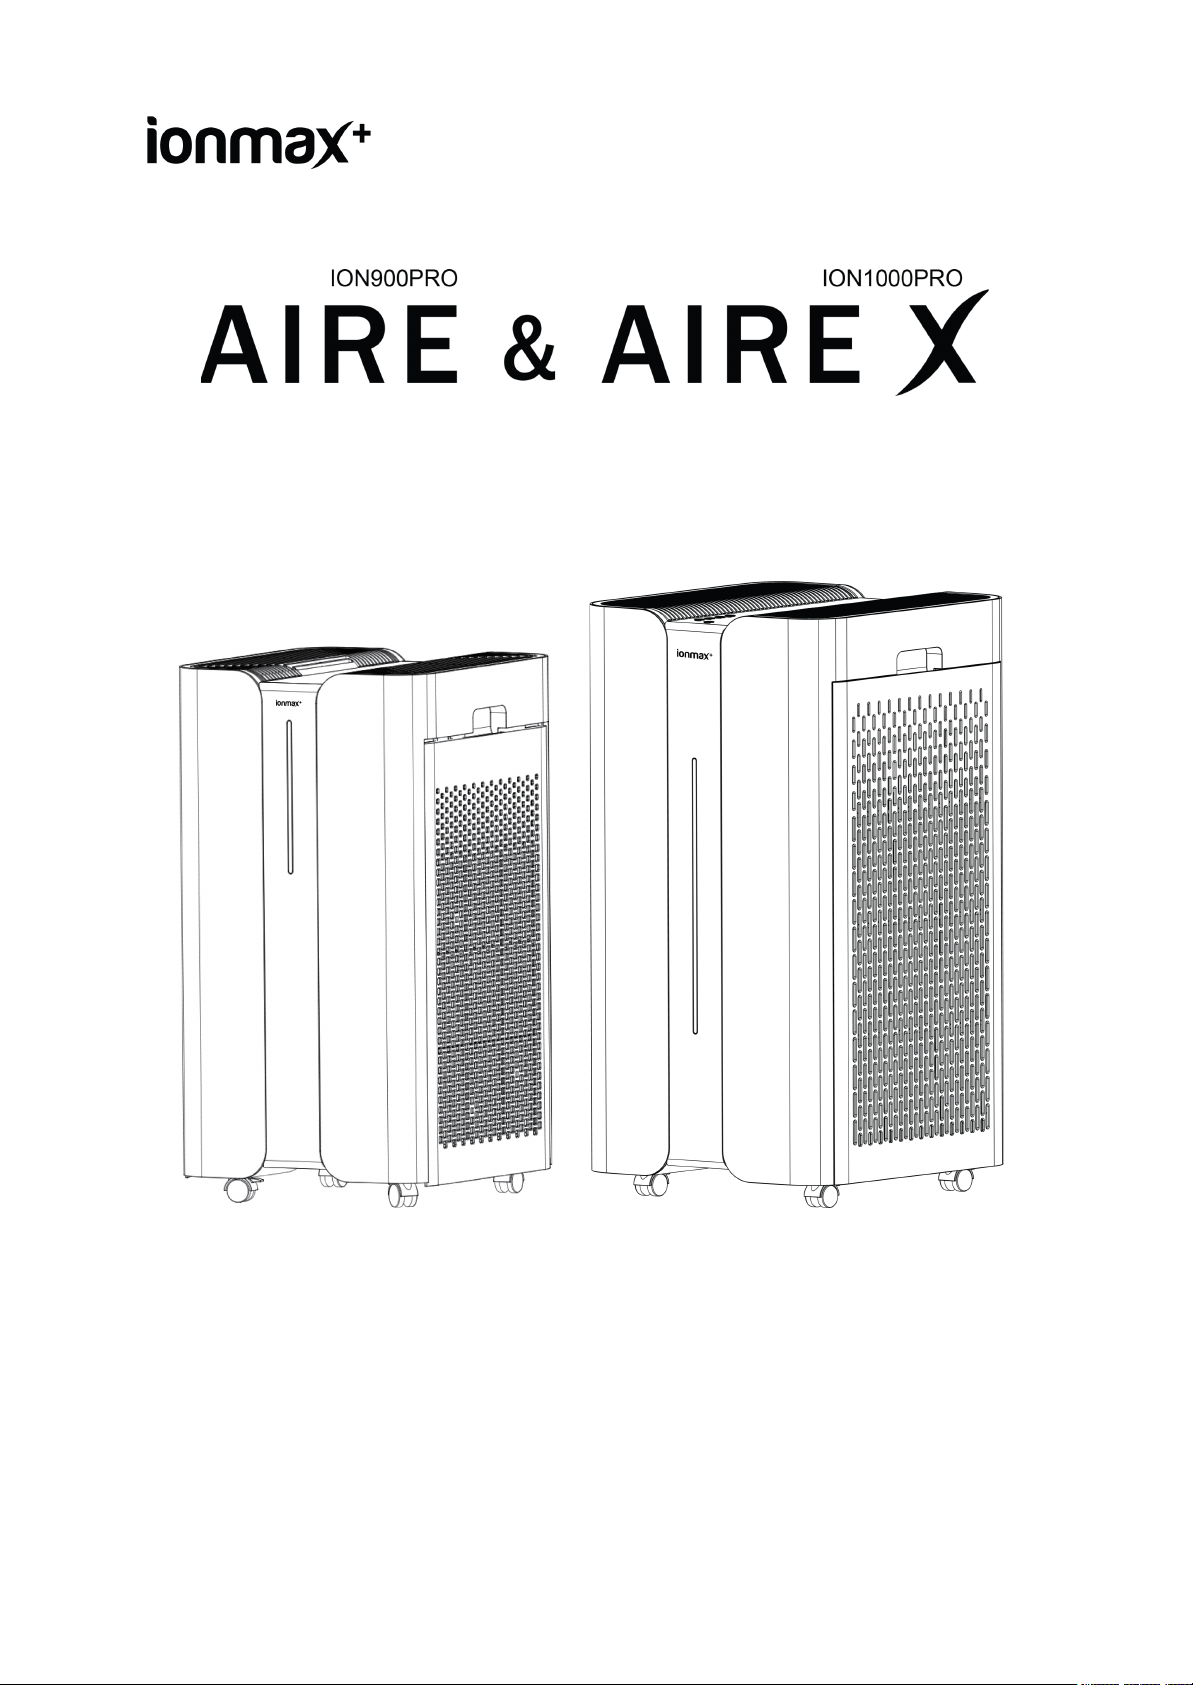
High-Performance HEPA UV Air Purifier
User Manual
Version 1.0. Updated July 2022.
Page 2

Dear Customer
2
Thank you for purchasing the Ionmax+ Aire air purifier. The Ionmax+ Aire air purifier can help
to improve the indoor air quality in your home or office. Paired with the Ionmax WiFi app, you
can easily control and monitor your air purifier and indoor air quality from your mobile phone.
Please read this manual carefully before use to ensure proper usage and save these
instructions for future reference.
The package includes
● Ionmax+ Aire air purifier
● User manual
⚠ Note: Remove plastic bags from filters before first use
Page 3

Table of Contents
3
Safety Instructions 4
Product Diagram 5
Specifications 6
Purification System 7
Unit Setup 8
Operating Instructions 9
Power Button 9
IONX-Shield Button 10
Child Lock Button 10
UVX-Shield Button 10
Sleep Button 10
Timer Button 10
Filter Reset 11
Fan Speed Button 11
WiFi Button 11
Mobile App Setup 12
Cleaning and Maintenance 14
Storage Instructions 15
Filter Replacement 15
Troubleshooting Guide 17
Warranty Details 18
Warranty Registration 19
Page 4

Safety Instructions
PLEASE READ ALL THE TIPS AND WARNINGS BELOW BEFORE USING THE
AIR PURIFIER.
4
● Use the unit only as directed in the User Manual.
● Do not allow children or persons with reduced physical, sensory, or mental
capabilities to operate the unit without adult supervision.
● Only designed for use in a 240V, 50Hz outlet.
● Use indoors only.
● Only operate the unit when it is fully assembled.
● Never touch the unit with wet hands or allow it to come into contact with water.
● Switch off all controls before unplugging the power supply.
● Always disconnect the unit from the power supply before moving or cleaning the unit
and when the unit is not in use.
● When removing the power plug, always hold the plug and never pull the cord.
● This air purifier is not a substitute for proper ventilation, regular vacuum cleaning or
an extractor hood or fan while cooking.
● Reserve sufficient space around the unit for proper airflow, as recommended under
Unit Setup.
● Do not use the unit in bathrooms, kitchens, humid areas, near fireplaces, or in
proximity to flammable or combustible products, as electric shock and a fire hazard
may result.
● Do not use water or other liquids, including flammable products, to clean the unit.
● Never operate the unit if the plug or cord appears damaged.
● Contact the authorised distributor or qualified personnel immediately for examination
and repair.
● Do not insert fingers or foreign objects into the air inlet and outlet or block them by
placing items on the air outlet or in front of the air intake.
● Do not place anything on top of the unit and do not sit on the unit. Do not place the
unit directly below an air conditioner, as condensation may drip into the unit.
● Do not operate this unit when using indoor insect repellents (aerosols) or in places
with oily residues, burning incense or chemical fumes.
● Do not use the unit in a room with significant temperature changes, as this may
cause condensation inside the unit.
Page 5
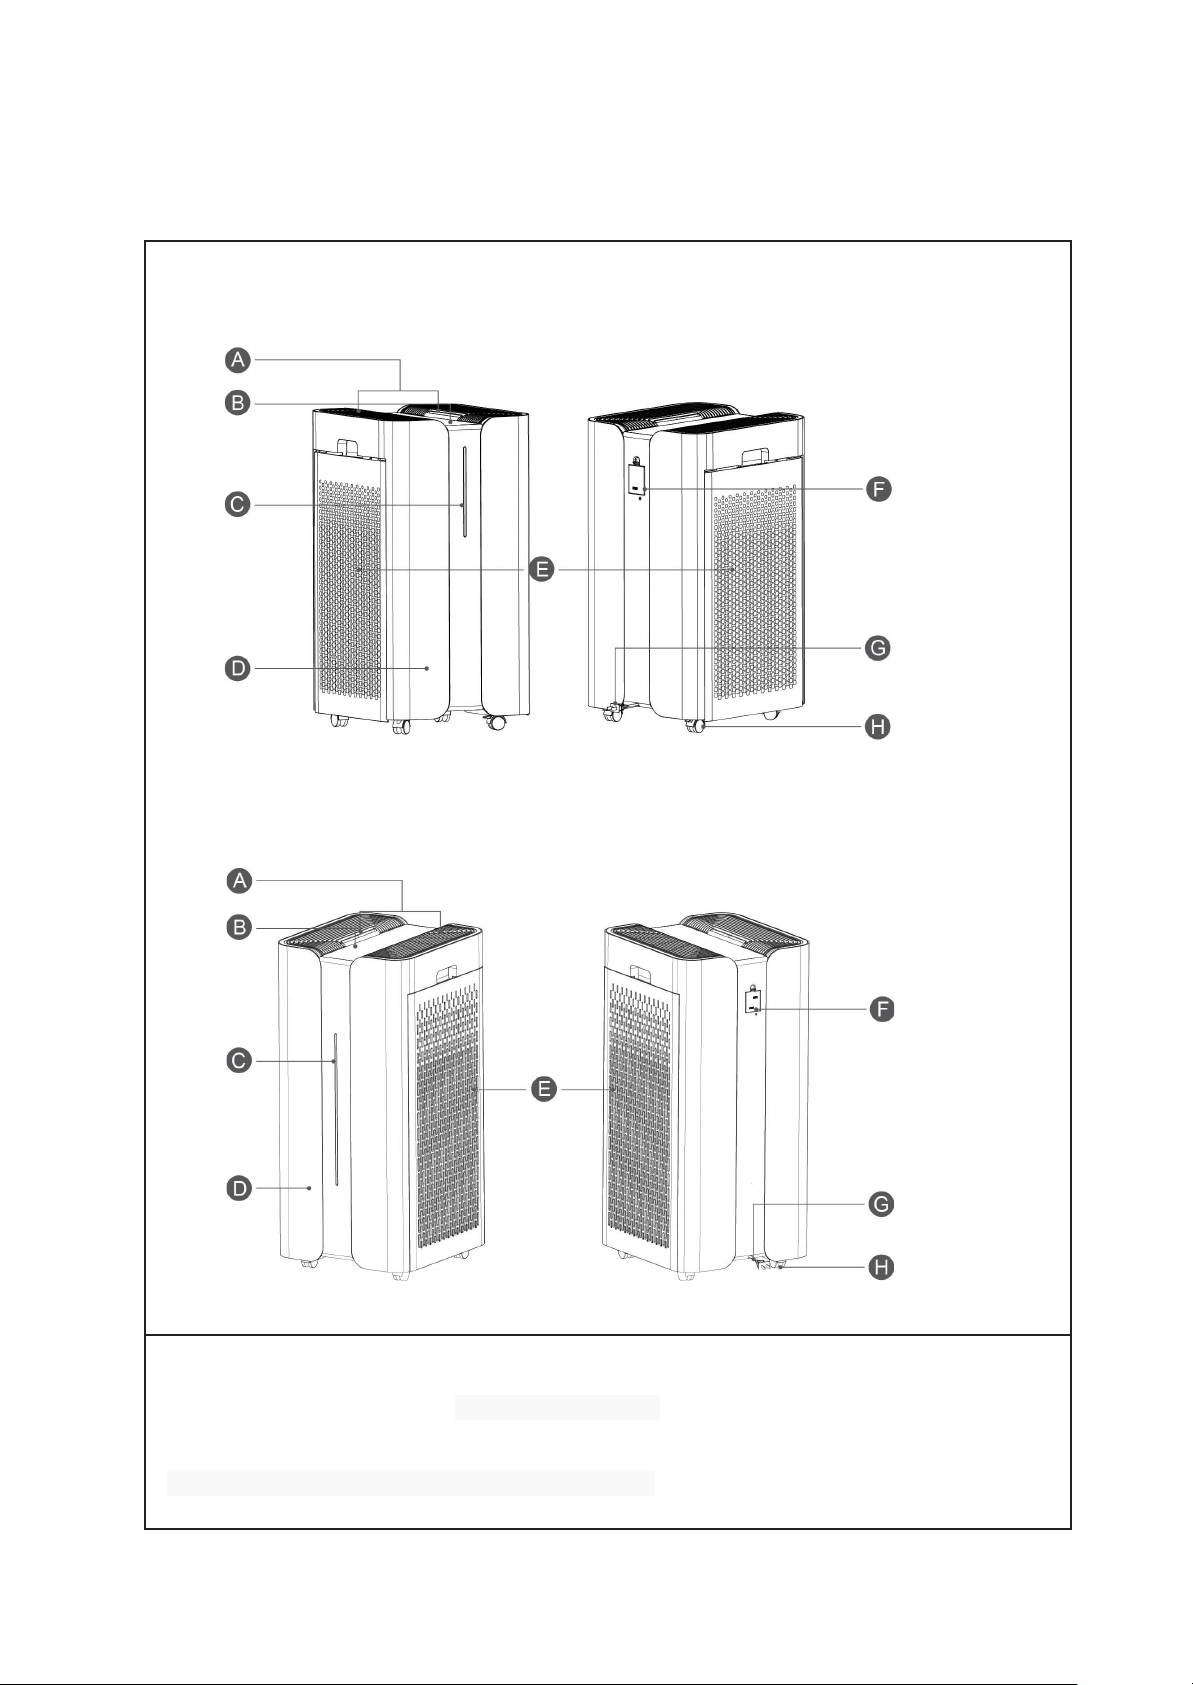
Ionmax+ Aire
Ionmax+ Aire X
Ⓐ Air Outlet Ⓔ Air Inlet
Ⓑ Control Panel Ⓕ Air Quality Sensor
Ⓒ Air Quality Indicator Ⓖ Power Cord
Ⓓ Body Ⓗ Universal Wheels
5
Product Diagram
Page 6

Specifications
Ionmax+ Aire
Ionmax+ Aire X
SKU
ION900PRO
ION1000PRO
Room Size
77 m
2 (1)
- 234 m
2 (2)
1) ANSI/AHAM AC-1 2015
2) NRCC-54013-2011
85 m
2 (1)
- 260 m
2 (2)
1) ANSI/AHAM AC-1 2015
2) NRCC-54013-2011
CADR (m3/h)
900 m3/h
1000 m3/h
Air Flow
Top
Top
HEPA Filter
H13
H13
Ion-X Shield Ioniser
Yes
Yes
UVX-Shield
Germicidal UV Light
Yes
Yes
Fan Speeds
4
4
SmartSens
Air Quality Monitor
Yes
Yes
Air Filter
Replacement Alert
Yes
Yes
Air Filter
Replacement
6 - 12 months
6 - 12 months
Timer
Up to 12 hours
Up to 12 hours
WiFi App Control
Yes
Yes
Rated Voltage
240V, 50Hz
240V, 50Hz
Power Consumption
105 W
95 W
Noise Level
~66dB(A)
~66dB(A)
Warranty
2 years
2 years
Dimensions
370 x 396 x 691 mm
370 x 400 x 796 mm
Weight
14.2 kg
15 kg
6
Page 7
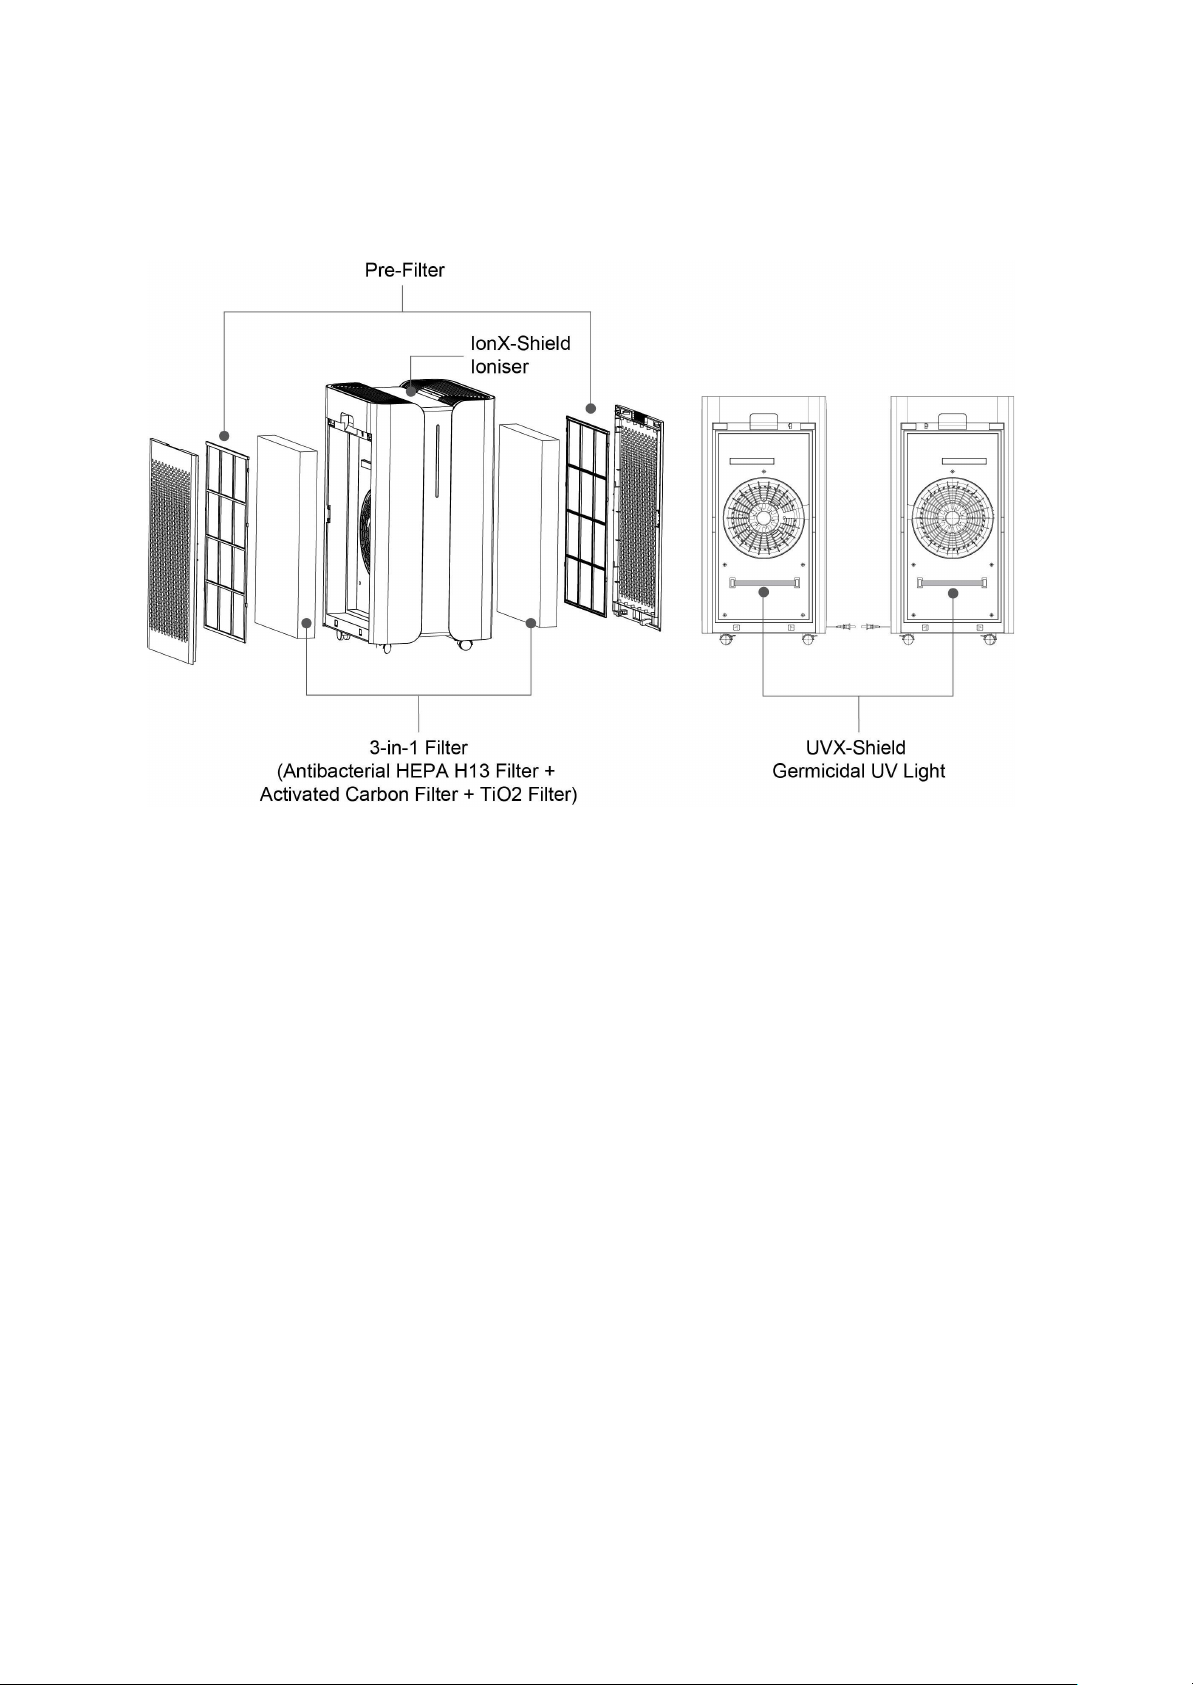
Purification System
7
① Pre-Filter
Traps large airborne particles, such as hair, dust, and pet dander.
② Antibacterial HEPA H13 Filter
Captures 99.97% of microscopic allergens and germs as small as 0.3 microns from the air
with a proven ability to kill bacteria and prevent mould growth.
③ Activated Carbon Filter
Neutralises odours caused by smoke and VOCs emitted from new furniture, household
disinfectants, paint and more.
④ TiO2 Filter
Breaks down organic compounds such as VOCs through an oxidation process to remove
odours from the air.
⑤ UVX-Shield Germicidal UV Light
Inactivates viruses and bacteria trapped within the air purifier through direct UV-C light
exposure.
⑥ IONX-Shield
Releases negative ions into the surrounding air to help with the removal of airborne particles
and freshens the air.
Page 8
Unit Setup
8
1. Remove the unit from the box and plastic bag.
2. Place the unit on a firm, flat, and level surface.
3. Open the side panels and remove the plastic bags from the filters (refer to Filter
Replacement Instructions for a detailed guide).
4. Replace the filters and side panels into position.
5. Plug the unit into a suitable electrical outlet to begin operation.
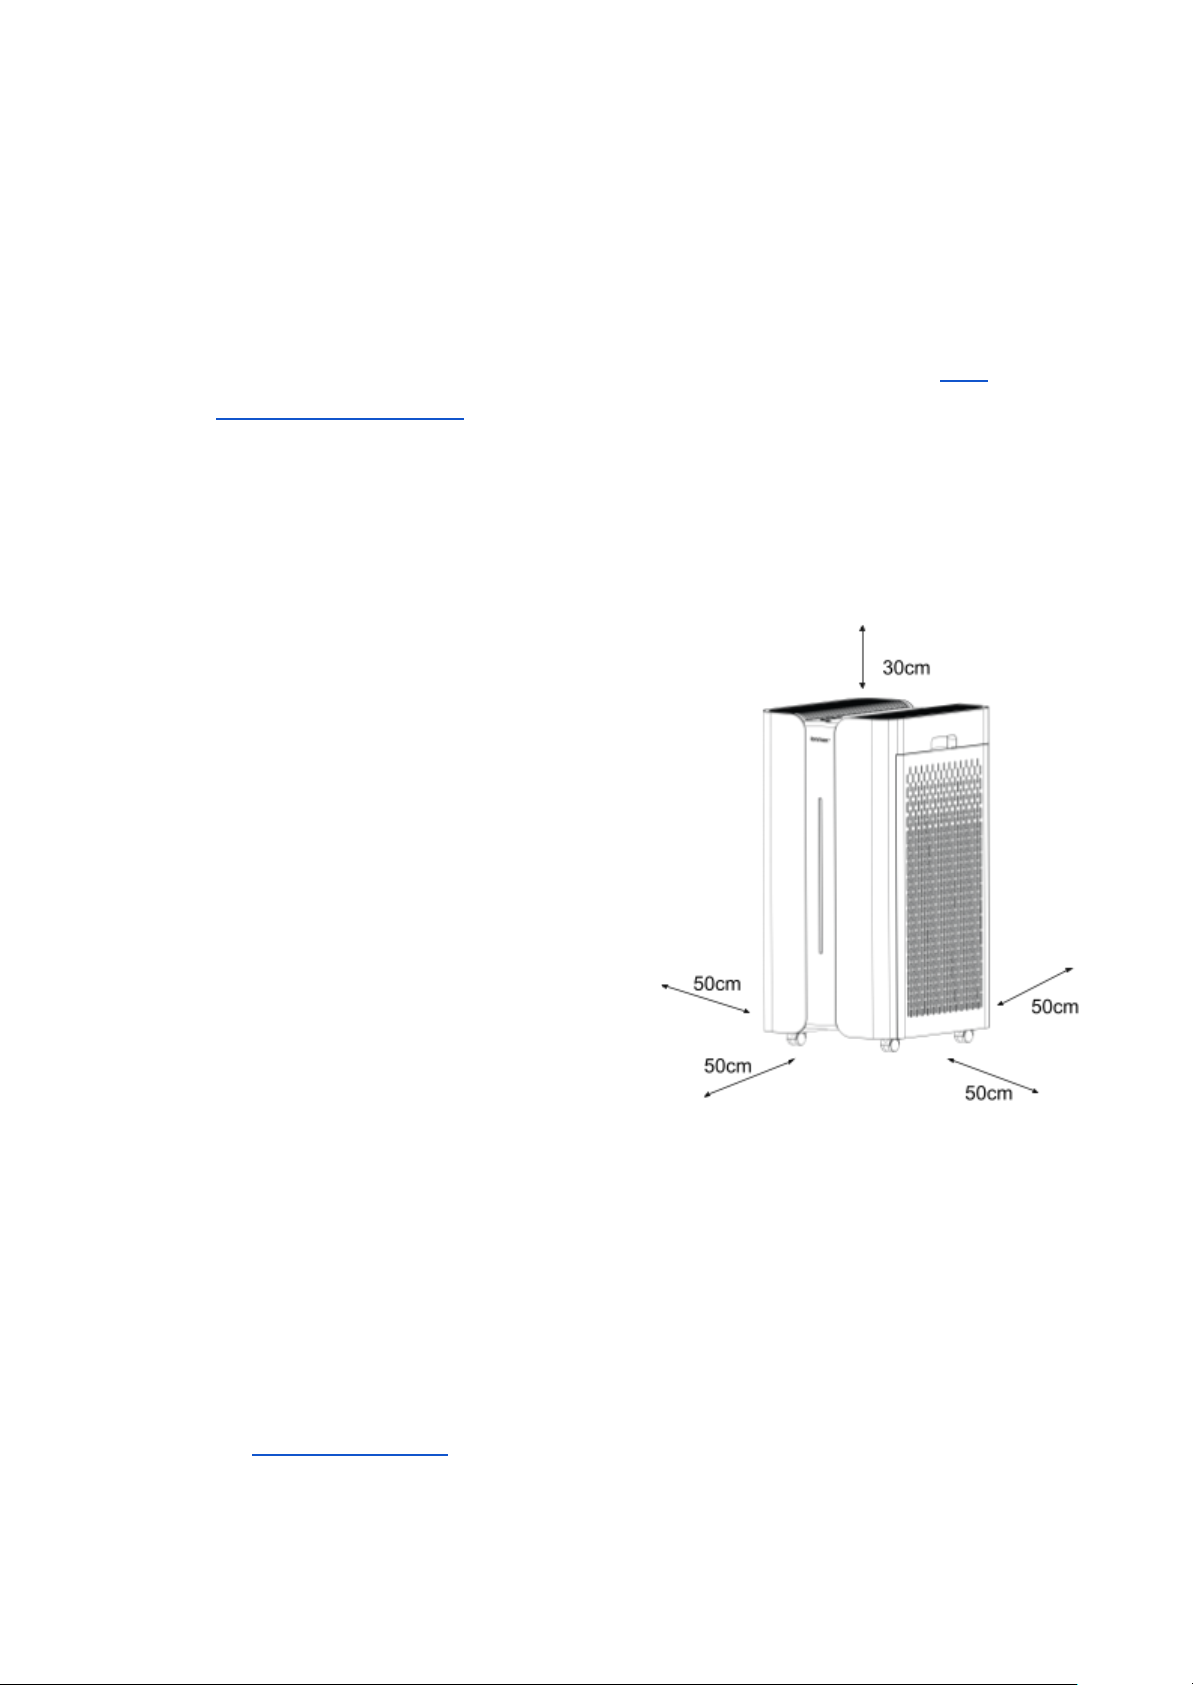
Unit Placement
For proper airflow, please follow these guidelines
on where to place the unit:
● Avoid placing the unit behind curtains,
under windows, near furniture or shelves,
or near any obstacle
● Ensure its air inlet and outlet are not
blocked
● Position the unit at least 50cm away from
any wall or furniture
● Reserve at least 30cm of space above the
unit
Important Notes
● Move the unit using its universal wheels; avoid lifting the unit to avoid injury.
● When the unit is not in use, switch it off and unplug it from the electrical outlet.
● If the unit will not be in use for a long period of time, pack and store it according to
the Storage Instructions.
Page 9
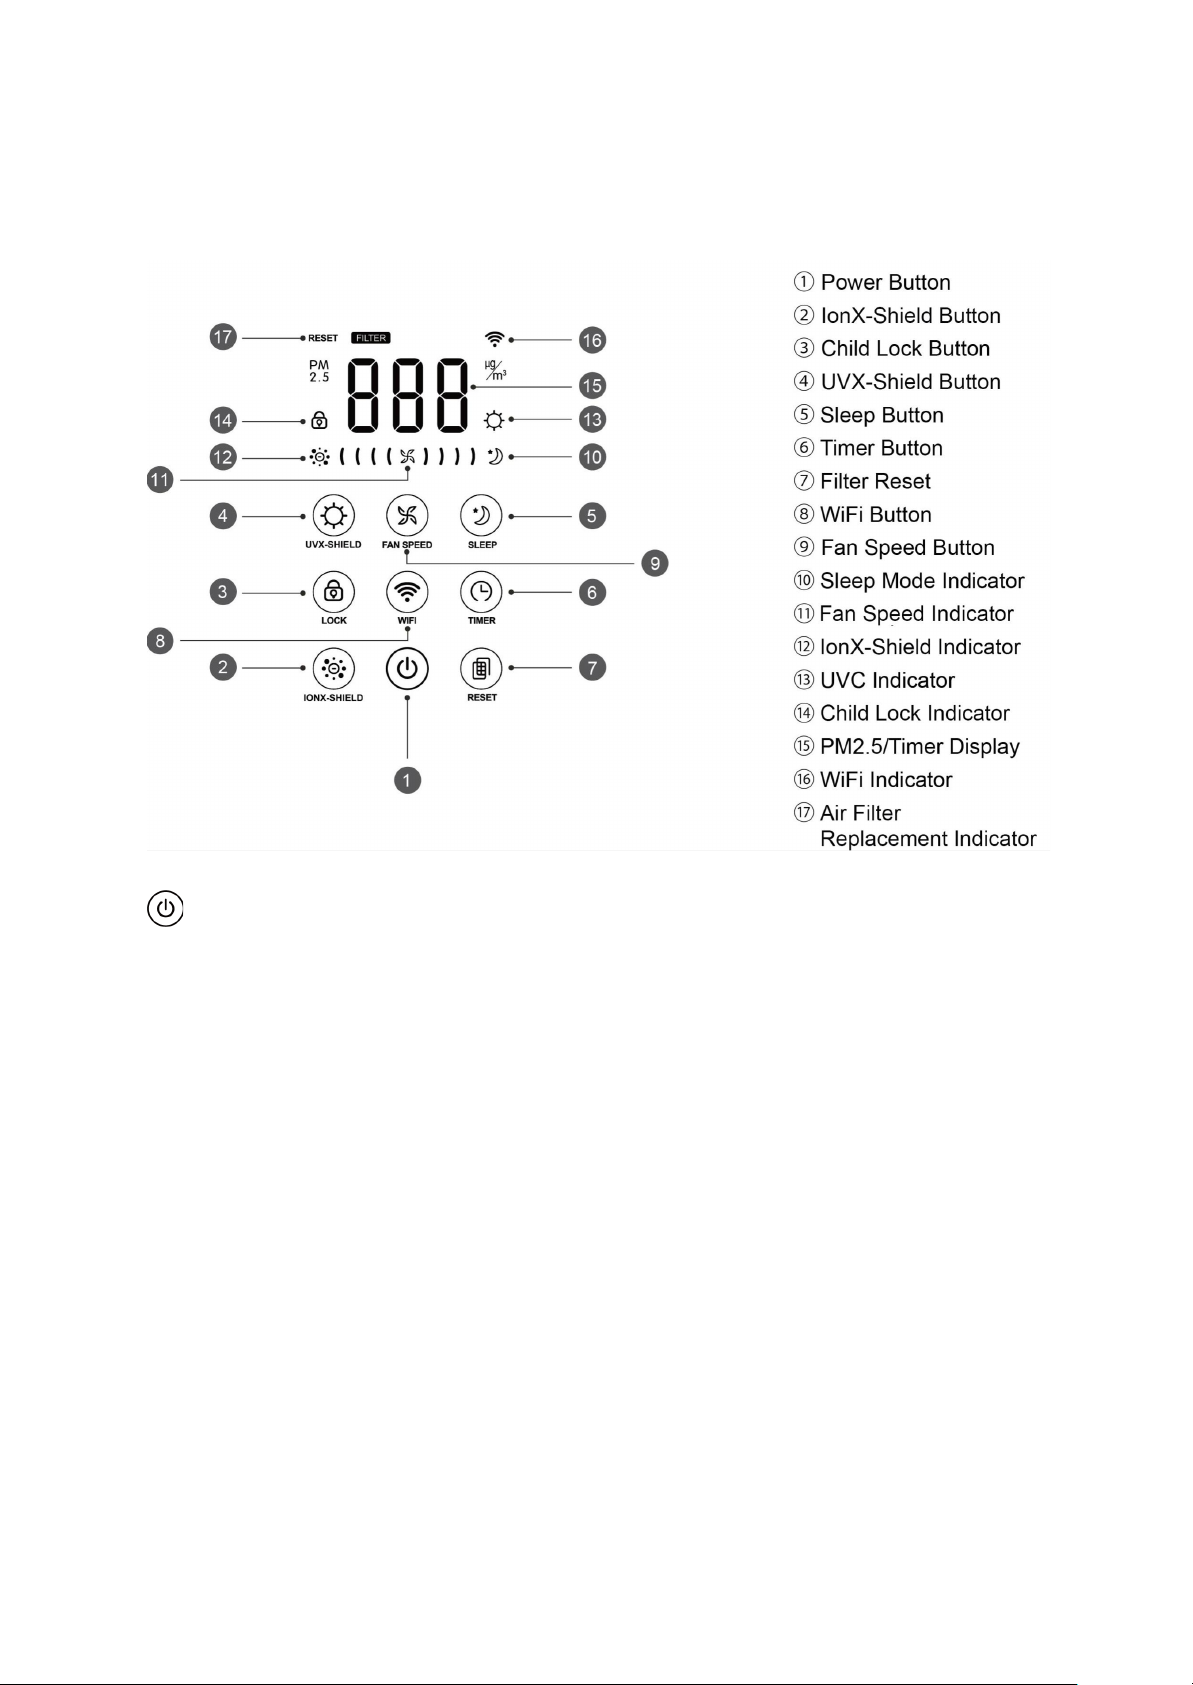
Operating Instructions
Digital Display
Air Quality Indicator Colour
Indoor Air Quality Level
0-35
Blue
Excellent
36-75
Green
Good
76-150
Yellow
Average
150+
Red
Poor
9
Power Button
Connect the unit to a suitable power supply, then touch the Power Button.
The unit will switch on with a notification sound and begin operation in Auto mode. The Air
Quality Indicator will flash for about 30 seconds while the Air Quality Sensor starts up.
The unit will then indicate the detected indoor air quality level through the PM2.5 level on the
digital display and the Air Quality Indicator’s colour.
Page 10

IONX-Shield Button
10
Touch the IONX-Shield Button to enable the Ioniser function. The IONX-Shield Indicator will
light up, and the built-in negative ion generator will start to release negative ions to freshen
the air.
Touch the IONX-Shield Button again to disable the Ioniser function. The IONX-Shield
Indicator light will switch off.
Child Lock Button
While the unit is in operation, hold the Child Lock Button for approximately 3 seconds to
enable Child Lock. The Child Lock Indicator will light up and all control panel buttons will be
locked to prevent unintended operation, especially by children.
To disable Child Lock, hold the Child Lock Button for approximately 3 seconds. The Child
Lock Indicator light will switch off, and the control panel buttons will be unlocked.
UVX-Shield Button
Touch the UVX-Shield Button to enable the UV disinfection function. The UVX-Shield
Indicator will light up, and the built-in UV lamp inside the unit will switch on.
Touch the UVX-Shield Button again to disable the UV disinfection function. The UVX-Shield
Indicator light will switch off.
Sleep Button
Touch the Sleep Button to enable Sleep Mode. The unit will change to Low fan speed and
switch off all control panel and indicator lights, except for the Sleep Mode Indicator and the
Power Button indicator.
Touch the Sleep Button again to disable Sleep Mode. The Sleep Mode Indicator light will
switch off, and the unit will return to its normal mode of operation.
Timer Button
While the unit is in operation, touch the Timer Button repeatedly until the digital display
shows the preferred purifying time between 1 to 12 hours ( ~ ). The unit will switch
off after the allotted time has passed.
When the timer is enabled, the digital display will cycle the hours remaining with the current
air quality level. If the timer is enabled during Sleep Mode (digital display is off), touch the
Timer Button once to check the time remaining on the digital display for 5 seconds.
To switch off the Timer, touch or hold the Timer Button until the digital display shows 0 hours
( ). If no timer is set, the unit will operate continuously.
Page 11
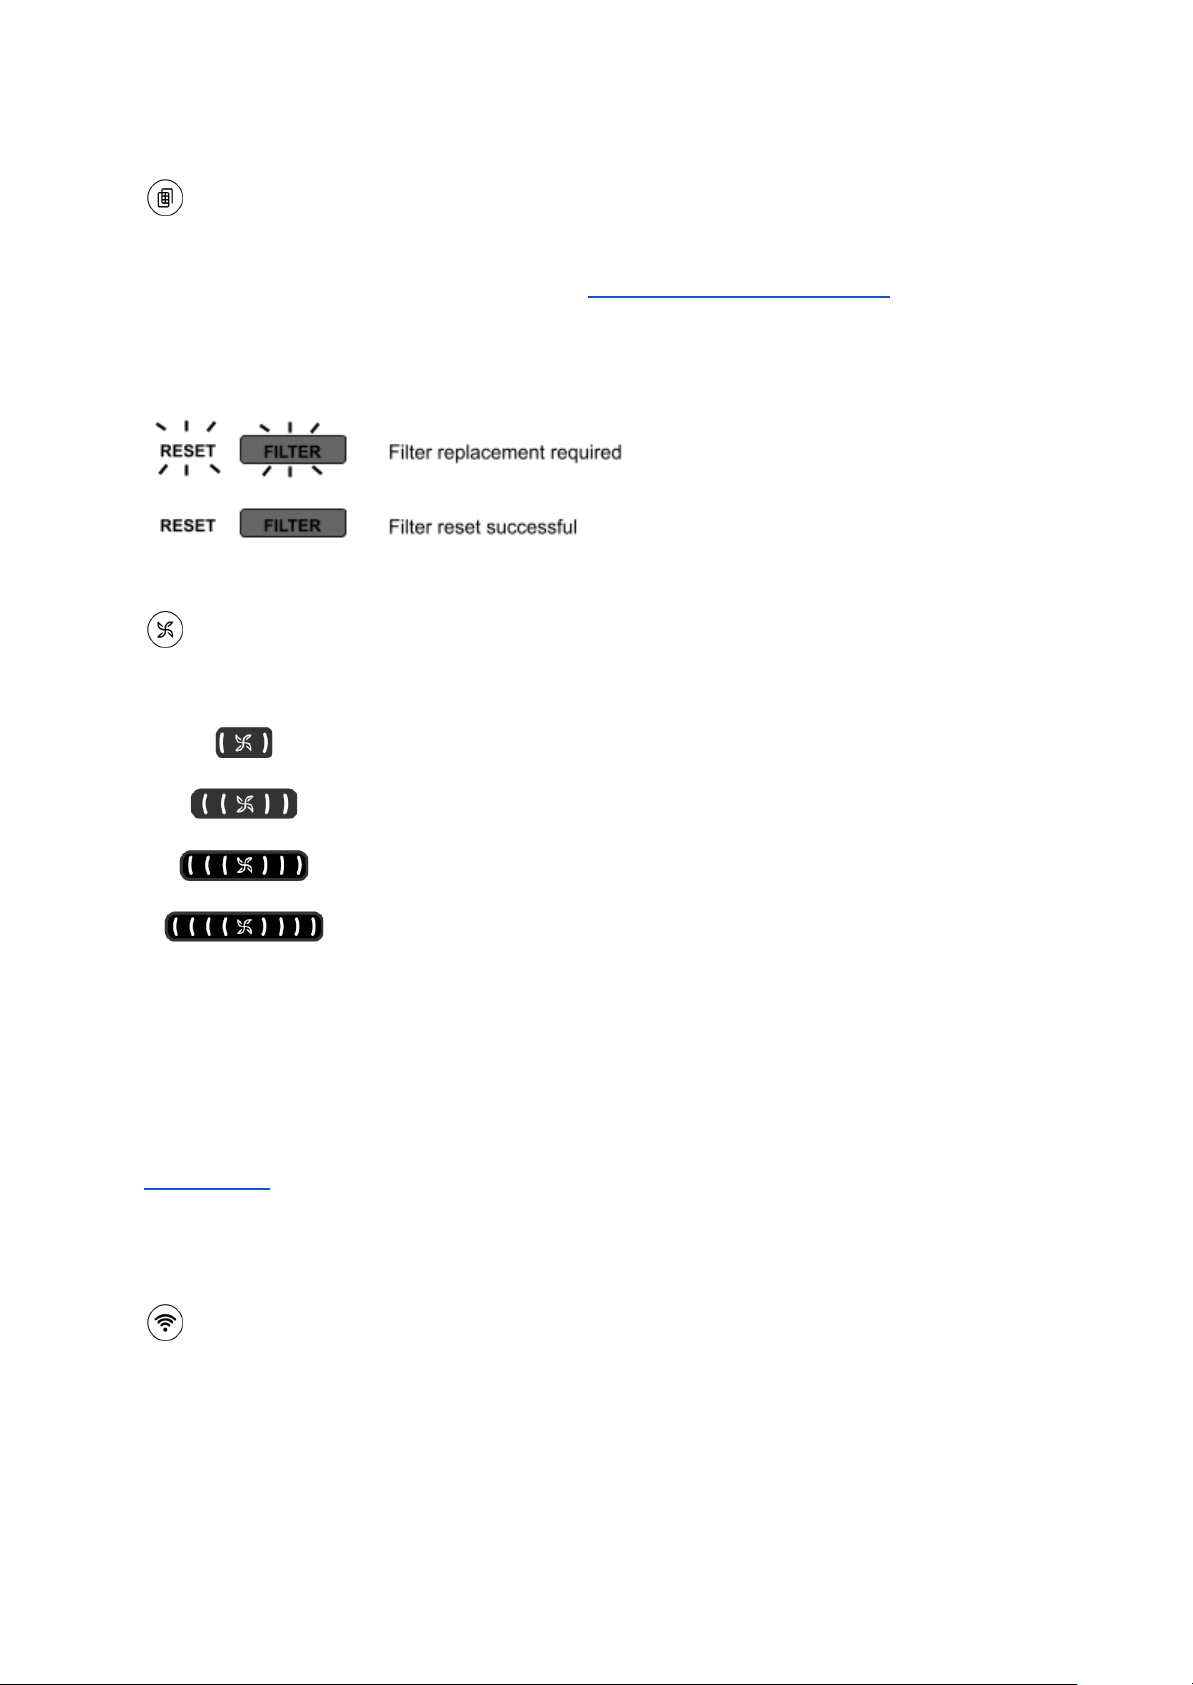
Filter Reset
LOW
MID
HIGH
TURBO
11
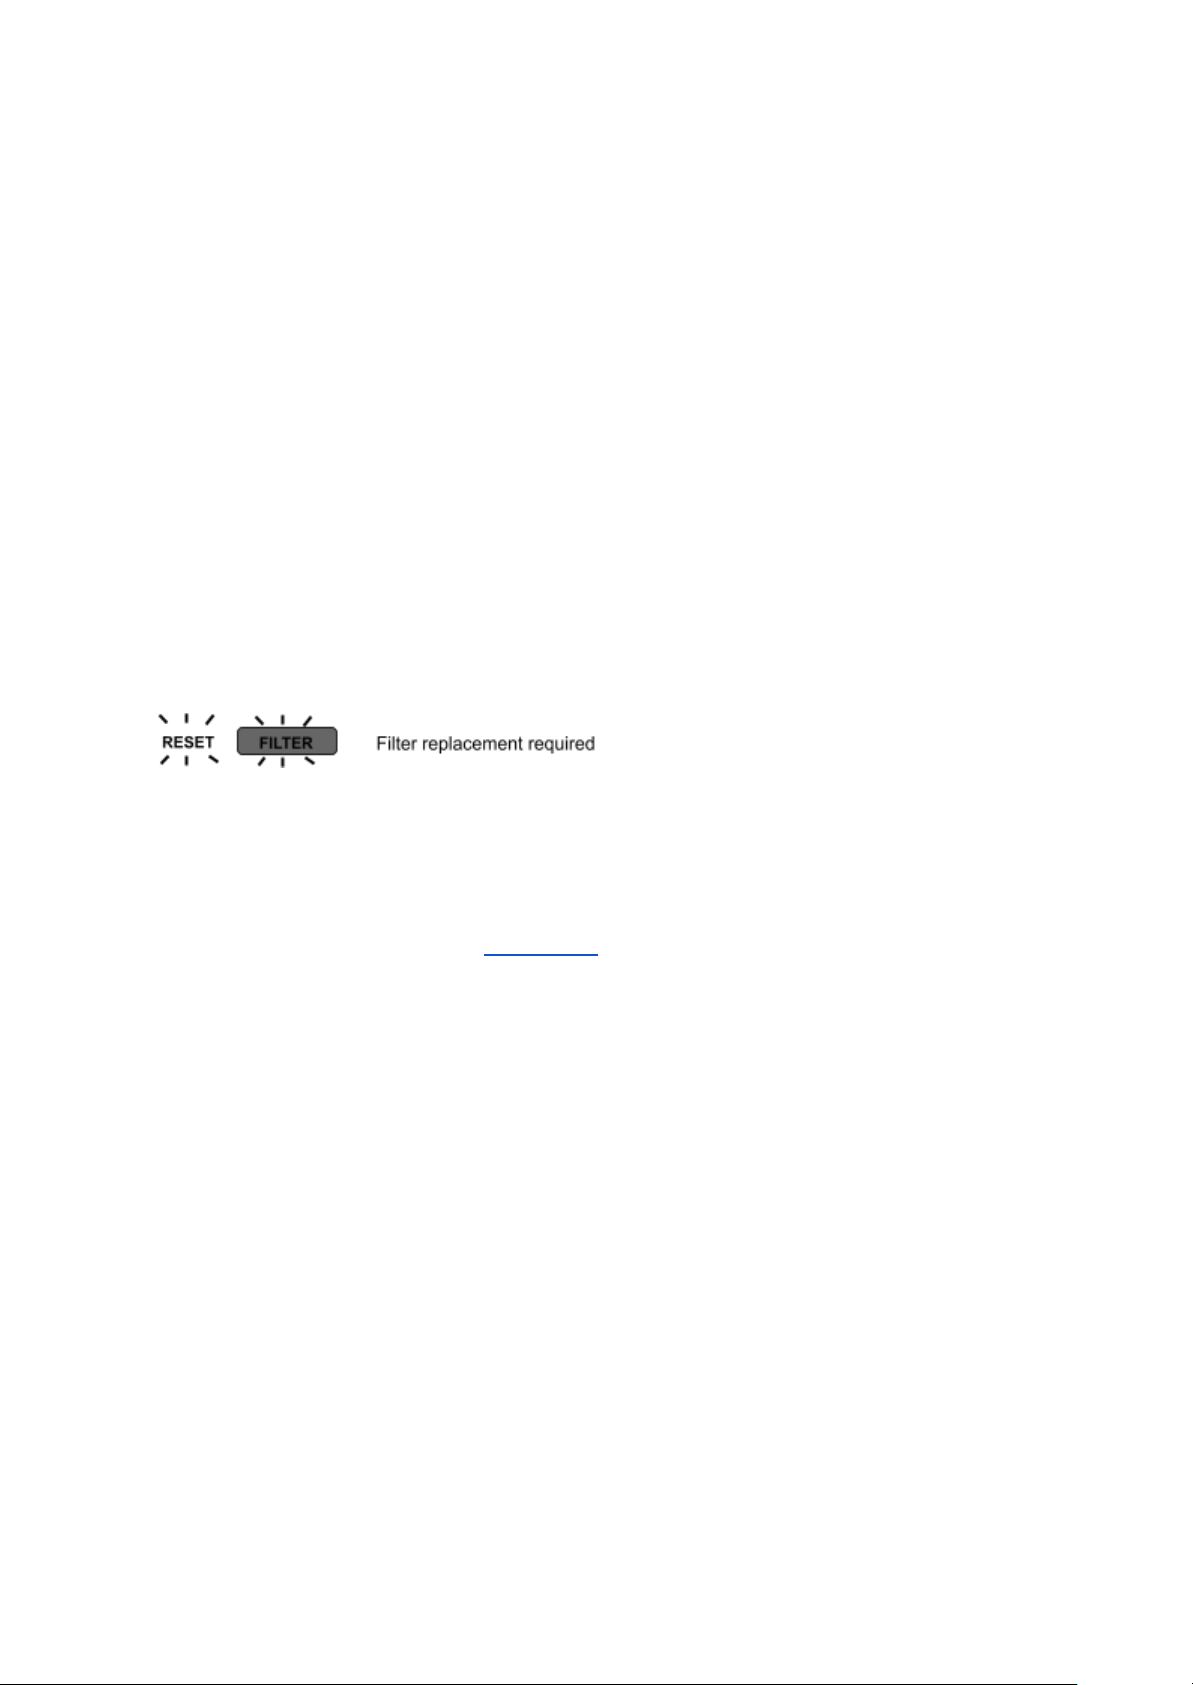
When the Filter Replacement Indicator (below) starts blinking, the unit’s filters require
replacement. Replace the filters following the Filter Replacement Instructions.
After replacing the filters, hold the Filter Reset Button for 3 seconds until the Filter
Replacement Indicator bar stops blinking, which indicates that the Filter Reset is successful.
Fan Speed Button
The unit operates at four fan speeds:
The fan speeds may change based on the Mode selected.
Auto Mode: When the unit is switched on, it will start operating in Auto Mode by default. In
Auto Mode, the Fan Speed Indicator will flash cyclically, and the unit will automatically adjust
its fan speed according to the indoor air quality detected by the air quality sensor.
Sleep Mode: When Sleep Mode is selected, the unit will operate at Low Fan speed. Refer to
Sleep Button instructions.
Manual Mode: Select any fan speed manually by touching the Fan Speed Button until the
desired fan speed is reached.
WiFi Button
Hold the WiFi Button for 5 seconds while the unit is in operation to connect to a new WiFi
network or if a WiFi network reset is required.
The WiFi Indicator will start blinking to show it is ready for network connection and will stop
blinking when the unit has successfully connected to a network.
Page 12
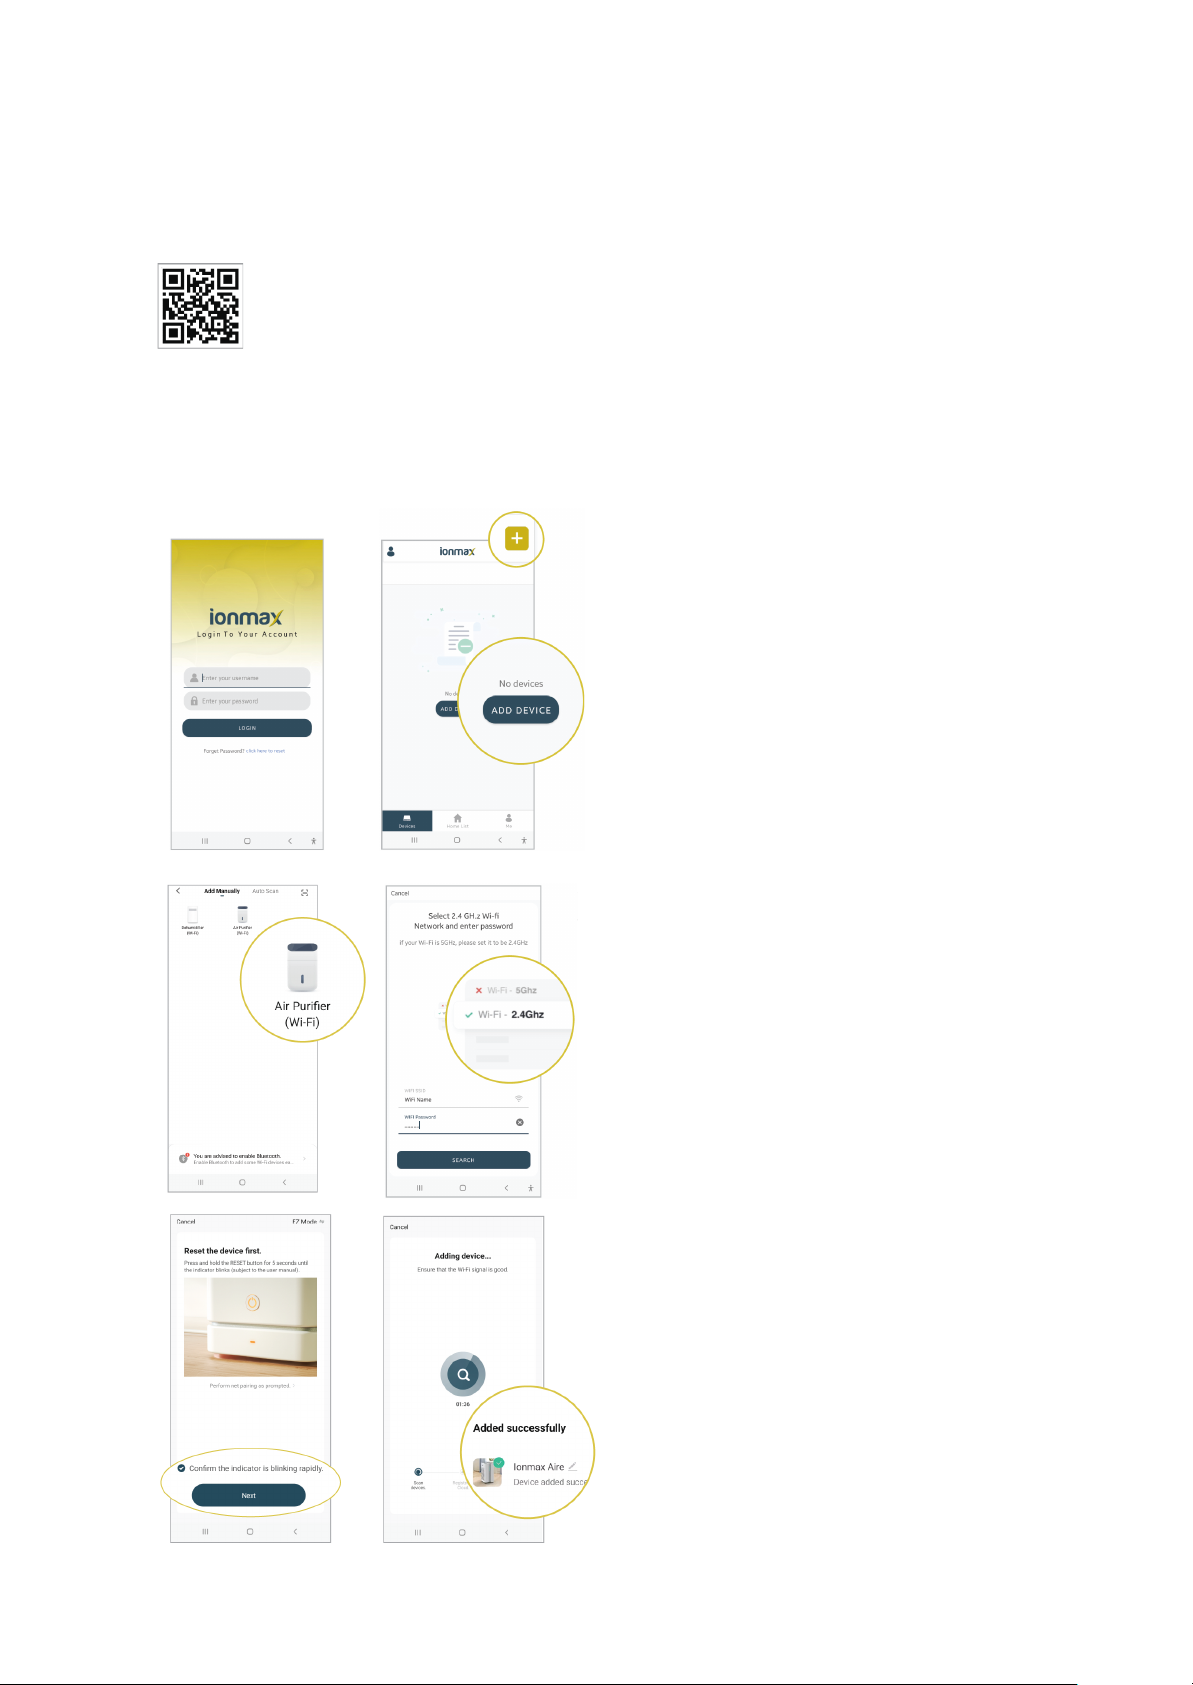
Mobile App Setup
Download the Ionmax app on your phone.
Scan the QR code or visit bit.ly/ionmax-app
① Log in to an existing account for the Ionmax app,
or register a new account.
*If your account is new, you will be prompted to
add a location first.
② Select “Devices”.
Select “+” or “Add Device”.
③ Under ‘Add Manually’, select “Air Purifier”.
④ Enter your WiFi network SSID and password on
the app.
*Please use a 2.4GHz network only.
⑤ Ensure that the WiFi indicator on the air purifier is
blinking rapidly (about 2 flashes per second). This
indicates that the air purifier is in EZ Mode and is
ready for connection.
*If the WiFi indicator is not blinking or is blinking
slowly, hold the WiFi button on the air purifier for 5
seconds until the WiFi indicator is blinking rapidly.
Then, tick the checkbox to confirm and select
“Next” to continue.
⑥ The app will search for the air purifier and connect
automatically.
12
EZ Mode Connection
This is the default connection mode in the Ionmax app and the easiest way to connect.
Page 13
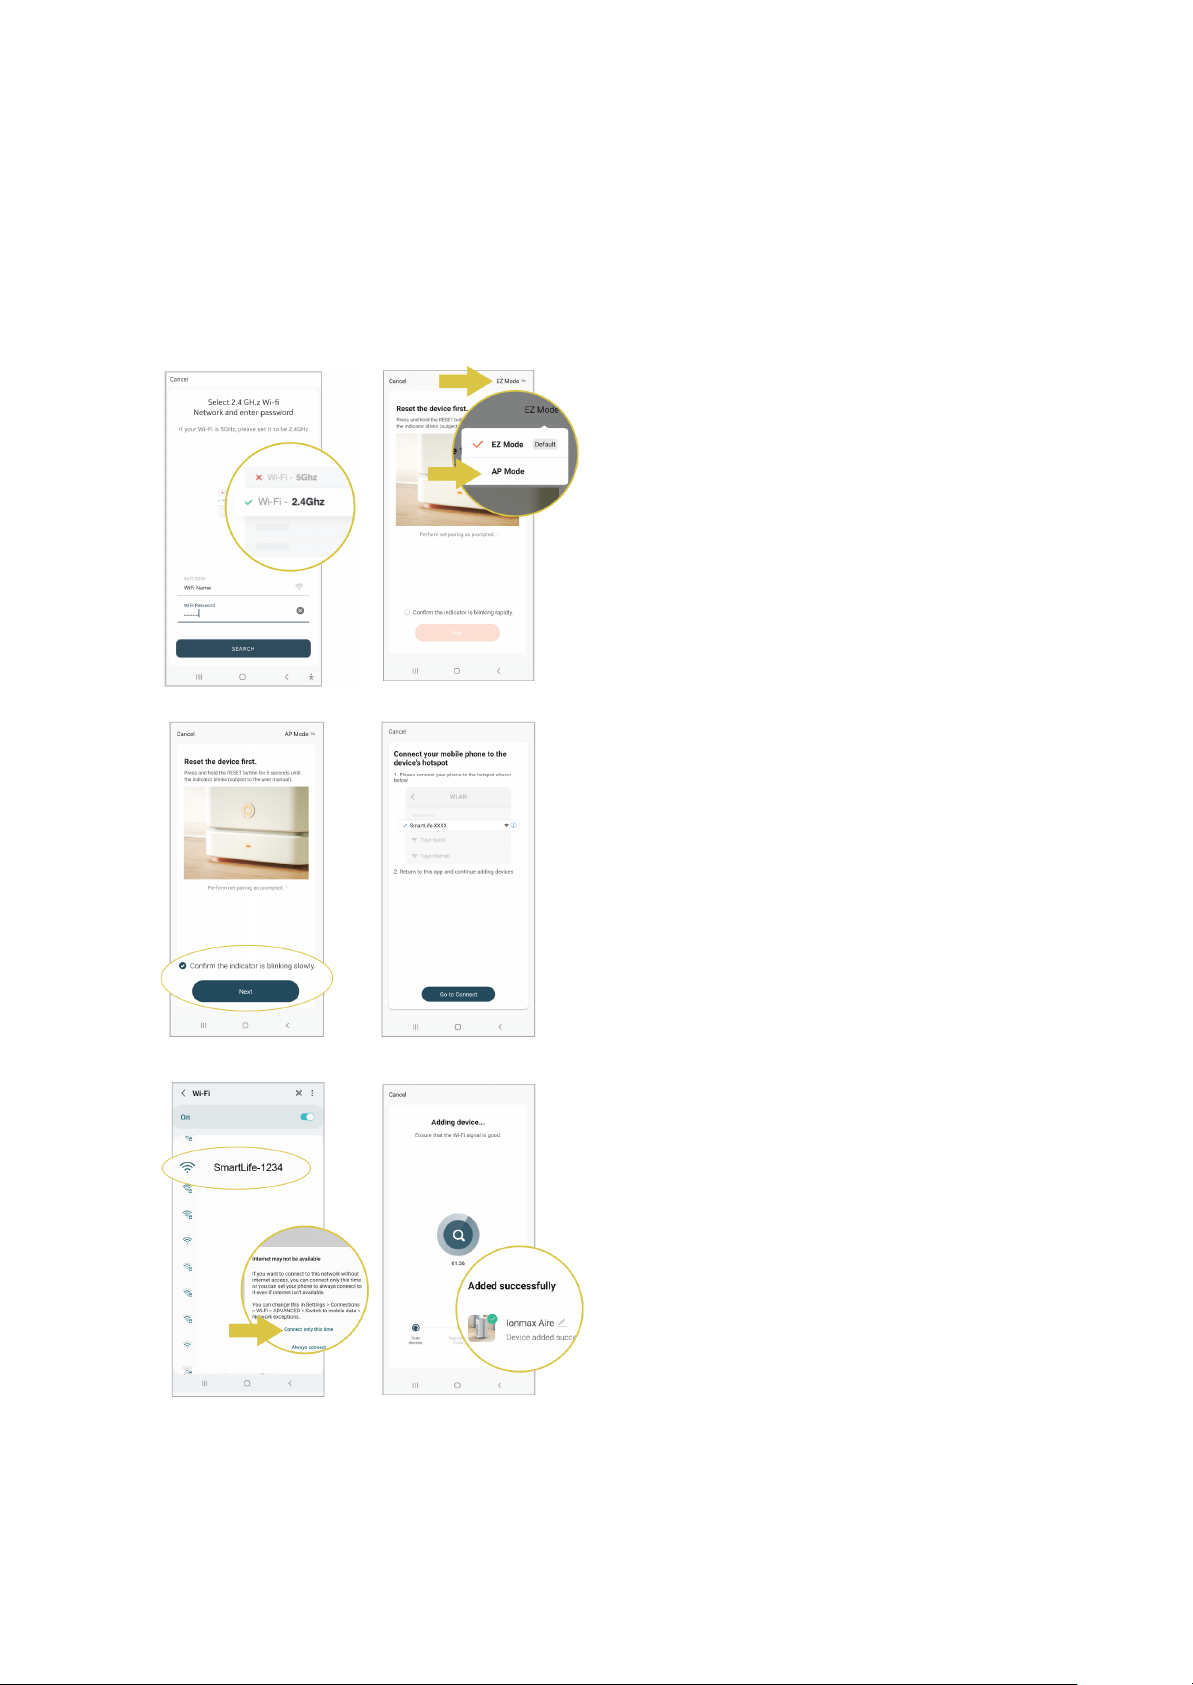
AP Mode Connection
① Follow the EZ Mode Connection guide until step
④ (connecting to a 2.4GHz WiFi network).
② Select “EZ Mode” to open the mode dropdown
list and select “AP Mode”.
③ Ensure that the WiFi indicator on the air purifier
is blinking slowly (about 1 flash per second).
This indicates that the air purifier is in AP Mode
and is ready for connection.
*If the WiFi indicator is not blinking or is blinking
rapidly, hold the WiFi button on the air purifier
for 5 seconds until the WiFi indicator is blinking
slowly.
Then, tick the checkbox to confirm and select
“Next” to continue.
④ Select “Go to Connect” to continue.
You will be redirected to your phone’s Wi-Fi
networks settings to connect to the air purifier’s
hotspot directly.
⑤ From your phone’s list of detected Wi-Fi
networks, select the network named
“SmartLife-XXXX”.
If the “Internet may not be available” notification
appears, select “Connect only this time” to
continue.
⑥ Return to the Ionmax app.
The app will search for the air purifier and
connect automatically.
13
If EZ Mode Connection was unsuccessful, you will be prompted to switch to AP Mode
Connection instead. Follow the on-screen app instructions to proceed.
Alternatively, refer to the steps below to connect to the air purifier using AP Mode manually.
Page 14
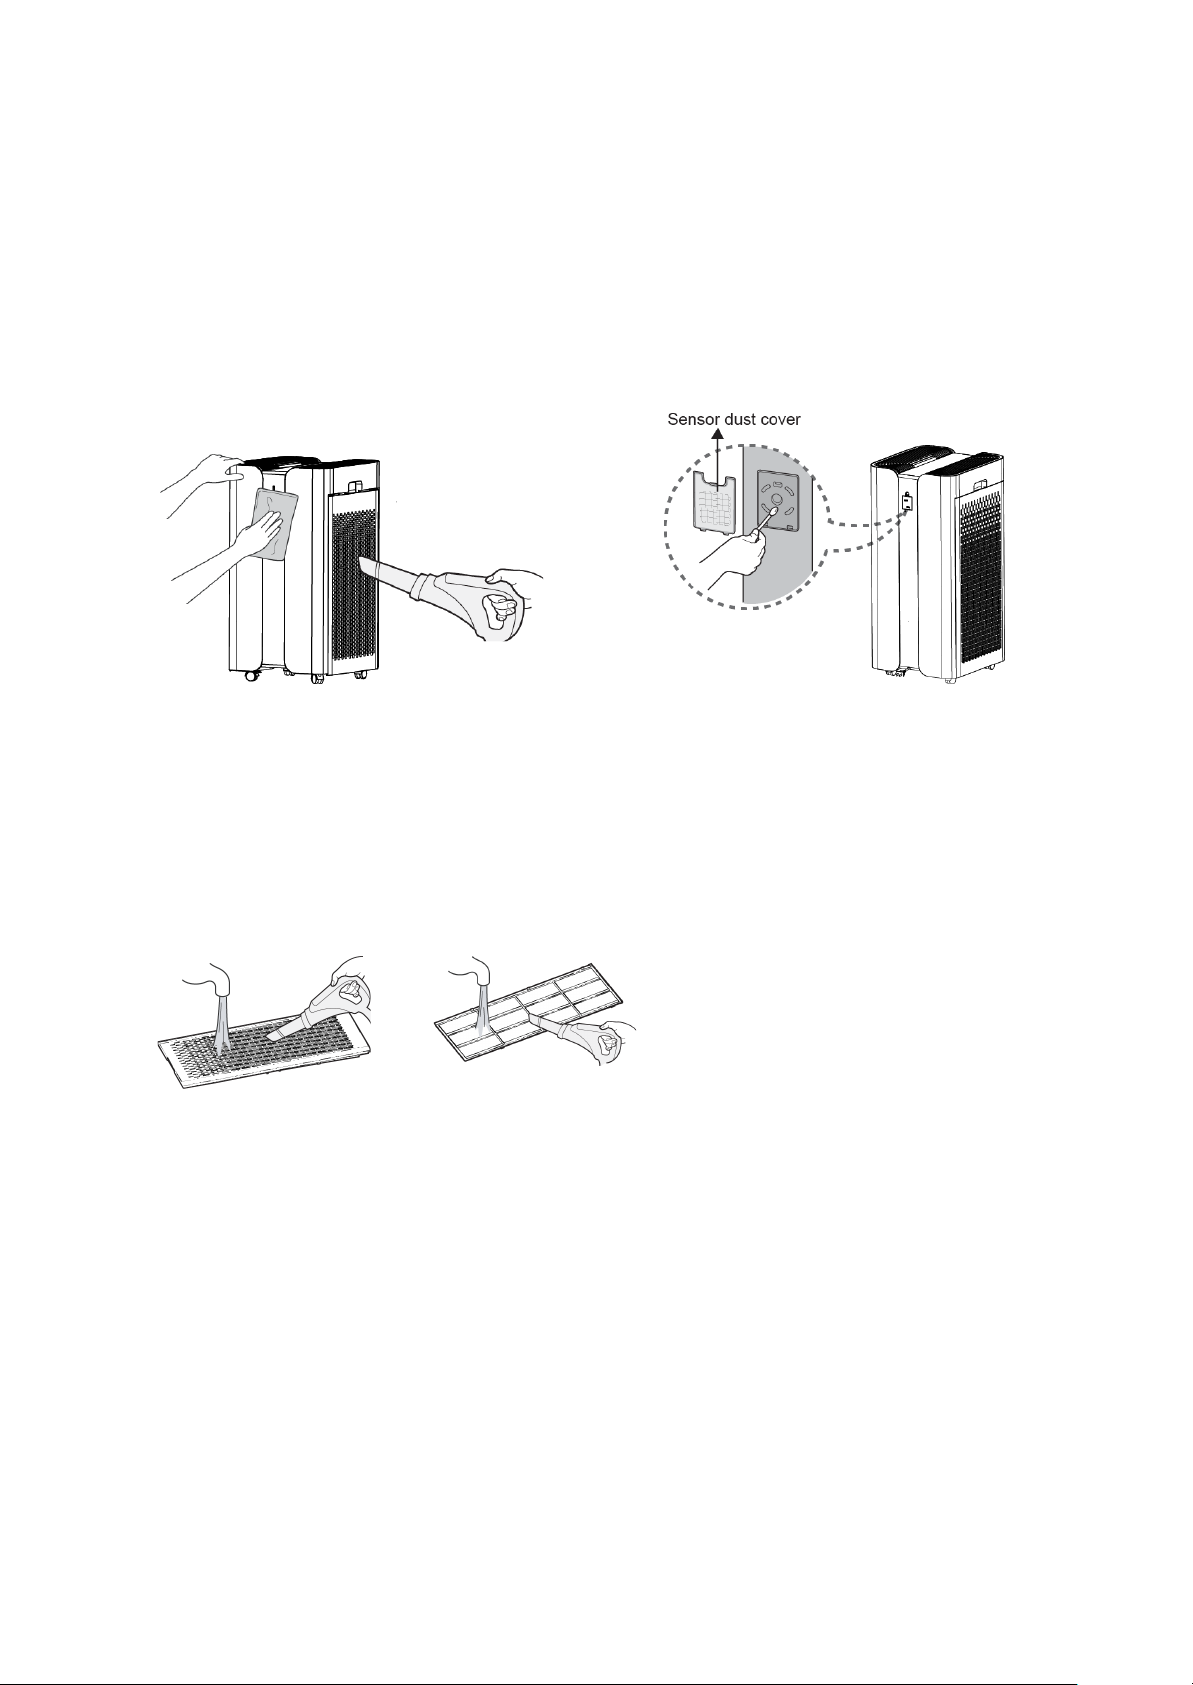
Cleaning and Maintenance
Wipe down the outer case of the unit using a soft,
damp cloth.
Use a vacuum cleaner to remove dirt from the fan
grills on both side panels of the unit.
Remove the sensor cover.
Gently clean the dust in the sensor hole
using a cotton swab.
Use a vacuum cleaner with a soft brush or
water to clean the side panels and
pre-filters.
Ensure the side panels and pre-filters are
completely dry before attaching them
back to the unit.
14
Proper use and regular maintenance can ensure efficient operation and extend the unit's life.
Always switch off the unit and unplug the power supply before cleaning the unit.
Clean the unit at least once a month.
The filters should be cleaned every month or more frequently, depending on environmental
conditions.
Important notes:
● Do not put the unit into water or use water to wash it directly.
● Do not use alcohol, oil, benzene, or any corrosive or flammable detergent to clean
the unit.
● Use a soft cloth with mild detergent to clean the unit, and make sure the unit is
completely dry after cleaning.
● Regularly clean the inside and outer surface to prevent dust from gathering.
Page 15
Storage Instructions
15
If the unit will not be in use for a long time, please pack and store the unit properly.
● Unplug the unit's power supply.
● Clean the pre-filter.
● Use a soft cloth to clean the air intake and air outlet.
● Pack and store the unit away from moisture and direct sunlight.
Filter Replacement
Filter Replacement Indicator
After 3600 hours of use, the Filter Replacement Indicator light will start blinking during
operation.
Replace the filters according to the following Filter Replacement Instructions.
Then, follow the instructions under Filter Reset to reset the filter usage countdown timer.
Page 16
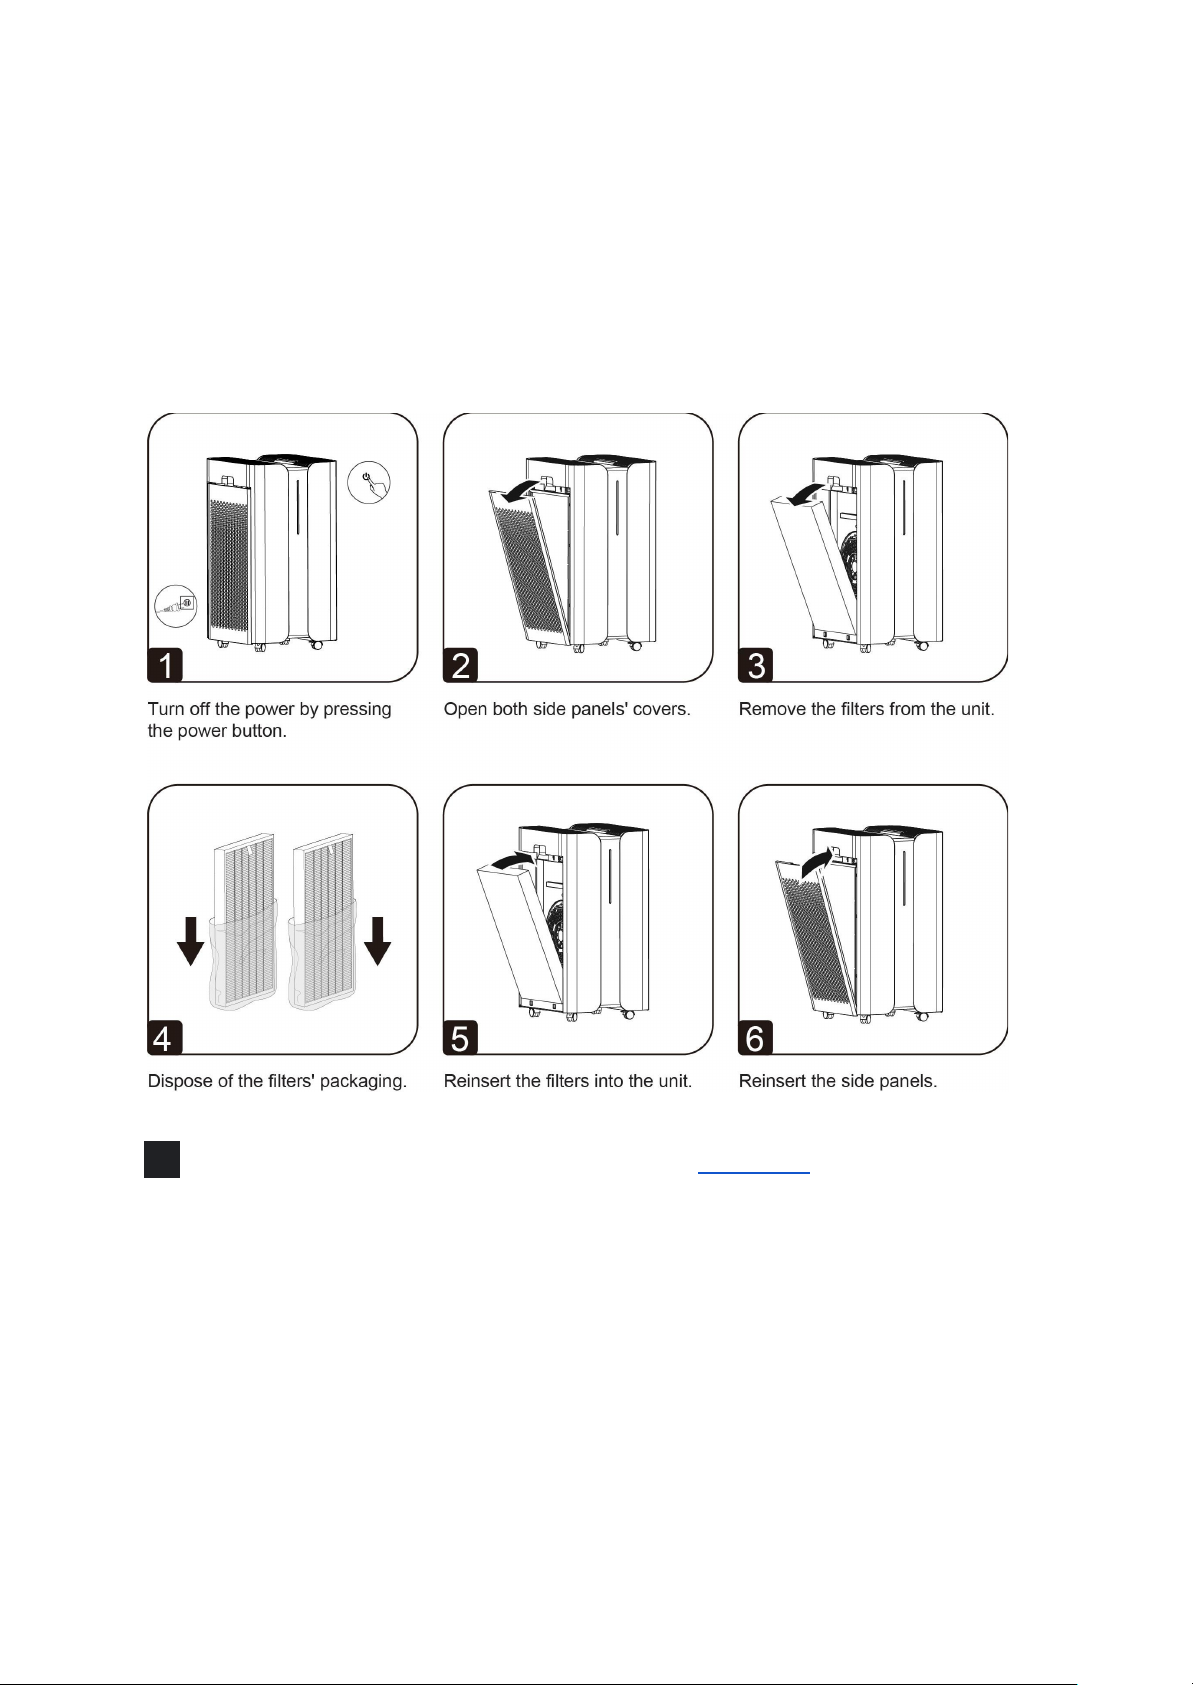
Filter Replacement Instructions
16
The Ionmax+ Aire comes with the filters fitted inside. Please remove the plastic packaging
from the filters before using the air purifier.
When replacing with new filters, remove all plastic packaging and place the filters into the
unit, as described here.
7 Reset the filter usage countdown timer following the Filter Reset instructions.
Note:
● Avoid touching used filters if you suffer from allergies or have breathing difficulties.
● Wear gloves and a face mask when replacing the filter. Additionally, wash your hands
with soap and water once the replacement is complete.
● Place the used filter in a sealed bag and throw it away safely to prevent the spread of
pollutants.
● Please note: The 3-in-1 filter cannot be washed with water or used repeatedly.
Replace the filters when indicated by the Filter Replacement Indicator.
Page 17
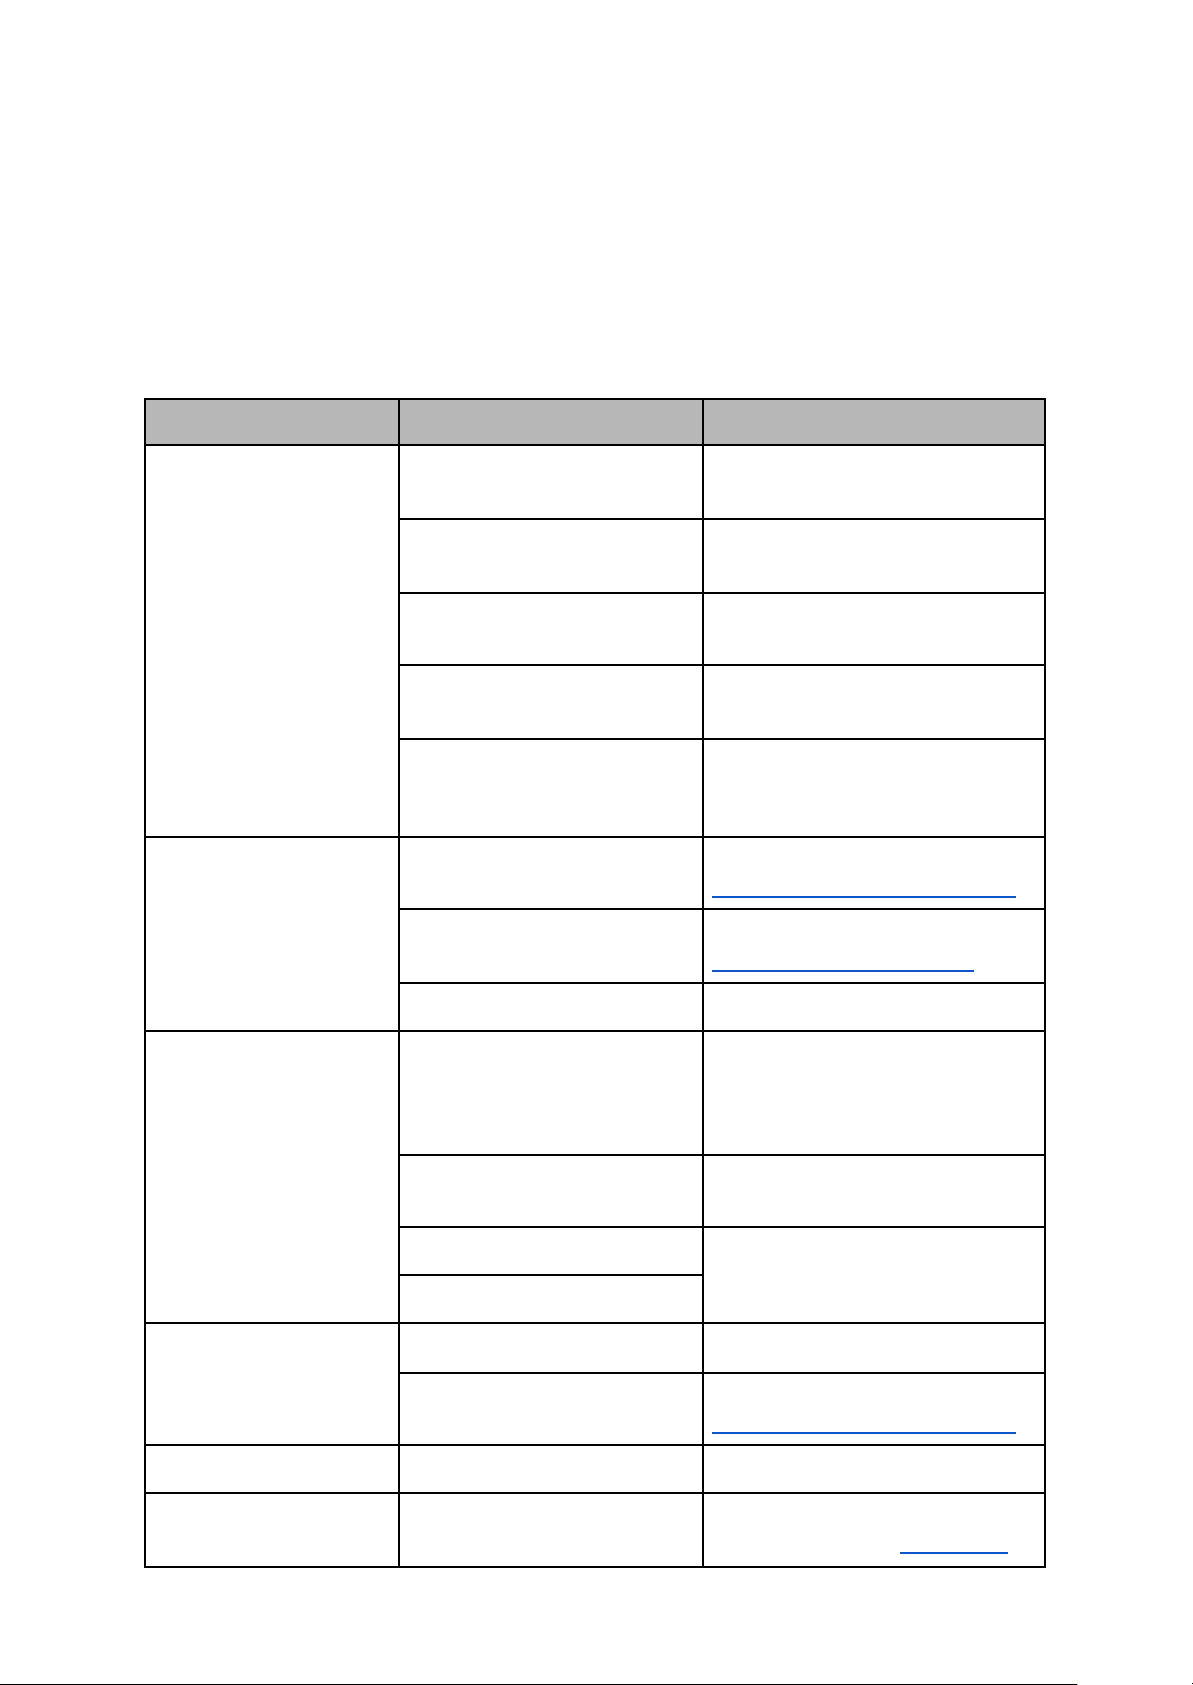
Troubleshooting Guide
Problem
Probable Cause
Solution
Unit not operating
Power cable not plugged in
Plug power cable into a suitable
power outlet
Power cable not plugged in
properly
Plug power cable in correctly
Unit not powered on
Touch the Power button to
switch on the unit
Side panels not attached
properly
Reattach the side panels
correctly
Filters not inserted correctly
Check that the filters are
inserted correctly and secured
firmly in place
Loud noise
Filters not unpacked
Unpack the filter packaging (see
Filter Replacement Instructions)
Too much dust on the
pre-filters
Clean the pre-filters (see
Cleaning and Maintenance)
3-in-1 filters are dirty
Replace with new 3-in-1 filters
Abnormal noise
Foreign object is in contact
with fan
Stop unit operation, remove the
side panels and filters and
remove any obstruction visible
on the fan
Unit is positioned on uneven
surface
Position the unit on a flat, stable
and even surface
Loose parts inside the unit
Stop unit operation and contact
customer service
Motor broken
Reduced airflow
Filters are dirty
Replace with new filters
Filters not unpacked
Unpack the filter packaging (see
Filter Replacement Instructions)
Odour from air outlet
Filters are dirty
Replace with new filters
Fan speed cannot be
changed manually
Unit is not in Manual mode
Activate Manual mode to change
the fan speed (see Fan Speed)
17
Before carrying out any of the following service checks, unplug the unit from the power
supply.
DO NOT attempt to repair or adjust this unit's electrical or mechanical functions. All servicing
should be performed by qualified personnel only.
Page 18

WARRANTY DETAILS
18
Congratulations on your purchase! It is our aim to provide you with quality products that you can trust.
Our goods come with guarantees that cannot be excluded under the Australian Consumer Law. You
are entitled to a replacement or refund for a major failure and compensation for any other reasonably
foreseeable loss or damage.
You are also entitled to have the goods repaired or replaced if the goods fail to be of acceptable
quality and the failure does not amount to a major failure.
The Guarantee
The product is guaranteed to be free from defects in workmanship and parts for a period of 24 months
from the date of purchase. Defects that occur within this warranty period, under normal use and care,
will be repaired, replaced or refunded at our discretion, solely at our option with no charge for parts
and labour. The benefits conferred by this warranty are in addition to all rights and remedies in respect
of the product that the consumer has under the Trade Practices Act and similar state laws.
Proof of Purchase
This warranty is valid for the original purchase and is not transferable. Please keep your purchase
docket or receipt as proof of purchase and as proof of date on which the purchase was made. The
purchase docket (or a copy) or receipt must be presented with the warranty when making a claim
under this warranty.
Service during the Warranty Period
To claim for warranty, contact us on 1300 800 200 or [email protected] to get an RA#
(Return Authorisation Number) or submit a support ticket on my.andatech.com.au. Ensure that the
RA# is clearly stated on the outside of the packaging and that the product is properly packaged so
that no damage occurs to the product during transit. Shipping of the product back to us for warranty
will be at your cost. A product return without the RA# will not be accepted.
Extent of Warranty
This warranty is limited to defects in workmanship or parts. All defective products or parts will be
repaired or replaced. This warranty does not cover manuals and packaging.
Normal Wear and Tear
This warranty does not cover normal wear and tear to the product or parts.
Exclusions
This warranty does not cover:
● Any defect caused by an accident, misuse, abuse, improper operation, lack of reasonable
care, unauthorised modification, loss of parts, tampering or attempted repair by a person not
authorised by the distributor.
● Any product that has been damaged by a lightning strike either directly or indirectly or a main
power surge or liquid ingress.
● The product if it is located outside of Australia.
● Any damage caused by improper power input or improper cable connection.
Andatech Pty. Ltd.
PO Box 3038, Nunawading VIC 3131, Australia.
Phone: 1300 800 200 Fax: 1300 883 802 Email: [email protected]
Page 19
WARRANTY REGISTRATION
Product
: Ionmax+
Aire
Aire X
Date of Purchase : ____________________________________
Place of Purchase : ____________________________________
Serial No. : ____________________________________
Surname : ____________________________________
Given Name : ____________________________________
Address : ____________________________________
Suburb : ____________________________________
Postcode : ____________________________________
State : ____________________________________
Contact No. : ____________________________________
Email : ____________________________________
19
Register your Ionmax+ Aire online at my.andatech.com.au or fill out this form and forward
to the address below with a copy of your proof of purchase. Contact us on 1300 800 200 or
visit ionmax.com.au for options to extend your warranty.
Andatech Pty Ltd
PO Box 3038, Nunawading VIC 3131, Australia.
Page 20

ionmax.com.au
1300 800 200
 Loading...