

Page 1
USER MANUAL
Page 2

INDEX
IMPORTANT SAFETY INSTRUCTIONS ..................................................................................
FEATURES ..............................................................................................................................
PRODUCT DESCRIPTION ......................................................................................................
UNIT SETUP.............................................................................................................................
TO OPERATE SAFELY ...........................................................................................................
OPERATING INSTRUCTIONS .............................................................................................
MAINTENANCE .......................................................................................................................
PLEASE NOTE ......................................................................................................................
TROUBLESHOOTING ............................................................................................................
WARRANTY DETAILS ............................................................................................................
WARRANTY REGISTRATION.................................................................................................
1
2
3
4
4
5-8
9
10
11
12
13
SPECIFICATIONS.....................................................................................................................2
Page 3

IMPORTANT SAFETY INSTRUCTIONS
1
PLEASE READ ALL INSTRUCTIONS CAREFULLY BEFORE OPERATING.
WARNING - This appliance is intended for use in a domestic environment only. Any other
use is not recommended by the manufacturer and may cause fire, electrical shocks or
other injury to person or property.
When using electrical appliances, basic safety precautions should always be followed:
1. Do not operate the unit with a damaged cord or plug, after it malfunctions or has been
dropped or damaged in any way. Return to an authorised service facility for examination
and repair.
2. This unit should always be kept in an upright position to avoid any damage. Locate the
unit on a flat stable surface.
3. Check the household voltage to ensure it matches the unit’s rated specification before
operating.
4. Operate this unit in an ambient temperature between 1°C and 40°C.
5. Ensure that the air inlets and outlets are not blocked or covered.
6. Do not place the unit too close to curtains or other objects - min 40cm.
7. When using the "LAUNDRY MODE" to speed up the drying of wet clothes in the room,
please keep the clothing at a safe distance from the unit to prevent water from dropping
onto the unit.
8. Never place anything on top of the unit and do not cover with any kind of material while
in use.
9. This product is intended for domestic and light office use ONLY and not for commercial,
industrial or outdoor use.
10. To protect against electrical shocks, do not immerse unit, plug or cord in water, or spray
with liquids.
11. Never unplug the power cord without pressing the "ON/OFF" button to off first, as this
could damage the unit.
12. Always unplug the unit when not in use or moving location. To disconnect from the
power supply, grip the plug and pull from the power socket. Never pull by the cord.
13. Always empty the water tank before storing the unit away.
14. Close supervision is necessary when any appliance is used by or near children and pets.
15. Do not run power cord under carpeting, or cover with rugs or runners. Arrange the
cord away from areas where it may be tripped over.
16. Never operate or store the unit in direct sunlight.
17. To repair the unit, take it to a qualified service engineer. Repairs carried out by
unqualified people may cause damage to the unit or injury to persons or property and
void the warranty.
18. Where possible, avoid the use of an extension cable as they may overheat and cause
a risk of fire. Only use an extension cord after ensuring it is in perfect condition.
19. Do not use the unit without the air filter.
SAVE AND READ THESE IMPORTANT SAFETY INSTRUCTIONS
This appliance is not intended for use by persons (including children) with reduced physical,
sensory or mental capabilities, or lack of experience and knowledge, unless they have been given
supervision or instruction concerning use of the appliance by a person responsible for their safety.
Children should be supervised to ensure that they do not play with the appliance.
1
Page 4

FEATURES
SPECIFICATIONS
• Compressorless dehumidifier - uses desiccant rotor technology
•
Automatic swing louvre
•
Moisture removal - 6 litres/day (20°C 60%RH)
•
Water tank capacity - 1.8 litres
•
Electronic louvre
•
•
Laundry mode - helps to dry out damp clothes
Up to 8 hour timer - for added convenience
•
Temperature range for use ~ 1°C - 40°C
•
Light & portable with carry handle
•
Removable water bucket with handle
•
Auto restart after power cut
Once the power is restored after a power failure, the appliance will continue
to operate at the selected settings prior to the power failure.
•
Safety function
Adaptive control, tip over, water-full and abnormal temperature detection
Model: Ionmax Ion610
Voltage: 220-240V ~ 50Hz
Power consumption: 280-460W
Net weight: 5.1kg
Dimensions (W x D x H): 269 x 174 x 445 mm
Environmentally friendly - with no harmful gases and quiet in operation
•
Antibacterial Dust Filter
Prevents the growth of bacteria on the filter, improving the quality of air in
your home
•
2
Page 5
PRODUCT DESCRIPTION
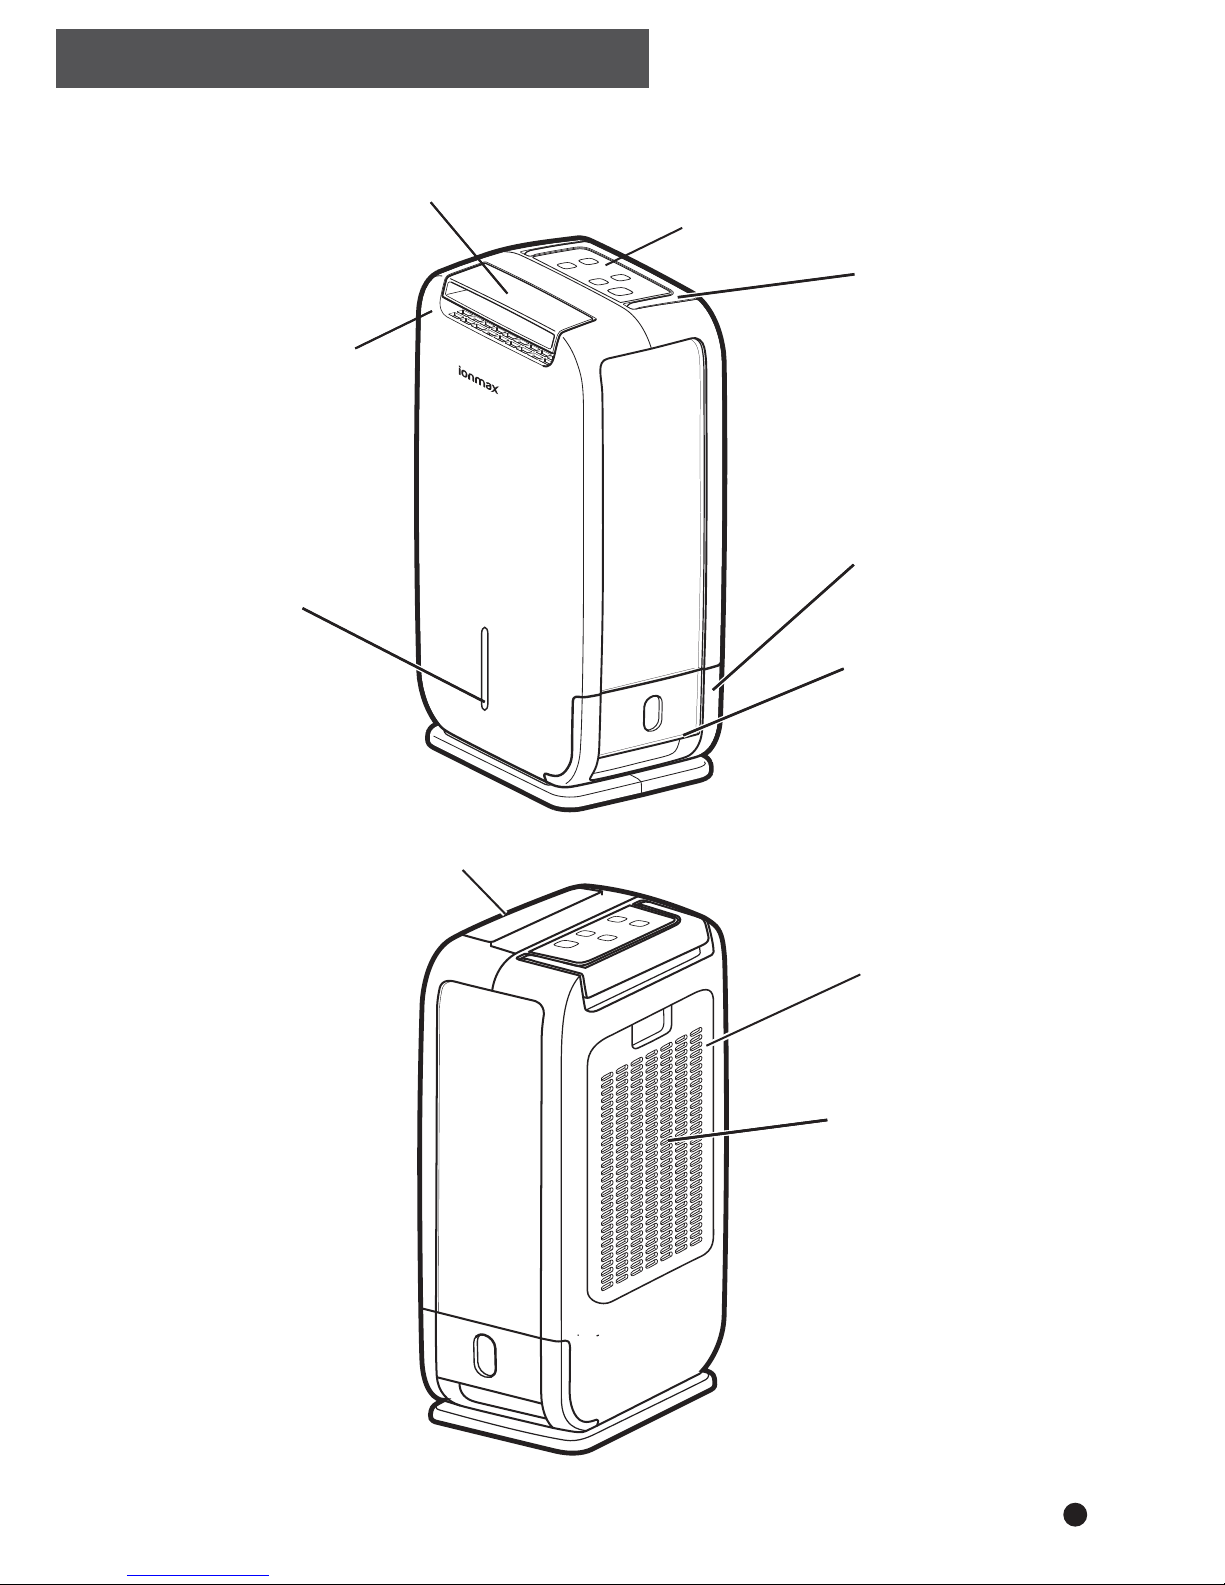
Control panel
Automatic louvre
Air outlet
Water tank
Water level
indicator
Hand grip for
easy removal
Handle
Air filter
Air inlet
Air outlet
3
Page 6
Top
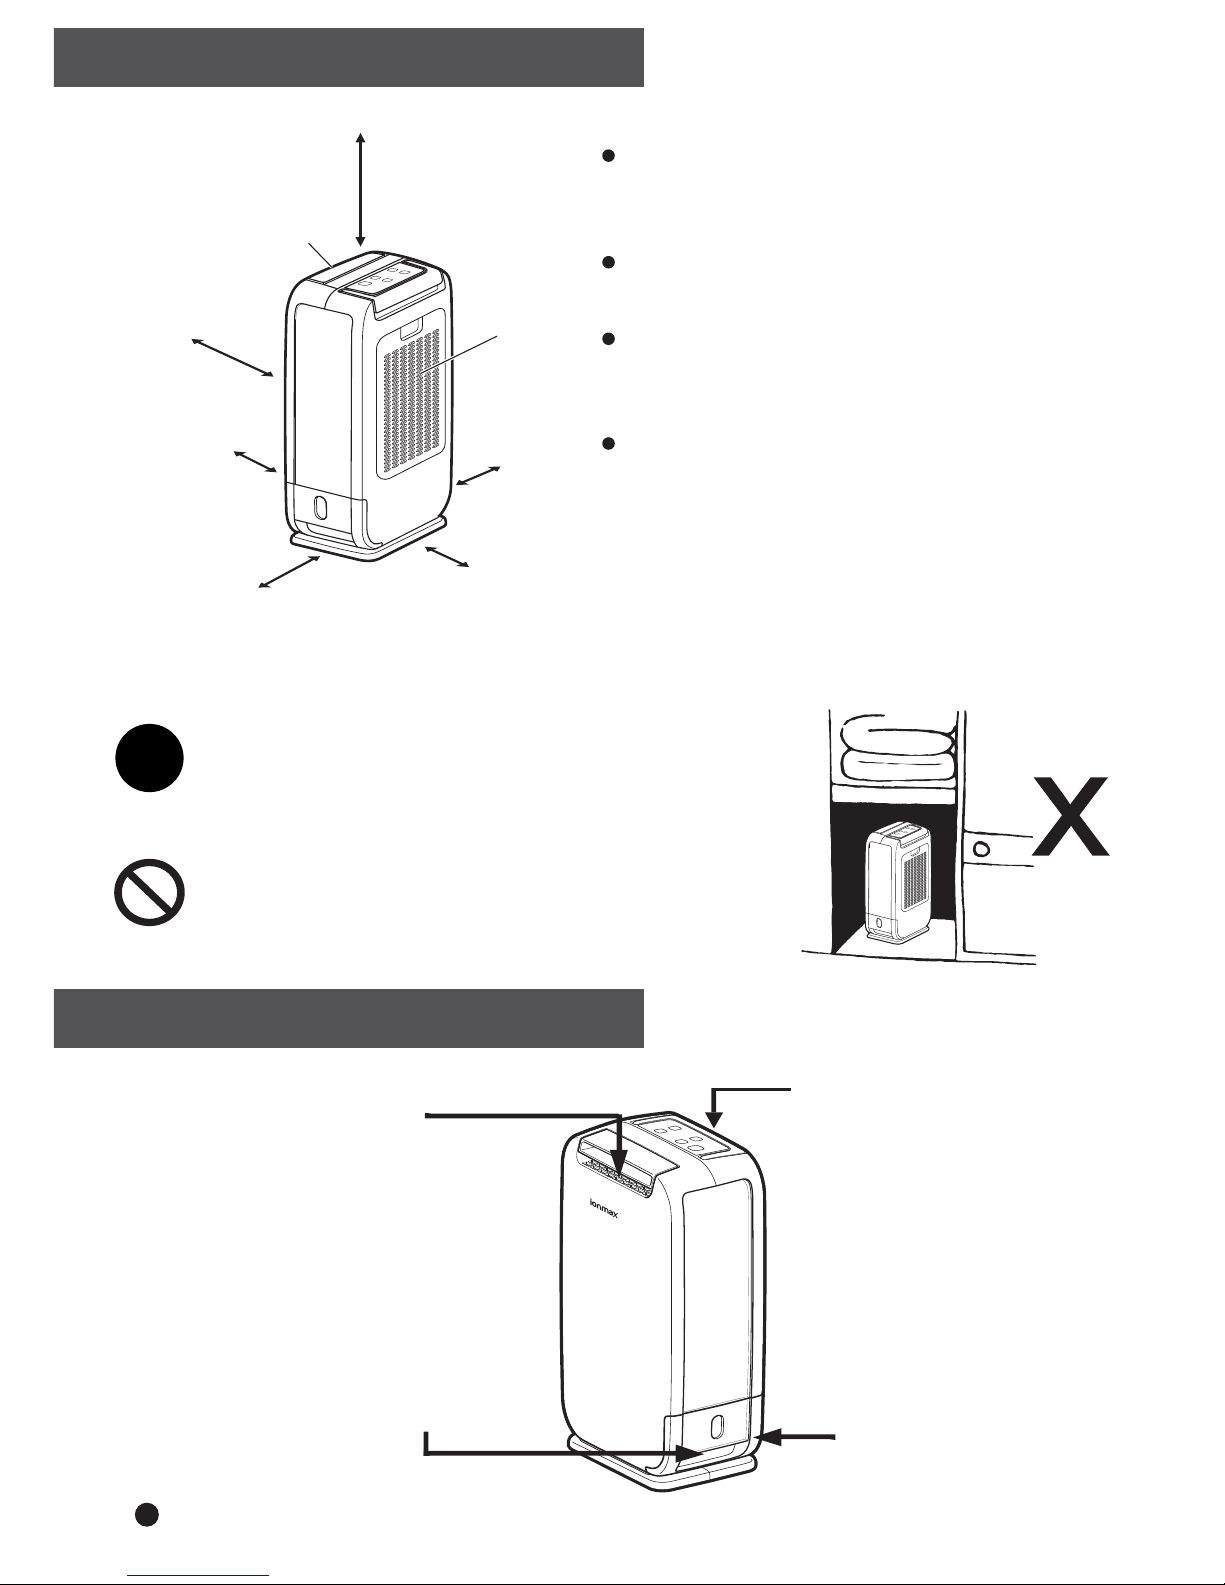
min 60cm
Air outlet
min 40cm
(When louvre down)
min 20cm
(When louvre up)
Air inlet
min 20cm
min 20cm
min 50cm
!
TO OPERATE SAFELY
CAUTION: Do not place the dehumidifier in a broom cupboard,
boiler room, small unventilated rooms etc. Avoid placing the
dehumidifier in small confined areas or in close proximity to a
radiator or heat source such as tumble driers and cookers to
prevent the dehumidifier from overheating.
Do not use this dehumidifier in dusty or industrial
environments where particles can get into the dehumidifier.
This will cause a malfunction and void your warranty.
UNIT SETUP
Place the unit in an upright position on a
stable, level surface. (Please ensure unit
is not sitting on its own cable)
Please ensure the unit is a safe distance away
from walls and furniture (see image on the left).
Please keep clothes at a safe distance of
60cm from air outlet of the unit to prevent
water dripping into the unit.
For best results, position the dehumidifier
somewhere central like a landing or a hallway.
As long as the internal doors are open,
the excess moisture from all of the rooms
in the house will migrate naturally towards
the dehumidifier and be processed.
Do not insert small
objects into the unit as
this will damage it and
cause a hazard.
Do not attempt to remove
the bucket while unit is in
operation to avoid water
leakage.
Maintain safe clearance
space as shown in
Unit Setup.
Ensure bucket is
fitted correctly.
4
Page 7
OPERATING INSTRUCTIONS
ON and OFF
Connect the power plug to the appropriate electrical socket outlet.
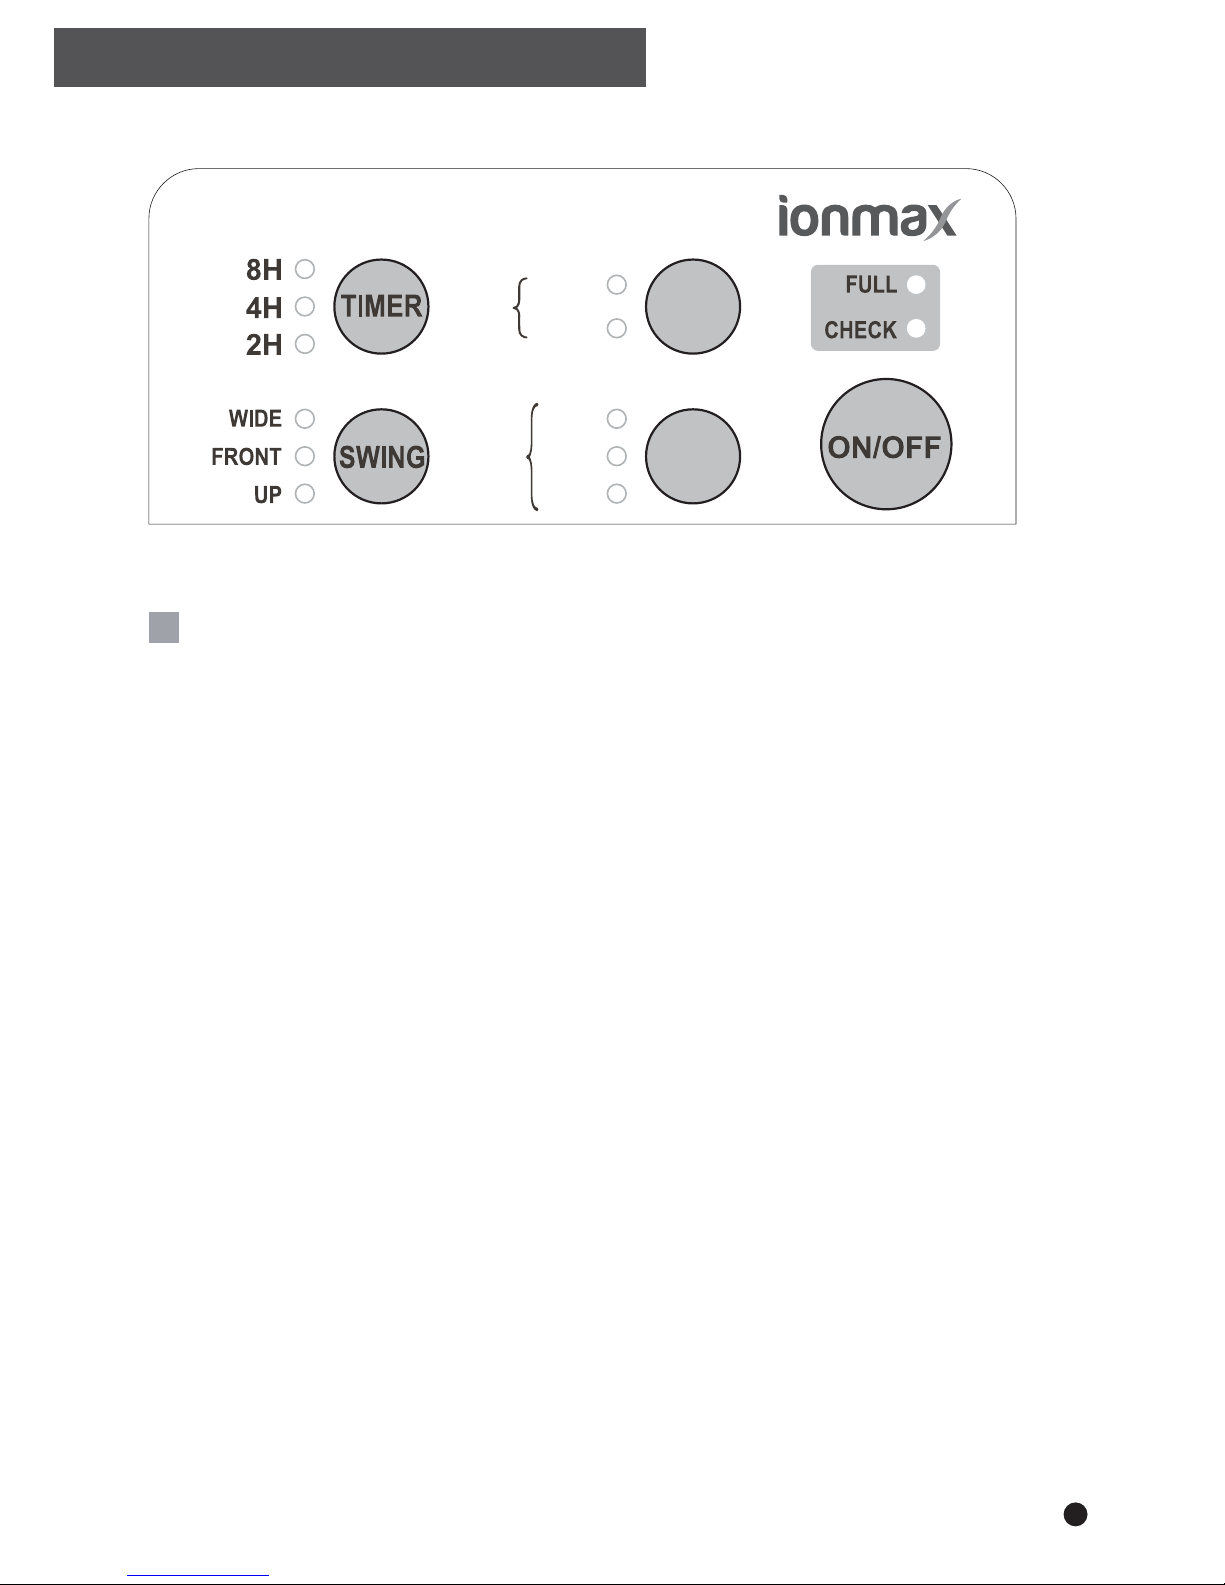
Press the ON/OFF button to turn the appliance ON.
Press the ON/OFF button again to turn the appliance OFF.
Note: In the event of a power failure
Once the power is restored after a power failure, the appliance will continue to
operate at the selected settings prior to the power failure.
This includes the power level, relative humidity, swing function and time remaining
in timer mode.
Note: After turning the appliance OFF
After turning the appliance OFF using the ON/OFF button, the fan will continue
to run for a two minute period. This is a normal procedure and helps to cool and
protect the internal components.
During these two minutes, DO NOT remove the power plug from the electrical
socket outlet; wait for the fan to stop running.
RELATIVE
HUMIDITY
POWER
LEVEL
50%
40%
60%
LAUNDRY
LOW
AUTO
HIGH
5
Page 8
OPERATING INSTRUCTIONS
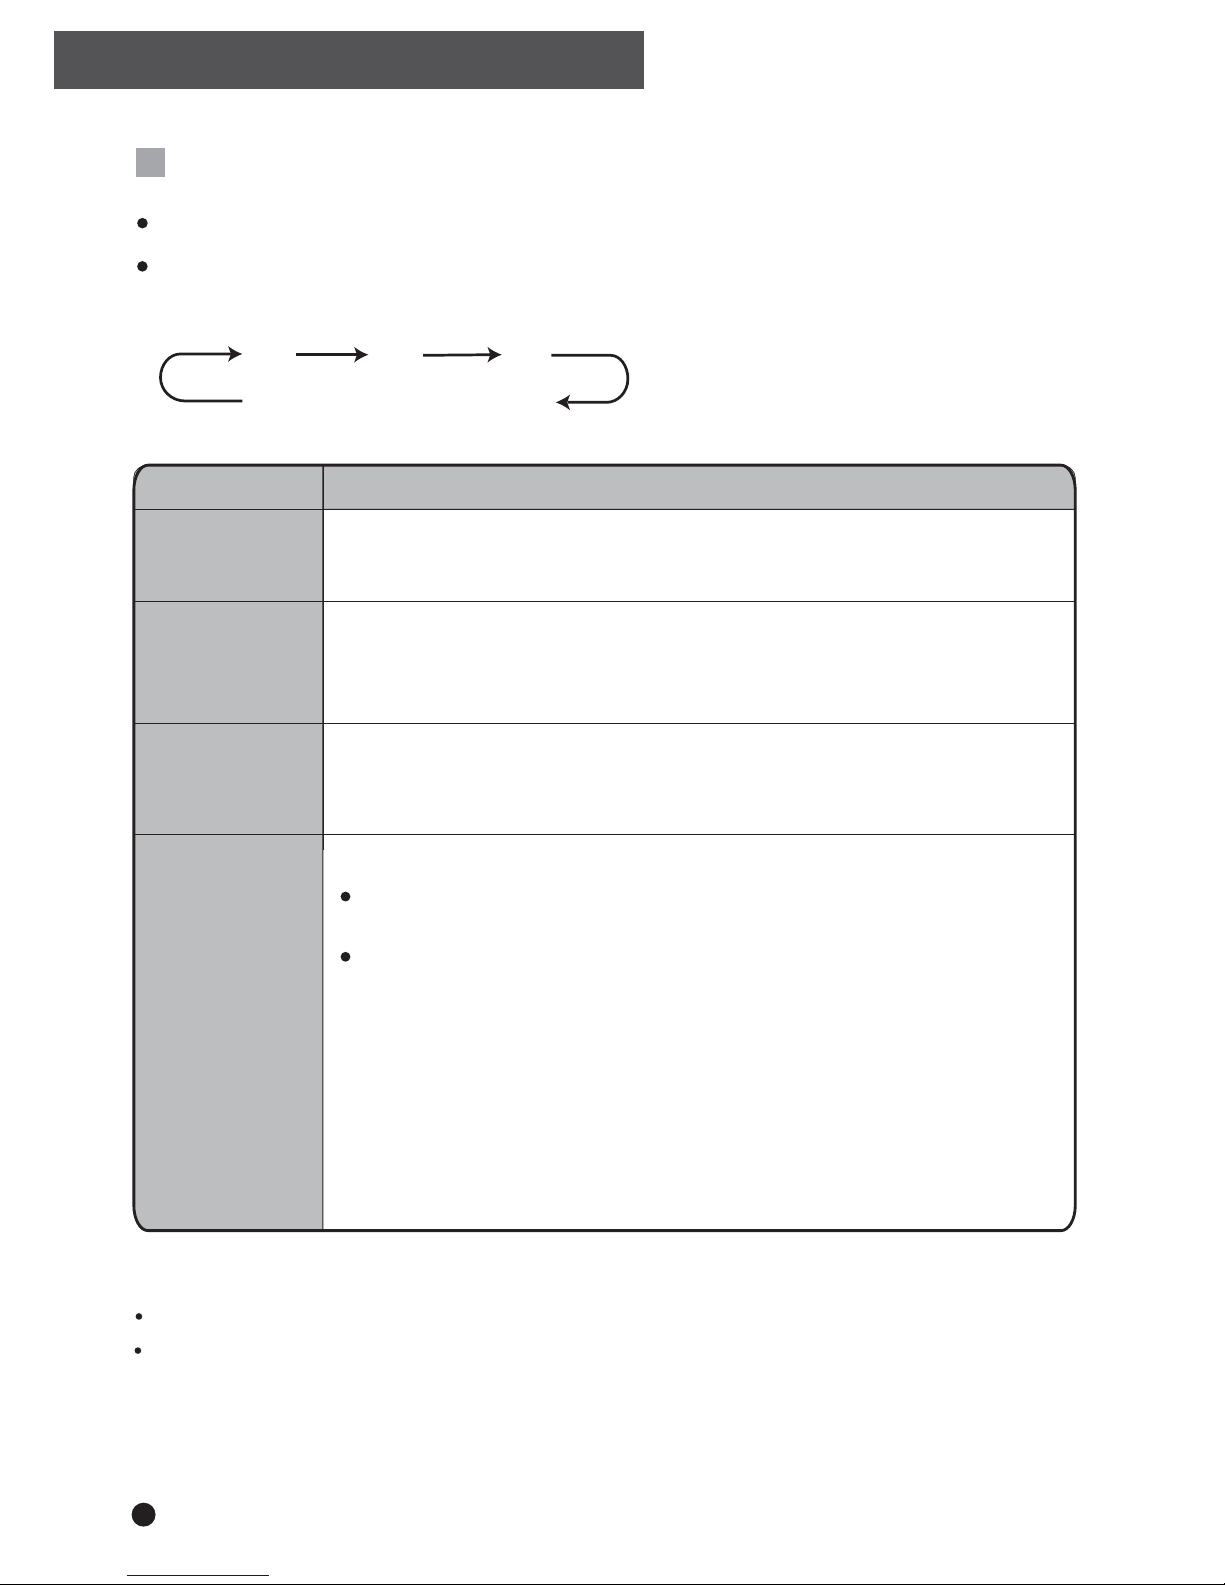
RELATIVE HUMIDITY
Note:
RH indicated has a ±10% RH tolerance and may vary depending on room temperature.
When the unit is set to 60%, 50% and 40% RH humidity level, the heater and fan will operate at
the specified power level until the room humidity level reaches the set humidity setting, unless
ambient temperature becomes too high. Once the desired humidity level is reached, the fan will
continue operating but the heater will turn off.
60%
50%
40%
Laundry
(Continuous)
MODE DESCRIPTION
Maintain the room at a comfortable indoor humidity level
Inhibit mould and bacteria growth
Super dry mode to prevent condensation
Suitable in winter to dry clothes faster
The unit automatically provides heated air to dry clothes faster with
higher power consumption.
The
heater will continue to operate at the set power level regardless of
the humidity level, unless the ambient temperature becomes too high.
Note: Use this to control a very damp room in the first couple of days and then switch
to 50% or 60% to save energy.
Note: Use this mode for daily normal household use to maintain humidity at a healthy
level of 55%RH (Bacteria and mould will not breed at this level).
Note: Use this mode for maximum energy saving and quiet operation.
Press the "RELATIVE HUMIDITY" button to select your desired humidity level.
For example, if 50% RH is selected, the heater will operate and dehumidification will occur when
the room humidity level is detected at above 50% RH.
Note:
• In Auto power setting, the heater and fan will run on “High” while the humidity level
is above 40% RH. Below 40% RH, the heater and fan will run on “Low”.
• It can take between 2 – 8 hours to dry your laundry, depending on the power level
selected. You may want to utilise the timer when selecting Laundry
mode to avoid excess energy consumption.
• To prevent excess energy consumption, avoid using Laundry mode for normal
daily use. May be used for extreme drying of very damp rooms over 2-3 days
and then switch to one of the three preset humidity levels.
50%
(ALL LED’S LIGHT UP)
60% 40%
LAUNDRY
6
Page 9
OPERATING INSTRUCTIONS
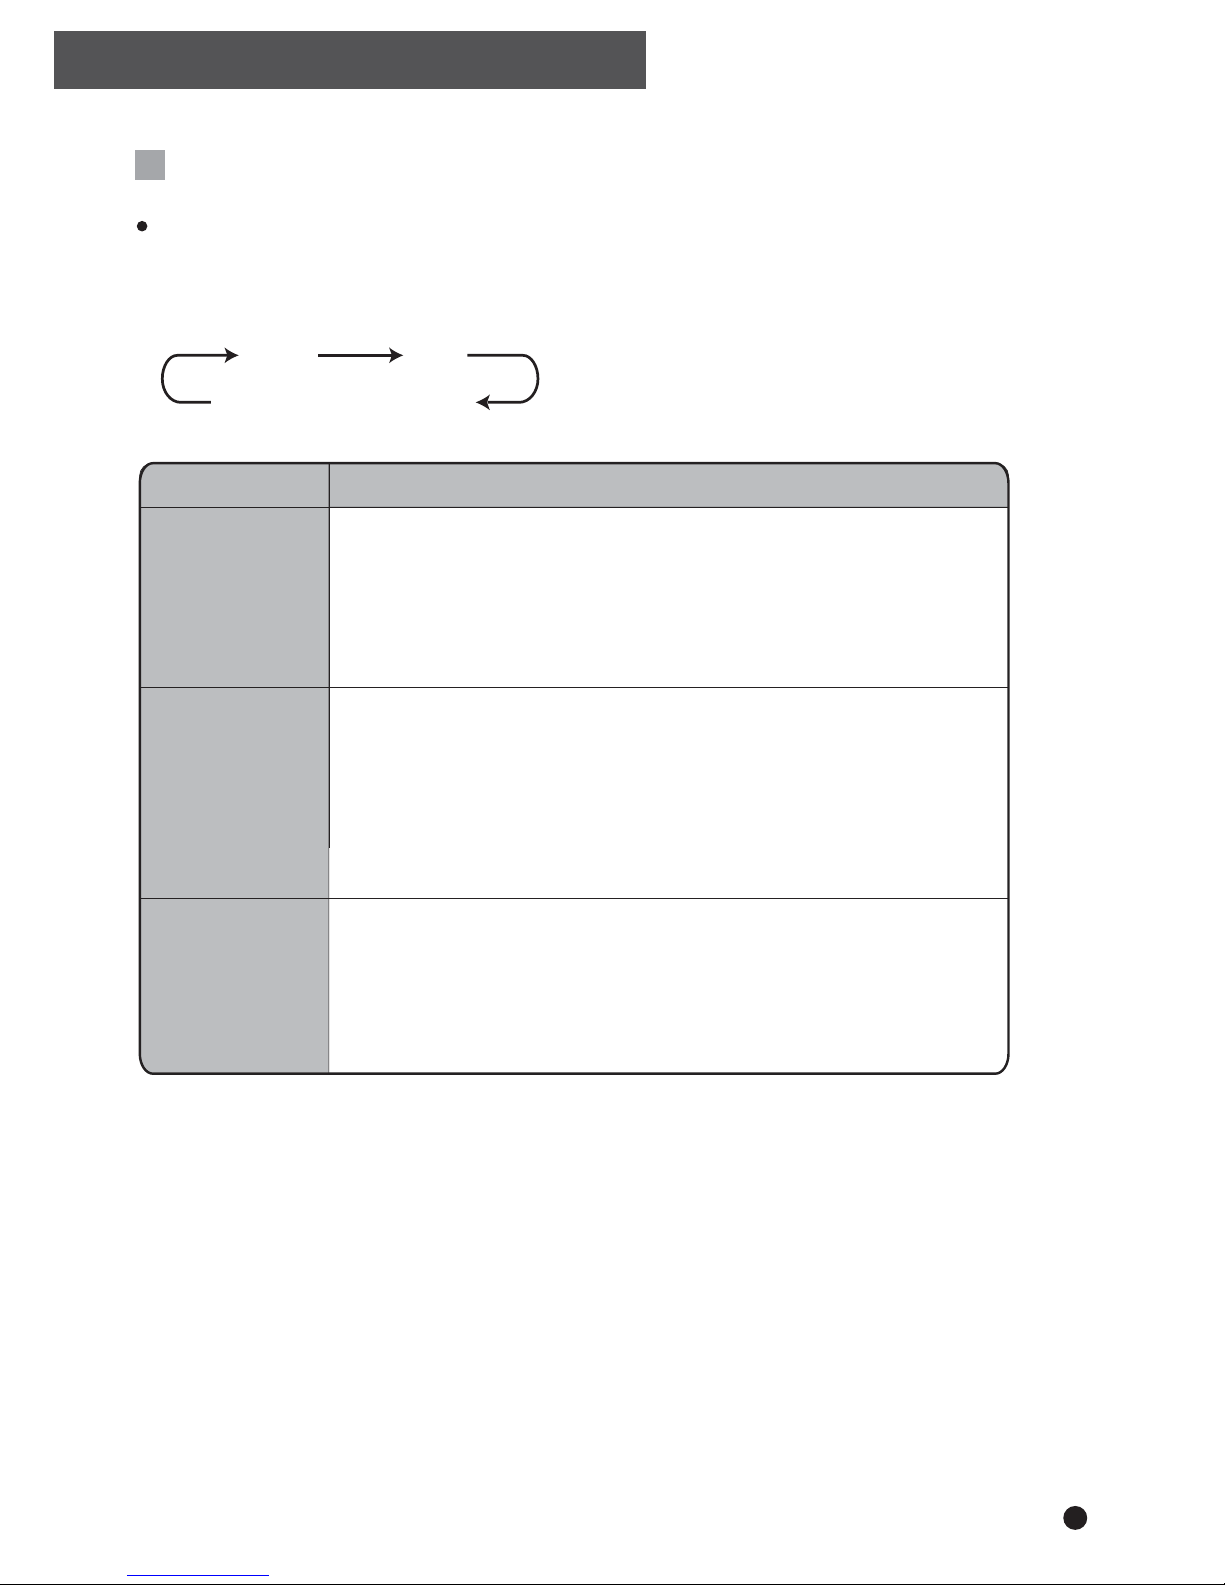
POWER LEVEL
Press the "POWER LEVEL" button to select the desired power level for the
fan and heater
MODE DESCRIPTION
(BOTH LED’S LIGHT UP)
AUTO
LOW
HIGH
Auto
Low (Quiet)
High
Convenient automatic operation
• Fan and Heater settings will be automatically controlled until the
specified humidity has been reached.
• Once desired humidity has been reached, the fan will continue to
run on "Low" but the heater will turn off (except in Laundry mode).
Power saving, low noise and long term operation, suitable for
daily use
• Fan and Heater will operate on "Low" until specified humidity has
been reached.
• Once desired humidity has been reached, the fan will continue to
run on "Low" but the heater will turn off.
For rapid dehumidification
• Fan and Heater will operate on "High" until specified humidity has
been reached.
• Once desired humidity has been reached, the fan will continue to
run on "High" but the heater will turn off.
7
Page 10
OPERATING INSTRUCTIONS
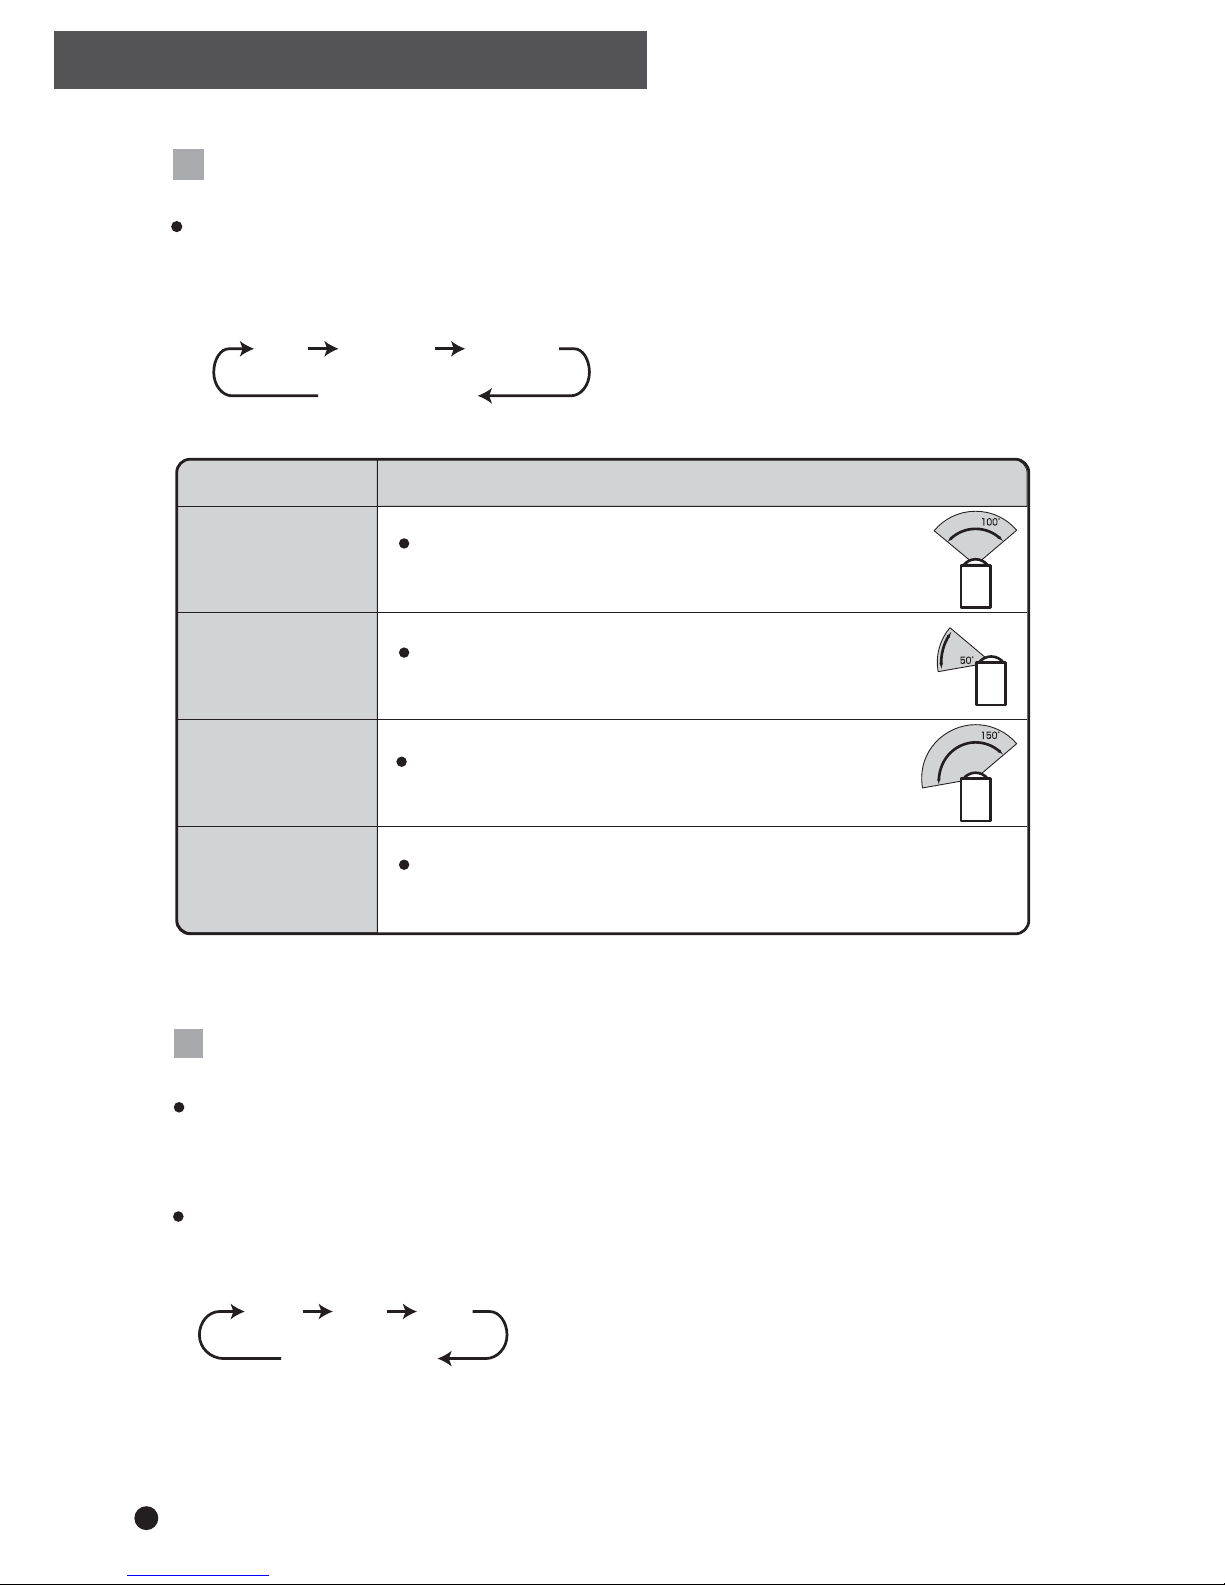
AUTO SWING LOUVRE
Press the "SWING" button to select air louvre angle.
MODE
DESCRIPTION
UP
FRONT
WIDE
HOLD
(LED OFF)
TOP
FRONT
WIDE
Up
Front
Wide
Hold
The automatic louvre swings in an upward
range of approximately 100
°
The automatic louvre swings in a wide
range of approximately 150
°
The automatic louvre stops swinging when you press the
"SWING” button and turns the LED off.
The automatic louvre swings in a front
range of approximately 50
°
TIMER MODE
Press the "TIMER" button to select your desired running time (2,4 or 8 hours).
The unit will automatically switch off at the end of the selected time period.
As the time counts down,the LED (4 or 2 hours) lights will indicate the time remaining.
When no "TIMER" is set (the LED is off), the unit will run continuously, or until the
drain bucket becomes full.
2H
4H 8H
OFF
(LED OFF)
8
Page 11
MAINTENANCE
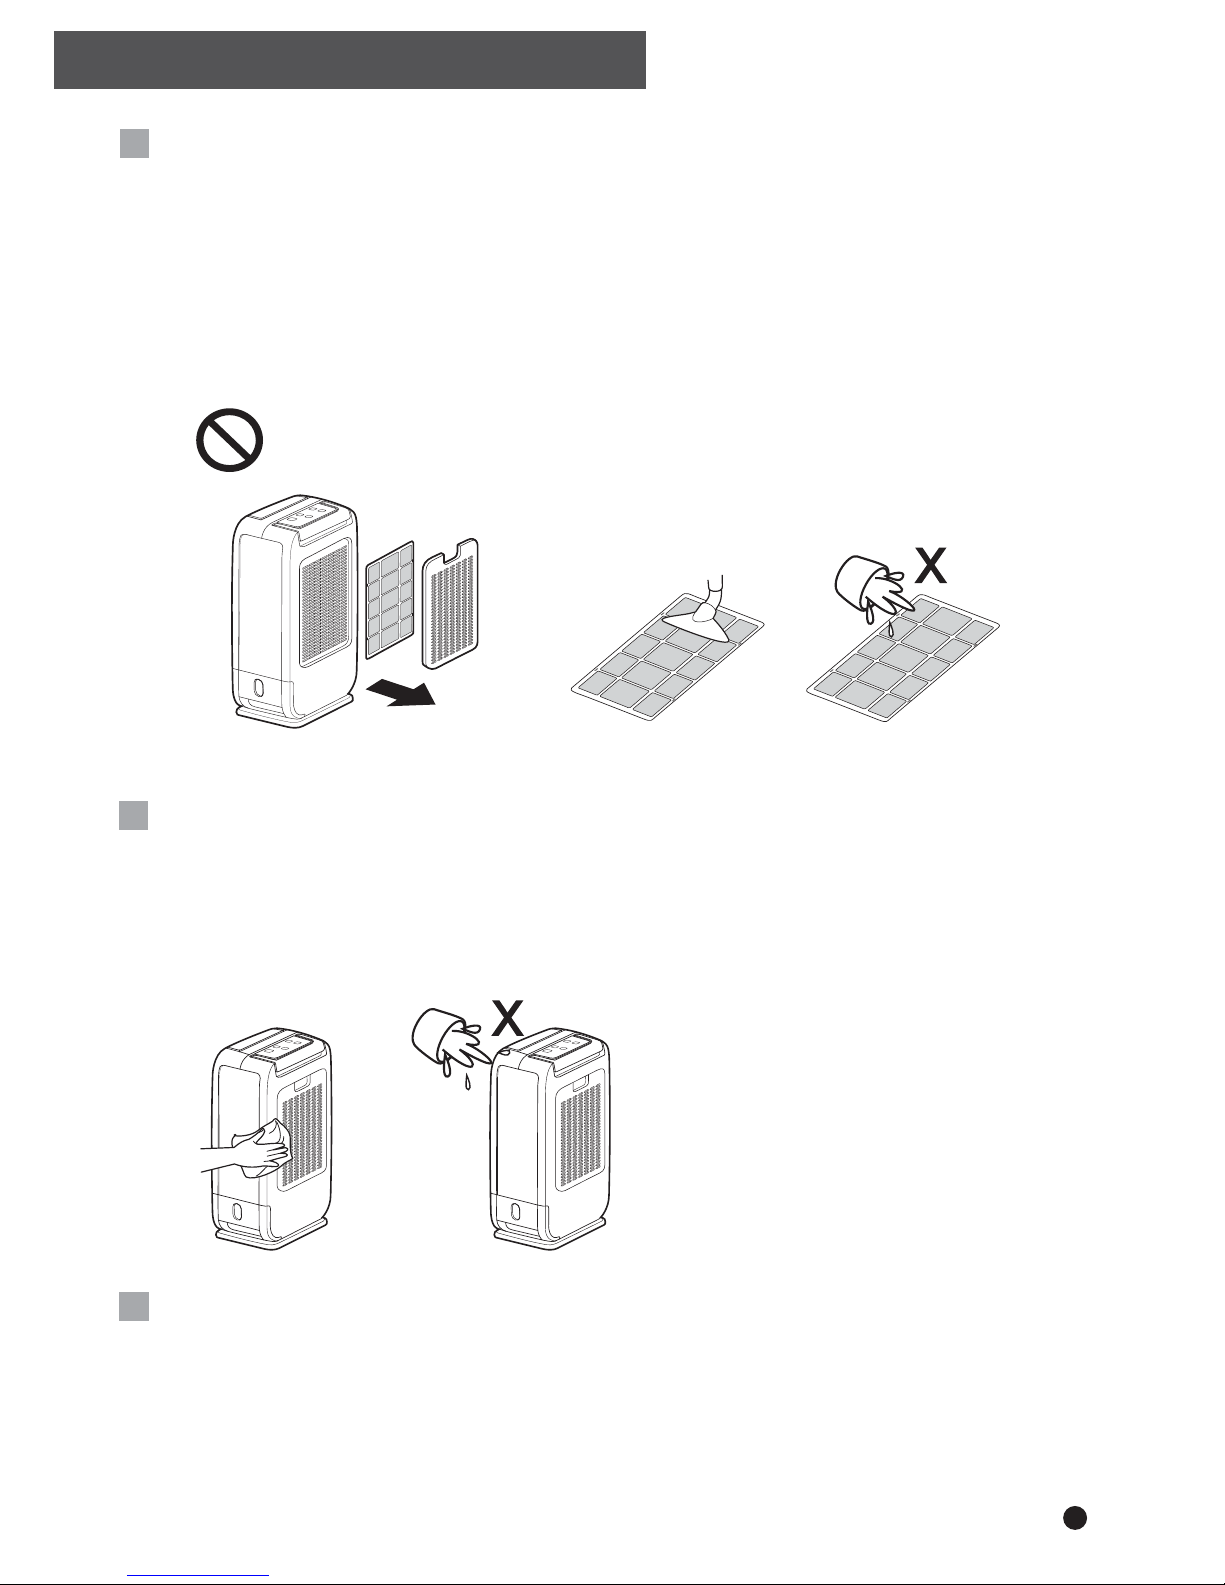
Cleaning the unit
1. Turn off the unit, wait for the fan to stop and unplug from the power socket.
2. Clean the surface with a soft damp cloth.
3. Dry thoroughly with a towel after cleaning.
4. In order to avoid damage, do not wash the machine with water, or let water drip into the
air inlet or outlet.
Cleaning the filter
4. If the filter is covered with dust, the airflow and the performance of the unit will be affected.
Check the filter periodically to ensure any dust is removed.
Clean your filter every 2 weeks to keep your air clean and prolong the life of your dehumidifier
.
1. Turn off the unit and remove the filter from the unit.
2. Clean the filter gently using a vacuum cleaner with a smooth head attachment (do not use
rotating brushes). Do not wash the filter.
3. Replace the filter in position.
Before storing
1. Turn off the unit, wait for it to stop and unplug from the power socket.
2. Clean and dry the bucket. Leave the unit to drain for approximately one day.
3. Clean the filter and the unit. Cover the unit to prevent it from gathering dust. Store upright in
a cool dry place.
4. Do not expose to direct sunlight.
Do not operate the unit without the air filter
Dust build-up in the unit can cause malfunction and overheating.
9
Page 12
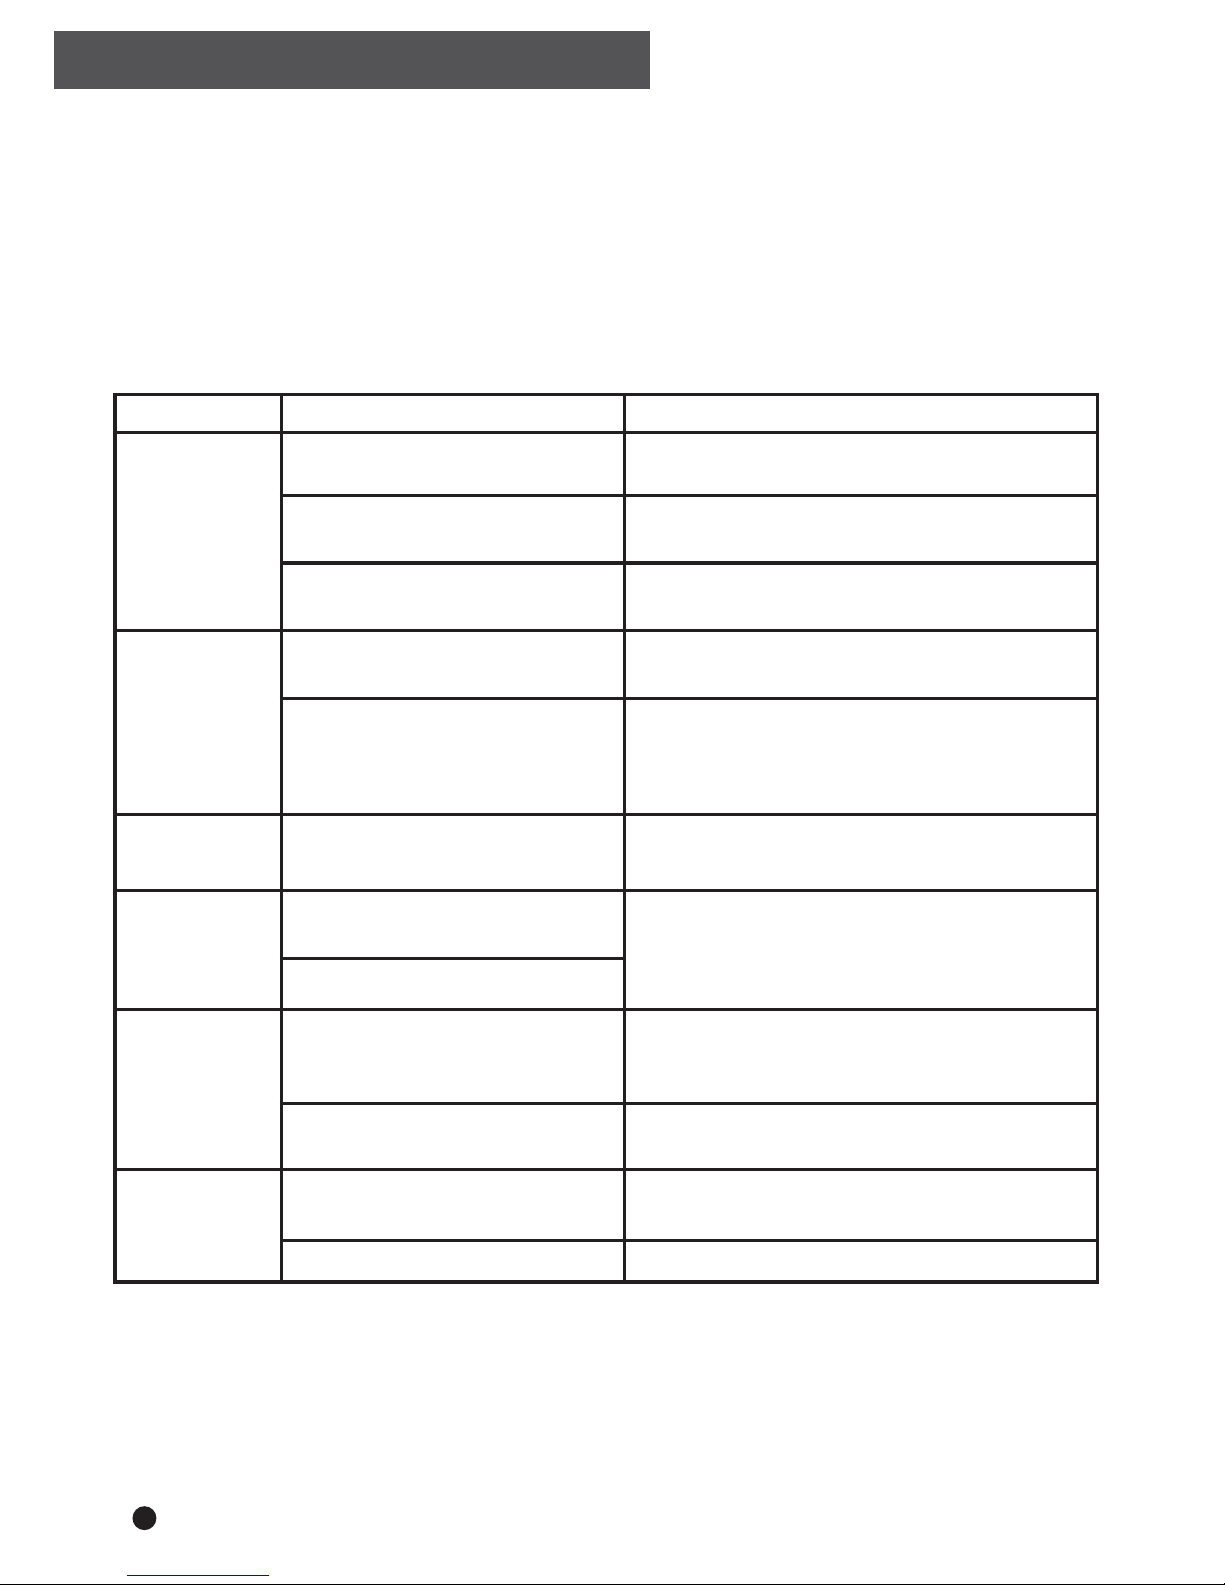
TROUBLESHOOTING
NOTE:
1. If the "CHECK" LED illuminates, turn off the unit, unplug from the power socket,
check and clean the filter. If it is dirty, remove any obstacle that covers the air inlet or
outlet, and wait for at least ten minutes before plugging in and switching back on.
2. Please contact your retailer if the problem continues. Do not try to repair it yourself, as
as this could cause an electrical shock and void your warranty.
Problem
Dehumidi fier
doesn’t start
(no LEDs on)
“FULL” LED
on
Leaking
Very little
water is
collected
“CHECK”
LED on
The unit is unplugged Make sure the plug is pushed completely
into the outlet.
The bucket is full or not in place
Empty the bucket, check the float is in the
position, and replace the bucket.
The unit falls down or is not level
on the floor / surface
Place the unit on a stable, level surface.
The air inlet or outlet is covered
or blocked
Filter clogged with dust
Make sure there is nothing blocking the air
inlet and air outlet of the unit. Clean the
filter. Unplug and wait at least 10 minutes to
resume operation.
The ambient temperature is too
high, such as over 40ºC
Do not use it in a small and closed place
where heat accumulates.
Move to a cooler place, wait at least 10
minutes to resume operation.
The
unit is not level
surface and not accidentally sitting on a
Check the unit is placed on a level
cable etc.
The drainage is clogged or
loose
connection.
Check the drainage hose and its
The fuse
is blown or circuit
breaker is tripped
Check the house fuse / circuit breaker box
and replace fuse or reset the breaker.
The room humidity has reached
the setting
It is normal, you may choose a lower
humidity setting (e.g. 40%RH) for drier air.
Possible Causes What to Do
The following conditions are normal:
1. The fan is still running about 2 minutes after the unit is turned off.
2. The unit works within room temperature about 1~40ºC. It may stop operation
out of this range or when the air inlet or outlet is covered. (The "CHECK" LED light
will illuminate)
3. The unit includes a heater that could increase the room temperature while actively
dehumidifying. If your dehumidifier stops working or "CHECK" LED illuminates,
please check the following items first.
Unit is noisy
Unit is not on a horizontal flat and
level surface
Air filter is dirty
Move and reset the unit.
Clean the filter.
10
Page 13

PLEASE NOTE
Smell coming from the dehumidifier
When you first use the dehumidifier and periodically afterwards you might notice
a smell coming from the dehumidifier. This is caused by the Zeolite desiccant material
and is not a sign that the dehumidifier is faulty, nor is it harmful to humans or pets.
The smell occurs because the Zeolite absorbs odours from items like cigarettes,
cosmetics, hair sprays, building materials and new furniture and then when the
desiccant is heated the smell is discharged into the room. This smell has been
described as being like a burning smell or a sour smell. It is normal, will not last long
and is not a sign of a fault.
Amount of water collected
When you first use your dehumidifier it will work harder to reduce the room humidity
to it's target of 45-50%RH, this is the time when it will produce the most water and need
emptying most frequently. As the room becomes dryer the dehumidifier collects less
water and runs at a lower fan speed. This is normal. When the target relative humidity
has been reached the air coming out of the dehumidifier will not be heated and it will
only be running in low fan mode. This is because there is no need for dehumidification
at this point and the dehumidifier is sampling the air to check the current relative humidity
to see if dehumidification is required.
If you find that you still have condensation on your windows or you need to dry the air
further then using the High fan speed, or the Turbo Laundry mode, will force the
dehumidifier to dry the air further to 40%RH. This might well be necessary if you have
single glazed windows or if the outside air temperature drops to freezing.
11
Page 14
12
Page 15
Product : Ionmax Ion610
Date of Purchase : ____________________________________
Place of Purchase : ____________________________________
Serial No. : ____________________________________
Surname : ____________________________________
Given Name : ____________________________________
Address : ____________________________________
Suburb : ____________________________________
Postcode : ____________________________________
State : ____________________________________
Contact No. : ____________________________________
Email : ____________________________________
Register your Ionmax Ion610 online at my.andatech.com.au
Alternatively, fill out this form and forward to the address below
with a copy of your proof of purchase.
Andatech Pty Ltd
PO Box 3038, Nunawading VIC 3131, Australia.
WARRANTY REGISTRATION
0
13
Page 16

Version 1.0. Updated 28.03.2017.
 Loading...