

ionit VisiTank ION-9100 Installation Instructions Manual

IONIT Networks LLC • 5600 Post Rd, Suite 114, Unit 225 • East Greenwich, RI 02818 • (401) 244-7404 • www.ionitnetworks.com
Installation Instructions for
Version 1.1 – 03/21/2016
ION-9071 Fluid
(1) Display Module
(2) Display Module
Power Adapter
What You’ll Need to Setup
Full Strength
Note: The ION-9100 is designed to work in combination with IONIT’s
ION-9100 Remote Tank Level Display
Prior to beginning installation, please scan the QR code to the left, or down load and print the
most current instructions from our site here: http://www.ionitnetworks.com/pdf/ion-9100install-guide.pdf.
Please read through the entire set of instructions and verify that you have all of the
items needed for installation.
Items Included with your Remo te Dis pla y
(1) ION-9100 Remote Tank Level Display Module
(2) ION-9422 Display Module USB Wall-plug Power Adapter
SETTING UP YOUR DISPLAY
Level Sensor
6. While the 9071 remains i n fast m ode, th e 910 0 w ill disp lay th e RSSI between the 9071 and 9100 in
ORANGE LED bars with a RED bar at top, then disp lay th e tank l ev el in GREEN, alternating until the
9071 exits fast mode.
7. Once the 9071 has exited fas t m ode, th e 910 0 w ill disp lay th e tank lev e l. Since the 907 1 tra n smi ts th e
tank level once per hour, the 9100 will display the fluid level in the tank as reported by the 9071 during
its last transmission.
8. On each subsequent hour ly 9071 transmission, the 9100 will display the RSSI for about 1 second, and then display the tank level.
STEP2: Select the Your Correct Tank Type and Size
Note: The unit will revert to normal operation using the previously selected tank size if there is no activity for 10 seconds
To begin using your new Remot e Tank Display, you must associate or “pair” your display with your
IONIT fluid level sensor (ION-9071) located on your oil tank. Follow Step 1 below to associate your
display to your oil level sensor. By default, your display is setup for the most common oil tank type
and size, a Granby type 275 gallon standard vertical o il tank. If you have a different type/size tank
please follow Step 2 below. Also, your display is setup by default to operate as a display only.
There are several other operating modes for advanced functionality. Please see Step 3 for
configuring the operating modes of your 9100.
ultrasonic remote tank level monitor, sold separately (ION-9071).
Your Remote Displa y
A magnet for activating the sensor
The type and size of your tank (in
gallons)
STEP 1: Associate (“pair”) Your 9071 Fluid Level Sensor to Your 9100
Remote Tank Display
1. Plug the 9100 into its wall-plug USB power adapter and into an o utle t near you r 9071 leve l sens or
2. The 9100 will power on and every other LED will be flashing RED (meaning, not associated w ith a 9071)
3. Place the 9071 into fast mode by swiping a magnet over the black dot on the 9071. The 9071 will remain
in fast mode for about 4 minutes.
4. Once the 9071 is in fast mode, a fter about 10 seconds the 9100 w ill lock onto
the 9071’s signal be paired with it, then the 9100 wil l d isplay the f lu id l ev e l
from the 9071.
5. With the 9071 in fast mode, unplug the 9100 and its power supply and move it
to a convenient location in your home where you want to view your tank level
remotely. Plug in the power supply to a live un-switched electrical outlet, and
then plug the 9100 in to it. The 9100 will display the Received S ignal Strength
Indicator (RSSI) and fluid level.
RSSI
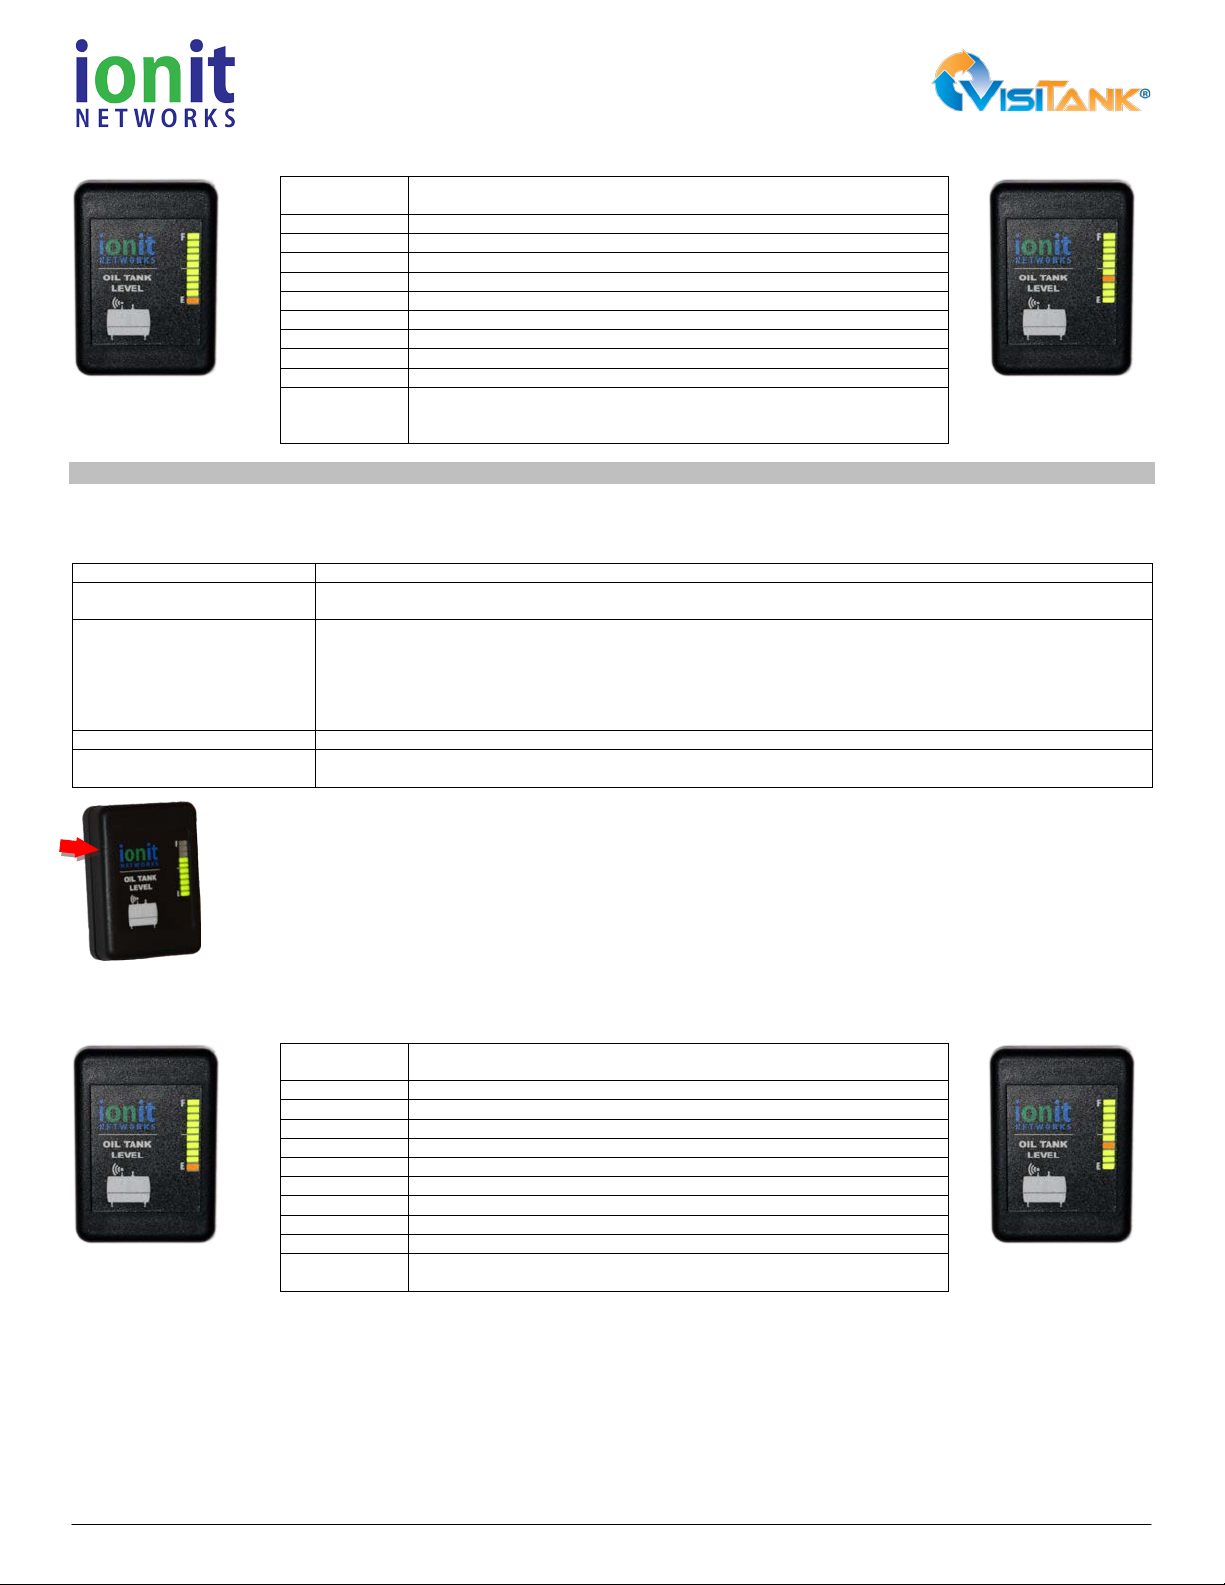
Your 9100 is setup by default for a Granby 275 gallon vertical tank. To select a different tank:
1. Hold the magnet to the upper LEFT side of the 9100 display module lined up with the “i” in IONIT’s logo (shown
by the red arrow), until the display flashes
2. Remove the magnet
3. Swipe magnet at the same spot each time to increment the ORANGE LED bar from the first bar position at the
bottom (position 1) to the top bar (position 10), per the Tank Type/Size table below.
4. Once the correct tank is selected, place and hold the magnet on the left side of the 9100 again until the display
returns to normal. Your selected tank is locked in to your 9100 now.
IONIT Networks LLC • 5600 Post Rd, Suite 114, Unit 225 • East Greenwich, RI 02818 • (401) 244-7404 • www.ionitnetworks.com
Installation Instructions for
Version 1.1 – 03/21/2016
ORANGE LED
Bar Position
Tank Type/Size
10
84” Horizontal cylinder
9
78” Horizontal cylinder
8
72” Horizontal cylinder
7
54” Horizontal cylinder
6
48” Horizontal cylinder
5
Roth style 1500L (400 gal)
4
Roth style 620L (165 gal) or 1000L (275 gal)
3
Granby style 190 gallon (720L) or Convault style 2000 gallon
2
Granby style 275 gallon horizontal t ank
1
Granby style 275 gallon standard vertical tank
gallon tanks, 138 gallon and Roth style 400L tanks.
Mode
Mode Description
Display Only Mode
(DEFAULT)
When in this mode, the 9100 will display the last reported t a nk level and the RSSI bet ween the
9071 and 9100.
Repeater Mode
Displays the RSSI when a transmission is receiv ed, then displays its mode until next received transmission.
greater distances.
Display and Repeater Mode
Combines both functionalities as described above. When it repeats a sig na l, all LE Ds
LED Test Mode
Counts in binary from 0-1023 using yellow LEDs. If any segments are green, red or blank, then a failure
exists.
Display Only Mode
ORANGE LED
Bar Position
Operating Modes
10
Reset and restore factory configuration
9
Reset and restore factory configuration
8
Reset and restore factory configuration
7
LED Test Mode
6
Not in use – reserved for future feature – chirp transmitter
5
Not in use – reserved for future feature – signal level meter
4
Not in use – reserved for future feature – Drive-by Tank Level™
3
Display and Repeater Mode
2
Repeater Mode
1
(DEFAULT)
Display Only Mode
Not In Use
ION-9100 Remote Tank Level Display
ORANGE LED Bar
at position 1
Granby 275
(DEFAULT)
Use this setting for 330 gallon vertical tank, dual 275 or dual 330
ORANGE LED Bar at
position 4
Roth Style 620L
STEP3: Configure the Remote Displa y ’s MODE of Operation (ADVANCED FEATURE)
If you wish to change the operating mode of your 9100 from the default Display Only Mode, please follow these instructions. Your 9100
Remote Display can operate in 3 distinct operating modes and 1 test mode:
Acts as a signal R epeat er whe n us ed in comb in ation wi th IO NI T Netwo rks 9 401 Hub for cloud -based
remote monitoring. When in Repeater mode, the 9100 listens for signals transmitted from any IONIT
device (e.g. 9071 fluid level sensor) and repeats the signal. Used when there is low RSSI between 9401
Hub and IONIT d evices. Place the 9100 between I ONIT devices and IONIT Hubs to have signals span
To change the Mode of Operation:
1. Plug the 9100 wall-plug power adapter into a live power outlet
2. With the 9100 display module unplugged from power, hold the magnet against the upper RIGHT side of the 9100
and then plug it into its power adapter
3. Keep holding the magnet in place until the LED display starts flashing
4. Remove magnet
5. Swipe magnet each time to increment through each mode (0 bars to 9 bars)
Note: The unit will revert to normal operation using the previously selected mode if there is no activity for 10 seconds
6. Once the correct mode is selected, hold the magnet aga inst the upper RIGHT side again until the 9100 resets
ORANGE LED Bar
at position 1
ORANGE LED Bar at
position 4
 Loading...