

Page 1

Superior LP
Quickstart Guide English ( 3 – 9 )
Guía de inicio rápido Español ( 10 – 17 )
Guide d'utilisation rapide Français ( 18 – 25 )
Guida rapida Italiano ( 26 – 33 )
Schnellstart-Anleitung Deutsch ( 34 – 42 )
Snelstartgids Nederlands ( 43 – 50 )
Page 2

Page 3
Quickstart Guide (English)
Box Contents
Superior LP
45 RPM Adapter
Quickstart Guide
Safety & Warranty Manual
Support
For the latest information about this product (system requirements, compatibility information,
etc.) and product registration, visit ionaudio.com.
• Do not stand it on a thick pile carpet, or install it in a place with poor air flow.
• Place the unit on a flat even surface, away from vibrating sources.
Quick Setup
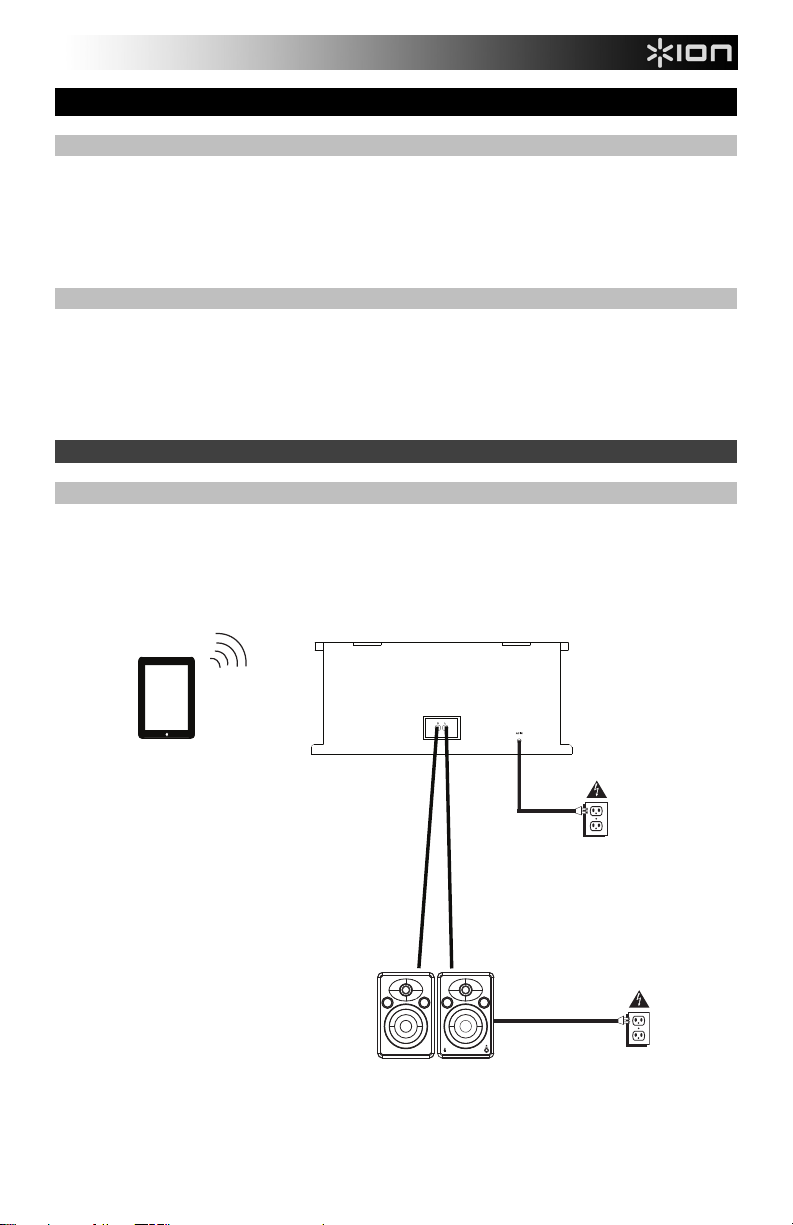
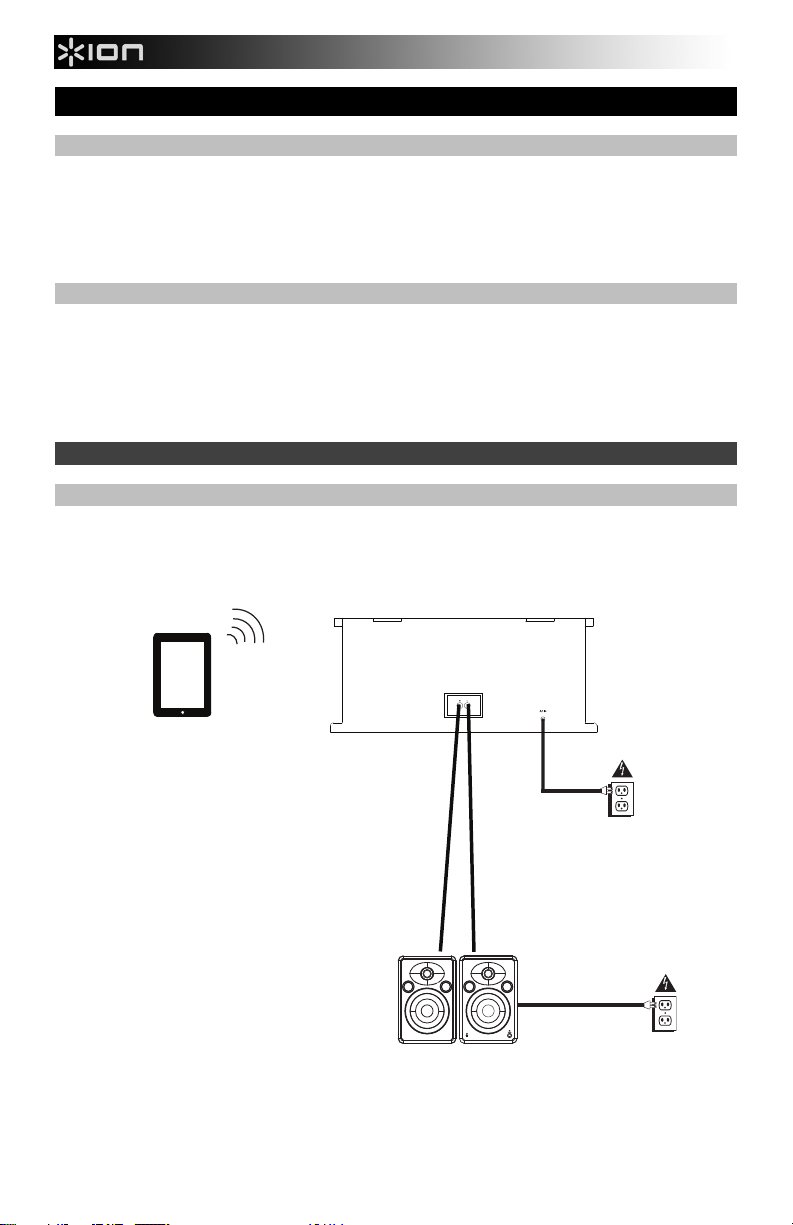
Connection Diagram
Items not listed under the Box Contents are sold separately.
Tablet
LINE OUT
Powered
Speakers
(optional)
Power
Power
3
Page 4
Features
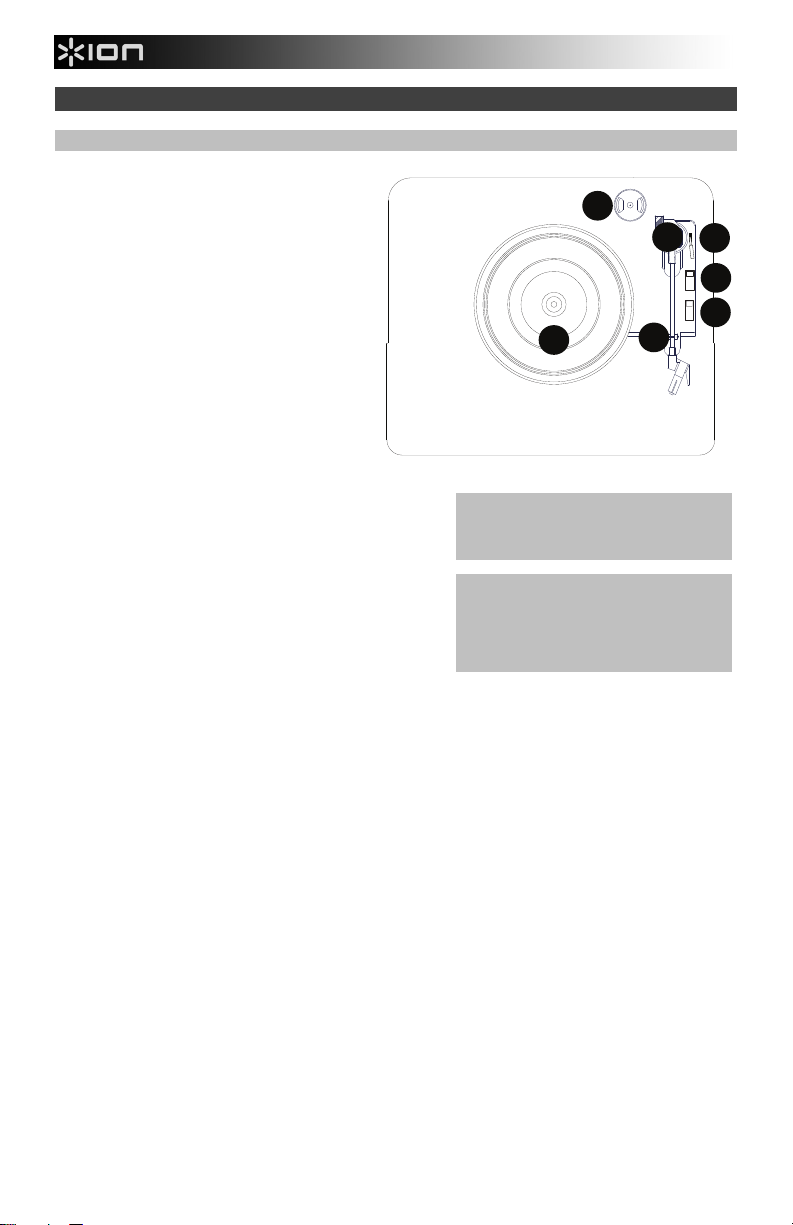
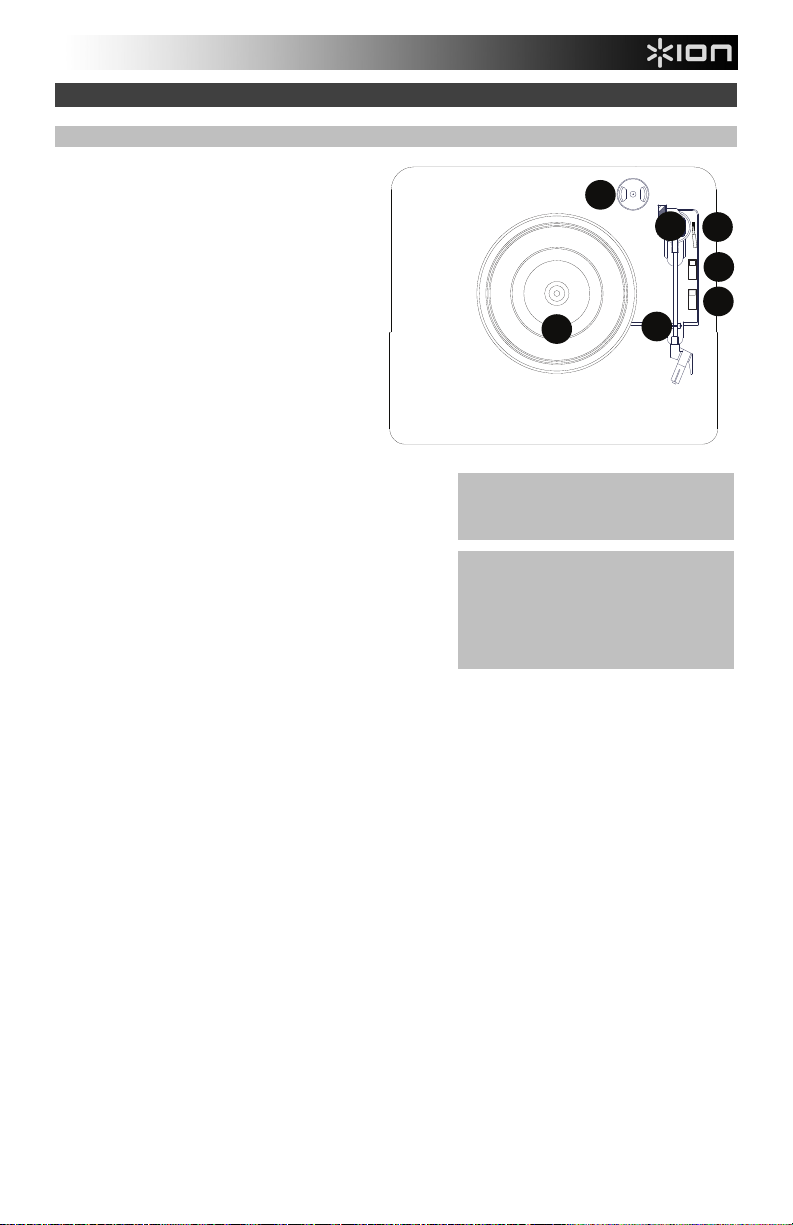
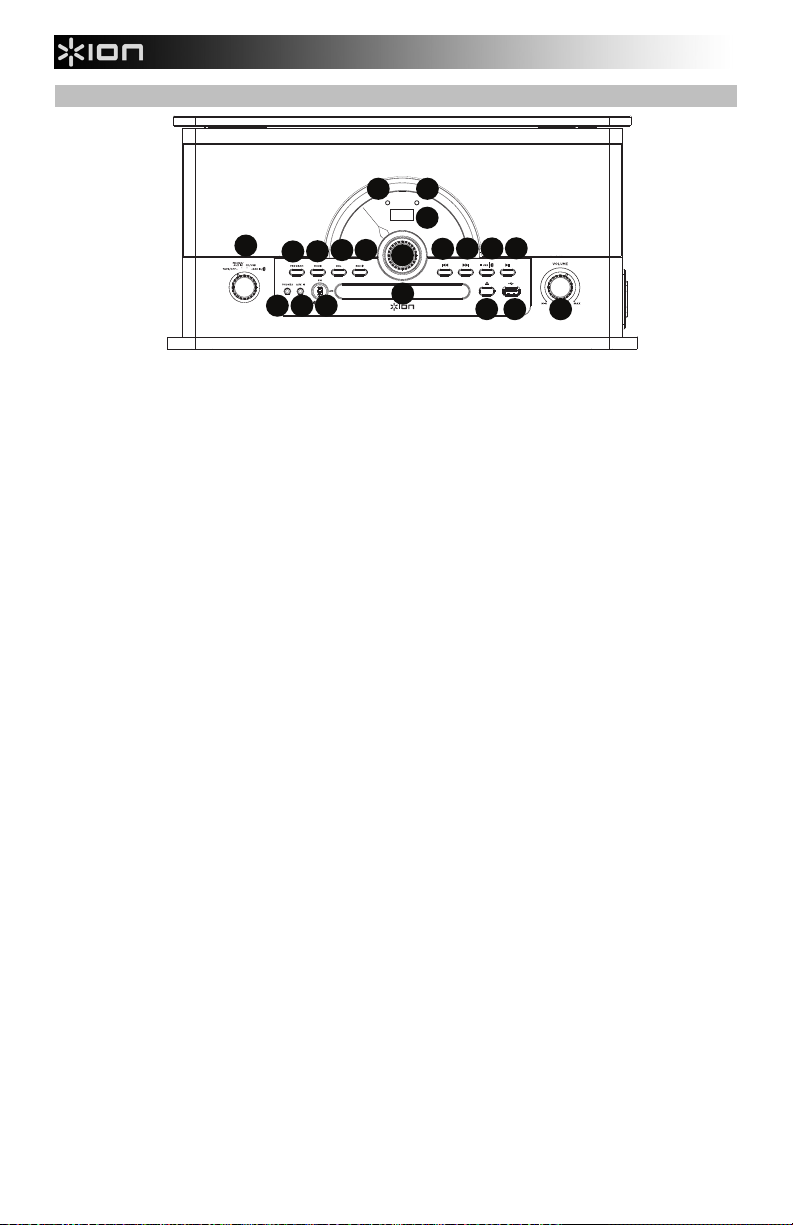
Top Panel
1. Platter: Place your record here.
2. 45 RPM Adapter Holder: Holds the
included 45 RPM adapter. When not
using the adapter, please place it in
this holder.
3. Tonearm: The fixed tonearm can be
raised and lowered by hand, or by
pressing the raise / lower lever.
4. Arm Clip: This specially designed
arm clip secures the tonearm while at
rest or when not in use. The arm clip
has been designed to remain in the
up position while unlocked.
5. Raise / Lower Lever: Raises and
lowers the tonearm.
6. 33 / 45 / 78 Switch: This switch controls the
speed of the turntable platter.
Note: For best results when playing 78 RPM
vinyl records, use a 78 stylus (sold separately).
Only use a 78 stylus with 78 RPM vinyl records.
7. Autostop switch: This switch turns autostop
on or off. When autostop is on, the platter will
start spinning when the tonearm is placed over
the record and stop spinning when the record
has reached the end. When Autostop is off, the
platter will always spin regardless of the position of the tonearm.
Note: If your vinyl record stops before it reaches the end of the music, turn Autostop to
the off position for this particular record. This is generally recommended for 45 RPM
records.
IMPORTANT: Remove the plastic
cartridge cover (needle cover) before
operating the turntable.
*WARNING: The RCA outputs are LINE
level. Please only connect these to LINE
level inputs. You may damage your
receiver if you plug in a LINE level device
into a PHONO level input.
2
1
4
3
5
6
7
4
Page 5
AUTO STOP
2
1
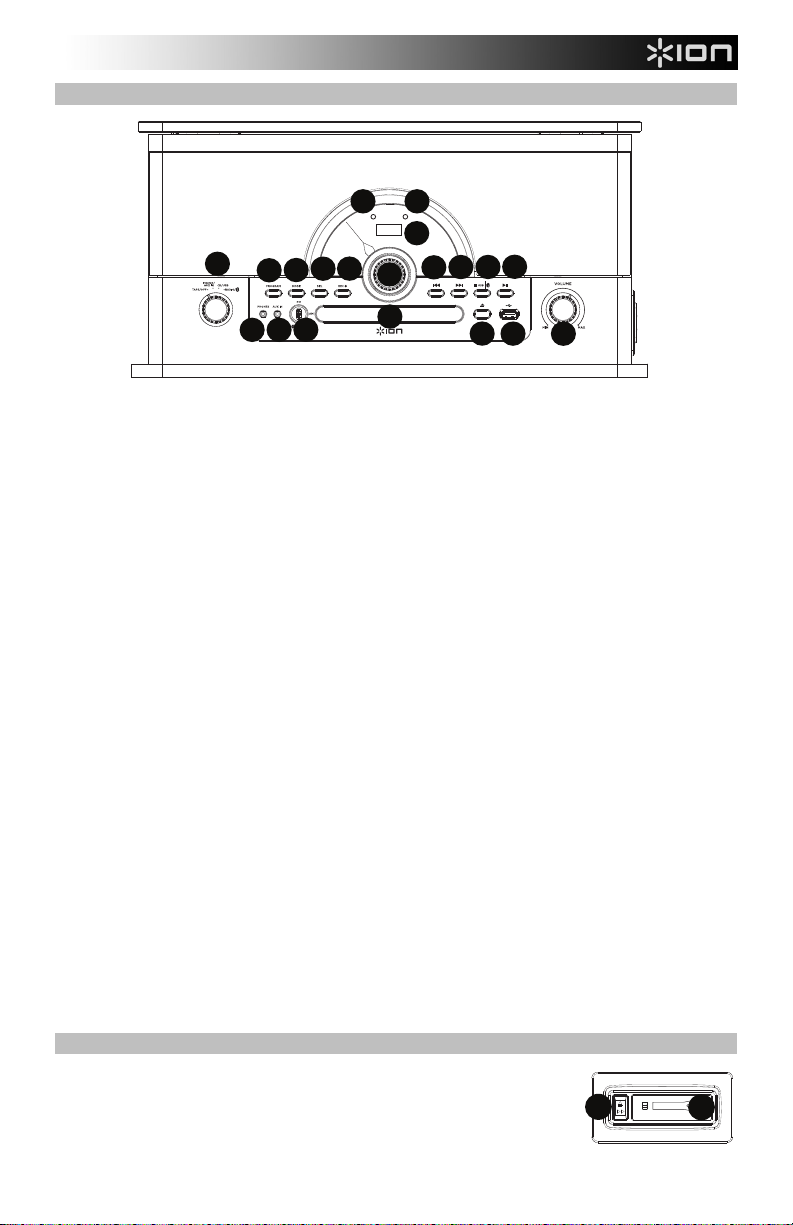
Front Panel
9
8
7
1
2
5
4
3
10
6
11
12
13
16
15
14
1. Function Selector: Turn this dial to select which source to use: Tape/Off, Phono/Aux In, CD/USB, or
Radio/Bluetooth.
2. Program Button: Press this button to program CD tracks to play in a certain order.
3. Mode: Selects how the tracks on the USB flash drive or CD will be played back: “ONE” (plays the
same track repeatedly), “FOL” (plays through the same folder repeatedly) “ALL” (plays through all
tracks repeatedly), or “NOR” (normal playback order without repeating).
4. Delete Button: Press this button to delete tracks or folders from a USB flash drive.
5. Rec: Press this button to go to USB recording mode if a USB flash drive is connected.
6. Radio Frequency Selector: Turn this dial to select the AM or FM radio station frequency.
Note: EU units can only select FM stations.
7. Display: Shows the current mode and track number.
8. Power LED: This LED illuminates when the power is turned on.
9. Bluetooth LED: This LED flashes when in pairing mode and is solid when connected to a Bluetooth
speaker.
10. Skip Backward: Press this button to go to the previous USB file, Bluetooth track, or CD track.
Note: When listening to Bluetooth sources, pressing this button may go to another playlist or music
genre in some apps.
11. Skip Forward: Press this button to go to the next USB file, Bluetooth track, or CD track.
Note: When listening to Bluetooth sources, pressing this button may go to another playlist or music
genre in some apps.
12. Stop/USB/Bluetooth: Press this button to end recording to the USB flash drive. Press this button to
stop playback of a USB track, CD track, or Bluetooth track. With the Function Selector set to
USB/CD, press and hold this button for 2 seconds to switch between CD mode and USB mode. With
the Function Selector set to Radio/Bluetooth, press and hold this button for 2 seconds to disconnect
from a paired Bluetooth device.
13. Play/Pause: Press and release this button to play/pause tracks from CD, USB, and Bluetooth
sources.
14. Headphone Output: When headphones are connected, the internal speaker is muted.
15. Aux In: Connect the output of a line-level device to this input, such as from a smartphone, media
player, tablet, etc.
16. FM/AM/Bluetooth (FM/Bluetooth for EU units): Toggle this to switch from FM, AM, and Bluetooth
sources.
Note: EU units can only select between FM and Bluetooth.
17. CD Tray: Place a CD here. This unit is designed to play commercially available CDs, properly burned
and finalized CD-Rs, CD-RW’s, and MP3 CDs.
18. Open/Close: Press this button to open or close the CD tray.
19. USB Port: Playback tracks from your USB flash drive or record songs to the USB flash drive.
20. Volume: Adjusts the sound level for the internal speakers and the headphone output.
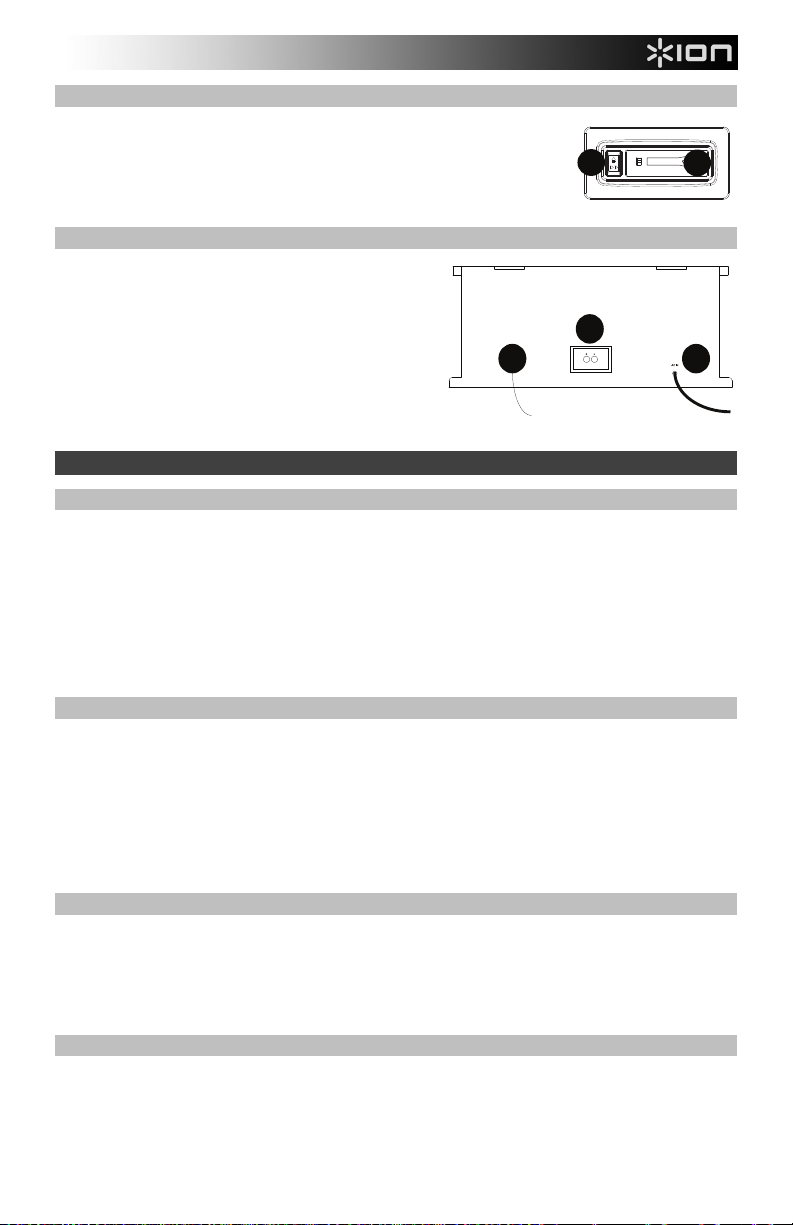
Side Panel
1. Cassette Eject / Fast Forward (FF) Button: Press this button to eject the
tape. Press and hold the button to fast forward through the tape.
2. Cassette Door: Insert a cassette tape here.
17
18
19
20
5
Page 6
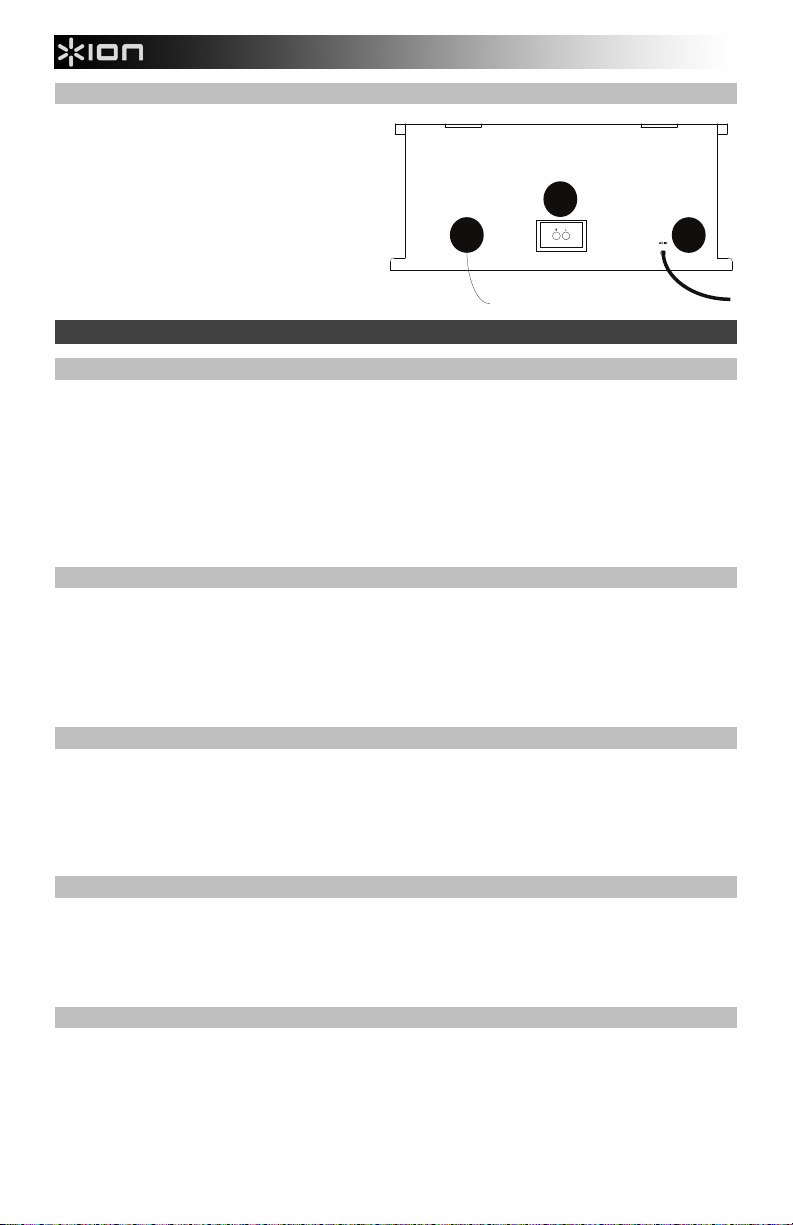
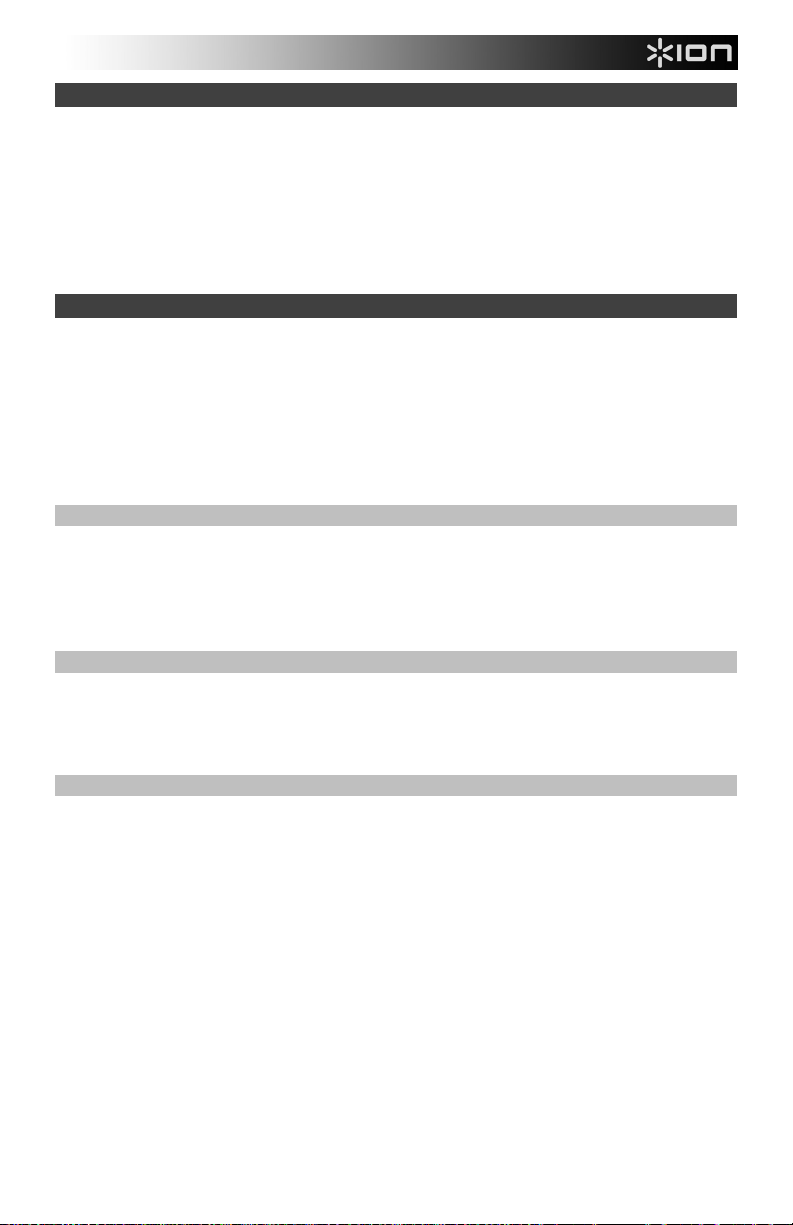
Rear Panel
1. Line Output: Connect this output to a
receiver, amplifier, or powered speakers.
Note: Superior LP’s volume control will not
adjust the volume when the line output is in
use.
2. Power Input: The integrated power cable
is connected here.
3. FM Antenna: Adjust this wire for better FM
radio reception. For AM reception (US/CA
units only), rotate the unit until the best
reception is found.
Recording
Recording from a CD
1. Set the Function selector to CD/USB.
2. Insert the USB flash drive into the USB port.
3. Press the Record button. “REC” will flash on the display for 3 seconds and then show “ONE”. Press
the Backward/Forward button to select to record “ONE” track or “ALL” tracks and then press the
Record button to confirm.
4. Press the Backward/Forward button to select the track and then press the Record button to
confirm. “REC” and “Track No.” (track number) will be alternately displayed to indicate the track is
being recorded.
5. Press the Stop button to stop recording.
Note: Some original CDs may not be recordable if they are copy-protected.
Recording from a MP3 Disc
1. Set the Function selector to CD/USB and insert the MP3 disc in the CD tray.
2. Insert the USB flash drive into the USB slot.
3. Press the Record button. “REC” will flash on the display for 3 seconds and will then show “ONE”.
4. Press the Backward/Forward button to record “ONE” track, “FOL” (a folder) or “ALL” tracks. Press
the Record button to confirm. “REC”, “folder number”, and “number of total tracks” will be alternately
displayed, indicating that it is being recorded.
5. Press the Stop button to stop recording.
Recording from the Turntable
1. Set the Function selector to Phono/Aux In.
2. Insert the USB flash drive into the USB slot.
3. Lower the tonearm to the desired location on the record.
4. Press the Record button. “REC” will flash on the display for 3 seconds and then, “REC” and “PHO”
will be alternately displayed to indicate that it is being recorded.
5. Press the Stop button to stop recording.
Recording from the Radio (FM Band only)
1. Set the Function selector to Radio/Bluetooth.
2. Insert the USB flash drive into the USB slot.
3. Select the FM radio station using the Frequency Selector dial.
4. Press the Record button.
5. Press the Stop button to stop recording.
Recording from a Cassette
1. Insert the USB flash drive into the USB slot.
2. Set the Function selector to Tape/Off.
3. Insert the tape with the thicker side of the tape facing to the right of tape tray. The cassette will play
automatically.
4. Press the Record button. “REC” will flash on the display for 3 seconds and then, “REC” and “TAP”
will be alternately displayed to indicate that it is being recorded.
5. Press the Stop button to stop recording.
3
1
LINE OUT
2
6
Page 7

Recording from the Aux Input
1. Insert the USB flash drive into the USB slot.
2. Set the Function selector to Phono/Aux In.
3. Connect your external audio device and start its playback.
4. Press the Record button. “REC” will flash on the display for 3 seconds and then “REC” and “AUX” will
be alternately displayed to indicate that it is being recorded.
5. Press the Stop button to stop recording.
Bluetooth Playback
1. Set the Function selector to Radio/Bluetooth and set the FM/AM/Bluetooth switch (FM/Bluetooth
on EU units) to the Bluetooth position. The Bluetooth indicator will flash.
2. The pairing indicator will flash quickly. When pairing, remain within 10 meters (33 feet) of Superior LP.
3. Turn on Bluetooth on your phone or tablet to pair. Select “Superior LP” as the Bluetooth device.
4. When successfully paired and connected, the Bluetooth indicator will become solid.
5. To disconnect from the currently paired Bluetooth device and pair to another Bluetooth device, hold
the Stop/USB/Bluetooth button for 2 seconds.
Note: If your Bluetooth device prompts for a pairing code, enter “0000”.
Tape Playback
1. Set the Function selector to Tape/Off.
2. Insert the tape with the thicker side of the tape facing to the right of tape tray. The cassette will play
automatically.
3. Push the Eject/Fast Forward button 1/2 way down to toggle between fast forward and
playback. Release the FF button to start playback.
4. Push the Eject/Fast Forward button completely down to eject the tape.
Turntable Playback
Before use, please make sure to:
Remove the stylus protector. Reconnect the protective cap on the stylus when not in use.
•
• Ensure the tonearm is free to move from the tonearm rest. Lock the tonearm in place again when not
in use.
1. Set the
Function
selector to
Phono/Aux In
and lift the turntable dust cover.
2. Place a record on the turntable, over the central spindle on the slipmat.
3. Set the
selector to 33, 45, or 78 rpm depending on the record.
Speed
4. Lift the tonearm from the tonearm rest by using the Raise Lever and slowly move it over the record.
The turntable platter will start turning.
5. Place the tonearm on the desired location of the record.
6. Gently lower the tonearm onto the record to start playing.
7. When the record is finished playing, the tonearm will automatically stop. Lift the tonearm from the
record and put it back on the rest.
8. To manually stop the record, lift the tonearm from the record and return it to the rest.
Do not stop or turn the platter manually. Moving or jarring the turntable without securing the
Note:
tonearm clamp could result in damage to the tonearm.
Auto-stop Switch Operation
Certain types of records may have an auto-stop area outside the pre-set limit, so the turntable may stop
before the last track finishes. If this occurs, set the Auto-stop switch to the Off position. This allows the
record to play to the end, but it will not stop automatically. You must manually raise the tonearm and place
it back in the rest and then turn the power OFF to stop the turntable from spinning.
Aux In Playback
1. Set the Function selector to Phono/Aux In.
2. Connect an 1/8” (3.5 mm) stereo audio cable (not included) from the AUX IN on the front panel of
Superior LP to the line output or headphone output of your external audio device to be able to listen to
the external source through Superior LP’s internal speakers.
3. Adjust the volume on Superior LP to the desired level.
Note: If the line output of your external device is connected, you only need to adjust the system’s volume
control. If your external device’s headphone output is connected, you may need to adjust the volume
control on both your external device and Superior LP to achieve the desired volume.
7
Page 8
CD Playback
Standard audio CDs and data CDs can be used. The following file types are playable from data CDs:
• MP3
• WAV
• WMA
If a CD contains more than 999 files in a folder, the files above 999 will not appear correctly on the
Note:
display. Arrange your files into folders with a maximum of 999 files per folder.
Loading and Unloading a CD
1. Set the Function selector to CD/USB.
2.
Open the disc tray by pressing the CD door Open/Close button.
3.
When the disc tray has opened, carefully place the CD in the tray with the label facing up. Position
smaller discs in the center of the CD tray.
4.
Close the disc tray. The total number of tracks on the CD will appear on the LED display and will play
automatically.
CD Repeat
1. To listen to the same track repeatedly when playing back a CD, press the Mode button once. The LED
display will show “ONE”.
2. To play the entire disc repeatedly, press Mode twice. The LED display will show “ALL”.
3. To cancel repeat play, press the Stop button.
Programming CD Track Playback Order
Follow these instructions to program the playback order for tracks on a CD.
Note: The CD playback must be stopped before programming track order.
1. Press the Program button.
2. Press the Backward/Forward button to select the location in which the track should be stored, i.e.
track 03.
3. Press the Program button. The first programmed selection is now stored in the programmed memory.
4. To listen to a programmed track, press the Play/Pause button. The CD will start playing at the
beginning of the first programmed track.
5. To clear the programmed memory, while the disc is playing, press the Stop button twice.
USB Flash Drive Playback
The following file types are playable from USB flash drives:
• AAC/M4A
• AIFF/AIF
• MP3
• WAV
• WMA
To playback a file:
1. Set the Function selector to CD/USB.
2. Connect the USB flash drive to the USB port.
3. Press and hold the Stop/USB/Bluetooth button for 2 seconds to switch to USB mode. The total
number of tracks will be shown on the display and will begin playing automatically.
4. Press the Stop button to stop playing.
Note: Please note that the unit can only read FAT32 format USB flash drives that are 32GB or less.
If a USB flash drive contains more than 999 files in a folder, the files above 999 will not appear
Note:
correctly on the display. Arrange your files into folders with a maximum of 999 files per folder.
8
Page 9
Listening to the Radio
1. Set the Function selector to the Radio/Bluetooth position.
2. Select the desired frequency (AM or FM) using the FM/AM/Bluetooth switch (FM/Bluetooth on EU
units).
Note: EU units only can select FM.
3. Select the desired radio station by turning the Tuning knob.
4. Adjust the volume to the desired level.
5. When finished listening to the radio, set the Function selector to the OFF position to turn off the radio.
Note: The receiver has a built-in FM antenna hanging at the rear cabinet. This wire should be fully uncoiled
and extended for best reception.
Technical Specifications
Speaker Output Power
Frequency Response
Motor
Drive System
Speed
Output Level
Impedance
Cartridge Type
Supported Data CD File Types AAC/M4A, AIFF/AIF, MP3, WAV, WMA
Supported USB Flash Drive File Types
Voltage
Power Consumption 20W
Dimensions
(width x depth x height)
Weight
Specifications are subject to change without notice.
* Bluetooth range is affected by walls, obstructions, and movement. For optimal performance, place the product in the center
of the room so it is unobstructed by walls, furniture, etc.
Trademarks and Licenses
ION Audio is a trademark of ION Audio, LLC, registered in the U.S. and other countries.
The Bluetooth word mark and logos are owned by the Bluetooth SIG, Inc. and any use of such marks by
ION Audio is under license.
All other product or company names are trademarks or registered trademarks of their respective owners.
2W + 2W
60-20,000 Hz
DC servo motor
Belt drive
33-1/3, 45, 78 RPM
500 mV@ 1 kHz
4 ohm
Ceramic stereo cartridge
MP3, WAV, WMA
120V AC, 50 Hz (US/CA)
230V AC, 60 Hz (EU)
18.5" x 15" x 9.6"
47 cm x 38.1 cm x 24.3 cm
18.9 lbs; 8.6 kg
9
Page 10
Guía de inicio rápido (Español)
Contenido de la caja
Superior LP
Adaptador para 45 rpm
Guía de inicio rápido
Manual sobre la seguridad y garantía
Soporte
Para obtener la información más reciente acerca de este producto (requisitos de sistema,
información de compatibilidad, etc.) y registrarlo, visite ionaudio.com:
• No lo apoye sobre una alfombra gruesa o en un lugar con poco flujo de aire.
• Coloque la superficie sobre una superficie plana y pareja, alejada de fuentes de
vibraciones.
Instalación rápida
Diagrama de conexión
Los elementos que no se enumeran en Contenido de la caja se venden por separado.
10
Tableta
LINE OUT
Altavoces con
alimentación
(opcional)
Suministro
eléctrico
Suministro
eléctrico
Page 11
Características
Modo vinilo
1. Plato: Coloque aquí su disco.
2. Soporte del adaptador para 45 rpm:
Sostiene el adaptador para 45 RPM
incluido. Cuando no use el adaptador,
póngalo en este soporte.
3. Brazo: El brazo fijo se puede subir y
bajar a mano o presionando la
palanca de subir / bajar.
4. Clip del brazo: Este clip diseñado
especialmente fija el brazo mientras
está en reposo o no se usa. El clip ha
sido diseñado para que permanezca
hacia arriba mientras está
desbloqueado.
5. Palanca de subir / bajar: Sube y
baja el brazo.
6. Conmutador de 33 / 45 / 78: Este conmutador
controla la velocidad del plato del giradiscos.
Nota: Para obtener los mejores resultados al
reproducir discos de vinilo de 78 RPM, use una
púa para 78 (que se vende por separado). Use
sólo una púa para 78 con los discos de vinilo de
78 RPM.
7. Interruptor de parada automática: Este
interruptor activa y desactiva la parada
automática. Cuando la parada automática está
activada, el plato comienza a girar cuando el
brazo se coloca sobre el disco y se detiene
cuando llega al final del mismo. Si está desactivada, el plato gira siempre,
independientemente de la posición del brazo.
Nota: Si su disco de vinilo se detiene antes de llegar al final de la música, gire Autostop a
la posición de desactivado para este disco en particular. Esto se recomienda en general
para los discos de 45 RPM.
IMPORTANTE: Retire la cubierta plástica
de la cápsula (cubierta de la púa) antes
de hacer funcionar el giradiscos.
*ADVERTENCIA: Las salidas RCA son
para nivel de LÍNEA. Conéctelas sólo a
las entradas de nivel de línea (LINE).
Puede dañar el receptor si enchufa un
dispositivo de nivel de línea en una
entrada de nivel fonográfico (PHONO).
2
1
4
3
5
6
7
11
Page 12
Panel frontal
9
8
7
1
2
5
4
3
10
6
11
12
13
16
15
14
1. Selector de función: Gire este cuadrante para seleccionar la fuente a utilizar: cinta/apagado, entrada
fonográfica/auxiliar, CD/USB o radio/Bluetooth.
2. Botón de programa: Pulse este botón para programar la reproducción de pistas de CD en un
determinado orden.
3. Modo: Seleccione la manera en la que se reproducirán las pistas en la unidad de memoria USB o CD:
“ONE” (repite la misma pista), “FOL” (reproduce el contenido de la misma carpeta de forma repetida)
“ALL” (reproduce todas las pistas de forma repetida) o “NOR” (orden de reproducción normal sin
repeticiones).
4. Botón de eliminación: Pulse este botón para eliminar pistas o carpetas de la unidad de memoria
USB.
5. Grabación: Pulse este botón para entrar al modo de grabación de USB si está conectada una
memoria flash USB.
6. Selector de frecuencias de radio: Gire este cuadrante para seleccionar la frecuencia de estación de
radio AM o FM.
Nota: Las unidades de la UE solo pueden seleccionar estaciones de FM.
7. Pantalla: Muestra el modo y número de pista actuales.
8. LED de encendido: Este LED se ilumina cuando la unidad está encendida.
9. LED de Bluetooth: Este LED parpadea en modo de apareamiento y permanece encendido cuando se
conecta a un altavoz Bluetooth.
10. Pista anterior: Pulse este botón para pasar al archivo USB o pista de Bluetooth o CD anterior.
Nota: Al escuchar de fuentes Bluetooth, pulsar este botón en algunas aplicaciones puede hacer que
vaya a otra lista de reproducción o género musical.
11. Pista siguiente: Pulse este botón para pasar al archivo USB o pista de Bluetooth o CD siguiente.
Nota: Al escuchar de fuentes Bluetooth, pulsar este botón en algunas aplicaciones puede hacer que
vaya a otra lista de reproducción o género musical.
12. Detener/USB/Bluetooth: Pulse este botón para finalizar la grabación al dispositivo de memoria USB.
Pulse este botón para detener la reproducción de una pista de USB, CD o Bluetooth. Con el selector
de función en la posición USB/CD, mantenga pulsado este botón durante dos segundos para alternar
entre el modo CD y el modo USB. Con el selector de función en la posición radio/Bluetooth,
mantenga pulsado este botón durante dos segundos para desconectar el dispositivo Bluetooth
apareado.
13. Play/Pause (Reproducir/Pausa): Pulse y suelte este botón para reproducir/poner en pausa las pistas
de fuentes de CD, USB y Bluetooth.
14.
Salida para auriculares: Cuando se conectan auriculares, el altavoz interno se silencia.
15. Entrada auxiliar: Conecte a esta entrada la salida de un dispositivo de nivel de línea, como por
ejemplo un teléfono inteligente (smartphone), reproductor de medios, tableta, etc.
16. FM/AM/Bluetooth (FM/Bluetooth para unidades de la UE): Conmute este interruptor para alternar
entre fuentes de FM, AM y Bluetooth.
Nota: Las unidades de la UE solo pueden alternar entre FM y Bluetooth.
17. Bandeja de CD: Coloque un CD aquí. Esta unidad está diseñada para reproducir CD que están
disponibles comercialmente y CD-R, CD-RW y CD de MP3 que hayan sido grabados y finalizados
correctamente.
18. Abrir/Cerrar: Pulse este botón para abrir o cerrar la bandeja de CD.
19. Puerto USB: Reproduzca pistas desde su unidad flash USB o grabe canciones en la unidad flash
USB.
20. Volumen: Ajusta el nivel de sonido de los altavoces internos y la salida para auriculares.
17
18
19
20
12
Page 13
AUTO STOP
2
1
Panel lateral
1. Botón para eyectar casete / avance rápido (FF): Pulse este botón para
eyectar la cinta. Mantenga pulsado el botón para avanzar rápidamente
por la cinta.
2. Ranura para casetes: Inserte aquí un casete.
Panel trasero
1. Salida de línea: Conecte esta salida a su receptor,
amplificador o altavoces alimentados.
Nota: El control de volumen superior del LP no
ajustará el volumen cuando se esté utilizando la
salida de línea.
2. Entrada de corriente: El cable de corriente
integrado se conecta aquí.
3
3. Antena de FM: Ajuste de cable para una mejor
recepción de radio FM. Para mejorar la recepción de
AM (unidades para EE.UU./Canadá solamente), gire
la unidad hasta encontrar la mejor recepción.
Grabación
Grabación desde un CD
1. Ajuste el selector de función a CD/USB.
2. Inserte la unidad de memoria USB en el puerto USB.
3. Pulse el botón Record. Parpadeará “REC” en la pantalla durante tres segundos y luego se mostrará
“ONE”. Pulse el botón siguiente/anterior para seleccionar la grabación de una (“ONE”) pista o todas
(“ALL”) las pistas y luego pulse el botón Record para confirmar.
4. Pulse el botón siguiente/anterior para seleccionar la pista y luego pulse el botón Record para
confirmar. Se mostrará “REC” y “Track No.” (número de pista) de forma alternada para indicar que se
está grabando la pista.
5. Pulse el botón detener para detener la grabación.
Nota: Puede que algunos CD originales no se puedan grabar si están protegidos contra la copia.
Grabación de un disco MP3
1. Ajuste el selector de función a CD/USB y luego inserte el disco MP3 en la bandeja para CD.
2. Inserte la unidad de memoria USB en la ranura USB.
3. Pulse el botón Record. Parpadeará “REC” en la pantalla durante tres segundos y luego se mostrará
“ONE”.
4. Pulse el botón anterior/siguiente para grabar una pista (“ONE”), una carpeta (“FOL”) o todas (“ALL”)
las pistas. Pulse el botón Record para confirmar. Se mostrarán “REC”, “folder number” (nro. de
carpeta) y “number of total tracks” (cantidad total de pista) de forma alternada, indicando que se está
grabando.
5. Pulse el botón detener para detener la grabación.
Grabación desde el giradiscos
1. Ajuste el selector de función a Phono/Aux In.
2. Inserte la unidad de memoria USB en la ranura USB.
3. Baje el brazo de lectura sobre la ubicación deseada del disco.
4. Pulse el botón Record. Parpadeará “REC” en la pantalla durante tres segundos y luego se mostrarán
“REC” y “PHO” de forma alternada para indicar que se está grabando.
5. Pulse el botón detener para detener la grabación.
Grabación desde la radio (banda FM solamente)
1. Ajuste el selector de función a Radio/Bluetooth.
2. Inserte la unidad de memoria USB en la ranura USB.
3. Seleccione la estación de radio FM utilizando el cuadrante selector de frecuencias.
4. Pulse el botón Record.
5. Pulse el botón detener para detener la grabación.
1
LINE OUT
2
13
Page 14

Grabación desde un casete
1. Inserte la unidad de memoria USB en la ranura USB.
2. Ajuste el selector de función a Tape/Off.
3. Inserte el casete con su lado más grueso hacia la derecha de la bandeja. El casete se reproducirá
automáticamente.
4. Pulse el botón Record. Parpadeará “REC” en la pantalla durante tres segundos y luego se mostrarán
“REC” y “TAP” de forma alternada para indicar que se está grabando.
5. Pulse el botón detener para detener la grabación.
Grabación desde la entrada auxiliar
1. Inserte la unidad de memoria USB en la ranura USB.
2. Ajuste el selector de función a Phono/Aux In.
3. Conecte su dispositivo de audio externo y comience su reproducción.
4. Pulse el botón Record. Parpadeará
“REC” en la pantalla durante tres segundos y luego se mostrarán
“REC” y “AUX” de forma alternada para indicar que se está grabando.
5. Pulse el botón detener para detener la grabación.
Reproducción de Bluetooth
1. Ajuste el selector de función a Radio/Bluetooth y ajuste el interruptor FM/AM/Bluetooth
(FM/Bluetooth en unidades de la UE) a la posición Bluetooth. El indicador de Bluetooth parpadeará.
2. El indicador de apareamiento parpadeará rápidamente. Durante el apareamiento, permanezca a
menos de 10 metros (33 pies) del Superior LP.
3. Encienda el Bluetooth en su teléfono o tableta para aparearlo. Seleccione "Superior LP" como el
dispositivo Bluetooth.
4. Una vez apareado y conectado exitosamente, el indicador de Bluetooth permanecerá encendido.
5. Para desconectar el dispositivo Bluetooth actualmente apareado y aparear otro dispositivo Bluetooth,
mantenga pulsado el botón Stop/USB/Bluetooth durante 2 segundos.
Nota: Si su dispositivo Bluetooth solicita un código de apareamiento, ingrese "0000".
Reproducción de la cinta
1. Ajuste el selector de función a Tape/Off.
2. Inserte el casete con su lado más grueso hacia la derecha de la bandeja. El casete se reproducirá
automáticamente.
3. Pulse el botón eyectar/avance rápido hasta la mitad para alternar entre el modo de avance rápido y
la reproducción. Suelte el botón de avance rápido para comenzar la reproducción.
4. Pulse el botón eyectar/avance rápido completamente hasta abajo para expulsar el casete.
Reproducción del giradiscos
Antes de utilizarlo, asegúrese de:
Retirar el protector de la púa. Volver a colocar la tapa protectora en la púa cuando no lo utilice.
•
• Asegúrese de que el brazo de lectura puede moverse libremente desde su soporte. Trabe el brazo de
lectura en su lugar nuevamente cuando no lo utilice.
1. Ajuste el selector de
función
a
Phono/Aux In
y levante la cubierta antipolvo del giradiscos.
2. Coloque un disco en el giradiscos sobre el eje central en la almohadilla antideslizante.
3. Ajuste el selector de
velocidad
a 33, 45 o 78 rpm dependiendo del disco.
4. Levante el brazo de lectura de su soporte utilizando la palanca de elevación y muévalo lentamente
sobre el disco. El plato del giradiscos comenzará a girar.
5. Coloque el brazo de lectura sobre la ubicación deseada del disco.
6. Baje lentamente el brazo de lectura sobre el disco para que comience a reproducirlo.
7. Cuando se termina de reproducir el disco, el brazo de lectura se detendrá automáticamente. Levante
el brazo de lectura del disco y colóquelo nuevamente en su soporte.
8. Para detener el disco manualmente, levante el brazo de lectura del disco y regréselo a su soporte.
No detenga ni gire el plato manualmente. Mover o sacudir el giradiscos sin sujetar la
Nota:
abrazadera del brazo de lectura puede dar como resultado daños en el brazo.
Funcionamiento del interruptor de parada automática
Ciertos tipos de disco pueden tener un área de parada automática fuera del límite predefinido, de manera
que el giradiscos podría parar antes del final de la última pista. Si esto ocurriera, ajuste el interruptor de
parada automática a la posición Off (apagado). Esto permite reproducir el disco hasta el final, pero no se
detendrá automáticamente. Debe levantar manualmente el brazo de lectura y colocarlo nuevamente en su
soporte y luego apagar la unidad para detener el movimiento del giradiscos.
14
Page 15
Reproducción de la entrada auxiliar
1. Ajuste el selector de función a Phono/Aux In.
2. Conecte un cable de audio estéreo de 3,5 mm (1/8 pulg.) (no incluido) desde la ENTRADA AUXILIAR
en la panel frontal del Superior LP hasta la salida de línea o salida para auriculares de su dispositivo
de audio externo para poder escuchar esa fuente externa a través de los altavoces internos del
Superior LP.
3. Ajuste el volumen del Superior LP al nivel deseado.
Nota: Si la salida de línea de su dispositivo externo está conectada, sólo necesitará ajustar el control de
volumen del sistema. Si la salida para auriculares de su dispositivo externo está conectada, puede que
necesite ajustar el control de volumen tanto en su dispositivo externo como en el Superior LP para lograr el
volumen deseado.
Reproducción de CD
Pueden utilizarse CD de audio y CD de datos estándar Los siguientes tipos de archivo pueden reproducirse
desde CD de datos:
• MP3
• WAV
• WMA
Si un CD contiene más de 999 archivos en una carpeta, los archivos después del nro. 999 no
Nota:
aparecerán correctamente en la pantalla. Acomode sus archivos en carpetas de 999 archivos como máximo
por carpeta.
Cargar y descargar un CD
1. Ajuste el selector de función a CD/USB.
2.
Abra la bandeja para discos pulsando el botón abrir/cerrar de la puerta para CD.
3.
Una vez abierta la bandeja para discos, coloque cuidadosamente el CD en la bandeja con la etiqueta
hacia arriba. Coloque los discos más pequeños en el centro de la bandeja para CD.
4.
Cierre la bandeja para discos. La cantidad total de pistas en el CD aparecerá en la pantalla de LED y
se reproducirá automáticamente.
Repetición de CD
1. Para escuchar la misma pista de forma repetida al reproducir un cd, pulse una vez el botón Mode. La
pantalla de LED mostrará “ONE”.
2. Para reproducir el disco entero de forma repetida, pulse Mode dos veces. La pantalla de LED
mostrará “ALL”.
3. Para cancelar la repetición en la reproducción, pulse el botón reproducir/detener.
Programación del orden de reproducción de las pistas de un CD
Siga estas instrucciones para programar el orden de reproducción de las pistas de CD.
Nota: La reproducción del CD debe detenerse antes de programar el orden de las pistas.
1. Pulse el botón Program.
2. Pulse el botón anterior/siguiente para seleccionar la ubicación en la cual se deberá guardar la pista,
por ejemplo, pista 03.
3. Pulse el botón Program. La primera selección programada está ahora guardada en la memoria
programada.
4. Para escuchar una pista programada, pulse el botón reproducir/hacer pausa. El CD comenzará a
reproducirse desde el comienzo de la primera pista programada.
5. Para borrar la memoria programada, mientras se está reproduciendo el disco, pulse el botón detener
dos veces.
15
Page 16

Reproducción de la unidad flash USB
Los siguientes tipos de archivo pueden reproducirse desde unidades de memoria USB:
• AAC/M4A
• AIFF/AIF
• MP3
• WAV
• WMA
Cómo reproducir un archivo:
1. Ajuste el selector de función a CD/USB.
2. Conecte la unidad de memoria USB en el puerto USB.
3. Mantenga pulsado este Detener/USB/Bluetooth botón durante dos segundos para alternar para el
modo USB. La cantidad total de pistas se mostrará en la pantalla y se comenzarán a reproducir
automáticamente.
4. Pulse el botón detener para detener la reproducción.
Nota: Tenga en cuenta que la unidad solo puede leer unidades de memoria USB formateadas en FAT32 de
un tamaño de 32 GB o menos.
Si una memoria USB contiene más de 999 archivos en una carpeta, los archivos después del nro.
Nota:
999 no aparecerán correctamente en la pantalla. Acomode sus archivos en carpetas de 999 archivos como
máximo por carpeta.
Cómo escuchar radio
1. Ajuste el selector de función a la posición Radio/Bluetooth.
2. Seleccione la frecuencia deseada (AM o FM) utilizando el interruptor FM/AM/Bluetooth
(FM/Bluetooth en unidades de la UE).
Nota: Las unidades de la UE sólo pueden seleccionar FM.
3. Seleccione la estación de radio deseada girando la perilla de sintonización.
4. Ajuste el volumen al nivel deseado.
5. Al terminar de escuchar la radio, ajuste el selector de función a la posición OFF para apagar la radio.
Nota: El receptor tiene una antena de FM integrada que cuelga en el gabinete trasero. Este cable debe
desenrollarse completamente y extenderse para una mejor recepción.
16
Page 17

Especificaciones técnicas
Potencia de salida de los altavoces
Respuesta en frecuencia
Motor
Sistema de transmisión
Velocidad
Nivel de salida
Impedancia
Tipo de cápsula:
Tipos de archivo de CD de datos
soportados
Tipos de archivo de unidad de
memoria USB soportados
Voltaje
Consumo
Dimensiones
(ancho x profundidad x alto)
Peso
Especificaciones sujetas a cambio sin previo aviso.
* El alcance de Bluetooth se ve afectado por paredes, obstrucciones y movimiento. Para lograr un rendimiento óptimo,
coloque el producto en el centro de la sala donde no esté obstaculizado por paredes, muebles, etc.
2 W + 2 W
60-20.000 Hz
Servomotor de CC
Correa de transmisión
33-1/3, 45, 78 RPM
500 mV @ 1 kHz
4 ohmios
Cartucho estéreo de cerámica
AAC/M4A, AIFF/AIF, MP3, WAV, WMA
MP3, WAV, WMA
120 VCA, 50 Hz (US/CA)
230 VCA, 60 Hz (UE)
20W
18.5 x 15 x 9.6 pulg.
47 cm x 38,1 cm x 24,3 cm
18,9 lbs.; 8,6 kg
17
Page 18

Guide d’utilisation rapide (Français)
Contenu de la boîte
Superior LP
Adaptateur pour 45 tr/min
Guide d’utilisation rapide
Consignes de sécurité et informations concernant la garantie
Assistance technique
Pour les toutes dernières informations concernant ce produit (configuration système,
compatibilité, etc.), veuillez visiter le site ionaudio.com.
• Ne pas le déposer sur une moquette épaisse, ou l'installer dans un endroit où il y a une
mauvaise circulation d'air.
• Placez l'appareil sur une surface plane et stable, loin des sources de vibration.
Installation
Schéma de connexion
Les articles qui ne figurent pas dans l’encadré Contenu de la boîte sont vendus séparément.
18
Tablette
LINE OUT
Haut-parleurs
(facultatif)
Alimentation
Alimentation
Page 19

Caractéristiques
Lecture de disques vinyles
1. Plateau : Placez le disque vinyle à cet
endroit.
2. Rangement pour adaptateur
45 tr/min : Cet emplacement permet
de ranger l'adaptateur 45 tr/min
lorsqu’il n’est pas utilisé. Lorsqu’il
n’est pas utilisé, veuillez mettre
l'adaptateur dans cet emplacement.
3. Bras de lecture : Le bras de lecture
peut être lever ou abaisser
manuellement ou en utilisant le
bouton du levier de commande.
4. Serre-bras : Ce serre-bras est conçu
spécialement afin de maintenir en
place le bras de lecture lorsque la
platine n’est pas utilisée. Le serre-bras a été
conçu pour rester en position élevée lorsqu’il
est déverrouillé.
5. Levier de commande : Ce levier permet de
lever ou d’abaisser le bras de lecture.
IMPORTANT : Retirez le couvercle de
plastique de la cartouche (qui protège la
pointe de lecture) avant d’utiliser la
platine.
6. Sélecteur de vitesse (33/45/78) : Ce sélecteur
régit la vitesse de rotation du plateau.
Remarque : Pour de meilleurs résultats lors de
la lecture de disques vinyles de 78 tr/min,
utilisez une pointe de lecture 78 (vendu
séparément). Utilisez uniquement une pointe de
*MISE EN GARDE : Les sorties RCA sont
de niveau ligne. Veuillez ne les raccorder
qu’à des entrées à niveau ligne. Vous
pourriez endommager votre récepteur si
un appareil À NIVEAU LIGNE est branché
à une entrée PHONO.
lecture 78 pour les disques vinyles de 78 tr/min.
7. Autostop : Ce commutateur permet d'activer et de désactiver la fonction autostop.
Lorsqu’elle est activée, le plateau commence à tourner dès que le bras de lecture est
placé au-dessus du disque et s’arrête lorsque l’aiguille a atteint la fin du disque.
Lorsqu'elle est désactivée, le plateau tourne, peu importe l’emplacement du bras de
lecture.
Remarque : Si le disque s'arrête avant la fin de la musique, désactivez la fonction
Autostop pour ce disque. Ceci est généralement recommandé pour disques de
45 tr/min.
2
3
5
6
7
1
4
19
Page 20

Panneau avant
9
8
7
1
2
5
4
3
10
6
11
12
13
16
15
14
1. Sélecteur de fonction : Ce bouton permet de sélectionner la source audio : TAPE/OFF (platine
cassette/hors tension), Phono/Aux In (platine vinyle/entrée auxiliaire), CD/USB ou Radio/Bluetooth.
2. Program : Cette touche permet de sélectionner l’ordre de lecture des pistes du CD.
3. Mode : Cette touche permet de sélectionner la façon dont les pistes sur le périphérique USB ou le CD
seront lues : « ONE » (lecture répétée d’une piste), « FOL » (lecture répétée de toutes les pistes d’un
dossier), « ALL » (lecture répétée de toutes les pistes) ou « NOR » (lecture normale sans répétition).
4. Del : Cette touche permet de supprimer des pistes ou des dossiers sur un périphérique USB.
5. Rec : Cette touche permet de passer en mode d'enregistrement USB lorsqu’un périphérique USB est
branché.
6. Sélecteur de fréquences radio : Ce bouton permet de sélectionner les fréquences radio de la bande
AM ou FM.
Remarque : Les modèles européens ne peuvent sélectionner que les fréquences radio de la bande
FM.
7. Écran d’affichage : Cet écran indique le mode sélectionné et le numéro de la piste.
8. DEL d'alimentation : Cette DEL s’allume afin d’indiquer que l’appareil est en marche.
9. DEL Bluetooth : Cette DEL clignote lors du jumelage et demeure allumée lorsque l'appareil est
connecté à une enceinte Bluetooth.
10. Saut arrière : Cette touche permet de revenir au fichier USB, à la piste Bluetooth ou à la piste CD
précédent.
Remarque : Sur des sources Bluetooth, cette touche permet de passer à d’autres listes de lecture ou
de genre musical, selon l’application.
11. Saut avant : Cette touche permet de passer au fichier USB, à la piste Bluetooth ou à la piste CD
suivant.
Remarque : Sur des sources Bluetooth, cette touche permet de passer à d’autres listes de lecture ou
de genre musical, selon l’application.
12. Arrêt de lecture/USB/Bluetooth : Cette touche permet d’arrêter l'enregistrement sur le périphérique
USB. Cette touche permet de faire un arrêt de lecture de la piste USB, CD ou Bluetooth. Lorsque le
Sélecteur de fonction est sur USB/CD, maintenez cette touche enfoncée pendant deux secondes afin
de basculer entre le mode CD et le mode USB. Lorsque le Sélecteur de fonction est sur
Radio/Bluetooth, maintenez cette touche enfoncée pendant deux secondes afin de déjumeler un
appareil Bluetooth.
13. Lancer/interrompre la lecture : Cette touche permet de lancer et d’interrompre la lecture des pistes
des sources CD, USB et Bluetooth.
14. Sortie casque : Lorsqu’un casque d’écoute est branché, les enceintes internes sont désactivées.
15. Entrée auxiliaire : Cette entrée permet de brancher la sortie à niveau ligne d'un appareil, tel que
smartphone, lecteur multimédia, tablette, etc.
16. FM/AM/Bluetooth (FM/Bluetooth sur modèles européens) : Ce sélecteur permet de sélectionner les
sources FM, AM et Bluetooth.
Remarque : Les modèles européens ne peuvent sélectionner que les sources FM et Bluetooth.
17. Plateau du lecteur CD : Ce plateau permet d’insérer un CD. Cet appareil est conçu pour faire la
lecture de disques compacts vendus commercialement et des formats CD-R, CD-RW et MP3
correctement gravés et finalisés.
18. Ouverture/fermeture : Cette touche permet d’ouvrir et de fermer le plateau du lecteur CD.
19. Port USB : Ce connecteur permet de faire la lecture ou l’enregistrement de pistes sur périphérique
USB.
20. Volume : Cette touche permet de régler le niveau sonore des enceintes internes ainsi que de la sortie
casque.
17
18
19
20
20
Page 21

AUTO STOP
2
1
Panneau latéral
1. Touche d’éjection/avance rapide de la cassette (FF) : Cette touche
permet d’éjecter la cassette. Maintenez la touche enfoncée afin d’avancer la
cassette.
2. Lecteur cassette : Insérez une cassette dans ce lecteur.
Panneau arrière
1. Sortie ligne : Cette sortie permet de brancher un
récepteur, un amplificateur ou des enceintes amplifiées.
Remarque : La commande de volume du Superior LP
n’affecte pas le volume lorsque la sortie ligne est utilisée.
2. Entrée d'alimentation : Le câble d'alimentation intégré.
3. Antenne FM : Ajustez ce câble pour une meilleure
réception radio FM. Pour la réception AM (modèles
américains et canadiens uniquement), tournez l'appareil de
sorte à obtenir une meilleure réception.
Enregistrement
3
Enregistrement d'un CD
1. Veuillez régler le sélecteur de fonction sur CD/USB.
2. Insérez le périphérique USB dans le port USB.
3. Appuyez sur la touche Rec. « REC » clignotera à l’écran pendant 3 secondes et puis « ONE »
s’affichera. Appuyez sur la touche saut avant ou saut arrière afin de sélectionner le mode
d’enregistrement de pistes, « ONE » ou « ALL » et appuyez sur la touche Rec pour confirmer.
4. Appuyez sur la touche saut avant ou saut arrière afin de sélectionner la piste et appuyez sur la
touche Rec pour confirmer. « REC » et « Track No. » (numéro de piste) s’afficheront en alternance afin
d’indiquer quelle piste est enregistrée.
5. Pour arrêter l’enregistrement, appuyez sur la touche d’arrêt de lecture.
Remarque : Certains CD ne sont pas enregistrables, car ils sont protégés contre la copie.
Enregistrement d'un disque MP3
1. Réglez le sélecteur de fonction sur CD/USB et insérez le disque MP3 dans le plateau du lecteur CD.
2. Insérez le périphérique USB dans le port USB.
3. Appuyez sur la touche Rec. « REC » clignotera à l’écran pendant 3 secondes et puis « ONE »
s’affichera.
4. Appuyez sur la touche saut avant ou saut arrière afin de sélectionner le mode d’enregistrement de
pistes, « ONE », « FOL » ou « ALL ». Appuyez sur la touche Rec pour confirmer. « REC », « numéro de
dossier » et « nombre total de pistes » s’afficheront en alternance afin d’indiquer quelles pistes seront
enregistrées.
5. Pour arrêter l’enregistrement, appuyez sur la touche d’arrêt de lecture.
Enregistrement d’un disque vinyle
1. Veuillez régler le sélecteur de fonction sur Phono/Aux In.
2. Insérez le périphérique USB dans le port USB.
3. Abaissez le bras de lecture sur le sillon désiré sur le disque.
4. Appuyez sur la touche Rec. « REC » clignotera à l’écran pendant 3 secondes, puis « REC » et « PHO »
s’afficheront en alternance afin d’indiquer que l’enregistrement est en cours.
5. Pour arrêter l’enregistrement, appuyez sur la touche d’arrêt de lecture.
Enregistrement de la radio (bande FM seulement)
1. Veuillez régler le sélecteur de fonction sur Radio/Bluetooth.
2. Insérez le périphérique USB dans le port USB.
3. Sélectionnez la station de radio FM à l'aide du Sélecteur de fréquence radio.
4. Appuyez sur la touche Rec.
5. Pour arrêter l’enregistrement, appuyez sur la touche d’arrêt de lecture.
1
LINE OUT
2
21
Page 22

Enregistrement d'une cassette
1. Insérez le périphérique USB dans le port USB.
2. Veuillez régler le sélecteur de fonction sur Tape/Off.
3. Insérer la cassette côté plus épais du côté droit du logement de cassettes. La cassette jouera
automatiquement.
4. Appuyez sur la touche Rec. « REC » clignotera à l’écran pendant 3 secondes, puis « REC » et « TAP »
s’afficheront en alternance afin d’indiquer que l’enregistrement est en cours.
5. Pour arrêter l’enregistrement, appuyez sur la touche d’arrêt de lecture.
Enregistrement à partir de l’entrée auxiliaire
1. Insérez le périphérique USB dans le port USB.
2. Veuillez régler le sélecteur de fonction sur Phono/Aux In.
3. Branchez votre appareil audio externe et lancez la lecture.
4. Appuyez sur la touche Rec. « REC » clignotera à l’écran pendant 3 secondes, puis « REC » et « AUX »
s’afficheront en alternance afin d’indiquer que l’enregistrement est en cours.
5. Pour arrêter l’enregistrement, appuyez sur la touche d’arrêt de lecture.
Lecture Bluetooth
1. Veuillez régler le sélecteur de fonction sur Radio/Bluetooth et placer le sélecteur FM/AM/Bluetooth
(FM/Bluetooth sur modèles européens) dans la position Bluetooth. La DEL Bluetooth clignotera.
2. La DEL de jumelage clignotera rapidement. Lors du jumelage, veuillez vous assurer que l’appareil soit
à moins de 10 mètres du Superior LP.
3. Activez la fonction Bluetooth du téléphone ou de la tablette. Sélectionnez « Superior LP » comme
appareil Bluetooth.
4. Lorsque la connexion est établie, la DEL Bluetooth demeure allumée.
5. Pour déjumeler l’appareil Bluetooth et jumeler un autre appareil, maintenez la touche d’arrêt de
lecture/USB/Bluetooth enfoncée pendant 2 secondes.
Remarque : Si votre appareil Bluetooth vous demande d’entrer un code de jumelage, entrez « 0000 ».
Lecture cassette
1. Veuillez régler le sélecteur de fonction sur Tape/Off.
2. Insérer la cassette côté plus épais du côté droit du logement de cassettes. La cassette jouera
automatiquement.
3. Enfoncez la touche d’éjection/avance rapide (FF) à moitié pour basculer entre les modes d'avance
rapide et de lecture. Relâchez la touche FF pour démarrer la lecture.
4. Enfoncez la touche d’éjection/avance rapide complètement pour éjecter la cassette.
Lecture de la platine vinyle
Avant de l'utiliser, veuillez vous assurer de :
Retirer le protège-pointe. Remettre le protège-pointe lorsque vous n’utilisez pas la platine vinyle.
•
• Déverrouiller le bras de lecture avant de l'utiliser. Verrouiller le bras de lecture sur le serre-bras lorsque
vous n’utilisez pas la platine vinyle.
1. Réglez le
vinyle.
2. Placez un disque sur l'axe central et la feutrine du plateau.
3. Réglez le
4. Soulevez le bras de lecture du support en utilisant le levier de commande et déplacez-le lentement audessus du disque. Le plateau commencera à tourner.
5. Placez le bras de lecture au-dessus du sillon désiré sur le disque.
6. Abaissez le bras de lecture sur le disque afin de lancer la lecture.
7. Lorsque la lecture du disque est terminée, le bras de lecture arrêtera automatiquement. Soulevez le
bras de lecture et remettez-le sur le support.
8. Pour arrêter manuellement la lecture, soulevez le bras de lecture et remettez-le sur le support.
Remarque :
verrouiller le bras de lecture sur le support pourrait endommager le bras de lecture.
sélecteur de fonction
sélecteur de vitesse
N'arrêtez pas ou ne tournez pas le plateau manuellement. Déplacer le plateau sans
sur
Phono/Aux In
à la vitesse désirée, 33, 45, 78 t/min., selon le disque.
et relevez le couvercle de protection de la platine
22
Page 23

Fonction d’arrêt automatique
Certains types de disques peuvent avoir une zone d'arrêt automatique à l'extérieur de la limite prédéfinie,
donc la platine peut s'arrêter avant que la dernière piste se termine. Pour désactiver la fonction d’arrêt
automatique, mettez le commutateur Auto-stop à la position OFF. Cela permet au disque de jouer jusqu'au
bout, mais il ne s'arrêtera pas automatiquement. Vous devez soulever le bras de lecture et le placer sur son
support et mettre le sélecteur de fonction sur Tape/Off afin d'arrêter le plateau de tourner.
Lecture à partir de l’entrée auxiliaire
1. Veuillez régler le sélecteur de fonction sur Phono/Aux In.
2. Branchez un câble audio stéréo 3,5 mm (non fourni) à l’entrée auxiliaire sur le panneau avant du
Superior LP et à la sortie ligne ou à la sortie casque de votre appareil audio externe afin de pouvoir
écouter la source externe par le biais des haut-parleurs internes du Superior LP.
3. Réglez le volume du Superior LP au niveau désiré.
Remarque : Si la sortie de l'appareil externe est branchée, il vous suffit d'ajuster le réglage du volume du
système. Si la sortie casque de votre appareil externe est branchée, vous devrez peut-être ajuster la
commande de volume sur votre appareil externe et sur le Superior LP afin d'obtenir le volume souhaité.
Lecture CD
Les CD audio et les CD de données standards peuvent être utilisés. Les types de fichiers suivants sont pris
en charge sur les CD de données :
• MP3
• WAV
• WMA
Remarque :
999 ne s’afficheront pas correctement. Assurez-vous d’organiser vos fichiers de manière à avoir un
maximum de 999 fichiers par dossier.
Chargement et déchargement d'un CD
1. Veuillez régler le sélecteur de fonction sur CD/USB.
2.
3.
4.
Lecture répétée du CD
1. Pour écouter la même piste à plusieurs reprises lors de la lecture d'un CD, appuyez sur la touche
2. Pour faire la lecture répétée de l'intégralité du disque, appuyez sur la touche Mode deux fois. L’écran
3. Pour annuler la lecture répétée, appuyez sur la touche d’arrêt de lecture.
Programmer l’ordre de lecture des pistes d’un CD
Suivez ces instructions pour programmer l'ordre de lecture des pistes d'un CD.
Remarque : La lecture du CD doit être arrêtée afin de programmer l'ordre de lecture des pistes d'un CD.
1. Appuyez sur la touche Program.
2. Appuyez sur la touche saut avant ou saut arrière afin de sélectionner l’emplacement de sauvegarde
3. Appuyez sur la touche Program. La première sélection est maintenant stockée dans la mémoire.
4. Pour lancer la lecture d’une piste programmée, appuyez sur la touche lancer/interrompre la lecture.
5. Pour supprimer les pistes de la mémoire durant la lecture du CD, appuyez sur la touche d’arrêt de
Si un CD contient plus de 999 fichiers dans un dossier, les fichiers numérotés au-dessus de
Ouvrir le plateau à disque en appuyant sur la touche d’ouverture/fermeture du lecteur CD.
Lorsque le plateau est ouvert, placez soigneusement le CD dans le plateau avec l'étiquette vers le
haut. Placez de plus petits disques au centre du plateau.
Refermez le plateau à disque. Le nombre total de pistes sur le CD s’affiche sur l'écran DEL et la
lecture commence automatiquement.
Mode une fois. L’écran affichera « ONE ».
affichera « ALL ».
de la piste, p. ex., track 03.
Le CD commencera à jouer la première piste programmée.
lecture deux fois.
23
Page 24

Lecture USB
Les types de fichiers suivants sont pris en charge sur les clés USB :
• AAC/M4A
• AIFF/AIF
• MP3
• WAV
• WMA
Pour lire un fichier :
1. Veuillez régler le sélecteur de fonction sur CD/USB.
2. Insérez le périphérique USB dans le port USB.
3. Maintenez cette touche enfoncée Arrêt de lecture/USB/Bluetooth pendant deux secondes afin de
basculer afin mode USB. Le nombre total de pistes s’affiche et la lecture commence
automatiquement.
4. Pour arrêter la lecture, appuyer sur la touche d’arrêt de lecture.
Remarque : Veuillez noter que le périphérique USB doit avoir une capacité maximale de 32 GB et utiliser un
système de fichiers FAT32 afin que l’appareil puisse le lire.
Remarque :
Si une clé USB contient plus de 999 fichiers dans un dossier, les fichiers numérotés au-dessus
de 999 ne s’afficheront pas correctement. Assurez-vous d’organiser vos fichiers de manière à avoir un
maximum de 999 fichiers par dossier.
Utilisation de la radio
1. Veuillez régler le sélecteur de fonction sur Radio/Bluetooth.
2. Sélectionnez la fréquence désirée (AM ou FM) en utilisant le sélecteur FM/AM/Bluetooth
(FM/Bluetooth sur modèles européens).
Remarque : Les modèles européens ne peuvent sélectionner que les fréquences radio de la bande
FM.
3. Sélectionnez la station radio souhaitée en tournant le sélecteur de fréquences radio.
4. Réglez le volume au niveau désiré.
5. Lorsque vous avez terminé d'écouter la radio, veuillez régler le sélecteur de fonction sur Tape/Off
afin de mettre la radio hors tension.
Remarque : Le récepteur a une antenne FM intégrée située à l’arrière de l’appareil. Ce fil doit être
entièrement déroulé et déployé pour une meilleure réception.
24
Page 25

Spécifications techniques
Puissance de sortie des hautparleurs
Réponse en fréquence
Moteur
Système d'entraînement
Vitesses
Niveaux de sortie
Impédance
Type de cartouche
Types de fichiers pris en charge sur
les CD de données
Types de fichiers pris en charge sur
les clés USB
Tension
Consommation électrique
Dimensions
(largeur x profondeur x hauteur)
Poids
Toutes les spécifications sont susceptibles d'être modifiées sans préavis.
* La portée Bluetooth est affectée par les murs, les obstacles et le mouvement. Pour une performance optimale, placez le
produit dans le centre de la pièce afin qu'il n’y ait aucune obstruction créée par des murs, des meubles, etc.
2W + 2W
60-20 000 Hz
Servomécanisme
Entraînement par courroie
33-1/3, 45, 78 t/min
500 mV @ 1 kHz
4 ohms
Cartouche stéréo en céramique
AAC/M4A, AIFF/AIF, MP3, WAV, WMA
MP3, WAV, WMA
120V CA, 50 Hz (États-Unis/Canada)
230 V CA, 60 Hz (Europe)
20 W
18,5 po x 15 po x 9,6 po
47 cm x 38,1 cm x 24,3 cm
18,9 lb ; 8,6 kg
25
Page 26

Guida rapida (Italiano)
Contenuti della confezione
Superior LP
Adattatore 45 giri
Guida rapida
Istruzioni di sicurezza e garanzia
Assistenza
Per le ultime informazioni in merito a questo prodotto (requisiti di sistema, informazioni sulla
compatibilità, ecc.) e per la registrazione del prodotto, recarsi alla pagina ionaudio.com.
• Non collocarlo su un tappeto spesso o in un luogo dalla scarsa di ventilazione.
• Collocare l'apparecchio su una superficie pianeggiante e uniforme, lontano da fonti di
vibrazioni.
Configurazione rapida
Schema dei collegamenti
Elementi non elencati sotto Contenuti della confezione sono venduti separatamente.
Tablet
LINE OUT
Alimentazione
Alimentazione
Altoparlanti
alimentati
(opzionale)
26
Page 27

Caratteristiche
Modalità vinile
1. Piatto: Il disco va collocato qui.
2. Supporto adattatore 45 giri: Regge
l’incluso adattatore per 45 giri.
Quando l'adattatore non è in uso, può
essere collocato a questo livello.
3. Braccio: Il braccio fisso può essere
alzato e abbassato a mano, oppure
premendo la levetta di sollevamento /
abbassamento.
4. Fermabraccio: Questo fermabraccio
dal design speciale fissa il braccio
quando è a riposo o quando non è in
uso. Il fermabraccio è stato
progettato in modo che resti sollevato
quando sbloccato.
5. Levetta di sollevamento / abbassamento:
Alza e abbassa il braccio.
6. Interruttore 33 / 45 / 78: Controlla la velocità
del piatto del giradischi.
Nota bene: per i migliori risultati durante la
riproduzione di dischi in vinile a 78 giri, servirsi
di una puntina 78 (venduta separatamente).
Servirsi unicamente di una puntina 78 con
dischi in vinile a 78 giri.
7. Interruttore Autostop: Accende o spegne la
IMPORTANTE: rimuovere il cappuccio
della cartuccia (copripuntina) prima di
utilizzare il giradischi.
*AVVERTENZA: le uscite RCA sono a
livello di LINEA. Collegarle unicamente a
ingressi a livello di LINEA. Si rischia di
danneggiare il ricevitore collegando un
dispositivo a livello di LINEA in un
ingresso PHONO.
funzione "autostop". Quando la funzione
"autostop" è attiva, il piatto inizia a girare quando il braccio è posato sul disco e smette di
girare quando il disco arriva alla fine. Quando la funzione autostop è disattiva, il piatto
continuerà a girare, indipendentemente dalla posizione del braccio.
Nota bene: se il vinile si ferma prima di raggiungere la fine della musica, spegnere la
funzione Autostop per quel particolare disco. Di solito, ciò è consigliato per i dischi a 45
giri.
2
1
3
5
6
7
4
27
Page 28

Pannello anteriore
9
8
7
1
2
5
4
3
10
6
11
12
13
16
15
14
1. Selettore di funzioni: girare la manopola per selezionare quale fonte utilizzare: Tape/Off, ingresso
Phono/Aux, CD/USB o Radio/Bluetooth.
2. Tasto Program (programma): premere questo tasto per programmare le tracce CD in modo che
vengano riprodotte in un determinato ordine.
3. Modalità: seleziona il modo in cui le tracce presenti sul drive flash USB o su CD verranno riprodotte:
“ONE” (riproduce la stessa traccia ripetutamente), “FOL” (riproduce la stessa cartella ripetutamente)
“ALL” (riproduce tutte le tracce ripetutamente) o “NOR” (ordine di riproduzione normale senza alcuna
ripetizione).
4. Tasto Canc (delete): premere questo tasto per cancellare tracce o cartelle da un drive flash USB.
5. Rec: premere questo tasto per passare alla modalità di registrazione USB quando è collegato un drive
flash USB.
6. Selettore di frequenza radio: girare questa manopola per selezionare la frequenza di stazione radio
AM o FM.
Nota bene: i dispositivi UE possono selezionare solo stazioni FM.
7. Display: mostra la modalità corrente e il numero di traccia.
8. LED di alimentazione: questo LED si illumina quando viene accesa l'alimentazione.
9. LED Bluetooth: questo LED lampeggia quando ci si trova in modalità di collegamento ed è fisso
quando è collegato a un altoparlante Bluetooth.
10. Skip Backward (salta indietro): premere questo tasto per passare al file USB, alla traccia Bluetooth o
alla traccia CD precedente.
Nota bene: quando si ascoltano fonti Bluetooth, la pressione di questo tasto in alcune app può far
passare a un'altra playlist o a un altro genere musicale.
11. Skip Forward (salta avanti): premere questo tasto per passare al file USB, alla traccia Bluetooth o
alla traccia CD precedente.
Nota bene: quando si ascoltano fonti Bluetooth, la pressione di questo tasto in alcune app può far
passare a un'altra playlist o a un altro genere musicale.
12. Stop/USB/Bluetooth: premere questo tasto per fermare la registrazione sul drive flash USB. Premere
questo tasto per interrompere la riproduzione di una traccia USB, una traccia CD o una traccia
Bluetooth. Con il selettore di funzioni su USB/CD, tenere premuto questo tasto per 2 secondi per
commutare tra la modalità CD e la modalità USB. Con il selettore di funzioni su Radio/Bluetooth,
tenere premuto questo tasto per 2 secondi per scollegare un dispositivo Bluetooth collegato.
13. Play/Pause: premere questo tasto per riprodurre/interrompere momentaneamente le tracce da fonti
CD, USB e Bluetooth.
14. Uscita cuffie: quando le cuffie sono inserite, l'altoparlante interno viene silenziato.
15. Ingresso Aux: collegare l'uscita di un dispositivo a livello di linea a questo ingresso (quali uno
smartphone, un media player, un tablet, ecc.).
16. FM/AM/Bluetooth (FM/Bluetooth per dispositivi UE): commutare questo comando per commutare
tra fonti FM, AM e Bluetooth.
Nota bene: i dispositivi UE possono commutare solo tra FM e Bluetooth.
17. Vassoio porta-CD: collocare un CD a questo livello. L'apparecchio è stato concepito per riprodurre i
CD disponibili in commercio, CD-R masterizzati adeguatamente e finalizzati, CD-RW e CD MP3.
18. Open/Close: premere questo pulsante per aprire o chiudere il vassoio porta CD.
19. Porta USB: riproduce le tracce dal drive flash USB o registra canzoni sullo stesso.
20. Volume: regola il livello dell'audio degli altoparlanti interni e dell'uscita cuffie.
17
18
19
20
28
Page 29

AUTO STOP
2
1
Pannello laterale
1. Tasto di espulsione cassetta / avanti rapido (FF): premere questo tasto
per espellere il nastro. Tenere premuto il tasto per avanzare rapidamente
lungo il nastro.
2. Sportello porta-cassetta: inserire una cassetta a questo livello.
Pannello posteriore
1. Uscita di linea: collegare questa uscita a un ricevitore,
un amplificatore o a casse alimentate.
Nota bene: il comando di regolazione del volume del
Superior LP non regola il volume quando l'uscita di linea
è in uso.
2. Ingresso di alimentazione: il cavo di alimentazione
integrato va collegato a questo livello.
3
3. Antenna FM: regolare questo filo per migliorare la
ricezione della radio FM. Per la ricezione AM (solo
dispositivi US/CA), ruotare l'apparecchio fino a trovare la
ricezione migliore.
Registrazione
Registrazione da CD
1. Posizionare il selettore di Funzione su CD/USB.
2. Inserire il drive flash USB nella porta USB.
3. Premere il tasto Record. “REC” lampeggia a display per 3 secondi e quindi compare “ONE”. Premere
il tasto Backward/Forward (indietro/avanti) per registrare una (“ONE”) traccia o tutte (“ALL”) le tracce,
quindi premere il tasto Record per confermare.
4. Premere il tasto Backward/Forward (indietro/avanti) per selezionare la traccia, quindi premere il tasto
Record per confermare. “REC” e “Track No.” (registra e numero di traccia) compariranno
alternativamente a display a indicare che la registrazione della traccia è in corso.
5. Premere il tasto Stop per interrompere la riproduzione.
Nota bene: alcuni CD originali, se protetti, potrebbero non essere registrabili.
Registrazione da un disco MP3
1. Impostare il selettore di Funzioni su CD/USB e inserire il disco MP3 nel vassoio CD.
2. Inserire il drive flash USB nello slot USB.
3. Premere il tasto Record. “REC” lampeggia a display per 3 secondi e quindi compare “ONE”.
4. Premere il tasto Backward/Forward (indietro/avanti) per registrare una (“ONE”) traccia, “FOL” (una
cartella) o tutte (“ALL”) le tracce. Premere il tasto Record per confermare. “REC”, “folder number”
(numero di cartella) e “number of total tracks” (numero totale di tracce) comparirà alternativamente a
display, a indicare che è in via di registrazione.
5. Premere il tasto Stop per interrompere la riproduzione.
Registrazione dal giradischi
1. Impostare il selettore di Funzione su Phono/Aux In.
2. Inserire il drive flash USB nello slot USB.
3. Abbassare il braccio sul punto desiderato sul disco.
4. Premere il tasto Record. “REC” lampeggia a display per 3 secondi e a display compaiono quindi,
alternate, le scritte “REC” e “PHO” per indicare che la registrazione è in corso.
5. Premere il tasto Stop per interrompere la riproduzione.
Registrazione dalla radio (solo banda FM)
1. Posizionare il selettore Funzione su Radio/Bluetooth.
2. Inserire il drive flash USB nello slot USB.
3. Selezionare la stazione radio FM servendosi della manopola di selezione della Frequenza.
4. Premere il tasto Record.
5. Premere il tasto Stop per interrompere la riproduzione.
1
LINE OUT
2
29
Page 30

Registrazione da una cassetta
1. Inserire il drive flash USB nello slot USB.
2. Posizionare il selettore di Funzione su Tape/Off.
3. Inserire il nastro con il lato più spesso rivolto verso il lato destro del vassoio porta-nastro. La cassetta
viene riprodotta automaticamente.
4. Premere il tasto Record. “REC” lampeggia a display per 3 secondi e a display compaiono quindi,
alternate, le scritte “REC” e “TAP” per indicare che la registrazione è in corso.
5. Premere il tasto Stop per interrompere la riproduzione.
Registrazione dall'ingresso Aux
1. Inserire il drive flash USB nello slot USB.
2. Impostare il selettore di Funzione su Phono/Aux In.
3. Collegare il dispositivo audio esterno e avviarne la riproduzione.
4. Premere il tasto Record. “REC” lampeggia a display per 3 secondi e a display compaiono, alternate,
le scritte “REC” e “AUX” per indicare che la registrazione è in corso.
5. Premere il tasto Stop per interrompere la riproduzione.
Riproduzione Bluetooth
1. Impostare il selettore di Funzione su Radio/Bluetooth e posizionare l'interruttore FM/AM/Bluetooth
(FM/Bluetooth su apparecchi UE) su Bluetooth. La spia Bluetooth lampeggia.
2. La spia di collegamento lampeggia rapidamente. Durante il collegamento, rimanere entro 10 metri (33
piedi) dal Superior LP.
3. Accendere il Bluetooth sul telefono o sul tablet per effettuare il collegamento. Selezionare “Superior
LP” come dispositivo Bluetooth.
4. Una volta collegato, la spia Bluetooth rimane fissa.
5. Per scollegare l'apparecchio dal dispositivo Bluetooth attualmente collegato e collegare un altro
dispositivo Bluetooth, tenere premuto il tasto
Nota bene: se il dispositivo Bluetooth richiede un codice, digitare ‘0000’.
Riproduzione del nastro
1. Posizionare il selettore di Funzione su Tape/Off.
Stop/USB/Bluetooth per 2 secondi.
2. Inserire il nastro con il lato più spesso rivolto verso il lato destro del vassoio porta-nastro. La cassetta
viene riprodotta automaticamente.
3. Premere il tasto Eject/Fast Forward (espulsione/avanzamento rapido) a metà per commutare tra
avanzamento rapido e riproduzione. Rilasciare il tasto FF per avviare la riproduzione.
4. Premere a fondo il tasto Eject/Fast Forward (espulsione/avanzamento rapido) per effettuare
l'espulsione del nastro.
Riproduzione del giradischi
Prima dell'uso, assicurarsi di:
Rimuovere la protezione della puntina. Mettere il cappuccio di protezione sulla puntina quando non è
•
in uso.
• Assicurarsi che il braccio sia libero di muoversi dal poggiabraccio. Fissare nuovamente il braccio in
posizione quando non è in uso.
1. Impostare il selettore di
Funzione
sull'ingresso
Phono/Aux
e sollevare il coperchio antipolvere del
giradischi.
2. Collocare un disco sul giradischi, sull'asse centrale sul tappetino.
3. Impostare il selettore di
su 33, 45 o 78 giri a seconda del disco.
Velocità
4. Sollevare il braccio dal poggiabraccio servendosi dell'apposita leva di sollevamento e portarlo
lentamente sul disco. Il piatto del giradischi inizia a girare.
5. Collocare il braccio sul punto desiderato sul disco.
6. Abbassare delicatamente il braccio sul disco per avviare la riproduzione.
7. Quando la riproduzione del disco è conclusa, il braccio si ferma automaticamente. Sollevare il braccio
dal disco e posizionarlo nuovamente sul poggiabraccio.
8. Per fermare manualmente il disco, sollevare il braccio dal disco e riposizionarlo sul poggiabraccio.
Nota bene:
fissato il fermabraccio può causare danni al braccio stesso.
non arrestare né far girare il piatto manualmente. Spostare o urtare il giradischi senza aver
30
Page 31

Funzionamento dell'interruttore Auto-stop (arresto automatico)
Alcuni tipi di dischi possono presentare un'area di arresto automatico al di fuori del limite predefinito, quindi
il giradischi si può fermare prima del termine dell'ultima traccia. Se ciò accade, impostare l'interruttore
Auto-stop su Off. Ciò consente al disco di essere riprodotto fino alla fine, ma questo non si fermerà
automaticamente. Occorre alzare il braccio manualmente e collocarlo sul portabraccio, quindi spegnere
l'alimentazione (OFF) per far fermare il giradischi.
Riproduzione dall'ingresso Aux
1. Impostare il selettore di Funzione su Phono/Aux In.
2. Collegare un cavo audio stereo da 1/8” (3,5 mm) (non in dotazione) dall'ingresso AUX presente sul
pannello anteriore del Superior LP all'uscita di linea o all'uscita cuffie del dispositivo audio esterno per
ascoltare la fonte esterna tramite le casse interne del Superior LP.
3. Regolare il volume del Superior LP sul livello desiderato.
Nota bene: se l'uscita di linea del dispositivo esterno è collegata, occorre solo regolare il comando di
volume del sistema. Se l'uscita cuffie del dispositivo esterno è collegata, può essere necessario regolare il
volume sia sul dispositivo esterno sia sul Superior LP per ottenere il volume desiderato.
Riproduzione di un CD
Possibilità di utilizzare CD audio e CD dati standard. I seguenti tipi di file sono riproducibili dai CD dati:
• MP3
• WAV
• WMA
Nota bene:
correttamente a display. Sistemare i file in cartelle che contengano un massimo di 999 file ciascuna.
Caricamento ed espulsione di un CD
1. Posizionare il selettore di Funzione su CD/USB.
2.
3.
4.
CD Repeat
1. Per ascoltare la stessa traccia ripetutamente durante la riproduzione di un CD, premere il tasto Mode
2. Per riprodurre l'intero disco ripetutamente, premere due volte Mode. Sul display a LED compare la
3. Per annullare la riproduzione ripetuta, premere il tasto Stop.
Programmazione dell'ordine di riproduzione delle tracce CD
Seguire le presenti istruzioni per programmare l'ordine di riproduzione delle tracce presenti su un CD.
Nota bene: la riproduzione del CD deve essere interrotta prima di programmare l'ordine delle tracce.
1. Premere il tasto Program.
2. Premere il tasto Backward/Forward per selezionare il punto in cui la traccia deve essere memorizzata
3. Premere il tasto Program. La prima scelta è ora memorizzata nella memoria programmata.
4. Per ascoltare una traccia programmata, premere il tasto Play/Pause. La riproduzione del CD inizierà
5. Per cancellare la memoria programmata, durante la riproduzione del disco premere il tasto Stop due
se un CD contiene più di 999 file in una cartella, i file al di sopra del 999 non appariranno
Aprire il vassoio del disco premendo il tasto Open/Close sullo sportello CD.
Quando il vassoio del disco è aperto, collocarvi il disco con l'etichetta rivolta verso l'alto. Posizionare
dischi più piccoli al centro del vassoio CD.
Chiudere il vassoio del disco. Il numero totale di tracce presenti sul CD compare sul display a LED e la
riproduzione inizierà automaticamente.
una volta. Sul display a LED compare la scritta “ONE”.
scritta “ALL”.
(vale a dire traccia 03).
dall'inizio della prima traccia programmata.
volte.
31
Page 32

Riproduzione da drive flash USB
I seguenti tipi di file sono riproducibili da drive flash USB:
• AAC/M4A
• AIFF/AIF
• Lettore
• WAV
• WMA
Per riprodurre un file:
1. Posizionare il selettore di Funzione su CD/USB.
2. Collegare il drive flash USB su porta USB.
3. Tenere premuto questo Stop/USB/Bluetooth tasto per 2 secondi per commutare per modalità USB. Il
numero totale di tracce verrà illustrato a display e inizierà a suonare automaticamente.
4. Premere il tasto Stop per interrompere la riproduzione.
Nota bene: l'apparecchio può leggere drive USB in formato FAT32 da 32GB o meno.
Nota bene:
appariranno correttamente a display. Sistemare i file in cartelle che contengano un massimo di 999 file
ciascuna
Ascoltare la radio
1. Posizionare il selettore Funzione su Radio/Bluetooth.
2. Selezionare la frequenza desiderata (AM o FM) servendosi dell'interruttore FM/AM/Bluetooth
3. Selezionare la stazione radio desiderata girando la manopola Tuning.
4. Regolare il volume come desiderato.
5. Una volta finito di ascoltare la radio, impostare il selettore Funzione su OFF per spegnere la radio.
Nota bene: il ricevitore ha un'antenna FM incorporata fissata a livello della parte posteriore
dell'alloggiamento. Questo filo va srotolato ed esteso per ottenere la migliore ricezione possibile.
se un drive flash USB contiene più di 999 file in una cartella, i file al di sopra del 999 non
(FM/Bluetooth su apparecchi UE).
Nota bene: i dispositivi UE possono unicamente selezionare FM.
32
Page 33

Specifiche tecniche
Potenza di uscita altoparlante
Risposta di frequenza
Motore
Trasmissione
Velocità
Livello di uscita
Impedenza
Tipo di cartuccia
Tipi di file supportati su CD dati AAC/M4A, AIFF/AIF, MP3, WAV, WMA
Tipi di file supportati su drive flash
USB
Tensione
Consumo 20W
Dimensioni
(larghezza x profondità x altezza)
Peso
Le specifiche tecniche possono variare senza preavviso.
* La portata del Bluetooth è influenzata da pareti, ostacoli e movimento. Per ottenere prestazioni ottimali, collocare il prodotto
al centro della stanza in modo che non sia ostacolato da pareti, mobili, ecc.
2W + 2W
60-20.000 Hz
Servo motore CC
Trasmissione a cinghia
33 -1/3, 45 e 78 giri
500 mV a 1 kHz
4 ohm
Cartuccia stereo in ceramica
MP3, WAV, WMA
120V AC, 50 Hz (US/CA)
230V AC, 60 Hz (UE)
18,5" x 15" x 9,6"
47 cm x 38,1 cm x 24,3 cm
8,6 kg (18,9 lb)
33
Page 34

Schnellstart-Anleitung (Deutsch)
Lieferumfang
Superior LP
45 RPM Adapter
Schnellstart-Anleitung
Sicherheitshinweise und Garantieinformationen
Kundendienst
Für die neuesten Informationen zu diesem Produkt (Systemanforderungen, Informationen zur
Kompatibilität etc.) und für die Produktregistrierung besuchen Sie ionaudio.com.
• Stellen Sie das Gerät nicht auf einen dicken Teppichboden oder an einen schlecht
belüfteten Ort.
• Stellen Sie das Gerät auf eine flache, ebene Oberfläche, fernab von jeglichen
Vibrationsquellen.
Schnelles Einrichten
Anschlussdiagramm
Teile, die nicht im Lieferumfang angegeben sind, sind separat erhältlich.
34
Tablet
LINE OUT
Aktivlautsprecher
(optional)
Stromversorgung
Stromversorgung
Page 35

Funktionen
Vinyl-Modus
1. Plattenteller: Hier platzieren Sie Ihre
Schallplatte.
2. 45 RPM-Adapterhalterung: Sichert
den mitgelieferten 45 RPM-Adapter.
Wenn Sie den Adapter nicht
verwenden, legen Sie ihn bitte in
diese Haltevorrichtung.
3. Tonarm: Der Tonarm kann mit der
Hand oder durch Drücken des
entsprechenden Hebels angehoben
und abgesenkt werden.
4. Arm-Clip: Dieser speziell entworfene
Arm-Clip sichert den Tonarm, wenn er
nicht verwendet wird. Der Arm-Clip
wurde so designt, dass er in der
oberen Position bleibt, wenn er entsperrt
ist.
5. Hebel: Hebt und senkt den Tonarm.
6. 33 / 45 / 78 RPM-SCHALTER: Regelt die
Geschwindigkeit des Plattentellers.
Hinweis: Für die Wiedergabe von 78 RPM
Schallplatten verwenden Sie idealerweise
eine 78 RPM-Nadel (separat erhältlich).
Verwenden Sie für 78 RPM Schallplatten
ausschließlich 78 RPM-Nadeln.
7. Autostop-Schalter: Dieser Schalter schaltet Autostop ein oder aus. Wenn Autostop
eingeschaltet ist, wird der Plattenteller zu rotieren beginnen, sobald der Tonarm über die
Schallplatte gelegt wird und stoppen, wenn die Platte das Ende erreicht hat. Wenn
Autostop ausgeschaltet ist, wird sich der Plattenteller immer und unabhängig von der
Position des Tonarms drehen.
Hinweis: Wenn Ihre Schallplatte stoppt, bevor sie das Ende des Songs erreicht hat,
bringen Sie Autostop für diese spezielle Schallplatte in die Position AUS. Dies wird in der
Regel für 45 RPM Schallplatten empfohlen.
WICHTIG: Entfernen Sie die Plastikabdeckung
des Tonabnehmers (Nadelabdeckung) bevor Sie
den Plattenspieler verwenden.
*WARNUNG: Die Cinch-Ausgänge sind LINELevel. Bitte schließen Sie sie nur an LINE-LevelEingänge an. Sie können Ihren Receiver
beschädigen, wenn Sie ein LINE-Level-Gerät an
einen PHONO-Level-Eingang anschließen.
2
3
5
6
7
1
4
35
Page 36

Vorderseite
9
8
7
1
2
5
4
3
10
6
11
12
13
16
15
14
1. Funktionswahlschalter: Drehen Sie diesen Regler, um die gewünschte Quelle auszuwählen:
Kassette/Aus, Phono/Aux In, CD/USB oder Radio/Bluetooth.
2. Programm-Taste: Drücken Sie diese Taste, um CD-Tracks in einer bestimmten Reihenfolge zu
programmieren.
3. Modus: Wählt aus, wie die Tracks am USB-Stick oder der CD wiedergegeben werden: "ONE" (Spielt
den gleichen Track wiederholt ab), "FOL" (wiederholt die Tracks im selben Ordner), "ALL" (spielt alle
Tracks wiederholt ab) oder "NOR" (normale Wiedergabereihenfolge ohne Wiederholungen).
4. Taste Löschen: Drücken Sie diese Taste, um Tracks oder Ordner von einem USB-Stick zu löschen.
5. Rec: Drücken Sie diese Taste, um in den USB-Aufnahmemodus zu wechseln, wenn ein USB-Stick
angeschlossen ist.
6. Radiofrequenzwähler: Drehen Sie diesen Regler, um zwischen AM- oder FM-Sendern auszuwählen.
Hinweis: EU-Geräte können nur FM-Sender auswählen.
7. Display: Zeigt den aktuellen Modus und die Track-Nummer.
8. Power-LED: Diese LED leuchtet, wenn das Gerät eingeschaltet ist.
9. Bluetooth-LED: Diese LED blinkt, wenn sich das Gerät im Koppel-Modus befindet und leuchtet
durchgehend, wenn es mit einem Bluetooth-Lautsprecher gekoppelt ist.
10. Zurück: Drücken Sie diese Taste, um zur/zum vorherigen USB-Datei, Bluetooth-Track oder CD-Track
zu springen.
Hinweis: Bei der Wiedergabe von Bluetooth-Quellen kann es in einigen Apps sein, dass das Drücken
von "Zurück" auf eine andere Wiedergabeliste oder ein anderes Musik-Genre schaltet.
11. Überspringen: Drücken Sie diese Taste, um zur/zum nächsten USB-Datei, Bluetooth-Track oder CD-
Track zu springen.
Hinweis: Bei der Wiedergabe von Bluetooth-Quellen kann es in einigen Apps sein, dass das Drücken
dieser Taste auf eine andere Wiedergabeliste oder ein anderes Musik-Genre schaltet.
12. Stopp/USB/Bluetooth: Mit dieser Taste können Sie die Aufnahme auf den USB-Stick beenden.
Drücken Sie diese Taste, um die Wiedergabe eines USB-Tracks, CD-Tracks oder Bluetooth-Tracks zu
beenden. Ist der Funktionswahlschalter auf USB/CD eingestellt, halten Sie diese Taste 2 Sekunden
lang gedrückt, um zwischen CD-Modus und USB-Modus zu wechseln. Ist der Funktionswahlschalter
auf Radio/Bluetooth eingestellt, halten Sie diese Taste 2 Sekunden lang gedrückt, um ein gekoppeltes
Bluetooth-Gerät zu trennen.
13. Wiedergabe/Pause: Drücken Sie kurz auf diese Taste, um die Tracks von CD-, USB- und Bluetooth-
Quellen zu spielen/pausieren.
14. Kopfhörerausgang: Wenn Kopfhörer angeschlossen sind, wird der interne Lautsprecher stumm
geschaltet.
15. Aux-Eingang: Verbinden Sie den Ausgang eines Line-Level-Geräts mit diesem Eingang,
beispielsweise von einem Smartphone, Media-Player, Tablet etc.
16. FM/AM/Bluetooth (FM/Bluetooth für EU-Geräte): Drücken Sie diesen Schalter, um zwischen FM,
AM, und Bluetooth-Quellen zu wechseln.
Hinweis: Bei EU-Geräten können Sie nur zwischen FM und Bluetooth wählen.
17. CD-Fach: Legen Sie hier Ihre CD ein. Dieses Gerät ist auf die Wiedergabe von im Handel erhältlichen
CDs, richtig gebrannten und finalisierten CD-Rs, CD-RWs und MP3-CDs ausgelegt.
18. Öffnen/Schließen: Drücken Sie diese Taste, um das CD-Fach zu öffnen oder zu schließen.
19. USB-Anschluss: Spielen Sie Tracks von Ihrem USB-Stick oder nehmen Sie Songs auf Ihren USB-
Stick auf.
20. Lautstärke: Stellt die Lautstärke für die internen Lautsprecher und den Kopfhörerausgang ein.
17
18
19
20
36
Page 37

AUTO STOP
2
1
Seitenteil
1. Taste Kassette Auswerfen/Schnellvorlauf (FF): Betätigen Sie diese
Taste, um die Kassette auszuwerfen. Halten Sie diese Taste gedrückt, um
die Kassette schnell vorzuspulen.
2. Kassettenklappe: Legen Sie Ihre Kassette hier ein.
Rückseite
1. Line-Ausgang: Schließen Sie diesen Ausgang an
einen Empfänger, Verstärker oder Aktivlautsprecher
an.
Hinweis: Der Lautstärkeregler des Superior LP wird
die Lautstärke nicht anpassen, wenn der LineAusgang verwendet wird.
2. Stromversorgung: Das integrierte Netzkabel wird
hier angeschlossen.
3. FM-Antenne: Richten Sie diese Antenne aus, um
den optimalen FM-Radioempfang zu erzielen. Für
den AM-Empfang (nur bei US/CA-Geräten) drehen
Sie das Gerät bis Sie den besten Empfang
gefunden haben.
3
Aufnahme
Aufnahme von einer CD
1. Bringen Sie den Funktionswahlschalter auf CD/USB.
2. Stecken Sie den USB-Stick in den USB-Port.
3. Drücken Sie die Taste Aufnahme. Auf der Anzeige wird für 3 Sekunden „REC“ und dann „ONE“
angezeigt. Drücken Sie die Taste Zurück/Vorwärts, um auszuwählen, ob Sie „ONE“ (einen) Track
oder „ALL“ (alle) Tracks aufnehmen möchten und drücken dann die Taste Aufnahme, um dies zu
bestätigen.
4. Drücken Sie die Taste Zurück/Vorwärts, um den Track auszuwählen und dann die Taste Aufnahme,
um dies zu bestätigen. „REC“ und „Track-Nr.“ (Track-Nummer) werden wechselnd eingeblendet, um
anzuzeigen, dass der Track aufgenommen wird.
5. Drücken Sie die Taste Stopp, um die Aufnahme zu stoppen.
Hinweis: Manche Original-CDs können möglicherweise nicht aufgenommen werden, wenn sie
kopiergeschützt sind.
Aufnahme von einer MP3-Disc
1. Bringen Sie den Funktionswahlschalter auf CD/USB und legen die MP3-Disc in das CD-Fach.
2. Stecken Sie den USB-Stick in den USB-Port.
3. Drücken Sie die Taste Aufnahme. Auf der Anzeige wird 3 Sekunden lang „REC“ und dann „ONE“
angezeigt.
4. Drücken Sie die Taste Zurück/Vorwärts, um "ONE" (einen) Track, "FOL" (einen Ordner) oder "ALL"
(alle) Tracks aufzunehmen. Betätigen Sie die Taste Aufnahme, um zu bestätigen. "REC",
"Ordnernummer" und "Anzahl aller Tracks" werden wechselnd angezeigt, um zu zeigen, dass
aufgenommen wird.
5. Drücken Sie die Taste Stopp, um die Aufnahme zu stoppen.
Aufnahme vom Plattenspieler
1. Stellen Sie den Funktionswahlschalter auf Phono/Aux In ein.
2. Stecken Sie den USB-Stick in den USB-Port.
3. Setzen Sie den Tonarm auf die gewünschte Position auf der Platte.
4. Drücken Sie die Taste Aufnahme. „REC“ wird 3 Sekunden lang im Display angezeigt. Anschließend
werden "REC" und "PHO" wechselnd eingeblendet, um anzuzeigen, dass aufgenommen wird.
5. Drücken Sie die Taste Stopp, um die Aufnahme zu stoppen.
1
LINE OUT
2
37
Page 38

Aufnahme vom Radio (nur FM-Band)
1. Stellen Sie den Funktionswahlschalter auf Radio/Bluetooth ein.
2. Stecken Sie den USB-Stick in den USB-Port.
3. Wählen Sie die FM-Radiostation mit dem Frequenzwähler.
4. Drücken Sie die Taste Aufnahme.
5. Drücken Sie die Taste Stopp, um die Aufnahme zu stoppen.
Aufnahme einer Kassette
1. Stecken Sie den USB-Stick in den USB-Port.
2. Stellen Sie den Funktionswahlschalter auf Kassette/Aus.
3. Legen Sie die Kassette mit der breiteren Kassettenseite nach rechts zeigend in das Kassettenfach. Die
Kassette spielt automatisch.
4. Drücken Sie die Taste Aufnahme. „REC“ wird 3 Sekunden lang im Display angezeigt und dann
werden "REC" und "TAP" wechselnd eingeblendet, um anzuzeigen, dass aufgenommen wird.
5. Drücken Sie die Taste Stopp, um die Aufnahme zu stoppen.
Aufnahme vom Aux-Eingang
1. Stecken Sie den USB-Stick in den USB-Port.
2. Stellen Sie den Funktionswahlschalter auf Phono/Aux In ein.
3. Schließen Sie Ihr externes Audiogerät an und beginnen Sie seine Wiedergabe.
4. Drücken Sie die Taste Aufnahme. "REC" wird 3 Sekunden lang im Display angezeigt. Anschließend
werden "REC" und "AUX" wechselnd eingeblendet, um anzuzeigen, dass aufgenommen wird.
5. Drücken Sie die Taste Stopp, um die Aufnahme zu stoppen.
Bluetooth-Wiedergabe
1. Stellen Sie den Funktionswahlschalter auf Radio/Bluetooth und den FM/AM/Bluetooth-Schalter
(FM/Bluetooth auf EU-Geräten) auf die Bluetooth-Position. Die Bluetooth-Anzeige blinkt.
2. Die Koppel-Anzeige blinkt schnell. Wenn Sie eine Verbindung herstellen möchten, bleiben Sie
innerhalb von 10 Metern (33 Fuß) des Superior LP.
3. Schalten Sie Bluetooth auf Ihrem Handy oder Tablet ein, um die Geräte zu koppeln. Wählen Sie
"Superior LP" als Bluetooth-Gerät.
4. Wenn die Geräte erfolgreich gekoppelt und verbunden wurden, leuchtet die Bluetooth-Anzeige
durchgehend.
5. Um die Verbindung zum aktuell gekoppelten Bluetooth-Gerät zu trennen und eine Verbindung mit
einem anderen Bluetooth-Gerät herzustellen, halten Sie die Taste Stopp/USB/Bluetooth 2 Sekunden
lang gedrückt.
Hinweis: Wenn Ihr Bluetooth-Gerät die Eingabe eines Koppel-Codes anfordert, geben Sie "0000" ein.
Wiedergabe von Kassetten
1. Stellen Sie den Funktionswahlschalter auf Kassette/Aus.
2. Legen Sie die Kassette mit der breiteren Kassettenseite nach rechts zeigend in das Kassettenfach. Die
Kassette spielt automatisch.
3. Drücken Sie die Taste Auswerfen/Schnellvorlauf zur Hälfte herunter, um zwischen Vorspulen und
Wiedergabe umzuschalten. Lassen Sie die FF-Taste (Schnellvorlauf) los, um die Wiedergabe zu
starten.
4. Drücken Sie die Taste Auswerfen/Schnellvorlauf ganz herunter, um die Kassette auszuwerfen.
38
Page 39

Wiedergabe über den Plattenspieler
Führen Sie vor der Anwendung folgende Schritte aus:
Entfernen Sie den Nadelschutz. Setzen Sie die Schutzkappe wieder auf die Plattennadel auf, wenn Sie
•
das Gerät nicht verwenden.
• Achten Sie darauf, dass sich der Tonarm frei vom Tonarmhalter entfernen lässt. Verriegeln Sie den
Tonarm wieder am Halter, wenn er nicht in Gebrauch ist.
1. Stellen Sie den
Funktionswahlschalter
Plattenspielers ab.
2. Legen Sie eine Platte über die mittige Spindel auf die Slipmat am Plattenteller.
3. Stellen Sie den
Geschwindigkeitsregler
4. Heben Sie den Tonarm vom Tonarmhalter, indem Sie den Hebel verwenden. Bringen Sie den Tonarm
behutsam über die Platte. Der Plattenteller beginnt sich zu drehen.
5. Setzen Sie den Tonarm auf die gewünschte Stelle auf der Platte.
6. Senken Sie den Tonarm behutsam auf die Platte, um die Wiedergabe zu beginnen.
7. Wenn das Ende der Platte erreicht ist, stoppt der Tonarm automatisch. Heben Sie den Tonarm von
der Platte und setzen ihn wieder in den Halter zurück.
8. Um die Platte manuell zu stoppen, heben Sie den Tonarm von der Platte und setzen ihn wieder in den
Halter zurück.
Hinweis:
Versuchen Sie nie, den Plattenteller manuell anzuhalten oder zu drehen. Ist der Tonarm nicht
im Halter gesichert können Bewegungen oder Erschütterungen des Plattenspielers den Tonarm
beschädigen.
Auto-Stopp-Betrieb
Bestimmte Platten haben einen Auto-Stopp-Bereich außerhalb der voreingestellten Grenze. Der
Plattenspieler beendet die Wiedergabe in diesem Fall vielleicht schon vor dem Ende des letzten Tracks. Ist
dies der Fall, stellen Sie den Auto-Stopp-Schalter in die Position Aus. So kann eine Platte ohne
automatisches Stoppen zu Ende gespielt werden. Sie müssen den Tonarm manuell anheben, wieder in den
Halter legen und das Gerät ausschalten, damit sich der Plattenspieler nicht dreht.
Wiedergabe über den Aux-Eingang
1. Stellen Sie den Funktionswahlschalter auf Phono/Aux In ein.
2. Schließen Sie ein 1/8" (3,5 mm) Stereo-Audiokabel (nicht enthalten) an den AUX-EINGANG auf der
vorderseite des Superior LP an und verbinden es mit dem Line-Ausgang oder Kopfhörerausgang Ihres
externen Audio-Geräts, um eine externe Quelle durch die im Superior LP integrierten Lautsprecher zu
hören.
3. Stellen Sie die Lautstärke am Superior LP auf das gewünschte Niveau.
Hinweis: Wenn der Line-Ausgang Ihres externen Gerätes angeschlossen ist, müssen Sie nur den
Lautstärkeregler des Systems anpassen. Wenn der Kopfhörerausgang Ihres externen Gerätes in
Verwendung ist, müssen Sie möglicherweise die Lautstärke sowohl auf dem externen Gerät als auch
am Superior LP anpassen, um den gewünschten Pegel zu erreichen.
auf
Phono/Aux In
und nehmen die Staubabdeckung des
je nach Platte auf 33, 45 oder 78 Umdrehungen pro Minute.
39
Page 40

CD-Wiedergabe
Standard-Audio-CDs und Daten-CDs können verwendet werden. Die folgenden Dateitypen sind von DatenCDs abspielbar:
• MP3
• WAV
• WMA
Hinweis: Wenn eine CD mehr als 999 Dateien in einem Ordner enthält, werden die Dateien über 999 nicht
korrekt auf dem Display angezeigt. Arrangieren Sie Ihre Dateien in den Ordnern so, dass Sie maximal 999
Dateien in einem Ordner haben.
Einlegen und Auswerfen einer CD
1. Bringen Sie den Funktionswahlschalter auf CD/USB.
2.
Öffnen Sie das CD-Fach, indem Sie die Taste Öffnen/Schließen am CD-Fach drücken.
3.
Wenn das Fach geöffnet ist, legen Sie die CD vorsichtig mit der beschrifteten Seite nach oben in das
Fach. Positionieren Sie kleinere CDs in der Mitte des CD-Fachs.
4.
Schließen Sie das Disc-Fach. Die Gesamtzahl der Tracks auf der CD wird am LED-Display angezeigt.
Die Wiedergabe erfolgt automatisch.
CD wiederholen
1. Um bei der Wiedergabe einer CD einen bestimmten Track wiederholt zu hören, drücken Sie einmal auf
die Modus-Taste. Das LED-Display zeigt "ONE".
2. Um die gesamte CD wiederholt abzuspielen, drücken Sie zweimal auf Modus. Das LED-Display zeigt
"ALL".
3. Um die wiederholte Wiedergabe abzubrechen, drücken Sie die Stopp-Taste.
Programmieren der CD-Track-Wiedergabereihenfolge
Befolgen Sie diese Anweisungen, um die Wiedergabereihenfolge für die Tracks auf einer CD zu
programmieren.
Hinweis: Die CD-Wiedergabe muss vor dem Programmieren der Wiedergabereihenfolge angehalten
werden.
1. Drücken Sie die Programmtaste.
2. Drücken Sie die Taste Zurück/Vorwärts, um die Position auszuwählen, in der der Track gespeichert
werden soll, z.B. Track 03.
3. Drücken Sie die Programmtaste. Die erste programmierte Auswahl ist nun im programmierten
Speicher gespeichert.
4. Um einen programmierten Track anzuhören, drücken Sie die Taste Wiedergabe/Pause. Die CD wird
mit dem Anfang des ersten programmierten Tracks mit der Wiedergabe beginnen.
5. Um den programmierten Speicher zu löschen, während die Disc wiedergegeben wird, drücken Sie die
Stopp-Taste zweimal.
40
Page 41

Wiedergabe eines USB-Sticks
Die folgenden Dateitypen sind von USB -Flash-Laufwerken spielbar:
• AAC/M4A
• AIFF/AIF
• MP3
• WAV
• WMA
Um eine Datei wiederzugeben:
1. Bringen Sie den Funktionswahlschalter auf CD/USB.
2. Verbinden Sie den USB-Stick mit einem USB-Port.
3. Halten Stopp/USB/Bluetooth Sie Taste 2 Sekunden lang gedrückt, um zu USB-Modus zu wechseln.
Die Gesamtzahl der Tracks wird am Display angezeigt. Die Tracks werden automatisch abgespielt.
4. Drücken Sie die Taste Stopp, um die Wiedergabe zu stoppen.
Hinweis: Bitte beachten Sie, dass das Gerät nur USB-Sticks im FAT32-Format lesen kann, die 32 GB oder
weniger beherbergen.
Hinweis: Wenn ein USB -Flash-Laufwerk mehr als 999 Dateien in einem Ordner enthält, werden die Dateien
über 999 nicht korrekt auf dem Display angezeigt. Arrangieren Sie Ihre Dateien in den Ordnern so, dass Sie
maximal 999 Dateien in einem Ordner haben.
Radio hören
1. Stellen Sie den Funktionswahlschalter auf Radio/Bluetooth ein.
2. Wählen Sie die gewünschte Frequenz (AM oder FM) mit dem FM/AM/Bluetooth-Schalter
(FM/Bluetooth auf EU-Geräten).
Hinweis: EU-Geräte können nur FM-Stationen auswählen.
3. Wählen Sie den gewünschten Sender durch Drehen des Tuning-Reglers.
4. Bringen Sie die Lautstärke auf das gewünschte Niveau.
5. Wenn Sie Radio hören, bringen Sie den Funktionswahlschalter auf die Position OFF, um das Radio
auszuschalten.
Hinweis: Der Receiver verfügt über eine eingebaute FM-Antenne, die an der Rückseite hängt. Dieser Draht
sollte für den besten Empfang vollständig ausgerollt und ausgezogen werden.
41
Page 42

Technische Daten
Lautsprecherausgangsleistung
Frequenzgang
Motor
Antrieb
Tempi:
Ausgabepegel
Impedanz
Tonabnehmerart
Unterstützte Dateitypen für DatenCDs
Unterstützte Dateitypen für USB Flash-Laufwerke
Spannung
Stromverbrauch
Abmessungen
(Breite x Tiefe x Höhe)
Gewicht
Die Spezifikationen können ohne Ankündigung geändert werden.
* Die Bluetooth-Reichweite wird durch Wände, Hindernisse und Bewegungen beeinflusst. Um eine optimale Leistung zu
erzielen, platzieren Sie das Gerät am besten in der Raummitte, damit es nicht durch Wände, Möbel usw. behindert wird.
42
2W + 2W
60-20.000 Hz
DC-Servomotor
Riemenantrieb
33-1/3, 45, 78 RPM
500 mV bei 1 kHz
4 Ohm
Stereo-Keramiktonabnehmer
AAC/M4A, AIFF/AIF, MP3, WAV, WMA
MP3, WAV, WMA
120V AC, 50 Hz (US/CA)
230V AC, 60 Hz (EU)
20W
18,5" x 15" x 9,6 "
47 cm x 38,1 cm x 24,3 cm
18,9 Pfund; 8,6 kg
Page 43

Snelstartgids (Nederlands)
Inhoud van de doos
Superior LP
45 RPM Adapter
Snelstartgids
Veiligheids- & Garantiehandleiding
Ondersteuning
Voor de laatste informatie over dit product (systeemvereisten, compatibiliteitsinformatie, etc.)
en product registratie, bezoek ionaudio.com.
• Zet deze niet op een hoogpolig tapijt of op een plek met een zwakke luchtstroom.
• Plaats het toestel op een platte egale oppervlakte, verwijderd van vibrerende bronnen.
Snelle installatie
Aansluitschema
Items die niet vermeld worden onder Inhoud van de doos worden apart verkocht.
Toestel
LINE OUT
Stroomaansluiting
Luidsprekers
(optioneel)
Stroomaansluiting
43
Page 44

Functionaliteiten
Vinyl Stand
1. Draaitafel: Plaats hier uw schijf.
2. 45 RPM Adapter Houder: Houdt de
2
45 RPM adapter bij. Wanneer de
adapter niet gebruikt wordt, gelieve
deze in de houder te plaatsen.
3. Toonarm: De gefixeerde toonarm kan
manueel omhoog en omlaag gebracht
worden of door te duwen op de
omhoog/omlaag hendel.
1
4
4. Arm Clip: Deze speciaal ontworpen
arm clip bevestigt de toonarm
wanneer deze niet wordt gebruikt. De
arm clip werd ontworpen om in de
omhoog positie te blijven terwijl deze
ontgrendeld is.
5. Omhoog / Omlaag Hendel: Brengt de toonarm
omhoog en omlaag.
6. 33 / 45 / 78 schakelaar: Deze schakelaar
BELANGRIJK: Verwijder de plastiek
naald bedekking voor de draaitafel te
bedienen.
bepaalt de snelheid van de draaitafel.
Opmerking: Voor de beste resultaten bij 78
RPM vinyl schijven, gebruik een 78 stylus (apart
verkocht). Gebruik alleen een 78 stylus met 78
RPM vinyl schijven.
7. Autostop schakelaar: Deze schakelaar zet
*WAARSCHUWING: De RCA uitgangen
zijn op LINE niveau. Verbind deze alleen
met LINE niveau ingangen. U kan uw
ontvanger beschadigen indien u een LINE
niveau toestel in een PHONO niveau
ingang steekt.
autostop aan of uit. Wanneer autostop aan
staat, zal de draaitafel beginnen draaien wanneer de toonarm op de schijf wordt
geplaatst en stoppen wanneer het einde van de schijf wordt bereikt. Wanneer Autostop
uit staat zal de draaitafel altijd draaien ongeacht de positie van de toonarm.
Opmerking: Indien uw vinyl schijf stopt voor het einde van de muziek te bereiken, zet
Autostop op de uit positie voor deze schijf. Dit is aangeraden voor 45 RPM schijven.
44
3
5
6
7
Page 45

Voorpaneel
9
8
7
1
2
5
4
3
10
6
11
12
13
16
15
14
1. Functietoets: Draai aan deze knop om de bron te selecteren die u wilt gebruiken: Tape/Off,
Phono/Aux In, CD/USB of Radio/Bluetooth.
2. Programmaknop: Druk op deze knop om de afspeelvolgorde van cd-nummers te programmeren.
3. Modus: Selecteert hoe de nummers op de USB-stick of cd zullen worden afgespeeld: "ONE" (herhaalt
hetzelfde nummer), "FOL" (herhaalt de nummers in een map), "ALL" (herhaalt alle nummers), of "NOR"
(normale speelvolgorde zonder herhaling).
4. Verwijderknop: Druk op deze knop om nummers of mappen van een USB-stick te verwijderen.
5. Rec: Druk op deze knop om USB-opnamemodus in te schakelen wanneer een USB-stick is
verbonden.
6. Radiofrequentieknop: Draai aan deze knop om de AM- of FM-frequentie van de radiozender te
selecteren.
Opmerking: Apparaten voor de EU kunnen alleen FM-zenders selecteren.
7. Scherm: Toont de huidige modus en het nummer.
8. Stroomled: Deze led gaat branden wanneer de stroom wordt ingeschakeld.
9. Bluetooth-LED: Deze led knippert in koppelingsmodus en blijft branden bij aansluiting met een
Bluetooth-luidspreker.
10. Achteruit bladeren: Druk op deze knop om naar het vorige USB-bestand, bluetooth-nummer of cdnummer te navigeren.
Opmerking: Als u drukt op deze knop tijdens het luisteren via Bluetooth, navigeren sommige apps
naar een andere afspeellijst of muziekgenre.
11. Voorwaarts bladeren: Druk op deze knop om te navigeren naar het volgende USB-bestand,
Bluetooth-nummer of nummer op cd.
Opmerking: Als u drukt op deze knop tijdens het luisteren via Bluetooth, navigeren sommige apps
naar een andere afspeellijst of muziekgenre.
12. Stop/USB/Bluetooth: Druk op deze knop om de opname op de USB-stick stop te zetten. Druk op
deze knop om het afspelen van een nummer via USB, cd of Bluetooth stop te zetten. Als de
functieknop op USB/CD staat: druk deze knop 2 seconden lang in om over te schakelen tussen cd- en
USB-modus. Als de functieknop op Radio/Bluetooth staat: druk deze knop 2 seconden lang in om de
verbinding met een gekoppeld Bluetooth-apparaat te verbreken.
13. Afspelen/pauzeren: Deze knop indrukken en loslaten om nummers van cd-, USB- en Bluetoothbronnen af te spelen/te pauzeren.
14.
Koptelefoonuitgang: Wanneer een koptelefoon is aangesloten, wordt de interne luidspreker
gedempt.
15. Aux In: Sluit op deze ingang de uitgang van een apparaat op lijnniveau aan, zoals een smartphone,
mediaspeler, tablet, enz.
16. FM/AM/Bluetooth (FM/Bluetooth voor apparaten voor de EU): Verzet deze schakelaar om over te
schakelen tussen FM-, AM- en Bluetooth-bronnen.
Opmerking: Apparaten voor de EU kunnen alleen kiezen tussen FM en Bluetooth.
17. Cd-lade: Plaats hier een cd. Dit apparaat is ontworpen voor het afspelen van commercieel
verkrijgbare cd's, naar behoren gebrande en gefinaliseerde cd-r's, cd-rw's en cd's met mp3bestanden.
18. Openen/sluiten: Druk op deze knop om de cd-lade te openen of te sluiten.
19. USB-poort: Speel nummers af van uw USB-stick of neem nummers op op uw USB-stick.
20. Volume: Regelt het geluidsniveau van de interne luidsprekers en de koptelefoonuitgang.
17
18
19
20
45
Page 46

AUTO STOP
2
1
Zijpaneel
1. Knop Cassette uitwerpen/Snel vooruitspoelen (FF): Druk op deze knop
om de cassette uit te werpen. Houd deze knop ingedrukt om de cassette
snel vooruit te spoelen.
2. Cassetteluik: Plaats hier een cassette.
Achter paneel
1. Line-uitgang: Sluit deze uitgang aan op
een receiver, versterker of actieve
luidsprekers.
Opmerking: Wanneer de line-uitgang
wordt gebruikt, werkt de volumecontrole
van de Superior LP niet.
2. Vermogen: De geïntegreerde stroomkabel
is hier verbonden.
3. FM-antenne: Verplaats deze draad om de
FM-ontvangst te verbeteren. Voor AMontvangst (alleen apparaten voor de
VS/CA): draai het apparaat tot u de beste
ontvangst hebt.
Opnemen
3
1
LINE OUT
Opnemen van een CD
1. Zet de functieknop op CD/USB.
2. Plaats de USB-stick in de USB-poort.
3. Druk op de knop Opnemen. Op het scherm zal 3 seconden lang "REC" knipperen, waarna "ONE"
verschijnt. Druk op de knop Achteruit/Vooruit om te kiezen om "ONE" ("EEN") nummer of "ALL"
("ALLE") nummers op te nemen en druk op de knop Opnemen om te bevestigen.
4. Druk op de knop Achteruit/Vooruit om het nummer te selecteren en druk vervolgens op de knop
Opnemen om te bevestigen. Afwisselend worden "REC" en "Track No." (nummer) weergegeven om
aan te duiden welk nummer wordt opgenomen.
5. Druk op de Stop-knop om de opname stop te zetten.
Opmerking: Van sommige originele cd's kan niet worden opgenomen als ze beschermd zijn tegen
opnemen.
Opnemen van een MP3-CD
1. Zet de functieknop op CD/USB en plaats de mp3-cd in de cd-lade.
2. Plaats de USB-stick in de USB-poort.
3. Druk op de knop Opnemen. Op het scherm gaat 3 seconden lang "REC" knipperen, waarna "ONE"
("EEN") verschijnt.
4. Druk op de knop Achteruit/Vooruit om "ONE" ("EEN") nummer op te nemen, een "FOL" (map) of
"ALL" ("ALLE") nummers. Druk op de knop Opnemen om te bevestigen. Afwisselend verschijnt
“REC”, “mapnummer” en “totaalaantal nummers”, om aan te geven wat wordt opgenomen.
5. Druk op de Stop-knop om de opname stop te zetten.
Opnemen van een draaitafel
1. Zet de functieknop op Phono/Aux In.
2. Plaats de USB-stick in de USB-poort.
3. Laat de toonarm zakken op de gewenste locatie op de plaat.
4. Druk op de knop Opnemen. Op het scherm zal 3 seconden lang "REC" knipperen, waarna "REC" en
"PHO" afwisselend verschijnen, om aan te geven dat er een opname plaatsvindt.
5. Druk op de Stop-knop om de opname stop te zetten.
46
2
Page 47

Opnemen van de radio (alleen FM)
1. Zet de functieknop op Radio/Bluetooth.
2. Plaats de USB-stick in de USB-poort.
3. Selecteer de FM-zender met behulp van de draaiknop Frequentiekeuze.
4. Druk op de knop Opnemen.
5. Druk op de Stop-knop om de opname stop te zetten.
Opnemen van een cassette
1. Plaats de USB-stick in de USB-poort.
2. Zet de functieknop op Tape/Off.
3. Plaats de cassette met de dikke kant rechts in de cassettelade. De cassette begint automatisch af te
spelen.
4. Druk op de knop Opnemen. Op het scherm zal 3 seconden lang "REC" knipperen, waarna "REC" en
"TAP" afwisselend verschijnen, om aan te geven dat er een opname plaatsvindt.
5. Druk op de Stop-knop om de opname stop te zetten.
Opnemen van de aux-ingang
1. Plaats de USB-stick in de USB-poort.
2. Zet de functieknop op Phono/Aux In.
3. Sluit uw extern audioapparaat aan en start het afspelen.
4. Druk op de knop Opnemen. Op het scherm zal 3 seconden lang "REC" knipperen, waarna "REC" en
"AUX" afwisselend verschijnen, om aan te geven dat er een opname plaatsvindt.
5. Druk op de Stop-knop om de opname stop te zetten.
Bluetooth afspelen
1. Zet de functieknop op Radio/Bluetooth en zet de schakelaar FM/AM/Bluetooth (FM/Bluetooth op
apparaten voor de EU) op de Bluetooth-stand. De Bluetooth-indicator gaat knipperen.
2. Het koppelingslampje gaat snel knipperen. Blijf tijdens het koppelen binnen de 10 meter (33 ft) van
Superior LP.
3. Zet om te koppelen Bluetooth aan op uw smarthone of tablet. Selecteer "Superior LP" als Bluetoothapparaat.
4. Wanneer het koppelen is geslaagd en er verbinding is gemaakt, blijft de Bluetooth-led branden.
5. Om de verbinding met het gekoppelde Bluetooth-apparaat te verbreken en te koppelen met een ander
Bluetooth-apparaat: houd de Stop/USB/Bluetooth-knop 2 seconden lang ingedrukt.
Opmerking: Als uw Bluetooth-apparaat om een koppelingscode verzoekt, voer dan '0000' in.
Afspelen van cassettes
1. Zet de functieknop op Tape/Off.
2. Plaats de cassette met de dikke kant rechts in de cassettelade. De cassette begint automatisch af te
spelen.
3. Druk de knop Uitwerpen/Snel vooruitspoelen voor de helft in om te kiezen tussen snel vooruitspelen
en afspelen. Laat de knop Snel vooruitspoelen los om het afspelen te starten.
4. Druk de knop Uitwerpen/Snel vooruitspoelen volledig in om de cassette uit te werpen.
47
Page 48

Afspelen van een draaitafel
Zorg ervoor voor gebruik:
De beschermkap van de stylus te verwijderen. Plaats de beschermkap terug op de stylus wanneer het
•
apparaat niet wordt gebruikt.
• Dat de toonarm vrij de houder kan verlaten. Vergrendel de toonarm wanneer het apparaat niet wordt
gebruikt.
1. Zet de functieknop op
Phono/Aux In
en til de stofkap van de draaitafel op.
2. Leg een plaat op de draaitafel, op de slipmat en over de centrale stang.
3. Zet de
Snelheidsknop
4. Til de toonarm van de houder met behulp van de knop
op 33, 45 of 78 rpm, afhankelijk van de plaat.
Toonarmhendel
en beweeg de toonarm traag
over de plaat. De draaitafel begint te draaien.
5. Breng de toonarm naar de gewenste locatie op de plaat.
6. Laat de toonarm traag zakken op de plaat om het afspelen te starten.
7. Wanneer de plaat is uitgespeeld, zal de toonarm automatisch stoppen. Til de toonarm van de plaat en
leg hem terug op de houder.
8. Om de plaat manueel te stoppen: til de toonarm op van de plaat en leg hem terug op de houder.
Opmerking:
zonder de klem van de toonarmhouder te vergrendelen kan de toonarm beschadigen.
Werking van de automatische stopschakelaar
De draaitafel nooit manueel stopzetten of draaien. De draaitafel bewegen of schokken
Sommige platen hebben een autostopzone buiten de vooringestelde limiet, zodat de draaitafel stopt
voordat het laatste nummer is beëindigd. Als dit gebeurt, zet dan de Auto Stop-schakelaar in uitpositie.
Hierdoor speelt de plaat tot het einde, maar zal ze niet automatisch stoppen. U moet de toonarm met de
hand optillen, terugplaatsen op de houder en vervolgens de stroom uitzetten om de draaitafel te stoppen.
Afspelen van Aux In
1. Zet de functieknop op Phono/Aux In.
2. Verbind met een stereo audiokabel (niet meegeleverd) van 1/8" (3,5mm) de AUX IN-INGANG
voorpaneel Superior LP met de lijnuitgang of koptelefoonuitgang van uw extern audioapparaat om
door de interne luidsprekers van Superior LP te luisteren naar een externe geluidsbron.
3. Zet het volume van Superior LP op het gewenste niveau.
Opmerking: Als de lijnuitgang van uw extern apparaat is aangesloten, hoeft u enkel de volumecontrole van
het systeem te regelen. Als de koptelefoonuitgang van uw extern apparaat is aangesloten, moet u mogelijk
de volumeregeling op zowel uw extern apparaat als Superior LP bijregelen om het gewenste niveau te
bereiken.
48
Page 49

Afspelen van een CD
Er kunnen standaard audio-cd's en gegevens-cd's worden gebruikt. De volgende bestandstypes kunnen
worden afgespeeld van gegevens-cd's:
• MP3
• WAV
• WMA
Opmerking: Als een map op de cd meer dan 999 bestanden bevat, worden de bestanden boven 999 niet
correct op het scherm weergegeven. Organiseer uw bestanden in mappen met een maximum van 999
bestanden per map.
Een cd laden en uitwerpen
1. Zet de functieknop op CD/USB.
2. Open de cd-lade door te drukken op de knop Openen/sluiten op de cd-lade.
3. Plaats de cd voorzichtig in de open lade met het label naar boven. Leg kleinere cd's in het midden van
de cd-lade.
4. Sluit de cd-lade. Op het ledscherm verschijnt het totaalaantal nummers; het afspelen begint
automatisch.
CD herhalen
1. Om herhaald naar hetzelfde nummer te luisteren bij het afspelen van een cd drukt u éénmaal op de
Modus-knop. Op het ledscherm verschijnt "ONE" ("EEN").
2. Druk twee keer op Modus om de hele cd te herhalen. Op het ledscherm verschijnt "ALL" ("ALLE").
3. Om herhaald afspelen te annuleren: druk op de Stop-knop.
De afspeelvolgorde van een cd programmeren
Volg deze instructies om de afspeelvolgorde van de nummers op een cd te programmeren.
Opmerking: De cd moet worden gestopt om de afspeelvolgorde te programmeren.
1. Druk op de knop Programma.
2. Druk op de knop Achteruit/Vooruit om de locatie te selecteren waar het nummer moet worden
opgeslagen, bv. nummer 03.
3. Druk op de knop Programma. De eerste geprogrammeerde selectie wordt opgeslagen in het
programmageheugen.
4. Om naar een geprogrammeerd nummer te luisteren, drukt u op de knop Afspelen/Onderbreken. De
cd begint te spelen op het begin van het eerste geprogrammeerde nummer.
5. Om het geprogrammeerde geheugen te wissen: druk op de Stopknop tweemaal wanneer de cd wordt
afgespeeld.
Afspelen van een USB-stick
De volgende bestandstypes kunnen worden afgespeeld vanaf USB-stick:
• AAC/M4A
• AIFF/AIF
• MP3
• WAV
• WMA
Een bestand afspelen:
1. Zet de functieknop op CD/USB.
2. Plaats de USB-stick in de USB-poort.
3. Druk Stop/USB/Bluetooth knop 2 seconden lang in om over te schakelen te USB-modus. Op het
scherm verschijnt het totaal aantal nummers en het automatisch afspelen begint.
4. Druk op de Stopknop om afspelen stop te zetten.
Opmerking: Houd er rekening mee dat het apparaat alleen USB-sticks kan lezen die geformatteerd zijn als
FAT 32, met een geheugen van 32 GB of minder.
Opmerking: Als een map op de USB-stick meer dan 999 bestanden bevat, worden de bestanden boven
999 niet correct weergegeven op het scherm. Organiseer uw bestanden in mappen met een maximum van
999 bestanden per map.
49
Page 50

Naar de radio luisteren
1. Zet de functieknop op de stand Radio/Bluetooth.
2. Selecteer de gewenste frequentie (AM of FM) met behulp van de schakelaar FM/AM/Bluetooth
(FM/Bluetooth op apparaten voor de EU).
Opmerking: Apparaten voor de EU kunnen alleen FM selecteren.
3. Selecteer de gewenste zender door te draaien aan de knop Afstemmen.
4. Zet het volume op het gewenste niveau.
5. Wanneer u klaar bent met het luisteren naar de radio, zet u de functieknop op OFF om de radio uit te
zetten.
Opmerking: De receiver heeft een ingebouwde FM-antenne achteraan de behuizing. Deze draad moet
volledig worden afgewikkeld en uitgerold voor een optimale ontvangst.
Technische Specificaties
Uitgangsvermogen luidsprekers
Frequentiebereik:
Motor
Aandrijfsysteem
Snelheid
Uitgangsvermogen
Impedantie
Type cartridge
Ondersteunde bestandstypen op
gegevens-cd's
Ondersteunde bestandstypen op
USB-sticks
Spanning
Stroomverbruik
Afmetingen
(breedte x diepte x hoogte)
Gewicht
Specificaties kunnen veranderen zonder waarschuwing.
* Bluetooth bereik wordt beïnvloed door muren, obstakels en beweging. Voor optimale prestatie, plaats het prodcut in het
midden van de kamer zodat deze niet gestoord wordt door muren, tafels etc.
2W + 2W
60-20,000 Hz
Gelijkstroommotor
Riemaandrijving
33-1/3, 45, 78 RPM
500 mV @ 1 kHz
4 Ohm
Keramische stereocartridge
AAC/M4A, AIFF/AIF, MP3, WAV, WMA
MP3, WAV, WMA
120V AC, 50 Hz (VS/CA)
230V AC, 60 Hz (EU)
20W
18,5" x 15" x 9,6"
47 cm x 38,1 cm x 24,3 cm
18,9 lbs.; 8,6 kg
50
Page 51

Page 52

ionaudio.com
Manual Version 1.4
 Loading...