

ION Audio Party Rocker Express operation manual

Party Rocker Express
Quickstart Guide English ( 3 – 6 )
Guía de inicio rápido Español ( 7 – 10 )
Guide d’utilisation rapide Français ( 11 – 14 )
Guida rapida Italiano ( 15 – 18 )
Schnellstart-Anleitung Deutsch ( 19 – 22 )
Snelstartgids Nederlands ( 23 – 26 )
Appendix English ( 27 )

2

Quickstart Guide (English)
Introduction
Box Contents
Party Rocker Express
Microphone with Cable
Power Adapter
1/8” (3.5 mm) Audio Cable
Quickstart Guide
Safety & Warranty Manual
Support
For the latest information about this product (documentation, technical specifications, system
requirements, compatibility information, etc.) and product registration, visit ionaudio.com.
For additional product support, visit ionaudio.com/support.
WARNING: DO NOT splash or immerse in water or other liquids. Not for use in rain. Use only in
dry locations.
WARNING: DO NOT look directly into the dome light. Do not sit, stand, or apply pressure on
the dome light.
3
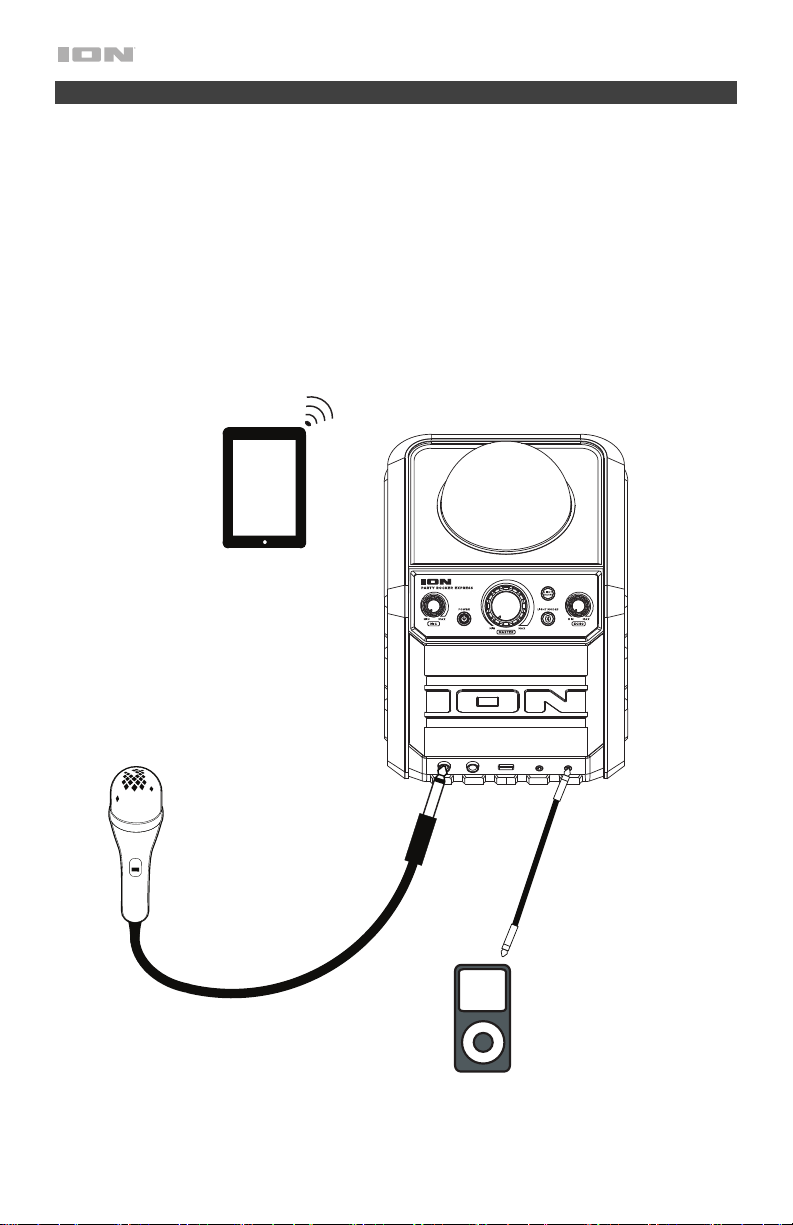
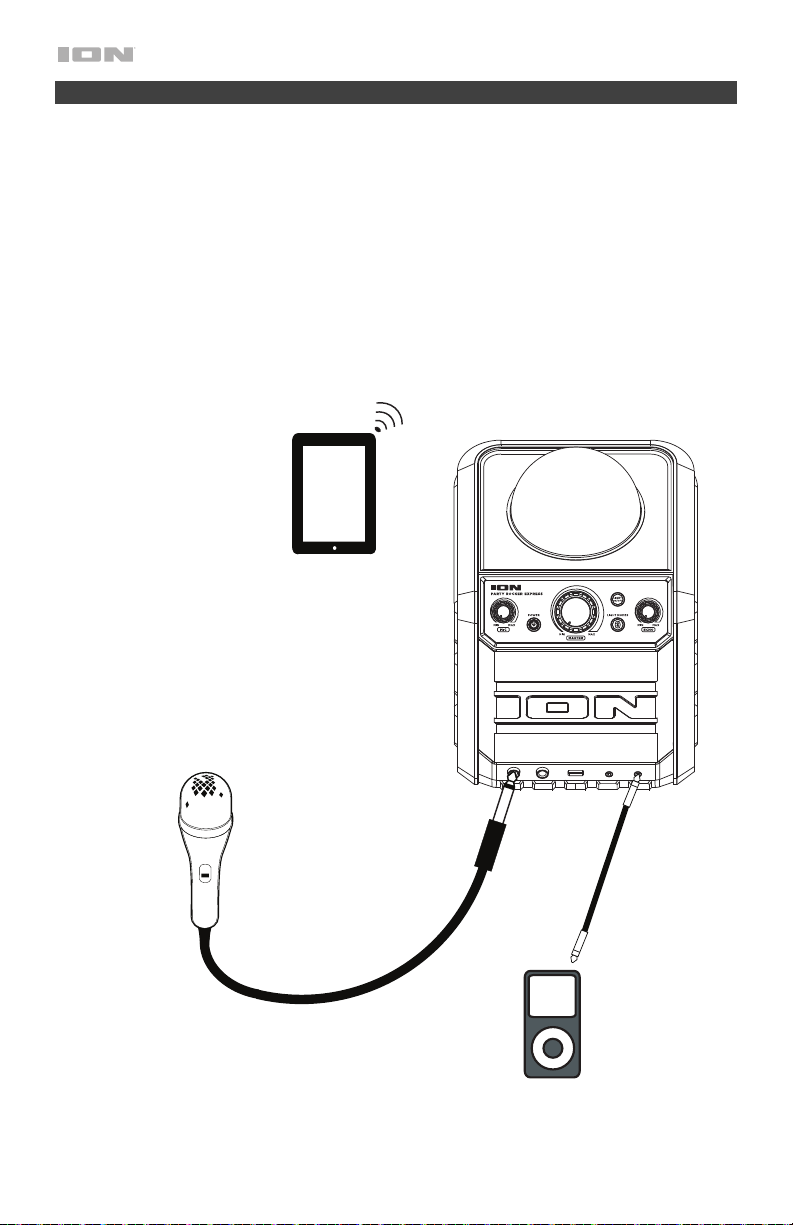
Setup
Items not listed under Introduction > Box Contents are sold separately.
1. For optimal performance, place Party Rocker Express in the center of the room so it is
unobstructed by walls, furniture, etc.
2. Turn down the Master Volume on the Party Rocker Express.
3. Turn on Party Rocker Express.
4. Connect your music player with an audio cable or Bluetooth (see Connecting with a
Bluetooth Device for more details on this).
5. Adjust the volume on your music player and on Party Rocker Express as needed.
6. Press the Light Mode button on Party Rocker Express.
7. Turn off Party Rocker Express when not in use.
Tablet
Microphone
Media
Player
4
13
14
2 3
1
4
567
9
10
11
8
12
9
1010
1111
1212
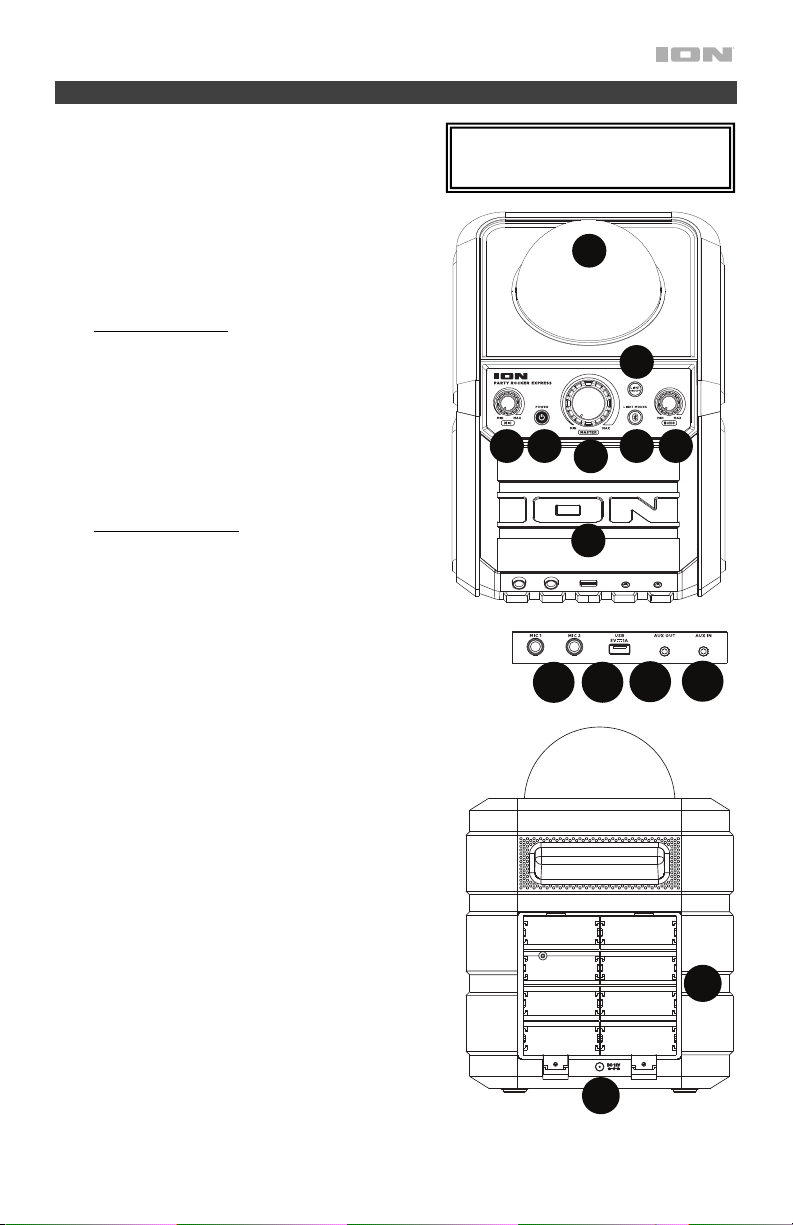
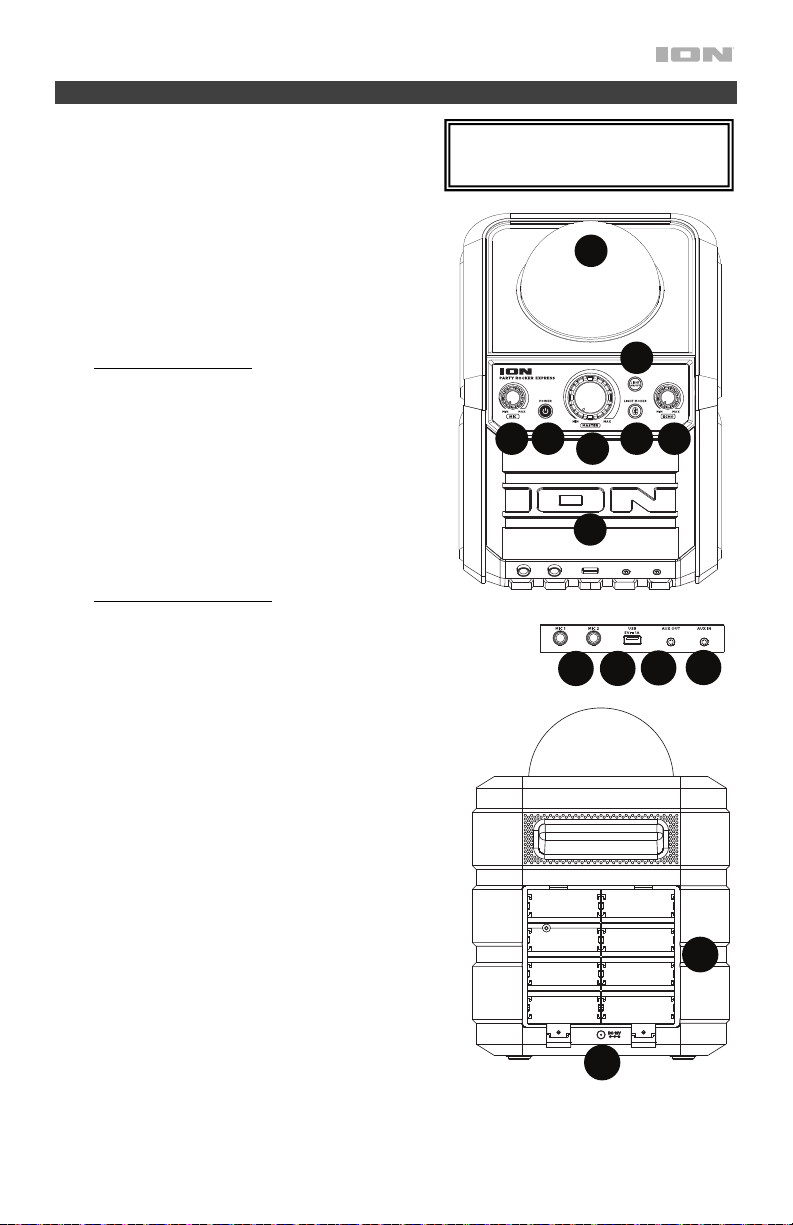
Features
1. Dome*: The lights in the dome can spin and react to
the music playing (depending on the Light Mode that
is selected).
2. Microphone Volume Control: Adjust this knob to
control the volume for microphone inputs 1 and 2.
3. Power ON/OFF: Press this button for one second to
turn Party Rocker Express on or off.
4. Master Volume Control: This adjusts the speaker’s
main mix volume, which includes the microphone
inputs, auxiliary input, and the audio of a paired
Bluetooth device.
5. Bluetooth/Light Mode Button:
Bluetooth Functions
• When the unit is first powered on, it will
automatically enter Pairing mode.
• The Paired LED will be lit when a device is
paired to Party Rocker Express. This LED will
not be lit when Party Rocker Express is first
powered on (unless it was previously paired
with a device).
• Press and hold the Bluetooth button for 3
seconds to disconnect a paired Bluetooth
device.
Light Mode Functions
• When the lights are activated, press and
release this button to cycle to the next light
mode.
• Play through all individual pattern loops or
select from one of the 7 individual pattern loops.
• The lights follow a mode-selected pattern and will react
to the music playback.
6. Lights: Press and release this button to turn the dome and
grille party lights on and off.
7. Echo: Now you can sound like a rock star in a huge arena!
Adjust this knob to control the amount of echo applied
to the mic inputs, making your voice reverberate and
sound spacious.
8. Speaker Grille: The audio playback is heard through
here. Also, the illuminated party lights are seen here.
9. Microphone Inputs: Connect 1/4" (6.35 mm)
microphones to these inputs.
10. USB: Connect a smartphone or tablet here to charge.
11. Auxiliary Output: Connect this output to a home
12. Auxiliary Input: This stereo 1/8” input can be used to
13. Battery Compartment: If powering with batteries,
14. Power Input: If powering with the power adapter,
stereo or an ION Block Rocker to increase the overall
volume.
connect a smartphone, MP3 player, or other audio
sources.
install 8 “C” size batteries here.
connect the included power adapter here.
*WARNING: Do not look directly into the
dome light. Do not sit, stand, or apply
pressure on the dome light.
13
14
5

Operation
Connecting with a Bluetooth Device
1. Turn on Party Rocker Express using the power button.
2. Navigate to your Bluetooth device’s setup screen, find “Party Rocker Express” and connect.
Note: If your Bluetooth device prompts for a pairing code, enter ‘0000’.
Note: The next time you approach Party Rocker Express with your Bluetooth device, it will
automatically re-connect.
3. If your Bluetooth device is not able to connect to Party Rocker Express, press and hold the Bluetooth
button on Party Rocker Express for 3 seconds to break previous Bluetooth connections and reset the
Bluetooth module.
Note: Maximum range will be achieved when using devices with Bluetooth 4.0.
4. Start music playback from your Bluetooth device.
5. To connect to another Bluetooth device, press and hold the Bluetooth button for 3 seconds. Repeat
Step 2.
6. To disconnect a connected Bluetooth device, press and hold the Bluetooth button for 3 seconds.
Note: If you experience trouble connecting or playing music, update your device's OS.
Troubleshooting
If the sound is distorted: Try lowering the volume control of your sound source or musical instrument.
Also, try to reduce the overall volume of Party Rocker Express.
If there is too much bass: Try adjusting the tone or EQ control on your sound source to lower the bass
level. This will allow you to play the music louder before clipping (distortion) occurs.
If there is a high-pitched whistling noise when using microphones: This is probably feedback. Point the
microphone away from the speaker.
If you can’t hear the microphone over the music volume: Turn down the music volume from your source.
6

Guía de inicio rápido (Español)
Introducción
Contenido de la caja
Party Rocker Express
Micrófono y cable
Adaptador de alimentación
Guía de inicio rápido
Manual sobre la seguridad y garantía
Soporte
Para obtener la información más reciente acerca de este producto (documentación,
especificaciones técnicas, requisitos de sistema, información de compatibilidad, etc.) y
registrarlo, visite ionaudio.com.
Para obtener soporte adicional del producto, visite ionaudio.com/support.
ADVERTENCIA: NO salpique ni sumerja el producto en agua u otros líquidos. No lo use bajo la
lluvia. Úselo sólo en lugares secos.
ADVERTENCIA: NO mire directamente a la luz del domo. No se siente, se pare o aplique
presión sobre la luz del domo.
7
r
Instalación
Los elementos que no se enumeran en Introducción > Contenido de la caja se venden por
separado.
1. Para lograr un rendimiento óptimo, coloque el Party Rocker Express en el centro de la
sala donde no esté obstaculizado por paredes, muebles, etc.
2. Baje el control de volumen maestro del Party Rocker Express.
3. Encienda el Party Rocker Express.
4. Conecte su reproductor de música con un cable de audio o Bluetooth (para obtener más
detalles de esto, consulte Conexión con un dispositivo Bluetooth).
5. Pulse el botón del modo de luz del Party Rocker Express.
6. Ajuste el interruptor de modo de luz del Party Rocker Express según sea necesario.
7. Apague el Party Rocker Express cuando no lo use.
Tablet
Microphone
Media
Playe
8
13
14
2 3
1
4
567
9
10
11
8
12
9
1010
1111
1212
Características
1. Domo*: El domo luz puede girar y reaccionar a la
música que se reproduce (en función del modo de
luz seleccionado).
2. Control de volumen del micrófono: Ajuste esta
perilla para controlar el volumen de las entradas de
micrófono 1 y 2.
3. Encendido/apagado: Pulse este botón durante un
segundo para encender o apagar el Party Rocker
Express.
4. Control de volumen maestro: Este control ajusta el
volumen de la mezcla principal del altavoz, que
incluye la entrada de micrófono, la entrada auxiliar, y
el audio de un dispositivo Bluetooth apareado.
5. Botón de Bluetooth/Modo de luz:
Funciones de Bluetooth
• Cuando se enciende esta unidad por primera
vez, entrará automáticamente al modo de
apareamiento.
• El LED Paired (apareado) se enciende cuando se
aparea un dispositivo al Party Rocker Express.
Este LED no se enciende cuando el Party
Rocker Express se enciende por primera vez (a
menos que hubiera sido apareado previamente
con un dispositivo).
• Mantenga pulsado el botón de Bluetooth
durante 3 segundos para desconectar un
dispositivo Bluetooth apareado.
Funciones del modo de luz
• Cuando se activan las luces, pulse y suelte este botón para
pasar al siguiente modo de luz.
• Recorra todos los bucles de patrones individuales o
seleccione uno de los 7 bucles de patrones individuales.
• Las luces siguen un patrón seleccionado por modo y
reaccionarán a la música reproducida.
6. Luces: Pulse y suelte este botón para encender o
apagar el domo y las luces de fiesta de la rejilla.
7. Eco: ¡Ahora puede sonar como una estrella de rock en
un escenario enorme! Ajuste esta perilla para controlar
la cantidad de eco aplicada a las entradas para
micrófonos, haciendo que su voz reverbere y suene
como si estuviera en un espacio enorme.
8. Rejilla del altavoz: La reproducción de audio se
escucha por aquí. Además, las luces de fiesta
encendidas se ven aquí.
9. Entradas de micrófono: Conecte micrófonos de 6,35
10. USB: Conecte aquí su teléfono inteligente (smartphone)
11. Salida auxiliar: Conecte esta salida a un equipo de
12. Entrada auxiliar: Esta entrada de 3,5 mm (1/8 pulg.)
13. Compartimiento para pilas: Si lo está utilizando con
14. Entrada de corriente: Si lo está utilizando con el adaptador de corriente, conecte aquí el adaptador
mm (1/4 pulg.) a estas entradas.
o tableta para cargarlos.
audio hogareño o a un ION Block Rocker para aumentar
el volumen general.
estéreo se puede usar para conectar un teléfono
inteligente (smartphone), reproductor MP3 u otras
fuentes de audio.
pilas, instale 8 pilas de tamaño "C" aquí.
de corriente incluido.
* ADVERTENCIA: No mire directamente a
la luz del domo. No se siente, se pare o
aplique presión sobre la luz del domo.
14
13
9
 Loading...