

ION Audio IT94 User Manual

Quickstart Guide English ( 2 – 9 )
Guía de inicio rápido Español ( 10 – 17 )
Guide d’utilisation rapide Français ( 18 – 25 )
Guida rapida Italiano ( 26 – 33 )
Schnellstart-Anleitung Deutsch ( 34 – 41 )
Snelstartgids Nederlands ( 42 – 49 )
Appendix English ( 50 )

Quickstart Guide (English)
Introduction
Thank you for purchasing the Premier LP. At ION, your entertainment is as important to us as it is to you. That’s why
we design our products with one thing in mind—to make your life more fun and more convenient.
Box Contents
Premier LP
Power Adapter
Dust Cover
Felt Slipmat
Important: Visit ionaudio.com to download the free EZ Vinyl/Tape Converter software.
45 RPM Adapter
USB Cable
Quickstart Guide
Safety & Warranty Manual
Support
For the latest information about this product (documentation, technical specifications, system requirements,
compatibility information, etc.) and product registration, visit ionaudio.com.
For additional product support, visit ionaudio.com/support.
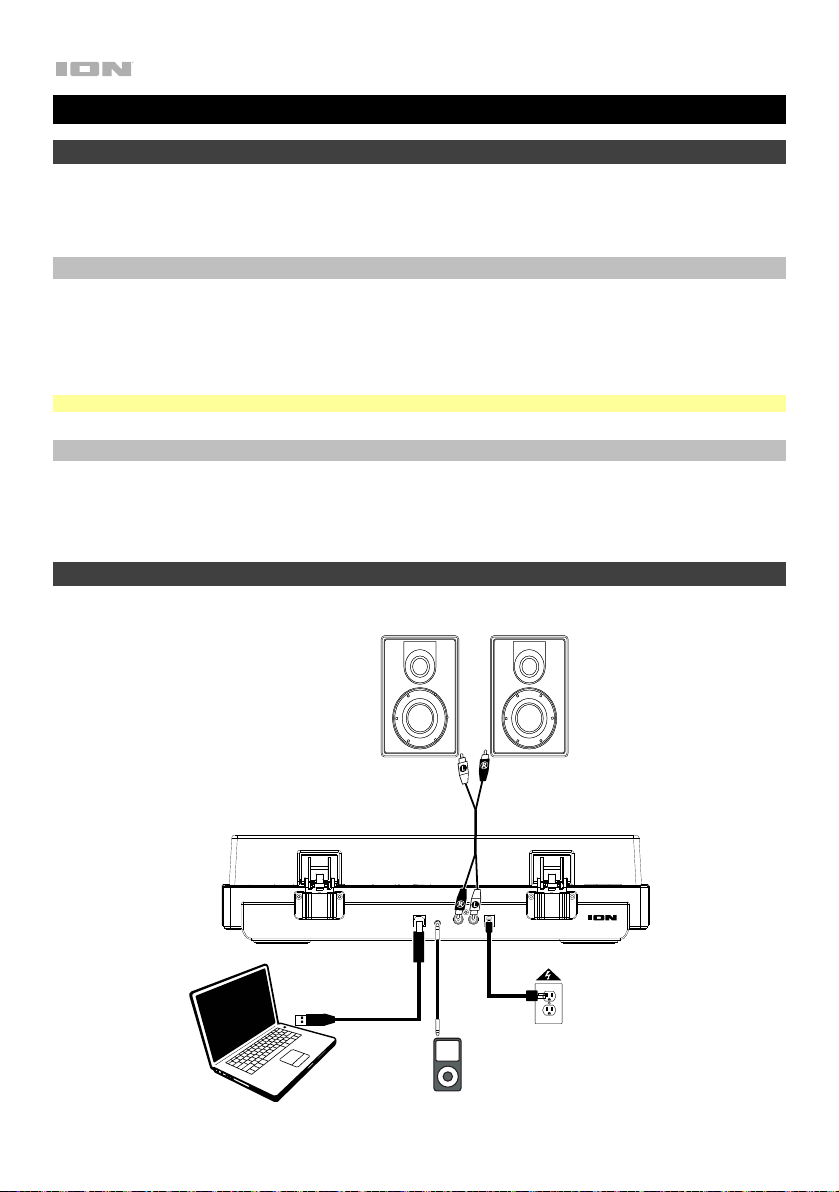
Setup
Items not listed under Introduction > Box Contents are sold separately.
Speakers
RLDC IN
USB AUX IN AUDIO OUT
Computer
MP3 Player
2
PREMIER LP
Power
Features
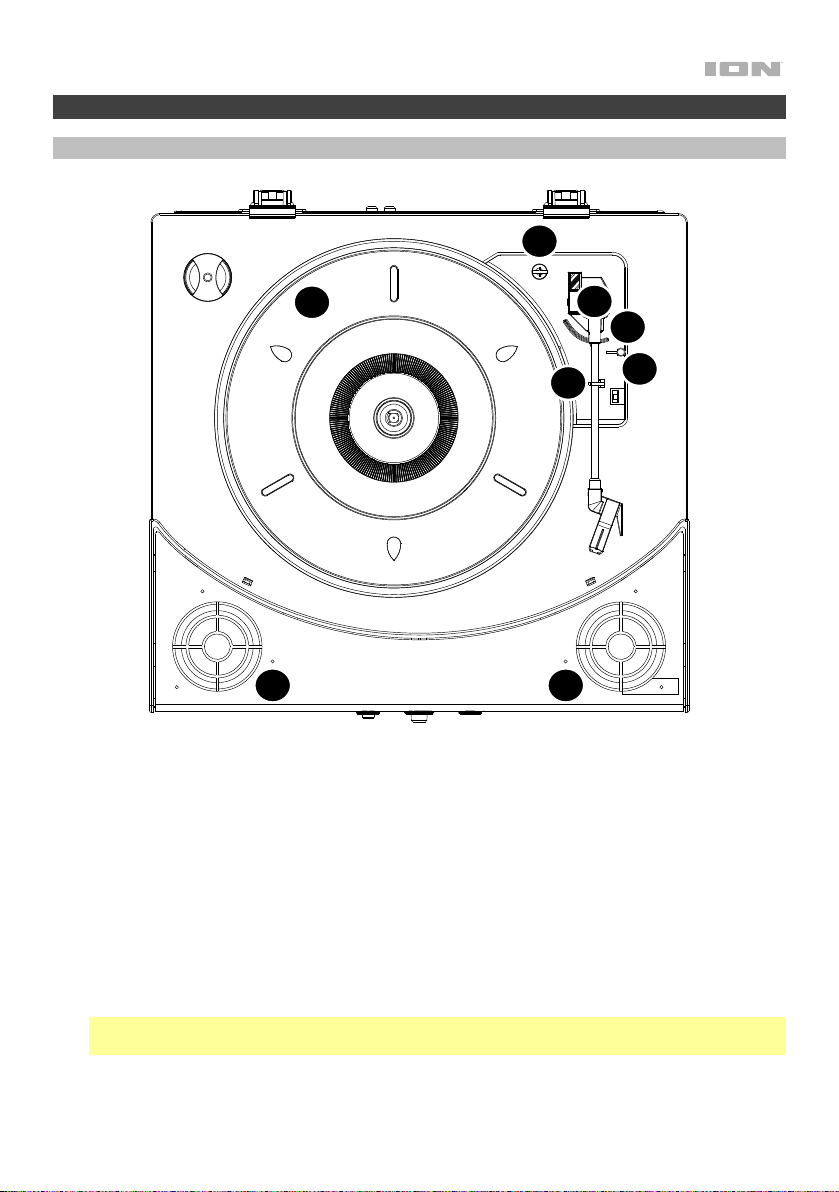
Top Panel
2
1
3
5
4
6
7 7
1. Platter: Place your record here.
2. 45 RPM Adapter Holder: Holds the included 45 RPM adapter. When not using the adapter,
please place it in this holder.
3. Tonearm: Tracks the groove in a vinyl record. When the tonearm reaches the center of a playing
vinyl record, it will automatically return to the arm rest.
4. Arm Clip: This specially designed arm clip secures the tonearm while at rest or when not in use.
The arm clip has been designed to remain in the up position while unlocked.
5. Raise / Lower Lever: Raises and lowers the tonearm.
6. 33 / 45 / 78 Switch: This switch controls the RPM of the turntable platter.
Note: For best results when playing 78 RPM vinyl records, use a 78 stylus (sold separately). Only
use a 78 stylus with 78 RPM vinyl records. Purchase a 78 RPM stylus at ionaudio.com.
7. Speakers: Plays the audio from your vinyl record and the Aux Input.
3
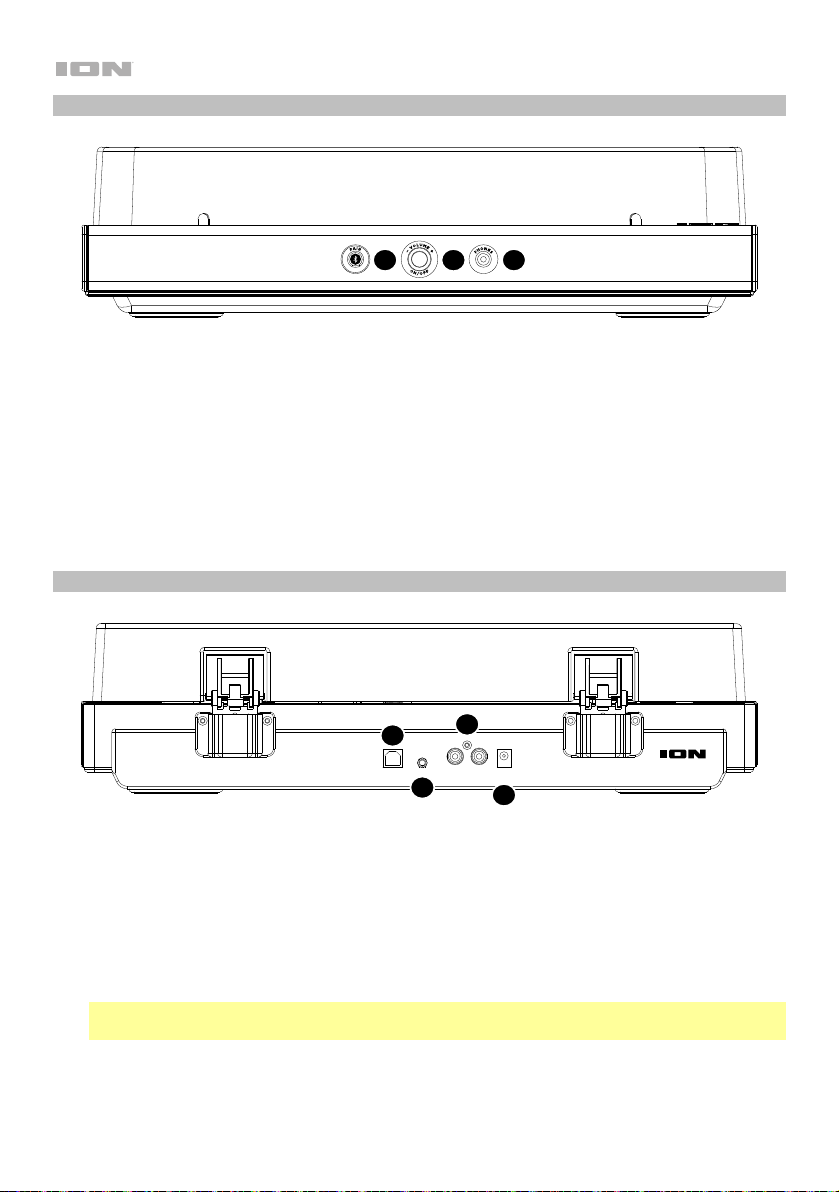
Front Panel
10 9 8
8. Bluetooth Button: Press this button to start Bluetooth pairing. The LED will blink when pairing
with a Bluetooth device, and remain solid once fully paired. If after 1 minute no Bluetooth
speaker can be found to pair with, the Bluetooth transmitter will become inactive and the LED
will turn off. If currently connected, press this to disconnect from a currently connected
Bluetooth device.
9. Volume/Power: This knob is used both for powering on Premier LP and adjusting the volume.
To turn Premier LP on or off, press the knob. To adjust the volume, turn the knob left and right.
10. Headphone Jack: Connect headphones (sold separately) to listen to your vinyl playback.
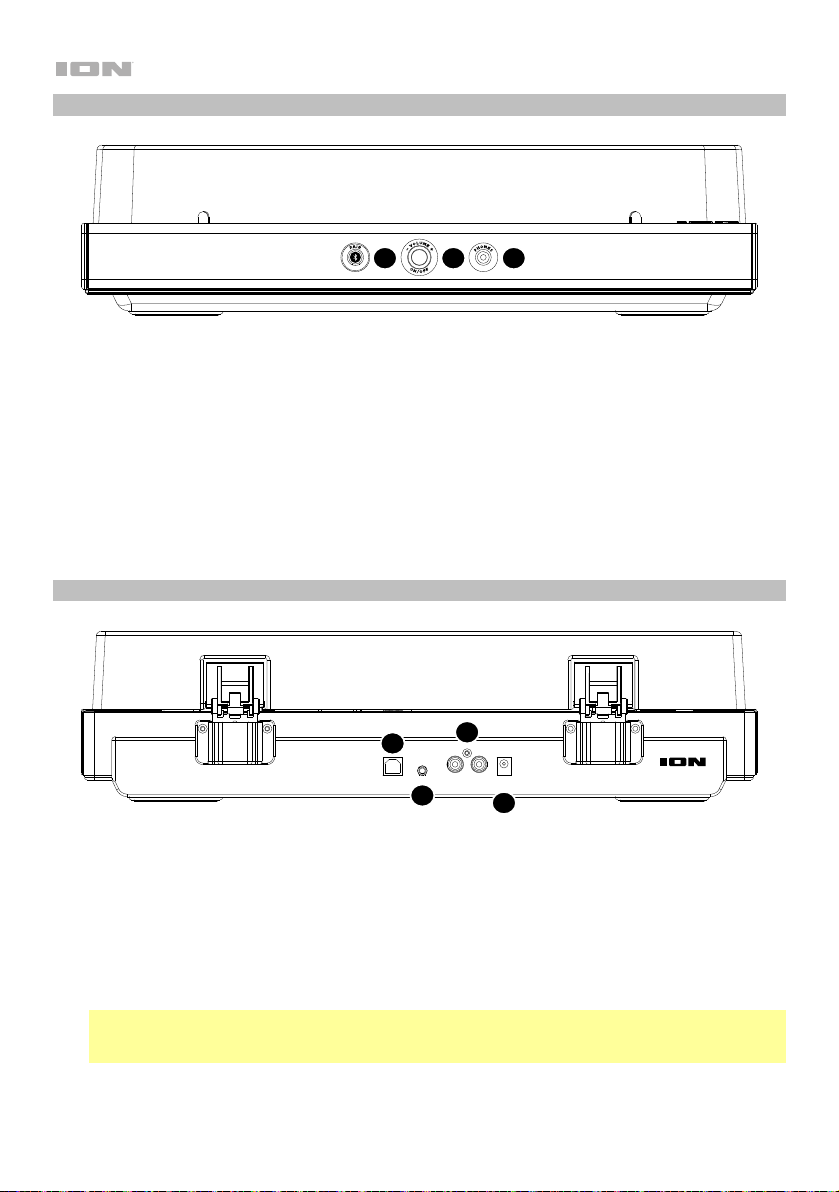
Rear Panel
12
13
RLDC IN
14
PREMIER LP
11
USB AUX IN AUDIO OUT
11. USB Audio Output: Use the included USB cable to connect your turntable to your computer.
The USB connection will send audio from the turntable to your computer. Please see the Using
Premier LP With Your Computer section of this manual for information.
12. Aux Input: Connect a CD player, digital media player, or other audio source to this 1/8” (3.5 mm)
stereo auxiliary input. The audio from the Aux Input is also transmitted over a Bluetooth
connection.
13. RCA Output: The audio from a playing vinyl record is sent to this line-level RCA audio output.
Warning: The RCA Outputs are line-level. Please only connect these to line-level inputs. You
may damage your receiver if you plug in a line-level device into a phono-level input.
14. Power Cable Input: Use the included adapter to connect to wall power.
4

Operation
Playback
There are 4 ways to listen to your vinyl records with Premier LP:
1. You can simply listen to your music using Premier LP’s internal speakers.
2. You can connect Premier LP to a Bluetooth speaker. See the section Pairing Premier LP to a
Bluetooth Speaker for details.
3. If you prefer to use your own stereo speakers, you can connect Premier LP's RCA outputs to a
stereo system or to powered speakers. Do not connect them to phono-level inputs; Premier LP's
RCA outputs are line-level and could damage a device with phono-level inputs. Any other
standard input type, such as CD, Aux In, or Tape is acceptable.
4. You can listen through your computer speakers or with headphones connected to your
computer, once your computer soundcard’s input device has been set to USB PnP Audio
Device or USB Audio Device, depending on your Windows operating system (USB PnP Audio
Device on macOS) and that you are record-monitoring the audio using EZ Vinyl/Tape Converter
or similar software (Premier LP cannot be used as a playback device for your computer's audio).
See the section Setting Your Computer’s Soundcard as the Default Playback Device for
details on how to configure sound playback.
Pairing Premier LP to a Bluetooth Speaker
Premier LP has a Bluetooth transmitter to send audio to a Bluetooth speaker wirelessly.
1. Power on your Bluetooth speaker and ensure it is in pairing mode.
2. Power on the Premier LP turntable.
3. Press and release the Bluetooth button on Premier LP to start pairing to your Bluetooth device.
Once Premier LP is connected to the Bluetooth speaker, the Bluetooth LED will be solid blue.
Your Bluetooth speaker should also indicate that its paired.
Note: Premier LP will connect to the closest Bluetooth speaker that is near it. If after 5 minutes
no Bluetooth speaker can be found to pair with, the Bluetooth transmitter will become inactive
and the LED will turn off.
Note: Maximum range will be achieved when using devices with Bluetooth 4.0 or higher.
4. Play music on your Premier LP turntable. If you are connected to a Bluetooth speaker with a
play/pause button and do not hear audio, try pressing the play/pause button.
5. Adjust the volume on your Bluetooth speaker (if applicable) or the Volume knob on Premier LP
to control the output level.
6. To disconnect pairing, power off the Premier LP turntable or turn off Bluetooth pairing on your
Bluetooth speaker.
Note: Move other Bluetooth receivers/speakers out of range of Premier LP (30'/9.1m or more) or turn
them off to connect to your Bluetooth speaker.
5

Using Premier LP With Your Computer
Recording
To record music to your computer, you can use ION EZ Vinyl/Tape Converter and a USB cable. EZ
Vinyl/Tape Converter conveniently saves your recordings to your computer. After you finish
converting your vinyl, you can then burn to CD or load onto portable media devices.
Visit ionaudio.com to download the free EZ Vinyl/Tape Converter software.
1. With EZ Vinyl/Tape Converter installed on your computer, use the included USB cable to
connect Premier LP's USB port to an available USB port on your computer.
2. On your computer, you can open EZ Vinyl/Tape Converter by going to Start Menu All
Programs (Windows) or the Applications menu (macOS).
3. Follow the on-screen instructions to set up your recording. When prompted to play your music,
move Premier LP's tonearm over the record to start playback.
Note: To listen to a record while it’s playing, listen through Bluetooth speakers, your computer's
speakers, or connect Premier LP's RCA outputs to a stereo system or powered speakers. Do
not connect them to phono-level inputs; Premier LP's RCA outputs are line-level and could
damage a device with phono-level inputs.
4. When the record has ended, Premier LP's tonearm will automatically return to the arm clip.
Visit ionaudio.com/computer-optimization for more information on optimizing your computer for
audio.
Playback
You can listen to the music on your computer through its internal speakers or through headphones
connected to it. (Premier LP cannot be used as a playback device for your computer's audio.)
To listen to a record while it's playing, listen through Bluetooth speakers, your computer's speakers,
or connect Premier LP's RCA outputs to a stereo system or powered speakers. Do not connect them
to phono-level inputs; Premier LP's RCA outputs are line-level and could damage a device with
phono-level inputs.
6

Troubleshooting
If you experience any difficulties, please refer to the troubleshooting steps below as well as
those in the EZ Vinyl/Tape Converter manual.
If you are recording to a computer:
• Make sure that Premier LP is powered on and that the needle is on the record.
• Make sure Premier LP is selected as your computer's default recording device (see the
instructions below).
• If you are listening through your computer's speakers, make sure those speakers are selected as
your computer's default playback device (see the instructions below). Alternatively, you can use
Bluetooth or the RCA Outputs to connect Premier LP to a stereo system or powered speakers.
Do not connect the RCA Outputs to phono-level inputs; Premier LP's RCA outputs are line-level
and could damage a device with phono-level inputs.
Note: The RCA outputs monitor the signal coming out of the turntable, not the signal coming from
your computer.
• Disconnect then reconnect the USB cable connecting Premier LP to your computer.
I'm not hearing any audio when playing music:
• If you are playing music from vinyl:
o Make sure that Premier LP is powered on and that the needle is on the record.
o Use Bluetooth or the RCA Outputs to connect Premier LP to a stereo system or powered
speakers. Do not connect the RCA Outputs to phono-level inputs; Premier LP's RCA
outputs are line-level and could damage a device with phono-level inputs.
• If you are playing music from your computer:
o Make sure your software music player's volume is turned up.
o Make sure your computer's volume is turned up.
o Make sure your computer's speakers are selected as your computer's default playback
device (see the instructions below). (Premier LP cannot be used as a playback device for
your computer's audio.)
I am hearing a hum through my speaker or laptop when using the turntable:
• If you are recording to a laptop:
o Please connect the laptop to a grounded power supply (3 prong)
• If you are playing through a speaker:
o Please connect to a grounded (3 prong) power supply.
My record is not playing at the correct speed; its pitch is too high or too low:
• Ensure the 33 / 45 / 78 switch is set to the correct speed for your record.
The Bluetooth speaker that I want is not pairing to Premier LP.
• Turn off or move other nearby Bluetooth speakers over 30’ (9.1m) so only the closest Bluetooth
speaker you want will pair.
7

I am connected to a Bluetooth speaker but do not hear any audio.
• If you are connected to a Bluetooth speaker with a play/pause button, and do not hear audio, try
pressing the play/pause button.
• Press and release Premier LP’s Bluetooth button to disconnect it from the Bluetooth speaker, and
then press it once more to try pairing it again.
• Turn Premier LP off and then on again, and then press its Bluetooth button to try pairing it again.
• Use the volume knob on Premier LP to turn up the Bluetooth output level.
My smartphone will not connect to Premier LP Turntable.
• Premier LP Turntable acts as a Bluetooth Transmitter, sending the audio out of Premier LP into
other Bluetooth Speakers. Premier LP Turntable cannot act as a Bluetooth Receiver and play
music from your smartphone over headphones or RCA outputs.
The Bluetooth LED will not stop blinking.
• Once the Bluetooth button is pressed, Premier LP will try to connect to nearby Bluetooth
speakers for 1 minute. To stop the blinking Bluetooth LED, power cycle Premier LP.
I am hearing an echo when listening to music.
• Either listen to music through a paired Bluetooth speaker or connect the RCA audio outputs from
Premier LP to a speaker. Both playback methods should not be used at the same time.
I am hearing static noise in my headphones.
• Press Premier LP’s Bluetooth button to disconnect it from a paired Bluetooth speaker. When
listening to Premier LP with headphones, always make sure Premier LP is not connected to a
Bluetooth speaker at the same time.
Setting Premier LP as the Default Recording Device
• Windows XP: Click Start Menu Control Panel (or Settings Control Panel in Classic View)
Sound and Audio Devices. Click the Audio tab and under Sound recording, select USB PnP
Audio Device as the default device.
• Windows Vista: Click Start Menu Control Panel (or Settings Control Panel in Classic View)
Hardware and Sound Sound. Click the Recording tab and select USB PnP Audio Device
as the default device.
• Windows 7: Click Start Menu Control Panel Sound. Click the Recording tab and select
USB PnP Audio Device as the default device.
• Windows 8: From the Start Menu, click the lower-left corner of the screen to bring yourself to the
Desktop.
In the bottom-right corner of the Taskbar, locate the Volume Control "Speaker" icon. Right-click
the speaker and select Playback Devices. In the Windows Sound control panel select the
Recording tab.
If USB PnP Audio Device does not have a green "check mark" symbol next to it, right-click it and
select "Set as Default Device".
• macOS: Click the upper-left "apple" icon then click System Preferences Sound. Click the
Input tab. From the menu, select USB PnP Audio Device as the device.
8

Setting Your Computer's Soundcard as the Default Playback Device
• Windows XP: Click Start Menu Control Panel (or Settings Control Panel in Classic View)
Sound and Audio Devices. Click the Audio tab and under Sound playback, select your
computer's soundcard as the default device.
• Windows Vista: Click Start Menu Control Panel (or Settings Control Panel in Classic View)
Hardware and Sound Sound. Click the Playback tab and select your computer's
soundcard as the default device.
• Windows 7: Click Start Menu Control Panel Sound. Click the Playback tab and select
your computer's soundcard as the default device.
• Windows 8: From the Start menu, click the lower-left corner of the screen to bring yourself to the
Desktop.
In the bottom-right corner of the Taskbar, locate the Volume Control "Speaker" icon. Right-click
the speaker and select Playback Devices. The Windows Sound control panel should appear set
on the Playback tab.
If your computer’s soundcard does not have a green "check mark" symbol next to it, right-click it
and select "Set as Default Device".
• macOS: Click the upper-left "apple" icon then click System Preferences Sound. Click the
Output tab. From the menu, select Internal Speakers if you are using the computer's internal
speakers or select Headphones if you are using speakers or headphones attached to the
computer's 1/8" headphone output.
BEFORE RETURNING THE PRODUCT, please contact ION Audio for technical support at
ionaudio.com/support
9
Guía de inicio rápido (Español)
Introducción
Gracias por comprar el Premier LP. En ION, su entretenimiento es tan importante para nosotros como para usted. Por
eso es que diseñamos nuestros productos con una sola cosa en mente—hacer que su vida sea más divertida y
cómoda.
Contenido de la caja
Premier LP
Adaptador de alimentación
Cubierta antipolvo
Alfombrilla antideslizante de fieltro
Importante: Visite ionaudio.com para descargar el software EZ Vinyl/Tape Converter gratis.
Soporte
Para obtener la información más reciente acerca de este producto (documentación, especificaciones técnicas,
requisitos de sistema, información de compatibilidad, etc.) y registrarlo, visite ionaudio.com.
Para obtener soporte adicional del producto, visite ionaudio.com/support.
Instalación
Los elementos que no se enumeran en Introducción > Contenido de la caja se venden por separado.
Adaptador para 45 RPM
Cable USB
Guía de inicio rápido
Manual sobre la seguridad y garantía
10
Computadora
Altavoces
RLDC IN
USB AUX IN AUDIO OUT
PREMIER LP
Suministro
Eléctrico
MP3 Reproductor
Características
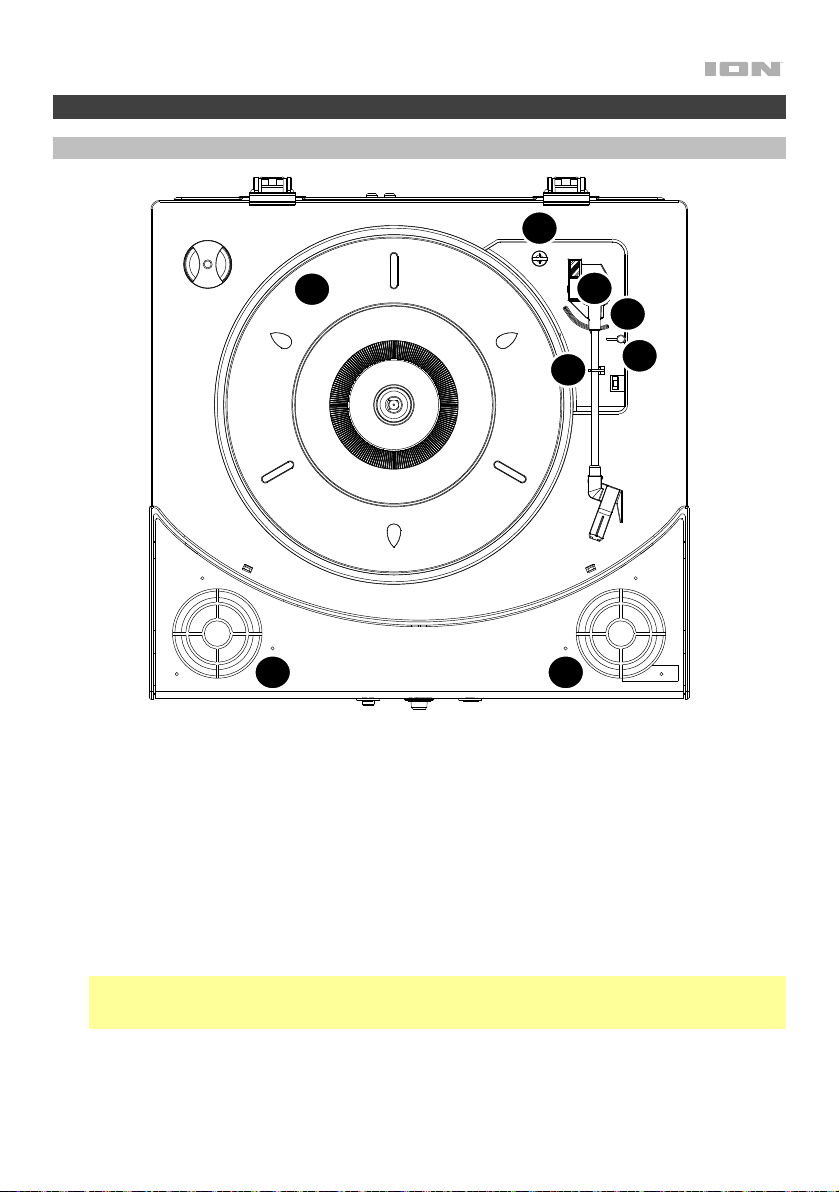
Panel superior
2
1
3
5
4
6
7 7
1. Plato: Coloque aquí su disco.
2. Soporte del adaptador para 45 RPM: Sostiene el adaptador para 45 RPM incluido. Cuando no use el
adaptador, póngalo en este soporte.
3. Brazo: Sigue el surco en un disco de vinilo. Cuando el brazo de lectura llega al centro del disco de
vinilo que se está reproduciendo, volverá automáticamente al soporte del brazo.
4. Clip del brazo: Este clip diseñado especialmente fija el brazo mientras está en reposo o no se usa. El
clip ha sido diseñado para que permanezca hacia arriba mientras está desbloqueado.
5. Palanca de subir / bajar: Sube y baja el brazo.
6. Conmutador de 33 / 45 / 78 RPM: Este conmutador controla las RPM del plato del giradiscos.
Nota: Para obtener los mejores resultados al reproducir discos de vinilo de 78 RPM, use una púa para
78 (que se vende por separado). Use sólo una púa para 78 con los discos de vinilo de 78 RPM.
Adquiera la púa para 78 en ionaudio.com.
7. Altavoces: Reproduce el audio de su disco de vinilo y la entrada auxiliar.
11
Panel frontal
10 9 8
8. Botón Bluetooth: Pulse este botón para comenzar el apareamiento Bluetooth. El LED parpadea
cuando se está apareando con un dispositivo Bluetooth y permanece encendido permanentemente
una vez totalmente apareado. Si tras 1 minuto no puede encontrarse ningún altavoz Bluetooth con el
cual aparearse, el transmisor Bluetooth se desactivará y el LED se apagará. Si está actualmente
conectado, pulse este botón para desconectarlo del dispositivo Bluetooth actualmente conectado.
9. Volumen/Encendido: Esta perilla se usa para encender el Premier LP y para ajustar el volumen. Para
encender o apagar el Premier LP presione la perilla. Para ajustar el volumen, gire la perilla a la
izquierda o a la derecha.
10. Conector para auriculares: Conecte auriculares (que se venden por separado) para escuchar sus
discos de vinilo.
Panel trasero
12
13
RLDC IN
14
PREMIER LP
11
USB AUX IN AUDIO OUT
11. Salida de audio USB: Use el cable USB incluido para conectar el giradiscos a su computadora. La
conexión USB envía audio desde el giradiscos a su computadora. Para obtener información, consulte
la sección Cómo usar el Premier LP con su computadora.
12. Entrada auxiliary: Conecte a esta entrada auxiliar estéreo de 1/8 pulg. un reproductor de CD, un
reproductor de medios digitales u otra fuente de audio. El audio proveniente de la entrada Aux también
se transmite por la conexión Bluetooth.
13. Salida RCA: El audio del disco de vinilo que se está reproduciendo se aplica a esta salida de audio
RCA de nivel de línea. Esta salida no debe conectarse a dispositivos de nivel fonográfico.
ADVERTENCIA: Las salidas RCA son para nivel de LÍNEA. Conéctelas sólo a las entradas de nivel de
línea (LINE). Puede dañar el receptor si enchufa un dispositivo de nivel de línea en una entrada de nivel
fonográfico (PHONO).
14. Entrada del cavo de alimentación: Use el adaptador incluido para conectarlo al tomacorriente de
pared.
12

Funcionamiento
Reproducción
¡Hay 4 maneras de escuchar sus discos de vinilo con Premier LP:
1. Puede escuchar simplemente su música con los altavoces internos de Premier LP.
2. Puede conectar el Premier LP a un altavoz Bluetooth. Consulte la sección Apareamiento del Premier
LP con un altavoz Bluetooth para más detalles.
3. Si prefiere usar sus propios altavoces estéreo, puede conectar las salidas RCA de Premier LP a un
sistema estéreo o a altavoces alimentados. No las conecte a entradas de nivel fonográfico—las salidas
RCA del Premier LP son de nivel de línea y podrían dañar un dispositivo con entradas de nivel
fonográfico. (Cualquier otro tipo de entrada estándar, tal como CD, entrada Aux o Cinta, es aceptable).
4. Puede escuchar a través de los altavoces de su ordenador o auriculares conectados al mismo, una vez
que el dispositivo de entrada de la placa de sonido de su ordenador se configure como USB PnP
Audio Device (Dispositivo de audio USB PnP) o USB Audio Device (Dispositivo de audio USB),
dependiendo de su sistema operativo Windows (USB PnP Audio Device para macOS) y de si está
grabando y monitorizando con el software EZ Vinyl/Tape Converter o similar (el Premier LP no puede
utilizarse como dispositivo de reproducción para el audio de su ordenador). Consulte la sección Cómo
configurar la tarjeta de sonido de su computadora como dispositivo de reproducción
predeterminado para más detalles acerca de cómo configurar la reproducción del sonido.
Apareamiento del Premier LP con un altavoz Bluetooth
El Premier LP cuenta con un transmisor Bluetooth que transmite audio a un altavoz Bluetooth de forma
inalámbrica.
1. Encienda su altavoz Bluetooth y asegúrese de que se encuentre en modo de apareamiento.
2. Encienda el giradiscos Premier LP.
3. Pulse y suelte el botón de Bluetooth el Premier LP para comenzar el apareamiento con su dispositivo
Bluetooth. Una vez conectado con el altavoz Bluetooth, el LED Bluetooth del Premier LP
permanecerá iluminado. Su altavoz Bluetooth también debería indicar que está apareado.
Nota: Premier LP se conectará con el altavoz Bluetooth más cercano. Si tras 5 minutos no puede
encontrarse ningún altavoz Bluetooth con el cual aparearse, el transmisor Bluetooth se desactivará y el
LED se apagará.
Nota: El alcance máximo se logra cuando se utilizan dispositivos con Bluetooth 4.0 o superior.
4. Reproduzca música en su giradiscos Premier LP. Si está conectado con un altavoz Bluetooth con un
botón reproducir/pausa y no escucha el audio, intente pulsar dicho botón.
5. Ajuste el volumen de su altavoz Bluetooth (si aplica) con la perilla de volumen del Premier LP para
controlar el nivel de salida.
6. Para desconectar el apareamiento, apague el giradiscos Premier LP o apague el apareamiento
Bluetooth en su altavoz Bluetooth.
Nota: Aleje otros receptores/altavoces Bluetooth fuera del alcance del Premier LP (10 metros o más) para
desconectarlos a fin de conectar su altavoz Bluetooth.
13

Cómo usar el Premier LP con su computadora
Cómo grabar
Para grabar música en su ordenador, puede usar el EZ Vinyl/Tape Converter de ION y un cable USB. EZ
Vinyl/Tape Converter guarda conveniente sus grabaciones en su computadora. Después de terminar de
convertir su vinilo, puede quemarlo en CD o cargarlo en dispositivos de medios portátiles.
Visite ionaudio.com para descargar el software EZ Vinyl/Tape Converter gratis.
1. Con EZ Vinyl/Tape Converter instalado en su computadora, use el cable USB incluido para conectar el
puerto USB del Premier LP a un puerto USB disponible de su computadora.
2. En su computadora, puede abrir EZ Vinyl/Tape Converter yendo al menú Start All Programs (Inicio
Todos los programas) (Windows) o al menú Applications (Aplicaciones) (macOS).
3. Siga las instrucciones de la pantalla para preparar su grabación. Cuando se le indique que reproduzca
su música, lleve el brazo del Premier LP sobre el disco para iniciar la reproducción.
Nota: Para escuchar el disco mientras se reproduce, óigalo por los altavoces de su computadora o
conecte las salidas RCA del Premier LP a un sistema estéreo o altavoces alimentados. No las conecte
a entradas de nivel fonográfico—las salidas RCA del Premier LP son de nivel de línea y podrían dañar
un dispositivo con entradas de nivel fonográfico.
4. Cuando termine el disco, el brazo de lectura del Premier LP volverá automáticamente al clip del brazo.
Visite ionaudio.com/computer-optimization para más información sobre la optimización de su
computadora para audio.
Reproducción
Puede escuchar la música en su computadora a través de su altavoz interno o de auriculares conectados a
la misma. (El Premier LP no se puede usar como dispositivo de reproducción para el audio de su
computadora.)
Para escuchar el disco mientras se reproduce, óigalo por altavoces Bluetooth, los altavoces de su
computadora o conecte las salidas RCA del Premier LP a un sistema estéreo o altavoces alimentados. No
las conecte a entradas de nivel fonográfico—las salidas RCA del Premier LP son de nivel de línea y podrían
dañar un dispositivo con entradas de nivel fonográfico.
14

Solución de problemas
Si experimenta alguna dificultad, consulte los pasos de solución de problemas que se indican a
continuación, como también el manual de EZ Vinyl/Tape Converter.
Si está grabando en una computadora:
o Asegúrese de que el Premier LP esté encendido y que la púa esté sobre el disco.
o Haga que el Premier LP esté seleccionado como dispositivo de grabación predeterminado de su computadora
(consulte las instrucciones de más abajo).
o Si está escuchando por los altavoces de la computadora, asegúrese de que estos estén seleccionados como
dispositivo de reproducción predeterminado de la misma (consulte las instrucciones de más abajo). Como
alternativa, Puede usar Bluetooth o las salidas RCA para conectar el Premier LP a un sistema estéreo o a
altavoces alimentados. No conecte las salidas RCA a entradas de nivel fonográfico—las salidas RCA del
Premier LP son de nivel de línea y podrían dañar un dispositivo con entradas de nivel fonográfico.
Nota: Las salidas RCA monitorean la señal proveniente del giradiscos y no la señal proveniente de su
computadora.
o Desconecte y vuelva a conectar el cable USB entre el Premier LP y la computadora.
No oigo ningún audio cuando reproduzco la música:
• Si está reproduciendo la música de un vinilo:
o Asegúrese de que el Premier LP esté encendido y que la púa esté sobre el disco.
o Use Bluetooth o las salidas RCA para conectar el Premier LP a un sistema estéreo o a altavoces
alimentados. No conecte las salidas RCA a entradas de nivel fonográfico—las salidas RCA del Premier
LP son de nivel de línea y podrían dañar un dispositivo con entradas de nivel fonográfico.
• Si está reproduciendo la música de la computadora:
o Asegúrese de que el volumen del reproductor de música del software esté ajustado a un valor alto.
o Asegúrese de que el volumen de su computadora esté ajustado a un valor alto.
o Asegúrese de que los altavoces de su computadora estén seleccionados como dispositivo de
reproducción predeterminado de la misma (consulte las instrucciones de más abajo). (El Premier LP no
Oigo un zumbido en mi altavoz o portátil cuando se usa el giradiscos:
• Si está grabando en una laptop:
• Si está reproduciendo por un altavoz:
Mi disco no se reproduce a la velocidad correcta. Su tono es demasiado alto o bajo:
• Asegúrese de que el interruptor 33 / 45 / 78 esté colocado en la velocidad correcta para su disco.
Mi altavoz Bluetooth no se aparea con el Premier LP.
• Apague o aleje a más de 10 metros otros altavoces Bluetooth cercanos de forma que el más cercano sea el
• Pulse y suelte el botón de Bluetooth del Premier LP para desconectarlo del altavoz Bluetooth, y luego púlselo
• Apague y vuelva a encender el Premier LP, y luego pulse su botón Bluetooth para intentar aparearlo
• Utilice la perilla de volumen del Premier LP para aumentar el nivel de salida de Bluetooth.
se puede usar como dispositivo de reproducción para el audio de su computadora.)
o Conecte la laptop a un suministro eléctrico con conexión a tierra (de 3 patas).
o Conecte el equipo a un suministro eléctrico con conexión a tierra (de 3 patas).
que desee aparear.
una vez más para intentar aparearlo nuevamente.
nuevamente.
15

Estoy conectado con un altavoz Bluetooth pero no escucho ningún audio.
• Si está conectado con un altavoz Bluetooth con un botón reproducir/pausa y no escucha el audio, intente
pulsar dicho botón.
Mi teléfono inteligente (smartphone) no se conecta con el giradiscos Premier LP.
• El giradiscos Premier LP funciona como un transmisor Bluetooth, transmitiendo el audio desde el Premier LP
hacia otros altavoces Bluetooth. El Premier LP no funciona como un receptor Bluetooth que reproduce música
desde su teléfono inteligente como si fuera unos auriculares o salidas RCA.
El LED Bluetooth no para de parpadear.
• Una vez pulsado el botón Bluetooth, el Premier LP intentará conectarse con los altavoces Bluetooth cercanos
durante 1 minuto. Para detener el parpadeo del LED Bluetooth, reinicie el Premier LP.
Escucho estática en mis auriculares.
• Pulse el botón Bluetooth del Premier LP para desconectarlo del altavoz Bluetooth apareado. Al escuchar el
Premier LP con auriculares, siempre asegúrese de que el Premier LP no esté conectado a un altavoz Bluetooth
al mismo tiempo.
Cómo configurar el Premier LP como dispositivo de grabación predeterminado
• Windows XP: Haga clic en el menú Start Control Panel (Inicio Panel de control (o Settings Control
Panel (Configuración Panel de control) en la vista clásica) Sound and Audio Devices (Dispositivos de
sonido y audio). Haga clic en la pestaña Audio y bajo Sound recording (Grabación de sonido), seleccione el
Dispositivo de audio USB PnP como dispositivo predeterminado.
• Windows Vista: Haga clic en el menú Start Control Panel (Inicio Panel de control) (o Settings Control
Panel (Configuración Panel de control) en la vista clásica) Hardware and Sound (Hardware y sonido)
Sound (Sonido). Haga clic en la pestaña Recording (Grabación) y seleccione el Dispositivo de audio USB
PnP como dispositivo predeterminado.
• Windows 7: Haga clic en el menú Start Control Panel Sound (Inicio Panel de control Sonido). Haga
clic en la pestaña Recording (Grabación) y seleccione el Dispositivo de audio USB PnP como dispositivo
predeterminado.
• Windows 8: Desde el menú Start (Inicio), haga clic en la esquina inferior izquierda de la pantalla para entrar al
escritorio. En la esquina inferior derecha de la barra de tareas, localice el icono del "Altavoz" de control de
volumen. Haga clic derecho en el altavoz y seleccione Playback Devices (Dispositivos de reproducción).
En el panel de control Windows Sound (Sonido de Windows), seleccione la pestaña Recording (Grabación). Si
Dispositivo de audio USB PnP no tiene el símbolo de la "marca de verificación" verde junto a él, haga clic
derecho en el mismo y seleccione Set as Default Device (Configurar como dispositivo predeterminado).
•
macOS: Haga clic en el icono superior izquierdo de la "manzana" y luego en System Preferences Sound
(Preferencias del sistema Sonido). Haga clic en la pestaña Input (Entrada). En el menú, seleccione el
Dispositivo de audio USB PnP como dispositivo.
16
 Loading...