


Tiki Sounds
Quickstart Guide English ( 3 – 6 )
Guía de inicio rápido Español ( 7 – 10 )
Guide d'utilisation rapide Français ( 11 – 14 )
Guida rapida Italiano ( 15 – 18 )
Schnellstart-Anleitung Deutsch ( 19 – 22 )
Snelstartgids Nederlands ( 23 – 26 )
Appendix English ( 27 )

2

Quickstart Guide (English)
Introduction
Thank you for purchasing Tiki Sounds. At ION, your entertainment is as important to us as it is
to you. That’s why we design our products with one thing in mind—to make your life more fun
and more convenient.
Box Contents
If an individual speaker is purchased:
(1) Tiki Sounds
(1) Pole Mount Assembly
• (3) Extension Tubes
• (1) Tube Cap
• (1) Ground Stake
(1) Lamp Base
(1) Handle
(1) Micro-USB Cable
Quickstart Guide
Safety & Warranty Manual
Note: Some items may already be assembled.
Support
For the latest information about this product (documentation, technical specifications, system
requirements, compatibility information, etc.) and product registration, visit ionaudio.com.
For additional product support, visit ionaudio.com/support.
Outdoor Use and Care
Certified to IPX4 standards, Tiki Sounds is water-resistant and protected against splashing
water in any direction, such as light rain or water spray. Please review the tips below to get the
best performance from Tiki Sounds:
• Bring Tiki Sounds indoors during extreme weather.
• Please do not place Tiki Sounds in standing water.
• Tiki Sounds must only be used outdoors with power outlets or extension cords that are
rated for outdoor use.
• Please do not connect Tiki Sounds to charge in a wet environment. Make sure the micro-
USB port, charging adapter, and power outlet are all completely dry before making any
connections.
• WARNING: Keep any non-water-resistant devices (phones, music players, etc.) in a dry
place where they will not be affected by water and cause a risk of electric shock.
If purchased as a pair:
(2) Tiki Sounds
(2) Pole Mount Assemblies
• (6) Extension Tubes
• (2) Tube Caps
• (2) Ground Stakes
(2) Lamp Bases
(2) Handles
(2) Micro-USB Cables
Quickstart Guide
Safety & Warranty Manual
3

Setup
1. Make sure all items listed in the Box Contents are included in the box. Items not listed are
sold separately.
2. Read the Safety & Warranty Manual before using the product.
3. Make sure the battery is completely charged prior to first use for maximum battery life.
Assembly
Tiki Sounds may be used mounted using the included post; freestanding using the included
base; or hanging using the included handle. Follow the instructions below for how you would
like to use Tiki Sounds.
Important: If using the solar panel to prolong battery life between charges, make sure to place
Tiki Sounds in an area that receives at least 3 hours of direct sunlight a day for best results.
For fastest charging, power off Tiki Sounds and connect to USB.
Pole Mounted
1. Drive the ground stake into the ground where you would like to install Tiki Sounds.
Important: If the ground where you would like to install Tiki Sounds is hard or tough, use a
shovel to loosen the soil prior to driving the ground stake.
2. Attach the three sections of the extension tube to the ground stake. The middle section is
tapered at both ends to connect to the other sections, and the top section includes a cap
used to secure Tiki Sounds and prevent water from entering the pole.
3. Place Tiki Sounds so that the hole at the bottom of the speaker is in line with the cap at
top of the pole mount. Gently push Tiki Sounds onto the pole mount until it is secure.
4. Before attempting to move Tiki Sounds, always remove the speaker from the pole mount
first. Hold the topmost section of the pole with one hand and gently pull Tiki Sounds up
until it is separated from the pole mount.
Freestanding
1. Place the lamp base on a flat, stable surface.
Note: If desired, a screw can be inserted into the center of the lamp base to secure the
speaker in place.
2. Place Tiki Sounds on the lamp base so that the hole at the bottom of the speaker is in line
with the post at the top of the base. Gently push Tiki Sounds onto the base until it is
secure.
3. To remove Tiki Sounds from the base, hold the base with one hand and gently pull Tiki
Sounds up until it is separated from the base.
Hanging
1. Attach the included handle to the holes located on the outer edge of each Tiki Sounds
speaker. Make sure the handle "snaps" into place to indicate it is properly secured before
attempting to hang Tiki Sounds.
2. To remove the handles, gently pull each side away from the speaker until it is separated.
4
Charging
If the LEDs appear dim, or if your music cuts out or fails to play, your battery may require
recharging. Tiki Sounds can be charged using the micro-USB port or the solar panel.
For fastest charging, power off Tiki Sounds and use the included micro-USB cable to connect
the speaker to (A) a USB power adapter (DC 5 V; sold separately) connected to a power
outlet, or (B) your computer (powered on).
Tiki Sounds' battery life can also be prolonged between charges using the solar panel. For
best results, place Tiki Sounds in an area that receives at least 3 hours of direct sunlight a day.
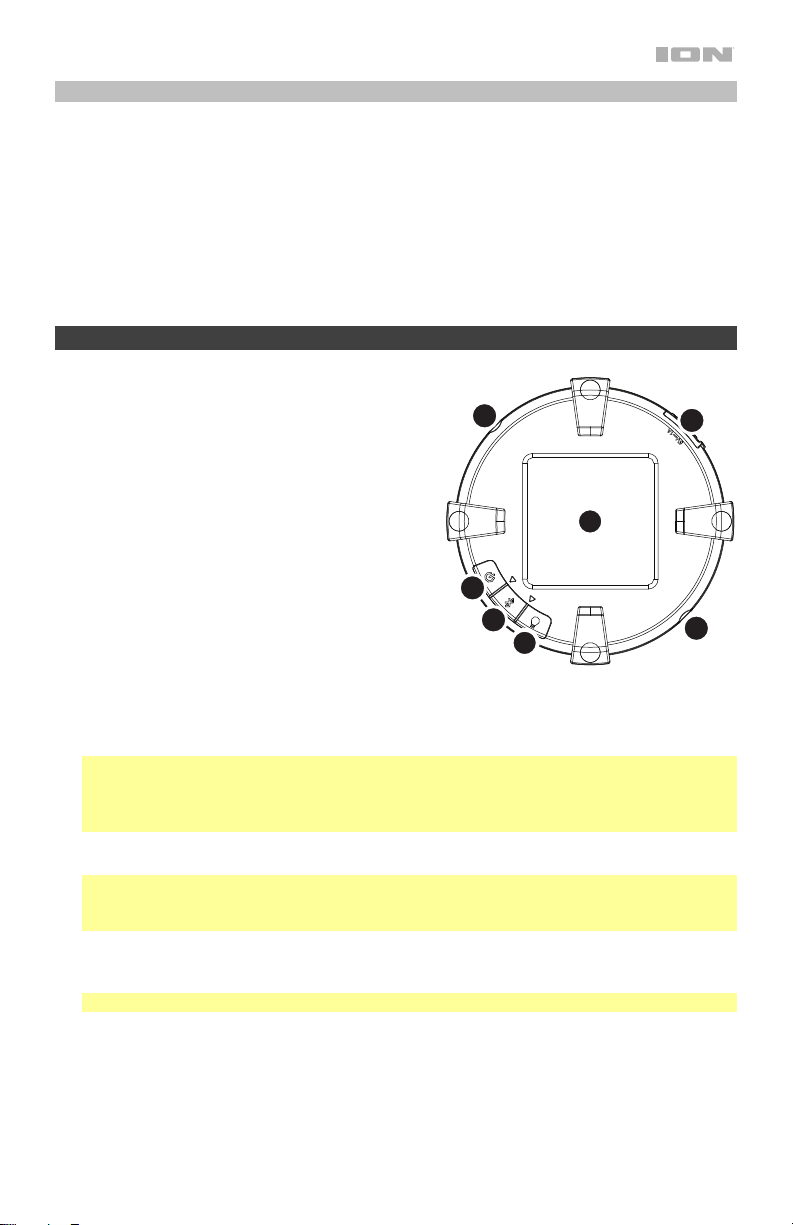
Features
1. Power Button: Press and hold this button to
power Tiki Sounds on and off.
2. Bluetooth/Link Button: Press this button to
disconnect a Bluetooth device and enter pairing
mode to connect to another Bluetooth device.
When available for pairing, the blue LED will
quickly flash; when connected, it will slowly
blink.
Press and hold this button for 2 seconds to
toggle between Bluetooth/Master mode and
Link Mode. When in Link mode, the yellow LED
will be solidly lit. See Connecting with Tiki
Sounds to learn more.
3. Light Mode Button: Press this button to adjust
the brightness setting for the LED lights: Bright,
Brighter, Brightest, Flicker (simulates a real
flame), and Off (default when Tiki Sounds is
powered on).
Note: When a speaker is in Link Mode, its Light Mode Button will not function. The
master speaker's Light Mode Button will control the brightness of any linked speakers
while audio is being transmitted. See Linking Additional Tiki Sounds to the Master
Speaker with Multi-Link™ to learn more.
4. Solar Panel: Place Tiki Sounds in sunlight to charge the battery using the solar panel.
Note: The rate of charging depends on the amount of sunlight the solar panel receives.
The unit will charge slower when receiving indirect sunlight. Place Tiki Sounds in direct
sunlight for best results.
5. Micro-USB Port: Use the included micro-USB cable to connect this port to a computer or
power adapter (DC 5 V; sold separately) to charge Tiki Sounds.
Note: For fastest charging, power off Tiki Sounds before connecting.
6. Handle Attachment: Connect the included handle here. To remove, pull apart gently.
6
4
1
2
3
5
6
5

Connecting with Tiki Sounds
Connecting to One Speaker / Establishing the Master Speaker
Before connecting to Tiki Sounds, make sure the “master” speaker is within range of your
Bluetooth device.
1. Power on Tiki Sounds by holding down the power button. You will hear “Power On” for
confirmation. *
2. Ensure the speaker is in Bluetooth/Master mode. A blue LED will indicate the speaker is in
Bluetooth/Master mode. If a yellow LED appears, the speaker is not in Bluetooth/Master
mode, it is in Link mode. You will need to hold the Bluetooth/Link button down for 2
seconds to exit Link mode.
Note: The speaker(s) power on in the last mode used prior to being powering down. If
powered on in Bluetooth/Master mode, the speaker will automatically connect to a
previously paired Bluetooth device.
3. When connecting to a Bluetooth device for the first time, navigate to your device’s
Bluetooth setup screen, find Tiki Sounds, and connect. The Bluetooth LED will be solidly
lit blue when it is connected and you will hear “Paired” for confirmation. *
Note: If you experience trouble in connecting, select “Forget this Device” on your
Bluetooth device and try to connect again.
4. Start playback from your Bluetooth device.
To disconnect from a paired Bluetooth device, press the Bluetooth/Link button on the
master speaker. The Bluetooth LED will blink blue, and you will hear “Ready to Pair” to
indicate that the previous pairing was disconnected and the speaker is "ready to pair" to
another Bluetooth device. *
* Tip: If you would like to disable (or enable) the voice prompts, press and hold the Light
Mode button for 2 seconds.
Linking Additional Tiki Sounds to the Master Speaker with Multi-Link™
After establishing the “master” speaker by connecting via Bluetooth as described above, you
can link an unlimited number of speakers to the master speaker to play the same music.
1. Power on the additional speaker(s) you would like to link to the master speaker.
2. Ensure the speaker(s) is in Link mode, which will be indicated by the yellow LED. If a blue
LED is seen, press and hold the Bluetooth/Link button to enter Link Mode.
3. Once in Link Mode, the speaker will automatically link to the master speaker and play the
same audio.
When a speaker is in Link Mode, its Light Mode Button will not function. The master
speaker's Light Mode Button will control the brightness of any linked speakers while audio is
being transmitted.
Tip: If all speakers are not at the same brightness level when linked, cycle through the
brightness settings once on the master speaker by pressing the Light Mode Button 5 times
while audio is being transmitted. This will sync the brightness levels on all speakers.
Linked speakers may be powered off at any time without interrupting playback from the
Master speaker. Powering off the Master speaker will disrupt audio on any linked speaker(s).
Note: If you have multiple speakers, it is possible to use each speaker independently if each is
in Bluetooth/Master Mode.
6

Guía de inicio rápido (Español)
Introducción
Gracias por comprar el Tiki Sounds. En ION, su entretenimiento es tan importante para
nosotros como para usted. Por eso es que diseñamos nuestros productos con una sola cosa
en mente—hacer que su vida sea más divertida y cómoda.
Contenido de la caja
Si adquirió un altavoz individual:
(1) Tiki Sounds
(1) Conjunto de montaje en soporte
• (3) Tubos de prolongación
• (1) Tapa del tubo
• (1) Estaca para jardín
(1) Base de la lámpara
(1) Manija
(1) Cable Micro USB
Guía de inicio rápido
Manual sobre la seguridad y garantía
Nota: Es posible que algunos elementos ya vengan ensamblados.
Soporte
Para obtener la información más reciente acerca de este producto (documentación,
especificaciones técnicas, requisitos de sistema, información de compatibilidad, etc.) y
registrarlo, visite ionaudio.com.
Para obtener soporte adicional del producto, visite ionaudio.com/support.
Uso y cuidado a la intemperie
El Tiki Sounds cumple con la norma IPX4, es resistente al agua y está protegido contra
salpicaduras de agua desde cualquier dirección, como por ejemplo lluvia leve o agua rociada.
Lea las sugerencias que se incluyen a continuación para obtener el mejor rendimiento del Tiki
Sounds:
• Traiga a los Tiki Sounds bajo techo durante condiciones meteorológicas extremas.
• No coloque el Tiki Sounds sobre agua estancada.
• El Tiki Sounds sólo puede usarse en exteriores con tomas de corriente o cables de
prolongación aptos para el uso en exteriores.
• No cargue el Tiki Sounds en ambientes húmedos. Asegúrese de que el puerto micro USB,
el adaptador de carga y la toma de corriente estén completamente secos antes de realizar
cualquier conexión.
• ADVERTENCIA: Coloque los dispositivos no resistentes al agua (teléfonos, reproductores
de música, etc.) en un lugar seco donde no sean afectados por el agua y causen un riesgo
de electrocución.
Si adquirió un par de altavoces:
(2) Tiki Sounds
(2) Conjuntos de montaje en soporte
• (6) Tubos de prolongación
• (2) Tapas del tubo
• (2) Estacas para jardín
(2) Bases de la lámpara
(2) Manijas
(2) Cables Micro USB
Guía de inicio rápido
Manual sobre la seguridad y garantía
7

Instalación
1. Asegúrese de que estén presentes todos los elementos enumerados en Contenido de la
caja estén incluidos en la caja. Los elementos que no se enumeran se venden por
separado.
2. Lea el manual sobre la seguridad y garantía antes de utilizar el producto.
3. Para asegurar una máxima vida útil de la batería, cárguela completamente antes de usarla
por primera vez.
Ensamblaje
El Tiki Sounds puede utilizarse montado en el soporte incluido; de pie utilizando la base
incluida o colgado desde la manija incluida. Siga las instrucciones a continuación según como
quiera utilizar el Tiki Sounds.
Importante: Si utiliza el panel solar para prolongar la vida útil de la batería entre cargas,
asegúrese de colocar los Tiki Sounds en un área que reciba al menos 3 horas de luz solar
directa para un mejor resultado. Para lograr una carga más rápida, apague el Tiki Sounds y
conéctelo mediante USB.
Instalación en soporte de montaje
1. Clave la estaca para jardín en la tierra en donde desea instalar el Tiki Sounds.
Importante: Si la tierra en donde desea instalar el Tiki Sounds es dura, utilice una pala
para aflojarla antes de clavar la estaca para jardín.
2. Conecte las tres secciones del tubo de prolongación a la estaca para jardín. La sección
del medio tiene forma de cono en ambos extremos para poder conectarse a las otras
secciones, y la sección superior incluye una tapa para sujetar el Tiki Sounds y evitar el
ingreso de agua en el tubo.
3. Coloque el Tiki Sounds de manera que el orificio en la parte inferior del altavoz esté
alineado con la tapa en la parte superior del soporte de montaje. Empuje delicadamente el
Tiki Sounds sobre el soporte de montaje hasta que quede firme.
4. Antes de intentar mover el Tiki Sounds, siempre desmonte primero el altavoz del soporte.
Sostenga la sección superior del soporte con una mano y tire con delicadeza del Tiki
Sounds hacia arriba hasta que se desprenda del soporte.
Instalación de pie
1. Coloque la base de la lámpara sobre una superficie plana y estable.
Nota: Si se desea puede introducirse un tornillo en el centro de la base de la lámpara para
sujetar el altavoz en el lugar.
2. Coloque el Tiki Sounds sobre la base de la lámpara de manera que el orificio en la parte
inferior del altavoz esté alineado con el soporte en la parte superior de la base. Empuje
delicadamente el Tiki Sounds sobre la base hasta que quede firme.
3. Para retirar el Tiki Sounds de la base, sosténgala con una mano y tire con delicadeza del
Tiki Sounds hacia arriba hasta que se desprenda de la base.
Instalación colgante
1. Sujete la manija incluida en los orificios localizados en el borde externo de cada altavoz
Tiki Sounds. Asegúrese de que la manija se encaje "a presión" en su lugar para indicar
que está firmemente asegurada antes de intentar colgar el Tiki Sounds.
2. Para retirar las manijas, tire con delicadeza de cada lado hacia fuera del altavoz hasta que
quede separado.
8

Carga
Si los LED se atenúan, o si la música se corta o no se reproduce, significa que es posible que
deba recargarse la batería. El Tiki Sounds se puede cargar utilizando el puerto micro USB o
el panel solar.
Para lograr una carga más rápida, apague el Tiki Sounds y utilice el cable micro USB incluido
para conectar el altavoz a (A) un adaptador de corriente USB (5 V de CC; se vende por
separado) conectado a una toma de corriente, o a (B) su ordenador (encendido).
La duración de la batería del Tiki Sounds también se puede prolongar entre cargas utilizando
el panel solar. Para obtener mejores resultados, coloque el Tiki Sounds en un lugar que reciba
al menos 3 horas de luz solar directa por día.
Características
1. Botón de encendido: Mantenga pulsado este
botón para encender y apagar el Tiki Sounds.
2. Botón Bluetooth/Enlace: Pulse este botón
para desconectar un dispositivo Bluetooth
apareado e ingresar al modo de apareamiento
para conectar otro dispositivo Bluetooth. Una
vez que esté disponible para el apareamiento,
el LED azul parpadeará; una vez conectado,
parpadeará lentamente.
Mantenga pulsado este botón durante 2
segundos para alternar entre el modo
Bluetooth/Maestro y el modo de enlace. Una
vez que esté en modo de enlace, el LED
amarillo permanecerá encendido. Consulte
Cómo conectarse con el Tiki Sounds para
aprender más.
3. Botón de modo de luz: Pulse este botón para configurar los ajustes de brillo de las luces
LED: Normal, Más brillante, Muy brillante, Intermitente (simula una llama real) y
apagado (el valor predeterminado cuando el Tiki Sounds está encendido).
Nota: Cuando un altavoz está en modo de enlace, su botón Light Mode (modo de luz) no
funcionará. El botón Light Mode controlará el brillo de cualquier altavoz enlazado
mientras se esté transmitiendo audio. Consulte Enlace de Tiki Sounds adicionales al
altavoz maestro con Multi-Link™ para aprender más.
4. Panel solar: Coloque el Tiki Sounds al sol para cargar su batería a través del panel solar.
Nota: La velocidad de carga depende de la cantidad de luz que recibe el panel solar. La
unidad se carga más lentamente si recibe luz solar indirecta. Coloque el Tiki Sounds bajo
luz solar directa para obtener mejores resultados.
5. Puerto micro USB: Utilice el cable micro USB incluido para conectar este puerto a un
ordenador o adaptador de corriente (5 V de CC; se vende por separado) para cargar el Tiki
Sounds.
Nota: Para lograr una carga más rápida, apague el Tiki Sounds antes de conectarlo.
6. Colocación de la manija: Conecte la manija incluida aquí. Para retirarla, sepárela con
delicadeza.
6
5
4
1
2
3
6
9

Cómo conectarse con el Tiki Sounds
Conexión con un altavoz / Selección del altavoz maestro
Antes de conectarse con el Tiki Sounds, asegúrese de que el altavoz "maestro" se encuentra dentro
del alcance de su dispositivo Bluetooth.
1. Encienda el Tiki Sounds manteniendo pulsado el botón de encendido. Escuchará “Power On”
(Unidad encendida) como confirmación. *
2. Asegúrese de que el altavoz esté en modo Bluetooth/maestro. Un LED azul indicará que el
altavoz se encuentra en modo Bluetooth/maestro. Si se enciende un LED verde, el altavoz no se
encuentra en modo Bluetooth/maestro, sino en modo de enlace. Deberá mantener pulsado el
botón de Bluetooth/Link durante 2 segundos para salir del modo de enlace.
Nota: El/Los altavoz(es) se encienden en el último estado en el que se encontraba(n) la última
vez que se apagó(aron). Si se enciende en modo Bluetooth/Maestro, el altavoz se conectará
automáticamente a un dispositivo Bluetooth previamente apareado.
3. Al conectar un dispositivo Bluetooth por primera vez, navegue hasta la pantalla de configuración
de Bluetooth de su dispositivo, busque Tiki Sounds y realice la conexión. El LED Bluetooth
quedará permanentemente encendido una vez conectado y escuchará “Paired” (Apareado)
como confirmación. *
Nota: Si tiene problemas para conectarse, seleccione "Forget this Device" (Olvidar este
dispositivo) en su dispositivo Bluetooth e intente conectarse nuevamente.
4. Comience la reproducción desde su dispositivo Bluetooth.
Para desconectarlo de un dispositivo Bluetooth, pulse el botón Bluetooth/Link del altavoz
maestro. El LED Bluetooth parpadeará de color azul y escuchará “Ready to Pair” (Listo para
aparearse) lo cual indicará que el apareamiento anterior ha quedado desconectado y que el altavoz
está "listo para aparearse" con otro dispositivo Bluetooth. *
* Consejo: Si desea desactivar (o activar) los avisos de voz, mantenga pulsado el botón Light Mode
durante 2 segundos.
Enlace de Tiki Sounds adicionales al altavoz maestro con Multi-Link™
Una vez establecido el altavoz "maestro" conectándose vía Bluetooth como se describió
anteriormente, puede enlazar una cantidad ilimitada de altavoces al altavoz maestro y reproducir la
misma música.
1. Encienda el/los altavoz(es) adicional(es) que desearía enlazar con el altavoz maestro.
2. Asegúrese de que el/los altavoz(es) esté(n) en modo de enlace, lo cual será indicado por el LED
amarillo. Si se enciende un LED azul, mantenga pulsado el botón Bluetooth/Link para entrar al
modo de enlace.
3. Una vez en modo de enlace, el altavoz se enlazará de forma automática al altavoz maestro y
reproducirá el mismo audio.
Cuando un altavoz está en modo de enlace, su botón Light Mode (modo de luz) no funcionará. El
botón Light Mode controlará el brillo de cualquier altavoz enlazado mientras se esté transmitiendo
audio.
Consejo: Si no todos los altavoces tienen el mismo nivel de brillo cuando están enlazados, reinicie
los ajustes de brillo una vez en el altavoz maestro pulsando el botón Light Mode 5 veces mientras
se esté transmitiendo audio. Esto sincronizará los niveles de brillo en todos los altavoces.
Los altavoces enlazados pueden apagarse en cualquier momento sin interrumpir la reproducción
desde el altavoz maestro. Al apagar el altavoz maestro se interrumpirá el audio en todos los
altavoces enlazados.
Nota: Si tiene múltiples altavoces, es posible usar cada altavoz de forma independiente si se
encuentran en modo Bluetooth/Maestro.
10

Guide d'utilisation rapide (Français)
Présentation
Merci d’avoir fait l’acquisition de l'enceinte Tiki Sounds. Chez ION, votre divertissement est
aussi important pour nous qu’il l’est pour vous. C’est pourquoi nous concevons nos produits
avec une seule chose en tête — rendre la vie plus amusante et plus pratique.
Contenu de la boîte
Ensemble d’une enceinte :
1 Tiki Sounds
1 ensemble pour montage sur tige
• 3 tubes de rallonge
• 1 bouchon pour tube
• 1 piquet
1 base
1 poignée en boucle
1 câble de rechargement micro-USB
Guide d'utilisation rapide
Consignes de sécurité et informations
concernant la garantie
Remarque : Certains articles peuvent être pré-assemblés.
Assistance
Pour les toutes dernières informations concernant la documentation, les spécifications
techniques, la configuration requise, la compatibilité et l’enregistrement du produit, veuillez
visiter ionaudio.com.
Pour de l’assistance supplémentaire, veuillez visiter ionaudio.com/support.
Utilisation extérieure et entretien
Certifiée IPX4, l’enceinte Tiki Sounds résiste aux éclaboussures provenant de toutes
directions, comme les projections d'eau et la pluie fine. Veuillez lire les conseils ci-dessous
afin d’obtenir la meilleure performance de la Tiki Sounds :
• L'enceinte Tiki Sounds doit être rentrée à l'intérieur lors de conditions météorologiques
extrêmes.
• Veuillez ne pas placer le Tiki Sounds dans l'eau stagnante.
• L'enceinte Tiki Sounds doit être utilisée à l'extérieur uniquement avec une prise secteur ou
un câble prolongateur qui sont conçus pour une utilisation extérieure.
• Veuillez ne pas utiliser le câble de rechargement micro-USB lorsque la Tiki Sounds se
trouve dans un environnement humide. Veuillez vous assurer que le port micro-USB, le
câble de rechargement micro-USB et la prise secteur soient tous complètement secs
avant d’effectuer tout raccordement.
• MISE EN GARDE : Gardez tout appareil non étanche (téléphones, lecteurs, etc.) dans un
endroit sec à l'abri des éclaboussures et des risques de décharges électriques.
Ensemble de deux enceintes :
2 Tiki Sounds
2 ensembles pour montage sur tige
• 6 tubes de rallonge
• 2 bouchons pour tube
• 2 piquets
2 bases
2 poignées en boucle
2 câbles de rechargement micro-USB
Guide d'utilisation rapide
Consignes de sécurité et informations
concernant la garantie
11

Démarrage
1. Assurez-vous que tous les articles énumérés dans la section Contenu de la boîte de ce guide
sont inclus dans la boîte. Les éléments qui ne figurent pas sont vendus séparément.
2. Veuillez lire le livret des Consignes de sécurité avant d'utiliser le produit.
3. Assurez-vous d'avoir complètement chargé la pile avant la première utilisation afin d'augmenter
sa durée de vie.
Montage
L’enceinte Tiki Sounds peut être utilisée sur tige, sur table en installant la base, ou en suspension en
utilisant la poignée en boucle. Veuillez suivre les instructions ci-dessous selon le mode d’utilisation
désiré.
Important : Si vous désirez utiliser le panneau solaire afin de prolonger l’autonomie de la batterie
entre les charges, veuillez placer l’enceinte Tiki Sounds dans un endroit qui est exposé à la lumière
directe du soleil pendant au moins 3 heures par jour. Pour un rechargement plus rapide, mettez la
Tiki Sounds hors tension et utilisez le câble de rechargement micro-USB.
Montage sur la tige
1. Enfoncez le piquet dans le sol où vous souhaitez installer la Tiki Sounds.
Important : Si le sol dans lequel vous souhaitez installer la Tiki Sounds est dur et compact,
utilisez une pelle pour ameublir le sol avant d’enfoncer le piquet.
2. Fixez les trois tubes de rallonge au piquet. Le tube central est fuselé aux deux extrémités afin
de se raccorder aux deux autres sections, et la section supérieure dispose d’un bouchon qui
permet de bien fixer la Tiki Sounds et d’empêcher l'eau de s’infiltrer dans la tige.
3. Placez la Tiki Sounds de façon à ce que le trou au bas de l'enceinte soit aligné avec le bouchon
au sommet de la tige. Poussez doucement la Tiki Sounds sur la tige jusqu'à ce qu'elle soit bien
fixée.
4. Avant d'essayer de déplacer la Tiki Sounds, veillez à toujours retirez l’enceinte de la tige d’abord.
Tenez d'une main la partie supérieure de la tige et tirez doucement sur la Tiki Sounds jusqu'à ce
qu'elle se dégage de la tige.
Montage sur la base
1. Placez la base sur une surface plane et stable.
Remarque : Il est possible d’utiliser une vis au centre de la base afin de fixer l’enceinte en place.
2. Placez la Tiki Sounds sur la base de façon à ce que le trou au bas de l'enceinte soit aligné avec
la tige au sommet de la base. Poussez doucement la Tiki Sounds sur la base jusqu'à ce qu'elle
soit bien fixée.
3. Pour retirer la Tiki Sounds de la base, tenez d'une main la base et tirez doucement sur l’enceinte
jusqu'à ce qu'elle se dégage de la base.
En suspension
1. Fixez la poignée en boucle fournie aux trous situés sur le rebord extérieur de chaque enceinte
Tiki Sounds. Veillez à ce que la poignée clique en place afin qu'elle soit correctement fixée avant
d'essayer de suspendre la Tiki Sounds.
2. Pour retirer la poignée, tirez doucement de chaque côté jusqu'à ce qu'elle se dégage de
l’enceinte.
12

Rechargement
Si les DEL apparaissent faibles, ou si la musique coupe ou ne joue pas, il peut être nécessaire de
recharger la batterie. La Tiki Sounds peut être rechargée en utilisant le port micro-USB ou le
panneau solaire.
Pour un rechargement plus rapide, mettez la Tiki Sounds hors tension et utilisez le câble de
rechargement micro-USB fourni afin de brancher l’enceinte à (A) un adaptateur d’alimentation USB
(CC 5 V ; vendu séparément) branché à une prise secteur, ou (B) un ordinateur sous tension.
Il est possible de prolonger l’autonomie de la batterie entre les charges en utilisant le panneau
solaire de la Tiki Sounds. Pour de meilleurs résultats, placez l’enceinte Tiki Sounds dans un endroit
qui est exposé à la lumière directe du soleil pendant au moins 3 heures par jour.
Caractéristiques
1. Touche d'alimentation : Maintenir cette touche
enfoncée permet de mettre la Tiki Sounds sous et
hors tension.
2. Touche Bluetooth/Link : Appuyer sur cette
touche permet de déjumeler un appareil Bluetooth
afin de relancer le mode de jumelage pour
connecter un autre appareil Bluetooth. Lorsque
l’enceinte est prête à être jumelée, la DEL bleue
clignote rapidement ; lorsqu’elle est connectée, la
DEL bleue clignote lentement.
Maintenir cette touche enfoncée pendant 2
secondes permet de basculer entre le mode
Bluetooth/Maître et le mode raccordement en
série. En mode raccordement en série, la DEL
jaune s’allume. Veuillez consulter la section
Connexion à la Tiki Sounds afin d’en savoir plus.
3. Touche mode d'éclairage : Cette touche permet de régler les paramètres d’intensité des
lumières DEL : Intensité faible, intensité moyenne, intensité élevée, scintillement (simule une
flamme) et éteint (par défaut à la mise sous tension de la Tiki Sounds).
Remarque : Lorsqu’une enceinte est en mode de raccordement en série, sa touche mode
d’éclairage ne fonctionne pas. La touche mode d’éclairage de l’enceinte maître contrôle la
luminosité de toutes les enceintes raccordées lorsqu’un signal audio est diffusé. Veuillez
consulter la section Raccordement en série d’enceintes Tiki Sounds supplémentaires avec
Multi-Link™ afin d’en savoir plus.
4. Panneau solaire : Ce panneau permet de placer l’enceinte Tiki Sounds au soleil afin de
recharger la batterie.
Remarque : Le temps de rechargement dépend du taux d’ensoleillement reçu par le panneau
solaire. Le temps de rechargement est plus long lorsque l’appareil est exposé à un
ensoleillement indirect. Placez la Tiki Sounds en plein soleil pour de meilleurs résultats.
5. Port micro-USB : Ce port permet de brancher le câble de rechargement micro-USB fourni à un
ordinateur ou à un adaptateur d’alimentation USB (CC 5 V ; vendu séparément) afin de recharger
la Tiki Sounds.
Remarque : Pour un rechargement plus rapide, mettez la Tiki Sounds hors tension avant de
raccorder le câble de rechargement.
6. Trous de fixation : Ces trous permettent de fixer la poignée en boucle. Pour retirer la poignée,
tirez doucement de chaque côté afin de la dégager.
6
5
4
1
2
3
6
13

Connexion à la Tiki Sounds
Jumelage à une enceinte/définition de l'enceinte maître
Avant de jumeler votre appareil à la Tiki Sounds, assurez-vous que l’enceinte « maître » se trouve
dans les limites de portée de votre appareil Bluetooth.
1. Mettez la Tiki Sounds sous tension en maintenant la touche d'alimentation enfoncée. Vous
entendrez le message de confirmation vocal « Power On ». *
2. Assurez-vous que l’enceinte soit en mode Bluetooth/Maître. Une DEL bleue indique que
l’enceinte est en mode Bluetooth/Maître. Si la DEL est jaune, l’enceinte n'est pas en mode
Bluetooth/Maître, elle est en mode raccordement en série. Vous devez appuyer sur la touche
Bluetooth/Link pendant 2 secondes afin de quitter le mode raccordement en série.
Remarque : Lors de la mise sous tension de l'enceinte, le mode sélectionné lors de la dernière
mise hors tension est automatiquement restauré. L’enceinte se jumelle automatiquement à un
appareil Bluetooth ayant été précédemment jumelé lors de sa mise sous tension en mode
Bluetooth/Maître.
3. Pour jumeler un appareil Bluetooth pour la première fois, accédez à l'écran de configuration de
votre appareil Bluetooth, recherchez Tiki Sounds et appuyez sur Connecter. La DEL Bluetooth
s’allumera lorsque la connexion est établie et vous entendrez le message de confirmation vocal
« Paired ». *
Remarque : Si la connexion ne peut être établie, sélectionnez « Oublier cet appareil » sur votre
appareil Bluetooth et lancer à nouveau le jumelage.
4. Lancez la lecture de votre appareil Bluetooth.
Pour déjumeler un appareil Bluetooth, appuyez sur la touche Bluetooth/Link sur l’enceinte
« maître ». La DEL Bluetooth bleue clignotera et vous entendrez le message de confirmation vocal
« Ready to Pair » afin d’indiquer que le jumelage précédent a été supprimé et que l'enceinte est
prête à être jumeler à un autre appareil Bluetooth. *
*Astuce : Pour désactiver (ou activer) les messages vocaux, maintenez la touche mode d’éclairage
enfoncée pendant 2 secondes.
Raccordement en série d'enceintes Tiki Sounds supplémentaires avec Multi-Link™
Après avoir défini l’enceinte « maître » par connexion Bluetooth comme décrit ci-dessus, il est
possible de relier un nombre illimité d’enceintes à l’enceinte « maître » afin qu’elles jouent toutes la
même musique.
1. Mettez les enceintes supplémentaires que vous souhaitez relier à l’enceinte « maître » sous
tension.
2. Assurez-vous que les enceintes soient en mode raccordement en série, indiqué par une DEL
jaune. Si la DEL est bleue, maintenez la touche Bluetooth/Link enfoncée afin d’activer le
raccordement en série.
3. Une fois l’enceinte en mode raccordement en série, elle se connectera automatiquement à
l’enceinte « maître » et jouera la même musique.
Lorsqu’une enceinte est en mode de raccordement en série, sa touche mode d’éclairage ne
fonctionne pas. La touche mode d’éclairage de l’enceinte maître contrôle la luminosité de toutes
les enceintes raccordées lorsqu’un signal audio est diffusé.
Astuce : Si toutes les enceintes raccordées ne sont pas au même niveau de luminosité, parcourez
les réglages de luminosité en appuyant sur la touche mode d’éclairage de l’enceinte maître 5 fois
lorsqu’un signal audio est diffusé. Ceci permettra de synchroniser les niveaux de luminosité sur
toutes les enceintes.
Les enceintes raccordées en série peuvent être mises hors tension à tout moment sans interrompre
la diffusion de l’enceinte « maître ». Éteindre l’enceinte « maître » interrompt la diffusion de toutes les
enceintes raccordées.
Remarque : Si vous disposez de plusieurs enceintes, il est possible d’utiliser chacune des enceintes
individuellement lorsqu’elles sont en mode Bluetooth/Maître.
14

Guida rapida (Italiano)
Introduzione
Grazie per aver acquistato il Tiki Sounds. Per noi di ION, il tuo divertimento è importante
quanto lo è per te. Ecco perché progettiamo i nostri dispositivi con un unico obiettivo in
mente: rendere la tua vita più comoda e divertente.
Contenuti della confezione
Se viene acquistato un altoparlante singolo:
(1) Tiki Sounds
(1) Dispositivo di montaggio ad asta
• (3) Tubi di prolunga
• (1) Coperchio per tubo
• (1) Fissaggio a terra
(1) Base della lampada
(1) Maniglia
(1) Cavo Micro USB
Guida rapida
Istruzioni di sicurezza e garanzia
Nota bene: alcuni articoli possono essere già montati.
Assistenza
Per le ultime informazioni in merito a questo prodotto (documentazione, specifiche tecniche,
requisiti di sistema, informazioni sulla compatibilità, ecc.) e per effettuarne la registrazione,
recarsi alla pagina ionaudio.com.
Per ulteriore assistenza sul prodotto, recarsi alla pagina ionaudio.com/support.
Utilizzo all'aperto e cura
Certificato secondo gli standard IPX4, il Tiki Sounds è impermeabile e protetto contro gli
schizzi d’acqua in qualsiasi direzione, come una pioggia leggera o uno spruzzo d’acqua. Si
vedano i consigli seguenti per trarre le migliori prestazioni dal Tiki Sounds:
• Portare il Tiki Sounds all'interno in caso di maltempo.
• Non collocare il Tiki Sounds in acqua.
• Il Tiki Sounds deve essere utilizzato unicamente all'aperto, con prese di alimentazione o
prolunghe dalla tensione nominale specifica per un utilizzo all'aperto.
• Non collegare il Tiki Sounds in carica in un ambiente bagnato. Assicurarsi che la porta
micro USB, l'adattatore di carica e la presa di alimentazione siano completamente asciutti
prima di effettuare qualsiasi collegamento.
• Avvertenza: mantenere qualsiasi dispositivo non impermeabile (telefono, lettore musicale,
ecc.) in un luogo asciutto dove non sia interessato dall’acqua rischiando di causare scosse
elettriche.
Se acqistato in coppia:
(2) Tiki Sounds
(2) Dispositivi di montaggio ad asta
• (6) Tubi di prolunga
• (2) Coperchi per tubo
• (2) Fissaggi a terra
(2) Basi della lampada
(2) Maniglie
(2) Cavi Micro USB
Guida rapida
Istruzioni di sicurezza e garanzia
15

Configurazione
1. Assicurarsi che tutti gli elementi elencati in Contenuti della confezione siano presenti.
Elementi non elencati sono venduti separatamente.
2. Leggere attentamente il Istruzioni di sicurezza e garanzia del prodotto prima di utilizzarlo.
3. Assicurarsi di aver caricato al massimo la batteria prima del primo utilizzo per garantire la
massima durata della batteria stessa.
Montaggio
Il Tiki Sounds può essere utilizzato montato con l’asta in dotazione, posizionato in maniera
indipendente utilizzando la base in dotazione o appeso utilizzando la maniglia in dotazione.
Procedere come indicato nelle seguenti istruzioni per utilizzare il Tiki Sounds come preferito.
Importante: se si desidera utilizzare il pannello solare per prolungare la durata della batteria
tra una carica e l'altra, collocare il Tiki Sounds in una zona che riceva almeno 3 ore di luce
diretta del sole per ottenere i migliori risultati. Per una ricarica più rapida, spegnere il Tiki
Sounds e collegarlo all’USB.
Installazione su asta
1. Infilare il fissaggio a terra nel punto in cui si desidera installare il Tiki Sounds.
Importante: se il terreno in cui si desidera installare il Tiki Sounds è duro o difficile, servirsi
di una pala per ammorbidire il terreno prima di infilare il paletto.
2. Fissare le tre sezioni del tubo di prolunga al paletto di fissaggio a terra. La sezione
centrale è rastremata a entrambe le estremità per collegarsi alle altre sezioni, e quella
superiore comprende un coperchio che serve a fissare il Tiki Sounds e a impedire
all’acqua di entrare nell’asta.
3. Posizionare il Tiki Sounds in modo tale che il foro presente a livello della parte inferiore
dell’altoparlante sia allineato con il coperchio sulla parte superiore dell’asta di fissaggio.
Spingere delicatamente il Tiki Sounds sull’asta fino a fissarlo in maniera sicura.
4. Prima di cercare di muovere il Tiki Sounds, rimuovere sempre per prima cosa l’altoparlante
dall’asta. Reggere la parte superiore dell’asta con una mano e tirare delicatamente il Tiki
Sounds verso l’alto fino a staccarlo dall’asta stessa.
Indipendente
1. Collocare la base della lampada su una superficie uniforme e stabile.
Nota bene: se desiderato, è possibile inserire una vite al centro della base della lampada
per fissare l’altoparlante in posizione.
2. Collocare il Tiki Sounds sulla base della lampada, in modo tale che il foro sulla parte
inferiore dell’altoparlante sia allineato con l’asta sulla parte superiore della base stessa.
Premere delicatamente il Tiki Sounds sulla base fino a infilarlo saldamente.
3. Per rimuovere il Tiki Sounds dalla base, reggere la base con una mano e sollevare
delicatamente il Tiki Sounds fino a separarlo dalla base.
Appendere il prodotto
1. Fissare la maniglia in dotazione ai fori situati sul bordo esterno di ciascun altoparlante Tiki
Sounds. Assicurarsi che la maniglia "scatti" in posizione indicando che è fissata
adeguatamente prima di tentare di appendere il Tiki Sounds.
2. Per rimuovere le maniglie, tirare delicatamente ciascun lato allontanandolo dall’altoparlante
fino a separarlo.
16

Ricarica
Se i LED appaiono offuscati o la musica salta o non suona, la batteria deve essere ricaricata. Il
Tiki Sounds può essere caricato tramite la porta micro USB o il pannello solare.
Per una ricarica più rapida, spegnere il Tiki Sounds e utilizzare il cavo micro USB per collegare
l’altoparlante a (A) un adattatore di alimentazione USB (CC 5 V; venduto separatamente)
collegato a una presa di alimentazione, oppure (B) al computer (acceso).
La durata della batteria del Tiki Sounds può inoltre essere prolungata tra una carica e l’altra
utilizzando il pannello solare. Per ottenere i migliori risultati, collocare il Tiki Sounds in una
zona che riceva almeno 3 ore di luce diretta del sole al giorno.
Caratteristiche
1. Tasto di alimentazione: tenere premuto
questo tasto per accendere e spegnere il Tiki
Sounds.
2. Tasto Bluetooth/Link: Premere questo tasto
per scollegare un dispositivo Bluetooth ed
entrare in modalità di collegamento per
collegare un altro dispositivo Bluetooth.
Quando l’apparecchio è disponibile per il
collegamento, il LED blu lampeggia
rapidamente; una volta collegato lampeggerà
lentamente.
Tenere premuto questo tasto per 2 secondi per
commutare tra le modalità Bluetooth/Master e
la modalità di collegamento Link. Quando ci si
trova in modalità di collegamento Link, il LED
giallo sarà acceso in maniera fissa. Per saperne
di più, si veda Collegamento con il Tiki
Sounds.
3. Tasto modalità luce: premere questo tasto per configurare la luminosità delle luci LED.
Bright, Brighter, Brightest, Flicker (simula una vera fiamma) e Off (predefinito, quando il
Tiki Sounds viene acceso).
Nota bene: quando un altoparlante è in modalità Link Mode, il tasto Light Mode non
funzionerà. Il tasto Light Mode sull’altoparlante master controlla la luminosità di tutti gli
altoparlanti collegati durante la trasmissione dell’audio. Si veda Collegamento di Tiki
Sounds aggiuntivi all’altoparlante Master tramite Multi-Link™ per saperne di più.
4. Pannello solare: collocare il Tiki Sounds alla luce del sole per caricare la batteria
utilizzando il pannello solare.
Nota bene: la percentuale di carica dipende dalla quantità di luce solare ricevuta dal
pannello solare. Quando riceve luce solare indiretta, l’apparecchio si carica più
lentamente. Per ottenere i migliori risultati, collocare il Tiki Sounds alla luce diretta del sole.
5. Porta micro USB: servirsi del cavo micro USB in dotazione per collegare questa porta a
un computer o a un adattatore di alimentazione (CC 5 V; venduto separatamente) per
caricare il Tiki Sounds.
Nota bene: per una ricarica più rapida, spegnere il Tiki Sounds prima di collegarlo.
6. Fissaggio della maniglia: collegare a questo livello la maniglia in dotazione. Per
rimuoverla, allargarla delicatamente.
6
5
4
1
2
3
6
17

Collegamento con il Tiki Sounds
Collegamento a un altoparlante/stabilire l’altoparlante Master
Prima di effettuare il collegamento al Tiki Sounds, assicurarsi che l’altoparlante “master” si trovi
entro la portata del dispositivo Bluetooth.
1. Accendere il Tiki Sounds tenendo premuto il tasto di alimentazione. Si sentirà “Power On” a
conferma. *
2. Assicurarsi che l’altoparlante si trovi in modalità Bluetooth/Master. Un LED blu indicherà che
l’altoparlante si trova in modalità Bluetooth/Master. Se compare un LED giallo, l’altoparlante non
si trova in modalità Bluetooth/Master, bensì in modalità Link. Per uscire dalla modalità Link
occorre tenere premuto il tasto Bluetooth/Link per 2 secondi.
Nota bene: l’altoparlante (o gli altoparlanti) si accende nell’ultima modalità in cui si trovava prima
dello spegnimento. Se viene acceso in modalità Bluetooth/Master, l’altoparlante si collegherà
automaticamente a un dispositivo Bluetooth collegato in precedenza.
3. Per collegare un dispositivo Bluetooth per la prima volta, navigare fino alla schermata di
configurazione del Bluetooth del proprio dispositivo, trovare il Tiki Sounds e collegare. Una volta
collegato, il LED Bluetooth si illumina di blu fisso e a conferma si sente “Paired” (collegato). *
Nota bene: in caso di problemi di collegamento, selezionare Forget this Device (Dimentica
questo dispositivo) sul dispositivo Bluetooth e cercare di collegarlo di nuovo.
4. Avviare la riproduzione del dispositivo Bluetooth.
Per scollegare l’apparecchio da un dispositivo Bluetooth collegato, premere il tasto
Bluetooth/Link sull’altoparlante master. Il LED Bluetooth lampeggia di blu e si sente “Ready to
Pair” (Pronto al collegamento) per indicare che il collegamento precedente è stato scollegato e che
l’altoparlante è pronto a collegarsi a un atro dispositivo Bluetooth. *
* Suggerimento: se si desidera disattivare (o attivare) i comandi vocali, tenere premuto il tasto Light
Mode per 2 secondi.
Collegamento di altoparlanti Tiki Sounds aggiuntivi all’altoparlante “Master”
servendosi del Multi-Link™
Dopo aver stabilito l’altoparlante “master” effettuando il collegamento tramite Bluetooth come
descritto in alto, è possibile collegare un numero illimitato di altoparlanti all’altoparlante master
affinché suonino la stessa musica.
1. Accendere gli altoparlanti aggiuntivi che si desidera collegare all’altoparlante master.
2. Assicurarsi che si trovino in modalità Link, indicata dal LED giallo. Se compare un LED blu,
tenere premuto il tasto Bluetooth/Link per entrare in modalità Link.
3. Una volta in modalità Link, l’altoparlante si collega automaticamente all’altoparlante master e
riprodurrà lo stesso audio.
Quando un altoparlante è in modalità Link Mode, il tasto Light Mode non funzionerà. Il tasto Light
Mode sull’altoparlante master controlla la luminosità di tutti gli altoparlanti collegati durante la
trasmissione dell’audio.
Suggerimento: se gli altoparlanti non si trovano tutti allo stesso livello di luminosità quando vengono
collegati, scorrere lungo le impostazioni di luminosità dell’altoparlante master premendo il tasto
Light Mode 5 volte mentre l’audio viene trasmesso. In questo modo verrà sincronizzato il livello di
luminosità di tutti gli altoparlanti.
Gli altoparlanti collegati possono essere spenti in qualsiasi momento senza interrompere la
riproduzione dall’altoparlante Master. Spegnendo l’altoparlante Master si interrompe l’audio su tutti
gli altoparlanti collegati.
Nota bene: se si dispone di più altoparlanti, è possibile utilizzarli indipendentemente se ciascuno di
essi si trova in modalità Bluetooth/Master.
18

Schnellstart-Anleitung (Deutsch)
Einführung
Vielen Dank für den Kauf von Tiki Sounds. Ihre Unterhaltung ist uns bei ION genauso wichtig
wie Ihnen. Darum entwerfen wir unsere Produkte stets nur mit einem einzigen Ziel vor Augen:
Ihr Leben einfacher und unterhaltsamer zu machen.
Lieferumfang
Wenn ein einzelner Lautsprecher
erworben wird:
(1) Tiki Sounds
(1) Stangenhalterung
• (3) Verlängerungsrohre
• (1) Rohrverschluss
• (1) Erdspieß
(1) Lampensockel
(1) Griff
(1) Mikro-USB-Kabel
Schnellstart-Anleitung
Sicherheitshinweise und
Garantieinformationen
Hinweis: Einige Artikel sind möglicherweise bereits zusammengesetzt.
Kundendienst
Für die neuesten Informationen zu diesem Produkt (Dokumentation, technische Daten,
Systemanforderungen, Informationen zur Kompatibilität etc.) und zur Produktregistrierung
besuchen Sie bitte: ionaudio.com.
Für zusätzlichen Produkt-Support besuchen Sie ionaudio.com/support.
Einsatz im Freien und Pflege des Produkts
Tiki Sounds ist gemäß IPX4-Standards wasserbeständig und gegen Spritzwasser in jeglicher
Richtung, wie beispielsweise leichten Regen oder Wassernebel, geschützt. Bitte lesen Sie die
nachstehenden Tipps, um die Leistungsfähigkeit von Tiki Sounds zu erhalten:
• Bringen Sie Tiki Sounds bei extremen Wetterbedingungen ins Haus.
• Bitte platzieren Sie den Tiki Sounds nie instehenden Gewässern.
• Tiki Sounds darf im Freien nur mit Steckdosen oder Verlängerungskabeln verwendet
werden, die für den Einsatz im Freien geeignet sind.
• Bitte schließen Sie Tiki Sounds nicht in einer nassen Umgebung zum Laden an. Stellen Sie
sicher, dass der Mikro-USB-Port, der Ladeadapter und die Steckdose vollkommen trocken
sind, bevor Sie eine Verbindung herstellen.
• Achtung: Bewahren Sie alle nicht wasserdichten Geräte (Handys, Musik-Player etc.) an
einem trockenen Ort auf, wo sie nicht von der Feuchtigkeit beeinträchtigt werden können
und kein Risiko durch Stromschläge besteht.
Wenn zwei Lautsprecher erworben
werden:
(2) Tiki Sounds
(2) Stangenhalterungen
• (6) Verlängerungsrohre
• (2) Rohrverschlüsse
• (2) Erdspieße
(2) Lampensockel
(2) Griffe
(2) Mikro-USB-Kabel
Schnellstart-Anleitung
Sicherheitshinweise und
Garantieinformationen
19

Setup
1. Stellen Sie sicher, dass alle im Lieferumfang aufgelisteten Teile in der Verpackung enthalten
sind. Teile, die nicht angegeben sind, sind separat erhältlich.
2. Lesen Sie die Sicherheitshinweise und Garantieinformationen bevor sie das Produkt verwenden.
3. Stellen Sie sicher, dass die Batterie vor der ersten Verwendung vollständig aufgeladen ist, um
eine maximale Batterielebensdauer zu erzielen.
Aufbau
Tiki Sounds kann unter Verwendung der beigefügten Stange angebracht, mithilfe des beigefügten
Sockels freistehend montiert oder an dem beigefügten Griff aufgehangen werden. Folgen Sie jeweils
den nachstehenden Anleitungen für die gewünschte Verwendung von Tiki Sounds.
Wichtig: Wenn Sie die Solarzelle zur Verlängerung der Akkulaufzeit zwischen den Ladungen
verwenden, erzielen Sie die besten Ergebnisse, wenn Sie Tiki Sounds in einem Bereich aufstellen,
indem pro Tag mindestens drei Stunden direkter Sonneneinstrahlung erzielt werden. Zur
Beschleunigung des Ladens sollten Sie Tiki Sounds ausschalten und über USB anschließen.
Montiert
1. Schlagen Sie den Erdspieß dort in den Boden, wo Sie Tiki Sounds installieren möchten.
Wichtig: Wenn der Boden an der für die Installation von Tiki Sounds gewünschten Stelle zu hart
ist, sollten Sie den Boden mit einer Schaufel zuvor auflockern.
2. Stecken Sie die drei Abschnitte des Verlängerungsrohrs in den Erdspieß ein. Der mittlere
Abschnitt verjüngt sich an beiden Enden, um das Einschieben in die anderen Rohrabschnitte zu
erleichtern. Der obere Abschnitt wird mit einem Rohrverschluss abgeschlossen, der die
Anbringung von Tiki Sounds erleichtert und das Eindringen von Wasser verhindert.
3. Platzieren Sie Tiki Sounds so, dass das Loch im Boden des Lautsprechers am Rohrverschluss
am Pfosten ausgerichtet ist. Drücken Sie Tiki Sounds sanft auf den Pfosten, bis dieser sicher
sitzt.
4. Bevor Sie versuchen, Tiki Sounds an einen anderen Standort zu transportieren, sollten Sie immer
zuerst den Lautsprecher abnehmen. Halten Sie den oberen Rohrabschnitt mit einer Hand fest
und ziehen Sie Tiki Sounds vorsichtig nach oben, bis er von der Stange getrennt ist.
Freistehend
1. Stellen Sie den Lampensockel auf einer ebenen, stabilen Oberfläche auf.
Hinweis: Bei Bedarf kann eine Schraube in der Mitte des Sockels eingesetzt werden, um den
Lautsprecher zu befestigen.
2. Platzieren Sie Tiki Sounds so auf dem Sockel, dass das Loch im Boden des Lautsprechers oben
an der Stange im Sockel ausgerichtet ist. Drücken Sie Tiki Sounds sanft auf die Stange, bis
dieser sicher sitzt.
3. Um Tiki Sounds vom Sockel zu entfernen, sollten Sie diesen mit einer Hand festhalten und Tiki
Sounds vorsichtig nach oben ziehen, bis er von der Stange getrennt ist.
Hängend
1. Befestigen Sie den beigefügten Griff an den Löchern an der äußeren Kante jedes Tiki SoundsLautsprechers. Sorgen Sie dafür, dass die Griffe „einrasten‟ und ordnungsgemäß gesichert sind,
bevor Sie versuchen, Tiki Sounds aufzuhängen.
2. Zur Entfernung der Griffe brauchen Sie nur die beiden Seiten vom Lautsprecher wegzuziehen,
bis sich der Griff abnehmen lässt.
20

Ladevorgang
Wenn die LEDs abgedunkelt erscheinen, die Musik unterbrochen wird oder die Wiedergabe nicht
erfolgt, kann es sein, dass der Akku aufgeladen werden muss. Tiki Sounds kann unter Verwendung
des Mikro-USB-Ports oder der Solarzelle geladen werden.
Zur Beschleunigung des Ladevorgangs sollten Sie Tiki Sounds ausschalten und die beigefügten
Mikro-USB-Kabel verwenden, um den Lautsprecher an (A) ein an eine Steckdose angeschlossenes
USB-Netzteil (5-V-Netzteil nicht im Lieferumfang enthalten) oder (B) Ihren (eingeschalteten)
Computer anzuschließen.
Die Akkulaufzeit von Tiki Sounds kann zwischen den Ladevorgängen durch die Verwendung der
Solarzelle verlängert werden. Die besten Ergebnisse erzielen Sie, wenn Tiki Sounds in einem Bereich
aufgestellt wird, der mindestens 3 Stunden direktes Sonnenlicht pro Tag erhält.
Funktionen
1. Netzstrom-Taste: Zum Ein- bzw. Ausschalten von
Tiki Sounds müssen Sie auf diese Taste drücken
und sie gedrückt halten.
2. Bluetooth-/Link-Taste: Drücken Sie diese Taste,
um die Verbindung mit einem Bluetooth-Gerät zu
trennen und den Kopplungsmodus zu wählen, um
eine Verbindung mit einem anderen BluetoothGerät herzustellen. Wenn die Verbindung verfügbar
ist, blinkt die blaue LED schnell. Wurde die
Verbindung hergestellt, blinkt die LED langsam.
Drücken Sie diese Taste und halten Sie sie 2
Sekunden lang gedrückt, um zwischen dem
Bluetooth-/Master-Modus und dem Link-Modus
hin- und herzuschalten. Wenn sich der
Lautsprecher im Link-Modus befindet, leuchtet die
gelbe LED dauerhaft auf. Lesen Sie Herstellen
einer Verbindung mit Tiki Sounds, wenn Sie
mehr darüber erfahren möchten.
3. Licht-Modus-Taste: Betätigen Sie diese Taste, wenn Sie die Helligkeitseinstellungen der LEDLichter festlegen möchten: Hell, Heller, Am hellsten, Flackern (simuliert eine echte Flamme)
und Aus (Standardeinstellung, wenn Tiki Sounds eingeschaltet ist).
Hinweis: Wenn sich ein Lautsprecher im Verbindungsmodus befindet, funktioniert seine
Lichtmodustaste nicht. Die Lichtmodustaste des Master-Lautsprechers wird die Helligkeit aller
verlinkten Lautsprecher steuern, während Audiosignale übertragen werden. Weitere
Informationen finden Sie unter Verknüpfen weiterer Tiki Sounds mit dem Master-
Lautsprecher via Multi-Link™.
4. Solarzelle: Platzieren Sie Tiki Sounds unter Sonneneinstrahlung, wenn Sie den Akku mithilfe der
Solarzelle aufladen möchten.
Hinweis: Die Ladedauer hängt davon ab, wieviel direkte Sonneneinstrahlung die Solarzelle
erhält. Der Ladevorgang verlangsamt sich, wenn nur indirektes Sonnenlicht zur Verfügung steht.
Beste Ergebnisse erzielen Sie, wenn Tiki Sounds an einem Ort mit direkter Sonneneinstrahlung
aufgestellt wird.
5. Mikro-USB-Port: Verwenden Sie das beigefügte Mikro-USB-Kabel, um zum Laden von Tiki
Sounds diesen Port mit einem Computer oder einem Netzteil (5-V-Netzteil nicht im Lieferumfang
enthalten) zu verbinden.
Hinweis: Der Ladevorgang läuft am schnellsten ab, wenn Sie Tiki Sounds zuvor ausschalten.
6. Befestigung des Griffs: Befestigen Sie hier den beigefügten Griff, zum Entfernen ziehen Sie die
beiden Enden sanft auseinander.
6
5
4
1
2
3
6
21

Herstellen einer Verbindung mit Tiki Sounds
Herstellen einer Verbindung mit einem Lautsprecher/Festlegen des MasterLautsprechers
Bevor Sie eine Verbindung mit Tiki Sounds herstellen, sollten Sie sicherstellen, dass sich der „Master‟-
Lautsprecher in Reichweite Ihres Bluetooth-Geräts befindet.
1. Schalten Sie Tiki Sounds ein, indem Sie die Netzstromtaste gedrückt halten. Zur Bestätigung ertönt die
Ansage „Power On‟ (Eingeschaltet). *
2. Stellen Sie sicher, dass sich der Lautsprecher im Bluetooth-/Master-Modus befindet, was durch eine
blaue LED angezeigt wird. Wenn eine gelbe LED aufleuchtet, befindet sich der Lautsprecher nicht im
Bluetooth-/Master-Modus, sondern im Link-Modus. Zur Beendigung des Link-Modus müssen Sie die
Bluetooth-/Link-Taste 2 Sekunden lang gedrückt halten.
Hinweis: Der/die Lautsprecher werden stets in dem Modus eingeschaltet, indem sie sich beim letzten
Ausschalten befunden haben. Wenn der Lautsprecher im Bluetooth-/Master-Modus eingeschaltet wird,
wird der Lautsprecher automatisch mit einem zuvor gekoppelten Bluetooth-Gerät verbunden.
3. Wenn Sie zum ersten Mal eine Verbindung mit einem Bluetooth-Gerät herstellen, navigieren Sie zum
Einrichtungsbildschirm Ihres Bluetooth–Geräts, suchen Tiki Sounds und stellen eine Verbindung her.
Die Bluetooth-LED leuchtet dauerhaft blau, wenn eine Verbindung hergestellt ist und zur Bestätigung
ertönt die Ansage „Paired‟ (Gekoppelt). *
Hinweis: Wenn Sie beim Herstellen einer Verbindung Schwierigkeiten haben, wählen Sie auf Ihrem
Bluetooth-Gerät „Dieses Gerät vergessen‟ aus und versuchen Sie erneut, die Verbindung herzustellen.
4. Starten Sie die Wiedergabe über Ihr Bluetooth-Gerät.
Wenn Sie die Verbindung mit einem gekoppelten Bluetooth-Gerät trennen wollen, drücken Sie auf die
Bluetooth-/Link-Taste auf dem Master-Lautsprecher. Die blaue Bluetooth-LED blinkt und Sie hören die
Ansage „Ready to Pair‟ (Zur Kopplung bereit), die anzeigt, dass die vorherige Kopplung getrennt wurde und
der Lautsprecher für eine neue Kopplung mit einem anderen Bluetooth–Gerät bereit ist. *
* Tipp: Wenn Sie die Sprachanweisungen deaktivieren (oder aktivieren) möchten, halten Sie die
Lichtmodustaste auf der Fernbedienung 2 Sekunden lang gedrückt.
Verknüpfen weiterer Tiki Sounds mit dem Master-Lautsprecher unter Verwendung
von Multi-Link™
Nach der Festlegung des „Master‟-Lautsprechers durch das Herstellen einer Bluetooth–Verbindung wie
oben beschrieben, können Sie eine unbegrenzte Anzahl von Lautsprechern mit dem Master-Lautsprecher
verbinden und dieselbe Musik abspielen.
1. Schalten Sie den/die zusätzlichen Lautsprecher ein, die Sie mit dem Master-Lautsprecher verknüpfen
möchten.
2. Stellen Sie sicher, dass sich der/die Lautsprecher im Link-Modus befindet/befinden, was durch die
gelbe LED angezeigt wird. Wenn eine blaue LED zu sehen ist, drücken Sie die Bluetooth-/Link–Taste
und halten diese gedrückt, um in den Link-Modus zu wechseln.
3. Sobald sich der Lautsprecher im Link-Modus befindet, stellt er automatisch eine Verbindung mit dem
Master-Lautsprecher her und spielt dasselbe Audio ab.
Wenn sich ein Lautsprecher im Verbindungsmodus befindet, funktioniert seine Lichtmodustaste nicht. Die
Lichtmodustaste des Master-Lautsprechers wird die Helligkeit aller verlinkten Lautsprecher steuern,
während Audiosignale übertragen werden.
Tipp: Wenn die Lautsprecher beim Verbinden nicht alle dieselbe Helligkeitsstufe haben, blättern Sie einmal
durch die Helligkeitseinstellungen auf den Master-Lautsprechern, indem Sie die Lichtmodustaste 5-mal
drücken, während Audiosignale übertragen werden. Dies synchronisiert die Helligkeitsstufen aller
Lautsprecher.
Verknüpfte Lautsprecher können jederzeit ausgeschaltet werden, ohne die Wiedergabe des MasterLautsprechers zu unterbrechen. Wenn Sie den Master-Lautsprecher ausschalten, wird jedoch auch die
Wiedergabe auf den verknüpften Lautsprechern beendet.
Hinweis: Wenn Sie mehrere Lautsprecher haben, ist es möglich, jeden Lautsprecher unabhängig zu
verwenden, wenn sich alle im Bluetooth/Master-Modus befinden.
22

Snelstartgids (Nederlands)
Introductie
Bedankt voor uw aankoop van de Tiki Sounds. Bij ION vinden wij entertainment even
belangrijk als u. Daarom ontwerpen wij onze producten met één doel voor ogen: u het leven
leuker en aangenamer maken.
Inhoud van de doos
Bij aankoop van een afzonderlijke luidspreker:
(1) Tiki Sounds
(1) Paalmontageset
• (3) Verlengbuizen
• (1) Buisdop
• (1) Grondpen
(1) Lampvoet
(1) Handgreep
(1) Micro-USB-kabel
Snelstartgids
Veiligheids-en garantie handleiding
Opmerking: Mogelijk zijn sommige elementen voorgemonteerd.
Ondersteuning
Voor de laatste informatie over dit product (documentatie, technische specificaties, systeem
vereisten, informatie over compatibiliteit, enz.) en productregistratie, bezoek ionaudio.com.
Voor aanvullende productondersteuning naar ionaudio.com/support.
Gebruik buitenshuis en onderhoud
De Tiki Sounds is volgens de IPX4-normen gecertificeerd en waterbestendig en beschermd
tegen spatwater vanuit elke richting, zoals lichte regen of waternevel. Raadpleeg de tips
hieronder voor optimale prestaties met uw Tiki Sounds:
• Breng de Tiki Sounds naar binnen bij slecht weer.
• De Tiki Sounds niet plaatsen in stilstaand water.
• Tiki Sounds mag buiten alleen worden gebruikt met stopcontacten of verlengsnoeren die
zijn goedgekeurd voor gebruik buitenshuis.
• Gelieve de Tiki Sounds niet aan te sluiten of op te laden in een natte omgeving. Zorg
ervoor dat de micro-USB-poort, de stroomadapter en het stopcontact volledig droog zijn
voordat u verbindingen tot stand brengt.
• Waarschuwing: Bewaar alle apparaten die niet waterbestendig zijn (telefoons,
muziekspelers, enz.) op een droge plaats waar ze niet kunnen worden aangetast door
water en een risico van elektrische schokken kunnen veroorzaken.
Indien gekocht als een paar:
(2) Tiki Sounds
(2) Paalmontagesets
• (6) Verlengbuizen
• (2) Buisdoppen
• (2) Grondpennen
(2) Lampvoeten
(2) Handgrepen
(2) Micro-USB-kabels
Snelstartgids
Veiligheids-en garantie handleiding
23

Opstelling
1. Zorg ervoor dat alle artikelen, opgesomd in Inhoud van de doos, zich in de doos
bevinden. Artikelen die niet zijn opgesomd worden afzonderlijk verkocht.
2. Lees de Veiligheids-en garantie handleiding vooraleer het product te gebruiken.
3. Zorg ervoor dat de accu voor het eerste gebruik volledig is opgeladen, voor een maximale
levensduur van de accu.
Montage
De Tiki Sounds kan als volgt worden gebruikt: gemonteerd op de meegeleverde staander;
vrijstaand met de meegeleverde voet; of hangend met de meegeleverde handgreep. Volg de
onderstaande instructies voor de wijze waarop u de Tiki Sounds wilt gebruiken.
Belangrijk: Als u tussen oplaadbeurten het zonnepaneel gebruikt om de levensduur van de
batterij te verlengen, zorg dan voor een optimaal resultaat dat u de Tiki Sounds plaatst in een
gebied dat ten minste 3 uur direct zonlicht per dag ontvangt. Om de Tiki Sounds zo snel
mogelijk op te laden: zet de luidspreker uit en maak een USB-verbinding.
Paalmontage
1. Steek de grondpen in de grond waar u de Tiki Sounds wilt plaatsen.
Belangrijk: Als de grond waar u de Tiki Sounds wilt plaatsen te hard is, gebruik dan een
schop om de grond los te maken voordat u de grondpen plaatst.
2. Bevestig de drie secties van de verlengbuis aan de grondpen. Het middelste deel loopt
aan beide uiteinden taps toe om het te verbinden met de andere secties, en het bovenste
deel bevat een dop om de Tiki Sounds op zijn plaats te houden en te voorkomen dat water
de paal binnendringt.
3. Plaats de Tiki Sounds zo dat het gat onderaan de luidspreker in lijn is met de dop bovenop
de paal. Duw de Tiki Sounds voorzichtig op de paal totdat deze stevig vast zit.
4. Voordat je de Tiki Sounds probeert te verplaatsen: verwijder eerst de luidspreker van de
paal. Houd het bovenste deel van de paal vast met één hand en trek voorzichtig de Tiki
Sounds omhoog totdat de luidspreker loskomt van de paal.
Vrijstaand
1. Plaats de lampvoet op een vlak, stabiel oppervlak.
Opmerking: Indien gewenst kunt u een schroef bevestigen in het midden van de lampvoet
om de luidspreker op zijn plaats te houden.
2. Plaats de Tiki Sounds op de lampvoet zodat het gat onderaan de luidspreker in lijn ligt met
de verhoging bovenop de voet. Duw de Tiki Sounds voorzichtig op de voet totdat deze
stevig vast zit.
3. Als je de Tiki Sounds van de voet wilt verwijderen, houd je de voet met één hand vast en
trek je de Tiki Sounds voorzichtig omhoog totdat deze loskomt van de voet.
Ophangen
1. Steek de meegeleverde handgreep in de openingen in de buitenste rand van elke Tiki
Sounds-luidspreker. Zorg ervoor dat de hendel op zijn plaats "klikt" om aan te geven dat
hij stevig vast zit voordat u de Tiki Sounds probeert op te hangen.
2. De hendels verwijderen: trek elke kant voorzichtig van de luidspreker tot deze loskomt.
24

Opladen
Als de leds zwak branden of als uw muziek wegvalt of niet wordt afgespeeld, moet u mogelijk
uw batterij opladen. De Tiki Sounds kan worden opgeladen via de micro-USB-poort of met het
zonnepaneel.
De snelste manier van opladen: schakel de Tiki Sounds uit en gebruik de meegeleverde microUSB-kabel om de luidspreker aan te sluiten op (A) een USB-voedingsadapter (DC 5 V;
afzonderlijk verkrijgbaar) die is aangesloten op een stopcontact of (B) op uw computer (die is
ingeschakeld).
De levensduur van de batterij van de Tiki Sounds kan worden verlengd door de luidspreker
tussen de oplaadbeurten op te laden met het zonnepaneel. Voor een optimaal resultaat moet u
de Tiki Sounds plaatsen in een gebied dat ten minste 3 uur direct zonlicht per dag ontvangt.
Kenmerken
1. Aan-uitknop: Druk deze knop in en houd hem
ingedrukt om de Tiki Sounds aan en uit te
zetten.
2. Bluetooth/Link-knop: Druk deze knop in om
een gekoppeld Bluetooth-apparaat af te
koppelen en koppelingsmodus te activeren om
verbinding te maken met een ander Bluetoothapparaat. Als het apparaat klaar is om
gekoppeld te worden, gaat de blauwe led snel
knipperen; zodra er verbinding is gemaakt, gaat
de led traag knipperen.
Druk deze knop in en houd hem 2 seconden
lang ingedrukt om te schakelen tussen
Bluetooth/Master-modus en Link-modus. In
Link-modus blijft de gele led onafgebroken
branden. Zie Verbinding maken met de Tiki
Sounds voor meer informatie.
3. Lichtmodusknop: Druk op deze knop om de helderheid van de ledverlichting aan te
passen: Helder, Helderder, Helderst, Knipperen (bootst een vlam na) en Uit (standaard
wanneer de Tiki Sounds is ingeschakeld).
Opmerking: De Light Mode-knop van een luidspreker die zich in koppelingsmodus
bevindt, werkt niet. Tijdens audio-overdracht wordt de helderheid van alle gekoppelde
luidsprekers geregeld via de Light Mode-knop van de hoofdluidspreker. Raadpleeg Extra
Tiki Sounds aan de hoofdluidspreker koppelen met Multi-Link™ voor meer informatie.
4. Zonnepaneel: Plaats de Tiki Sounds in het zonlicht om de batterij op te laden met het
zonnepaneel.
Opmerking: De oplaadsnelheid hangt af van de hoeveelheid zonlicht die het zonnepaneel
ontvangt. Het apparaat laadt trager op als het indirect zonlicht ontvangt. Plaats de Tiki
Sounds in direct zonlicht voor optimale resultaten.
5. Micro-USB-poort: Gebruik de meegeleverde micro-USB-kabel om deze poort aan te
sluiten op een computer of voedingsadapter (DC 5 V, apart verkrijgbaar) om de Tiki
Sounds op te laden.
Opmerking: Om de Tiki Sounds zo snel mogelijk op te laden, moet u hem afzetten voordat
u verbinding maakt.
6. Bevestiging voor de handgreep: Sluit hierop de meegeleverde handgreep aan. Om te
verwijderen: voorzichtig van elkaar trekken.
6
5
4
1
2
3
6
25

Verbinding maken met de Tiki Sounds
Verbinding maken met één luidspreker / de hoofdluidspreker instellen
Voordat u verbinding maakt met de Tiki Sounds, moet u controleren of de hoofdluidspreker zich
binnen het bereik van uw Bluetooth-apparaat bevindt.
1. Zet de Tiki Sounds aan door de aan-uitknop ingedrukt te houden. U hoort "Power On" als
bevestiging. *
2. Controleer of de luidspreker zich in Bluetooth/Master-modus bevindt. Een blauwe led geeft aan
of de luidspreker zich in Bluetooth/ Master-modus bevindt. Als een gele led verschijnt, bevindt
de luidspreker zich niet in Bluetooth/Master-modus, maar in koppelingsmodus. U moet de
Bluetooth/Link-knop 2 seconden lang ingedrukt houden om de Link-modus te verlaten.
Opmerking: Bij het inschakelen bevindt de luidspreker zich in de modus die het laatst werd
gebruikt voordat hij werd uitgeschakeld. Als hij werkt in Bluetooth/Master-modus, maakt de
luidspreker automatisch verbinding met een eerder gekoppeld Bluetooth-apparaat.
3. Wanneer u voor de eerste keer verbinding maakt met een Bluetooth-apparaat: navigeer naar het
scherm Bluetooth-instellingen van uw apparaat, zoek naar de Tiki Sounds en maak verbinding.
De Bluetooth-led blijft blauw branden wanneer het apparaat is aangesloten. Als bevestiging
hoort u "Paired". *
Opmerking: Als u problemen ondervindt bij het verbinden, selecteert u "Dit apparaat vergeten"
op uw Bluetooth-apparaat en probeert u opnieuw verbinding te maken.
4. Begin muziek af te spelen op uw Bluetooth-apparaat.
De verbinding met een gekoppeld Bluetooth-apparaat verbreken: druk op de Bluetooth/Linkknop op de hoofdluidspreker. De Bluetooth-led begint blauw te knipperen en u hoort "Ready to
Pair" om aan te geven dat de vorige koppeling is verbroken en de luidspreker gereed is om te
koppelen met een ander Bluetooth-apparaat. *
* Tip: Als u de stemprompts wilt uitschakelen (of inschakelen), druk dan 2 seconden lang op de
Light Mode-knop.
Extra Tiki Sounds aan de hoofdluidspreker koppelen met Multi-Link™
Nadat u de hoofdluidspreker hebt ingesteld door zoals hierboven beschreven via Bluetooth
verbinding te maken, kunt u een onbeperkt aantal luidsprekers aan de hoofdluidspreker koppelen
om dezelfde muziek af te spelen.
1. Schakel de extra luidspreker(s) in die u wilt koppelen aan de hoofdluidspreker.
2. Zorg ervoor dat de luidspreker(s) in de Link-modus staan, wat wordt aangegeven door de gele
led. Als een blauwe led zichtbaar is, houd dan de Bluetooth/ Link-knop ingedrukt om naar de
koppelingsmodus te gaan.
3. Eenmaal in de koppelingsmodus maakt de luidspreker automatisch verbinding met de
hoofdluidspreker en speelt dezelfde audio af.
De Light Mode-knop van een luidspreker die zich in koppelingsmodus bevindt, werkt niet. Tijdens
audio-overdracht wordt de helderheid van alle gekoppelde luidsprekers geregeld via de Light Modeknop van de hoofdluidspreker.
Tip: Als niet alle gekoppelde luidsprekers even helder zijn, doorloop dan één keer alle
helderheidsinstellingen op de hoofdluidspreker. Druk hiervoor tijdens de audio-overdracht 5 keer de
Light Mode-knop in. Hiermee synchroniseert u het helderheidsniveau van alle luidsprekers.
Gekoppelde luidsprekers kunnen op elk moment worden uitgeschakeld zonder dat hierdoor het
afspelen op de hoofdluidspreker wordt onderbroken. Als de hoofdluidspreker wordt uitgeschakeld,
wordt het afspelen op elke gekoppelde luidspreker verbroken.
Opmerking: Als u meerdere luidsprekers hebt, dan kunt u deze afzonderlijk gebruiken als ze zich
allemaal in Bluetooth/Master-modus bevinden.
26

Appendix (English)
Technical Specifications
Output Power
Drivers
Bluetooth Specifications Profile: A2DP, AVRCP
Water Resistance Class
Battery Battery life: Up to 6 hours (at 50%, lights on) **
Power
Dimensions, single
speaker
(depth x width x height)
Weight, single speaker
Specifications are subject to change without notice.
* Bluetooth and wireless reception and range are affected by walls, obstructions, and movement. For
optimal performance, place the product in the center of the room so it is unobstructed by walls, furniture,
etc.
** Battery life may vary based on temperature, age, and volume usage of product.
Trademarks & Licenses
ION Audio is a trademark of ION Audio, LLC, registered in the U.S. and other countries.
The Bluetooth word mark and logos are owned by the Bluetooth SIG, Inc. and any use of such marks by
ION Audio is under license.
All other product names, company names, trademarks, or trade names are those of their respective owners.
10 W (peak)
3" (76.2 mm) driver with sound dispersion
Range: Up to 32.8 feet / 10 meters *
IPX4
Recharge time: 4 hours
Via micro-USB or solar panel
Input Voltage: 5 V, 1 A
3.94” x 4.13” x 7.36”
100 x 105 x 187 mm
1.2 lbs.
0.55 kg
27

ionaudio.com
Manual Version 1.0
 Loading...