


Insta Sound™
Quickstart Guide English ( 3 – 6 )
Guía de inicio rápido Español ( 7 – 10 )
Guide d’utilisation rapide Français ( 11 – 14 )
Guida rapida Italiano ( 15 – 18 )
Schnellstart-Anleitung Deutsch ( 19 – 22 )
Snelstartgids Nederlands ( 23 – 26 )
Appendix English ( 27 )

2
Quickstart Guide (English)
Introduction
Thank you for purchasing the Insta Sound. At ION, your entertainment is as important to us as
it is to you. That’s why we design our products with one thing in mind—to make your life more
fun and more convenient.
Box Contents
(2) Insta Sound Speakers (8) Screws
(2) Wall Mounts Quickstart Guide
(2) Charging Adapters Safety & Warranty Manual
Support
For the latest information about this product (documentation, technical specifications, system
requirements, compatibility information, etc.) and product registration, visit ionaudio.com.
For additional product support, visit ionaudio.com/support.
Setup
Items not listed under Introduction > Box Contents are sold separately.
Smartphone,
tablet, etc.
Reset
Button
Bottom Panel
Charging
Adapter
Side Panel
Mounting
Post
Mounting
Post
Base
3

Installation
Insta Sound may be used freestanding or mounted. When used freestanding, the feet on the
bottom of the speaker allow Insta Sound to sit comfortably on any flat surface. To mount Insta
Sound using the included wall mount, follow the instructions below.
To use Insta Sound with the included wall mount, first inspect the area where you would like to
install the speakers. Confirm that the surface you are mounting Insta Sound on can safely hold
the weight of the speaker. If you are unsure whether you can safely install Insta Sound in your
desired location, please consult a professional contractor.
To install the wall mount:
Note: It is recommended to install the mount so that the post is pointing straight up. Since the
speaker is designed to easily slide off/on the post, do not install with the post at an extreme
angle, parallel with the ground, or pointing towards the ground as the speaker will slide off of
the post and cause damage.
1. Insert screws into the 4 holes on the wall mount base. Fully tighten all screws so the wall
mount base is flush with the surface before placing the speaker on the mount. Do not use
the included screws to mount Insta Sound on surfaces such as concrete or drywall, as
these may require special tools and/or hardware.
2. Slide Insta Sound onto the mount so that the mount post is fully inserted into the
mounting hole on the bottom of the speaker. Make sure it is unobstructed on all sides for
optimal performance.
Note: The posts have notches that match up with the grooves at the base of the hole on the
speaker to help pivot/rotate the speaker to a fixed position/angle.
Outdoor Use and Care
Though Insta Sound is water-resistant and able to tolerate splashing water, please review the
tips below to get the best performance from Insta Sound:
• Insta Sound must only be used outdoors with power outlets or extension cords that are
rated for outdoor use.
• Bring Insta Sound indoors during extreme weather.
• Please do not place Insta Sound in standing water.
• Please do not connect the charging adapter to Insta Sound in a wet environment. Make
sure the charging adapter input, charging adapter, and power outlet are all completely dry
before making any connections.
• Make sure the connection between the prongs of the charging adapter and the power
outlet is secure and sealed according to your power outlet’s specifications.
• WARNING: Keep any non-water-resistant devices (phones, music players, etc.) in a dry
place where they will not be affected by water and cause a risk of electric shock.
4

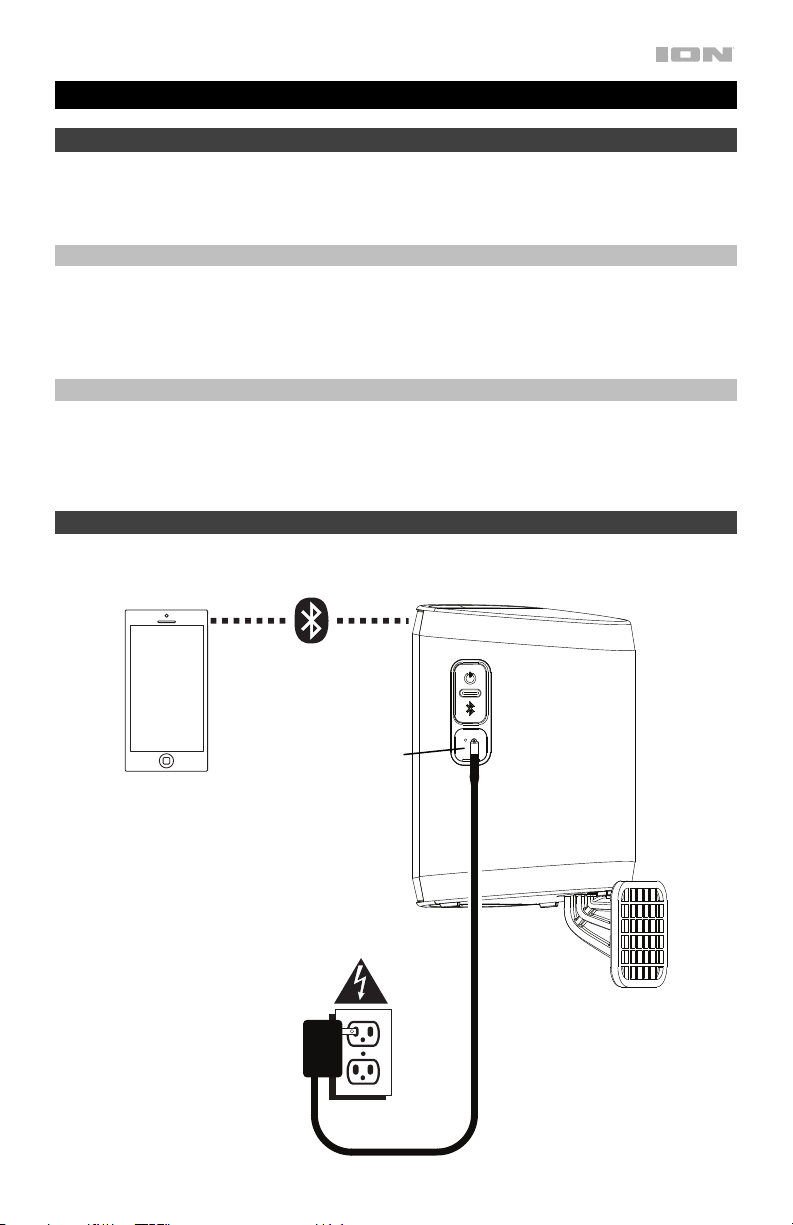
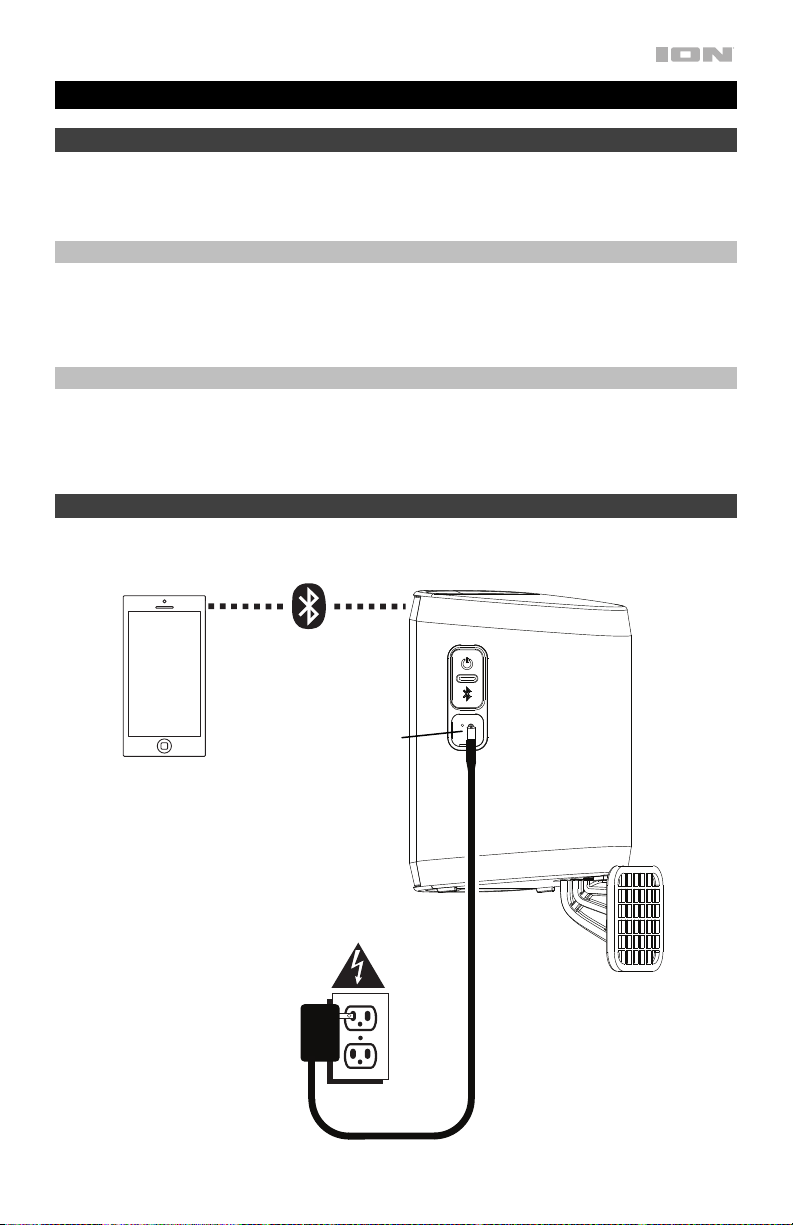
Stereo-Link™ and Bluetooth Connecting to Insta Sound
1. Power on each Insta Sound by pressing and releasing their power buttons. You will hear
“Powering On” for confirmation. *
2. The 2 speakers will automatically initiate the wireless stereo linking process. The speakers
will search for each other indicated by their blinking yellow LEDs. Once the stereo pair is
successfully linked, you will hear “Connected”, the yellow LEDs will be solid, and the
“master” speaker’s blue LED will blink to indicate it is in Bluetooth pairing mode.
This process may take up to 2 minutes the first time two speakers are linked. Speakers
that were previously linked will relink automatically in seconds if powered on in range of
one another.
Note: Insta Sound speakers should be within 30 ft. (9 m) of each other to Link properly.
3. When the stereo link is confirmed by the solid yellow LED, the blue LED on the “master”
speaker will begin to blink to indicate that it is ready to pair with your Bluetooth device.
Note: The Left channel will be the “master” speaker, and the unit from which the Bluetooth
range will be determined.
4. On your Bluetooth device, navigate to your Bluetooth settings menu, find Insta Sound,
and connect. Once the Bluetooth connection is made, the blue LED will be lit solid. You
will hear “Paired” for confirmation.
Note: If you experience trouble in connecting, select “Forget this Device” for Insta Sound
on your Bluetooth device and try to connect again.
If your Bluetooth device is not able to connect to Insta Sound, while powered on, press
and hold the Bluetooth button for 2 seconds to break previous Bluetooth connections.
Press and hold the Reset button for 5 seconds to reset the device. This will clear the
memory of existing paired Bluetooth devices.
Single Speaker Mode
If you want to use only 1 Insta Sound speaker, you can enter Single Speaker mode. While the
unit is powered off, press and hold the Power button on the speaker. After the Insta Sound
powers on, while still holding the Power button, press and hold the Bluetooth button for 2
seconds. The yellow LED will be unlit, and the Blue LED will blink to confirm the speaker is
now in Single Speaker mode. Proceed to connect to Insta Sound in your Bluetooth device's
Bluetooth menu. To revert back to Stereo mode, power the speaker off then back on.
5
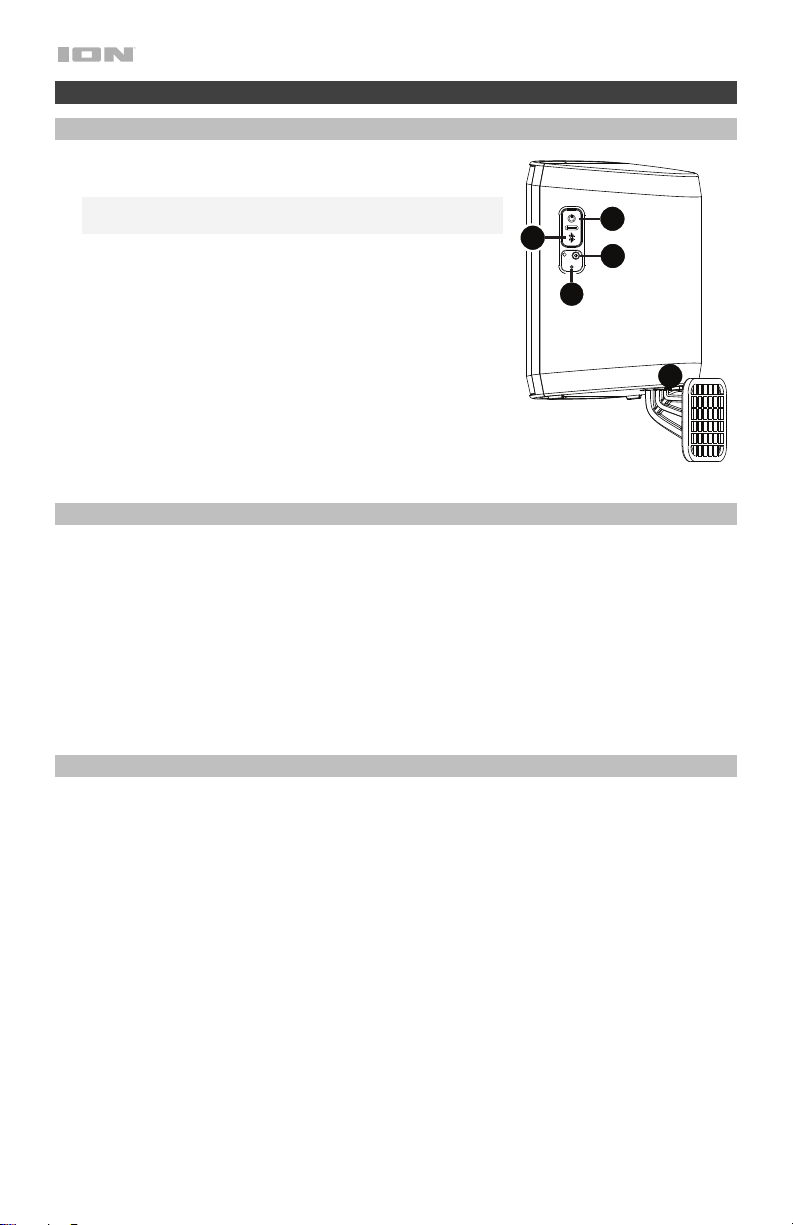
Features
Speaker (Side View)
1. Charging Adapter Input: Insert the included charging
adapter here to charge the Insta Sound battery.
Important: Insta Sound should be fully charged prior to
first use for maximum battery life.
2. Power: Press and release this button to power on Insta
Sound. Press and hold this button for 1 second to power
off Insta Sound.
3. Bluetooth: Press and hold this button to disconnect
3
2
1
4
current Bluetooth connections.
Note: Insta Sound will automatically power off after 15
minutes if no audio is playing.
4. Reset: If Insta Sound is working abnormally, shut down
5
the unit by pressing and holding the Reset button for 5
seconds. This will power the speaker off, and clear all
previous Bluetooth connections.
5. Mount: Insert the wall mount post here.
LED Activity
Blinking Blue LED = Bluetooth pairing mode
Solid Blue LED = Connected to a Bluetooth device
Blinking Yellow LED = Stereo-Linking mode
Solid Yellow LED = Both speakers are Stereo-Linked
Blinking Red LED = Battery is low and needs to be recharged
Solid Red LED = The Battery Charging LED will be lit while the unit is charging and the red
LED will turn off when charging has completed
Enabling/Disabling Voice Prompts
If you would like to disable or enable the voice prompts, while the speaker(s) is on, press the
Power button and the Bluetooth button simultaneously. With the voice prompts disabled,
LED feedback is still present.
6
Guía de inicio rápido (Español)
Introducción
Gracias por comprar el Insta Sound. En ION, su entretenimiento es tan importante para nosotros
como para usted. Por eso es que diseñamos nuestros productos con una sola cosa en mente—
hacer que su vida sea más divertida y cómoda.
Contenido de la caja
(2) Altavoces Insta Sound
(2) Montajes para pared
(2) Adaptadores de carga
Soporte
Para obtener la información más reciente acerca de este producto (documentación, especificaciones
técnicas, requisitos de sistema, información de compatibilidad, etc.) y registrarlo, visite
ionaudio.com.
Para obtener soporte adicional del producto, visite ionaudio.com/support.
Instalación
Los elementos que no se enumeran en Introducción > Contenido de la caja se venden por separado.
Teléfono inteligente,
tableta, etc.
Adaptador de
carga
Botón de
reinicio
(8) Tornillos
Guía de inicio rápido
Manual sobre la seguridad y garantía
Panel lateral
Panel inferior
Poste de
montaje
Base del poste
de montaje
7

Instalación
Los Insta Sound pueden utilizarse apoyados o montados. Cuando los utilice apoyados, las
patas en su parte inferior le permiten a los Insta Sound asentarse cómodamente en cualquier
superficie plana. Para montar los Insta Sound utilizando el montaje para pared incluido, siga
las instrucciones a continuación.
Para utilizar los Insta Sound con el montaje para pared incluido, primero inspeccione el área
en donde desea instalar los altavoces. Asegúrese de que la superficie en la que está
montando los Insta Sound pueda soportar de forma segura el peso del altavoz. Si no está
seguro si podrá instalar los Insta Sound de forma segura en la ubicación deseada, póngase en
contacto con un contratista profesional.
Cómo instalar el montaje para pared:
Nota: Se recomienda instalar el montaje de manera que el poste quede apuntando
verticalmente hacia arriba. Dado que el altavoz está diseñado para deslizarse con facilidad del
poste, no lo instale en un poste con un ángulo agudo, paralelo al piso o apuntando hacia el
piso ya que el altavoz podría zafarse del poste y causar daño.
1. Inserte los tornillos en los 4 orificios de la base del montaje para pared. Apriete
completamente todos los tornillos de manera que la base del montaje para pared quede al
ras con la superficie antes de colocar el altavoz en el montaje. No utilice los tornillos
incluidos para montar los Insta Sound en superficies tales como concreto o yeso, ya que
puede que se requieran herramientas y tornillería especiales.
2. Deslice el Insta Sound hacia el montaje de manera que el poste de montaje se inserte
totalmente dentro del orificio de montaje en la parte inferior del altavoz. Asegúrese de que
permanezca sin obstrucciones en todos sus lados para un desempeño óptimo.
Nota: Los postes tienen muescas que coinciden con las ranuras en la base del orificio del
altavoz para ayudar a pivotar/rotar el altavoz a una posición/ángulo fijo.
Uso y cuidado a la intemperie
Aunque el Insta Sound es resistente al agua y capaz de tolerar salpicaduras, lea las
sugerencias que se incluyen a continuación para obtener el mejor rendimiento del Insta
Sound:
• El Insta Sound sólo puede usarse en exteriores con tomas de corriente o cables de
prolongación aptos para el uso en exteriores.
• Traiga a los Insta Sound bajo techo durante condiciones meteorológicas extremas.
• No coloque el Insta Sound sobre agua estancada.
• No conecte el adaptador de carga al Insta Sound en un ambiente húmedo. Asegúrese de
que la entrada para el adaptador de carga, el adaptador de carga y la toma de corriente
estén completamente secos antes de realizar cualquier conexión.
• Asegúrese de que la conexión entre las espigas del adaptador de carga y la toma de
corriente quede segura y sellada de acuerdo a las especificaciones de su toma de
corriente.
• ADVERTENCIA: Coloque los dispositivos no resistentes al agua (teléfonos, reproductores
de música, etc.) en un lugar seco donde no sean afectados por el agua y causen un riesgo
de electrocución.
8

Conexión de Stereo-Link™ y Bluetooth con Insta Sound
1. Encienda cada Insta Sound pulsando y soltando sus botones de encendido. Escuchará
“Power On” (Unidad encendida) como confirmación.*
2. Los 2 altavoces iniciarán de forma automática el proceso de enlace estéreo inalámbrico.
Los altavoces se buscarán mutuamente indicándolo con sus LED amarillos intermitentes.
Una vez que el par estéreo esté exitosamente enlazado, escuchará "Connected"
(Conectado), los LED amarillos permanecerán encendidos constantemente y el LED azul
del altavoz "maestro" parpadeará para indicar que se encuentra en modo de
apareamiento Bluetooth.
Este proceso puede llevar hasta 2 minutos la primera vez que se realiza el enlace. Los
altavoces que estuvieron enlazados previamente volverán a enlazarse automáticamente en
unos pocos segundos si se encienden estando dentro de sus mutuos alcances.
Nota: Los Insta Sound deben encontrarse a menos de 9 m (30 pies) de cada uno para
enlazarse correctamente.
3. Cuando el enlace exterior sea confirmado por el LED amarillo permanente, el LED azul del
altavoz "maestro" comenzará a parpadear para indicar que está listo para aparearse con
su dispositivo Bluetooth.
Nota: El canal izquierdo será el altavoz "maestro" y la unidad desde la cual se determinará
el rango de Bluetooth.
4. En su dispositivo Bluetooth, navegue hasta el menú de ajustes de Bluetooth busque Insta
Sound, y conéctese a él. Una vez realizada la conexión Bluetooth el LED se encenderá
permanentemente con luz azul. Escuchará "Paired” (Apareado) como confirmación.
Nota: Si experimenta problemas para conectarse, seleccione “Olvidar este Dispositivo”
(Forget this Device) para el Insta Sound en su dispositivo Bluetooth e intente conectarse
nuevamente.
Si su dispositivo Bluetooth no es capaz de conectarse con Insta Sound, estando
encendido, mantenga pulsado el botón Bluetooth durante 2 segundos para desconectar
conexiones Bluetooth previas. Mantenga pulsado el botón Reset durante 5 segundos para
apagar el dispositivo. Esto borrará los dispositivos Bluetooth previamente apareados de la
memoria.
Modo de altavoz individual
Si sólo desea utilizar 1 altavoz Insta Sound, puede entrar al modo de altavoz individual. Con la
unidad apagada, mantenga pulsado el botón Power del altavoz. Una vez encendido el Insta
Sound, con el botón Power presionado, mantenga pulsado el botón Bluetooth durante 2
segundos El LED amarillo estará apagado y el LED azul parpadeará para confirmar que el
altavoz ahora se encuentra en modo de altavoz individual. Proceda a conectarse a Insta
Sound en el menú de Bluetooth de su dispositivo Bluetooth. Para regresar al modo estéreo,
apague el altavoz y luego enciéndalo.
9
 Loading...