

Page 1
Road PA System
(iPA02)
Quick Start Owner’s Manual
BOX CONTENTS
Battery Powered Amplifier: iPA02
(1) XLR Microphone Cable
(1) XLR Microphone
(1) Power Cable (standard IEC)
Manual de inicio rápido para el usuario (ESPAÑOL)
CONTENIDO DE LA CAJA
Amplificador alimentado
(1) cable para micrófono XLR
(1) micrófono XLR
(1) cable de alimentación
Schnellbedienungsanleitung (DEUTSCH)
INHALT DER VERPACKUNG
Verstärker
(1) XLR Mikrofonkabel
(1) XLR Mikrofon
(1) Netzkabel
Manuel d’utilisation du propriétaire (FRANÇAIS)
CONTENU DE LA BOÎTE
Amplificateur de puissance
(1) Câble XLR pour microphone
(1) Microphone XLR
(1) Câble d’alimentation
Manuale rapido di utilizzazione (ITALIANO)
CONTENUTI DELLA CONFEZIONE
Amplificatore alimentato
(1) cavo da microfono XLR
(1) microfono XLR
(1) Cavo di alimentazione
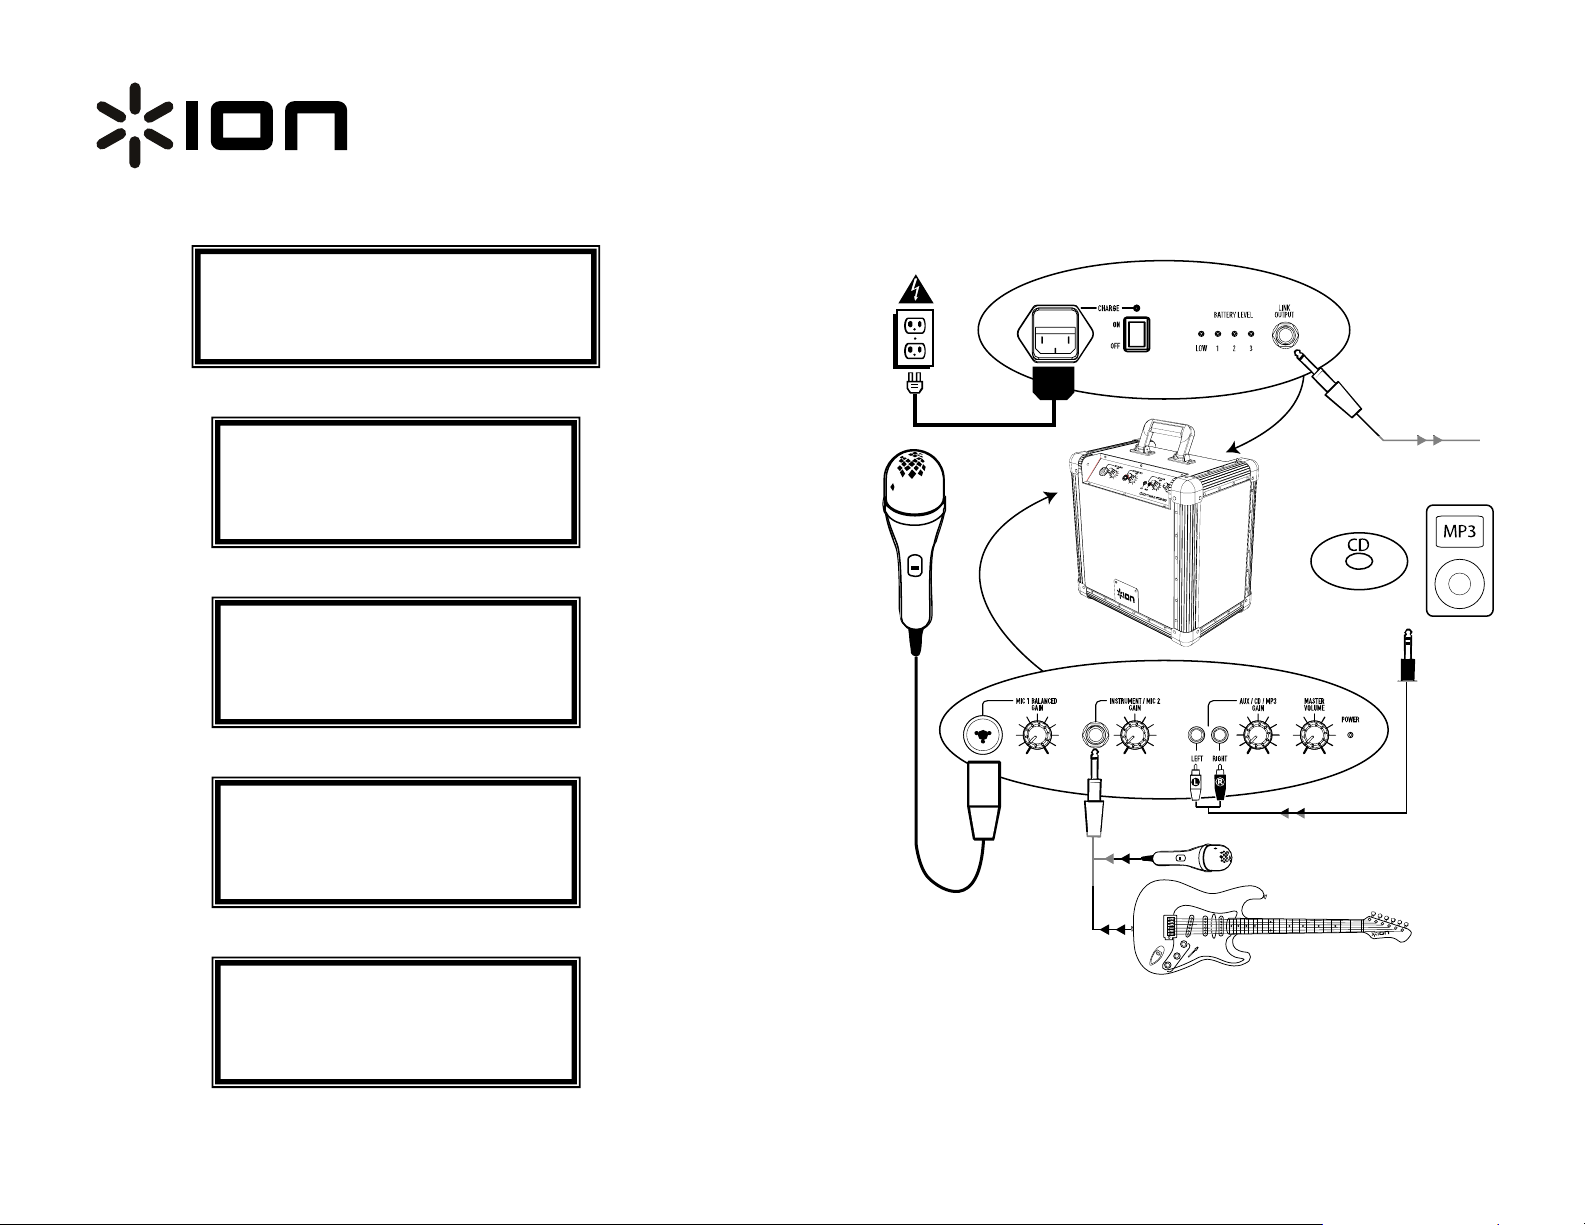
Quick Setup Guide
OR
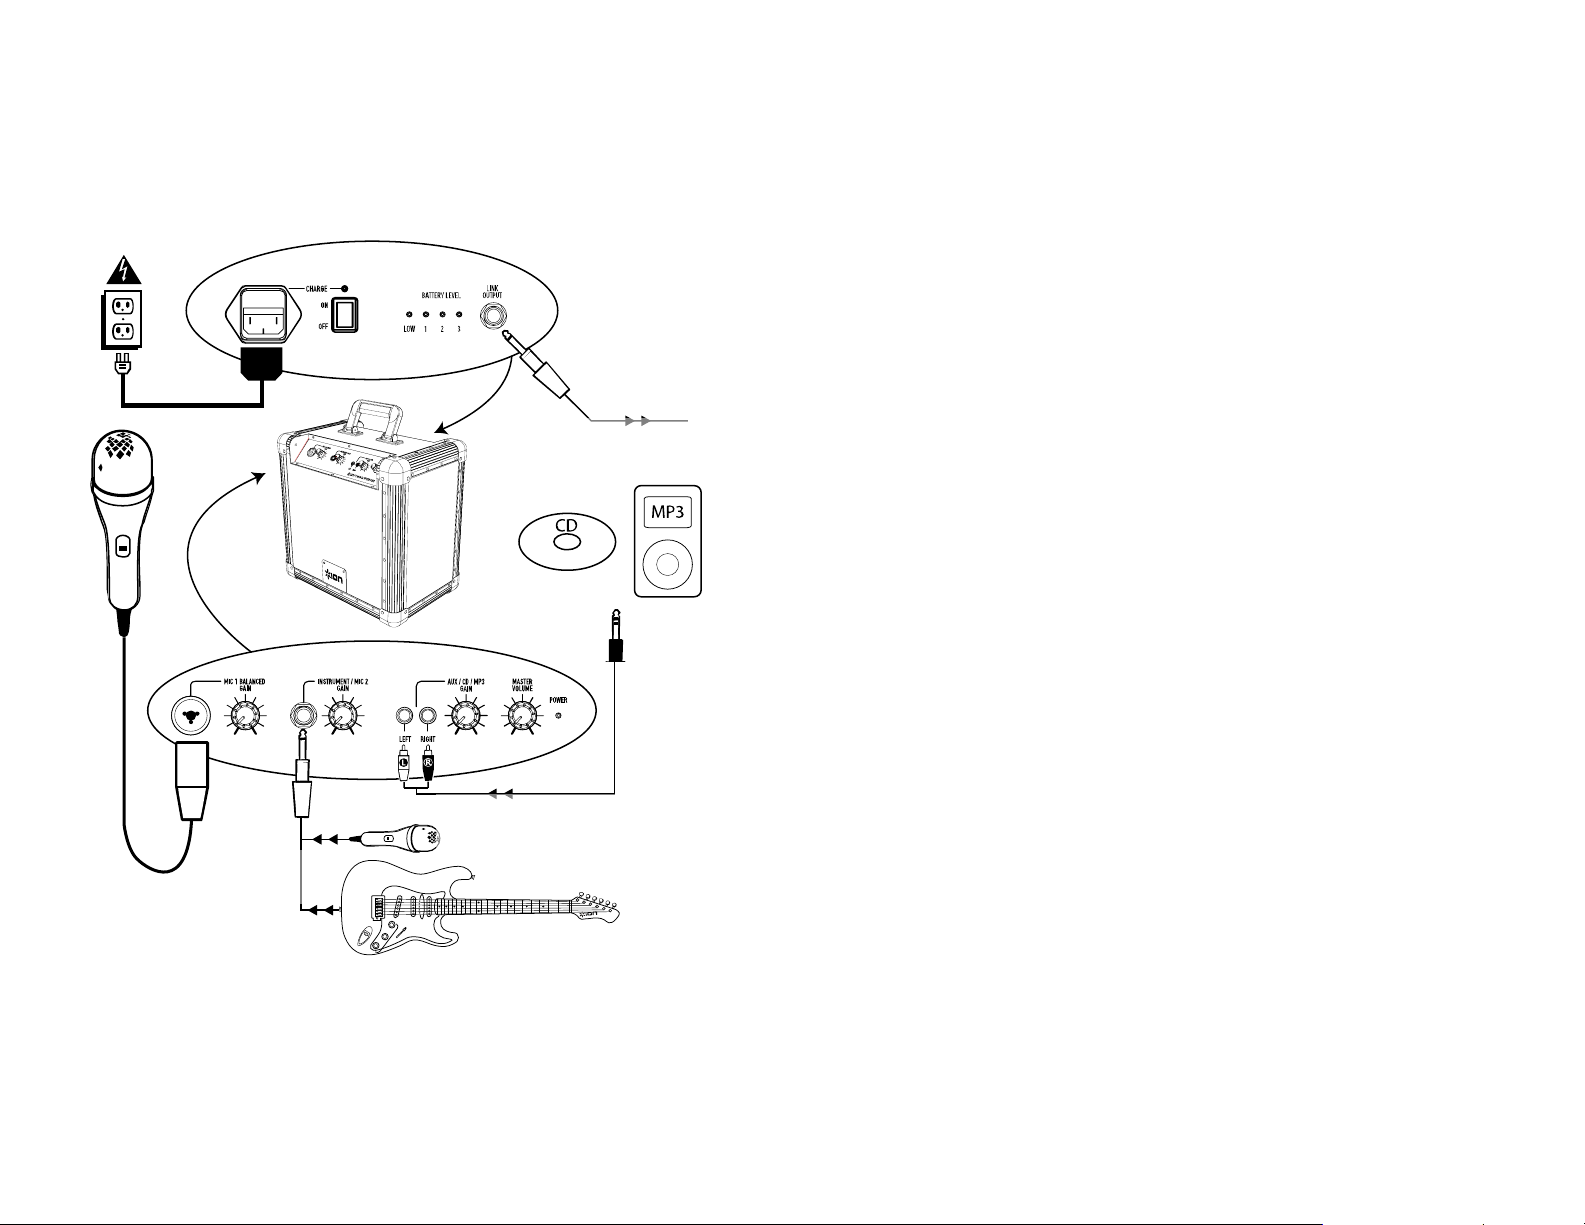
To input on additional PA
Cable sold separately
1 2
Page 2
FULLY CHARGE THE BATTERY BEFORE FIRST USE
FOR MAXIMUM BATTERY LIFE
1. Make sure all items listed on the front of this guide are
included in the box.
2. READ SAFETY INSTRUCTION BOOKLET BEFORE USING
THE PRODUCT.
3. MAKE SURE THAT YOU HAVE COMPLETELY CHARGED THE
BATTERY.
4. Study this setup diagram.
5. Place product in an appropriate position for operation.
6. Make sure all input devices such as microphones, cd players,
mp3 players, and linked amplifiers/PAs are turned off and
volume settings are set at “zero”
7. Connect all devices as shown above.
8. Connect the stereo outputs to the power amplifier(s), tape
decks, and/or audio sources.
9. Switch everything on in the following order.
audio input sources (i.e. microphones, instruments,
CD/MP3 Players)
last, any amplifiers
10. When turning off, always reverse this operation by,
• turning off amplifiers
• your mixer
• last, any input devices
Go to
http://www.ion-audio.com for product registration.
Specifications
• Input Voltage: AC 100-120V/ 60Hz 220-240V/ 50Hz
• Output Wattage: (Peak) 22W
• Output Wattage: (RMS) 15W, 1%THD
• Frequency Response: 10Hz~ 50kHz +/- 3dB
• Bottom pole mount specifications: Standard Pole Mount
found at professional audio retailer
o depth 80mm (3.15”)
o Diameter 35.5mm (1.40”)
• Time required to fully charge the iPA02: under 12
hours
• Battery life: Over 10 hours* at full volume of the iPA02
when fully charged.
*Note: Battery life may vary based on temperature, age, and
volume usage of product.
DIAGRAM AND PARTS DESCRIPTION
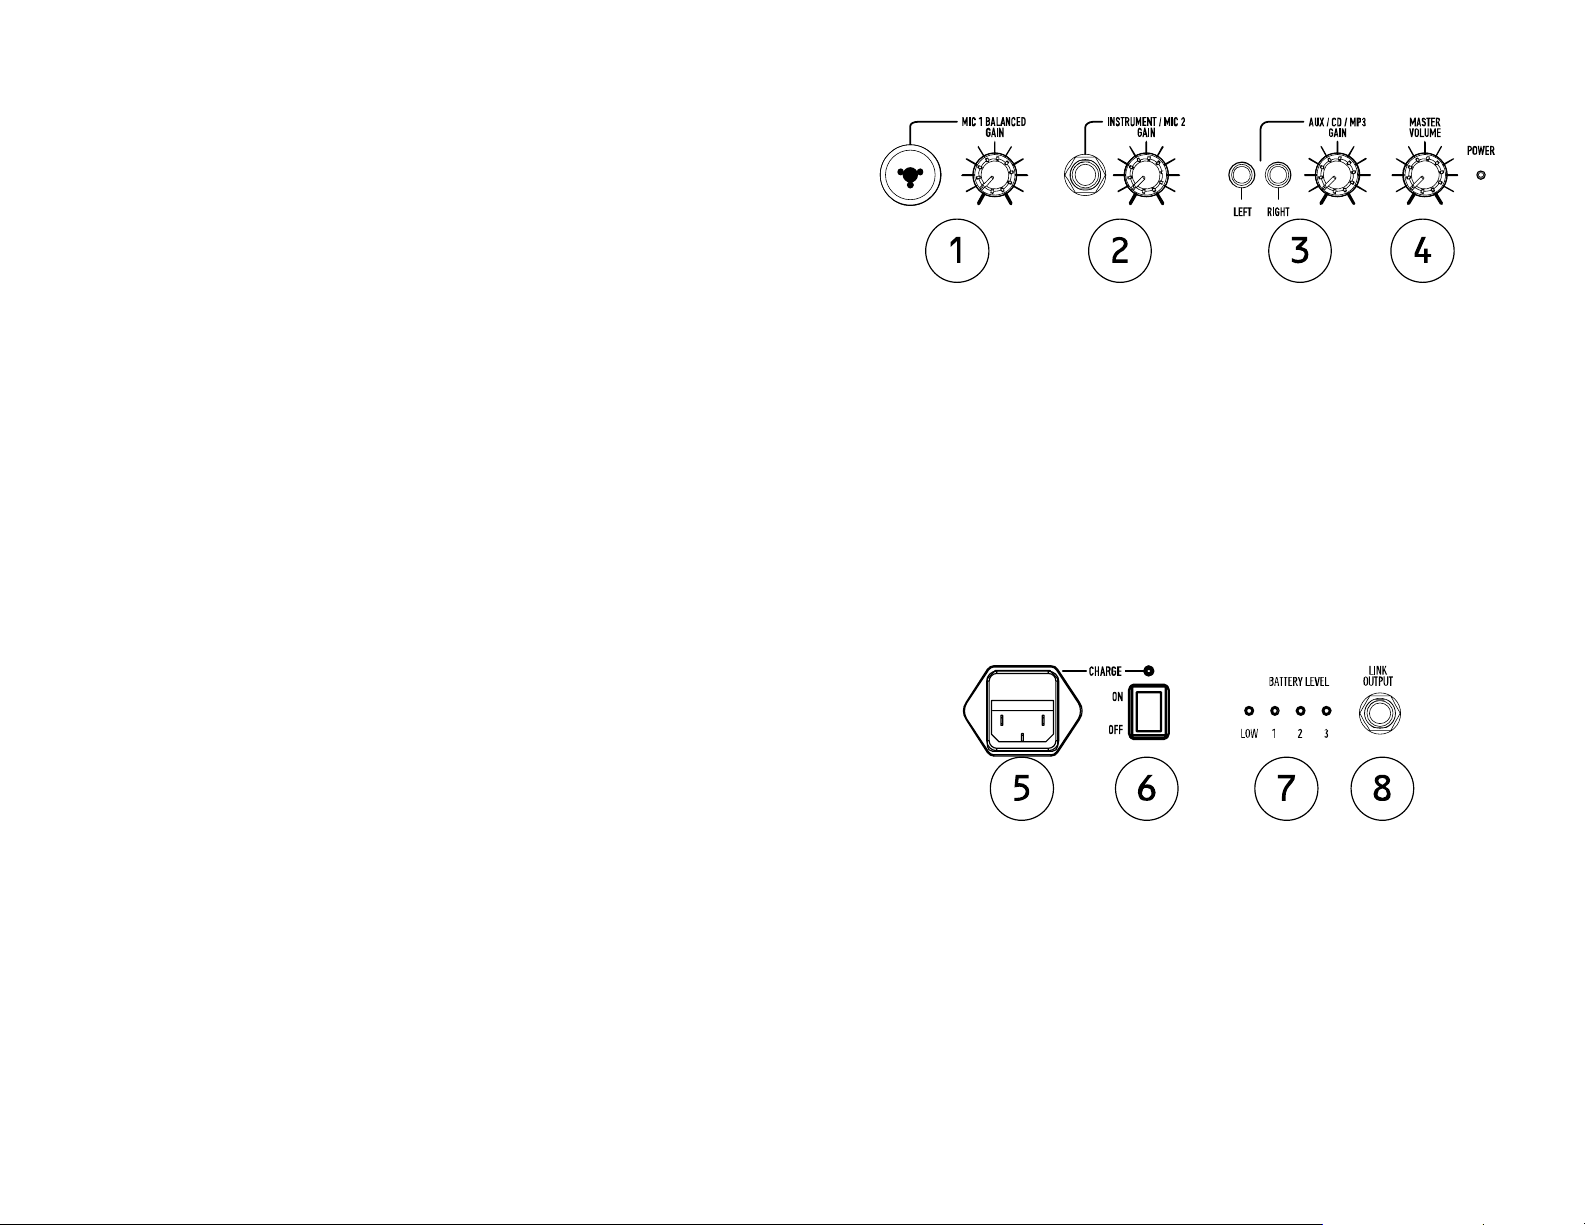
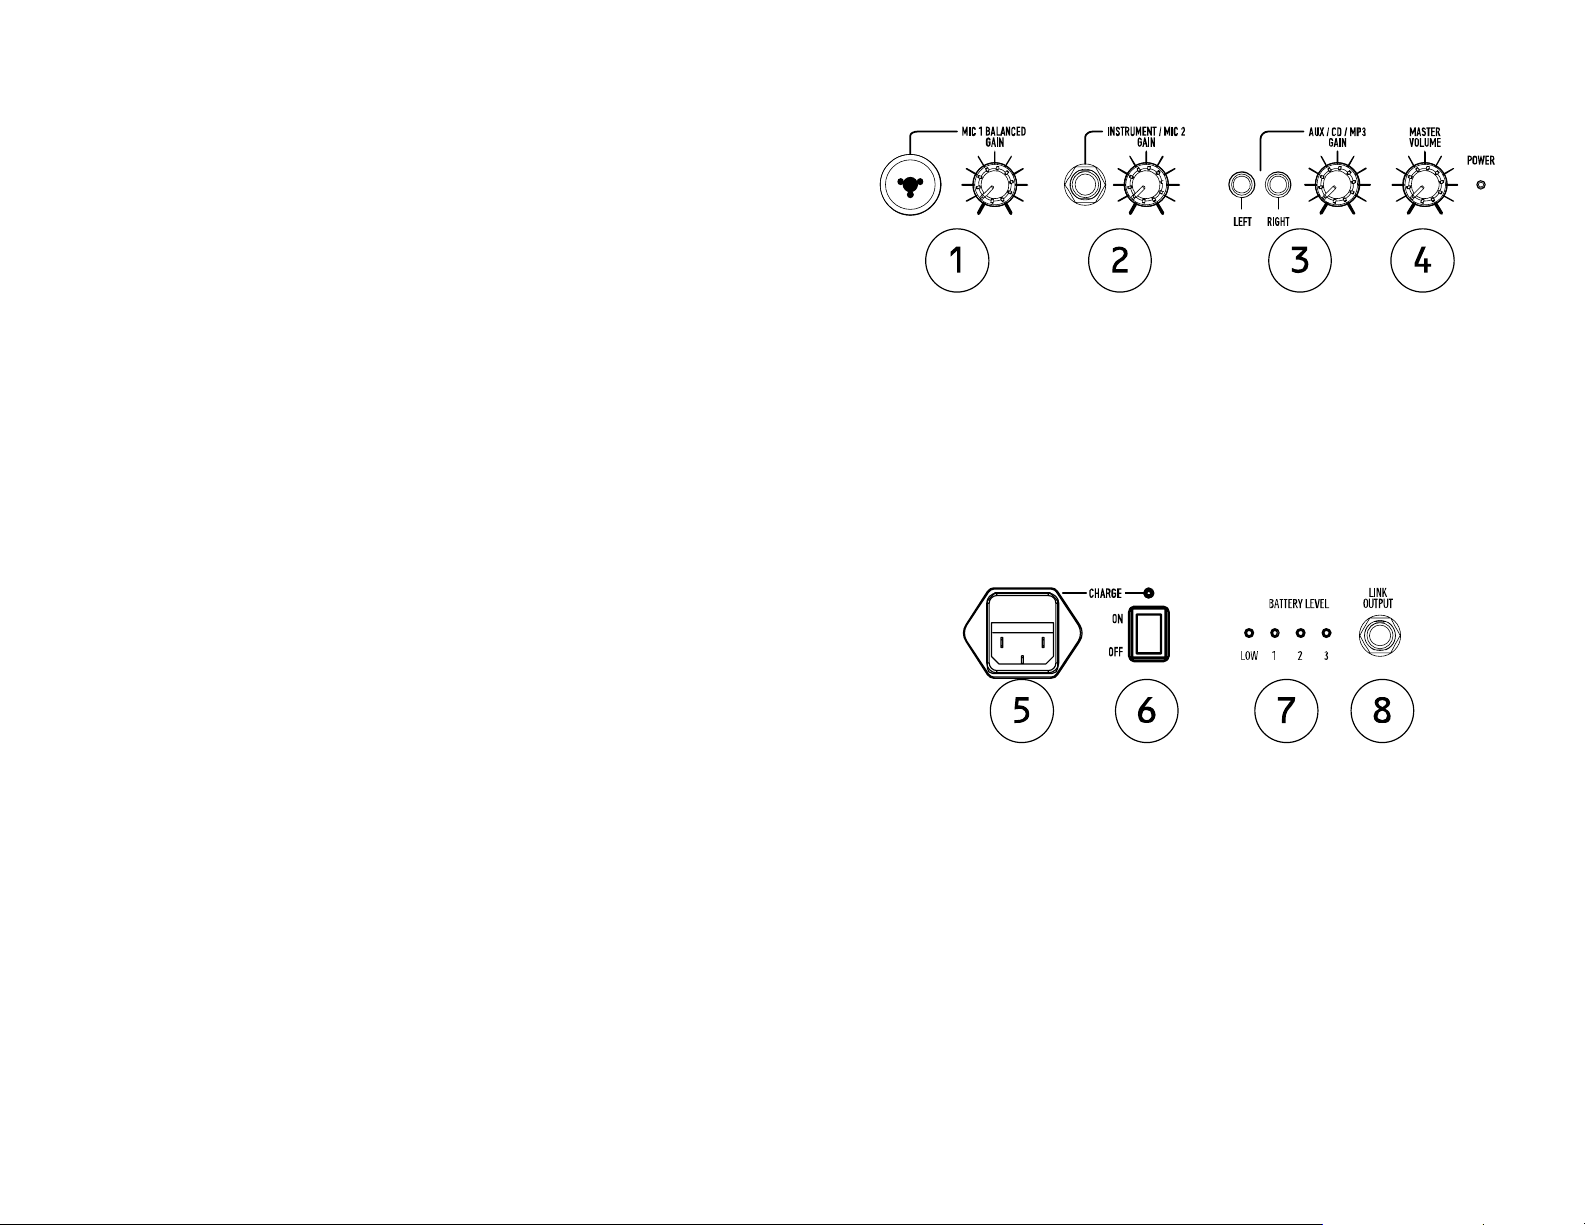
1. Microphone 1 Balanced Input with Gain Control (1/4”
and XLR): This jack can either take a ¼” balanced or a
XLR balanced cable. An XLR Cable is included with the
microphone.
2. Instrument/Microphone 2 Input with Gain Control
(1/4”): This mono input accepts a ¼” input such as a
microphone, guitar, or other musical instrument.
3. Auxuliary/CD/MP3 input with Gain Control (Stereo
RCA): This stereo RCA input can be used to connect a CD,
MP3, or other audio source. To connect to a portable
device with a 1/8” headphone jack, you need a standard
(1/8” to RCA) adapter which is NOT included.
4. Master Volume Control: This knob controls the master
volume of the Road PA.
5. Power Adapter (IEC): Insert the included power cable
here to charge the unit. Note that the Road PA can run off
the power adapter while it simeotaneously charges the
battery. The charge indicator illuminates when the battery
is charging
6. Power ON/OFF Switch
7. Battery Level Indicator: While the unit is powered ON,
these four lights indicate the power left in the battery.
Battery life varies based on volume and usage.
8. Link Output: this ¼” jack is a stereo output to send the
mixed inputs
3 4
Page 3
Guía de instalación rápida (ESPAÑOL)
PARA LOGRAR LA MÁXIMA VIDA ÚTIL DE LA
BATERÍA, CÁRGUELA TOTALMENTE ANTES DEL
PRIMER USO
1. Asegúrese que todos los artículos incluidos al inicio de este manual estén
incluidos en la caja.
2. LEA LAS INSTRUCCIONES DEL FOLLETO DE SEGURIDAD ANTES DE
UTILIZAR EL PRODUCTO.
3. ASEGÚRESE DE QUE HA CARGADO COMPLETAMENTE LA BATERÍA.
4. Estudie este diagrama de instalación.
5. Coloque el producto en una posición adecuada para su funcionamiento.
6. Asegúrese de que todos los dispositivos de entrada tales como
micrófonos, reproductores de CD, reproductores MP3 y
amplificadores/sistemas de amplificadores para altavoces estén apagados
y con el control de volumen en “cero”.
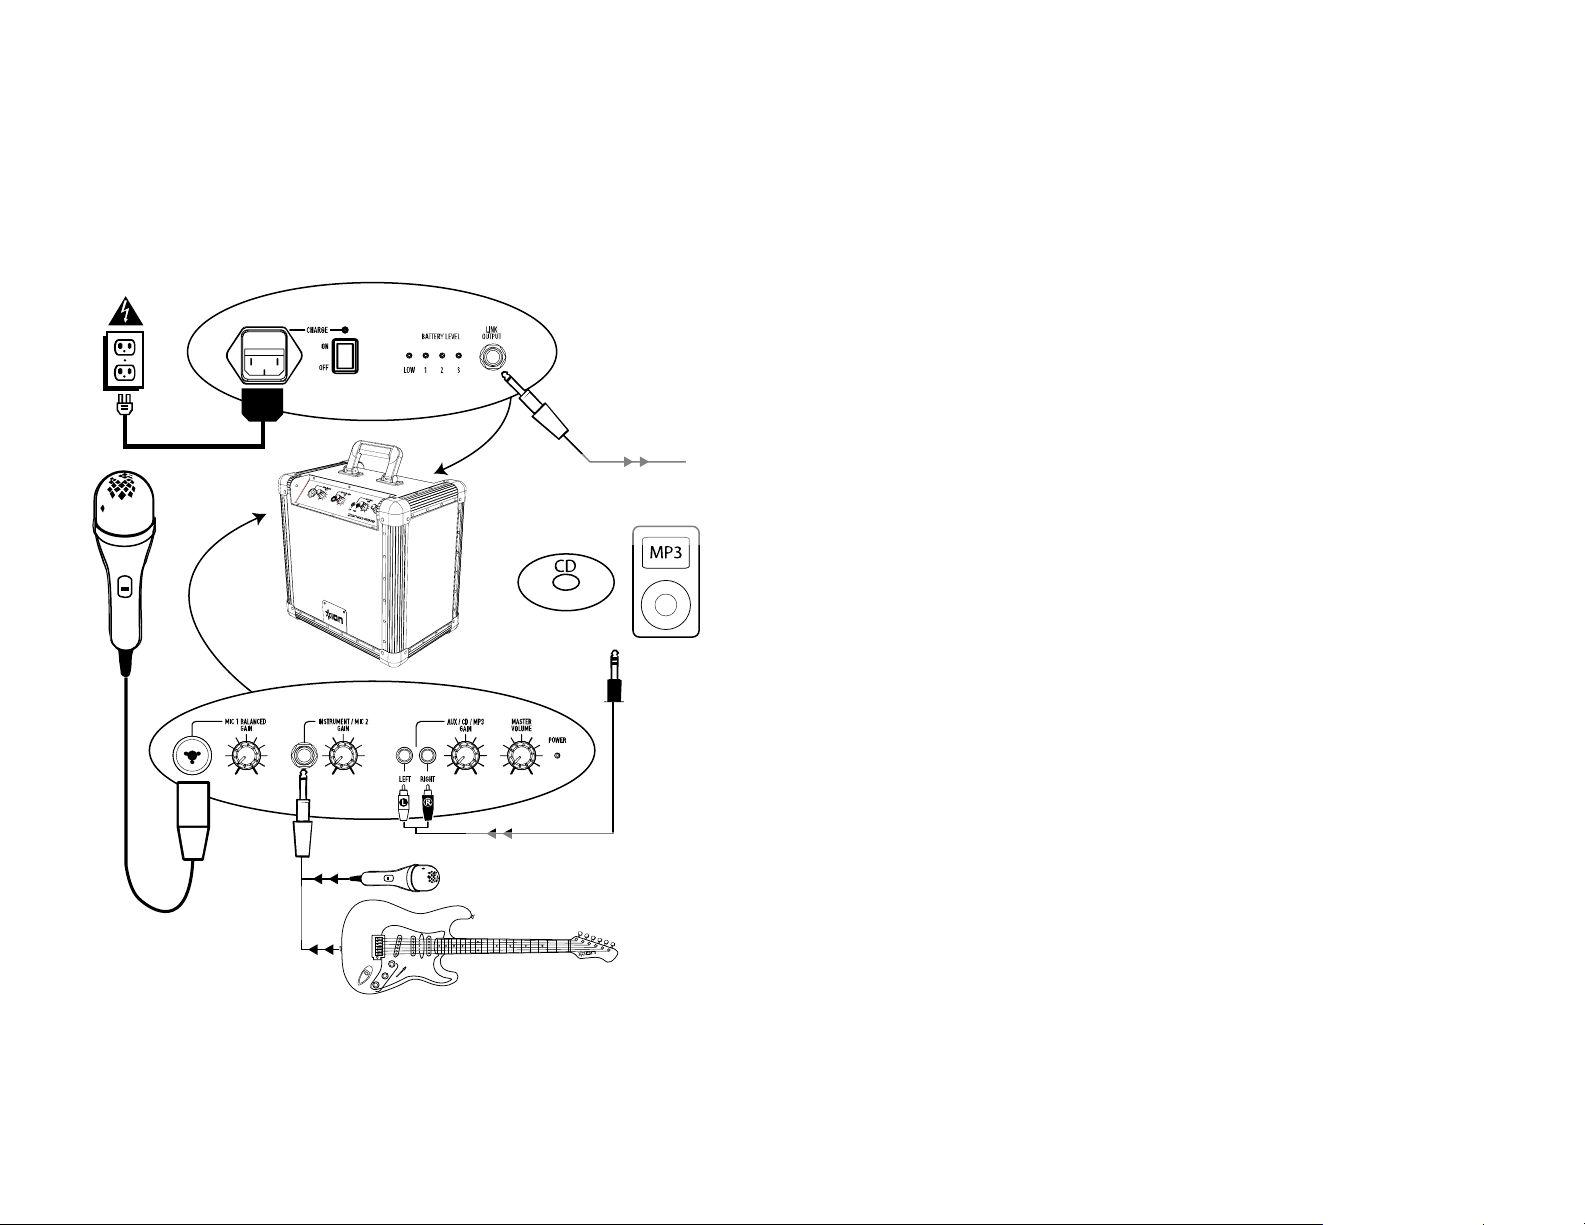
7. Conecte todos los dispositivos como se muestra arriba.
8. Conecte las salidas estéreo a los amplificadores de alimentación, unidades
A otro sistema de
amplificación para
altavoces
de cinta magnética, y/o fuentes de audio.
9. Encienda todo en el siguiente orden:
fuentes de entrada de audio (por ejemplo, micrófonos, instrumentos,
reproductores de CD/MP3)
por último, cualquier amplificador
10. Al apagar, realice siempre esta operación en sentido inverso:
• apague los amplificadores
• su mezclador
• por último, cualquier dispositivo de entrada
Visite
http://www.ion-audio.com para registrar el producto.
Datos técnicos
• Voltaje de entrada: CA 100-120 V/ 60 Hz 220-240 V/ 50 Hz
Potencia de salida: (Pico) 22 W
Cable vendido por
separado
OR
•
Potencia de salida: (RMS) 1 5 W, 1% THD
•
Respuesta en frecuencia: 10 Hz~ 50 kHz +/- 3 dB
•
Especificaciones de montaje del poste inferior: Montaje de poste
•
estándar que se encuentra en las tiendas minoristas para pr ofesionales de
audio
o profundidad 80 mm (3.15”)
o Diámetro 35.5 mm (1.40”)
• Tiempo requerido para cargar totalmente el iPA02: menos de 12
horas
Vida útil de la batería: Más de 10 horas* a pleno volumen del iPA02
•
cuando está totalmente cargada.
*Nota: La vida útil de la batería puede variar en función de la temperatura, la
antigüedad y el consumo de volumen del producto.
5 6
Page 4
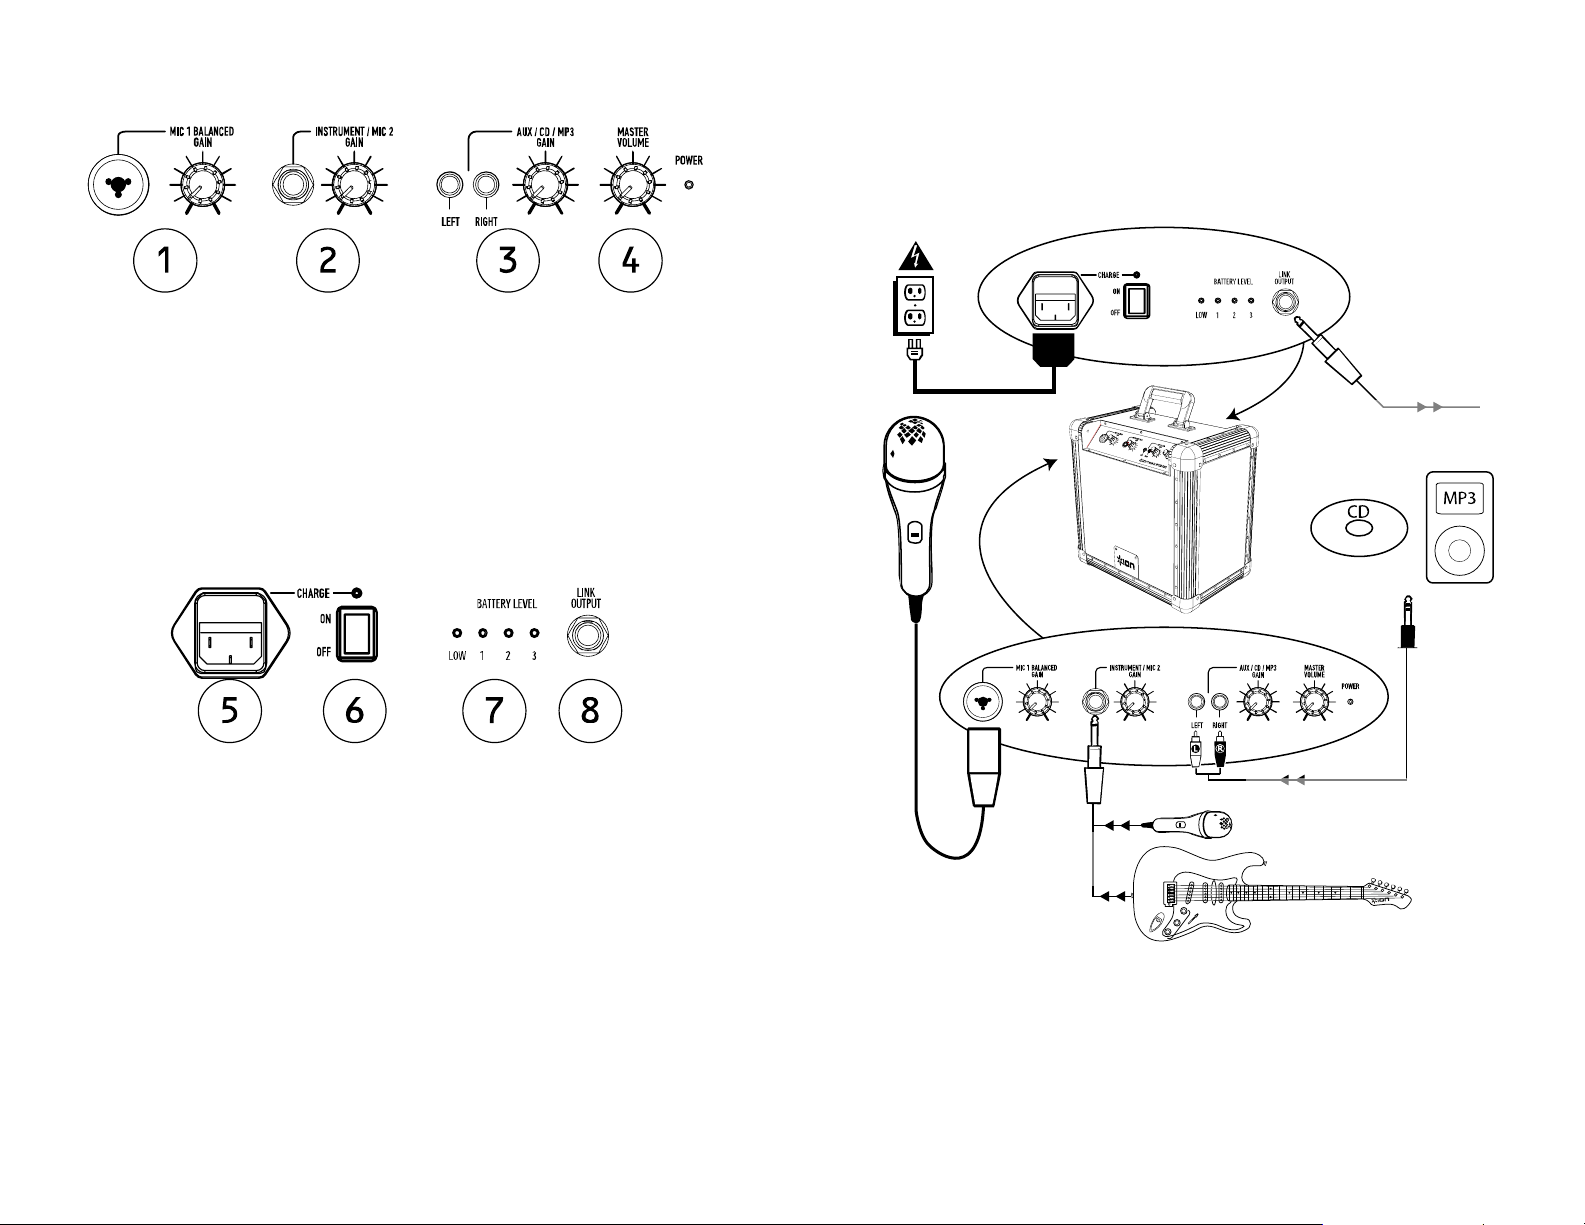
DIAGRAMA Y DESCRIPCIÓN Aufbauanleitung (DEUTSCH)
1. Entrada balanceada de micrófono 1 con control de ganancia (1/4”
y XLR): Este conector admite un cable balanceado de ¼” o XLR. Se
incluye un cable XLR con el micrófono.
2. Entrada de instrumento/Micrófono 2 con control de ganancia
(1/4”): Esta entrada mono admite una entrada de ¼” tal como un
micrófono, una guitarra u otro instrumento musical.
Esta entrada se puede usar para conectar un reproductor de CD, MP3 u
otra fuente de audio. Para conectar a un dispositivo portátil con conector
para auriculares de 1/8”, se necesita un adaptador estándar (1/8” a RCA)
que no está incluido.
4. Control de volumen master: Esta perilla controla el volumen master
(maestro) del amplificador portátil para altavoces.
5. Adaptador de alimentación (IEC): Inserte aquí el cable de
alimentación incluido para cargar la unidad. Tenga en cuenta que el
amplificador portátil para altavoces puede funcionar con el adaptador de
potencia mientras se carga simultáneamente la batería. El indicador de
carga se enciende cuando se está cargando la batería.
6. Interruptor de encendido/apagado
7. Indicador de nivel de baterí a : Mientras la unidad está alimentada,
estas cuatro luces indican la energía remanente en la batería. La vida útil
de la batería varía en función del volumen y el consumo.
8. Salida de enlace: Este conector de ¼” es una salida de línea estéreo
para enviar a otro amplificador o sistema de altavoces alimentados ( tal
como otro iPA02).
Zu externem PA System 3. Entrada auxiliar/CD/MP3 con control de ganancia (RCA estéreo):
Kabel optional erhältlich
ODER
7 8
Page 5
LADEN SIE DIE BATTERIE VOR DER ERSTEN
VERWENDUNG AUF, UM DIE LEBENSDAUER DER
BATTERIE ZU MAXIMIEREN
1. Überprüfen Sie, dass sich alle auf dem Deckblatt genannten Teile in der
Verpackung befinden.
2. LESEN SIE DIE SICHERHEITSHINWEISE, BEVOR SIE DIESES PRODUKT
VERWENDEN
3. Sehen Sie sich die Aufbauabbildung der an.
4. Stellen Sie den Mixer in einer für den Betrieb geeigneten Position auf.
5. Schalten Sie alle Eingangsquellen (Mikrofone, CD Player, MP3 Player und
Verstärker/PAs aus und drehen Sie deren Lautstärke auf “Null.”
6. Verbinden Sie die Stereoausgänge mit den Verstärkern, Tape Decks, und/oder
Signalquellen.
7. Verbinden Sie Ihren Mixer und die anderen Geräte mit dem Stromkreis.
8. Schalten Sie das System in der folgenden Reihenfolge ein:
9. Gehen Sie beim Ausschalten in der genau umgekehrten Reihenfolge vor:
Registrieren Sie Ihr Produkt online unter
Technische Daten
• Eingangsspannung: AC 100-120V/ 60Hz 220-240V/ 50Hz
• Ausgangsleistung: (Peak) 22W
• Ausgangsleistung: (RMS) 15W, 1%THD
• Frequenzgang: 10Hz~ 50kHz +/- 3dB
• Boxenständerflansch: Standart-Boxenflansch, kompatibel mit Produkten
• Ladedauer der internen iPA02 Batterie: weniger als 12 Stunden
• Betriebsdauer: Über 10 Stunden* bei voller Leistung mit voller
*Beachten Sie: Die Batterieleistung kann auf Grund von Temperatur, Alter und
Eingangsquellen (z.B. Mikrofon, Instrumente und/oder CD-
Player)
Zuletzt, die Verstärker
Schalten Sie zuerst die Verstärker aus
Danach den Mixer
Und zuletzt die Eingangsquellen
http://www.ion-audio.com.
der meisten Hersteller
o Tiefe 80mm (3.15”)
o Durchmesser 35.5mm (1.40”)
Batterieladung.
Lautstärke variieren.
BEDIENELEMENTE
9. Symmetrischer Mikrofon 1 Eingang mit Gain Regler (6,3mm Klinke
und XLR): Diese Buchse nimmt sowohl ein 6,3mm Klinkenstecker a ls
auch einen XLR Stecker auf. Ein XLR Kabel finden Sie beim mitgelieferten
Mikrofon.
10. Instrument/Mikrofon 2 Eingang mit Gain Regler (6,3mm Klinke):
Dieser Mono Eingang verarbeitet normale Klinkenkabelanschlüsse von
einem Mikrofon, einer Gitarre oder einem anderen Musikinstrument.
11. Aux/CD/MP3 Eingang mit Gain Regler (Stereo RCA): Dieser Eingang
nimmt das Signal eines CD/MP3 Players oder einer anderen Audioquelle
auf. Um ein tragbares Gerät mit einem 3,5mm Miniklinkenstecker zu
verwenden, benötigen Sie einen optionalen Miniklinke/RCA Adapter.
12. Lautstärkenregler: Mit diesem Regler stellen Sie die Summenlautstärke
der Road PA ein.
13. Netzanschluss (IEC): Schließen Sie hier das mitgelieferte Netzkabel
zum Laden der Batterie an. Die Road PA kann mit dem Netzkabel
betrieben werden und gleichzeitig die Batterie laden. Die LadekontrollLED leuchtet, sobald die Batterie aufgeladen wird.
14. Power ON/OFF Schalter: Schalten Sie hier das Gerät ein und aus.
15. Batteriestand-LEDs: Wenn das Gerät eingeschaltet wird, zeigen diese
vier LEDs an, wie viel Spannung in der Batterie vorhanden ist. Die
Lebensdauer der Batterie variiert auf Grund von Lautstärke und
Betriebsdauer.
16. Link Ausgang: Verwenden Sie ein 6,3mm Stereoklinkenkabel, um diese
Buchse mit einem anderen Verstärker oder einem anderen aktiven
Lautsprechersystem (wie einem anderen iPA 02) zu verbinden.
9 10
Page 6
Guide d'installation rapide (FRANÇAIS) RECHARGER COMPLÈTEMENT LA PILE AVANT LA
Vers un autre Système PA
Câble vendu séparément
PREMIÈRE UTILISATION AFIN D’AUGMENTER SA
DURÉE DE VIE
1. Assurez-vous que tous les articles énumérés sur la page
couverture de ce guide sont inclus dans la boîte.
2. VEUILLEZ LIRE LE LIVRET DES CONSIGNES DE SÉCURITÉ
AVANT D'UTILISER LE PRODUIT.
3. VEUILLEZ VOUS ASSURER QUE LA PILE EST
COMPLÈTEMENT RECHARGÉE.
4. Examinez bien le schéma d'installation.
5. Placez l'appareil en position de fonctionnement.
6. Assurez-vous que tous les appareils d'entrée tels que
microphones, lecteur de disques compacts, lecteur MP3 et les
autres appareils branchés tels que les amplificateurs et les
systèmes PA sont hors tension et que leur volume soit réglé à
« zéro ».
7. Connectez tous les appareils tel qu'indiqué sur le schéma.
8. Brancher toutes les sorties stéréo aux amplificateurs de
puissance, aux lecteurs de cassettes et/ou aux sources audio.
9. Mettre tous les appareils sous tension dans l'ordre suivant.
source d'entrée audio (p. ex. microphones, instruments,
lecteurs CD/MP3);
en dernier, tous les amplificateurs.
10. Pour mettre hors tension, toujours inverser l'opération :
• éteindre les amplificateurs;
• console de mixage;
• en dernier, tous les appareils d'entrée.
Allez à
http://www.ion-audio.com pour enregistrer le produit.
Spécifications
OU
11
• Tension d'entrée : 100-120 V/60 Hz 220-240 V/50 Hz CA
• Puissance de sortie : (maximale) 22 W
• Puissance de sortie : pression acoustique efficace
harmonique de distorsion (THD) de 1%
• Réponse en fréquence : 10 Hz~ 50 kHz +/- 3dB
• Spécification du pied : Pied standard offert chez les bons revendeurs
audio professionnels
o profondeur de 80 mm (3,15 po)
o Diamètre de 35,5 mm (1,40 po)
• Temps de recharge complète du iPA02 : moins de 12 heures
• Durée de vie de la pile : Plus de 10 heures* à volume maximal lorsque
le iPA02 est rechargé complètement.
*Remarque : La durée de vie de la pile peut être affectée par la te mpérature, l’âge
du produit, ainsi que le niveau du volume d’utilisation.
(RMS) de 15 W, taux
12
Page 7
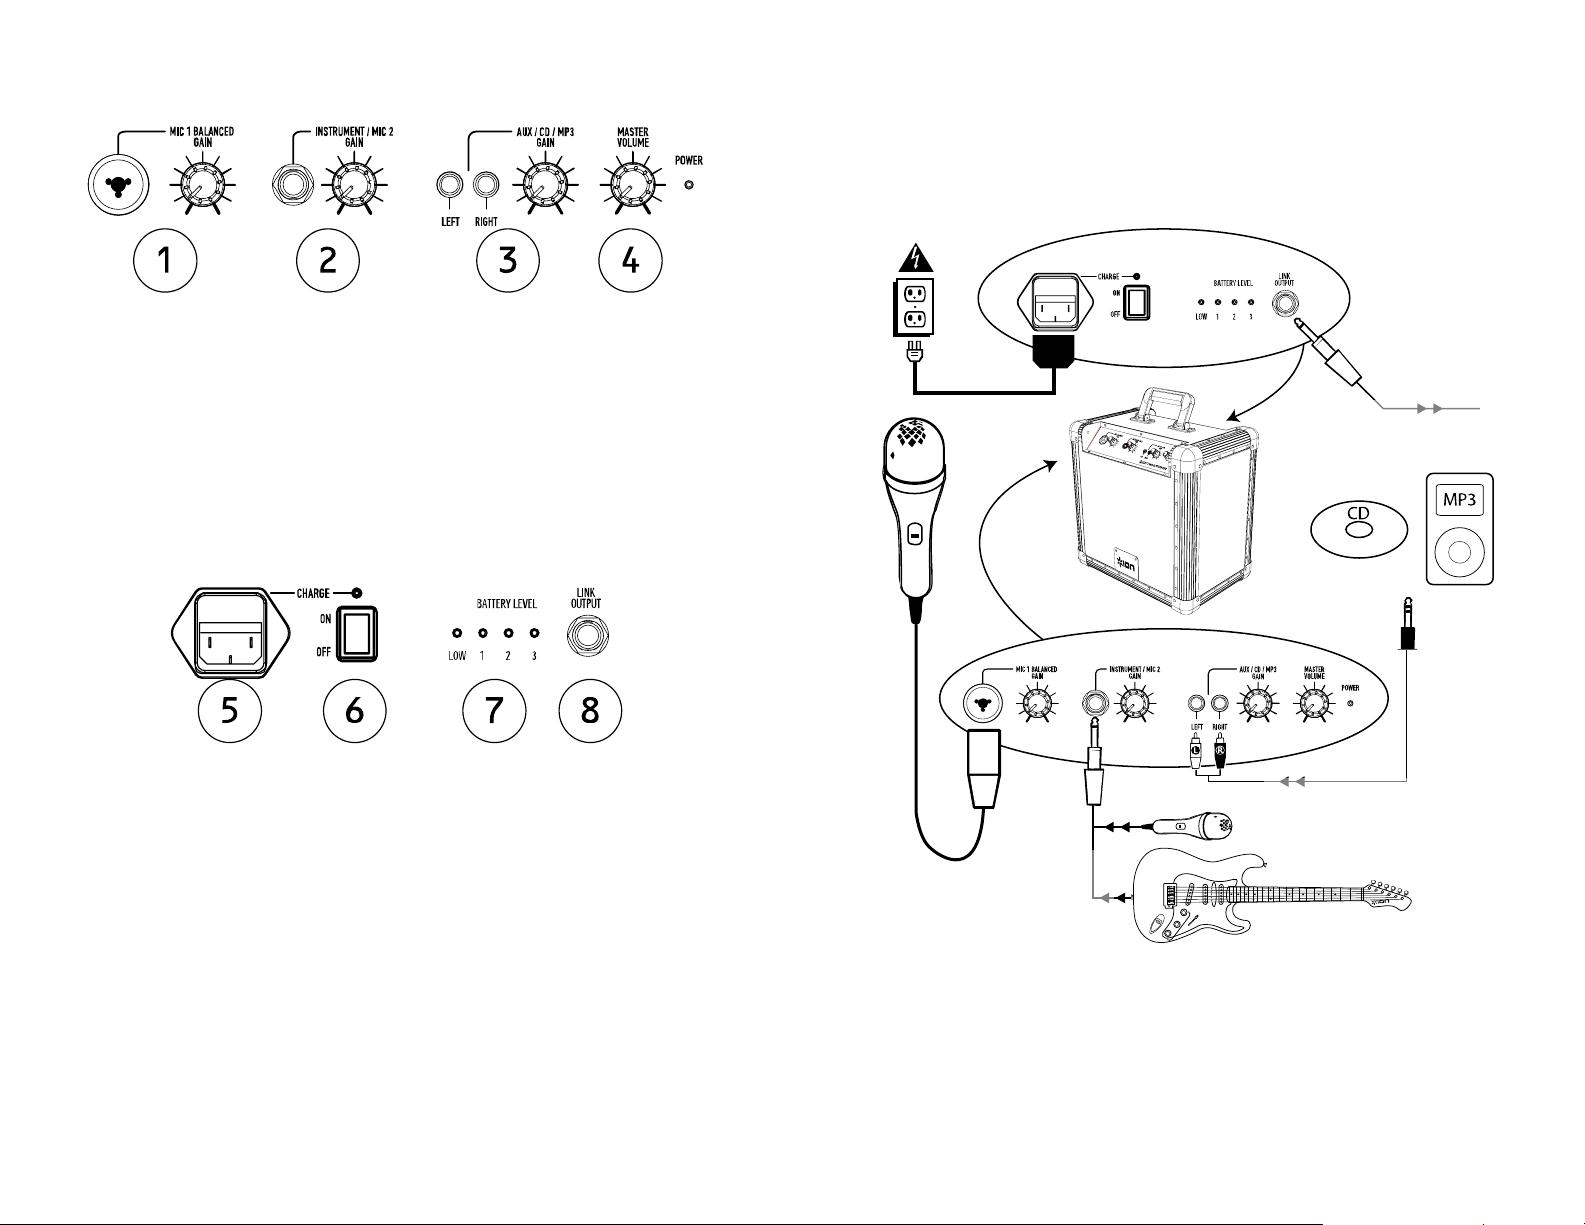
SCHÉMA ET DESCRIPTION
Guida d’impostazione rapida (ITALIANO)
1. Entrée microphone 1 symétrique avec commande de gain (1/4 po
et XLR) : Cette entrée peut accueillir un câble symétrique de ¼ po ou un
câble symétrique XLR. Un câble XLR est fourni avec le microphone.
2. Entrée instrument/microphone 2 avec commande de gain
(1/4 po) : Cette entrée mono peut accueillir un câble de ¼ po pour
microphone, guitare ou un autre instrument de musique.
3. Entrée auxiliaire/CD/MP3 avec commande de gain (stéréo RCA) :
Cette entrée permet de brancher un lecteur de disques compacts, un
lecteur MP3 ou autres sources audio. Pour brancher à un appareil portable
à l’aide d’une prise de casque d’écoute de 1/8 po, il vous faut un
adaptateur standard (1/8 po à RCA) non fourni.
4. Volume général : Ce contrôle permet de régler le niveau du volume
général du système PA portable.
5. Adaptateur d’alimentation (IEC) : Brancher le câble d'alimentation
ci-inclus ici pour recharger l’apparei l. Sachez qu’il est possible d’utiliser le
système PA portable tout en le rechargeant à l’aide de l’adaptateur
d’alimentation. L'indicateur de charge s’allume lorsque la pile se recharge.
6. Interrupteur Marche/Arrêt
7. Indicateur de niveau de charge : Lorsque l'appareil est sous tension,
ces quatre témoins indiquent le niveau de charge de la pile. La durée de
vie de la pile dépend de l’utilisation de l’appareil et du réglage du niveau
du volume.
8. Sortie de liaison : Cette sortie est de type stéréo à niveau ligne qui
permet d'acheminer le signal à un autre système d’amplification tel qu’un
autre iPA02.
Ad un altro sistema PA
Cavo venduto
separatamente
OPPURE
13 14
Page 8
CARICARE TOTALMENTE LA BATTERIA PRIMA DEL
PRIMO UTILIZZO PER GARANTIRNE LA MASSIMA
DURATA
1. Verificare che tutti gli elementi el encati sul frontespizio di questa guida siano
inclusi nella confezione.
2. PRIMA DI UTILIZZARE IL PRODOTTO LEGGERE IL LIBRETTO DELLE
ISTRUZIONI DI SICUREZZA.
3. ASSICURARSI DI AVER CARICATO COMPLETAMENTE LA BATTERIA.
4. Esaminare attentamente lo schema di montaggio.
5. Posizionare il prodotto in maniera adeguata all’uso.
6. Assicurarsi che tutti i disposit ivi d’ingresso quali microfoni, lettori cd, lettori
mp3 e amplificatori/PA collegati siano spenti e che il volume sia impostato su
“zero”
7. Collegare tutti i dispositivi come il lustrato in precedenza.
8. Collegare le uscite stereo agli amplificatori, piastre di registrazione e/o altre
sorgenti audio.
9. Accendere tutto nel seguente ordine:
sorgenti di ingresso audio (microfoni, strumenti, lettori CD/MP3)
per ultimi, gli amplificatori
10. Al momento dello spegnimento, invertire l’operazione
• spegnendo gli amplificatori
• il mixer
• per ultimi, tutti i dispositivi di ingresso
Recarsi sul sito
http://www.ion-audio.com per la registrazione del prodotto.
Specifiche tecniche
• Voltaggio d’Ingresso: CA 100-120V/ 60Hz 220-240V/ 50Hz
• Potenza nominale di uscita: (Peak) 22W
• Potenza nominale di uscita: (RMS) 15W, 1%THD
• Risposta di frequenza: 10Hz~ 50kHz +/- 3dB
• Specifiche del sostegno di montaggio inferiore: Sostegno standard
presso qualsiasi rivenditore audio professionale
o Profondità 80mm (3.15”)
• Tempo di ricarica dell’i PA02: meno di 12 ore
• Durata della batteria: oltre 10 ore* a pieno volume del iPA02 quando
*Nota: la durata della batteria può variare in base alla temperatura, l’età e il
o Diametro 35.5mm (1.40”)
pienamente carica.
volume di utilizzo del prodotto.
DIAGRAMMA E DESCRIZIONE
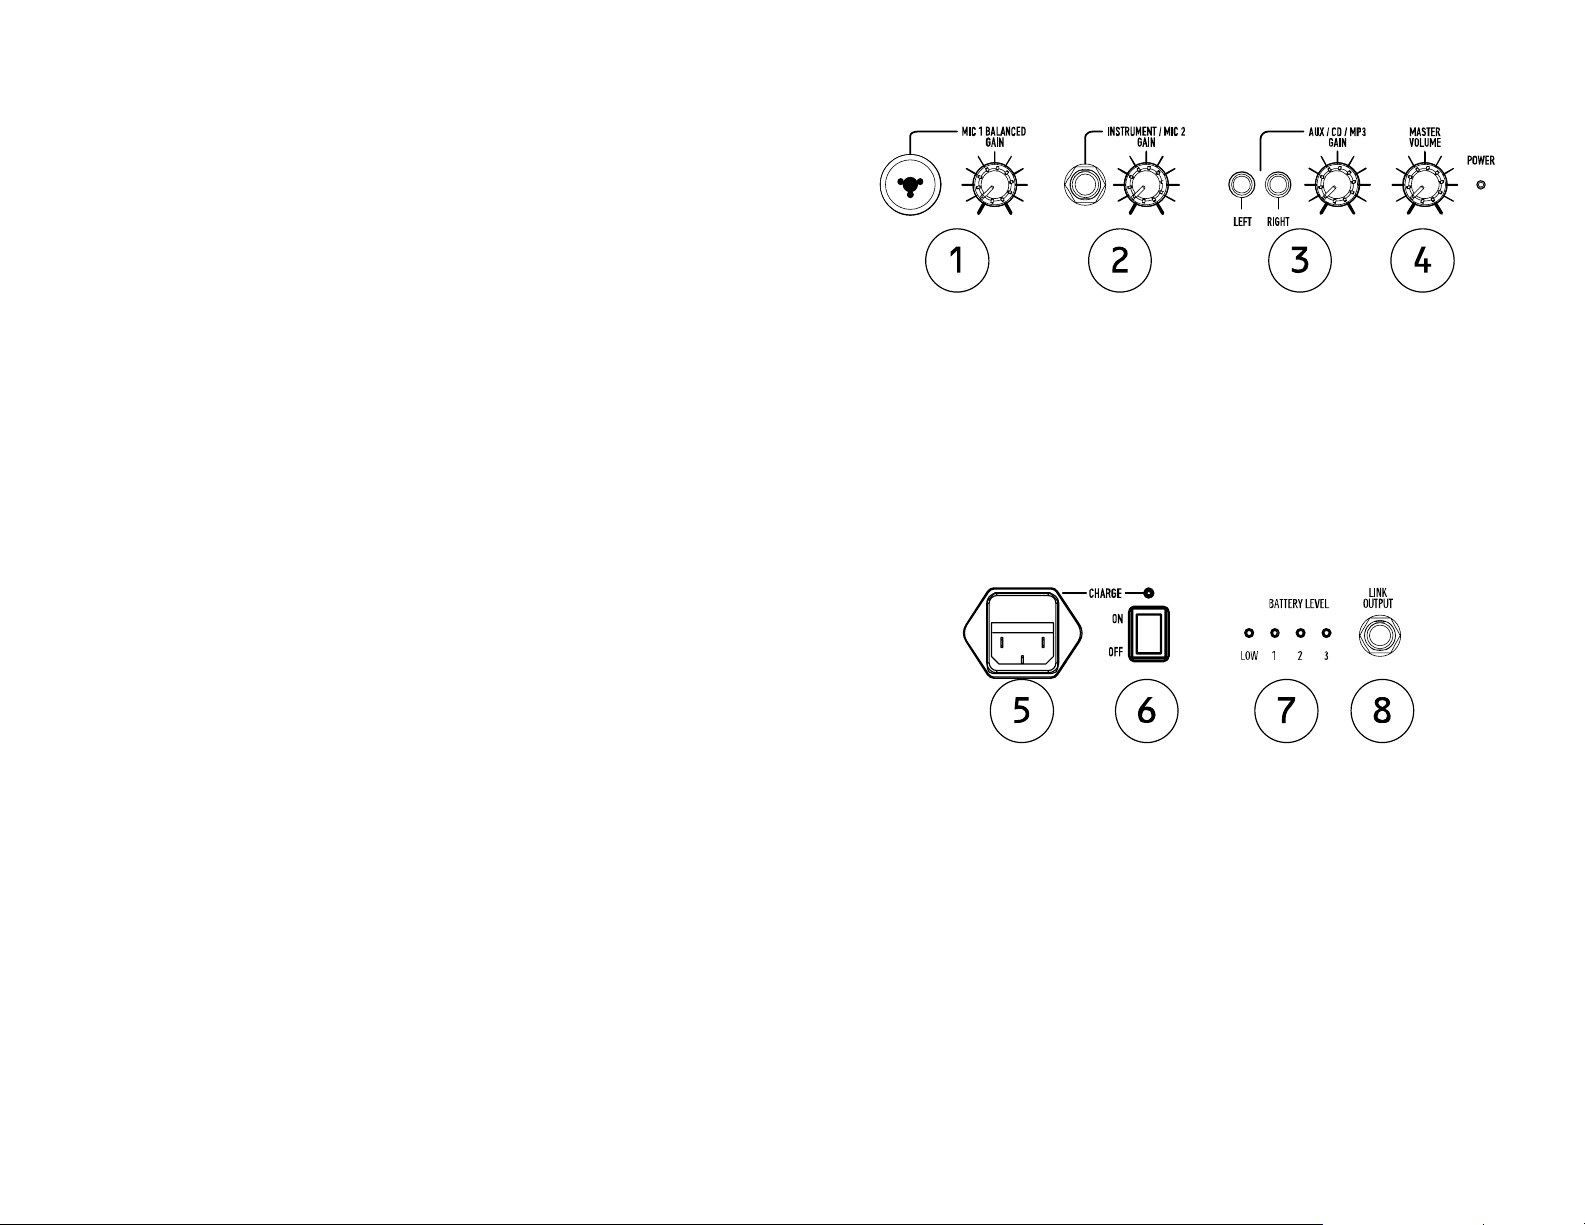
1. Ingresso bilanciato microfono 1 con controllo di guadagno gain
(1/4” e XLR): questo jack accetta un cavo bilanciato da ¼” o XLR. Un
cavo XLR è incluso con il microfono.
2. Ingresso strumento/microfono con controllo di guadagno gain
(1/4”): questo ingresso mono accetta un ingresso da ¼” quali un
microfono, chitarra o altro strumento musicale.
3. Ingresso ausiliario/CD/MP3 con controllo di guadagno gain (RCA
Stereo): questo ingresso può essere utilizzato per il collegamento di un
CD, MP3, o altra sorgente audio. Per collegare un dispositivo portatile
dotato di jack cuffie da 1/8”, è necessario un adattatore standard (da 1/8”
a RCA) non incluso.
4. Comando volume master: questa manopola regola il volume master del
Road PA.
5. Adattatore di alimentazione (IEC): inserire il cavo di alimentazione in
dotazione per caricare l’apparecchio. Il Road PA può funzionare con
l’adattatore anche durante la ricarica della batteria. L’indicatore di carica si
illumina durante la ricarica stessa.
6. Interruttore di alimentazione ON/OFF
7. Indicatore di livello batteria: ad apparecchio acceso (ON), queste
quattro luci indicano la carica residua della batteria. La durata della
batteria dipende dal volume e dall’uso.
8. Uscita link: questo jack da ¼” è un’uscita stereo di linea per l’invio ad un
altro amplificatore o sistema di altoparlanti (quali un altro iPA02).
15 16
 Loading...