

Iomega 33784 - Gigabit Ethernet 1HD X 500GB StorCenter Network Storage, StorCenter Quick Start Manual

Iomega® StorCenter™
Network Hard Drive
Quick Start Guide
Guide de démarrage rapide
Schnellstart-Handbuch
Guida di installazione rapida
Guía de instrucciones rápidas
Guia de uso rápido
Snel aan de slag
Snabbstartguide
Introduktion
Hurtigreferanse
Pikaopas
Gyors útmutató
Stručná příručka
Wprowadzenie
Οδηγός γρήγορης εκκίνησης
快速入門指南
If you have a problem, we can help. Please do NOT return this product to the store!
Your answer is on the web. Visit our award-winning web support site www.iomega.com.
Select your region, then select Support and Downloads.
Si vous avez un problème, nous pouvons vous aider. NE RENVOYEZ PAS ce produit au
magasin !
Votre réponse est sur le Web. Site Web d’assistance primé www.iomega.com.
Sélectionnez votre région puis Support et téléchargements.
Si tiene algún problema, podemos ayudar. ¡Por favor, NO devuelva este producto a la
tienda!
Su respuesta está en la web. Destacado sitio Web de atención al cliente
www.iomega.com. Seleccione su región y, a continuación, acceda al
área de asistencia y descarga.
如果發生問題, 我們可以提供協助。請「勿」將此產品退回至門市!
您要的解答 就在網站上 。優質的網路支援網站 www.iomega.com。選擇您所在的地
區,然後選擇「支援」。
Wenn Sie ein Problem haben, können wir Ihnen helfen. Bringen Sie dieses Produkt
NICHT zu Ihrem Händler zurück!
Ihre Antwort steht im Netz. Preisgekrönte Support-Website www.iomega.com. Wählen
Sie Ihr Gebiet aus und klicken Sie auf Support und Downloads.
In caso di problemi, noi possiamo fornire assistenza. NON restituire questo prodotto al
rivenditore!
La risposta è sul Web. Sito di supporto sul Web premiato www.iomega.com. Selezionare
la propria regione, quindi scegliere Supporto tecnico e download.

Contents • Matières • Inhalt • Sommario • Contenido
Conteúdo • Inhoudsopgave • Innehåll • Indhold • Innhold
Sisällys • Περιεχόµενα • Obsah • Spis treści • Tartalom • 內容
Quick Install . . . . . . . . . . . . . . . . . . . . . . . . . . . . . . . . . . . . . . . . 4
Installation rapide . . . . . . . . . . . . . . . . . . . . . . . . . . . . . . . . . . . . . 4
Schnellinstallation . . . . . . . . . . . . . . . . . . . . . . . . . . . . . . . . . . . . . 5
Installazione rapida . . . . . . . . . . . . . . . . . . . . . . . . . . . . . . . . . . . . 5
Instalación rápida . . . . . . . . . . . . . . . . . . . . . . . . . . . . . . . . . . . . . 5
Instalação rápida . . . . . . . . . . . . . . . . . . . . . . . . . . . . . . . . . . . . . 5
Snelle installatie . . . . . . . . . . . . . . . . . . . . . . . . . . . . . . . . . . . . . . 6
Snabbinstallation . . . . . . . . . . . . . . . . . . . . . . . . . . . . . . . . . . . . . 6
Hurtig installation . . . . . . . . . . . . . . . . . . . . . . . . . . . . . . . . . . . . . 7
Rask installering . . . . . . . . . . . . . . . . . . . . . . . . . . . . . . . . . . . . . . 7
Pika-asennus . . . . . . . . . . . . . . . . . . . . . . . . . . . . . . . . . . . . . . . . 7
Gyors telepítés . . . . . . . . . . . . . . . . . . . . . . . . . . . . . . . . . . . . . . . 7
Rychlá instalace . . . . . . . . . . . . . . . . . . . . . . . . . . . . . . . . . . . . . . 8
Skrócona instrukcja insalacji . . . . . . . . . . . . . . . . . . . . . . . . . . . . . . . 8
Γρήγορη εγκατάσταση . . . . . . . . . . . . . . . . . . . . . . . . . . . . . . . . . . 9
快速安裝指南 . . . . . . . . . . . . . . . . . . . . . . . . . . . . . . . . . . . . . . . 9
Using Your StorCenter Network Hard Drive . . . . . . . . . . . . . . . . . . . . . . .10
Troubleshooting . . . . . . . . . . . . . . . . . . . . . . . . . . . . . . . . . . . . . .10
Utilisation de votre disque dur réseau StorCenter Network Hard Drive . . . . . . . .11
Dépannage . . . . . . . . . . . . . . . . . . . . . . . . . . . . . . . . . . . . . . . . .12
Arbeiten mit dem StorCenter-Netzlaufwerk . . . . . . . . . . . . . . . . . . . . . . .12
Problembehandlung . . . . . . . . . . . . . . . . . . . . . . . . . . . . . . . . . . . .13
Utilizzo del disco rigido di rete StorCenter . . . . . . . . . . . . . . . . . . . . . . . .13
Risoluzione dei problemi . . . . . . . . . . . . . . . . . . . . . . . . . . . . . . . . .14
Uso de la unidad de disco duro de red StorCenter . . . . . . . . . . . . . . . . . . .14
Solución de problemas . . . . . . . . . . . . . . . . . . . . . . . . . . . . . . . . . .15
使用您的 StorCenter Network Hard Drive . . . . . . . . . . . . . . . . . . . . . . . .15
疑難排解 . . . . . . . . . . . . . . . . . . . . . . . . . . . . . . . . . . . . . . . . . .16
Limited Warranty . . . . . . . . . . . . . . . . . . . . . . . . . . . . . . . . . . . . .17
Garantie Limitée . . . . . . . . . . . . . . . . . . . . . . . . . . . . . . . . . . . . . .17
Eingeschränkte Garantie . . . . . . . . . . . . . . . . . . . . . . . . . . . . . . . . .18
Garanzia limitata . . . . . . . . . . . . . . . . . . . . . . . . . . . . . . . . . . . . . .18
Garantía limitada . . . . . . . . . . . . . . . . . . . . . . . . . . . . . . . . . . . . .19
Customer Support . . . . . . . . . . . . . . . . . . . . . . . . . . . . . . . . . . . . .20
Assistance clientèle . . . . . . . . . . . . . . . . . . . . . . . . . . . . . . . . . . . .20
Kundenunterstützung . . . . . . . . . . . . . . . . . . . . . . . . . . . . . . . . . . .20
Assistenza clienti . . . . . . . . . . . . . . . . . . . . . . . . . . . . . . . . . . . . .20
Asistencia al cliente . . . . . . . . . . . . . . . . . . . . . . . . . . . . . . . . . . . .20
客戶支援 . . . . . . . . . . . . . . . . . . . . . . . . . . . . . . . . . . . . . . . . . .20

4
1. Plug the the StorCenter drive into an uninterruptible
power supply (UPS) or power outlet.
2. Using the included cable, connect the StorCenter
drive to your network.
3. Power up the StorCenter drive. Wait until the activity
light turns blue before proceeding.
4. Insert the Solutions CD. If the CD menu does not
launch automatically, double click the CD icon, then
double click the Start icon.
5. Click on the Run the Discovery Tool Pro button to run
the software.
NOTE: The client computer must be on the same
subnet or network segment as the StorCenter.
6. The Iomega Discovery Tool Pro software will list all
Iomega StorCenter devices on your network segment.
Select the StorCenter you would like to configure
from the Discovery window, then click the Manage
button. Refer to the software help for information on
configuration options.
7. Log into the StorCenter. If you are logging in for the
first time, leave the user name and password blank.
1. Branchez le lecteur StorCenter à un onduleur (UPS)
ou à une prise secteur.
2. Connectez le lecteur StorCenter à votre réseau en
utilisant le câble fourni.
3. Mettez le lecteur StorCenter sous tension. Attendez
que le voyant d’activité devienne bleu avant de
continuer.
4. Insérez le CD Solutions. S’il ne démarre pas
automatiquement, double-cliquez sur l’icône du CD,
puis double-cliquez sur l’icône Start (Démarrer).
5. Cliquez sur le bouton Exécutez Discovery Tool Pro
pour exécuter le logiciel.
REMARQUE :
l’ordinateur client doit se trouver sur
le même segment de réseau ou sous-réseau que
l’ordinateur sur lequel s’exécute Iomega StorCenter.
6. Le logiciel Iomega Discovery Tool Pro répertorie tous
les serveurs Iomega StorCenter sur votre segment
de réseau. Sélectionnez le système StorCenter à
configurer dans la fenêtre Discovery, puis cliquez
sur le bouton Gérer. Reportez-vous à l’aide du
logiciel pour plus d’informations sur les options de
configuration.
7. Connexion à StorCenter. S’il s’agit de votre première
connexion, laissez les champs correspondant au nom
d’utilisateur et au mot de passe vides.
Quick Install • Installation rapide •
Schnellinstallation
Installazione rapida
• Instalación rápida • Instalação rápida

5
1. Schließen Sie das StorCenter-Laufwerk an eine
USV (unterbrechungsfreie Stromversorgung) oder
Steckdose an.
2. Verbinden Sie das StorCenter-Laufwerk unter Verwendung
des mitgelieferten Kabels mit dem Netzwerk.
3. Schalten Sie das StorCenter-Laufwerk ein. Warten Sie
nun, bis die Betriebsleuchte blau leuchtet.
4.
Legen Sie die Solutions-CD ins Laufwerk ein. Falls das
Programm nicht automatisch gestartet wird, doppelklicken
Sie auf das CD-Symbol. Doppelklicken Sie anschließend auf
Start.
5. Klicken Sie auf die Schaltfläche
Führen Sie das Discovery
Tool Pro
, um die Software zu starten.
Hinweis: Der Client-Computer muss sich im selben Subnetz
oder Netzwerksegment wie das Iomega StorCenter-Gerät
befinden.
6. Die Software Iomega Discovery Tool Pro listet alle Iomega
StorCenter-Server in Ihrem Netzwerksegment auf. Wählen
Sie das StorCenter-Gerät, das Sie über das DiscoveryFenster konfigurieren möchten, und klicken Sie auf
die Schaltfläche für die Verwaltung. Informationen zu
Konfigurationsoptionen finden Sie in der Hilfe der Software.
7. Melden Sie sich beim StorCenter-System an. Wenn Sie
sich das erste Mal anmelden, lassen Sie die Felder für
Benutzername und Passwort leer.
1. Collegare l’unità StorCenter a un gruppo di continuità
o a una presa di corrente.
2. Con il cavo in dotazione, collegare l’unità StorCenter
alla rete.
3. Accedere l’unità StorCenter. Prima di continuare
attendere che il LED di attività blu si illumini.
4.
Inserire il CD Soluzioni. Se il CD non si avvia
automaticamente, fare doppio clic sull’icona del CD,
quindi sull’icona di Start (Avvio).
5. Fare clic sul pulsante Faccia funzionare L’Attrezzo di
Discovery Tool Pro per eseguire il software.
NOTA: il computer client deve trovarsi sulla stessa
sottorete o sullo segmento di rete dell’unità Iomega
StorCenter.
6. Il software Iomega Discovery Tool Pro elencherà tutti
i server Iomega StorCenter presenti sul segmento di
rete. Selezionare l’unità StorCenter da configurare
nella finestra Rilevamento, quindi fare clic sul
pulsante Gestisci. Per informazioni sulle opzioni di
configurazione, fare riferimento alla guida del software.
7. Modalità di accesso all’unità StorCenter. Se si effettua
l’accesso per la prima volta, lasciare vuoti i campi del
nome utente e della password.
1.
Conecte la unidad StorCenter a un sistema de
alimentación ininterrumpida (UPS) o a la toma eléctrica.
2. Utilice el cable que se incluye para conectar la unidad
StorCenter a la red.
3. Encienda la unidad StorCenter. Espere hasta que la
luz de actividad se ponga azul antes de continuar.
4.
Introduzca el CD de soluciones. Si la instalación no se inicia
automáticamente, haga doble clic en el icono del CD, a
continuación, haga doble clic en el icono Start (Iniciar).
5. Haga clic en el botón
Ejecute la
Discovery Tool Pro Software
para ejecutar el software.
NOTA: el equipo cliente debe encontrarse en la misma
subred o segmento de red que Iomega StorCenter.
6. El software Iomega Discovery Tool Pro mostrará una lista
de todos los servidores de Iomega StorCenter detectados.
Seleccione el dispositivo StorCenter que desea configurar
en la ventana Discovery y después haga clic en el botón
Administrar. Consulte la ayuda del software para obtener
información sobre las opciones de configuración.
7. Inicie sesión en StorCenter. Si es la primera vez que inicia
sesión, deje el nombre de usuario y la contraseña en blanco.
1. Conecte a unidade StorCenter a uma fonte de
alimentação ininterrupta (UPS) ou tomada elétrica.
2. Com o cabo fornecido, conecte a unidade StorCenter
à sua rede.
3. Ligue a unidade StorCenter. Aguarde até que a luz de
atividade fique azul antes de prosseguir.
4. Insira o CD Soluções. Se o menu do CD não for
exibido automaticamente, clique duas vezes no ícone
do CD Soluções e, em seguida, clique duas vezes no
ícone Iniciar.
5. Clique no botão do Run the Discovery Tool Pro para
executar o software.
OBS: O computador cliente deve estar na mesma
sub-rede ou no mesmo segmento de rede que o
StorCenter.
6. O software Iomega Discovery Tool Pro irá listar todos
os servidores Iomega StorCenter no seu segmento
de rede. Na janela Discovery, selecione o StorCenter
que deseja configurar e, em seguida, clique no
botão Manage (Gerenciar). Consulte a Ajuda do
software para obter informações sobre opções de
configuração.
7. Efetue login no StorCenter. Caso esteja efetuando
login pela primeira vez, deixe o nome de usuário e a
senha em branco.
6
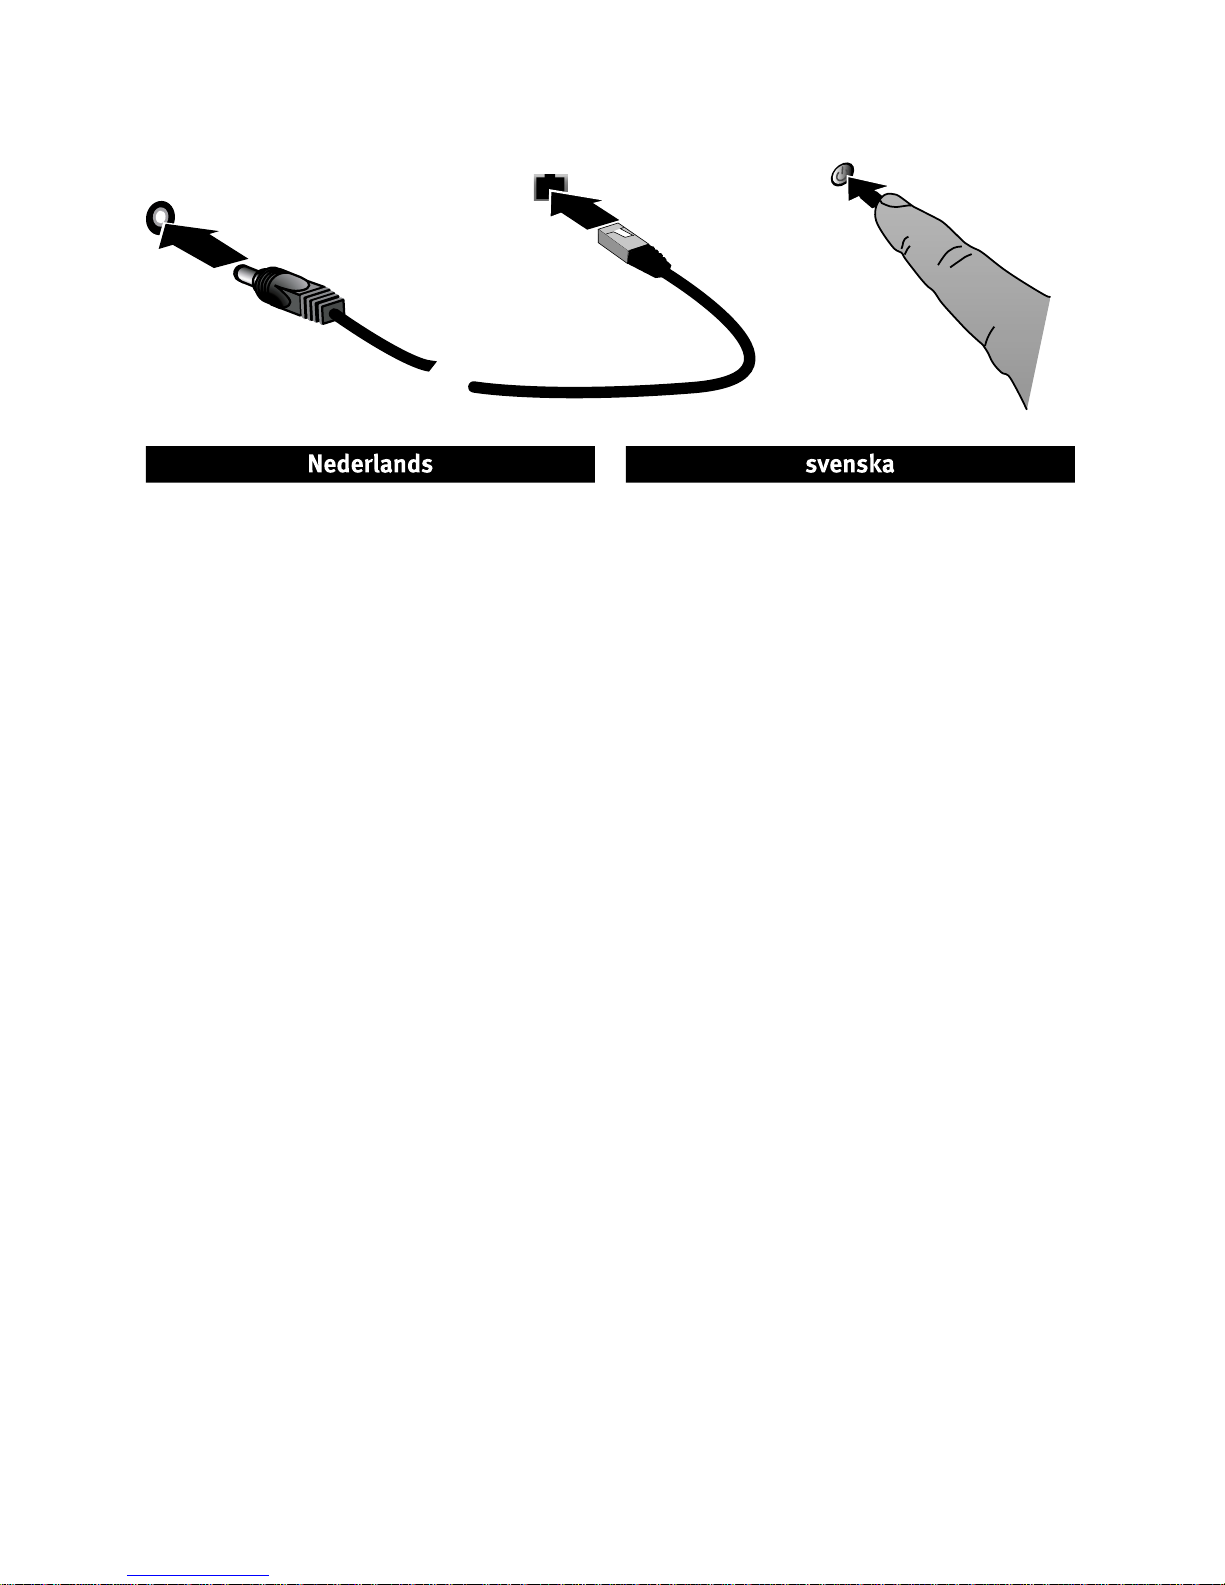
1. Sluit de StorCenter-drive aan op een UPS
(uninterruptible power supply) of stopcontact.
2. Sluit de StorCenter-drive met de meegeleverde kabel
aan op uw netwerk.
3. Schakel de StorCenter-drive in. Wacht tot het
statuslampje blauw brandt voordat u verdergaat.
4. Plaats de cd Solutions in het cd-rom-station. Als
het cd-menu niet automatisch wordt geopend,
dubbelklikt u op het cd-pictogram en daarna op het
Start-pictogram.
5. Klik op de knop van de Run the Discovery Tool Pro om
die software te starten.
OPMERKING: de clientcomputer moet zich in
hetzelfde subnet of netwerksegment bevinden als de
StorCenter-drive.
6. In de Iomega Discovery Tool Pro-software worden alle
Iomega StorCenter-servers in uw netwerksegment
vermeld. Selecteer de StorCenter-drive die u wilt
configureren in het Discovery-venster en klik
op de knop Manage (Beheren). Raadpleeg de
help van de software voor meer informatie over
configuratieopties.
7. Meld u aan bij de StorCenter-drive. Als u zich voor
het eerst aanmeldt, laat u de gebruikersnaam en het
wachtwoord leeg.
1. Anslut StorCenter-enheten till en UPS-enhet
(avbrottsfri strömkälla) eller ett strömuttag.
2. Anslut StorCenter-enheten till ditt nätverk med den
medföljande kabeln.
3. Slå på strömmen till StorCenter-enheten. Vänta
tills aktivitetslampan lyser med blått sken innan du
fortsätter.
4. Sätt in Solutions-CD:n. Dubbelklicka på CDikonen om CD-menyn inte öppnas automatiskt och
dubbelklicka sedan på startikonen.
5. Klicka på knapen Run the Discovery Tool Pro för att
starta programmet.
OBS: Klientdatorn måste vara i samma undernät eller
nätverkssegment som StorCenter.
6. Programmet Iomega Discovery Tool Pro listar alla
Iomega StorCenter-servrar i ditt nätverkssegment.
Välj den StorCenter du vill konfigurera från fönstret
för Discovery och klicka sedan på knappen Manage.
Se programhjälpen för information om konfigurations
alternativ.
7. Logga in på StorCenter. Om du loggar in för första
gången ska du lämna användarnamn och lösenord
tomt.
Snelle installatie • Snabbinstallation • Hurtig installation
Rask installering • Pika-asennus • Gyors telepítés
 Loading...