

Page 1

TM
User’s Manual
TM
®
Digital Image Center
Instructions for use
with a TV or digital
camera!
This manual covers everything you need to know about
using your FotoShow
™
Digital Image Center with a TV set
or digital camera. For more information on using your
FotoShow Image Center as an external Zip
®
250 USB
drive, please view the Zip drive Manual on the Zip disk
that came with your FotoShow Digital Image Center.
To view the Zip Drive Manual, you must have Microsoft
®
Internet Exlplorer®4.0 or higher or Netscape Navigator
™
4.5 or higher installed on your system.
®
TM
Page 2

Limited Warranty
(Drives and Media)
Coverage
Iomega warrants this hardware product to be free from defects in materials and workmanship for the
warranty period. This non-transferable, limited warranty is only to you, the first end-user Purchaser. The
warranty begins on the date of purchase and lasts for the period specified below:
Clik!
™
, PocketZip™, Zip®, Jaz®, ZipCD™drives: one (1) year
Clik!
™
, PocketZip™, Zip®, Jaz®, ZipCD™disk media: five (5) years
Any other Iomega hardware product unless otherwise stated: one (1) year
Excluded Products and Problems
This warranty does not apply to: (a) Iomega software products; (b) expendable components such as fuses or
bulbs; or (c) third party products, hardware or software, supplied with the warranted product. Iomega makes
no warranty of any kind on such products which, if included, are provided “AS IS.” Excluded is damage
caused by accident, misuse, abuse, unusually heavy use, use of non-Iomega supplied or approved media,
exposure of media to excess magnetic fields, or external environmental causes.
Remedies
Your sole and exclusive remedy for a covered defect is repair or replacement of the defective product, at
Iomega’s sole option and expense, and Iomega may use new or refurbished parts or products to do so. If
Iomega is unable to repair or replace a defective product, your alternate exclusive remedy shall be a refund
of the original purchase price.
The above is Iomega’s entire obligation to you under this warranty. IN NO EVENT SHALL IOMEGA BE LIABLE
FOR INDIRECT, INCIDENTAL, CONSEQUENTIAL OR SPECIAL DAMAGES OR LOSSES, INCLUDING LOSS OF DATA,
USE, OR PROFITS EVEN IF IOMEGA HAS BEEN ADVISED OF THE POSSIBILITY OF SUCH DAMAGES. In no event
shall Iomega’s liability exceed the original purchase price of the drive or the media disk. Some jurisdictions
do not allow the exclusion or limitation of incidental or consequential damages, so the above limitation or
exclusion may not apply to you.
Obtaining Warranty Service
You must notify Iomega within the warranty period to receive warranty service. For information on warranty
service, visit our website at http://www.iomega.com/supportpolicy.html; call 1-888-4-IOMEGA*; write to
Iomega Customer Service at 1821 W. Iomega Way, Roy, UT, 84067, USA; or, contact your local Iomega dealer.
Iomega's specific customer support policies (including fees for services) and procedures change as technology
and market conditions dictate. To obtain information about Iomega's current policies, please visit our website
at http://www.iomega.com/supportpolicy.html or call 1-888-4-IOMEGA*. Iomega reserves the right to change
the above stated conditions without any advance notice.
If the Iomega representative determines your product is eligible for warranty service, you will be required to
return it to Iomega, shipping prepaid, along with proper identification, a return authorization number
provided by the representative, and proof of purchase. Customers located in Latin America may obtain
warranty service by returning the Iomega product to the dealer where it was purchased. Iomega will not
protect, recover, or return data during warranty service so you should duplicate your data before shipment.
Limitations
THE ABOVE WARRANTY IS EXCLUSIVE AND IN LIEU OF ALL OTHER WARRANTIES, EXPRESS OR IMPLIED. To the
extent permitted by applicable law, IOMEGA SPECIFICALLY DISCLAIMS ANY IMPLIED WARRANTIES, INCLUDING
ANY IMPLIED WARRANTY OF MERCHANTABILITY OR FITNESS FOR A PARTICULAR PURPOSE. Any implied
warranty required by applicable law shall be limited in duration to the express warranty term. Some
jurisdictions do not allow disclaimers of implied warranties or limitations on how long an implied warranty
lasts, so the above limitation may not apply to you.
This warranty gives you specific legal rights and you may also have other rights that vary from jurisdiction to
jurisdiction. Any suit for breach of any warranty on your Product must be filed within 1 year of the first date
the suit could have been brought.
*1-888-4-IOMEGA (1-888-446-6342) is available in the U.S and Canada only
Page 3

Table of Contents
Limited Warranty . . . . . . . . . . . . . . . . . . . 2
Getting Started . . . . . . . . . . . . . . . . . . . . 5
List of Features. . . . . . . . . . . . . . . . . . . 5
Contents . . . . . . . . . . . . . . . . . . . . . . . 5
Accessories . . . . . . . . . . . . . . . . . . . . . 6
Front Panel Controls and Indicators . . . . . 7
Back Panel Controls and Connectors . . . . 7
Connecting Your FotoShow
™
Image Center . . 8
Typical Connection . . . . . . . . . . . . . . . . 8
Using the RCA Connectors. . . . . . . . . . 8
Other Types of Connections. . . . . . . . . . 10
Using an S-Video Connector . . . . . . . . 11
Using the FotoShow
™
Auto Adapter . . . 13
Viewing the FotoShow™Tutorial . . . . . . . 13
Copying Files to the FotoShow
™
Image Center . . . . . . . . . . . . . . . . . . . 15
Understanding the Copy Button
on your FotoShow™Image Center . . . . 15
Copy Selectively . . . . . . . . . . . . . . . . . 15
Copying Everything the Easy Way. . . . . . 16
Portable Downloads the Quick Way . . . . 17
Adding Photos from Your Computer . . . . 18
FotoShow
™
Image Center at a Glance . . . . . 19
Toolbar Overview . . . . . . . . . . . . . . . . . 19
Understanding the Copy Button
on your FotoShow
™
Image Center . . . . 20
Using the FotoShow™Remote Control . . . 20
Using your FotoShow
™
Image Center . . . . . 21
Remote Control Buttons . . . . . . . . . . . . 21
Using the FotoShow
™
Remote Control . . . 22
Using the FotoShow™Software . . . . . . . 23
Starting Your Fotoshow™Digital
Image Center for the First Time . . . . . 23
Setting the System Clock . . . . . . . . . 23
View the FotoShow
™
Image
Center Tutorial. . . . . . . . . . . . . . . . . 23
Before you Start Using the
FotoShow
™
Software. . . . . . . . . . . . . 23
Understanding Grids. . . . . . . . . . . . . 23
Understanding System Folders . . . . . . 25
Using the Keyboard . . . . . . . . . . . . . 26
The Album Room . . . . . . . . . . . . . . . . 27
Alternate Photo Album Views. . . . . . . 28
Using the Zoom Tool . . . . . . . . . . . . 28
Opening an Existing Album . . . . . . . . 29
Creating a New Album . . . . . . . . . . . 29
Adding Photos to an Album . . . . . . . 29
Removing Photos From an Album. . . . 30
Rearranging Photos in an Album . . . . 30
Choosing a Theme for Your Album . . . 31
Deleting Unwanted Photos. . . . . . . . . 31
Deleting an Entire Album . . . . . . . . . 32
Using Album Info to Customize Your
Album . . . . . . . . . . . . . . . . . . . . . . 32
Editing Your Pictures . . . . . . . . . . . . . . 33
Rotating Your Photo . . . . . . . . . . . . . 33
Correcting Your Photo’s Color
Automatically . . . . . . . . . . . . . . . . . 33
Removing Red-Eye from Your Photo . . 34
Adding Effects to a Photo . . . . . . . . . 34
Available Photo Effects . . . . . . . . . . . 35
Cropping a Photo . . . . . . . . . . . . . . 35
Undoing Your Changes . . . . . . . . . . . 35
Saving Your Photo . . . . . . . . . . . . . . 36
Adding Captions or Changing
a Photo’s Information . . . . . . . . . . . . 36
Creating and Viewing a Slideshow . . . . . 37
Creating a New Slideshow . . . . . . . . . 37
Turning an Album into a Slideshow . . 38
Opening an Existing Slideshow . . . . . 38
Running Your Slideshow . . . . . . . . . . 39
Adding Photos to a Slideshow . . . . . . 39
Removing Photos from a Slideshow . . 39
Rearranging the Photos in
a Slideshow . . . . . . . . . . . . . . . . . . 40
Choosing a Theme for
Your Slideshow . . . . . . . . . . . . . . . . 40
Deleting an Entire Slideshow . . . . . . . 41
Viewing and Editing the Slideshow
Information . . . . . . . . . . . . . . . . . . . 41
Some of the Available
Transition Styles . . . . . . . . . . . . . . . 41
Making Microsoft
®
PowerPoint
®
Presentations . . . . . . . . . . . . . . . . . . . 42
Using Your FotoShow
™
Image Center to Give
PowerPoint®Presentations. . . . . . . . . 42
FotoShow
™
Essentials . . . . . . . . . . . . . . . 44
Inserting Zip®Disks . . . . . . . . . . . . . . . 44
Inserting CompactFlash™Cards or IBM
®
Microdrives™. . . . . . . . . . . . . . . . . . 45
Inserting SmartMedia™Cards. . . . . . . . . 45
Ejecting Zip®Disks. . . . . . . . . . . . . . . . 46
Page 4

Ejecting Disks Without Power . . . . . . . . 46
Ejecting CompactFlash™Cards
and IBM
®
Microdrives™. . . . . . . . . . . 46
Ejecting SmartMedia™Cards . . . . . . . . . 47
Ejecting Memory Cards Without Power . . 47
Using FotoShow
™
Zip®Disks on
a Computer. . . . . . . . . . . . . . . . . . . 47
Drive Sleep . . . . . . . . . . . . . . . . . . . . 48
Compatibility with 100MB Zip
®
Disks . . . 48
JPEG Guidelines . . . . . . . . . . . . . . . . . 48
Using FotoShow™Media . . . . . . . . . . . . 49
Backing up With Zip
®
Disks. . . . . . . . . . 49
Formatting Zip®Disks. . . . . . . . . . . . . . 50
Using Read/Write Protected Zip®Disks . . 51
Using Write Protected Files . . . . . . . . . . 52
Shutting Down the FotoShow
™
Image Center . . . . . . . . . . . . . . . . . 52
FotoShow
™
Image Center Tips. . . . . . . . . . 53
Working with the Zip Drive . . . . . . . . . . 53
Working with the FotoShow™Software . . 54
Using with the FotoShow
™
Image
Center for Portable Downloads. . . . . . 55
Using the FotoShow™ Image Center
with Your Computer . . . . . . . . . . . . . 55
Troubleshooting . . . . . . . . . . . . . . . . . . . 56
Why Don’t I Get a Picture on My TV
After I connect the FotoShow
™
Image Center? . . . . . . . . . . . . . . . . . 56
Why Doesn’t the FotoShow™Zip®Disk
I Created on My Macintosh Work?. . . . 56
Why Doesn’t My Write-Protected Zip
®
Disk Work on My FotoShow
™
Image Center? . . . . . . . . . . . . . . . . . 56
Why Does My Digital Photo Look
Different When It is Printed Than
When It is on the Computer or
TV Screen? . . . . . . . . . . . . . . . . . . . 57
Why Are My Pictures Cropped When
I View Them Full Screen? . . . . . . . . . 57
Why Doesn’t my FotoShow
™
Digital
Image Center Display the Pictures I
Take with my Digital Camera? . . . . . . 57
What Causes the Delay that Sometimes
Occurs When I Insert a Zip Disk? . . . . 57
Why Does My FotoShow
™
Image Center
Automatically Eject A Zip
®
Disk as
Soon as I Insert it? . . . . . . . . . . . . . 58
What are the “Zip” Folder and
“All my Photos?” . . . . . . . . . . . . . . . 58
How Do I Delete Photos from
“All My Photos?” . . . . . . . . . . . . . . . 58
Why Doesn’t the FotoShow
™
Image Center
Respond When I Press the Buttons
on the Remote Control? . . . . . . . . . . 58
Why Can’t I Locate a Photo I saved in the
Edit Room Yesterday? . . . . . . . . . . . . 59
Why Do Some of My Photos Appear
Sideways?. . . . . . . . . . . . . . . . . . . . 59
How can I save the Changes without
Losing the Original Photo? . . . . . . . . 59
How Can I Undo the Changes I’ve
Made to My Picture?. . . . . . . . . . . . . 59
Why Doesn’t The Auto Fix Button
Seem to Do Anything? . . . . . . . . . . . 59
Where Do Pictures Go When I
save Them?. . . . . . . . . . . . . . . . . . . 60
How to I Get a Photo Back that I
Accidentally Deleted? . . . . . . . . . . . . 60
How Many Pictures Can I save on a
Zip
®
disk? . . . . . . . . . . . . . . . . . . . . 60
Why Am I Asked to Move My Photos
When I Delete an Album, But Not
When I Delete a Slideshow? . . . . . . . 60
What is the Difference Between
Zoom and Crop?. . . . . . . . . . . . . . . . 61
Why are Some of Items on the Toolbar
Grayed Out? . . . . . . . . . . . . . . . . . . 61
Why Don’t the Photos I Add to an
Album Automatically Appear in the
Slideshow I created from that Album? . 61
What Causes Photos to Disappear
from My Slideshow? . . . . . . . . . . . . . 61
Why Do the Album Names I Create with
the Album Info Tool Always Revert to
the Original? . . . . . . . . . . . . . . . . . . 61
Why Do Only Some of My Photos Have
Captions? . . . . . . . . . . . . . . . . . . . . 62
What is the “PictIQ” Folder That I
Found on My Zip
®
Disk? . . . . . . . . . . 62
What is the “Deleted_Albums” Folder
That I Found on My Zip®Disk? . . . . . . 62
Why Did My FotoShow™Image Center
Copy Duplicate pictures or Images
I Didn’t Take From My
Digital Camera? . . . . . . . . . . . . . . . . 62
How to Get Help. . . . . . . . . . . . . . . . . . . 63
Regulatory Information . . . . . . . . . . . . . . 66
USB Guidelines. . . . . . . . . . . . . . Back Cover
Page 5

Getting Started 5
Getting Started
List of Features
The FotoShow™Digital Image Center provides a digital workspace where you can organize,
edit, and present your digital photos and presentations. Your FotoShow Image Center can:
• Transfer digital film content (3.3v SmartMedia™or CompactFlash™memory cards or
IBM
®
Microdrives™) to inexpensive Zip®disks that can be read by your computer.
• Transfer existing JPEG images from your email, scanner, hard drive, or directly from
the internet to the FotoShow™Digital Image Center and organize them in your digital
photo album.
• Function as an external Zip
®
250 USB drive. (This manual discusses using your
FotoShow Image Center with a TV or as a portable device for downloading images
from your digital camera. For information on using this device with a computer,
please view the Zip Drive Manual contained on the FotoShow
™
Zip®disk..)
• Organize photos into digital photo albums that can be viewed on your TV.
• Create slideshows and presentations that can be displayed on any TV. Some TVs may
require a special adapter (sold separately).
• Rotate, crop, and correct your digital photos.
• Remove red eye from portraits.
• Add effects, such as sepia tone (antique) or black and white, to your digital photos.
• Display and edit JPEG graphics on your TV.
• Be used as an alternative to expensive computer projection systems.
• Take your photos back to the PC for printing, e-mailing, posting on the internet, etc.
Contents
Unpack the FotoShow™Digital Image Center and accessories. Check to make sure you
have all of the parts shown in the picture below.
1. FotoShow
™
QuickStart Guide
2. User’s Manual—Instructions for use with your
TV or digital camera
3. FotoShow™Zip®Disk—includes a tutorial,
PowerPoint
®
templates, and a Zip Drive Manual
4. IomegaWare™Software CD (for computer use
only!)
5. FotoShow
™
Remote Control
6. RCA cable
7. FotoShow™Power Supply
8. FotoShow
™
Vertical Stand
9. USB Cable (for use when hooking your
FotoShow™Image Center to a computer only)
10. Batteries
11. FotoShow
™
Digital Image Center
Page 6

Accessories
There are several FotoShow™accessories that are not included with your FotoShow Digital
Image Center. The FotoShow accessories listed below are available directly from Iomega’s
web site at http://www.iomegadirect.com.
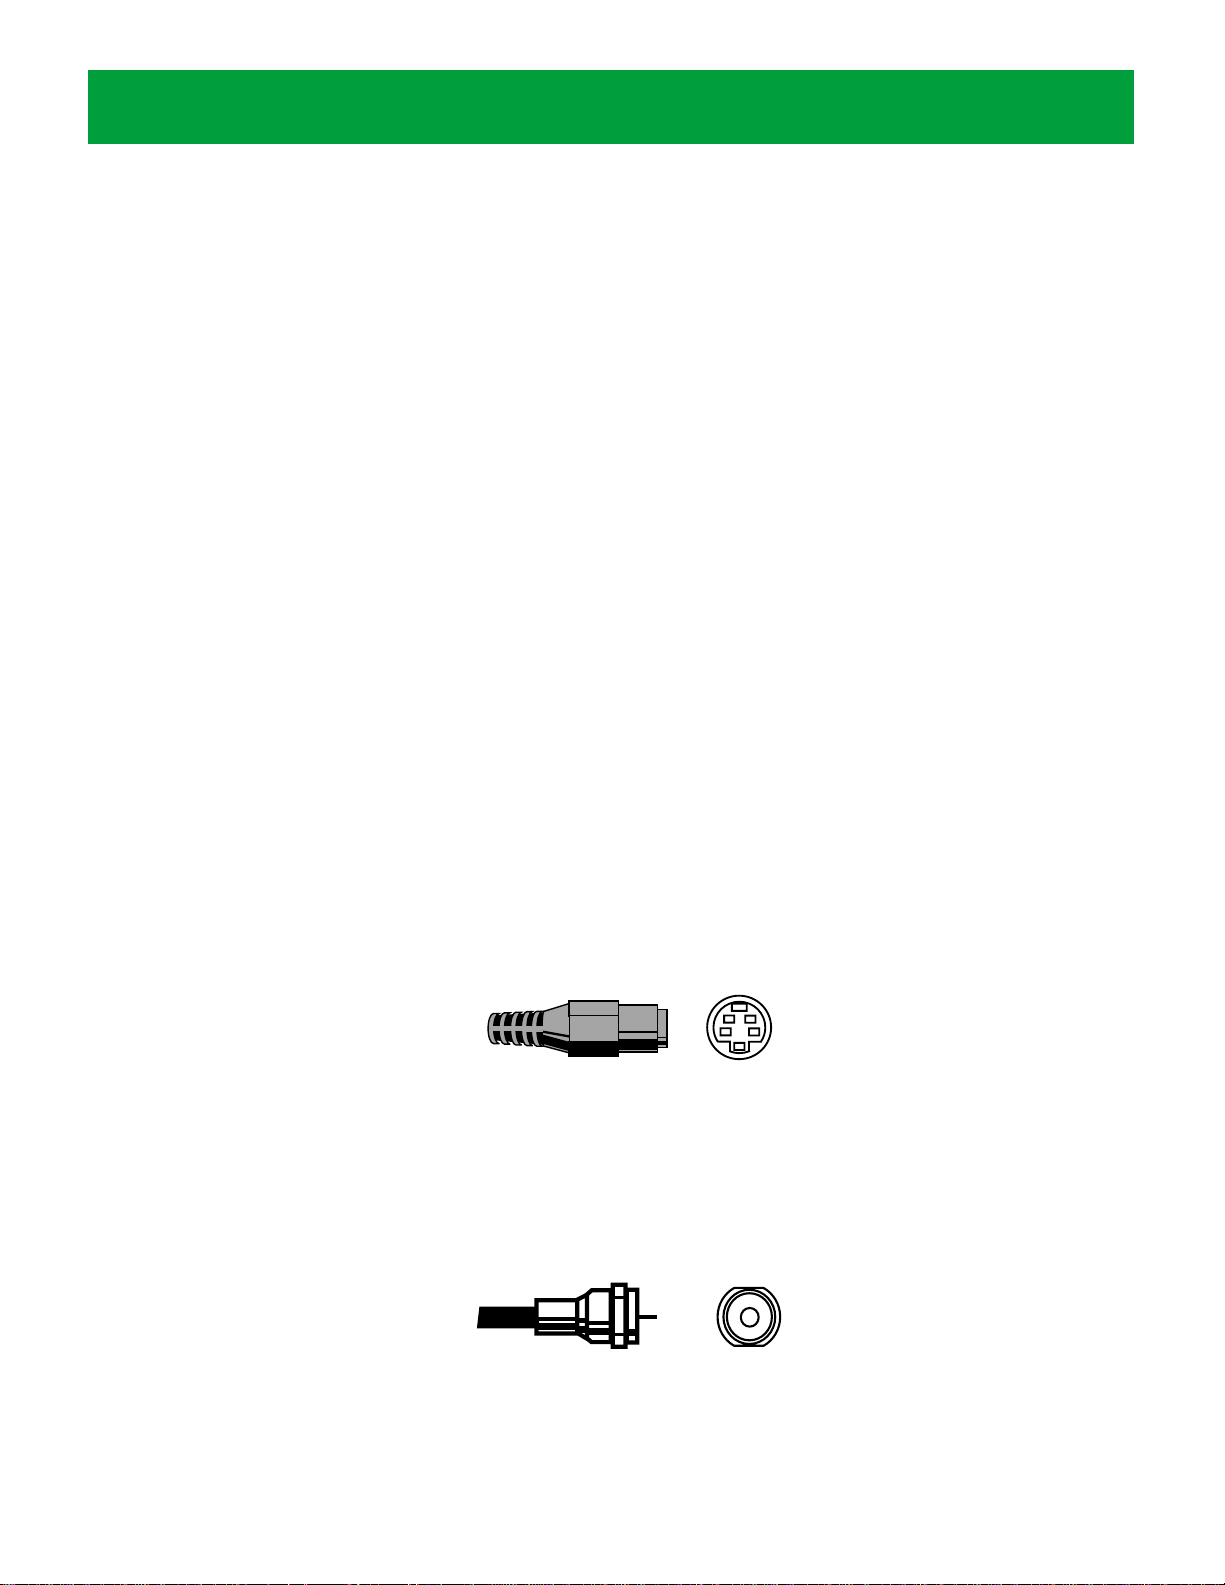
S-Video Cable
Your FotoShow
™
Digital Image Center can be connected to your TV or VCR using an SVideo connector. S-Video carries a higher quality video signal than the RCA connector
included with your FotoShow Image Center; however, only high end TVs have S-Video
connectors.
NOTE:
S-Video cables carry video only. You will still need to connect the red and white
connectors on the RCA cable included with your FotoShow
™
Image Center to hear any sound.
Auto Adapter
Your FotoShow
™
Image Center can be used to transfer digital photos from digital film
(SmartMedia
™
, CompactFlash™cards, and IBM®Microdrives™) when it is not connected to
either a TV or computer. The FotoShow Auto Adapter allows you to plug your FotoShow
Image Center into your car’s cigarette lighter or power outlet. This accessory allows you
to transfer your digital photos to a Zip
®
disk and reuse your camera’s digital storage
while you are away from home without having to buy expensive digital film cards.
RF Modulator
The RF Modulator allows you to hook your FotoShow
™
Image Center to TVs that do not
have either RCA or S-Video inputs. The RF Modulator hooks into your TV’s standard
antenna connector.
6 FotoShow™Digital Image Center User’s Manual
Page 7
Getting Started 7
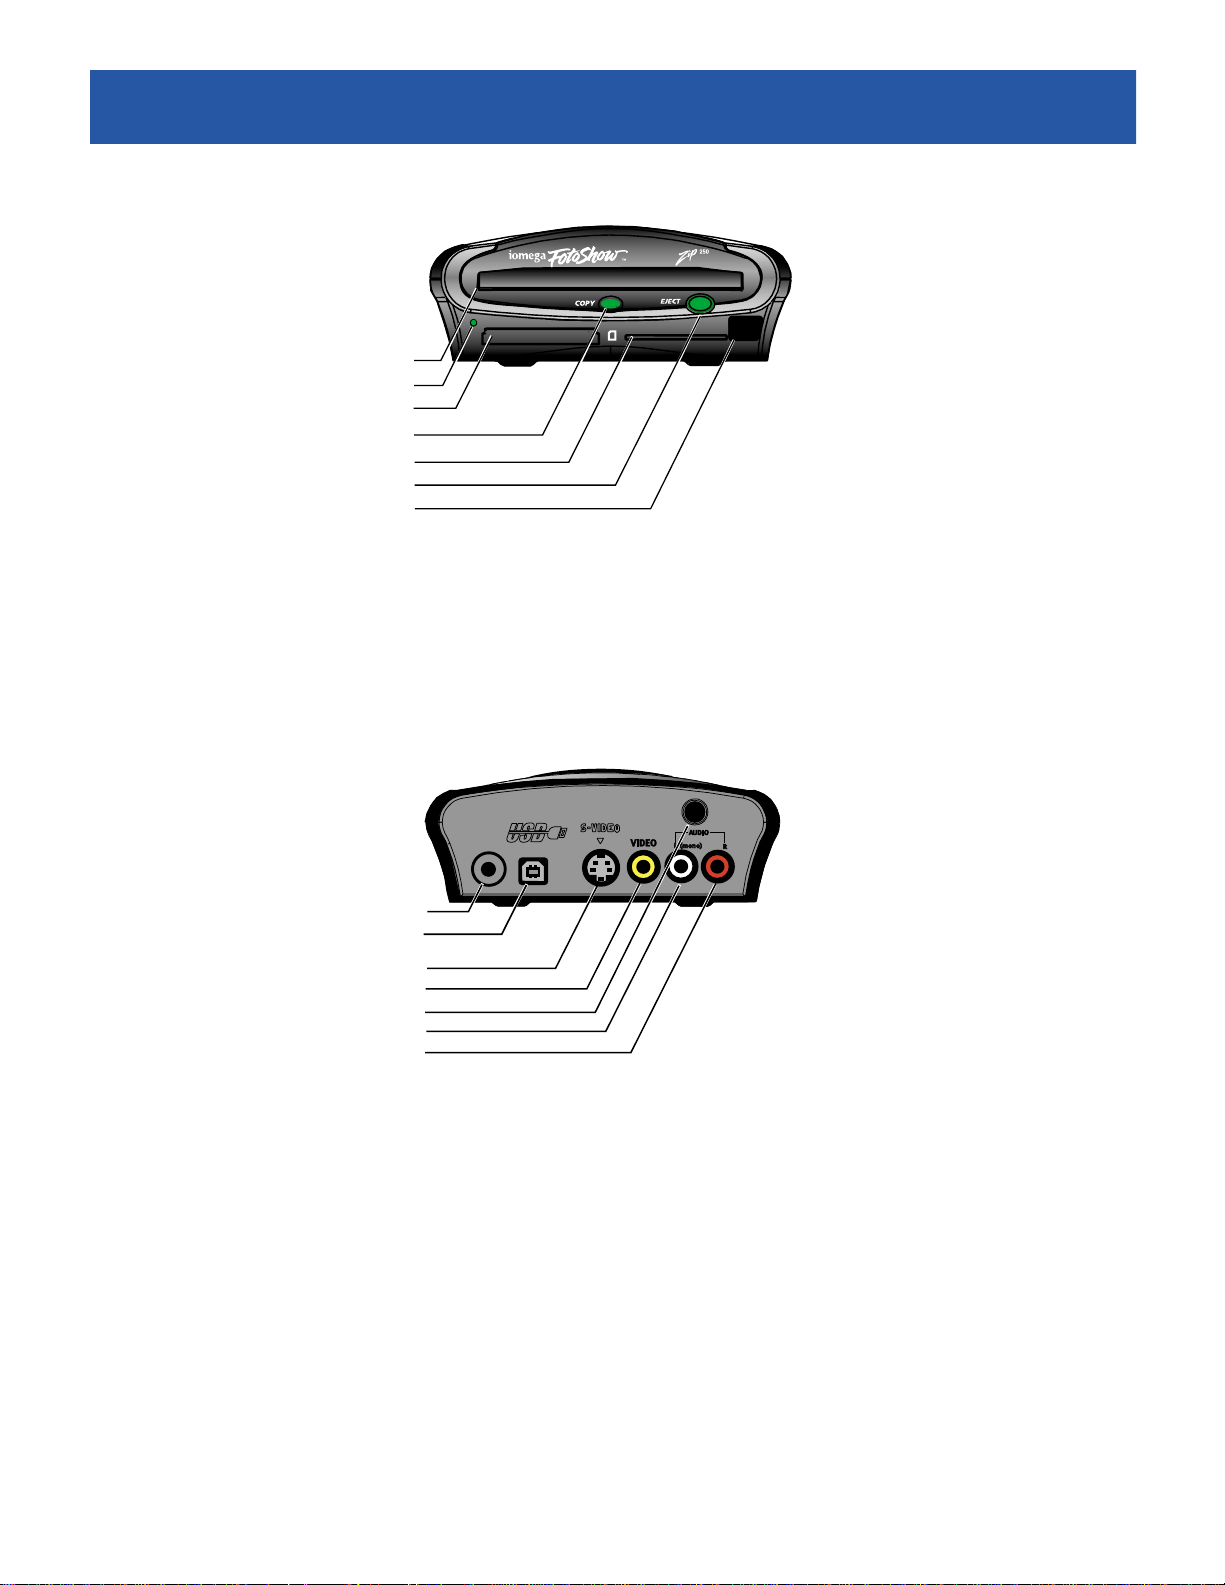
Front Panel Controls and Indicators
1. Zip®Disk Slot
2. Power Light
3. CompactFlash
™
/Microdrive™Slot
4. Copy Button
5. 3.3v SmartMedia
™
Card Slot
6. Zip
®
Disk Eject Button
7. Infrared Sensor
Back Panel Controls and Connectors
1. Power Connector
2. USB Connector (For use with computers only)
NOTE:
This port is only used when connecting the FotoShow™Image Center to a
computer. Do not use this port to connect other devices to your FotoShow Image
Center.
3. S-Video Connector
4. Composite (RCA) Video Out Connector
5. Emergency Disk Eject Button (recessed)
6. Left (Mono) Audio Channel Out Connector
7. Right Audio Channel Out Connector
Page 8

Connecting Your FotoShow
™
Image Center
Typical Connection
Your FotoShow™Digital Image Center can be hooked to an NTSC* TV, VCR, or AV receiver.
Your FotoShow Image Center includes a set of RCA cables. Most TVs have RCA connectors.
Check your TV’s user’s manual or the back of your TV to determine whether your TV has
an RCA connector (pictured below). If your TV does not have the connector pictured
below, skip to page 10.
Using the RCA Connectors
1. Connect the yellow RCA cable to the yellow RCA VIDEO IN connector on the back of
your TV, VCR, or AV receiver.
2. Connect the yellow RCA cable to the yellow RCA VIDEO OUT connector on the back
of your FotoShow
™
Image Center.
3. Connect the RCA audio connector to the AUDIO IN connector on the back of your
TV, VCR, AV receiver, or stereo system.
Make sure you match the white cable connector with the white (left, mono) AUDIO
IN connector on the back of your TV, VCR, AV receiver, or stereo system. If the
8 FotoShow™Digital Image Center User’s Manual
* NTSC is the television standard used in the United States, Japan, and parts of Canada. Your FotoShow™Image Center will
not work with PAL or SECAM TVs.
S-
VIDEO
TELEVISION BACK
AUDIO/VIDEO
VIDEO
LEFT
AUDIO
RIGHT
AUDIO
IN OUT
VHF/UHF
Page 9

Connecting Your FotoShow™Image Center 9
device you are connecting to has stereo sound you will also find a red (right)
AUDIO IN connector. The red connector is optional.
4. Connect the RCA audio cable to the audio connectors on the back of your
FotoShow
™
Image Center.
Make sure you match the white cable connector with the white (left, mono) AUDIO
OUT connector on the back of your FotoShow
™
Image Center. If you connected the
Red (right) RCA connector in step 3, make sure that you connect the red cable
connector to the red (right) AUDIO OUT connector on the back of your FotoShow
Image Center. The red connector is optional
5. Connect the power supply to your FotoShow
™
Image Center and then plug it into an
outlet. Press the POWER button on the FotoShow remote control.
Ensure the green power light on the front of the FotoShow
™
Image Center comes on
after you have connected the power supply cable.
Connecting Your FotoShow™Image Center 9
TELEVISION BACK
S-
VIDEO
VIDEO
LEFT
AUDIO
RIGHT
AUDIO
AUDIO/VIDEO
IN OUT
VHF/UHF
Page 10
6. Turn on your TV set and set it to the appropriate video input. Adjust the volume
level of your TV or stereo.
Most TVs will have either AU X (auxiliary) or VIDEO input channels. Many TV remote
controls have either a TV/VCR or a TV/VIDEO button that changes the video input.
Refer to the manual that came with your TV for more information on choosing the
appropriate video input channel. If you hooked the audio channel to a stereo or AV
receiver, turn it on.
NOTE:
If you are connecting the FotoShow™ Image Center to a VCR or AV receiver,
you will need to turn on the VCR or receiver as well as the TV. You may also need
to adjust the video input on the VCR or receiver. See the user’s manual that came
with the VCR or AV receiver for more information.
7. Insert the Zip®disk that came with your FotoShow™Image Center and view the
FotoShow Image Center tutorial.
For more information on viewing the tutorial, see “Viewing the FotoShow
™
Tutorial”
at the end of this chapter.
Other Types of Connections
Your FotoShow™Digital Image Center can be attached to almost any TV. If your TV does
not have the RCA connectors described above, you will need to determine which
connection type is appropriate for you. Refer to the manual that came with your TV, VCR,
or AV receiver or look at the back of the device to which you will be hooking your
FotoShow image Center to determine the type of connectors that are available. Select the
appropriate connector for your TV, VCR or AV receiver, pictured below.
S-Video Cable*
Your FotoShow
™
Digital Image Center can be connected to your TV or VCR using an
S-Video cable. S-Video carries the highest quality video signal that your FotoShow Image
Center supports; however, only high end TVs have S-Video connectors. Your FotoShow
™
Image Center does not include an S-Video cable. For information on connecting your
FotoShow Image Center to a TV, VCR, or AV receiver using an S-Video connector, continue
to the next page.
RF Cable*
10 FotoShow™Digital Image Center User’s Manual
* Your FotoShow™Image Center does not come with an S-Video cable or an RF modulator. To use these connection
options, you will need to purchase an S-Video cable or RF Modulator (available from your local electronics store or directly
from Iomega at http://www.iomegadirect.com). S-Video cables carry video signals only. You will still need to connect the
red and white connectors on the RCA cable included with your FotoShow™Image Center to hear any sound.
Page 11
Connecting Your FotoShow™Image Center 11
Some TVs do not have either RCA or S-Video connectors. You will need an RF modulator
(not included with your FotoShow
™
Image Center) to connect to some TVs. In many cases
you can use your VCR instead of an RF modulator. Please check Iomega’s web site at
http://www.iomegadirect.com for recommendations on purchasing an RF modulator.
Follow the instructions included with the RF modulator to connect your FotoShow
™
Image
Center to your TV.
NOTE:
Connecting the FotoShow™ Image Center will be similar to the RCA connector
instructions above, except the connections are to the RF modulator instead of the TV. Set
your TV to the channel that you set on the RF modulator (usually 3 or 4).
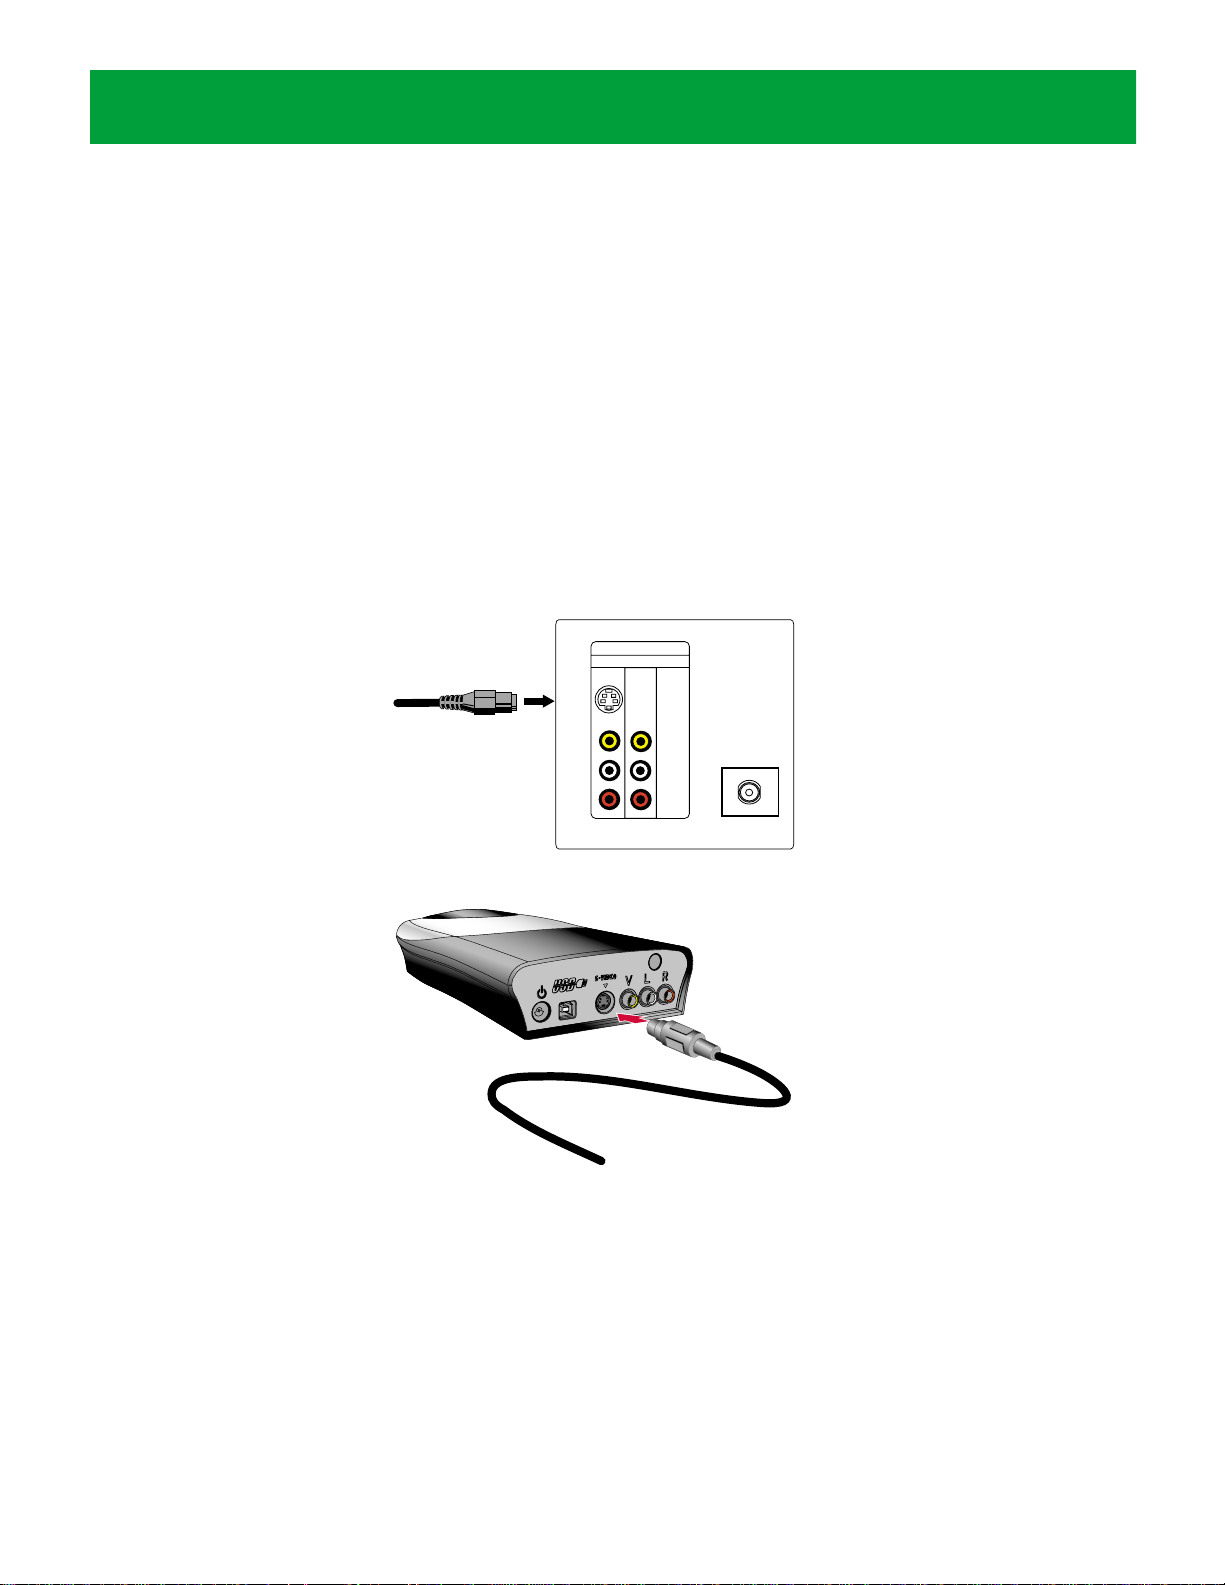
Using an S-Video Connector
1. Connect the S-Video cable to the S-VIDEO IN connector on the back of your TV
,
VCR, AV receiver
.
2. Connect the S-Video cable to the S-VIDEO OUT connector on the back of your
FotoShow
™
Image Center.
3. Connect the RCA audio connector to the AUDIO IN connector on the back of your
TV, VCR, AV receiver, or stereo system.
Make sure you match the white cable connector with the white (left, mono) AUDIO
IN connector on the back of your TV, VCR, AV receiver, or stereo system. If the
device you are connecting to has stereo sound you will also find a red (right)
AUDIO IN connector. The red connector is optional.
TELEVISION BACK
AUDIO/VIDEO
S
VIDEO
VIDEO
LEFT
AUDIO
RIGHT
AUDIO
IN OUT
VHF/UHF
S-VIDEO
R
L
V
Page 12

12 FotoShow™Digital Image Center User’s Manual
4. Connect the RCA audio cable to the audio connectors on the back of your FotoShow
Image Center.
Make sure you match the white cable connector with the white (left, mono) AUDIO
OUT connector on the back of your FotoShow
™
Image Center. If you connected the
Red (right) RCA connector in step 3, make sure that you connect the red cable
connector to the red (right) AUDIO OUT connector on the back of your FotoShow
Image Center. The red connector is optional
5. Connect the power supply to your FotoShow
™
Image Center and then plug it into an
outlet. Press the POWER button on your FotoShow remote control.
Ensure the green power light on the front of the FotoShow Image Center comes on
after you have connected the power supply cable.
6. Turn on your TV set and set it to the appropriate video input.
Most TVs will have either AU X (auxiliary) or VIDEO input channels. Many TV remote
controls have either a TV/VCR or a TV/VIDEO button that changes the video input.
Refer to the manual that came with your TV for more information on choosing the
S-
VIDEO
VIDEO
LEFT
AUDIO
RIGHT
AUDIO
TELEVISION BACK
AUDIO/VIDEO
IN OUT
VHF/UHF
Page 13

Connecting Your FotoShow™Image Center 13
appropriate video input channel. If you hooked the audio channel to a stereo or AV
receiver turn it on.
NOTE:
If you are connecting the FotoShow™ Image Center to a VCR or AV receiver,
you will need to turn on the VCR or receiver as well as the TV. You may also need
to adjust the video input on the VCR or receiver. See the user’s manual that came
with the VCR or AV receiver for more information.
7. Insert the Zip®disk that came with your FotoShow™Image Center and view the
FotoShow Image Center Tutorial.
For more information on viewing the tutorial, see “Viewing the FotoShow
™
Tutorial”
at the end of this chapter.
Using the FotoShow™Auto Adapter
The FotoShow™Auto Adapter (sold separately) allows you to hook your FotoShow Image
Center to the cigarette lighter or power outlet in your vehicle. Generally, the FotoShow
Image Center will be used for portable downloads without a TV when it is connected to
the auto adapter. When used for portable downloads, you can transfer the content of
your digital camera’s SmartMedia
™
or CompactFlash™card to the FotoShow Image Center’s
Zip
®
drive.
1. Connect the FotoShow
™
Auto Adapter to the power connector on your FotoShow
Image Center and then plug it into your vehicle’s cigarette lighter or power outlet.
2. Insert a Zip
®
disk and SmartMedia™card, CompactFlash™card, or IBM®Microdrive™.
Press the COPY button to transfer your digital photos to your Zip disk. For more
information on transferring images to a Zip Disk, see “Copying Files to the
FotoShow Image Center” on page 15.
Viewing the FotoShow™Image Center Tutorial
1. If the FotoShow™Image Center is not already on, press the POWER button on the
FotoShow™remote control.
2. Insert the Zip
®
disk that came with your FotoShow™Image Center.
3. The FotoShow™Image Center tutorial should start automatically. Press either the
BACK or SLIDESHOW button to exit the tutorial.
Connecting Your FotoShow™Image Center 13
Page 14

14 FotoShow™Digital Image Center User’s Manual
If the tutorial does not start:
1. Press the SLIDESHOW button on the FotoShow
™
remote control.
2. Use the right and left arrow buttons to select Open/Create Slideshow, then press GO.
3. Use the right and left arrow buttons to select Open Slideshow, then press GO.
4. Use the up and down arrow buttons to select the slideshow titled Auto, then press
GO.
5. Use the right and left arrow buttons to select Start Show Manual/Auto, then press GO.
6. Use the right and left arrow buttons to select Start Show Manual, then press GO.
7. Use the arrow buttons to navigate through the slideshow. Use either the down or
right arrow button to move to the next slide. Press either the up or left arrow
button to move to the previous slide. Press either the BACK or SLIDESHOW button
to exit the tutorial.
Page 15

Copying Files to the FotoShow
™
Image
Center
Your FotoShow™Digital Image Center provides a simple way to copy your digital photos
from expensive digital film (SmartMedia
™
, CompactFlash™and, Microdrive™) to
inexpensive, portable Zip
®
disks. You can do selective copies when hooked to a TV set or
copy the entire contents of your digital film when you are away from home.
Understanding the COPY button on your FotoShow
™
Digital Image Center
When the COPY button is pressed, the button will light up showing the status of the
digital film reader. The light will stay on until the status of the transfer changes or
another copy is started. For example, when a copy is completed successfully the green
light will stay on until the next copy begins. The COPY button is disabled when your
FotoShow
™
Image Center is connected to a computer that is powered on.
Flashing Green—Copy in progress.
Solid Green—Copy successful.
Flashing Red—Not enough space on the Zip
®
disk (no files copied).
Solid Red—Copy failed. Verify all media and try again.
Flashing Yellow—Reading your digital film. Wait until the flashing stops before
pressing the COPY button.
Copying Selectively
The FotoShow™Image Center provides a simple way to transfer only the photos you want
from your digital camera to your Zip
®
disk. You must have your FotoShow Image Center
connected to a TV to copy your photos selectively from your digital film. Follow these
steps to transfer your important data.
1. If your FotoShow
™
Image Center is off, turn it on by pressing the POWER button on
your remote control.
2. Insert your 3.3v SmartMedia
™
card, CompactFlash™card, or IBM®Microdrive™into
the appropriate FotoShow
™
digital film reader slot. See page 45.
3. The yellow light in the COPY button will flash momentarily, make sure it has quit
flashing before proceeding to the next step. If the light in the COPY button turns
solid red, eject the media and try again.
4. Insert a PC-formatted Zip
®
disk into the FotoShow™Zip drive.
5. Your FotoShow
™
Image Center must be hooked to a TV to perform this type of copy.
Press the Copy button.
6. When the Copy Photos dialog box appears, press the BACK button. If you wait more
than 10 seconds, your FotoShow
™
Image Center will automatically copy all of the
JPEG files on your memory card.
7. The Copy Grid will appear. By default all of the photos are selected.
Copying Files to the FotoShow™Image Center 15
Page 16

16 FotoShow™Digital Image Center User’s Manual
The Copy Grid is used to view and select those pictures you would like to copy. It
will display photos from your specified digital source—SmartMedia
™
,
CompactFlash
™
, or Microdrive™. It may take a moment for all of your photos to
appear on the screen. By default, all photos are selected for copying. For more
information on the Copy Grid, see “Understanding Grids.”
8. Press the arrow buttons to move between photos. Press C to deselect the photos
you don’t want to copy. Press PHOTO GRID to select/deselect all of the photos.
9. Press GO when you have finished marking the photos. Press BACK to cancel the
operation.
10. The light in the Copy button will flash green while your data is being transferred.
11. When the data transfer is complete the Copy button will glow green if the transfer
was successful, red if there was a disk or drive error, or flash red if your disk is full.
CAUTION!
Your FotoShow™Image Center is compatible with 3.3v SmartMedia™memory
cards only. Using a 5v SmartMedia card with your FotoShow
™
Image Center may cause
irreparable damage to either the SmartMedia card or the FotoShow Image Center.
NOTE:
There are two locations to which your files may be copied. JPEG files will be
copied to an album titled “Album <date>.” Any non-JPEG files will be copied to a folder
titled “Camera_Misc.” Non-JPEG files will not be visible on your FotoShow
™
Image Center.
You must have a computer to view the contents of the Camera_Misc folder.
Copying Everything the Simple Way
The simplest way to copy the entire contents of your digital film involves little more than
inserting your media and pressing the COPY button. You can do a simple copy with or
without a TV.
1. If your FotoShow
™
Image Center is off, turn it on by pressing the POWER button on
your remote control.
2. Insert your 3.3v SmartMedia card, CompactFlash card, or IBM
®
Microdrive™into the
appropriate FotoShow™card reader slot. See page 45 for more information.
3. The yellow light in the COPY button will flash momentarily, make sure it has quit
flashing before proceeding to the next step. If the light in the COPY button turns
solid red, eject the media and try again.
4. Insert a PC-formatted Zip
®
disk into the FotoShow™Zip drive.
5. Press the COPY button.
6. If your FotoShow
™
Image Center is hooked to a TV, You will see the Copy Photos
dialog box.
7. Press the GO button to start transferring your photos or wait 10 seconds for the
copy to start automatically.
NOTE:
This is the simple part, you don’t have to do anything and your copy will
still be completed.
8. The light in the Copy button will flash green while your data is being transferred.
Page 17

9. When the data transfer is complete the Copy will glow green if the transfer was
successful, red if there was a disk or drive error, or flash red if your disk is full.
This copy may take a few moments. Your FotoShow
™
Image Center is not only
copying your digital film, but also preparing your photos to be viewed on the TV.
CAUTION!
Your FotoShow™Image Center is compatible with 3.3v SmartMedia™memory
cards only. Using a 5v SmartMedia card with your FotoShow
™
Image Center may cause
irreparable damage to either the SmartMedia card or the FotoShow Image Center.
NOTE:
There are two locations to which your files may be copied. JPEG files will be
copied to an album titled “Album <date>.” Any non-JPEG files will be copied to a folder
titled “Camera_Misc.” Non-JPEG files will not be visible on your FotoShow
™
Image Center.
You must have a computer to view the contents of the Camera_Misc folder.
Portable Downloads the Quick Way
The FotoShow™Image Center provides a quick way to transfer all of the contents of your
digital film from expensive IBM
®
Microdrives™, CompactFlash™cards or 3.3v SmartMedia
™
cards to inexpensive Zip®disks. This method is ideal, when you are away from home,
because it copies the content of your digital film. Using this method, the FotoShow Image
Center does not prepare the photos for display on TV which saves valuable time between
photos. Follow these steps to transfer your photos quickly.
1. If your FotoShow
™
Image Center is on, turn it off by pressing the POWER button on
your remote control. Make sure the power light on the front of your device is off.
NOTE:
The POWER button enables and disables the software only. When the
software is active (the power light is on), your FotoShow
™
Image Center not only
copies the files but prepares them to be displayed on the TV. When the software is
inactive (the power light is off), your FotoShow Image Center will simply copy all of
the files from your SmartMedia
™
card, CompactFlash™card, or Microdrive™.
2. Insert your 3.3v SmartMedia™card, CompactFlash™card, or Microdrive™into the
appropriate FotoShow™card reader slot. See page 45 for more information.
3. The yellow light in the COPY button will flash momentarily, make sure it has quit
flashing before proceeding to the next step. If the light in the COPY button turns
solid red, eject the media and try again.
4. Insert a PC-formatted Zip
®
disk into the FotoShow™Zip drive.
5. Press the COPY button.
6. After a brief pause, the light in the COPY button will flash green while your data is
being transferred.
7. When the data transfer is complete the Copy will glow green if the transfer was
successful, red if there was a disk or drive error, or flash red if your disk is full.
NOTE:
This copy method does not prepare your photos for display on the TV. There will
be a slight delay as the FotoShow
™
Image Center prepares your images for display the
next time you insert your Zip
®
disk.
Copying Files to the FotoShow™Image Center 17
Page 18

18 FotoShow™Digital Image Center User’s Manual
CAUTION!
Your FotoShow™Image Center is compatible with 3.3v SmartMedia™memory
cards only. Using a 5v SmartMedia card with your FotoShow
™
Image Center may cause
irreparable damage to either the SmartMedia card or the FotoShow Image Center.
CAUTION!
Like video tapes and floppy disks, your Zip®disks and digital film are
sensitive to light and heat. Keep your FotoShow
™
Image Center and media out of heat
and direct sunlight. Never leave the FotoShow device or media on your car’s dashboard.
NOTE:
There are two locations to which your files may be copied. JPEG files will be
copied to an album titled “Album <date>.” Any non-JPEG files will be copied to a folder
titled “Camera_Misc.” Non-JPEG files will not be visible on your FotoShow
™
Image Center.
You must have a computer to view the contents of the Camera_Misc folder.
Adding Photos from Your Computer
For more information on using your FotoShow™Digital Image Center with your computer,
please view the Zip
®
Drive Manual on the Zip disk that came with this device. The Zip
Drive Manual is standard HTML and can be viewed with Internet Explorer
®
4.0 or
Netscape Navigator
™
4.5 on either a Macintosh®or Windows®PC.
NOTE: You must save photos to the Zip®disk before they can be viewed.
1. Connect the FotoShow™Image Center to your Computer. If your Computer is already
equipped with a Zip®drive, insert a Zip disk into the drive.
2. Save your JPEG photos or images to the Zip
®
disk.
NOTE: JPEG is the most common file format used by digital cameras. The FotoShow
™
Image Center is compatible with most JPEG formats; however, some less common
JPEG formats such as CMYK JPEG, progressive JPEG, motion JPEG, and JPEG 2000/JBIG
are incompatible. If you would like to view non-JPEG images (such as BMP, PICT, GIF,
PNG, EPS, or TIFF) on your FotoShow Image Center, you will need to use a computer
to convert them to a compatible JPEG format. For more information on converting
JPEG images on a computer, see “JPEG Guidelines” section on pg. 48.
3. Disconnect the FotoShow™Image Center from your computer and connect it to your
television. (If your computer already has a Zip
®
drive, remove the Zip disk and
insert it into the FotoShow Image Center connected to your television.)
NOTE:
The COPY button and all video and audio connectors are disabled when your
FotoShow
™
Image Center is connected to a computer that is powered on. The EJECT
button may be disabled by some computer operating systems (i.e., Mac
®
OS or Linux).
CAUTION!
Never connect your FotoShow™Image Center to a computer while you are
copying images from your digital film as this may result in an incomplete copy.
Connecting the FotoShow Image Center to a computer shuts down all of the Image
Center’s functionality, except for the Zip
®
drive, which may prevent your digital film from
being copied successfully.
Page 19

FotoShow™Image Center at a Glance 19
Open/Create
Album
pg. 29
Open Album
Tool
pg. 29
Create Album
Tool
pg. 29
View As
pg. 28
Slideshow
pg. 28
Full Screen
pg. 28
Move Photos
In/Out
pg. 29
Move
Photos Out
pg. 30
Move
Photos In
pg. 29
Arrange
Photos
pg. 30
Choose Theme
pg. 31
Delete Photos
pg. 30
Album Info
pg. 32
Rotate
pg. 33
Rotate Right
pg. 33
Rotate Left
pg. 33
Auto Fix
pg. 33
Remove
Red-Eye
pg. 34
Add Effect
pg. 34
Crop
pg. 35
Save
pg. 36
Save a Copy
pg. 36
Save Over
pg. 36
Undo Changes
pg. 35
Revert to
Original
pg. 35
Undo Last
Change
pg. 35
Photo Info
pg. 36
Name
Photos
Caption
Name
Caption
Date
Size
Delete Albums
pg. 31
Page 20
20 FotoShow™Digital Image Center User’s Manual
Open/Create
Slideshow
pg. 37
Open
Slideshow
pg. 38
Create
Slideshow
pg. 37
Start Slideshow
Manual/Auto
pg. 39
Start Show
Manual pg. 39
Start Show
Auto pg. 39
Add/Remove
Photos
pg. 39
Remove
Photos
pg. 39
Add Photos
pg. 39
Choose Theme
pg. 40
Delete Slideshow
pg. 41
Slideshow Info
pg. 41
Name
Photos
Delay
Transition
Create from
Album
pg. 38
Arrange Photos
pg. 40
Understanding the COPY button on your FotoShow™Digital Image Center
When the COPY button is pressed, the button will light up
showing the status of the digital film reader.
Flashing Green—Copy in progress.
Solid Green—Copy successful.
Flashing Red—Not enough space on the Zip
®
disk (no files
copied).
Solid Red—Copy failed. Verify all media and try again.
Flashing Yellow—Reading your digital film. Wait until the
flashing stops before pressing the COPY button.
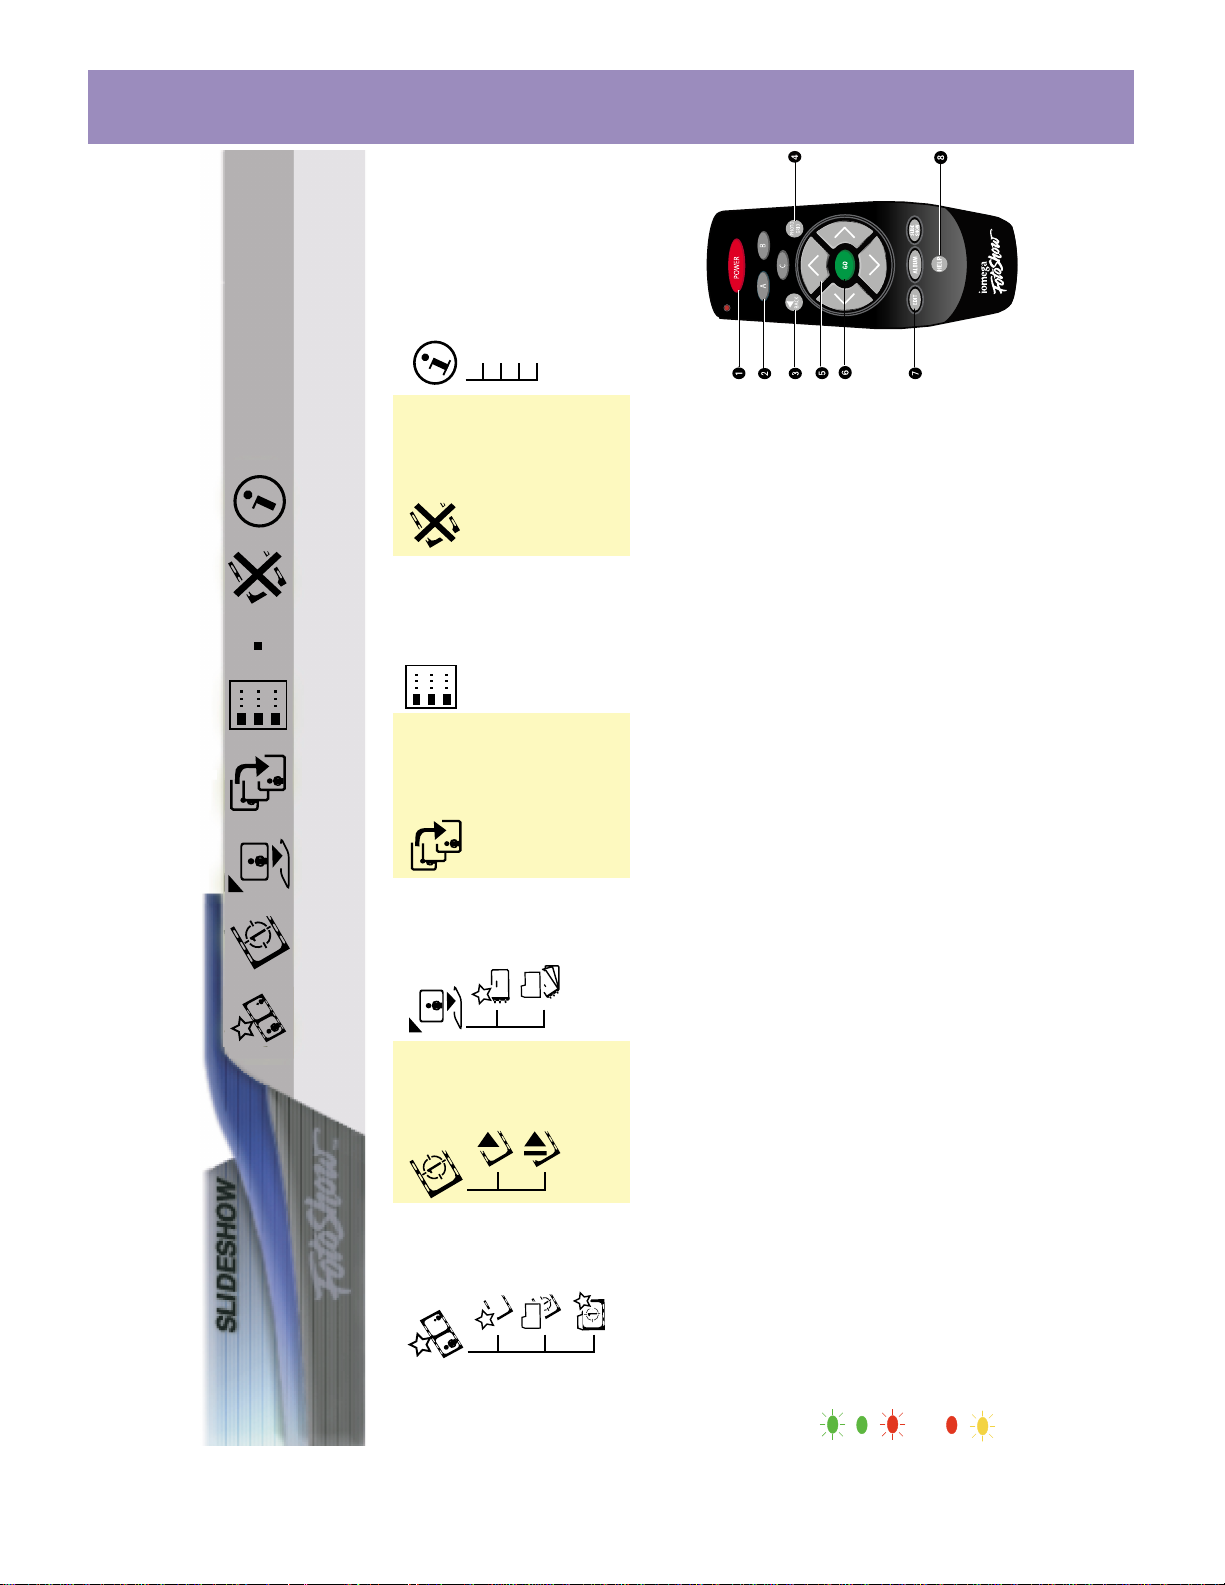
Using the Remote Control
1. Power Button—activates the FotoShow
™
software.
2. A, B, and C Buttons—perform various tasks in
the FotoShow
™
software (depending on the
screen).
3. Back Button—Cancels the current task and
returns to the previous screen.
4. PHOTO GRID Button—accesses the Photo Grid
screen or marks all photos when in the Photo
Grid screen.
5. Directional Navigation (arrow) Buttons—used
to make on-screen selections.
6. GO Button—selects current option.
7. Menu Buttons—the EDIT, ALBUM, and
SLIDESHOW buttons change rooms in the
FotoShow
™
software.
8. Help Button—Accesses the FotoShow
™
software’s on-screen help system.
Page 21

Using the FotoShow™Image Center 21
Using Your FotoShow
™
Image Center
Remote Control Buttons
1. Power Button—activates the FotoShow™software.
2. A, B, and C Buttons—perform various tasks in the FotoShow
™
software (depending
on the screen).
3. Back Button—Cancels the current task and returns to the previous screen.
4. PHOTO GRID Button—accesses the Photo Grid screen or marks all photos when in
the Photo Grid screen.
5. Directional Navigation (arrow) Buttons—used to make on-screen selections.
6. GO Button—selects current option.
7. Menu Buttons—the EDIT, ALBUM, and SLIDESHOW buttons change rooms in the
FotoShow
™
software.
8. Help Button—Accesses the FotoShow
™
software’s on-screen help system.
Page 22

Using the FotoShow™Remote Control
1. To open the battery compartment, press down on the latch on the back cover and
pull the door towards you.
2. Insert the two AAA batteries as shown in the picture below.
NOTE:
Make sure the positive (+) symbol on each battery lines up with the (+)
symbol inside the battery compartment.
3. Replace the battery compartment door.
Your FotoShow
™
remote control can be used up to 10 m. (≈ 30 ft.) from the FotoShow
Image Center. See the next section for a description of the buttons on your remote
control.
30
0
22 FotoShow™Digital Image Center User’s Manual
Page 23

Using the FotoShow™Image Center 23
Using the FotoShow™Software
The FotoShow™software is divided into three easy-to-use sections: the Album Gallery, the
Editing Room, and the Slideshow Organizer. Each of these “rooms” has a unique set of
tools to help you organize, enhance, and view your photos. These icon-based toolbars
are intuitive to use, and this manual will explain the special features of each.
Starting Your FotoShow™Digital Image Center for the First Time
Setting the System Clock
When you start your FotoShow
™
Image Center, it runs a quick check to make sure the
system is working with a valid time and date. If the system can’t find this information,
the Set Clock dialog will be displayed and you must then enter the current time and
date. Use your FotoShow remote to enter the information. Use the left and right arrows
to move between date and time fields. Use the up and down arrows to change the
selected date or time. Press the GO button to accept changes.
NOTE: Your FotoShow™Image Center has an internal battery that maintains the date and
time; however, you may want to change the date and time for daylight savings. To
change the date and time, remove the Zip
®
disk, then press the C button on the remote
control to bring up the Set Clock dialog box.
View the FotoShow™Image Center Tutorial
Insert the Zip
®
disk that came with your FotoShow™Image Center. The FotoShow Image
Center tutorial should start automatically. Press either the BACK or SLIDESHOW button to
exit the tutorial.
Before You Start Using the FotoShow™ Software
Insert a Zip®Disk. When you insert a Zip disk, the system will then run a check to see if
any changes have been made to the Zip disk. If changes have been made, the system
will take a few minutes to prepare your new images for viewing on a TV.
Please take a minute to learn more about the basic structure of the FotoShow
™
software,
before you start using the software.
Understanding Grids
Your FotoShow
™
Digital Image Center uses a grid system to help you view, manage, and
present your photos. While there are a number of different types of grids, they all look
Page 24

and operate in basically the same way. The main grid is the Photo Grid. It displays
miniatures of your photos arranged in columns, and can be accessed easily from any of
the three sections of FotoShow
™
software by pressing the PHOTO GRID button on your
FotoShow remote control.
The Photo Grid is a browsing tool that allows you to get an overall view of the current
set of photos, and can be invoked from each of the three rooms: Album, Edit, and
Slideshow. In the Album and Slideshow rooms, the Photo Grid shows only the photos in
the current album or slideshow. In the Edit room, the Photo Grid shows all the photos on
the Zip
®
disk.
There are four other grid types used in your FotoShow
™
Image Center:
• The Arrange Grid is used to reorder the photos within the current album or
slideshow.
• The Move In/Out Grid is used to move photos between albums and add or remove
photos from slideshows.
• The Delete Grid is used to select and mark photos for deletion.
• The Copy Grid is used to view and select those pictures you would like to copy to
your Zip disk.
For a complete description of these grids, including instructions on how to use them,
please refer to the User Manual sections associated with them.
24 FotoShow™Digital Image Center User’s Manual
Page 25

Using the FotoShow™Image Center 25
Understanding System Folders
Another basic part of the FotoShow
™
software structure is the System Folders. These are
vital components of the software, so you should be aware of what they do when you see
them.
• All My Photos contains all the photos you have saved to the current Zip®disk. You
can view the photos in All My Photos, but you cannot change them in any way. This
is where your viewable digital negatives are stored.
• Zip is the Root folder; it contains all the images you have saved to the Root folder
while using your Zip
®
disk with a computer.
By default, the FotoShow
™
software opens in the Album room, and then automatically
selects the most recent album you used or opened. If you are new to the program and
there are no photos on the Zip
®
disk, you will need to copy some onto the disk before
proceeding. Feel free to use the sample photos that Iomega has provided on your
FotoShow Zip disk. If there are photos on the Zip disk, but no albums in the Album
room, you should create an album before proceeding. Once you have created or selected
an album, you’re ready to see what you can do with your pictures and your FotoShow
Image Center.
Please take a minute to familiarize yourself with the tools and features in the FotoShow
software.
Page 26

Using the Keyboard:
When you create photo albums and slideshows you will need to use the on-screen
keyboard to enter a name. You will also use the on-screen keyboard to edit album and
slideshow names, captions, and file names.
Consult the table below for help using the on-screen keyboard with your remote control.
B
utton Action
arrows moves the cursor over letters and symbols on the keyboard
A Backspace
B Space
C Brings up the keyboard. Accepts changes when done.
GO Enters current character into the text field
BACK Discards changes
NOTE:
The FotoShow™software allows you to enter long names but may not display the
full album name or caption. If you want the whole album name or caption to be
displayed, make sure your album names are under 30 characters long. Album names may
be truncated when viewed on a computer. File names should be kept under 30
characters long to be viewed on a computer.
26 FotoShow™Digital Image Center User’s Manual
Page 27

Using the FotoShow™Image Center 27
The Album Room
The Album room allows you to view and organize your digital images and photos. You
can create an individual look and feel for each of your albums using the Choose Theme
tool. Your photo album will also display custom photo captions (added by using the
Photo Info tool in the Edit Room. For more information, see “Using Album Info to
Customize Your Albums” on pg 32).
Albums are organized on your Zip
®
disk by the date they were created. When viewing an
album, the first page will show the album title, the date it was created, and the first
photo. The following pages will automatically display your photos two at a time.
When working in the Album room, remember:
• By default the Album room displays photos two at a time. The photo you are working
with will be highlighted with a yellow-orange hue.
• The Up and Down buttons move you between the currently displayed photos.
• The A and B buttons turn the album pages (two different images will be displayed).
• The PHOTO GRID button allows you to see all of the photos in a grid of miniaturesized images.
The Album room toolbar (pictured here) features effective, easy-to-use tools to help you
organize and display your favorite photos.
The Broken File icon will appear when a photo is unavailable for viewing.
Broken Files include photos saved in an unreadable format and damaged files.
NOTE:
JPEG is the most common file format used by digital cameras. The FotoShow
™
Image Center is compatible with most JPEG formats; however, some less common JPEG
formats such as CMYK JPEG, progressive JPEG, motion JPEG, and JPEG 2000/JBIG are
incompatible. If you would like to view non-JPEG images (such as BMP, PICT, GIF, PNG,
EPS, or TIFF) on your FotoShow Image Center, you will need to use a computer to
convert them to a compatible JPEG format. For more information on converting JPEG
images on a computer, see “JPEG Guidelines” section on pg. 48.
Open/Create
Album
View As
Move
Photos
In/Out
Choose
Theme
Arrange
Photos
Delete
Album
Delete
Photos
Album
Info
Page 28

Alternate Photo Album Views
There are a number of ways you can view the pictures in your album. When
you open an album, you can use the A and B buttons to flip through the
pages. You can change the background pattern and color using the Select
Theme tool on the Album room toolbar. For other viewing options, select the View As
icon in the Album room toolbar, Press GO, and then make one of the following choices
from the submenu.
• Full Screen view increases the viewing size of your pictures as much as possible to fit
your television screen. When viewing pictures full screen, use the arrow buttons to
move between photos.
• Slideshow view displays one, large full screen photo at a time in an automatically
timed slideshow.
Press GO to accept the selected view style. Use the BACK or ALBUM button to return to
the standard album (two photos per screen) view.
Using the Zoom Tool
When you are in full screen mode, the Zoom tool allows you to view high-
resolution photos in more detail. This is not a cropping tool—your photo will
revert to its original condition when you stop using the Zoom tool.
You can view other photos in the same album without leaving full screen mode. Use the
arrow buttons to scroll through your photos in either direction.
1. Select the photo you would like to enlarge.
2. If the Album room toolbar is not already visible, press the ALBUM button.
3. Highlight the View As icon on the toolbar then press GO.
4. Select Full Screen from the submenu, then press GO.
5. Press GO to show the zoom box.
6. Position to zoom box over the area of the photo on which you would like to zoom
in. Press the arrow buttons to move the zoom box. Use the A and B buttons to
change the size of the zoom box.
7. press GO to zoom in.
8. Press BACK to return to the original full screen view.
9. Repeat the process if you would like to zoom in further. The C button can be used
to step back through each of the zoom levels.
28 FotoShow™Digital Image Center User’s Manual
Page 29

Using the FotoShow™Image Center 29
Opening an Existing Album
Use this tool to open an existing album and view or work with its contents.
When an album is opened, the album name, the first picture, and the album
date will appear on the screen. This information may be edited using the
Album Info tool on the Album room toolbar.
1. If the Album room toolbar is not visible, press the ALBUM button on your
FotoShow
™
remote control to toggle on the toolbar.
2. Press the Left and Right buttons to highlight the Open/Create Album icon.
3. Press GO.
4. Select Open Album from the submenu.
5. Press GO to bring up the Album List.
6. Press the Up and Down buttons to highlight the desired album.
7. Press GO to open the selected album.
Creating a New Album
Use this tool to add a new album to your Album List. When you create a new
album, an onscreen keyboard is displayed to help you enter the album name
(see “Using the Keyboard”). The FotoShow
™
software allows for long names
but may not display the full album name. If you want the whole album name to be
displayed, make sure your album names are under 30 characters long.
1. If the Album room toolbar is not visible, press the ALBUM button on your
FotoShow
™
remote control.
2. Press the Left and Right buttons to select the Open/Create Album icon.
3. Press GO.
4. Select Create Album from the submenu.
5. Press GO to bring up the Album List. It will automatically highlight an empty album
and bring up the onscreen keyboard to enter a name.
6. Use the arrow keys to select a letter or symbol. Press GO to accept it.
7. Complete the new name. Press the C button to accept the name or the BACK
button to cancel this operation without creating a new album.
8. You are now ready to add photos to your album. Proceed to the next section.
Adding Photos to an Album
Use this tool to move photos into an existing album. The Move Photos In is not
a copy feature. If you use the Move Photos In feature to add a photo from a
different album to your current album, the photo is no longer available in the
original album. If you would like to see the photo in both albums, use the Save
tool on the Edit room toolbar to save a copy of the photo and add the copied photo to
the new album.
Page 30

1. Open or create an album (see instructions above). This will be the album that your
photos will be added to.
2. Use the Left and Right buttons to highlight the Move Photos In/Out icon.
3. Press GO.
4. Highlight the Photos In icon in the submenu and press GO to automatically bring
up the Album List.
5. Select the album you want to take photos from and press GO. This will bring up
the Browse Grid showing all the pictures in that album.
6. Press the arrow buttons to move between photos. Press C to mark the photos you
would like to add. You can use the PHOTO GRID button to select or deselect all of
the photos at once.
7. Press GO when you have finished marking the photos to move them into their new
album.
Removing Photos from an Album
Use this tool to open an album and remove photos from within it. Removing a
photo from an album is not the same as deleting it. After selecting the photos
to remove, you will be asked to choose an album to move them to. To delete
the photo, select the Delete Photos icon on the toolbar.
1. Open or create an album (see instructions above). This will be the album that your
photos will be removed from.
2. Use the Left and Right buttons to highlight the Move Photos In/Out icon.
3. Press GO.
4. Select the Photos Out icon in the submenu and press GO to automatically bring up
the Photo Grid.
5. Use the arrow buttons to move between photos. Press C to mark the photos you
would like to remove from your album. You can use the PHOTO GRID button to
select or deselect all of the photos at once.
6. Press GO when you have finished marking the photos.
7. When the Album List appears, select the album that you would like to move your
photos into.
8. Press GO to move the photos.
Rearranging the Photos in an Album
This tool is used to change the viewing order of the photos within an album.
1. If the Album room toolbar is not visible, press the ALBUM button on your
FotoShow
™
remote control to toggle on the toolbar.
3. Press the Left and Right buttons to highlight the Arrange Photos icon.
4. Press GO to bring up the Photo Grid.
30 FotoShow™Digital Image Center User’s Manual
Page 31

Using the FotoShow™Image Center 31
5. Press the arrow buttons to move between pictures. Press C to mark (or pick up) the
photo you would like to move.
6. Press the arrow buttons to move the photo. Press C to reposition (or drop) the
photo. Repeat these steps for each photo you would like to move.
7. Press GO when you are finished rearranging your photos. Press BACK to cancel and
return photos to their original order.
Choosing a Theme for Your Album
Use this tool to change the background theme for your album. You can apply
a wide variety of colors and patterns to your album, and change them as
often as you’d like.
1. Open or create an album.
2. If the Album room toolbar is not visible, press the ALBUM button on your
FotoShow
™
remote control to toggle on the toolbar.
3. Press the Left and Right buttons to highlight the Choose Theme icon.
4. Press GO to bring up the Theme List.
5. Press the Up and Down buttons to select a theme.
6. Press GO to apply the selected theme to the current album. Press BACK to cancel
and return without changes.
Deleting Unwanted Photos
Use this tool to permanently delete photos from the Zip
®
disk. If you would
like to remove the photos from an album, keeping them for future use, use
the Move Photos Out tool on the Album room toolbar.
1. Open the album containing the photos you want to delete.
2. If the Album room toolbar is not visible, press the ALBUM button on your
FotoShow
™
remote control to toggle on the toolbar.
3. Use the Left and Right buttons to select the Delete Photos icon.
4. Press GO to bring up the Delete Grid.
The Delete Grid is used to select and
mark photos for deletion. The Delete Grid comes up when you want to
delete photos from an album. The photos you select and okay for deletion
will be permanently removed from your Zip
®
disk.
5. Use the arrow buttons to move move between photos. Press C to mark the photos
you would like to delete.
6. Press GO when you have finished marking the photos. Your FotoShow
™
Image
Center will verify that you want to delete all of the selected photos.
7. Follow the on-screen instructions.
CAUTION!
Using the Delete Photos tool will permanently delete photos from your Zip
®
disk.
Page 32

Deleting an Entire Album
Use this tool to delete an entire album from FotoShow. When you delete an
album that contains photos, you also delete those photos. A confirmation
dialog box will automatically ask you if you are sure about deleting the album.
1. Open the album you want to delete.
2. If the Album room toolbar is not visible, press the ALBUM button on your
FotoShow
™
remote control to toggle on the toolbar.
3. Use the Left and Right buttons to highlight the Delete Album icon.
4. Press GO to delete the current album. This will automatically bring up a
confirmation dialog box, asking if you really want to delete the album.
5. Press GO to delete the album or BACK to cancel.
NOTE: You will not be allowed to delete an album that contains files that are not photos.
If you have moved other types of files into an album while connected to a computer, you
will have to return to the PC to make this change.
Using Album Info to Customize Your Album
Use the Album Info tool to view information such as album name and the
number of pictures an album contains. You can also use this tool to modify
the album’s appearance. You can show or hide photo captions and dates. Use
this tool to rename your photo album. If you would like to add a caption to a photo, use
the Photo Info tool on the Edit room toolbar.
1. Open or create an album.
2. If the Album room toolbar is not visible, press the ALBUM button on your
FotoShow
™
remote control to toggle on the toolbar.
3. Press the Left and Right buttons to highlight the Album Info icon.
4. Press GO to bring up the Album Info box.
5. Use the arrow buttons to move through the information tabs.
6. Press C to edit a the current settings in the name and caption tabs. See “Using the
Keyboard.”
7. When you have finished making all of your changes to the album, press GO to save
the changes. If you wish to undo all of your changes, press BACK.
NOTE:
The FotoShow™ software allows for long names but may not display the full
album name. If you want the whole album name to be displayed, make sure your album
names are under 30 characters long.
NOTE: You cannot edit the name of the Zip folder or All My Photo..
32 FotoShow™Digital Image Center User’s Manual
Page 33

Using the FotoShow™Image Center 33
Editing your pictures
The Edit room is where you can fix, change, or play around with your photos. It’s simple,
and it’s fun! Find the photo you want to modify in one of your digital albums, press the
EDIT button on your FotoShow
™
remote control, and you’re ready to begin.
When working in the Edit room, remember:
• You can always revert to the original image if you don’t like your changes.
• You can choose Save a Copy to keep both the original version and the edited version
of your photo.
The Edit room toolbar (pictured here) features fast, easy-to-use tools to help you
enhance and correct your favorite photos.
Rotating Your Photo
Use this tool to rotate your photo either clockwise or counter-clockwise. If you
do not like the resulting rotation, you can either continue rotating, rotate in
the opposite direction, or use the Undo tool.
1. Select the photo you would like to edit.
2. If the edit room toolbar is not visible, press the EDIT button on your FotoShow
™
remote control to toggle on the toolbar.
3. Press the Left and Right buttons to highlight the Rotate icon.
4. Press Go.
5. Select Rotate Left or Rotate Right from the submenu.
6. Press Go to rotate the photo 90° in the selected direction.
Correcting Your Photo’s Color Automatically
Use this tool to automatically optimize your photo’s visual qualities, such as
brightness, contrast, and the color balance and richness. If your photo’s hues,
saturation and color values are already close to what would be considered
acceptable levels, you may not notice all of the changes made with Auto Fix.
Rotate
Right/Left
Remove
Red-Eye
Auto Fix
Add
Effect
Crop
Undo
Changes
Save
Photo
Info
Page 34

1. Select the photo you would like to edit.
2. If the Edit room toolbar is not visible, press the EDIT button on your FotoShow
™
remote control to toggle on the toolbar.
3. Press the Left and Right buttons to highlight the Auto Fix icon.
4. Press GO to toggle Auto Fix on and off.
5. If you want to keep your changes, select the Save icon, the press GO.
Removing Red-Eye from Your Photo
The red-eye removal feature helps you remove the red-eye reflection that
sometimes occurs with flash photography. Since FotoShow
™
software offers
fine control in red-eye removal, this procedure needs to be repeated for each
individual red-eye.
1. Select the photo you would like to edit.
2. If the Edit room toolbar is not visible, press the EDIT button on your FotoShow
™
remote control to toggle on the toolbar.
3. Press the Left and Right buttons to highlight the Remove Red-Eye icon.
4. Press GO to make the crosshair appear.
5. Press the arrow buttons to move the crosshair over the target eye.
6. Press GO to select the eye and bring up the Preview pane. Press Back to cancel.
7. To get a better view of the eye, press the A and B buttons to zoom in or out in the
Preview window.
8. To fine tune the selection of the red eye, press the arrow buttons to position the
crosshair over the red area in the target eye.
9. Press C to remove the red-eye. You can move the crosshair and press C again to
get a better result if the eye was not selected properly.
10. Press GO to accept the changes to the eye. Press BACK to discard the changes.
11. Repeat this process as necessary to correct all red-eyes in the photo.
Adding Effects to a Photo
The Add Effect tool includes color filters and picture enhancement tools to
help you create a wide range of new, artistic, and sometime humorous effects.
You can apply the photo effects one at a time. To remove the photo effect
from an unsaved photo, select No Effect from the Photo Effect List.
1. Select the photo you would like to edit.
2. If the Edit room toolbar is not visible, press the EDIT button on your FotoShow
™
remote control to toggle on the toolbar.
3. Press the Left and Right buttons to highlight the Add Effect icon.
4. Press Go to bring up the Photo Effect List.
5. Press the Up and Down arrows to select an effect to apply to the photo.
6. Press Go to apply the effect to your photo. Press BACK to cancel the operation
without making changes.
34 FotoShow™Digital Image Center User’s Manual
Page 35

Using the FotoShow™Image Center 35
Available Photo Effects
Black & White Sepia Turquoise
Posterize Green Tint Blue Tint
Orange Tint Magenta Tint Yellow Tint
Cropping a Photo
The Crop tool provides a quick way to remove unwanted portions of your
image. It uses a fixed aspect ratio that is optimized for viewing photos on
your TV. The Crop tool allows you to change the final orientation of your
photo. You can crop vertical, portrait-style images out of horizontal, landscape-style
photos or vice-versa.
1. Select the photo you would like to crop.
2. If the Edit room toolbar is not visible, press the EDIT button on your FotoShow
™
remote control to toggle on the toolbar.
3. Press the Left and Right buttons to highlight the Crop icon.
4. Press Go to make the crop box appear.
5. Press the A and B buttons to change the size of the crop box.
6. Press the C button the toggle the crop box between portrait and landscape.
7. Press the arrow buttons to move the crop box to the desired position.
8. Press Go to crop the photo. Press BACK to cancel the operation.
9. Save the cropped image using the Save tool on the Edit room toolbar.
NOTE:
The crop tool will always maintain a set aspect ratio (the same aspect ratio as
your TV). You can change the scale, but not the shape of the crop box.
Undoing Your Changes
The Undo tool allows you to experiment with the various effects without ruining
your original photo. Your original photo is preserved as a “digital negative,”
allowing you to create endless variations of your photo without losing the original.
1. Select the photo you would like to change.
2. If the Edit room toolbar is not visible, press the EDIT button on your FotoShow
™
remote control to toggle on the toolbar.
3. Press the Left and Right buttons to highlight to Undo icon.
4. Press GO to bring up the Undo dialog box.
5. Press the Up and Down buttons to highlight either the Undo Last to undo only the
last change or Back to Original to revert to your original photo.
6. Press GO to continue. Press BACK to cancel the operation.
Undo Last
Back to Original
Page 36

Saving Your Photo
The FotoShow
™
software makes it difficult to accidentally lose or delete your
photos, but it’s still important to save your photos. Whether you’re saving a
photo after removing the red-eye or saving a copy of an edited photo to a
new album, the process is quick and easy.
Use the Save Over option when you have made changes to a photo and would like to
replace the original photo in the album. Use the Save a Copy option when you want to
keep both the original and edited version of the photo.
NOTE:
If your photo has been write protected on either a computer or your digital
camera, you will need to use the Save a Copy option to keep your edited version.
Selecting Save a Copy will place the copy in the same album as the original; use the
Move Photos In/Out tool on the Album room toolbar to move the copy to another album.
1. Select the photo you would like to save.
2. If the Edit room toolbar is not visible, press the EDIT button on your FotoShow
™
remote control to toggle on the toolbar.
3. Press the Left and Right buttons to highlight the Save icon.
4. Press GO to bring up the Save Photo dialog box.
5. Select Save Over or Save a Copy (explained above).
6. Press GO to save your photo.
The Zip Disk icon in the upper right corner of the photo grid will help give you
an idea of how much memory space is left on the current Zip
®
disk. The red
portion of the Zip disk icon represents how much of the disk is full.
Adding Captions or Changing a Photo’s Information
Use this tool to add or edit a photo’s date, caption, and file name. The
FotoShow
™
software allows for long captions but may not display long
captions properly. If you want the whole caption to be displayed, make sure
captions are under 30 characters long.
NOTE: It is not usually necessary to edit a photo’s file name. The file name is needed
only when the Zip
®
disk is used with a computer, and will not be displayed with the
photo in either the Album room or Slideshow room.
1. Select the photo about which you would like to get information.
2. If the Edit room toolbar is not visible, press the EDIT button on your FotoShow
™
remote control to toggle on the toolbar.
Save Over
Save a Copy
36 FotoShow™Digital Image Center User’s Manual
Page 37

Using the FotoShow™Image Center 37
3. Press the Left and Right buttons to highlight the Photo Info icon.
4. Press GO to bring up the Photo Info box.
5. Use the arrow buttons to select the tab that contains the information you wish to
edit: date, caption, and file name.
6. Press the C button to start editing. See “Using the Keyboard” on page 26.
7. When you have finished making all of your changes to the album, press GO to save
the changes. If you wish to undo all of your changes, press BACK.
Creating and Viewing a Slideshow
The Slideshow room is for creating a dynamic presentation of your photos. In addition to
the full screen view, the FotoShow™software provides a wide selection of special themes
you can add to your slideshow. You can let your slideshow run automatically or change
slides manually with your remote control.
The Slideshow room toolbar (pictured here) features easy-to-use tools to help you
present your favorite photos.
Creating a New Slideshow
Use this tool to create a new slideshow. When your new slideshow is created,
you can add photos from any album on the Zip
®
disk. Adding photos to a
slideshow does not move the photo from the album. Instead, the slideshow
references the photo from the album that contains it. When you delete a slideshow—or
one of the photos in it—the slideshow quits referencing the photo from its original
location. You cannot permanently delete photos from your Zip disk in the Slideshow room.
1. If the Slideshow room toolbar is not visible, press the SLIDESHOW button on your
FotoShow
™
remote control to toggle on the toolbar.
2. Press the Left and Right buttons to highlight the Open/Create Slideshow icon.
3. Press GO.
4. Press the Right and Left buttons to select Create Slideshow from the submenu.
5. Press GO to bring up the Slideshow List. It will automatically highlight an empty
slideshow and bring up the onscreen keyboard. For more information, see “Using
the Keyboard” on page 26.
Open/Create
Slideshow
Manual/Auto
Add/Remove
Photos
Start
Show
Choose
Theme
Arrange
Photos
Slideshow
Info
Delete
Slideshow
Page 38

6. Enter the name and Press C to continue. Press the Back button to cancel.
7. You are now ready to add photos to your slideshow. For more information, see
“Adding Photos to a Slideshow” on page 39.
NOTE: If you name your slideshow “Auto,” your FotoShow™ Digital Image Center will run
the slideshow automatically on startup.
NOTE: If you press BACK while creating a slideshow and there are no other slideshows
on the list, you will automatically be sent to the Album room.
Turning an Album into a Slideshow
Use this tool as a quick way to save a copy of your favorite album as a
slideshow. This will save the current contents of the album as a slideshow. You
can change the theme and captions to vary from that of the original album.
The Create from Album feature will save only the current version of the album.
If you add photos to the album later, they will not automatically appear in the slideshow.
1. If the Slideshow room toolbar is not visible, press the SLIDESHOW button on your
FotoShow
™
remote control to toggle on the toolbar.
2. Press the Left and Right buttons to highlight the Open/Create Slideshow icon.
3. Press GO.
4. Press the Right or Left buttons to select the Create from Album icon from the
submenu.
5. Press GO to bring up the Album List.
6. Choose the album you would like to save as a slideshow.
7. Press GO to create the slideshow.
NOTE: When you have created a slideshow from a album, the new slideshow will
automatically appear on the Slideshow List using the same name as the original album.
Opening an Existing Slideshow
Use this tool to view or edit an existing slideshow. Once you have opened a
slideshow, you can change its Theme, Caption, Transition, and Delay with the
tools on the Slideshow room toolbar.
1. If the Slideshow room toolbar is not visible, press the SLIDESHOW button on your
FotoShow
™
remote control to toggle on the toolbar.
2. Press the Left and Right buttons to highlight the Open/Create Slideshow icon.
3. Press GO.
4. Select Open Slideshow from the submenu.
5. Press GO to bring up the Slideshow List.
6. Select a slideshow using the Up and Down arrows.
7. Press GO to open the slideshow or press Back to cancel this operation without
opening a slideshow.
38 FotoShow™Digital Image Center User’s Manual
Page 39

Using the FotoShow™Image Center 39
Running Your Slideshow
The FotoShow
™
software allows you to run slideshows in either Manual or
Automatic modes. In the Manual mode, use the Right or Down button to
advance to the next slide and the Left or Up button to show the previous
slide. In the Automatic mode, use the GO button to pause/resume the slideshow. Press
BACK stop a slideshow and return to the Slideshow room toolbar.
1. Press the Right and Left buttons to highlight the Start Show Manual/Auto icon.
2. Press GO to display the submenu.
3. Press the Right and Left buttons to select either the Start Show Manual or Start
Show Auto icon.
4. Press GO to start the slideshow.
5. If you selected auto, Press GO to Pause/resume the slideshow. Press Back to stop
the slideshow. If you selected manual, use the arrow buttons to change slides.
Adding Photos to a Slideshow
Use this tool to select photos to add to an existing slideshow. Adding photos
to a slideshow will not remove the photo from its original location. Slideshows
reference and display your photos without moving them.
1. Open or create the slideshow to which you want to add your photos.
2. Press the Left and Right buttons to highlight the Add/Remove Photos icon.
3. Press GO.
4. Highlight the Add Photos icon in the submenu and press GO to bring up the Album
List.
5. Choose an album to select photos from and press GO to bring up the Photo Grid.
Remember that you can add photos to a slideshow from more than one album.
6. Press the arrow buttons to move between photos. Press C to mark the photos you
would like to add.
7. Press GO when you have finished marking the photos. The photos will automatically
be added to the new slideshow. Press BACK to cancel the operation.
Removing Photos from a Slideshow
Use this tool to remove selected photos from an existing slideshow.
1. Open the slideshow you would like to remove the photos from.
2. If the Slideshow room toolbar is not visible, press the SLIDESHOW button on your
FotoShow
™
remote control to toggle on the toolbar.
3. Press the Left and Right buttons to highlight to the Add/Remove Photos icon.
4. Press GO.
Page 40

5. Highlight the Remove Photos icon in the submenu and press GO to automatically
bring up the Photo Grid.
6. Press the arrow buttons to move between photos. Press C to mark the photos you
would like to remove from this album.
7. Press GO when you have finished marking the photos. This will automatically
remove the photos from the slideshow, but not delete them from their album on
your Zip
®
disk.
Rearranging the Photos in a Slideshow
This tool is used to change the viewing order of the photos within a
slideshow.
1. Open the slideshow you would like to rearrange.
2. Press the Left and Right buttons to highlight the Arrange Photos icon.
3. Press GO to bring up the Photo Grid.
4. Press the arrow buttons to move between photos. Press C to mark (or pick up) the
photo you would like to move.
5. Press the arrow buttons to move the photo, and press C to reposition (or drop) the
photo.
6. Repeat as necessary.
7. Press GO when you have completed rearranging your photos.
Choosing a Theme for Your Slideshow
Use this tool to select and apply a special theme to your slideshow. The first
choice listed on the Slideshow List is a full screen option; it has no
background color, special border, or other decoration. The business themes are
sized to work well with business presentations, and uses muted business tones and a
straightforward look.
1. Open or create a slideshow.
2. Press the Left and Right buttons to highlight the Choose Theme icon.
3. Press GO to bring up the Theme List.
4. Press the Up and Down buttons to select a theme.
5. Press GO to apply the selected theme to the current slideshow. Press BACK to
cancel the theme and return to the album without changes.
NOTE:
All televisions crop images that fill the screen. To avoid cropping in full screen
mode, Iomega recommends that you use the themes provided in the Slideshow room.
The business themes have been optimized to show near full screen images without
cropping.
40 FotoShow™Digital Image Center User’s Manual
Page 41

Using the FotoShow™Image Center 41
Deleting an Entire Slideshow
Use this tool to eliminate a slideshow from the Slideshow List. Deleting a
slideshow will not delete the photos within it. Those photos will still exist in
their original albums.
1. Open the slideshow you would like to delete.
2. Press the Left and Right buttons to highlight the Delete Slideshow icon.
3. Press GO to delete the current slideshow. A dialog box will appear, asking if you
really want to delete the slideshow.
4. Press GO to delete the slideshow or BACK to cancel.
Viewing and Editing the Slideshow Information
Use this tool to view or edit slideshow details: Name, Delay, and Transition.
The FotoShow
™
software allows for fairly long slideshow names but for
readability, shorter names or phrases—under 30 characters—are
recommended.
1. Open or create a slideshow.
2. If the Slideshow room toolbar is not visible, press the SLIDESHOW button on your
FotoShow
™
remote control to toggle on the toolbar.
3. Press the Left and Right buttons to highlight the Slideshow Info icon.
4. Press GO to bring up the Slideshow Info box.
5. Use the arrow buttons to select the tab that contains the information you wish to
edit: Name, Delay, or Transition.
6. Press the C button to start editing. For more information, see “Using the
Keyboard.”
7. When you have finished making all of your changes to the album, press GO to save
the changes. If you wish to undo all of your changes, press BACK.
NOTE: If you name your slideshow “Auto,” your FotoShow™Digital Image Center will run
the slideshow automatically on startup.
Some of the Available Transition Styles
Random Replace Wipe to Right
Wipe to Left Wipe to Bottom Wipe to Top
Box Out Box In Split Vertical In
Split Vertical Out Split Horizontal In Split Horizontal Out
Blinds Down Blinds Up Blinds Left
Blinds Right Dissolve Slide to Right
Slide to Left Slide Up Slide Down
Glitter Right Glitter Left Glitter to Bottom
Glitter to Top
Page 42

Making Microsoft® PowerPoint
®
Presentations
Using Your FotoShow™Image Center to Give PowerPoint®Presentations
You can use your FotoShow™Digital Image Center as a replacement for expensive PC
screen or overhead projectors. Your FotoShow
™
Image Center can be used to give
business presentations anywhere there is a TV.
1. Create your Microsoft
®
PowerPoint®presentation. If you have problems creating
your PowerPoint presentation, consult the user’s manual that came with the
PowerPoint software.
NOTE:
Iomega has provided several PowerPoint®templates that have been
optimized for use with the FotoShow
™
Image Center. To use the Iomega provided
templates, insert your Zip®disk into your computer’s Zip drive (you may need to
follow the instructions on the purple side of the FotoShow QuickStart Guide to
connect your FotoShow Image Center to your computer for use as a standard USB
Zip drive), copy the contents of the TEMPLATES folder to your hard drive. Follow
the instructions in your PowerPoint
®
User’s Manual to create presentations based
on these templates.
NOTE:
When creating a Microsoft®PowerPoint®presentation for use with your
FotoShow
™
Image Center, use bold sans serif fonts (such as Arial Bold and Verdana
Bold) in sizes over 20 points.
2. After you have saved your presentation, select Save As… from the File menu.
3. In the Save As… dialog box, find or create the folder where you want to save your
presentation. You may want to save your presentation directly to your FotoShow
™
Zip®disk.
4. In the File name: field, type your presentations name. This will actually be the name
of the folder that contains your presentation. The actual file names will be
something like “slide1.jpg,” etc.
5. In the Save as type: field, select JPEG File Interchange Format.
6. Exit the Microsoft
®
PowerPoint®software.
7. If you saved your presentation somewhere other than on the Zip®disk that you are
using with your FotoShow
™
Image Center, move the folder that contains your
presentation to the Zip®disk.
8. Press the POWER button on the FotoShow
™
remote control if the FotoShow Image
Center is not already on.
9. Insert your FotoShow™Zip®disk into the FotoShow™Digital Image Center.
NOTE:
It may take several minutes to prepare your presentation to be viewed on
the FotoShow
™
Image Center.
42 FotoShow™Digital Image Center User’s Manual
Page 43

Making Microsoft® PowerPoint®Presentations 43
10. Press the SLIDESHOW button on the remote control.
11. Use the right and left arrow buttons to select Open/Create Slideshow, then press
GO.
12. Use the right and left arrow buttons to select Create Slideshow, then press GO.
13. Enter the name of your slideshow. Use the arrow buttons on the remote control to
move the cursor over the on-screen keyboard. Press the GO button to add the
current character to the slideshow’s name. Use A button to backspace. Use the B
button to insert a space. Press the C button to accept the current name. Use the
BACK button to cancel creation of the slideshow.
NOTE: If you name your slideshow “Auto,” your FotoShow™Digital Image Center
will run the slideshow automatically on startup.
14. Use the right and left arrow buttons to select Add/Remove Photos, then press GO.
15. Use the right and left arrow buttons to select Add Photos, then press GO.
16. Mark the slides that you want in your presentation. Use the arrow buttons to move
between images. Use the C button to mark an image. Press the Photo Grid button
to mark all of the photos. Use the GO button to add all of the marked images.
17.
Use the right and left arrow buttons to select Choose Theme, then press GO.
18. Use the up and down arrows to select an appropriate theme, then press GO.
NOTE:
To prevent your image from being cropped, Iomega recommends that you use
the one of the business themes rather than Full screen. See Troubleshooting for more
information.
19
. Use the right and left arrow buttons to select Start Show Manual/Auto, then press GO.
20. Use the right and left arrow buttons to select Start Show Manual, then press GO.
21. Use the arrow buttons to navigate through the slideshow. Use either the down or
right arrow button to move to the next slide. Use either the up or left arrow button
to move to the previous slide. Use either the BACK or SLIDESHOW button to exit
the tutorial.
Page 44

FotoShow
™
Image Center Essentials
To use the FotoShow™Image Center, insert a 250MB or 100MB* Zip®disk, SmartMedia
™
card, or CompactFlash™Card and begin organizing, editing, and presenting your digital
photos. This section of the manual will discuss some basic features of the FotoShow
Image Center. For information on using the software that came preinstalled on your
FotoShow Image Center, see “Using the FotoShow
™
Software” on page 23.
NOTE:
When hooked to a computer your FotoShow™Image Center will function as a USB
Zip
®
drive only. All other features are disabled, including the remote control, the RCA
ports, the S-Video port, the SmartMedia
™
Reader, the CompactFlash™/Microdrive™Reader,
and the Copy Button.
Inserting Zip®Disks
When you insert a Zip®disk, the green activity light (also the eject button**) on the Zip
drive will flash momentarily, then go out. If the light continues to blink slowly, push the
disk eject button to eject the Zip disk, then reinsert it.
CAUTION!
Never put anything into your Zip®drive except 250MB or 100MB Zip disks with
the symbols shown below. Using disks that do not have these symbols may cause
damage to your drive or loss of data.
* 250MB or 100MB where 1MB=1 million bytes. The capacity reported by your operating system may vary.
** The disk eject button will not eject a Zip® disk that is mounted on the Mac desktop. Use the procedures described
under “Ejecting Zip Disks.”
44 FotoShow™Digital Image Center User’s Manual
Page 45

FotoShow™Essentials 45
NOTE:
Zip®disks with formats other than PC (i.e., Mac®or Linux) will be automatically
ejected when inserted into your FotoShow
™
Image Center unless it is hooked to a
computer.
Inserting CompactFlash™Cards or IBM®Microdrives
™
Insert the CompactFlash™card or Microdrive™ into your FotoShow™Image Center’s
CompactFlash/Microdrive reader slot with the arrow facing up. When your digital film is
properly seated in the reader the COPY button will start flashing yellow. Do not force
your digital film into the slot. Make sure your card is not inserted at an angle.
CAUTION!
Inserting the CompactFlash™card or Microdrive™incorrectly may cause
irreparable damage to either the media or the reader. Inserting a CompactFlash card or
Microdrive into the Zip
®
drive slot may damage either the Zip drive or the media.
Inserting SmartMedia™Cards
Insert a 3.3v SmartMedia™card into your FotoShow™Image Center’s SmartMedia card
reader slot with the notch to the left and facing the drive. When your digital film is
properly seated in the reader the COPY button will start flashing yellow. Do not force
your digital film into the slot. Make sure your card is not inserted at an angle.
CAUTION!
Inserting the SmartMedia™card incorrectly may cause irreparable damage to
either the media or the reader. Inserting a SmartMedia card into the Zip
®
drive or
CompactFlash
™
/Microdrive™slot may damage either the Zip drive or the
CompactFlash/Microdrive card reader or the SmartMedia card.
Page 46

CAUTION!
Your FotoShow™Image Center is compatible with 3.3v SmartMedia™memory
cards only. Using a 5v SmartMedia card with your FotoShow Image Center may cause
irreparable damage to either the SmartMedia card or the FotoShow Image Center.
Ejecting Zip®Disks
To eject a Zip®disk when your drive has power, press the Eject/Activity button on the
front right side of your FotoShow
™
Image Center.
If your FotoShow
™
Image Center is attached to a computer, you may not always be able
to eject the disk. Please check the User’s Manual included on the Zip
®
disk that came
with your FotoShow Image Center for more information on ejecting Zip disks when using
the FotoShow Image Center as a USB Zip drive.
CAUTION!
Make sure that the activity and status lights are not blinking green before
removing your Zip
®
disk. Removing a Zip disk while it is being accessed may cause
irreparable data loss!
CAUTION!
To avoid damage to your FotoShow™Image Center’s Zip®drive or your Zip
disk, always remove the disk when it is not in use or before disconnecting or moving
your FotoShow
™
Image Center.
Ejecting Zip®Disks Without Power
The FotoShow™Image Center must be powered on for normal disk insertion and removal.
If you need to eject a disk during a power failure, disconnect the power supply from the
FotoShow Image Center and push a pen into the emergency disk eject hole on the back
of the drive.
CAUTION!
Never use the emergency eject procedure while the power supply is connected
to the FotoShow
™
Image Center. Never force a disk into or out of the Zip®drive as this
could damage the drive.
Ejecting CompactFlash™Cards and IBM®Microdrives
™
Make sure that the CompactFlash™/Microdrive™reader is not busy before ejecting. If you
are transferring files while your FotoShow
™
Image Center is connected to a TV, you should
see a dialog box on the TV screen that will show you when the transfer is complete.
When the copy completes, you can safely remove your CompactFlash card or Microdrive.
If you are using your FotoShow Image Center for portable downloads, make sure that the
activity light is off and status light is not blinking green before removing your digital film.
To remove the CompactFlash card or Microdrive, pull the card out of the card reader.
CAUTION!
To avoid damage to your CompactFlash™card or Microdrive™, always remove the
card when it is not in use or before disconnecting or moving your FotoShow
™
Image Center.
46 FotoShow™Digital Image Center User’s Manual
Page 47

FotoShow™Essentials 47
Ejecting SmartMedia™Cards
Make sure that the SmartMedia™card reader is not busy before ejecting. If you are
transferring files while your FotoShow
™
Image Center is connected to a TV, you should
see a dialog box on the TV screen that will show you when the transfer is complete.
When the copy completes, you can safely remove your SmartMedia card. If you are using
your FotoShow Image Center for portable downloads, make sure that the activity light is
off and status light is not blinking green before removing your digital film. To remove
the SmartMedia card, pull the card out of the card reader.
CAUTION!
To avoid damage to your SmartMedia™card, always remove the card when it
is not in use or before disconnecting or moving your FotoShow
™
Image Center.
Ejecting Memory Cards Without Power
To eject a SmartMedia™or CompactFlash™card during a power outage or when the
FotoShow
™
Image Center is turned off, disconnect the power supply from the FotoShow
Image Center and pull the card out of the card reader slot.
Using FotoShow™Zip®Disks on a Computer
You can read and write to your FotoShow™Zip®disk on any Macintosh®or Windows®PC
that has a Zip drive, or you can attach your FotoShow Image Center to your computer
and use it as an external Zip 250MB USB drive. You can use your Zip disk to transfer
files from your digital Camera to your computer for editing.
NOTE:
Your FotoShow™Image Center’s copy feature will allow you to copy any files that
you have stored on your SmartMedia
™
or CompactFlash™card to a Zip®disk; however,
you will only be able to view files that are in a JPEG format when your FotoShow Image
Center is hooked to a TV. A few digital cameras save their pictures in formats other than
JPEG. Please check the user’s manual that came with your digital camera for more
information on the file formats your camera uses to save your digital images.
Your FotoShow™Image Center can read only PC-formatted disks when hooked to your TV.
To use your FotoShow disk in a Macintosh, you will need to have Apple File Exchange
(part of Mac
®
OS 8.5 and higher) installed on your computer. When formatting a Zip®disk
for use with FotoShow on your Macintosh, always select DOS in the Format dialog box. If
the DOS format option does not appear in the standard Macintosh Erase Disk… dialog
box, use the Tools application that came with your FotoShow
™
Image Center.
Your FotoShow
™
Image Center may take several minutes to read your Zip®disk after you
have transferred files to it from your computer.
Page 48

48 FotoShow™Digital Image Center User’s Manual
Drive Sleep
The FotoShow™Image Center has an automatic sleep mode that spins down a Zip®disk
after several minutes of inactivity. This feature minimizes power consumption when the
Zip drive is not being accessed. During drive sleep, the green power light remains on,
and the Zip disk automatically spins up again when accessed.
Compatibility with 100MB Zip®Disks
The Zip®250 drive is compatible with both 100MB and 250MB Zip disks. However,
because of the difference in technology between the Zip 250 and Zip 100 drive,
performance when writing to a 100MB Zip disk is significantly reduced. This means that a
large file that takes 10 seconds to write to a 250MB Zip disk could take about a minuteand-a-half to write to a 100MB Zip disk (using your Zip 250 drive to write both disks).
To maximize performance of your Zip 250 drive, you should use 250MB Zip disks
whenever you want to store new information. If you have existing data on 100MB disks,
you can transfer it to 250MB Zip disks using the Iomega CopyDisk tool. (See “Copying
Zip Disks” in the HTML Zip Drive Manual that came with your device.)
Here are some important things to know about using 250MB and 100MB Zip
®
disks and
drives together:
1. If the Zip
®
250 drive appears to hang when you are writing to a 100MB Zip disk,
you can verify that the drive is operating correctly by checking that the green
activity light is blinking irregularly. (A slow, steady blink may indicate a problem
with the drive. If there is a slow, steady blink, try pushing the disk eject button to
eject the disk, then reinserting it.)
2. If you encounter any problems using 100MB Zip
®
disks in your Zip 250 drive, go to
the support site at: http://www.iomega.com/support.
JPEG Guidelines
There are many different programs available for both the Mac®OS and Microsoft
®
Windows®that will allow you to convert the non-JPEG images. You can convert images
saved from your digital camera, downloaded from the internet, scanned, etc. into JPEG
images. Then you can view, edit, and organize these images on your FotoShow
™
Digital
Image Center
For best results follow these tips when saving your JPEG images.
• Make sure that when you convert your files that you change them from CMYK images
(optimized for print) to RGB images (optimized for computer monitors).
• The JPEG format allows you to compress your images to save space. Remember the
higher the percentage of compression you use, the lower the image quality.
• Never save your images as progressive JPEGs. They are incompatible with your
FotoShow
™
Digital Image Center.
Page 49

FotoShow™Essentials 49
• Make sure your JPEG images always end with the extension .JPG. Your FotoShow
™
Image Center will not recognizes valid JPEGs with a missing or wrong extension.
NOTE:
JPEG is the most common file format used by digital cameras. The FotoShow
™
Image Center is compatible with most JPEG formats; however, some less common JPEG
formats such as CMYK JPEG, progressive JPEG, motion JPEG, and JPEG 2000/JBIG are
incompatible. If you would like to view non-JPEG images (such as BMP, PICT, GIF, PNG,
EPS, or TIFF) on your FotoShow Image Center, you will need to use a computer to
convert them to a compatible JPEG format.
Using FotoShow™Media
Use only genuine 250MB or 100MB* Zip®disks with your FotoShow™Digital Image Center.
This section describes some of the things you can do with Zip disks.
NOTE!
250MB Zip®disks work only in Zip 250 drives.
Backing Up with Zip®Disks
It’s important to always keep current backups of your digital photos. You can use your
FotoShow
™
Image center to copy the content of your SmartMedia™, CompactFlash™, and
Microdrive
™
memory (see “Copying Files to the FotoShow™ Image Center” on page 15). It
is also important to backup the albums and slideshows you have created with your
FotoShow Image Center.
In order to backup the files contained on your Zip
®
disk you will need a computer. The
simplest way to copy your Zip
®
disks is with the Iomega CopyDisk tool (for PCs only).
Mac
®
OS Users: Follow the instructions on the purple side of the QuickStart Guide to
connect your FotoShow
™
Image Center to your computer. See the help files installed with
IomegaWare
™
software on your Mac hard disk for instructions on copying your Iomega
disks.
Windows
®
PC Users:
1. Follow the instructions on the purple side of the QuickStart Guide to connect your
FotoShow
™
Image Center to your computer.
2. Insert the disk you want to copy into your Zip®drive.
3. Right mouse click on the Zip
®
drive icon in My Computer or Windows Explorer.
4. Select CopyDisk (indicated by the stylized Iomega
®
“i” logo) from the drive shortcut
menu.
5. Follow the onscreen instructions in the CopyDisk tool. If you need additional
information, click the help button.
* 250MB or 100MB where 1MB=1 million bytes. The capacity reported by your operating system may vary.
Page 50

50 FotoShow™Digital Image Center User’s Manual
NOTE:
The Iomega CopyDisk tool cannot copy any files that are open or in use at the
time the copy is made.
If you are using a Macintosh®or do not want to use CopyDisk, you can duplicate a Zip
®
disk by following these steps:
1. Copy the contents of your Zip
®
disk to a folder on your computer’s hard drive.
2. Eject your Zip®disk.
3. Insert a new Zip
®
disk.
4. Copy your files from the folder on your hard drive onto the new Zip®disk.
Formatting Zip®Disks
Your FotoShow™Image Center requires PC-formatted Zip®disks; however, it is not capable
of formatting a disk unless it is attached to a computer. See the Zip Drive Manual
included on your FotoShow Zip disk for more information on attaching your FotoShow
Image Center to a computer. Zip disks are available preformatted. You can format your
Zip disks to quickly erase all of the files on the disk or to repair a disk that has
developed bad sectors.
CAUTION!
Formatting a disk erases all data on the disk. Do not format any disk that
contains information you want to keep!
Formatting Instructions for Mac®OS Users:
NOTE:
You can use any Zip®250 drive that is connected to a computer to format your
Zip disk. If your computer does not already have a Zip drive, follow the instructions on
the the purple side of the FotoShow
™
Digital Image Center QuickStart Guide to use your
FotoShow Image Center with your computer.
1. Follow the instructions on the purple side of the QuickStart Guide to connect your
FotoShow™Image Center to your computer.
2. Insert the disk you want to format into your Zip®drive.
3. Open the IomegaWare folder on your Mac
®
hard disk, then open the Tools folder
and double click the Tools icon.
4. In the main Tools window, click on the icon for the disk you want to erase.
5. Select the Erase Disk tool.
6. Select DOS under Format For.
7. Click on the button for the type of format you would like to perform.
• Use Short Format if you want to quickly erase all data on a disk so you can
reuse it.
• Use Long Format if you are formatting a disk where you have forgotten the
password, or if you need to repair a disk that has developed read/write errors
due to bad sectors.
CAUTION!
Your FotoShow™Image Center can only read PC-formatted Zip®disks when it
is connected to your TV. Zip disks with formats other than PC (i.e., Mac
®
or Linux) will be
Page 51

FotoShow™Essentials 51
automatically ejected when inserted into your FotoShow Image Center unless it is hooked
to a computer.
Formatting Instructions for Windows®PC Users:
NOTE:
You can use any Zip®250 drive that is connected to a computer to format your
Zip disk. If your computer does not already have a Zip drive, follow the instructions on
the the purple side of the FotoShow
™
Digital Image Center QuickStart Guide to use your
FotoShow Image Center with your computer.
1. Follow the instructions on the purple side of the QuickStart Guide to connect your
FotoShow™Image Center to your computer.
2. Insert the disk you want to format into your Zip®drive.
3. Right mouse click on the Zip®drive icon in My Computer or Windows Explorer.
4. Select Format from the drive shortcut menu.
5. Choose the format type:
• Use Short Format if you want to quickly erase all data on a disk so you can
reuse it.
• Use Long Format if you are formatting a disk where you have forgotten the
password, or if you need to repair a disk that has developed read/write errors
due to bad sectors.
• Use either option to change the format type from Mac
®
to PC.
6. Click Start to start formatting the Zip
®
disk.
Using Read/Write Protected Zip®Disks
IomegaWare™software includes a special read/write protect feature that requires a
password in order for a disk to be accessed. Your FotoShow
™
Image Center cannot use
disks that have any sort of read/write protection. Follow the steps below to disable your
Zip
®
disk’s read/write protection on a computer before you insert it into your FotoShow
™
Image Center.
CAUTION!
Your FotoShow™Image Center cannot access read/write protected disks when
it is connected to your TV. Your FotoShow Image Center will eject read/write protected
disks and display an error message.
Removing Zip®Disk Protection under Mac®OS:
1. Follow the instructions on the purple side of the QuickStart Guide to connect your
FotoShow
™
Image Center to your computer.
2. Open the IomegaWare folder on your Mac®hard disk, then open the Tools folder
and double click the Tools icon.
3. Insert the disk you want to protect into your Zip
®
drive. You may be prompted for
the password.
4. In the main Tools window, click on the icon for the disk you want to unprotect.
5. Select the Disk Protection tool.
6. Choose the Remove Protection… option. You may be prompted for the disk’s
password. Click the Help button if you need information on any of these options.
Page 52

52 FotoShow™Digital Image Center User’s Manual
Removing Zip®Disk Protection under Windows®:
1. Follow the instructions on the purple side of the QuickStart Guide to connect your
FotoShow
™
Image Center to your computer.
2. Insert the disk you want to unprotect into your Zip
®
drive.
3. Open My Computer and right mouse click on the Zip
®
drive icon.
4. Select Protect… from the drive shortcut menu.
5. Choose the protection option you want to use. Click the Help button if you need
information on any of these options.
NOTE:
Although Zip®disk protection options are set and removed using IomegaWare
™
software, the actual protection mechanism is secured in the drive hardware. This means
the disk protection cannot be bypassed using other software programs.
Using Write Protected Files
Computers and some digital cameras can mark files as read only. You can view Read only
(or locked) photos just like any other photo on your FotoShow
™
Image Center; however,
you can only edit a read only file if you select the Save a Copy option.
Shutting Down the FotoShow™Image Center
The POWER button enables and disables the FotoShow™software only. When the
software is active (the power light is on), your FotoShow Image Center not only copies
the files but prepares them to be displayed on the TV. When the software is inactive (the
power light is off), your FotoShow Image Center will copy all of the files from your
SmartMedia
™
card, CompactFlash™card, or Microdrive™without preparing them for display
on your TV.
Since the FotoShow
™
Image Center is still active when the power light is off, it will
consume up to 4 Watts of electricity. When using your FotoShow Image Center with the
auto adapter, always remember to disconnect it when it is not in use.
If you leave your digital film inserted when you power down the FotoShow™ Image
Center, you will notice that the yellow light in the COPY button flashes for a moment.
Your FotoShow Image Center is preparing your digital film for portable downloads. For
more information on performing portable downloads, see “Portable Downloads the Quick
Way” on page 17.
CAUTION!
Never move your FotoShow Image Center with a Zip disk or digital film
inserted.
Page 53

FotoShow™Tips 53
FotoShow
™
Image Center Tips
Working with the Zip®Drive
Here are a few tips you’ll want to keep in mind to care for your FotoShow™Digital Image
Center, disks, and digital film!
• Always make sure the power supply is connected to the FotoShow™Image Center
before inserting a Zip
®
disk.
CAUTION!
If a disk is inserted without the power supply connected, and power is
then applied, it could damage the drive. If you accidentally insert a disk when the
power supply is not connected, eject it using the emergency disk eject procedure,
then connect the power supply and reinsert the disk.
• Never force a Zip®disk in or out of the drive.
• Never use ordinary 3.5
"
floppy diskettes or floppy head-cleaning disks in your Zip
®
drive. They will cause severe damage to the drive.
CAUTION!
Never put anything into your Zip®drive except genuine 250MB or 100MB
Zip disks. Using disks that do not have these symbols may cause damage to your
drive or loss of data:
• For best results, operate your FotoShow™Image Center on a level surface when a Zip
®
disk is inserted and in use. If you wish to set your FotoShow™Image Center on its
side, use the FotoShow stand that came with your FotoShow Image Center.
• Avoid exposing the FotoShow
™
Image Center, Zip®disks, Microdrives™, CompactFlash
™
cards, and SmartMedia™cards to dust, direct sunlight, high temperature, moisture, or
magnetic fields, such as from monitors and some speakers.
• Before disconnecting, shutting off the power, or moving your FotoShow
™
Image
Center, always remove the Zip
®
disk.
• Keep your FotoShow
™
Image Center away from speakers or other devices that
generate strong magnetic fields.
Page 54

54 FotoShow™Digital Image Center User’s Manual
CAUTION!
Remove disks from the FotoShow™Image Center drive before
disconnecting from the computer to avoid losing data. Disconnecting the FotoShow
Image Center from the computer while it is busy transferring data may cause damage
or loss of data.
• When connecting your FotoShow™Image Center to a computer, use only the USB data
cable that came with the drive.
CAUTION!
Do not use USB extension cables with your FotoShow™Image Center. Data
loss may result.
Working with the FotoShow™Software
• Your television may crop your digital images when the FotoShow™Image Center
displays them in full screen mode. Iomega recommends that you center the content
matter of your photos well away from the edges of your photos if you do not want
them to be cropped in full screen mode. See “Why are My Pictures Cropped When I
View Them Full Screen” on page 57, for more information.
• Remember to plan your albums in advance. If you will be creating a picture album
that you will be continually updating, you will want to reserve space on your Zip
®
disk. Dedicating a Zip disk may keep you from running out of room later. Consult the
table for the estimated number of images you can save for your camera resolution
and Zip disk size.
Resolution in Resolution in Zip
®
100 Zip®100 Zip®250 Zip®250
M
egapixels pixels
High Quality
Good Quality High Quality Good Quality
0.3 640 x 480 375 730 940 1825
0.8 1024 x 768 170 390 425 974
1.2 1280 x 960 110 270 280 680
1.9 1600 x 1200 75 185 185 460
3.1 2048 x 1536 45 115 115 295
• When creating a Microsoft
®
PowerPoint®presentation for use with your FotoShow
™
Image Center, use bold sans serif fonts (such as Arial Bold and Verdana Bold) in sizes
over 20 points. Iomega has provided several templates for use with PowerPoint that
have been optimized for use with your FotoShow Image Center. See page 42 for more
information on using your FotoShow Image Center to give PowerPoint presentations.
• To ensure that your JPEGs are compatible with your FotoShow
™
Image Center, follow
these guidelines:
1. Make sure that when converting your files you change them from CMYK images
(optimized for print) to RGB images (optimized for computer monitors).
2. The JPEG format allows you to compress your images to save space. Remember the
higher the percentage of compression you use, the lower the image quality.
3. Never save your images as progressive JPEGs, they are incompatible with your
FotoShow™ Digital Image Center.
NOTE:
JPEG is the most common file format used by digital cameras. The FotoShow
™
Image Center is compatible with most JPEG formats; however, some less common JPEG
Page 55

FotoShow™Tips 55
formats such as CMYK JPEG, progressive JPEG, motion JPEG, and JPEG 2000/JBIG are
incompatible. If you would like to view non-JPEG images (such as BMP, PICT, GIF, PNG,
EPS, or TIFF) on your FotoShow Image Center, you will need to use a computer to
convert them to a compatible JPEG format. For more information on converting JPEG
images on a computer, see “JPEG Guidelines” section on pg. 48.
Using the FotoShow™Image Center For Portable Downloads
Your FotoShow™ Digital Image Center does not always need to be connected to a
computer or TV to be used. You can use your FotoShow Image Center as a portable
device for downloading photos from your digital film when you are on the road. For best
results when using your FotoShow Image Center alone, Iomega recommends that you:
• Like video tapes and floppy disks, your Zip
®
disks and digital film are sensitive to
light and heat. Keep your FotoShow
™
Image Center and media out of heat and direct
sunlight. Do not use your FotoShow Image Center in temperatures over 100° F/39° C.
Never leave the FotoShow device or media on your car’s dashboard.
• Keep your FotoShow
™
Image Center on a level surface when possible.
• Protect your FotoShow
™
Image Center from shock and vibration.
• Keep your FotoShow
™
Image Center out of direct sunlight that can cause damage to
Zip
®
disks, digital film, or the FotoShow Image Center. Direct sunlight may also cause
your Zip disk to eject unexpectedly from the FotoShow Image Center.
• Since the FotoShow
™
Image Center is still active when the power light is off, it will
consume up to 4 Watts of electricity. When using your FotoShow Image Center with
the auto adapter, always remember to disconnect it when it is not in use.
Using the FotoShow™Image Center With Your Computer
For more information on using your FotoShow™Digital Image Center with your computer,
please view the Zip
®
Drive Manual on the Zip disk that came with this device. The Zip
Drive Manual is standard HTML and can be viewed with Internet Explorer 4.0 or Netscape
Navigator 4.5 on either a Macintosh
®
or Windows®PC.
NOTE:
The COPY button and all video and audio connectors are disabled when your
FotoShow
™
Image Center is connected to a computer that is powered on. The EJECT
button may be disabled by some computer operating systems (i.e., Mac
®
OS or Linux).
CAUTION!
Never connect your FotoShow™Image Center to a computer while you are
copying images from your digital film as this may result in an incomplete copy.
Connecting the FotoShow Image Center to a computer shuts down all of the Image
Center’s functionality, except for the Zip
®
drive, which may prevent your digital film from
being copied successfully.
Page 56

56 FotoShow™Digital Image Center User’s Manual
Troubleshooting
Why Don’t I Get a Picture on My TV After I connect the FotoShow
™
Image Center?
There are several things that could cause your TV not to properly display images from
your FotoShow
™
Digital Image Center.
1. Check all of the cables between your FotoShow
™
Image Center and your TV. Make
sure that the colored connectors match on both the TV and FotoShow Image Center.
2. Make sure that the FotoShow™Image Center is properly plugged in to a wall outlet
or powerstrip.
3. Press the POWER button on the FotoShow
™
remote control until the power light
comes on. Make sure that the batteries are properly installed in the remote control
and that you are following the usage guidelines on page 22.
4. Make sure that the TV and any other devices that may be connected in between
the FotoShow
™
Image Center and TV are powered on (these include VCRs, AV
Receivers, etc.).
5. Make sure your television (and VCR if connected through the VCR) is set to the correct
video input. Many TVs will label the connectors with the video input they are associated
with. Most TV remote control’s have a button labeled TV/VIDEO, TV/VCR, or INPUT. This
button switches between video inputs. If you are unsure about the type of video input
your TV uses, check the manual that came with your TV. Your FotoShow Image Center
has sound as well as video. If you can hear sound but can’t see any video, double
check the connection of the yellow RCA connector, S-Video connector or RF connector
(depending on your connection type). If the problem persists, visit our website at
http://www.iomega.com/support. If you are using an RF modulator try setting your TV to
channel 3 or 4. Some RF modulators let you specify the video input channel.
Why Doesn’t the FotoShow Zip®Disk I Created on
My Macintosh®Work?
When attached to a TV, The FotoShow™Digital Image Center can only read PC-formatted
Zip
®
disks. To format a disk on your Macintosh®for use with your FotoShow Image
Center, see the formatting instructions on page 50 of this manual.
Why Doesn’t My Write-Protected Zip®Disk Work on My FotoShow
™
Image Center
Your FotoShow™Digital Image Center creates several files, such as the miniatures used in
the Photo Grid, on your disk that help it to correctly display your photos. The FotoShow
Image Center cannot create these files if the disk is Read/Write protected. To use your Zip
®
disk with the FotoShow Image Center, see the instructions for removing read/write
protection on page 51.
Page 57

Troubleshooting 57
Why Does My Digital Photo Look Different When It is Printed Than on
the Computer or TV Screen?
Digital Cameras, TVs, Computers, and color printers use different technologies to create colors.
The colors of your digital photo or scanned image should look pretty close to the actual
subject of the picture; however, when you transfer an image from one technology to another
there will be slight color differences. Your FotoShow
™
Image Center is capable of displaying
many more colors than your color printer is able to print. Your printer will try to find the
closest approximation to the color possible, but there is often a noticeable difference.
Why are My Pictures Cropped When I View Them Full Screen?
All televisions crop images that fill the screen. Each television manufacturer’s TV screen
has different specifications, so it is impossible to say how much each image will be
cropped on any given TV set. Television broadcasters have determined an area of the
screen that will not be cropped on any TV. This area is referred to as the “Title Safe”
area of the screen. The title safe area of the TV is approximately 512 pixels by 385 pixels.
To avoid cropping in full screen mode, Iomega recommends that you position the main
subject matter of your photos well away from the edges of your photo (in the title safe
area). Your image will not be cropped when it is viewed in a mode other than full screen.
If you wish to display your entire photo without cropping, use the themes provided in
both the Album and Slideshow rooms.
Why Doesn’t My FotoShow™Digital Image Center Display the Pictures I
Take with My Digital Camera?
Your FotoShow™Digital Image Center is capable of displaying JPEG images only. Some
digital cameras can use file types other than JPEG or allow you to save your images in
several different file types. Check the user’s manual that came with your camera for
instructions on changing the file type your camera creates to JPEG. Your FotoShow
™
Image
Center transfers any file type from 3.3v SmartMedia
™
cards, CompactFlash™cards, and IBM
®
Microdrives™to a Zip®disk. To view photos that your camera saved in other file formats,
copy the photos from your camera to your Zip
®
drive, then use a computer to convert the
file to a compatible JPEG format. See the JPEG compatibility guidelines on page 48.
What Causes the Delay That Sometimes Occurs When I Insert
a Zip
®
Disk?
Whenever new photos are added to a Zip®disk, your FotoShow™Digital Image Center will
scan the disk for valid JPEG files. When your FotoShow Image Center finds a JPEG file, it
will prepare the file to be viewed on the television screen. It may take your FotoShow™
Image Center several minutes to perform this task, depending on how many new files are
on the disk. Your FotoShow Image Center will scan the Zip disk every time it is inserted,
but the delay will only be noticeable if JPEG files have been added.
Page 58

Why Does My FotoShow™Image Center Automatically Eject a Zip Disk
as Soon as I Insert It?
There are several things that might cause your FotoShow™Digital Image Center to eject
your Zip
®
disks.
1. If the Zip
®
disk you are using was formatted on a Macintosh®, it may be a Mac®formatted disk. See the instructions on formatting disks on a Macintosh for use
with the FotoShow Image Center on page 50.
2. If the Zip
®
disk is read/write protected, you will need to follow the instructions for
unprotecting the disk on page 51.
3. The FotoShow
™
Image Center will sometimes eject disks when it is in direct
sunlight. Move your FotoShow Image Center out of the sunlight.
4. The Zip®disk may be damaged.
What are the “Zip” folder and “All My Photos?”
There are two “system folders” that provide a basic part of the FotoShow™software
structure. These are vital components of the software, so you should be aware of what
they do when you see them.
• All My Photos contains all the photos you have saved to the current Zip
®
disk. You
can view the photos in the All My Photos album, but you cannot change them in any
way. This is where your viewable digital negatives are stored.
• Zip is the Root folder; it contains all the images you have saved to the Root folder
while using your Zip
®
disk with a computer.
How Do I Delete Photos from “All My Photos?”
The photos in “All My Photos” actually can be deleted, just not directly from All My
Photos. Use the Delete Photos tool in the Album room to delete your photos. You can
delete a specific photo, a group of photos, or an entire album.
Of course, the best way to keep unwanted photos off your Zip
®
disk is to screen them
out beforehand. Use the Select Photos option when you are copying photos onto the
disk from your digital media.
Why Doesn’t the FotoShow™Image Center Respond When I Press the
Buttons on the Remote Control?
There could be a number of reasons. First, check to make sure the FotoShow™Digital
Image Center is connected to your television and an appropriate power source, according
to the directions in this manual. Second, make sure the remote control contains two AAA
batteries in correct alignment. Third, be sure you are using the remote control within the
prescribed distance and pointing it towards the FotoShow Image Center.
58 FotoShow™Digital Image Center User’s Manual
Page 59

Troubleshooting 59
Why Can’t I Locate a Photo I Saved in the Edit Room yesterday?
The Edit room is a work area and is not designed to store saved pictures. Your edited
photo is most likely in the same album as the original photo. After you open the album
that contains the original photo, you will find both photos displayed in the Photo Grid,
accessible from the Album room.
Why Do Some of My Photos Appear Sideways?
Your photos will appear onscreen just as they would if you were to look through the
printed versions, with some appearing horizontal and some vertical. Use the Rotate tool
in the Edit room to change all of your photos to the appropriate orientation. This is not a
cropping tool, but using it may move small portions of your image out of the viewing
range in full screen mode.
How Can I Save the Changes Without Losing the Original Photo?
You can keep an unlimited number of different versions of a photo. Once you have made
the changes, select Save A Copy instead of Save Over. The Save A Copy tool will save
the work you have just done without changing the original image stored on the Zip
®
disk. By default, the copied version will be placed in the same album or folder as the
original. Use the Move Photos In/Out tool to move the photo to another album.
How Can I Undo the Changes I’ve Made to My Picture?
Whether you want to get rid of the last couple of changes or cancel all of your edits, use
the Undo tool on the Edit room toolbar. Selecting the Undo tool will bring up a dialog
box with two choices; you can either Undo Last Change or Undo Back to Original. If you
have more than one edit to remove, use the Undo Last Change command to back
through your edits in reverse order until you have removed the unwanted changes. Once
you save your changes they cannot be undone.
Why Doesn’t the Auto Fix Button Seem to Do Anything?
Auto Fix optimizes your picture’s inherent visual qualities, such as its brightness, contrast,
and color balance and richness. Changes made with Auto Fix will be less noticeable if a
picture’s hues, saturation and color values are already close to what would normally be
considered acceptable levels.
This button works like a toggle switch. Pressing this button once will apply the Auto Fix
enhancements, pressing it again will return the picture to its original image quality.
Page 60

Where Do Pictures Go When I Save Them?
By default, your photos are saved into the album from which they came. When you edit
and save a photo, you have a choice between saving over the original or keeping the
original and saving a copy of the edited version. If you choose Save A Copy, the copy
will be placed in the same album as the original.
How Do I Get a Photo Back that I Accidently Deleted?
It may be possible to recover an accidently deleted file, depending on how the photo was
deleted. When you delete an album, the photos it contains are not automatically deleted from
the Zip
®
disk. You have to select Delete and Discard Photos to erase the photos. If you were
using the Delete Grid and confirmed that you wanted to delete the photo, the photo has
been permanently removed from the disk.
How Many Pictures Can I Save on a Zip®Disk?
The number of photos you can save on Zip®disk depends on the size of the Zip disk,
resolution of your pictures, and type of digital camera you are using. Consult the table
below for the estimated number of images you can save for your camera resolution and
Zip disk size.
Resolution in Resolution in Zip
®
100 Zip®100 Zip®250 Zip®250
M
egapixels pix
els High Quality Good Quality High Quality Good Quality
0.3 640 x 480 375 730 940 1825
0.8 1024 x 768 170 390 425 974
1.2 1280 x 960 110 270 280 680
1.9 1600 x 1200 75 185 185 460
3.1 2048 x 1536 45 115 115 295
To get an idea of how much space is available on a particular Zip
®
disk,
consult the Zip Disk icon in the upper right corner of the Photo Grid. The red
portion indicates how much of the current Zip disk has been filled.
Why Am I Asked to Move my Photos When I Delete an Album, but Not
When I Delete a Slideshow?
Albums work differently than slideshows. Albums are similar to folders or directories on a
computer system. They hold photos. Deleting the album would also delete all the photos
it contains. Slideshows reference images. When you put a photo into a slideshow, the
slideshow references the picture from the album where it is saved. When you delete a
slideshow—or one of the photos in it—the slideshow quits referencing the photo from its
original location.
60 FotoShow™Digital Image Center User’s Manual
Page 61

Troubleshooting 61
What is the Difference Between Zoom and Crop?
The Zoom tool was designed to help you examine portions of your photo in greater
detail. The amount you have zoomed in on your photo is displayed in the upper right
corner of your screen, and depends on the original resolution of your photo. Lower
resolution photos may show a slightly limited final zoom percentage—somewhere around
1000-1200 percent.
The Crop tool allows you to reframe your photo. You can crop your photo and save your
photo (Zoom cannot be saved). You can cut vertical images out of horizontal photos or
vice-versa. Crop also helps you eliminate peripheral information and can dramatically
change or enhance the subject of your photo.
NOTE:
The Crop tool will always maintain a certain aspect ratio. You can change the
scale, but not the shape of the crop box.
Why are Some of Items on the Toolbar Grayed Out?
The tools that are grayed out are unavailable to use in your current situation. You simply
do not need all of the tools in every situation. You would never, for example, need to
undo changes if you have not yet made any.
Why Don’t the Photos I Add to an Album Automatically Appear in the
Slideshow I Created from that Album?
When you create a slideshow from an album, you are referencing photos from an album
as it currently exists. Photos added at a later date will not be recognized until they are
added with the Add/Remove Photos tool on the Slideshow room toolbar.
What Causes Photos to Disappear from My Slideshow?
If a photo is deleted from the Zip®disk it will disappear from any slideshows that use
that image. Since slideshows reference images from albums the photo disappears from
the slideshow when an album is deleted and the photos are removed from the Zip
®
disk.
Always make sure that a photo is not used by a slideshow when you are deleting an
album.
Why Do the Album Names I Create with the Album Info Tool Always
Revert to the Original?
When you have finished entering a name with the on-screen keyboard, you need to
accept the name by pressing the C button. You will be returned to the Album Info dialog
box. You can now make other changes to album settings. Pressing the GO button saves
Page 62

62 FotoShow™Digital Image Center User’s Manual
all of the changes you have made while using the Album Info Tool. Pressing the BACK
button will cancel all of the changes.
Why Do Only Some of My Photos Have Captions?
Although you have turned on the captions, some of your photos will not automatically
appear with captions. Your FotoShow
™
Image Center will only add captions automatically
to files that have custom file names. For example, if your image comes from a digital
camera that assigned the name “dcf1004.jpg” to your image, the FotoShow Image Center
will not display a caption. However, if your file is named “My Birthday.jpg,” “My Birthday”
will automatically appear as a caption. You can always add custom captions to a photo
by using the Photo Info tool on the Edit room toolbar.
What is the “PictIQ” Folder that I Found on My Zip®Disk?
The FotoShow™software uses the PictIQ folder to store files necessary for displaying your
photos on a TV. When your FotoShow Image Center starts up it has to individually
prepare each photo for use on a TV. Do not remove the PictIQ folder from your Zip
®
disk
or change its contents in anyway. Modifying the content of the PictIQ folder may effect
the way that your photos are displayed or cause long startup delays as the FotoShow
software rebuilds to contents of the folder.
What is the “Deleted_Albums” Folder that I Found on My Zip®Disk?
The FotoShow™software moves any Non-JPEG content of deleted albums to the
Deleted_Albums folder when an album is created. For example, if you accidently delete
an album that contains TIFF images saved from your digital camera, you can retrieve the
images from the Delete_Albums folder with a computer. Any JPEG images in the album
are permanently deleted. Non-JPEG images are saved since they are not visible on the
FotoShow Image Center when it is hooked to a computer.
Why Did My FotoShow™Image Center Copy Duplicate pictures or
Images I Didn’t Take From My Digital Camera?
Some Digital Cameras create an index of all the photos that have been taken. These
cameras may create extra graphics for use with the index. Other cameras will create
miniatures of all of your photos for display on the camera’s LCD. Your FotoShow
™
Image
Center will copy and display any valid JPEG file, which includes special images for an
index and miniatures of your photos.
For more details and answers to other questions, please consult the appropriate section
of the “Using the FotoShow
™
Software” chapter starting on page 23 in this manual.
Page 63

How to Get Help 63
How to Get Help
Iomega is committed to providing a first class technical support service. To meet this
goal, Iomega offers a variety of support options designed to meet the needs of a wide
range of users, including an award-winning web support site, automated FaxBack help,
e-mail, and live technical support service.
Iomega’s specific customer support policies (including fees for services) and procedures
change as technology and market conditions dictate. To obtain information about
Iomega’s current policies, please visit our website at
http://www.iomega.com/supportpolicy.html or call 1-888-4-IOMEGA* (1-888-446-6342,
available in the U.S. and Canada only).
Iomega’s Web Support Site: http://www.iomega.com/support
The Iomega award winning web support site offers advanced problem-solving support
available 24 hours a day. Here’s just some of what’s offered:
• Online help pages—You can find help pages with answers to frequently asked
questions (FAQs), troubleshooting, or basic “how to” information.
• Locate Iomega manuals—You can access an electronic copy of the manual for any
Iomega product. If the manual you select is a PDF file, you will need Adobe
®
Acrobat
™
Reader to view it. If you don’t already have Adobe Acrobat Reader installed on your
system, you can download it from the Adobe Systems Incorporated web site:
http://www.adobe.com.
• Download the latest Iomega software—The software that shipped with your Iomega
product may be updated over time. Choose Software Download from the Iomega web
support site to check for the most up-to-date Iomega software, or go directly to
http://www.iomega.com/software.
Automated FaxBack Help: 1-877-494-9488 (U.S. & Canada only)
Our automated FaxBack help allows you to use any touch-tone phone to instantly receive
detailed support information to your fax machine. When you call our FaxBack help
number, you can order a catalog listing the FaxBack documents available for your Iomega
product. Just follow the voice instructions to order what you need.
Web Support Forum
You can use our free, interactive support forums to get help from Iomega’s Technical
Support team, as well as from fellow Iomega customers! There’s no special software
required and registration is quick and easy. Just go to our support site at
http://www.iomega.com/support, select your product and click support forums.
*1-888-4-IOMEGA (1-888-446-6342) is available in the U.S. and Canada only.
Page 64

E-mail Tech Support
Send an e-mail to our Technical Support team via the web. Just go to our support site at
http://www.iomega.com/support, select your product and click e-mail.
Calling Iomega Technical Support
Iomega also offers live technical support for all your troubleshooting needs.
Before calling Iomega Technical Support, please have the following information available.
Also, please turn on your computer and call from a phone near your computer.
1. Previous customer number, if applicable.
2. Serial number of your FotoShow
™
Image Center.
4. Make and model of computer (if applicable).
5. Operating system used (e.g., Windows
®
98, Mac®OS 8.6, etc.) if applicable.
6. List of any other hardware installed on the computer (e.g., printers, CD-ROM, etc.) if
applicable.
7. Iomega software version (e.g., IomegaWare
™
2.0, etc.) if applicable.
8. Exact description of the problem and any error messages received.
Iomega has a highly trained technical support staff that is ready to take your call toll free
at 1-888-4-IOMEGA (1-888-446-6342*), Monday through Friday from 6 a.m. to 9 p.m. and
Saturday from 7 a.m. to 2 p.m. (Mountain Time). Technical support hours are subject to
change without notice.
Product Return or Repair
For information on returning your Iomega product for warranty service (or repair after the
warranty period), please visit our web support site at www.iomega.com/support or call
the Iomega Customer Service Hotline at 1-888-4-IOMEGA (1-888-446-6342*). Because
many returns are found to be due to a technical problem rather than a defective product,
it is necessary to check with Iomega Technical Support before returning your drive. Our
trained support personnel can often resolve the problem directly or otherwise supply you
with return authorization.
Warranty Information
For complete warranty information, refer to the warranty card or warranty information
contained on the CD-ROM included with your drive. If you have a question about the
limited warranty on your Iomega product, please go to our web support site at
http://www.iomega.com/support, select customer service and click the warranty option.
You can also call us at 1-888-4-IOMEGA (1-888-446-6342*) for warranty information.
*1-888-4-IOMEGA (1-888-446-6342) is available in the U.S. and Canada only.
64 FotoShow™Digital Image Center User’s Manual
Page 65

How to Get Help 65
Product Information
Call 1-800-MY-STUFF* (1-800-697-8833) or visit our web site at http://www.iomega.com for
information on new Iomega products, promotions, and rebates.
Purchasing Iomega Products
You can purchase Iomega products:
• Online at http://www.iomegadirect.com (U.S. Only).
• Calling 1-800-MY-STUFF (1-800-697-8833) (U.S. Only).
• Visiting your local computer store.
When purchasing Iomega products over the phone and on the Internet, you can use your
credit card (Visa
®
, MasterCard®, American Express®, or Discover®). Simply select the option
of interest to you.
*1-800-MY-STUFF (1-800-697-8833) is available in the U.S. and Canada only.
Page 66

Regulatory Information
Product Name: Iomega FotoShow™ Digital Image Center
Model Number: FotoShow
FCC (United States)
The computer equipment described in this manual generates and uses radio frequency (RF) energy.
If the equipment is not installed and operated in strict accordance with the manufacturer’s
instructions, interference to radio and television reception may result.
This equipment complies with Part 15 of the FCC Rules. Operation is subject to the following
conditions: (1) This device may not cause harmful interference, and (2) this device must accept
any interference received, including interference that may cause undesired operation.
Part 15, Class B, of the FCC Rules, is designed to provide reasonable protection against radio and
television interference in a residential installation. Although the equipment has been tested and
found to comply with the allowed RF emission limits, as specified in the above cited Rules, there
is no guarantee that interference will not occur in a particular installation. Interference can be
determined by turning the equipment off and on while monitoring radio or television reception.
The user may be able to eliminate any interference by implementing one or more of the following
measures:
• Reorient the affected device and/or its receiving antenna.
• Increase the distance between the affected device and the computer equipment.
• Plug the computer and its peripherals into a different branch circuit from that used by the
affected device.
• If necessary, consult an experienced radio/television technician for additional suggestions.
NOTE: Changes or modifications to the electronics or enclosure of this product must be expressly
approved by Iomega; otherwise, the user’s authority to operate this product may be voided by the
FCC.
Canadian Verification
This Class B digital apparatus meets all requirements of the Canadian Interference-Causing
Equipment Regulations (ICES-003, Class B).
Manufacturer/Responsible Party
Iomega Corporation
1821 West Iomega Way
Roy, UT 84067 U.S.A.
801-332-1000
66 FotoShow™Digital Image Center User’s Manual
Tested To Comply
With FCC Standards
For Home or Office Use
Page 67

USB Guidelines 67
Continued from back cover
Do not...
• Do not connect or disconnect any USB device while the Zip®USB drive is transferring
information—data loss will result!
NOTE: If the activity light is on, the Zip
®
drive is transferring information. Wait to
connect or disconnect any USB device until the activity light goes out and stays out.
• Do not use any USB cable with your Zip
®
USB drive other than the cable that came
with the drive. Never use USB extension cables with your Zip USB drive—data loss
may result.
• Do not disconnect your Zip
®
USB drive or unplug power to the Zip USB drive while a
Zip disk is inserted.
• Do not connect more than two Zip®USB drives to a single computer.
• If you are running Windows NT
®
4.0, do not connect or disconnect the Zip®drive
while the computer is on. System lockups or data loss may result.
Special Notes for Windows®95 and Windows NT®4.0 Users
• USB hubs are not supported on systems running Windows®95 or Windows NT®4.0.
• Install IomegaWare™software before you connect your Zip®250™drive.
CAUTION!
If you are running Windows®95 or Windows NT®4.0, only Iomega devices
are supported on the USB connections after IomegaWare
™
software is installed.
• IomegaWare™software enables you to use Iomega USB devices on computers with a
built-in USB connection running Windows®95 or Windows NT®4.0. (Some USB
controllers or motherboards may not support all types of USB devices.)
• For the best USB performance upgrade to Windows
®
98 or Windows 2000.
Upgrading from Windows®95 to Windows 98
For optimal USB performance, Iomega suggests you upgrade to Windows®98 SP1,
Windows 98 SE, or Windows Me. If you have already installed the IomegaWare™software,
reinstall it after you have upgraded. For instructions, see “Installing IomegaWare
Software” on the HTML Zip Drive Manual on the Zip disk that came with this device.
Windows
®
98 SP1, 98 SE, and Me updates provide better USB support than Windows 95.
For more information check Microsoft’s web site at: http://www.microsoft.com/support.
Page 68

TM
®
30398100 09/05/00 J
USB Guidelines
USB (Universal Serial Bus) is an interface designed to make it easy to connect mice,
keyboards, joysticks, printers, and other devices to your computer. Because of its ease of
use, USB has become a means for connecting high speed storage devices, such as the
FotoShow
™
Zip®250 drive.
CAUTION! Windows NT
®
4.0 users—Always turn off the computer to connect or disconnect
the Zip
®
250™drive.
Follow these guidelines to ensure optimal and reliable performance of your Zip
®
USB
drive and other USB devices.
You can...
• You can use your Zip®USB drive on either a Mac®with built-in USB running Mac OS
8.6, or 9, or on a Windows
®
PC with built-in USB running Windows 95, Windows 98,
Windows Me, Windows NT
®
4.0, or Windows 2000. (Some USB controllers or
motherboards may not support all types of USB devices.) If you are using Windows
95 or NT 4.0, see “Special Notes for Windows 95 and NT 4.0 Users” on page 67.
• You can connect or disconnect your USB device while your computer is on if you are
using a Mac
®
, Windows®95, Windows 98, Windows Me, or Windows 2000.
• You can optimize your Zip
®
USB drive’s performance by disconnecting other USB
devices when using your Zip drive. The performance of all USB devices decreases as
additional USB devices are connected.
• You can ensure maximum performance by connecting your Zip
®
drive directly to one
of the USB connections on your computer instead of a USB hub or keyboard.
• You can improve the reliability of your Zip
®
USB drive by unplugging and reconnecting
the power supply after a system crash or hang.
• You can avoid some system lockups by waiting at least 30 seconds after connecting
or disconnecting any USB device. (This allows the system to re-enumerate the USB
bus.) Do not connect, disconnect or use any other USB device during this time.
Continued on Page 67
Copyright © 2000 Iomega Corporation. Iomega, the stylized "i" logo, FotoShow, Zip, the Zip 100 brand block, the Zip 250 brand block, Clik!
PocketZip, Jaz, ZipCD and IomegaWare are either registered trademarks or trademarks of Iomega Corporation in the United States and/or
other countries. PictureIQ is a trademark of PictureIQ Corporation. Microsoft, Windows, NT, and PowerPoint are either registered trademarks
or trademarks of Microsoft Corporation in the United States and/or other countries. Apple, Macintosh, Mac, and iMac are either registered
trademarks or trademarks of Apple Computer, Inc., in the United States and/or other countries. Certain other product names, brand names,
and company names may be trademarks or designations of their respective owners.
 Loading...