

Page 1

ValueLoader™
LTO Tape Autoloader
User Manual
6326709-01
Ver. A, Rel. 01
Page 2

ValueLoader LTO Tape Autoloader User Manual, 6326709-01, Ver. A, Rel. 01, June 2003, Made in USA.
This publication is provided “as is” without warranty of any kind, either express or implied, including but
not limited to the implied warranties of merchantability or fitness for a particular purpose. This publication
may be revisee from time to time without notice.
COPYRIGHT STATEMENT
Copyright 2003 by Quantum Corporation. All rights reserved.
Your right to copy this manual is limited by copyright law. Making copies or adaptations without prior
written authorization of Quantum Corporation is prohibited by law and constitutes a punishable violation of
the law.
TRADEMARK STATEMENT
ValueLoader is a trademark of Quantum Corporation, registered in the U.S.A. and other countries. DLTtape
and Super DLTtape are trademarks of Quantum Corporation. Products mentioned herein are for
identification purposes only and may be trademarks or registered trademarks of their respective companies.
All other trademarks are the property of their respective owners.
6207947-00sN 44
Page 3

Contents
Preface xi
Chapter 1 Installing the ValueLoader 1
Installation Overview ............................................................................2
Understanding ValueLoader Features ................................................2
Barcode Reader.................................................................................3
SCSI Requirements ..........................................................................3
Product Overview............................................................................4
Choosing a Location...............................................................................6
Unpacking the ValueLoader.................................................................7
Identifying ValueLoader Accessories..................................................9
Installing the ValueLoader into a Rack ............................................. 11
Connecting the SCSI and Power Cables............................................13
Preparing the Host and Verifying the Connection..........................15
Installing Device Drivers ..............................................................17
ValueLoader LTO Tape Autoloader User Manual iii
Page 4

Chapter 2 Operating the ValueLoader 21
Operator’s Panel Overview.................................................................22
LED Indicators................................................................................24
Operator’s Panel Control Buttons................................................25
Understanding the Menu Structure...................................................26
Using Cartridges...................................................................................27
Importing Cartridges.....................................................................27
Exporting Cartridges .....................................................................29
Loading Cartridges........................................................................30
Unloading Cartridges....................................................................30
Write-Protecting Cartridges .........................................................31
Maintaining Cartridges.................................................................31
Cleaning the Tape Drive......................................................................32
Creating an Inventory of Cartridges..................................................33
Chapter 3 ValueLoader Administration 35
Configuring the ValueLoader.............................................................35
Resetting the ValueLoader ...........................................................36
Changing the SCSI ID....................................................................36
ValueLoader Operating Modes ...................................................38
Updating Firmware..............................................................................40
Using a Firmware Upgrade Tape ................................................40
Using SCSI.......................................................................................42
Running the ValueLoader System Test.............................................42
Retrieving Information About the ValueLoader..............................43
Cycle Count.....................................................................................43
View Event Log ..............................................................................43
Product Revision ............................................................................44
Firmware Revision.........................................................................44
Chapter 4 Diagnostics and Troubleshooting 47
Troubleshooting....................................................................................47
Installation Problems.....................................................................48
Troubleshooting Table ..................................................................50
Removing Stuck Cartridges ................................................................55
iv ValueLoader LTO Tape Autoloader User Manual
Page 5

ValueLoader Error Codes.................................................................... 59
Appendix A Technical Specifications 65
Appendix B Customer Support 69
Information Needed.............................................................................69
Information Needed by Software Vendors ......................................70
ValueLoader LTO Tape Autoloader User Manual v
Page 6

vi ValueLoader LTO Tape Autoloader User Manual
Page 7

Figures
Figure 1 Front Panel...........................................................................4
Figure 2 Rear Panel ............................................................................5
Figure 3 Basic ValueLoader Accessories......................................... 9
Figure 4 Rack Kit Components....................................................... 10
Figure 5 Installing Mounting Brackets (Left Side Shown) ......... 11
Figure 6 Installing Rails in the Rack (Left Side Shown)..............12
Figure 7 Sliding the ValueLoader into the Rack Slot .................. 13
Figure 8 Attaching SCSI and Power Cables .................................14
Figure 9 Operator’s Panel—Drive Empty.....................................22
Figure 10 Operator’s Panel—Drive Loaded ...................................23
Figure 11 Operator’s Panel Menu Structure...................................26
Figure 12 Importing a Cartridge ......................................................28
Figure 13 Exporting a Cartridge....................................................... 29
Figure 14 Write-Protect Switch.........................................................31
Figure 15 Removing Mounting Brackets (Left Side Shown)........ 56
ValueLoader LTO Tape Autoloader User Manual vii
Page 8

Figures
Figure 16 Pulling the Cartridge Release Lever...............................57
Figure 17 Installing the Carrier ........................................................58
viii ValueLoader LTO Tape Autoloader User Manual
Page 9

Tables
Table 1 Location Criteria .................................................................6
Table 2 LEDs....................................................................................24
Table 3 Control Buttons .................................................................25
Table 4 Common ValueLoader Problems ................................... 50
Table 5 Error Codes........................................................................60
Table 6 Physical Specifications .....................................................65
Table 7 Operating Specifications..................................................66
Table 8 ValueLoader Environmental Specifications..................66
Table 9 HP LTO Drive Specifications ..........................................67
Table 10 Media Specifications.........................................................68
ValueLoader LTO Tape Autoloader User Manual ix
Page 10

Tables
x ValueLoader LTO Tape Autoloader User Manual
Page 11

Preface
This chapter describes the ValueLoader User Manual’s audience,
purpose, organization, document conventions, and product safety.
Audience
Purpose
This user manual is designed and written for end users and field
service engineers.
The purpose of this manual is to provide end users with the
following information:
• ValueLoader™ LTO description and specifications.
• ValueLoader installation and configuration
• Tape cartridge description and general overview
• ValueLoader operation
• Troubleshooting
• Customer-replaceable components
ValueLoader LTO Tape Autoloader User Manual xi
Page 12

Document
Organization
This manual is organized as follows:
• Chapter 1, Installing the ValueLoader
- This chapter describes
ValueLoader features, accessories, and installation tasks.
• Chapter 2, Operating the ValueLoader
- This chapter describes
the front panel menu structure, menu tree, and drive and tape
operations.
• Chapter 3, ValueLoader Administration
- This chapter
describes how to configure the ValueLoader, upgrade
firmware, and retrieve ValueLoader information.
• Chapter 4, Diagnostics and Troubleshooting
- This chapter
describes how to identify and troubleshoot ValueLoader
problems and resolve error conditions.
• Appendix A, Technical Specifications
- This appendix
describes ValueLoader environmental, operational, drive, and
media specifications.
• Appendix B, Customer Support
- This appendix list support
information for the ValueLoader.
xii ValueLoader LTO Tape Autoloader User Manual
Page 13

Notational
Conventions
This manual uses the following conventions to designate specific
elements:
Note: Notes emphasize important information related to the
Caution: Cautions indicate potential hazards to equipment
Warning: Warnings indicate potential hazards to personal
Customer Support
For information on support, or to access our “Frequently Asked
Questions” database, visit our Web site.
main topic.
and are included to prevent damage to equipment.
safety and are included to prevent injury.
ValueLoader LTO Tape Autoloader User Manual xiii
Page 14

xiv ValueLoader LTO Tape Autoloader User Manual
Page 15

1Installing the ValueLoader
This chapter describes the following:
Chapter 1
• Installation Overview
• Understanding ValueLoader Features
• Choosing a Location
• Unpacking the ValueLoader
• Identifying ValueLoader Accessories
• Installing the ValueLoader into a Rack
• Connecting the SCSI and Power Cables
• Preparing the Host and Verifying the Connection
on page 2
on page 2
on page 6
on page 7
on page 9x
on page 11
on page 13
on page 15
ValueLoader LTO Tape Autoloader User Manual 1
Page 16

Installing the ValueLoader
Installation Overview
Installation Overview 1
Use the following steps to perform the ValueLoader installation.
These steps are fully explained in this chapter.
1 Choose a location for the ValueLoader (page 6).
2 Unpack the ValueLoader (page 7).
3 Identify the accessories for the ValueLoader (page 9).
4 Install the ValueLoader in a computer rack or select a table or
desktop near the host server (page 11
5 Shut down, turn off, and remove power from the server and all
devices attached to the server (page 13
6 Attach ValueLoader to the SCSI bus.
7 Attach the power cable between the ValueLoader and a
grounded power outlet. Power the ValueLoader on to ensure it
passes the power-on self test (POST).
).
).
8 Set the SCSI ID for the ValueLoader, if necessary.
9 Set up the host and verify the connection (page 15).
Understanding ValueLoader Features 1
The ValueLoader is a SCSI-2 low-voltage differential (LVD) data
storage device that incorporates an HP LTO tape drive and eight
tape slots. The ValueLoader operates as a dual SCSI device with
two SCSI IDs, one for the tape drive and the other for the
ValueLoader robotics. The ValueLoader uses up to eight LTO data
cartridges, providing a maximum formatted capacity of 1600
gigabytes (GB) assuming a 2:1 compression ratio.
2 ValueLoader LTO Tape Autoloader User Manual
Page 17

Installing the ValueLoader
Understanding ValueLoader Features
The ValueLoader is compatible with most operating systems and
environments that support the SCSI interface, but requires either
direct support from the operating system or a compatible backup
application to take full advantage of its many features.
Barcode Reader 1
SCSI Requirements
Your ValueLoader may have come equipped with an optional
barcode reader. The barcode reader is enclosed in a plastic housing
that protrudes out of the rear panel of the ValueLoader, just above
the SCSI connectors. The barcode reader automatically scans each
cartridge in the carousel upon power up, after a reset, or when a
re-inventory command is issued. (See Creating an Inventory of
Cartridges on page 33 for instructions.) Beyond that, there is no
user interface with the barcode reader via the front panel operator
controls or LCD display. The information from each label is stored
in memory and available through SCSI to the computer’s
operating system or backup application upon request.
If you plan to utilize the barcode reader, you must adhere a
barcode label into the designated area on the front of each
cartridge. These labels must conform to ANSI/AIM BC1-1995,
Uniform Symbology Specification Code 39. To obtain additional
barcode labels, refer to our Web site.
The ValueLoader incorporates a wide SCSI-2, LVD SCSI bus, but
1
may also be attached to a single-ended (SE) SCSI bus. Make sure
your SCSI host adapter or controller supports these standards. If
you connect the ValueLoader to an SE SCSI bus or if there are SE
devices attached to the same SCSI bus, the ValueLoader’s
performance is limited to the maximum data transfer speed and
maximum cable lengths of the SE bus. The ValueLoader is NOT
compatible with a standard differential (Diff) or high-voltage
differential (HVD) SCSI bus. The ValueLoader is compatible with a
narrow (50-pin) SCSI bus using a customer-supplied 68-pin to 50pin adapter that terminates the unused 18 pins. These adapters are
sometimes labeled high-byte termination.
ValueLoader LTO Tape Autoloader User Manual 3
Page 18
Installing the ValueLoader
Understanding ValueLoader Features
Product Overview 1
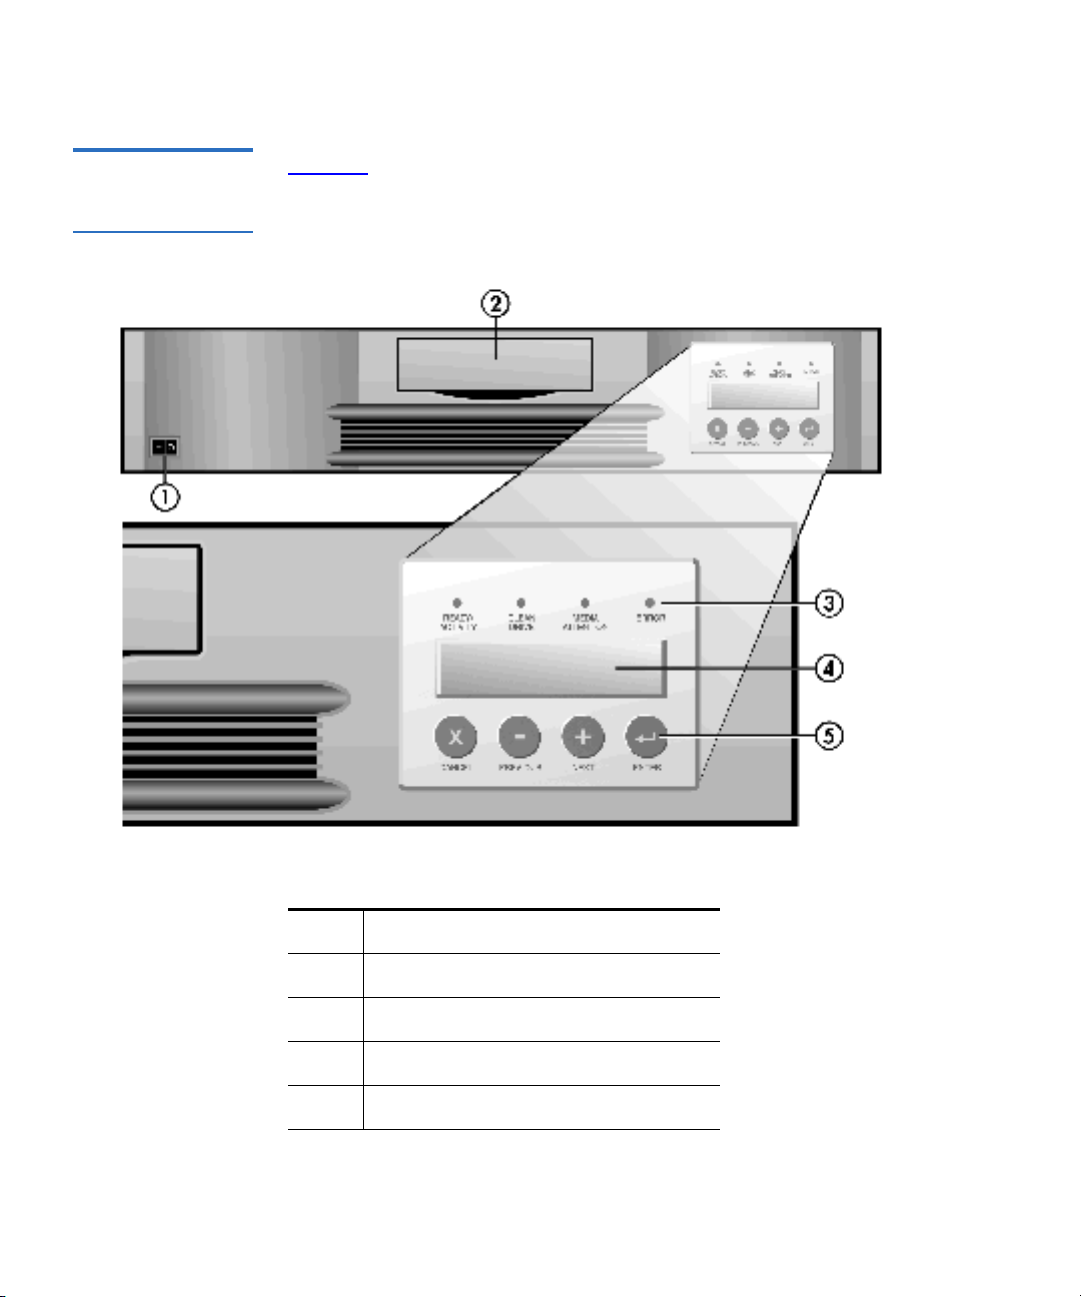
Figure 1 Front Panel
Figure 1
describes front panel controls.
1Power switch
2 Import/export slot
3 Front panel LEDs
4 Front panel LCD screen
5 Control keys
4 ValueLoader LTO Tape Autoloader User Manual
Page 19
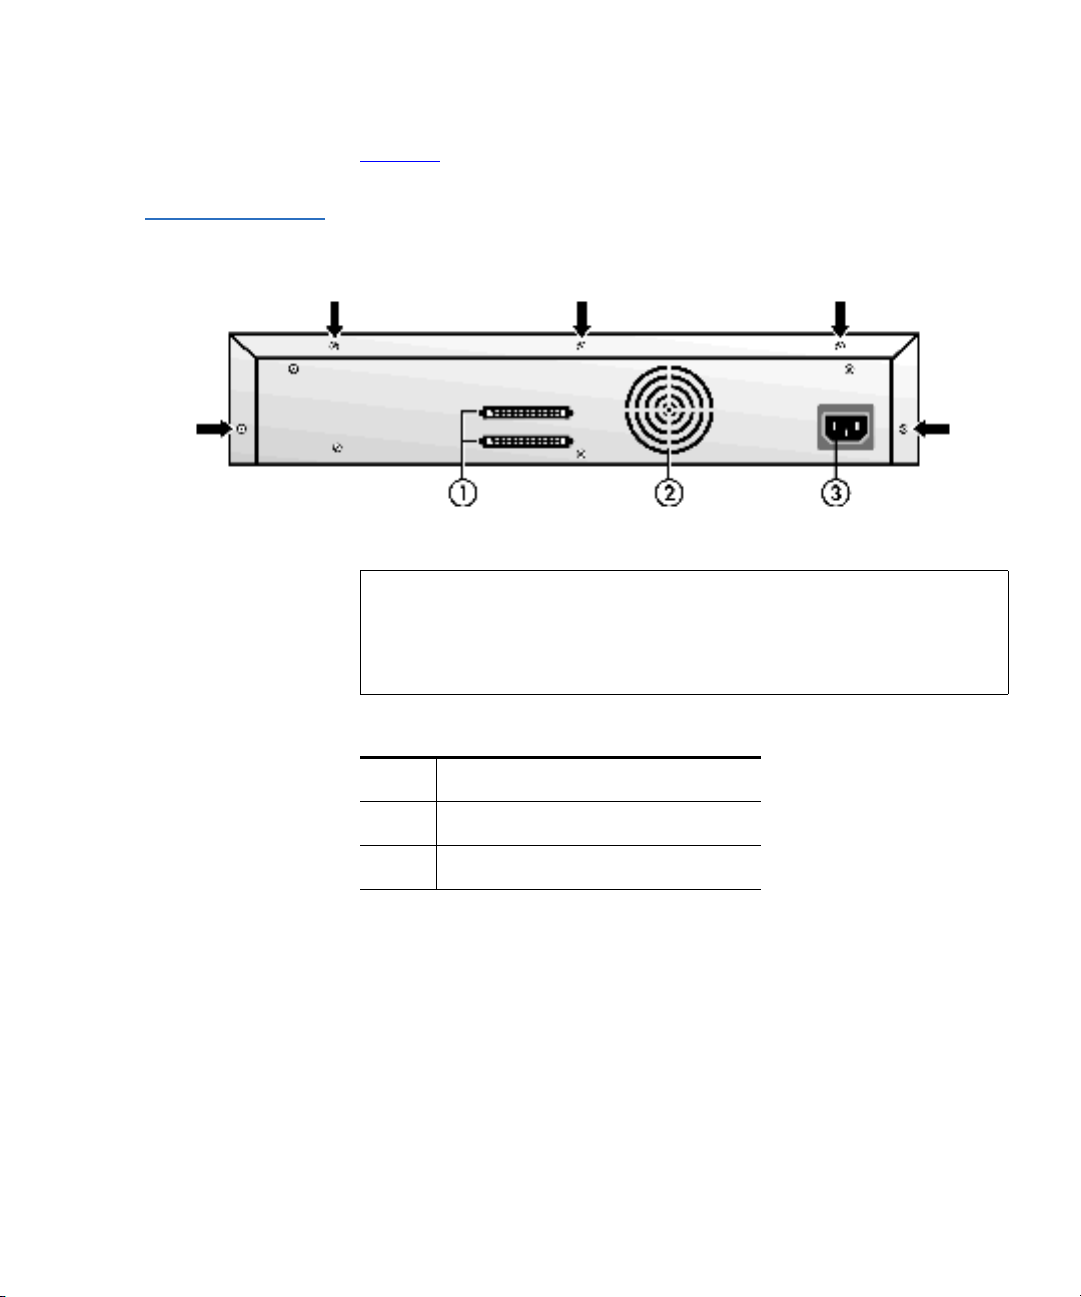
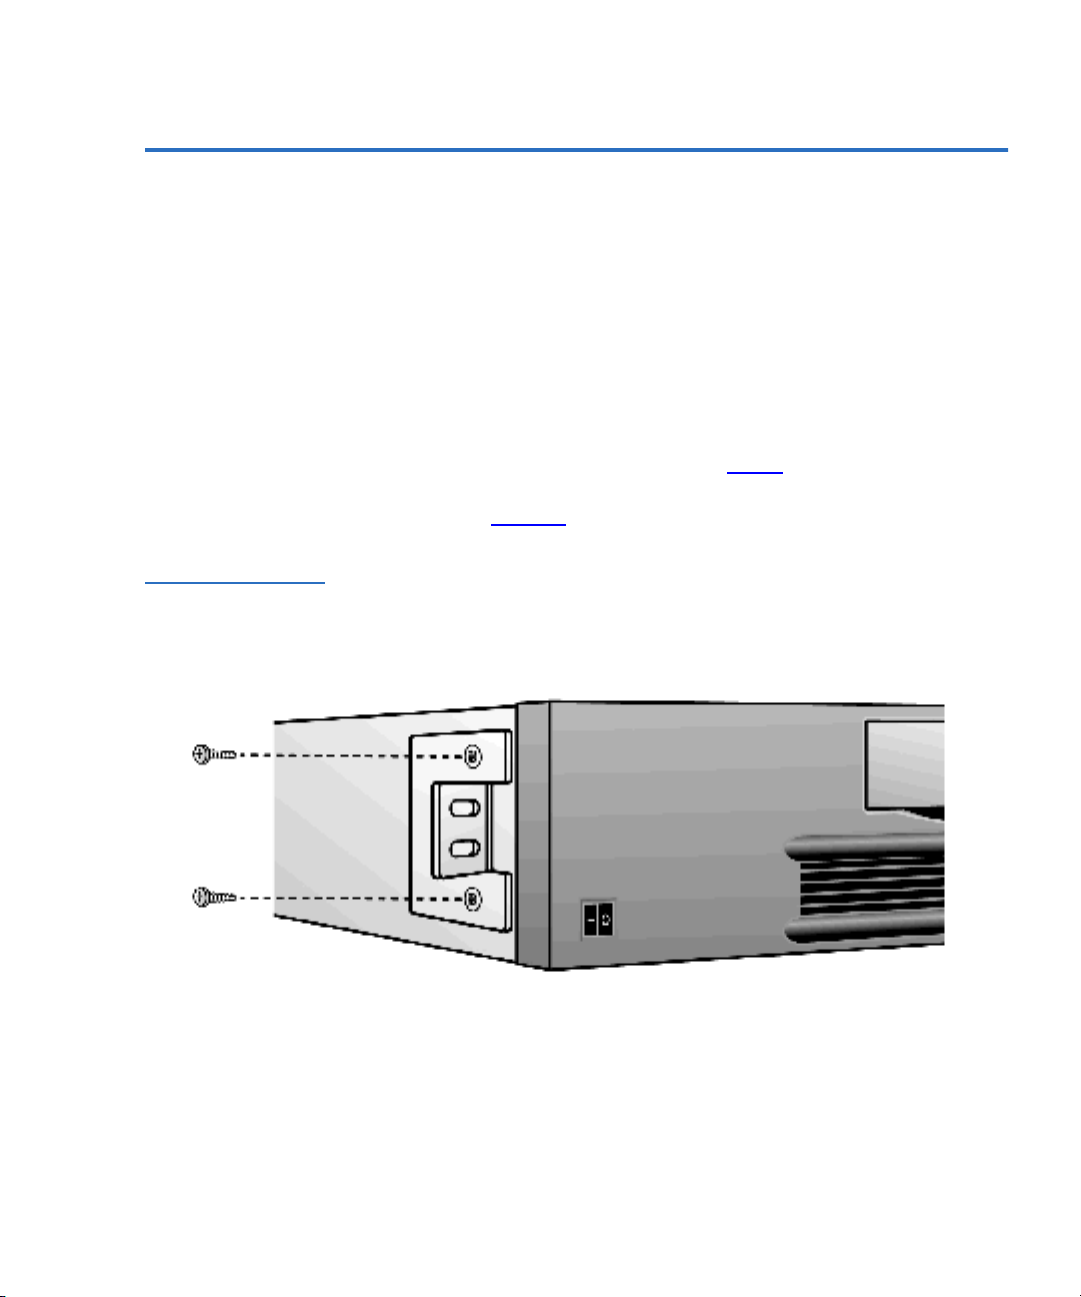
Figure 2 Rear Panel
Installing the ValueLoader
Understanding ValueLoader Features
Figure 2 describes the ValueLoader rear panel.
Note: The arrows in the figure indicate screws that need to be
removed to remove the top cover. In addition to the
screws pictured, there are three screws on each side of
the ValueLoader.
1 68-pin SCSI connectors
2Fan vent
3 Power connector
ValueLoader LTO Tape Autoloader User Manual 5
Page 20

Installing the ValueLoader
Choosing a Location
Choosing a Location 1
Choose a location that meets the following criteria. (See
appendix A
for more specifications.)
Table 1 Location
Criteria
Requirement Description
Work surface
(standalone
installation)
Rack requirements Standard 19-inch rack with a clearance of 2U.
Room temperature 10-35° C (50-95° F)
Power source AC power voltage: 100-127 VAC; 200-240 VAC
Select a location that is flat, level, sturdy, and
close to a host server. Do not place the
ValueLoader on the floor or other carpeted
surface.
Caution: Do not place the ValueLoader on its
side or upside down, or stack items
that weigh more than 15 kg (33 lbs)
on top of the ValueLoader.
Line frequency: 50-60 Hz
Note: Locate the AC outlet near the
ValueLoader. The AC power cord is the
product’s main AC disconnect device
and must be easily accessible at all
times.
Weight 10 kg (22 lbs)
Air quality Minimal sources of particulate contamination.
Avoid areas near frequently used doors and
walkways, stacks of supplies that collect dust,
printers, or smoke-filled rooms.
Caution: Excessive dust or debris can damage
tapes and tape drives.
6 ValueLoader LTO Tape Autoloader User Manual
Page 21

Installing the ValueLoader
Unpacking the ValueLoader
Requirement Description
Humidity 20-80% RH, non-condensing
Clearance Back: Minimum of 15.4 cm (6 inches)
Front: Minimum of 30.8 cm (12 inches)
Sides: Minimum of 5.08 cm (2 inches)
Unpacking the ValueLoader 1
Before you begin, clear a desk or table so you can unpack the
ValueLoader. You also need to select an open 2U computer rack
location or a desktop location near the server that is to be the host
for the ValueLoader.
Caution:
If the room temperature you are working in differs
from the shipping or storage temperature by 15° C
(30° F) or more, allow the ValueLoader to acclimate
to the surrounding environment for at least 12 hours
before opening the shipping carton.
Unpack and inspect the ValueLoader for shipping damage by
doing the following:
1 Clear a table or desk so that you have room to unpack the
ValueLoader.
2 Inspect the shipping box for damage. If you notice any
damage, report it to the shipping company immediately.
3 Open the shipping box and remove the accessories package.
Set the accessories package aside.
ValueLoader LTO Tape Autoloader User Manual 7
Page 22

Installing the ValueLoader
Unpacking the ValueLoader
4 Lift the ValueLoader and padding out of the box and place it
on the work surface, top facing up. Do not set the ValueLoader
on either end or side.
Caution: Placing the ValueLoader on its side, on end, or
upside down can cause permanent damage to the
unit.
5 Carefully remove the shipping padding from the left and right
sides of the ValueLoader. Then remove the bag from the
ValueLoader.
Note: Save the packing materials in case you need to move
or ship the ValueLoader in the future.
8 ValueLoader LTO Tape Autoloader User Manual
Page 23
Installing the ValueLoader
Identifying ValueLoader Accessories
Identifying ValueLoader Accessories 1
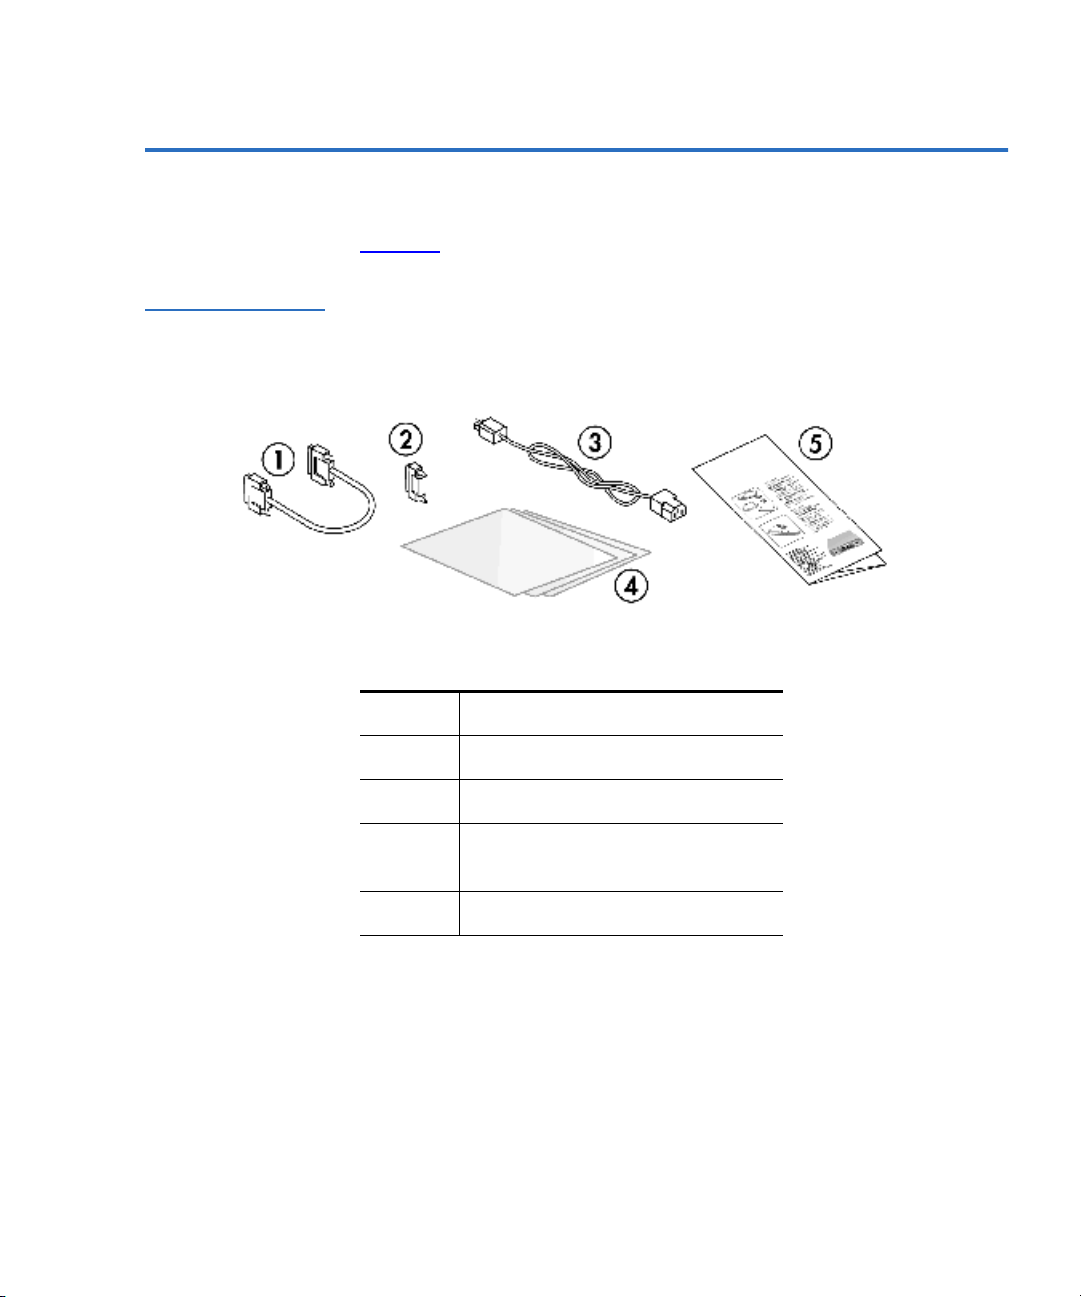
Figure 3 Basic
ValueLoader
Accessories
Figure 3
1 SCSI cable
2SCSI terminator
3Power cable
identifies accessories for use with the ValueLoader.
4 Marketing and regulatory
information
5 Quick Install Guide
ValueLoader LTO Tape Autoloader User Manual 9
Page 24
Installing the ValueLoader
Identifying ValueLoader Accessories
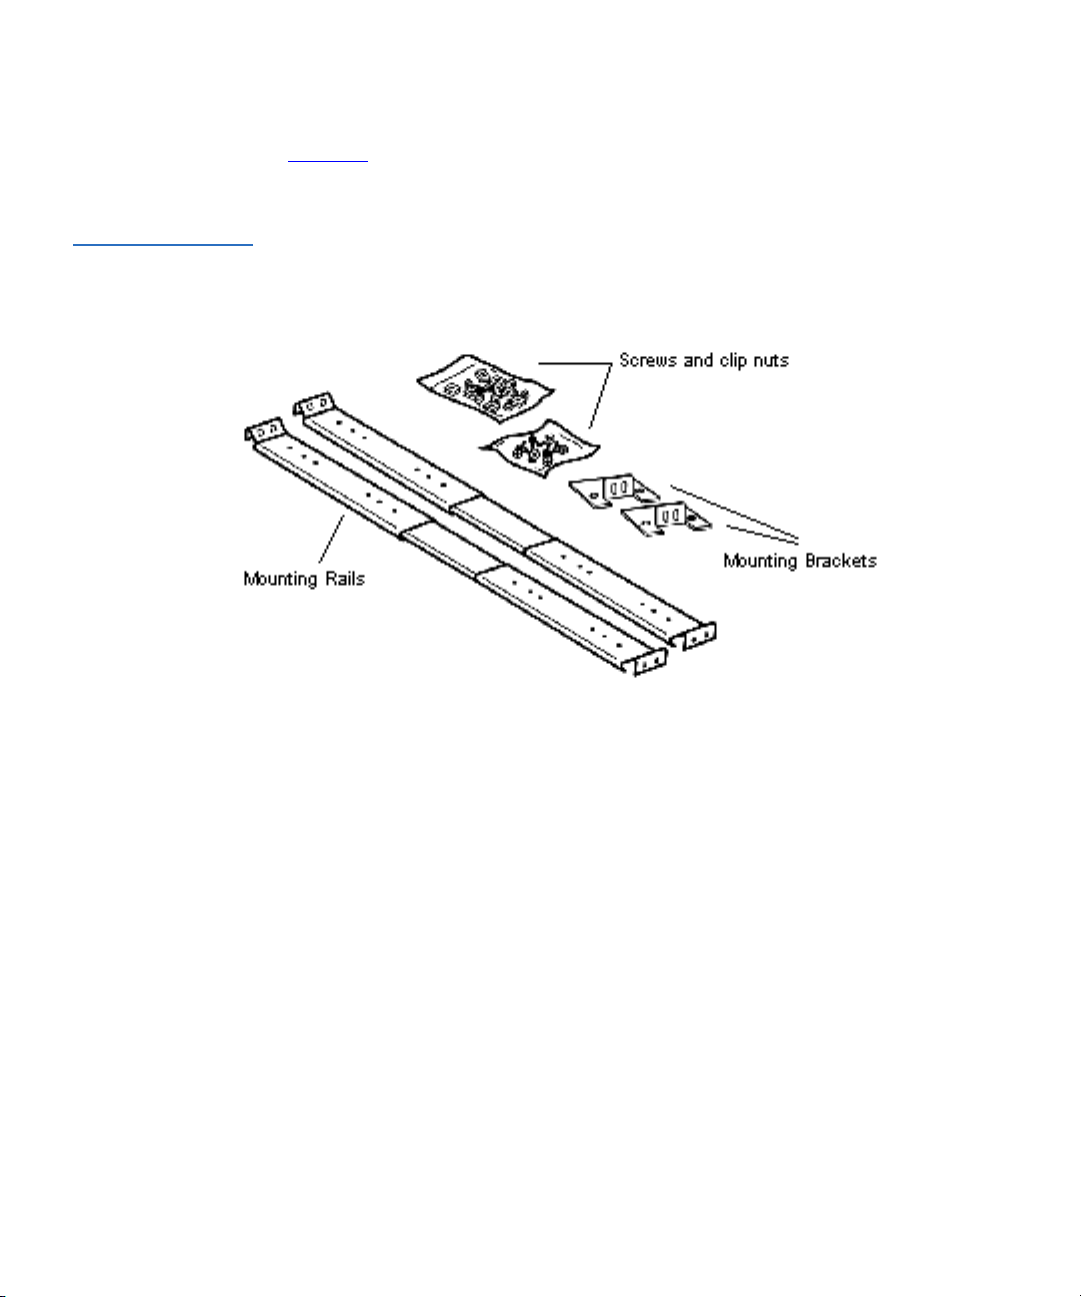
Figure 4 shows additional accessories used for rackmount
installations.
Figure 4 Rack Kit
Components
10 ValueLoader LTO Tape Autoloader User Manual
Page 25
Installing the ValueLoader
Installing the ValueLoader into a Rack
Installing the ValueLoader into a Rack 1
The ValueLoader fits all standard 19-inch racks, taking up 2U of
space. To install the ValueLoader into a rack, you need to install
the mounting brackets on both sides of the ValueLoader and the
rails in the selected rack location.
To install the ValueLoader, follow these steps:
1 Use a screwdriver or Torx T10 to remove the two screws near
the front on each side of the ValueLoader.
2 Using the screws you removed in step 1, secure one mounting
bracket from the rack kit to each side of the ValueLoader, as
shown in figure 5
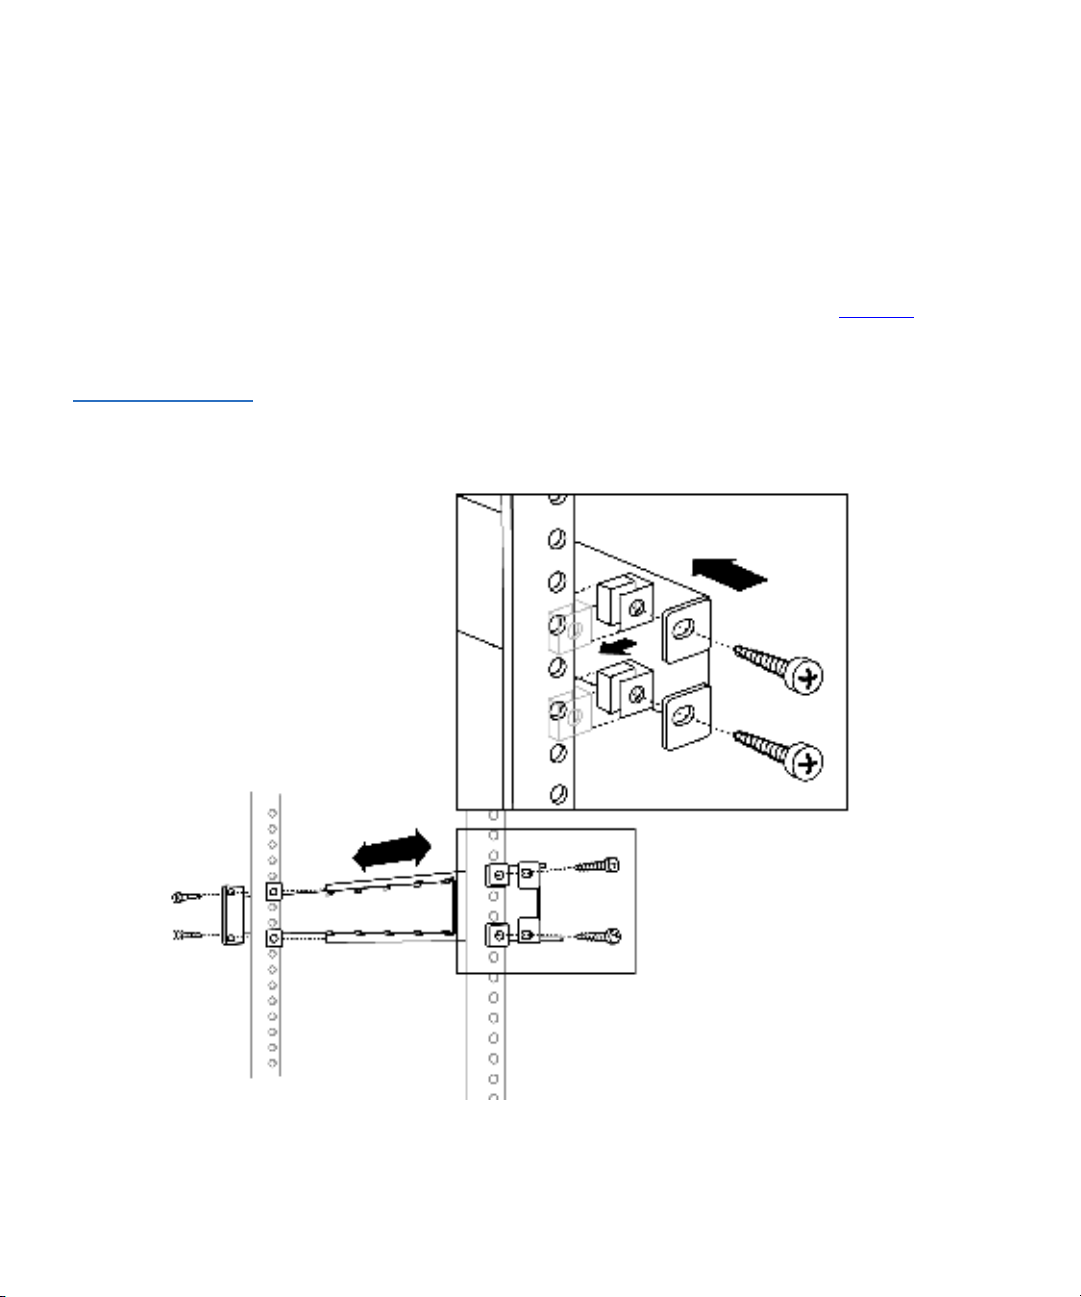
Figure 5 Installing
Mounting Brackets
(Left Side Shown)
.
ValueLoader LTO Tape Autoloader User Manual 11
Page 26
Installing the ValueLoader
Installing the ValueLoader into a Rack
3 Using screws and clip nuts from the rackmount hardware
package, secure one rail to each side of the rack in the location
where you plan to install the ValueLoader.
• Be sure to secure both the front and rear of each rail. The
rails extend to fit a variety of rack depths.
Figure 6 Installing
Rails in the Rack (Left
Side Shown)
• The correct orientation of the left rail is shown in figure 6
Repeat for the right rail.
.
12 ValueLoader LTO Tape Autoloader User Manual
Page 27
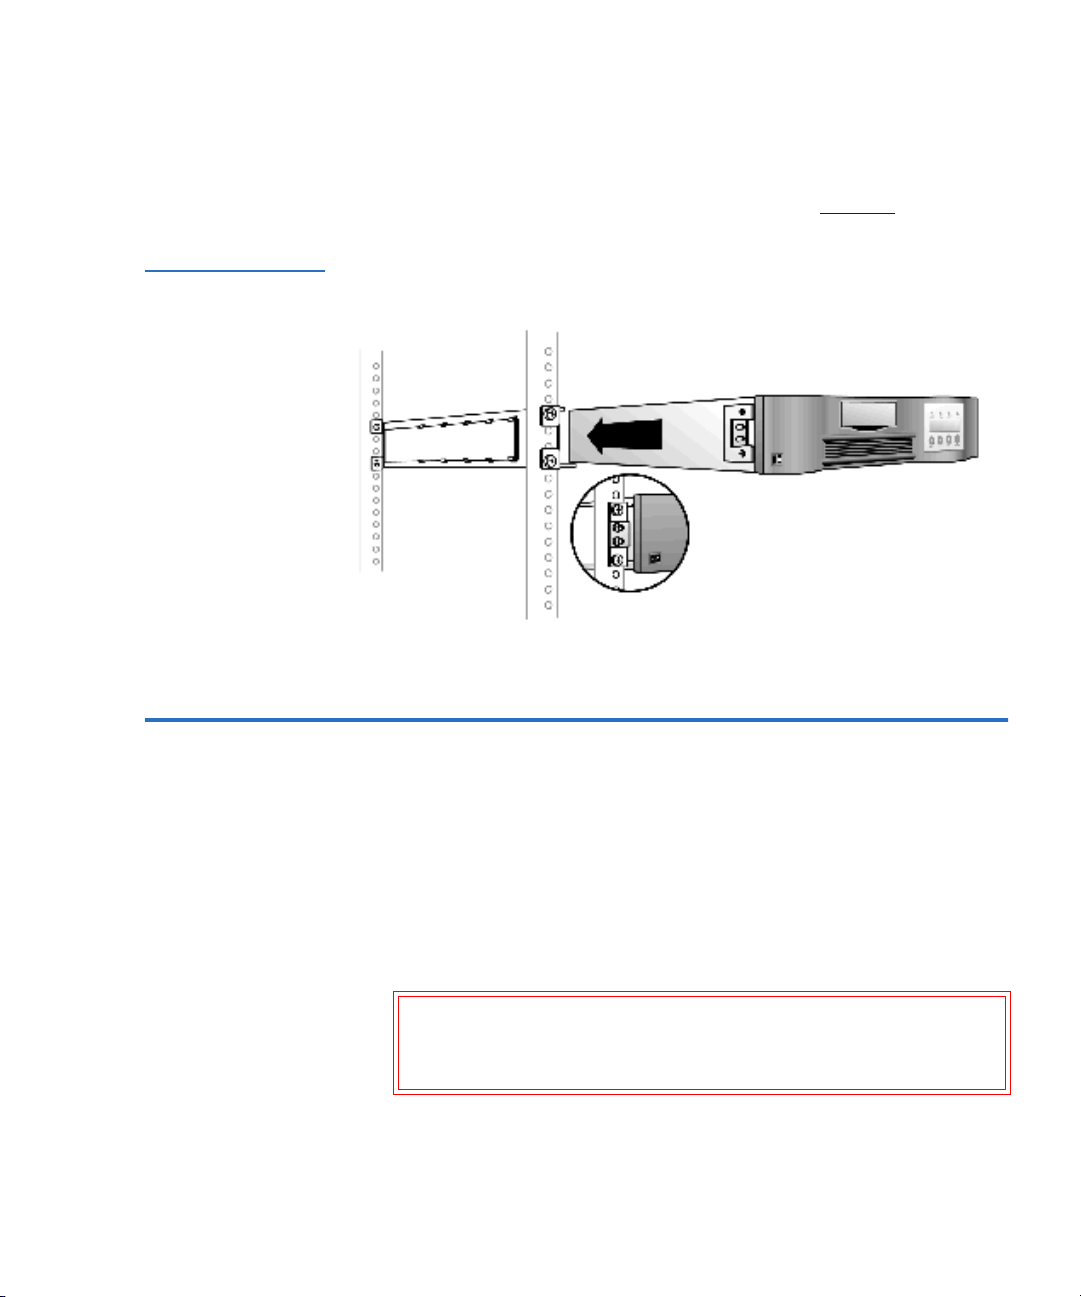
Figure 7 Sliding the
ValueLoader into the
Rack Slot
Installing the ValueLoader
Connecting the SCSI and Power Cables
4 Slide the ValueLoader onto the rails and secure the mounting
bracket to the rack using the screws and clip nuts from the
rackmount hardware package, as shown in figure 7
.
Connecting the SCSI and Power Cables 1
To connect the SCSI and power cables to the ValueLoader, follow
these steps:
1 Shut down and turn off the selected server. Turn off all
attached accessory devices, such as printers and other SCSI
devices. Remove the power cables from the server and all
attached accessories.
Caution: Failure to remove the power cables from these
devices may result in damage to the
ValueLoader.
ValueLoader LTO Tape Autoloader User Manual 13
Page 28

Installing the ValueLoader
Connecting the SCSI and Power Cables
2 Attach one end of the SCSI cable (included in the accessory kit)
to one of the connectors on the rear panel of the ValueLoader.
See figure 8
3 Attach the other end of the SCSI cable to the connector on the
SCSI host adapter or to the connector on the previous device on
the SCSI bus.
Note: If the supplied SCSI cable does not fit the connector
4 If the ValueLoader is the last (or only) device on the SCSI bus,
attach the terminator to the remaining SCSI connector on the
rear panel of the ValueLoader, as shown in figure 8
attach the cable to the next device on the SCSI bus. Make sure
the last device on the SCSI bus is properly terminated.
.
on your SCSI host adapter, you either have an
incompatible SCSI host adapter, or you need to
purchase a cable adapter. For clarification, contact
your service representative or SCSI host adapter
manufacturer.
. Otherwise,
5 Attach the power cable to the power connector on the rear
panel of the ValueLoader as shown in figure 8
Figure 8 Attaching
SCSI and Power
Cables
14 ValueLoader LTO Tape Autoloader User Manual
.
Page 29

Installing the ValueLoader
Preparing the Host and Verifying the Connection
6 Plug the power cable into a properly grounded power outlet.
Note: To disconnect all power from the ValueLoader,
remove the power cord from the outlet.
7 Plug in the host server or workstation and all attached devices.
8 Turn on the ValueLoader by setting the power switch on the
front panel to the ON position. Turn on any other devices you
turned off earlier. Check the LCD display to make sure the
ValueLoader is receiving power. If it is not, check the power
connectors and the power source.
During the power-on self test (POST), all four LEDs are
illuminated briefly, followed by just the Ready/Activity LED
flashing. When the initialization sequence is complete, the LCD
screen displays the Home screen.
9 Turn on the server.
Preparing the Host and Verifying the Connection 1
If necessary, install a SCSI host adapter, software, and compatible
driver(s). Refer to the manuals for the host computer and the SCSI
host adapter for detailed instructions. In addition, follow these
general guidelines:
• When the host server is powered on, install software, and/or
driver(s) that are compatible with the ValueLoader. (See
Installing Device Drivers
Most backup software packages require an additional module
to communicate with the ValueLoader robotics.
• If the host server is connected to a network, check with the
system administrator before turning off power.
• Use proper procedures to prevent electrostatic discharge
(ESD). Use wrist-grounding straps and anti-static mats when
handling internal components.
ValueLoader LTO Tape Autoloader User Manual 15
on page 17 for more information.)
Page 30

Installing the ValueLoader
Preparing the Host and Verifying the Connection
• Make sure the host server has an open expansion slot.
• Make sure your backup application supports the SCSI host
adapter.
• Depending on the server configuration, you may need to
change the SCSI ID of the ValueLoader. For more information,
see Changing the SCSI ID
• Ensure that the ValueLoader is properly terminated. If the
ValueLoader is the only SCSI device (other than the SCSI host
adapter) on the SCSI bus, it must be terminated. Likewise, if
the ValueLoader is physically the last SCSI device on the SCSI
bus, it must be terminated. Only the devices physically at the
beginning and end of the SCSI bus should be terminated.
• Verify the connection between the ValueLoader and host by
making sure the host server’s operating system recognizes the
ValueLoader. To do this:
on page 36.
• For Microsoft® Windows NT®, select
Panel > SCSI Adapter
Settings > Control
• For Windows® 2000, select Settings > Control Panel >
System > Hardware > Device Manager > Tape Drive
Media Changer)
(and/or
For more information on verifying the connection of SCSI
devices, consult the operating system documentation.
16 ValueLoader LTO Tape Autoloader User Manual
Page 31

Installing the ValueLoader
Preparing the Host and Verifying the Connection
Installing Device Drivers
Two device drivers are associated with the ValueLoader: one for
1
ValueLoader robotics and another for the tape drive within the
ValueLoader.
Note: The device drivers supplied at our Web site are required
if you intend to use the Windows 2000 native backup
application. Commercial backup applications provide all
necessary device driver support. Refer to our Web site
for a list of compatible backup applications. Please note
that Windows NT does not include native support for
ValueLoaders (a backup application must be used).
Note: The following instructions assume that you have
downloaded the appropriate device drivers from our
Web site and have saved them in a known location on
your computer system.
Tape Drive Device Driver (Windows 2000) 1
To install the tape drive device driver:
1 Make sure that you are logged onto the host server with
Administrator privileges.
2 Right-click the My Computer icon on the Windows desktop,
then click
Manage, and then click Device Manager.
The tape drive should be listed under the “? Other Devices”
item as “HP Ultrium-1 SCSI Sequential Device.”
3 Right-click the HP Ultrium-1 SCSI Sequential Device listing,
Uninstall, and then click the OK button to confirm that you
click
want to remove the device.
4 Click the Action button in the upper-left corner of the
Computer Management dialog box.
5 Click Scan for Hardware Changes. Windows 2000 scans for the
drive. The drive appears under “? Other Devices” again.
ValueLoader LTO Tape Autoloader User Manual 17
Page 32

Installing the ValueLoader
Preparing the Host and Verifying the Connection
6 Right-click the HP Ultrium-1 SCSI Sequential Device listing and
then click
7 Select the Drivers tab.
8 Click the Reinstall Driver or Update Driver button.
9 When the Upgrade Device Driver Wizard appears, click the
Next button.
10 Click Tape Drives and then click the Next button.
11 Click the Have Disk button. Type the path to where you have
Properties.
saved the device drivers on your system, then click the
button.
12 Click the DLT ValueLoader Tape Drive entry and click the Next
button.
Note: Depending on the status of your system and the exact
path taken to select the device driver, the driver may
appear as
OK
Dltvstp.inf.
13 Click the Next button again to install the driver.
14 Click the Finish button.
15 Close the Device Properties dialog box.
The drive appears in the Device Manager under Tape Drives as
DLT ValueLoader Tape Drive. It is now ready to use.
ValueLoader Device Driver (Windows 2000) 1
To install the ValueLoader device driver:
1 Make sure that you are logged onto the host server with
Administrator privileges.
2 Right-click the My Computer icon on the Windows desktop,
then click
Manage, and then click Device Manager.
The tape drive should be listed under the “Medium Changers”
item as “Unknown Medium Changer Device.”
18 ValueLoader LTO Tape Autoloader User Manual
Page 33

Installing the ValueLoader
Preparing the Host and Verifying the Connection
3 Right-click the Unknown Medium Changer Device listing, click
Uninstall, and then click the OK button to confirm that you
want to remove the device.
4 Click the Action button in the upper-left corner of the
Computer Management dialog box.
5 Click Scan for Hardware Changes. Windows 2000 scans for the
ValueLoader. The ValueLoader appears under “Medium
Changers” again.
6 Right-click the Unknown Medium Changer Device listing and
then click
7 Select the Drivers tab.
8 Click the Reinstall Driver or Update Driver button.
9 When the Upgrade Device Driver Wizard appears, click the
Next button.
10 Click Display a list... and then click the Next button.
Properties.
11 Click the Have Disk button. Type the path to where you have
saved the device drivers on your system, then click the
OK
button.
12 Click the DLT VS Medium Changer entry and click the Next
button.
Note: Depending on the status of your system and the exact
path taken to select the device driver, the driver may
appear as
13 Click the Next button again to install the driver.
14 Click the Finish button.
15 Close the Device Properties dialog box.
Dltvsmc.inf.
The ValueLoader appears in the Device Manager under Medium
Changers as
DLT VS Medium Changer. It is now ready to use.
ValueLoader LTO Tape Autoloader User Manual 19
Page 34

Installing the ValueLoader
Preparing the Host and Verifying the Connection
20 ValueLoader LTO Tape Autoloader User Manual
Page 35

2Operating the ValueLoader
This chapter describes the following:
Chapter 2
• Operator’s Panel Overview
• Understanding the Menu Structure
• Using Cartridges
• Cleaning the Tape Drive
• Creating an Inventory of Cartridges
on page 27
on page 22
on page 32
on page 26
on page 33
ValueLoader LTO Tape Autoloader User Manual 21
Page 36

Operating the ValueLoader
Operator’s Panel Overview
Operator’s Panel Overview 2
The Operator’s Panel consists of four LEDs, four buttons, and a 2line by 16-character LCD screen, as shown in figure 9
Operator’s Panel provides everything you need to monitor
ValueLoader status and to control all ValueLoader functions.
Figure 9 Operator’s
Panel—Drive Empty
. The
The display defaults to the Home screen. The Home screen
consists of the ValueLoader status on the top line and the current
cartridge inventory on the second line. If the tape drive does not
have a cartridge loaded, the top line displays “Drive empty.”
The cartridge inventory indicates all slots that contain a cartridge
by displaying the slot number. Empty slots are indicated by a
hyphen (-).
An exclamation point (!) displayed in the inventory indicates that
the ValueLoader has identified a cartridge in the indicated slot that
either is an invalid cartridge type or has had a media-related error
(e.g, as caused by dirty read/write heads in the tape drive).
The Media Attention LED will be illuminated in this case. See LED
Indicators on page 24 for more information. Exporting the
indicated cartridge should clear the error condition. See Exporting
Cartridges on page 29 for instructions.
22 ValueLoader LTO Tape Autoloader User Manual
Page 37

Operating the ValueLoader
Operator’s Panel Overview
If errors occur on multiple known good cartridges, consider
cleaning the tape drive. See Cleaning the Tape Drive
on page 32 for
instructions.
If a particular cartridge causes error conditions repeatedly, that
cartridge may be defective or invalid.
Occasionally, you may see the message “In Transit,” which may
indicate:
• An error condition has caused a cartridge to be left between its
slot and the drive.
• A cartridge is unexpectedly found in the Import/Export slot
opening.
If either condition occurs, reset or power cycle the ValueLoader to
clear the condition.
If the tape drive has a cartridge loaded, the top line displays
“Drive loaded.” The cartridge currently loaded in the drive is
indicated by an alternating black block and the slot number as
shown in figure 10
. This display can also indicate that the specified
cartridge is being loaded, unloaded, imported, or exported as well
as indications of reading, writing, calibrating, etc. The
ValueLoader status line indicates the current operation.
Figure 10 Operator’s
Panel—Drive Loaded
The block appears on
the corresponding
cartridge position. It
alternates between a
solid block and the
cartridge number to
indicate that the
cartridge is active.
ValueLoader LTO Tape Autoloader User Manual 23
Page 38

Operating the ValueLoader
Operator’s Panel Overview
LED Indicators 2
Table 2 LEDs
The Operator’s Panel includes four LED indicators that provide a
variety of information as detailed in table 2
.
LED Color Description
Ready/Activity Green Illuminated when power is on.
Blinks whenever there is tape drive or
ValueLoader robotics activity.
Clean Drive Amber Illuminated when the tape drive needs to be
cleaned. Turns off when cleaning is successfully
completed.
See Cleaning the Tape Drive
on page 32.
Media Attention Amber Illuminated when a media-related error occurs.
This type of error may occur if an invalid cartridge
type is inserted or if data is written to a tape
cartridge while the drive’s read/write heads are
dirty. The offending cartridge is indicated by an
“!” in the cartridge inventory display for the
corresponding slot. Exporting the indicated
cartridge will clear the error condition. See
Exporting Cartridges
on page 29.
If media-related errors occur on multiple known
good cartridges, consider cleaning the tape drive.
See Cleaning the Tape Drive
on page 32.
If a particular cartridge causes repeated mediarelated errors, that cartridge may be defective or
invalid.
Error Red Illuminated when an unrecoverable tape drive or
ValueLoader error occurs. A corresponding error
message appears on the LCD screen. See
ValueLoader Error Codes
on page 59 for more
details.
24 ValueLoader LTO Tape Autoloader User Manual
Page 39

Operating the ValueLoader
Operator’s Panel Overview
Operator’s Panel Control Buttons
Table 3 Control
Buttons
The Operator’s Panel includes four buttons that provide access to
2
all operations and information menus. These buttons are described
in table 3
Button Description
Cancel Cancels the current menu option and returns to the
Previous Selects the previous item or value in the currently
Next Selects the next item or value in the currently
Enter Executes the current menu or selects the current
.
previous menu level or Home screen.
displayed menu.
displayed menu.
option displayed on the LCD panel.
ValueLoader LTO Tape Autoloader User Manual 25
Page 40

Operating the ValueLoader
Understanding the Menu Structure
Understanding the Menu Structure 2
Figure 11 Operator’s
Panel Menu Structure
Figure 11
Unload Cartridge
displays the menu structure of the Operator’s Panel.
HOME SCREEN
INFORMATION
COMMANDS
Import
Export
Load Cartridge
Cycle Count
View Event Log
Product Rev
Firmware Rev
Clean Drive
CONFIGURATION
Re-inventor y
DIAGNOSTICS
System Test
Reset
Change SCSI ID
Code Update
Circular Mode
Autoload Mode
26 ValueLoader LTO Tape Autoloader User Manual
Page 41

Operating the ValueLoader
Using Cartridges
Using Cartridges 2
Before you use the ValueLoader LTO, make sure you observe these
general rules:
• Use only LTO cartridges. You can order tape cartridges at our
Web site. Make sure all cartridges that you want to use for
writing have either never been written to or have been written
to only with the LTO tape drive in the ValueLoader or
equivalent tape drive. The tape drive rejects all other formats.
• Clean the tape drive when the Clean Drive LED is illuminated,
or if there is any other indication that the drive is having
trouble reading or writing, such as if the Media Attention LED
is illuminated, or there is an exclamation point (!) in the
inventory display. Be sure to use only compatible cleaning
cartridges. The tape drive rejects all other types of cleaning
cartridges.
Importing Cartridges
The option forces the ValueLoader to import a cartridge into a
2
specific empty slot in the carousel. To import tapes into the
ValueLoader:
1 Make sure the write-protect switch is set as desired for each
data cartridge (see Write-Protecting Cartridges
on page 31). If
applicable, adhere a barcode label onto the designated area on
each cartridge. (See Barcode Reader
on page 3 for more
information.)
2 From the Home screen or main menu, press the [+] or [-] button
until “Commands” appears on the top line of the LCD screen.
3 Press the [Enter] button to access the available options.
4 Press the [+] or [-] button until “Import” appears on the LCD
screen. Press
5 Press the [+] or [-] button until the desired slot number appears
on the LCD screen and press the
[Enter] to select.
[Enter] button. You are not
given the option to import a cartridge to an occupied slot.
ValueLoader LTO Tape Autoloader User Manual 27
Page 42

Operating the ValueLoader
Using Cartridges
6 When “Insert Cartridge Slot” appears on the LCD screen and
the Import/Export slot opens, insert the desired data cartridge
into the Import/Export slot so that the write-protect switch is
facing out from the ValueLoader and toward the left, as shown
in figure 12
Note: If you are using the Operator’s Panel to clean the
.
drive, import the cleaning cartridge only when the
front panel indicates that cleaning is needed. You
may keep a cleaning cartridge in the ValueLoader if
the backup software can manage the drive cleaning.
7 Repeat steps 5 and 6 as needed for additional cartridges.
8 Press the [Cancel] button when you have finished importing
cartridges.
9 Verify that the LCD screen shows that the desired slots have
cartridges installed.
Figure 12 Importing a
Cartridge
28 ValueLoader LTO Tape Autoloader User Manual
Page 43

Operating the ValueLoader
Using Cartridges
Exporting Cartridges
This option moves a cartridge from a specific slot to the Import/
2
Export slot. To export one or more cartridges from the
ValueLoader, follow these steps:
1 From the Home Screen or main menu, press the [+] or [-] button
until “Commands” appears on the top line of the LCD screen.
Then, press
2 Press the [+] or [-] button until “Export” appears on the LCD
screen. Then, press
3 Press the [+] or [-] button until the desired slot number appears
on the LCD screen. Then, press the
[Enter].
[Enter].
[Enter] button. You are
given the option to export from an empty slot.
4 When “Remove Cartridge” appears on the LCD screen and the
cartridge is ejected through the Import/Export slot, remove the
exported cartridge from the ValueLoader, and press the
button.
5 Repeat steps 3 and 4 as needed for any additional cartridges.
6 Press the [Cancel] button when you are done exporting
cartridges.
7 Make sure the LCD screen indicates that the desired slots are
empty.
[Enter]
Figure 13 Exporting a
Cartridge
ValueLoader LTO Tape Autoloader User Manual 29
Page 44

Operating the ValueLoader
Using Cartridges
Loading Cartridges
This option loads a cartridge from the ValueLoader carousel into
2
the tape drive. To use this option, follow these steps:
1 From the Home Screen or main menu, press the [+] or [-] button
until “Commands” appears on the top line of the LCD screen.
Then, press
2 Press the [+] or [-] button until “Load Cartridge” appears on the
[Enter].
LCD screen.
3 Press the [Enter] button to select.
4 Press the [+] or [-] button until the desired slot number appears
on the LCD screen and press the
[Enter] button. The slot
number you select indicates the cartridge to be loaded into the
tape drive.
Note: Only slot numbers that contain cartridges are
displayed.
Status messages appear while the cartridge is loading. “Drive
Stopped” appears when the operation is complete.
5 Press the [Cancel] button when you are done loading the
cartridge.
Unloading Cartridges
This option unloads the cartridge from the tape drive into its
2
original slot. To use this option, follow these steps:
1 From the Home Screen or main menu, press the [+] or [-] button
until “Commands” appears on the top line of the LCD screen.
Then, press
2 Press the [+] or [-] button until “Unload Cartridge” appears on
the LCD screen. Then, press the
[Enter].
[Enter] button to unload the
cartridge from the tape drive.
Status messages appear while the cartridge is unloading.
“Drive Empty” appears when the operation is complete.
3 Press the [Cancel] button when you are done unloading the
cartridge.
30 ValueLoader LTO Tape Autoloader User Manual
Page 45

Operating the ValueLoader
Using Cartridges
Write-Protecting Cartridges
Figure 14 WriteProtect Switch
All cartridges have a write-protect switch to prevent accidental
2
erasure or overwriting of data (figure 14
). Before loading a
cartridge into the ValueLoader, make sure the write-protect switch
on the front of the cartridge is positioned as desired:
• Slide the switch to the left to write-protect the cartridge. A
small orange rectangle is visible, indicating the cartridge is
write protected.
• Slide the switch to the right to allow the ValueLoader to write
data to the cartridge. The lock icon on the switch indicates that
the cartridge is write-enabled.
Indicator
Write protect
switch
Maintaining Cartridges
Write protected
Write enabled
To ensure the longest possible life for all of your cartridges, follow
2
these guidelines:
• Do not drop or strike a cartridge. Excessive shock can displace
the tape leader, making the cartridge unusable and possibly
damaging the ValueLoader.
• Store cartridges in their storage cases.
• Do not expose cartridges to direct sunlight or sources of heat,
including portable heaters and heating ducts.
ValueLoader LTO Tape Autoloader User Manual 31
Page 46

Operating the ValueLoader
Cleaning the Tape Drive
• The operating temperature range for cartridges is 10° C to 35°
C (50° F to 95° F). The storage temperature range is 16° C to 32°
C (60° F to 90° F). Always store cartridges in their storage cases.
• If a cartridge has been exposed to temperatures outside the
ranges specified above, stabilize the cartridge at room
temperature for the same amount of time as it was exposed to
the extreme temperature or 24 hours, whichever is less.
• Store cartridges in a dust-free environment in which relative
humidity is always between 20% and 80%, non-condensing.
The ideal relative humidity is 40% ± 20%.
• Do not place cartridges near sources of electromagnetic energy
or strong magnetic fields, such as computer monitors, electric
motors, speakers, or X-ray equipment. Exposure to
electromagnetic energy or magnetic fields can destroy data on
cartridges.
• Place identification labels only in the slide-in slot on the front
of the cartridge.
Cleaning the Tape Drive 2
When the Clean Drive LED is on, the ValueLoader’s tape drive
needs to be cleaned. An illuminated Media Attention LED or an
exclamation point (!) in the inventory display may also indicate
that the tape drive needs to be cleaned. Cleaning typically takes
several minutes, during which the Ready LED blinks.
If you are using backup software to manage cleaning, then you
must monitor the software logs or use some other method to
determine when you need to replace the cleaning tape. Refer to the
backup software documentation for more information. Also refer
to the backup software documentation for information on enabling
automatic or scheduled cleanings with the use of a dedicated
cleaning slot.
32 ValueLoader LTO Tape Autoloader User Manual
Page 47

Operating the ValueLoader
Creating an Inventory of Cartridges
Note: If you are using Operator’s Panel commands to clean the
drive, import the cleaning cartridge only after you have
selected the Clean Drive command. If you would like to
keep a cleaning cartridge in the ValueLoader, the backup
software must manage drive cleaning.
Creating an Inventory of Cartridges 2
This option builds a new inventory of cartridges in the
ValueLoader. If using a barcode reader, this option also scans the
barcode label on each cartridge in the carousel. (See Barcode
Reader on page 3 for more information.) To use this option, follow
these steps:
1 From the Home Screen or main menu, press the [+] or [-] button
until “Commands” appears on the top line of the LCD screen.
2 Press the [Enter] button to access the available options.
3 Press the [+] or [-] button until “Re-inventory” appears on the
LCD screen. Then, press
[Enter].
The ValueLoader then checks the drive and each slot for the
presence of a tape in order to update inventory information.
ValueLoader LTO Tape Autoloader User Manual 33
Page 48

Operating the ValueLoader
Creating an Inventory of Cartridges
34 ValueLoader LTO Tape Autoloader User Manual
Page 49

Chapter 3
3ValueLoader Administration
This chapter describes the following:
• Configuring the ValueLoader
• Updating Firmware
• Running the ValueLoader System Test
• Retrieving Information About the ValueLoader
on page 40
on page 35
on page 42
on page 43
Configuring the ValueLoader 3
The Configuration menu provides access to the following
ValueLoader configuration options:
• Resetting the ValueLoader
• Setting SCSI IDs
• ValueLoader operating modes
•Updating firmware
ValueLoader LTO Tape Autoloader User Manual 35
Page 50

ValueLoader Administration
Configuring the ValueLoader
To access the Configuration menu from the Home Screen or main
menu, press the
the top line of the LCD screen. Press the
[-] to access the available options. Press the [Enter] button to
or
[+] or [-] button until “Configuration” appears on
[Enter] button and then [+]
execute the displayed menu option.
Resetting the ValueLoader
This option resets the ValueLoader robotics and the tape drive
3
within the ValueLoader, forces a new cartridge inventory, and
clears any current error condition.
Note: This option is primarily used if the ValueLoader is in an
error state.
To access this option, follow these steps:
1 From the Home Screen or main menu, press the [+] or [-] button
until “Configuration” appears on the top line of the LCD
screen.
2 Press the [Enter] button to select.
3 Press the [+] or [-] button until “Reset” appears on the LCD
screen.
4 Press [Enter] to reset the ValueLoader.
After initialization, the ValueLoader returns to normal operation
and displays the Home screen.
Changing the SCSI ID
This option changes the SCSI IDs that the ValueLoader uses. The
3
ValueLoader operates as a dual SCSI device with two separate
SCSI IDs: one for the tape drive and the other for the ValueLoader
robotics.
The default SCSI IDs for the ValueLoader are 6 for the tape drive
and 5 for the robotics. You should only need to change the SCSI
IDs if there are other devices on the SCSI bus with the same SCSI
IDs.
36 ValueLoader LTO Tape Autoloader User Manual
Page 51

ValueLoader Administration
Configuring the ValueLoader
To access this option, follow these steps:
1 From the Home Screen or main menu, press the [+] or [-] button
until “Configuration” appears on the top line of the LCD
screen.
2 Press the [Enter] button to select.
3 Press the [+] or [-] button until “Change SCSI ID” appears on
the LCD screen. The second line displays the current SCSI ID.
4 Press [Enter] to select.
5 Press the [+] or [-] button to change between “Loader” and
“Drive” until the desired item appears on the LCD screen.
6 Press the [Enter] button to select. The second line on the LCD
screen displays “New ID.”
7 Press the [+] or [-] button until the desired SCSI ID appears.
8 Press the [Enter] button to select the new ID number. The LCD
screen displays “Please Cycle Power.”
Note: The ValueLoader will not respond to input from the
Operator ‘s Panel until the power has been cycled.
9 Turn off the ValueLoader. After a few seconds, turn it back on
again.
The selected SCSI ID is now in effect.
Note: If you changed the SCSI ID, you may also need to cycle
power on the host server and reconfigure your backup
software before you can use the ValueLoader. Consult
your hardware and software manuals for more
information.
ValueLoader LTO Tape Autoloader User Manual 37
Page 52

ValueLoader Administration
Configuring the ValueLoader
ValueLoader Operating Modes
The operating mode is set based on whether you have automation
3
software controlling cartridges in the ValueLoader or if you are
manually loading and unloading cartridges using the ValueLoader
Operator’s Panel commands. The ValueLoader always operates in
Autodetect mode, which is transparent to you. In Autodetect
mode, the ValueLoader automatically assumes that you are not
using an automation software package to control cartridge or drive
activity. This is called Stacker or Sequential mode. If the
ValueLoader detects that an automation software package is
controlling tape/drive activity, it will automatically switch to
Random mode.
Random Mode 3
This is the normal mode of operation when a backup software
application is being used. In Random mode, the ValueLoader does
not automatically load tapes into the tape drive; instead, it waits
for commands from the software. To use Random mode, you do
not need to configure anything from the ValueLoader front panel.
In addition, your backup software package must support
ValueLoaders, which often requires the additional installation of a
ValueLoader/library software module.
Sequential Mode 3
Sequence Mode is useful when an adequate software application is
not available. In Sequential Mode, the ValueLoader automatically
loads and unloads tapes from the drive. The operator determines
the first tape to load by loading the desired tape into the tape drive
using the ValueLoader’s front panel controls. See Loading
Cartridges on page 30 for instructions. When the first tape is full or
unloaded for any other reason, the ValueLoader automatically
removes the tape from the drive, puts it in its original slot, then
loads the cartridge in the next available higher numbered slot,
continuing this sequence with each available higher numbered
slot. To further determine how you want tapes loaded into the
ValueLoader’s tape drive while in Sequential Mode, you may set
Circular and Autoload options from the autoload front panel.
38 ValueLoader LTO Tape Autoloader User Manual
Page 53

ValueLoader Administration
Configuring the ValueLoader
Circular Mode On/Off. This option turns Circular Mode on or off,
and is used only in sequential mode. When Circular Mode is on,
the ValueLoader reloads the original first cartridge in the sequence
after cycling through all available cartridges. If Circular Mode is
turned off and the last cartridge has been unloaded, the
ValueLoader stops loading cartridges until you manually load
another cartridge.
Caution: Use caution when choosing Circular Mode as it
makes it possible to overwrite data on previously
written cartridges.
To access this option, follow these steps:
1 From the Home Screen or main menu, press the [+] or [-] button
until “Configuration” appears on the top line of the LCD
screen.
2 Press the [Enter] button to select.
3 Press the [+] or [-] button until “Circular Mode” appears on the
LCD screen. The second line displays the current status of this
mode.
4 Press [Enter] to select. The LCD screen indicates whether you
are about to turn Circular Mode on or off.
5 Press the [Enter] button to accept the change to Circular Mode
or press
Autoload Mode On/Off. This option turns Autoload Mode on or off,
[Cancel] to exit and not save the changes.
and is only used when in Sequential Mode. When Autoload Mode
is on, the ValueLoader automatically loads the cartridge from the
lowest numbered full slot into the tape drive when powered on. It
then follows standard sequential operation as described in
Sequential Mode
on page 38.
To access this option, follow these steps:
1 From the Home Screen or main menu, press the [+] or [-] button
until “Configuration” appears on the top line of the LCD
screen.
2 Press the [Enter] button to select.
ValueLoader LTO Tape Autoloader User Manual 39
Page 54

ValueLoader Administration
Updating Firmware
3 Press the [+] or [-] button until “Autoload Mode” appears on
the LCD screen. The second line displays the current status of
this mode.
4 Press the [Enter] button. The LCD screen indicates whether you
are about to turn Autoload Mode on or off.
5 Press the [Enter] button to accept the change to Autoload Mode
or press
[Cancel] to exit and not save the changes.
Updating Firmware 3
This section explains how to update firmware using either a
firmware upgrade tape or SCSI commands.
Caution: Regardless of the firmware update technique, DO
NOT POWER CYCLE OR RESET THE
VALUELOADER DURING THE UPGRADE
PROCESS. Doing so could cause the ValueLoader to
become inoperable.
Using a Firmware Upgrade Tape
This option performs a firmware update for the ValueLoader and/
3
or the HP LTO drive using firmware upgrade cartridge.
Note: This code update operation assumes that a slot is
available in the carousel for the upgrade cartridge, and
the upgrade cartridge is imported as part of this
procedure.
If the carousel is full, export a cartridge to make room for
the firmware upgrade cartridge. (See Exporting
Cartridges on page 29 for instructions.) Do not import
the firmware upgrade cartridge before starting this
procedure.
40 ValueLoader LTO Tape Autoloader User Manual
Page 55

ValueLoader Administration
Updating Firmware
To access this option, follow these steps:
1 From the Home Screen or main menu, press the [+] or [-] button
until “Configuration” appears on the top line of the LCD
screen.
2 Press the [Enter] button to select.
3 Press the [+] or [-] button until “Code Update” appears on the
LCD screen. The second line displays the current status of this
mode.
4 Press the [Enter] button to select.
The ValueLoader selects the first available slot and prompts
you to insert the firmware upgrade cartridge.
Note: If the carousel is full, the LCD screen displays “No
slot free for transfer.” If this happens, press the
[Cancel] button repeatedly until the main menu or
Home Screen appears. Then, export a cartridge as
explained in Exporting Cartridges
on page 29 and
return to step 1 of this procedure.
5 Insert the firmware update cartridge into the Import/Export
slot.
Note: If the cartridge is not a valid firmware upgrade
cartridge, the cartridge is exported, and the LCD
displays “Bad upgrade tape.”
During the firmware update, which can take several minutes,
the LCD screen displays “Code update in Progress.” When the
firmware update is complete, the ValueLoader resets, then
unloads and exports the firmware upgrade cartridge.
6 Remove the firmware upgrade cartridge and press the [Enter]
button when the LCD screen prompts you to do so.
ValueLoader LTO Tape Autoloader User Manual 41
Page 56

ValueLoader Administration
Running the ValueLoader System Test
7 If you removed a data cartridge to make room for the firmware
upgrade cartridge, import the data cartridge to its original slot.
See Importing Cartridges
Note: After a firmware update, the firmware revision
on page 27 for instructions.
displayed on the LCD is not changed until the
ValueLoader is power cycled.
Using SCSI 3
Quantum has files and instructions necessary to update the drive
and ValueLoader firmware via SCSI. Refer to our Web site for
details.
Running the ValueLoader System Test 3
The System Test option cycles the ValueLoader through the
process of loading and unloading all cartridges in the carousel.
Running a System Test verifies the operational soundness of both
the ValueLoader and tape drive. The System Test continues
indefinitely until you press the
and restore operations are suspended while a System Test is in
progress.
Note: At least one cartridge must be present in the carousel in
order to run System Test.
To run a System Test:
[Cancel] button. All regular backup
1 From the Home Screen or main menu, press the [+] or [-] button
until “Diagnostics” appears on the top line of the LCD screen.
2 Press the [Enter] button to select. “System Test” appears on the
LCD screen.
3 Press the [Enter] button to begin the test.
42 ValueLoader LTO Tape Autoloader User Manual
Page 57

ValueLoader Administration
Retrieving Information About the ValueLoader
The “Test Count” displays the number of load-calibrate-unload
cycles that have been completed during the test.
4 Press the [Cancel] button to end the test.
Retrieving Information About the ValueLoader 3
The Information menu provides access to information about the
ValueLoader, including the cycle count, event log, and firmware
revision.
Cycle Count 3
View Event Log 3
This option displays the total system cycle count, incrementing
each time a tape is loaded into the drive or exported from the
ValueLoader.
To use this option:
1 From the Home Screen or main menu, press the [+] or [-] button
until “Information” appears on the top line of the LCD screen.
2 Press the [Enter] button to access the available options.
3 Press the [+] or [-] button until “Cycle Count” appears on the
LCD screen.
The LCD screen displays the total cycle count.
4 Press the [Cancel] button when done.
This option provides access to the most recent ValueLoader errors
and events (see table 5
on page 60 for a description of error codes).
To use this option:
1 From the Home Screen or main menu, press the [+] or [-] button
until “Information” appears on the top line of the LCD screen.
2 Press the [Enter] button to access the available options.
ValueLoader LTO Tape Autoloader User Manual 43
Page 58

ValueLoader Administration
Retrieving Information About the ValueLoader
3 Press the [+] or [-] button until “View Event Log” appears on
the LCD screen. The LCD screen also displays the quantity of
errors and events currently stored in the event log.
4 Press the [Enter] button to access the most recently logged
event.
5 Press the [+] or [-] button to display each event in the log.
6 Press [Cancel] when done.
Product Revision 3
Firmware Revision 3
This option displays the product revision of the ValueLoader.
To use this option:
1 From the Home Screen or main menu, press the [+] or [-] button
until “Information” appears on the top line of the LCD screen.
2 Press the [Enter] button to access the available options.
3 Press the [+] or [-] button until “Product Rev” appears on the
LCD screen.
The LCD screen displays the revision of the firmware currently
installed in the ValueLoader.
4 Press the [Cancel] button when done.
This option displays the revision of the firmware currently
installed in the ValueLoader.
To use this option:
1 From the Home Screen or main menu, press the [+] or [-] button
until “Information” appears on the top line of the LCD screen.
2 Press the [Enter] button to access the available options.
3 Press the [+] or [-] button until “Firmware Rev” appears on the
LCD screen.
The LCD screen displays the revision of the firmware currently
installed in the ValueLoader.
44 ValueLoader LTO Tape Autoloader User Manual
Page 59

ValueLoader Administration
Retrieving Information About the ValueLoader
4 Press the [Cancel] button when done.
Note: After a firmware update, the firmware revision
displayed on the LCD will not be updated until the
ValueLoader is power cycled.
ValueLoader LTO Tape Autoloader User Manual 45
Page 60

ValueLoader Administration
Retrieving Information About the ValueLoader
46 ValueLoader LTO Tape Autoloader User Manual
Page 61

Chapter 4
4Diagnostics and Troubleshooting
This chapter contains some general suggestions to aid you in
solving problems. It also includes information on error codes and
diagnostics.
• Troubleshooting
• Removing Stuck Cartridges
• ValueLoader Error Codes
on page 47
on page 55
on page 59
Troubleshooting 4
This section contains installation problems and a troubleshooting
table.
ValueLoader LTO Tape Autoloader User Manual 47
Page 62

Diagnostics and Troubleshooting
Troubleshooting
Installation Problems
Problems encountered during the installation of the ValueLoader
4
are usually caused by improper SCSI bus configuration,
application software configuration errors, or an incorrectly
configured operating system. If the application software that you
are using is not communicating with the ValueLoader after
installation, check the following:
SCSI ID: The ValueLoader uses two SCSI IDs: one for the tape
•
drive and one for the ValueLoader robotics. Depending on the
SCSI IDs of the other devices on the same SCSI bus, you may
need to change one or both of these SCSI IDs before you can
use the ValueLoader. Select an unused SCSI ID. See the
manuals for the other devices on the SCSI bus or your
operating system to determine which SCSI IDs are currently in
use. If the ValueLoader is attached to a narrow (50-pin) SCSI
bus, only SCSI IDs 0 through 7 are available. See Changing the
SCSI ID on page 36.
SCSI Cabling: Verify that all SCSI cables are securely connected
•
at both ends. Check the length and integrity of your SCSI
cabling. The total length of all cables must not exceed the
following lengths:
• SCSI-1 SE bus: 6 meters (19 feet)
• Fast or Ultra SCSI (Narrow or Wide) SE bus: 3 meters
(10 feet)
• LVD bus with multiple devices: 12 meters (40 feet)
• LVD bus with a single device: 25 meters (82 feet)
The length of the SCSI cabling inside the ValueLoader is 60 cm
(2 feet). This length must be included in any calculations of
total cable length. Replace suspect SCSI cables with known
good cables.
48 ValueLoader LTO Tape Autoloader User Manual
Page 63

Diagnostics and Troubleshooting
Troubleshooting
• Termination: If the ValueLoader is the only SCSI device (other
than the SCSI host adapter) on the selected SCSI bus, it must be
terminated. Likewise, if the ValueLoader is physically the last
SCSI device on the SCSI bus, it must be terminated. Likewise, if
the ValueLoader is physically the last SCSI device on the SCSI
bus, it must be terminated. Only the devices physically at the
beginning and end of the SCSI bus should be terminated. Refer
to the manuals supplied with the other devices on the SCSI bus
for termination on enabling or disabling termination on those
devices.
To terminate the ValueLoader, locate the terminator in the
accessories package and press it firmly into the either of the
two SCSI connectors on the rear panel of the ValueLoader.
Secure the terminator by tightening the finger-screws until
snug. The supplied terminator is “dual mode” and will work
on both LVD and SE SCSI buses. A green LED on the
terminator indicates that the unit is attached to a SCSI bus
running in LVD mode. A red LED on the terminator indicates
that the unit is attached to a SCSI bus running in SE mode. If
the LED is not on, check all SCSI and power connections and
confirm that the unit is attached to a valid SCSI bus.
Compatibility: Ensure that the ValueLoader is compatible with
•
the SCSI host adapter and backup application you plan to use.
For a list of compatible SCSI adapters and application software
packages, check with your SCSI host adapter manufacturer,
backup application vendor, or our Web site.
SCSI Host Adapter Installation: Verify that you have installed
•
your SCSI host adapter correctly. Refer to the manual that
came with your SCSI host adapter for installation and
troubleshooting instructions. Pay particular attention to any
steps describing the settings of various jumpers or switches on
the host adapter or, on newer adapters, the setup application
for the adapter. Make sure that the host adapter is properly
seated in the motherboard slot, and the operating system
correctly detects the host adapter. Make sure that the proper
device driver is installed for the SCSI host adapter.
ValueLoader LTO Tape Autoloader User Manual 49
Page 64

Diagnostics and Troubleshooting
Troubleshooting
• Backup Application Installation: Refer to the documentation
•
included with your backup application for instructions on how
to verify proper installation. Most backup software packages
require an additional module to communicate with the
ValueLoader robotics.
Device Driver Installation: Make sure that the proper device
driver, if applicable, is installed for the ValueLoader. (See
Installing Device Drivers
on page 17.) Also refer to our Web
site for more information.
lists common problems with the ValueLoader and possible
• Check all power cord connections.
• Make sure the power switch on the front panel is in the ON
position.
• Make sure there is power to the outlet. Try another working
outlet.
• Replace the power cord.
• Contact your service representative.
• Make sure the power cord is connected.
• Make sure the power switch is on.
4
Table 4
solutions.
Troubleshooting Table
Table 4 Common
ValueLoader
Problems
Problem Solution
Power
ValueLoader does not
power on.
No display messages
appear.
• Power cycle the ValueLoader.
• Download ValueLoader firmware.
• Contact your service representative.
50 ValueLoader LTO Tape Autoloader User Manual
Page 65

Diagnostics and Troubleshooting
Problem Solution
Tape Movement
Tape stuck in drive. • Power cycle the ValueLoader, allow it to complete
initialization (which in rare cases can take as long as 10
minutes), and then retry unloading the tape using the
ValueLoader Operator’s Panel controls.
• Allow the tape drive to complete all operations. This may take
as long as 10 minutes if you reset or cycle power on the
ValueLoader while the cartridge is positioned at the physical
end of the media.
• Make sure that the backup software is not reserving the slot or
preventing the tape drive from ejecting the cartridge. The
backup software needs to cancel the reservation and any hold
it has on the tape drive. Temporarily disconnecting the
ValueLoader from the host server eliminates the host and its
software as a problem source.
• Contact your service representative.
Troubleshooting
Tape stuck in storage slot. • See Removing Stuck Cartridges
Media
Cleaning or data cartridge
incompatible with drive
• Make sure you are using cleaning and data cartridges that are
compatible with the tape drive. The ValueLoader
automatically unloads incompatible cartridges to their original
slot.
ValueLoader LTO Tape Autoloader User Manual 51
on page 55.
Page 66

Diagnostics and Troubleshooting
Troubleshooting
Problem Solution
Cannot read from, or write
to, a tape
SCSI ID
Change drive or robotic
ID, but the host server
does not recognize the new
ID
• Make sure the cartridge is write enabled. (Move the writeprotect switch to the enabled position.)
• Make sure the cartridge is HP LTO compatible.
• Make sure the cartridge has not been exposed to harsh
environmental or electrical conditions and is not physically
damaged in any way.
• Many backup applications do not read from, or write to,
cartridges that were created using a different backup
application. In this case, you may have to perform an erase,
format, or label operation on the cartridge.
• Make sure you understand any data protection or overwrite
protection schemes that your backup application may be
using, which could prevent you from writing to a given
cartridge.
• Retry the operation with a different, known good tape.
• Clean the tape drive. See Cleaning the Tape Drive
on page 32
for instructions.
• Make sure all SCSI devices on the same bus have a unique ID
number.
• If the SCSI bus is narrow (50-pin), verify that only SCSI IDs 0
through 7 are being used.
• Make sure to cycle power on the ValueLoader after changing
the SCSI ID.
• Reboot the host server.
52 ValueLoader LTO Tape Autoloader User Manual
Page 67

Problem Solution
ValueLoader Performance
Diagnostics and Troubleshooting
Troubleshooting
The ValueLoader is not
efficiently backing up data.
Cleaning
Recurring cleaning
message.
• Check the network bandwidth from the host computer. If you
are backing up data over a network, consider comparing to a
local-only backup.
• Make sure the ValueLoader is on its own SCSI bus and not
daisy-chained to another tape drive or to the hard drive being
backed up.
• Clean the tape drive. See Cleaning the Tape Drive
on page 32.
• Try a new cartridge. A marginal cartridge can cause
performance problems due to bad spots on the tape requiring
retries.
• Make sure the data is being compressed.
• Check the size of the files. Small files can impact performance.
• Confirm that the backup application is utilizing block sizes of
at least 32 KB, preferably 64 KB. Refer to your application’s
documentation for details.
• Make sure you are using an HP LTO cleaning cartridge.
• Replace the existing cleaning cartridge with a new one.
• If the Media Attention LED is cleared using a cleaning
cartridge and then immediately reappears after a particular
data cartridge is reloaded, that data cartridge may
contaminated. If this occurs, check that the data cartridge can
be read, back up data from the suspect cartridge to another
cartridge, and then discard the suspect cartridge.
The Clean Drive LED is
illuminated.
Cannot load the cleaning
cartridge.
• This indicates that you have exceeded the tape motion hours.
• Clean the tape drive. See Cleaning the Tape Drive
on page 32.
• Make sure you are using an HP LTO cleaning cartridge.
• Contact your service representative.
ValueLoader LTO Tape Autoloader User Manual 53
Page 68

Diagnostics and Troubleshooting
Troubleshooting
Problem Solution
Media Compatibility
Media format invalid for
drive type.
• You attempted to load incompatible media into the tape drive.
Ensure the media is compatible with HP LTO.
Media Attention LED Issues
Contamination by loose
debris.
• Avoid contamination by ensuring that the ValueLoader is
installed in a clean, contamination-free environment.
• Store cartridges vertically in their plastic cases.
• Continue cleaning the tape drive as needed.
Contamination by head
staining (caused by
adhesion of chemicals
present in tape media to
the head surface).
• One or two passes with the cleaning cartridge should resolve
the Media Attention LED caused by normal head staining.
• If a cleaning cartridge is unsuccessful in resolving a cleaning
light after three or more attempts, discard it and use a new
cleaning cartridge.
Nonacclimated media. • A cartridge should be acclimated for a minimum of 24 hours
before being used, particularly if it has been stored at a
substantially different temperature or level of humidity than
the ValueLoader.
Wrong cleaning cartridge. • Make sure you are using an HP LTO cleaning cartridge.
Bad/defective/
contaminated media.
• If the Media Attention LED is cleared using a cleaning
cartridge and then immediately reappears each time a
particular cartridge is reloaded, and you have confirmed that
the suspect cartridge is not invalid, that cartridge should be
suspected as being contaminated.
• If this occurs, export the cartridge, clean the tape drive again,
and then load a known good cartridge. Any cartridge
suspected of being defective or contaminated should not be
reused in any drive.
Expired cleaning cartridge. • If the existing cleaning cartridge has been used 15 times,
replace it with a new cleaning cartridge.
54 ValueLoader LTO Tape Autoloader User Manual
Page 69

Problem Solution
Errors Displayed on the Front Panel
Diagnostics and Troubleshooting
Removing Stuck Cartridges
“!” in ValueLoader
Operator’s Panel inventory
display
The LCD displays an error
code.
• An exclamation point (!) displayed in the inventory means that
the ValueLoader has identified a cartridge in the indicated slot
that is either an invalid cartridge type or a cartridge with a
media-related error. The Media Attention LED is also
illuminated in this case. See LED Indicators
Exporting the indicated cartridge will clear the error condition.
See Exporting Cartridges
• If errors occur on multiple known good cartridges, consider
cleaning the tape drive. See Cleaning the Tape Drive
page 32.
• If a particular cartridges fails repeatedly, it may be defective or
invalid.
• Look up the error code, and try to resolve the failure. Then,
power cycle the ValueLoader.
on page 29.
on page 24.
on
Removing Stuck Cartridges 4
If the ValueLoader experiences a severe mechanical problem or if
you need to remove cartridges because of power failure or other
circumstance in which the ValueLoader is unable to export the
cartridges in the carousel, follow these steps:
Note:
Contact Customer Support if a cartridge is stuck in the
drive.
1 Move the power switch on the front panel to the OFF position.
You may need to use the tip of a pen or similar item to move
the power switch.
ValueLoader LTO Tape Autoloader User Manual 55
Page 70

Diagnostics and Troubleshooting
Removing Stuck Cartridges
2 Remove the power and SCSI cables from their connectors on
3 Remove the ValueLoader from its rack slot, if applicable, and
4 If the ValueLoader is a rackmounted, remove the front cover
Figure 15 Removing
Mounting Brackets
(Left Side Shown)
the back panel of the ValueLoader.
Warning: To prevent injury, disconnect all cables from the
ValueLoader before removing the ValueLoader
cover. Keep fingers away from the ValueLoader
fan.
place it on a table or other flat work surface.
screws that secure the mounting brackets from both sides of
the ValueLoader, as shown in figure 15
.
5 Remove the seven screws that secure the ValueLoader cover:
five on the back panel and one on each side of the
ValueLoader.
6 Remove the top cover by lifting it from the back and easing it
out from under the front panel display cover.
56 ValueLoader LTO Tape Autoloader User Manual
Page 71

Figure 16 Pulling the
Cartridge Release
Lever
Diagnostics and Troubleshooting
Removing Stuck Cartridges
7 Lift the cartridge carrier, with each cartridge you want to
remove, straight up from the ValueLoader.
Note: To remove the carrier directly in front of the Import/
Export slot, gently rotate the carousel clockwise by
moving the belt or carriers until the carrier is no
longer in front of the Import/Export slot.
8 On each carrier, carefully pull the cartridge lock lever away
from the carrier, allowing the cartridge to slide out as shown in
figure 16
.
ValueLoader LTO Tape Autoloader User Manual 57
Page 72

Diagnostics and Troubleshooting
Removing Stuck Cartridges
9 After removing the cartridges from the desired carriers,
Figure 17 Installing
the Carrier
reinstall each carrier on the ValueLoader belt (figure 17
). Make
sure of the following:
• That the rollers on the bottom of the carrier are aligned in
the carrier tracks.
• That the belt post beneath each carrier is inserted into the
proper ValueLoader belt loop.
Note: There are unused loops on the belt. The proper belt
loops have an extra bump on the outside of the loop.
See figure 17
.
10 Ensure the carrier is properly installed on the belt by gently
pressing on the top of the carrier and sliding it back and forth.
If it is properly attached to the belt, it should not move. If it
moves, reinstall the carrier.
11 Replace the top cover of the ValueLoader and reinstall the
cover screws and mounting brackets (if rackmounted).
58 ValueLoader LTO Tape Autoloader User Manual
Page 73

Diagnostics and Troubleshooting
ValueLoader Error Codes
ValueLoader Error Codes 4
If an error occurs during operation of the ValueLoader, the
ValueLoader stops the current operation and displays an error
code on the top line of the LCD screen. Unless otherwise noted in
table 5, attempt to resolve the error by resetting or cycling power
on the ValueLoader and retrying the last operation. If the error
persists, contact support personnel.
To view the error log, follow these steps:
1 From the Home Screen or main menu, press the [+] or [-] button
until “Information” appears on the top line of the LCD screen.
2 Press the [Enter] button to access the available options.
3 Press the [+] or [-] button until “View Event Log” appears on
the LCD screen. The LCD screen also displays the quantity of
errors and events stored in the error log.
4 Press the [Enter] button to access the most recently logged error
message.
5 Press the [+] or [-] button to display each error in the log.
6 Press [Cancel] when done.
Table 5
gives a description of ValueLoader error codes.
ValueLoader LTO Tape Autoloader User Manual 59
Page 74

Diagnostics and Troubleshooting
ValueLoader Error Codes
Table 5 Error Codes
Error Code Description Details
3081 Invalid Command Error. This error indicates that the ValueLoader
received an undefined command or an invalid
parameter with a command.
3082 Device Status Not Suitable To
Execute This Command.
If the robotics are busy, some commands
cannot be executed at the same time. This error
indicates a probable violation. This is not an
error condition, but it does result in busy being
reported to the host for the requested SCSI
command.
3083 Inventory Not Valid. The cartridge inventory is not valid because of
manual changes or previous fatal errors.
Update the inventory using the Re-inventory
option in the Configuration menu.
3084 Source Empty. There is no cartridge in the location from which
a cartridge move was issued.
3085 Destination Full. The location to which a cartridge move was
issued already contains a cartridge.
3086 Import/Export Slot Access
Rejected.
User attempted to access the Import/Export
slot, but media removal was prevented by the
host.
3087 Operation Timeout. A command did not complete in the required
amount of time.
3088 Communications Error
During Loop-back.
Cycle power on the ValueLoader and attempt
the operation again. If the error recurs, contact
Technical Support.
3089 System Test Timeout. There was a communication timeout between
the drive and loader during the System Test.
308F Recovered Loader Error. Loader error recovery successful. Your
diagnostic tool can provide details of the
original loader error.
60 ValueLoader LTO Tape Autoloader User Manual
Page 75

Error Code Description Details
Diagnostics and Troubleshooting
ValueLoader Error Codes
3090 Mechanical Initialization
Failure.
The robotics were not able to move to the safe
mechanical initialization position. Manual
intervention is necessary.
3091 Inventory Scan Failure. Fatal robotic error occurred during the
inventory scan.
3092 Preposition Failed. Belt positioning error occurred during
‘Preposition’ command.
3093 Cartridge Load Error. A failure occurred while trying to load a
cartridge from a slot to the drive.
3094 Cartridge Unload Error. A failure occurred while trying to unload a
cartridge from the drive to its slot.
3095 Import Error. An error occurred while trying to import a data
cartridge to a carousel slot.
3096 Export Error. An error occurred while trying to export a data
cartridge from its carousel slot. This can be
caused by an empty slot that is expected to be
full.
30A0 Carousel Motion Failure. An error occurred during carousel movement
(position not found). This could be caused by a
missing or misaligned cartridge carrier, an
obstruction, or an unexpected cartridge in
either the carousel path or the import/export
slot.
30A1 Cartridge Transport Position
Error.
The cartridge transport element is unable to
reach its desired position. Failure occurred
while trying to place a cartridge into or remove
a cartridge from the drive or a slot.
30A2 Gripper Position Error. Gripper unable to reach position.
30A3 Cartridge Pick Error. An error occurred while trying to pull a
cartridge from the drive or a carousel slot.
ValueLoader LTO Tape Autoloader User Manual 61
Page 76

Diagnostics and Troubleshooting
ValueLoader Error Codes
Error Code Description Details
3 0 A4 Import/Export Slot Position
Error.
The Import/Export slot door was not in the
requested position during device operation.
This can be caused by manually opening the
door or by a cartridge blocking the door. Try
removing the cartridge or obstruction, then
power cycle or reset the ValueLoader.
30A5 Fan Error. The ValueLoader processor has detected a fan
error.
30B0 ROM Error. Cycle power on the ValueLoader and attempt
the operation again. If the error recurs, contact
Technical Support.
30B1 RAM Error. Cycle power on the ValueLoader and attempt
the operation again. If the error recurs, contact
Technical Support.
30B2 NVRAM Error. Cycle power on the ValueLoader and attempt
the operation again. If the error recurs, contact
Technical Support.
30B3 Controller Timer Failure. An unrecoverable failure has occurred in the
controller timer circuit.
30B4 Loader to Drive
Communication IC Error.
A failure in IC handling loader to drive
communication has occurred.
30B5 Display Error. Cycle power on the ValueLoader and attempt
the operation again. If the error recurs, contact
Technical Support.
30B6 Memory Error. Cycle power on the ValueLoader and attempt
the operation again. If the error recurs, contact
Technical Support.
30B7 Timeout on ValueLoader
Command.
Cycle power on the ValueLoader and attempt
the operation again. If the error recurs, contact
Technical Support.
62 ValueLoader LTO Tape Autoloader User Manual
Page 77

Diagnostics and Troubleshooting
ValueLoader Error Codes
Error Code Description Details
30BC Drive Bug-checked. Cycle power on the ValueLoader and attempt
the operation again. If the error recurs, contact
Technical Support.
30BF Fatal Error. Cycle power on the ValueLoader and attempt
the operation again. If the error recurs, contact
Technical Support.
ValueLoader LTO Tape Autoloader User Manual 63
Page 78

Diagnostics and Troubleshooting
ValueLoader Error Codes
64 ValueLoader LTO Tape Autoloader User Manual
Page 79

Appendix A
ATechnical Specifications
This appendix contains the following ValueLoader specifications:
• Physical Specifications
• Operating Specifications
• Environmental Specifications
• Tape Drive Specifications
• Media Specifications
Table 6 Physical
Specifications
Characteristic Product Alone Product in Package
Height 8.4 cm (3.34 in.) 20.5 cm (8.0 in.)
Width 41.9 cm (16.5 in.) 60 cm (23.6 in.)
Depth 60.9 cm (24 in.)
65 cm (25.6 in) with barcode reader
Weight 10 kg (22 lbs.) 11.35 kg (24.9 lbs.)
ValueLoader LTO Tape Autoloader User Manual 65
74.3 cm (29.2 in.)
Page 80

Table 7 Operating
Specifications
Characteristic Specification
Maximum storage capacity Native: 800 GB
Compressed: 1.6 TB (assuming
2:1 compression ratio)
Maximum data transfer rate Native: 15 MB/s
Compressed: 6 MB/s (assuming
2:1 compression ratio)
Drive type 1 HP LTO drive
Number of slots 8
MSBF 250,000 swaps
Interface LVD ultra wide SCSI-2, 16 bits
wide, 68-pin HD connector
Table 8 ValueLoader
Environmental
Specifications
Characteristic Specification
Temperature/humidity
Operating 10° to 35° C
Nonoperating -40° to 65° C
Recommended operating
20° to 30° C
temperature
Temperature shock immunity -
10° C per hour
maximum rate of change
Humidity
Operating 20% to 80% RH noncondensing
Nonoperating 5% to 95% RH noncondensing
66 ValueLoader LTO Tape Autoloader User Manual
Page 81

Characteristic Specification
Altitude
Operating 0 to 4000 m
Nonoperating 0 to 9144 m
Vibration
Table 9 HP LTO
Drive Specifications
Maximum acceleration to
0.25 g RMS (random)
operating
Frequency range 500 Hz
Characteristic Specification
Read/write transfer rate,
maximum sustained
Native: 15 MB/second
Compressed (2:1 typical):
30 MB/second
Burst transfer rate 80 MB/second
Average access time 71 seconds
Loading time to BOT (for
<25 seconds (average)
previously written tape)
Unloading time from BOT 13 seconds (average)
MTBF 250,000 hours
Interface type LVD Ultra 2 SCSI
ValueLoader LTO Tape Autoloader User Manual 67
Page 82

Table 10 Media
Specifications
Characteristic Specification
LTO Ultrium capacity 100 GB (noncompressed)
200 GB (compressed; 2:1 typical)
Basic description Advanced metal particle
Tape Length 609 meters (1998 feet)
Cartridge dimensions 10.2 x 10.54 x 2.15 cm
(4 x 4.15 x 0.85 in.)
Shelf life 30 years minimum @ 20° C
40% RH (noncondensing)
Cartridge life 1,000,000 passes (any point on the
tape passing the recording head
in either direction)
Cleaning cartridge life 15 uses
68 ValueLoader LTO Tape Autoloader User Manual
Page 83

Appendix B
BCustomer Support
This appendix provides a list of information you should have
before contacting Customer Service or a backup software vendor
for technical support.
Information Needed 2
Before contacting Technical Support, please have the following
information ready:
• Model number for your ValueLoader
• Serial number
• Media type and format
• Recent error codes
• Revision number for ValueLoader and tape drive firmware
• Brand and model of your host computer
• Brand and model of your SCSI host adapter
ValueLoader LTO Tape Autoloader User Manual 69
Page 84

Information Needed by Software Vendors
• Name and version number of ValueLoader drivers and backup
software you are using
Information Needed by Software Vendors 2
While the ValueLoader itself is supported, software products used
with the ValueLoader are supported by individual software
vendors. Before contacting the software vendor, make sure you
have the following information:
• Your name and telephone number
• The product name, firmware revision, operating system, build,
and serial number
• Detailed list of reported error messages
• Configuration files and log files related to the problem
• Screen dumps, if applicable
• Explanation of how to reproduce the problem, if possible
• Events that may have contributed to the problem, recent
operator actions, recent events in the software or the system,
and recent changes to the computer system, software, or
network environment.
70 ValueLoader LTO Tape Autoloader User Manual
Page 85

Index
A
Accessories
basic 9
rack kit
10
Activity LED
24
B
Barcode reader 3
C
Cancel button 25
Capacity, maximum formatted 2
Cartridges
loading
30
maintaining
removing stuck
unloading
31
55–58
30
write-enabling
write-protecting
Clean Drive LED 24
Cleaning the tape drive
Clearance, ValueLoader
Configuring the ValueLoader 35–40
Control buttons
Controls, front panel
Customer support 69–70
Cycle count information
31
31
32
7
25
4
43
D
Differential SCSI bus 3
Drive empty message
22
E
Enter button 25
Error codes
59–63
ValueLoader LTO Tape Autoloader User Manual 71
Page 86

Error LED
Event log
Exclamation point 22
Exporting cartridges
24
43
29
M
Maintaining cartridges 31
Media Attention LED 22, 24
F
Fan vent 5
Firmware revision
Firmware, updating
Front panel
44
40–42
4
H
High-byte termination 3
Home screen
HVD SCSI bus 3
22
I
Importing cartridges 27–28
In Transit message
Inventory
33
23
N
Next button 25
O
Operator’s Panel 22–26
P
POST 2, 15
Power connector
Power-on Self Test (POST)
Previous button 25
Product revision
5
44
R
2, 15
Random mode 38
L
Labels, barcode 3
24
LEDs
Loading cartridges
Location criteria, installation
Low-voltage differential
LTO cartridge
LVD SCSI bus 2, 3
72 ValueLoader LTO Tape Autoloader User Manual
30
6–7
2, 3
27
Ready LED
Rear panel 5
Resetting the ValueLoader
S
SCSI bus
Diff 3
24
36
Page 87

3
HVD
LVD
2, 3
single-ended 3
SCSI connector
SCSI ID
SCSI requirements 3
SCSI-2
2, 3
Sequential mode
Single-ended SCSI bus 3
Specifications
Stacker mode
Stuck cartridge, removing 55–58
System test
5
36
38
65–68
38
42
T
Temperature
operating
storage 32
Termination, SCSI
Troubleshooting
32
16
47–63
U
Unloading cartridges 30
Unpacking the ValueLoader
Updating firmware
40–42
7–8
W
Write-enabling cartridges 31
Writing-protecting cartridges
ValueLoader LTO Tape Autoloader User Manual 73
31
Page 88

74 ValueLoader LTO Tape Autoloader User Manual
 Loading...