

Page 1
Network Attached
Storage Server 100d
Quick Start Guide
Page 2

Contents
Package Contents . . . . . . . . . . . . . . . . . . . . . . . . . . . . . . . . . . . . . 3
Default Settings
Quick Install
Troubleshooting . . . . . . . . . . . . . . . . . . . . . . . . . . . . . . . . . . . . . . 7
Customer Support
. . . . . . . . . . . . . . . . . . . . . . . . . . . . . . . . . . . . . . 3
. . . . . . . . . . . . . . . . . . . . . . . . . . . . . . . . . . . . . . . . 4
. . . . . . . . . . . . . . . . . . . . . . . . . . . . . . . . . . . . . 7
Page 3
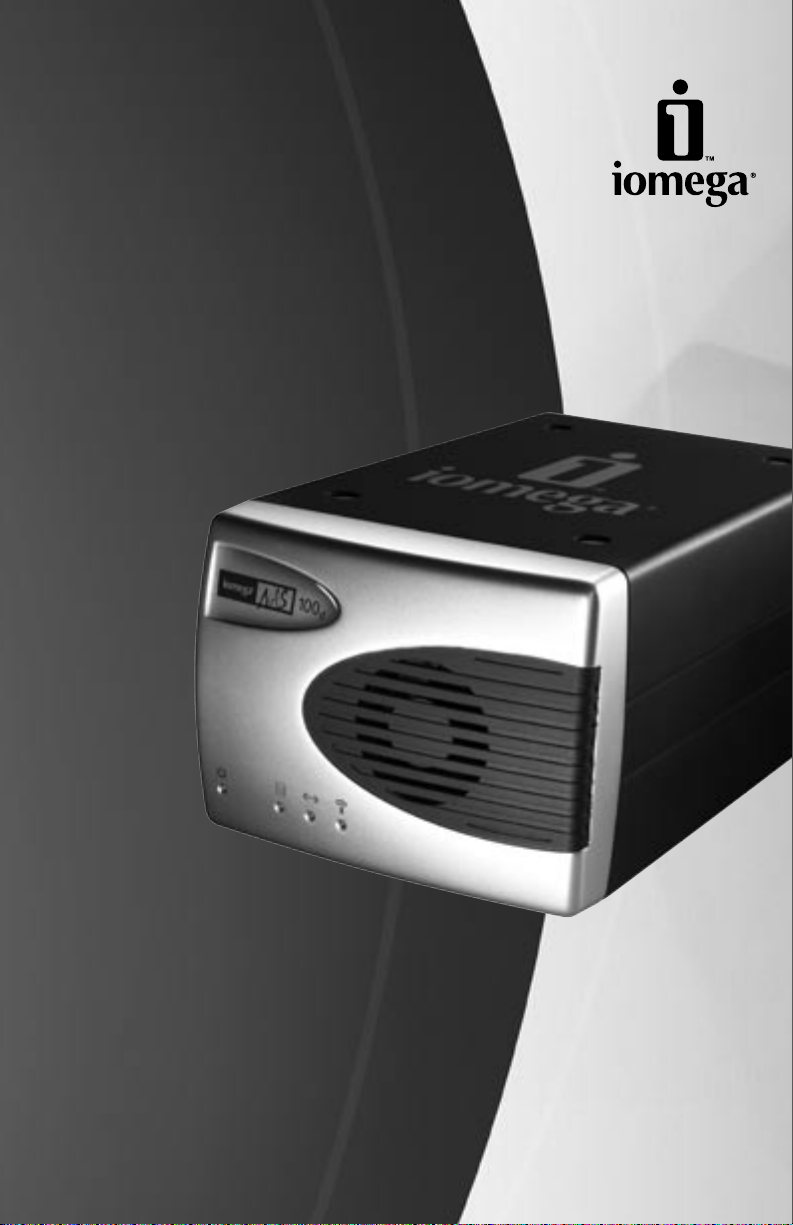
Package Contents
100 d
Network
Attac
hed
Storag
e
100 Ser
ies Se
rv
er
Qui
ck
Instal
l
Installation rapide
Sc
hnellstar
t
Installazione
rapida
Instalación
rápida
100 d
Default Settings
• DHCP client enabled
• Default IP Address on networks without DHCP: 169.254.10.10
• Wireless access point enabled
• Default wireless SSID: IOMEGA_NAS
3
Page 4

Quick Install
For best performance and easiest configuration, Iomega recommends connecting the Iomega NAS 100d to
a wired network. For instructions on configuring the Iomega NAS via a wireless connection, see the user's
manual on the Solutions CD.
If you have a problem, we can help. Please do NOT return this product to the store!
Your answer is on the web. Visit our award-winning web support site www.iomega.com
Select your region, then select Support.
.
Connect the included Ethernet cable to the Iomega
NAS and to an open network port on your router,
switch, or hub.
Connect the power supply to the Iomega NAS and
then to a power strip or outlet.
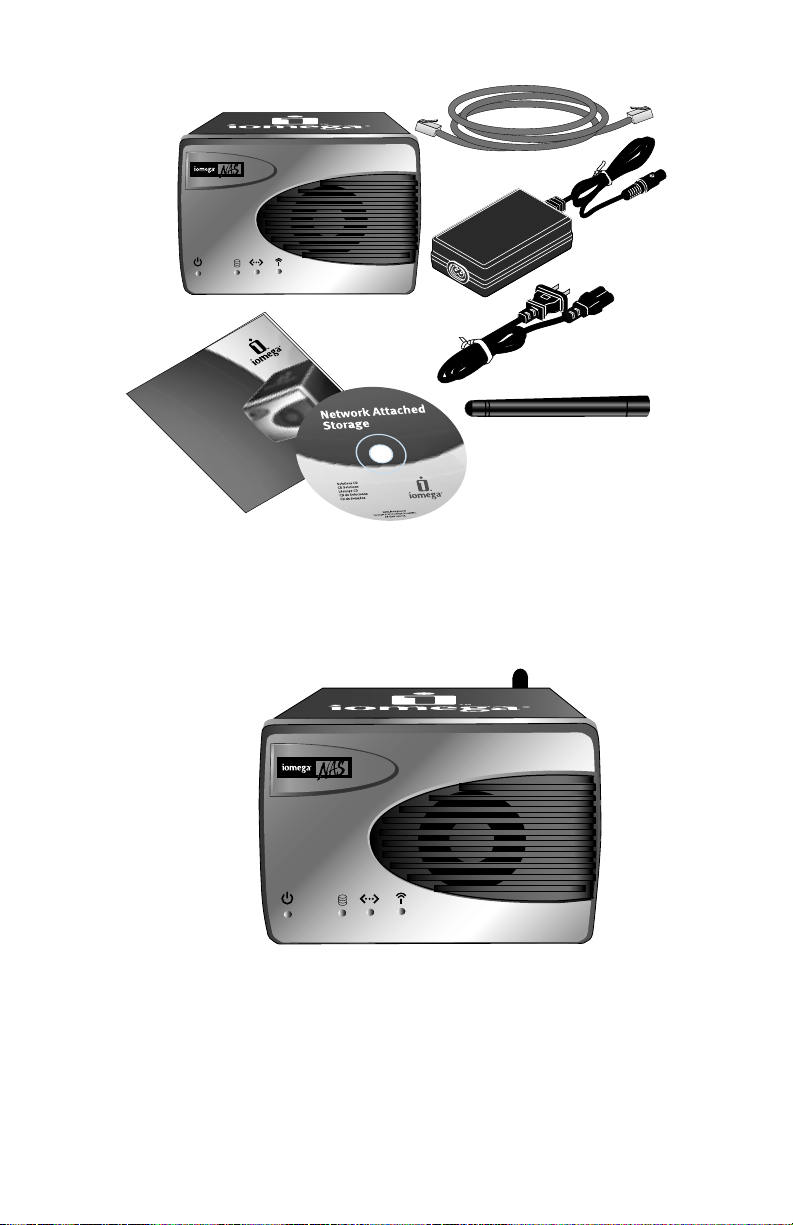
Press the power button on the back panel of the
Iomega NAS.
NOTE: The Iomega NAS will take a couple of
minutes to start up. Please wait until the Power
LED changes to solid blue before proceeding.
4
If your network does not have a DHCP
server, change your computer’s IP address
to 169.254.10.85 with a subnet mask of
255.255.0.0. The default IP address of the Iomega
NAS is 169.254.10.10. For more information on
changing your computer’s IP address, see page 7.
Page 5

S
t
a
rt
U
p
M
i
s
e
e
n
r
ou
t
e
S
t
ar
t
I
n
i
c
i
o
I
n
i
c
i
a
li
z
aç
ã
o
I
n
st
a
la
c
i
ón
3
1
3
8
7
2
0
0
w
w
w.
i
o
m
e
g
a
.
co
m
C
o
p
y
r
i
g
h
t
©
2
0
0
4
I
o
m
e
g
a
C
o
r
p
o
r
a
t
i
o
n
.
A
l
l
r
i
g
h
t
s
r
e
se
r
ve
d
.
N
e
t
w
o
r
k
Ha
r
d
D
ri
v
e
W
i
n
do
ws
M
a
c
A
v
v
i
o
Insert the Solutions CD and follow the instructions
onscreen to register your Iomega NAS.
Launch the Iomega NAS Discovery utility.
NOTE: Iomega NAS Discovery is available for
Windows only. If you are using a Macintosh to
configure the Iomega NAS, please see the user’s
manual on the Solutions CD.
Select your Iomega NAS in the Discovery window.
If your NAS is not listed, see Troubleshooting on
page 7.
Click the Manage button, then log into the Iomega
NAS for advanced configuration.
User name: admin (case sensitive)
Password: (Leave the password blank)
Click on Configuration, then select NAS ID. In the
Device Name field, enter a new name for your
Iomega NAS.
NOTE: Choose a name that is easy to remember.
The device name will make it easier to connect to
the Iomega NAS.
5
Page 6

Click on the IP Settings button.
Configure the IP Settings of the Iomega NAS to
match your network, then click the Apply button.
The Iomega NAS is configured by default to act as
a wireless access point. If you wish to connect to
the Iomega NAS from wireless clients and do not
already have a wireless access point, no change is
necessary; however, you will need to connect the
antenna to the Iomega NAS.
If you already have a wireless access point or
do not wish to allow wireless clients to connect
to the NAS, click on the Wireless tab, deselect
the Wireless check box, and then click the Apply
button.
Make any other desired configuration changes. See the user’s manual on the Solutions CD or the
help system for more information on Iomega NAS 100d configuration options.
6
Page 7

Troubleshooting
Changing Your Computer’s IP Address (Windows Users)
1. Right click on My Network Places or Network Neighborhood, then select Properties.
2. Right click on your LAN connection, then select Properties
3. Select Internet Protocol (TCP/IP), then select Properties
4. Write down the the current network settings.
5. On the General Tab, click on Use the following IP address:.
6. Change the IP address and subnet mask
7. Click OK.
8. Click OK.
I Cannot Configure the Iomega NAS
• Make sure all cable connectors are securely inserted in the proper ports.
• Make sure that the Iomega NAS has started up (The Power LED is solid blue).
• If your network is not running DHCP, assign your client computer an IP address in the 169.254.*.*
range with a subnet mask of 255.255.0.0.
• Disable any personal firewall software on the client computer.
• If you have multiple network connections, disable all but one network connection on the client
computer.
• Enter the IP address of your Iomega NAS in your web browser’s URL line (http://169.254.10.10 is
the default IP address on networks without a DHCP server). If you have a DHCP server, look for the
Iomega NAS in the server’s DHCP client list. See your router or DHCP server’s documentation for more
information.
• See the user’s manual included on the Solutions CD for more Troubleshooting steps.
.
.
Customer Support
For service and support for your Iomega product, visit us at www.iomega.com.
7
Page 8

Copyright © 2005 Iomega Corporation. All rights reserved. Iomega, the stylized “i” logo, and all Iomega brand blocks are either registered trademarks or trademarks of Iomega Corporation in the United States
and/or other countries. Microsoft and Windows are either registered trademarks or trademarks of Microsoft Corporation in the United States and/or other countries. Apple and Macintosh are either registered
trademarks or trademarks of Apple Computer, Inc. in the United States and/or other countries. Certain other product names, brand names, and company names may be trademarks or designations of their
respective owners.
d31336500 04/04/05 b
 Loading...