

I/OMagic Typhoon Theatre User guide

Typhoon Theatre
Advanced 5.1 PCI Audio Accelerator
USER’S GUIDE

Typhoon Theatre
User’s Guide
Dear Customer:
Congratulations on the purchase of your Typhoon Theatre PCI audio
accelerator. We all want to express our sincere gratitude for your decision to
purchase our product. Our commitment is to provide a product that is easy
to install and easy to use.
You can be assured that your new product is made from the latest state-ofthe-art components and that it has also gone through the most rigorous
testing and qualit y assurance procedures in the industry.
With an emphasis on products that revolutionize the way people interact with
the new technologies around us, we continually introduce integrated solutions
that enable users to take full advantage of their multimedia experience. Our
ever-expanding product line covers the entire multimedia spectrum. Look to
us to as the leader of providing media products ranging from sound and
graphics cards, to DVD and CD-ROM drives, and even to digital imaging and
mp3 audio products.
We hope you enjoy using your new product, and look forward to earning your
business in the coming years.
- 2 -
Typhoon Theatre
User’s Guide
Copyright Statement
It is a criminal offense, under applicable copyright laws, to make unauthorized copies of
copyright-protected material, including computer programs, films, broadcasts and sound
recordings. This equipment should not be used for such purposes.
Notice: I/OMAGIC Corporation makes no warranty of any kind with regards to this material, including, but
Trademarks: Microsoft is a registered trademark of Microsoft Corporation. Windows, Windows
Copyright: © 2002 I/OMAGIC Corp. all rights reserved. No part of this publication may be reproduced,
Warranty: I/OMAGIC Corporation warrants that the products it sells will be free from defects in materials and
FCC Compliance Statement
This device complies with Part 15 of the FCC Rules. Operation is subject to the following two
conditions:
• This device may not cause harmful interference, and
• This device must accept any interference received, including interference that may cause
undesired operation.
FCC Warning Statement
This equipment has been tested and found to comply with the limits for a Class B digital device,
pursuant to Part 15 of the FCC Rules. These limits are designed to provide reasonable protection
against harmful interference in a residential installation. This equipment generates, uses and can
emit radio frequency energy and, if not installed or used in accordance with the instructions, may
cause interference to radio communications. However, television reception interference can be
determined by turning the equipment off and on. The user is encouraged to correct the
interference by one or more of the following measures:
• Reorient or relocate the receiving antenna
• Increase the separation between the equipment and the receiver
• Connect the equipment into an outlet different from that to which the receiver is
connected
• Consult the dealer or an experienced radio/TV technician for help.
Caution
Changes or modifications not expressly approved by the party responsible for compliance could
void the user’s authority to operate the equipment.
For Europe
“The drive is in conformity with the EMC directive and low-voltage directive.”
not limited to, the implied warra nties of merchantability and fitness for a particular product.
I/OMAGIC Corporation shall not be liable for errors contained herein or for incidental consequential
damages in connection with the furnishing, performance, or use of this material.
Every effort has been made to ensure that the information in this manual is accurate. I/OMAGIC
Corporation is not responsible for printing or clerical errors.
Mention of third party products is for information purposes only and constitutes neither an
endorsement nor a recommendation. I/OMAGIC Corporation assumes no responsibility with
regards to the performance of these products.
This document contains proprietary information, which is protected by copyright (see below).
The information contained in this document is subject to change without notice.
95/98/Me/NT/2000/XP and the their logos are trademarks of Microsoft Corporation. IBM is a
registered trademark of International Business Machines Corporation. All other trademarks and
product names used within this manual are the property of their respective companies and are
hereby acknowledged.
transmitted, transcribed, stored in a retrieval system, or translated into any language or computer
language, in any form, by any means, without prior written consent of I/OMAGIC.
workmanship. Consult the warranty card for complete warranty information.
- 3 -

Typhoon Theatre
User’s Guide
Table Of Contents
Introduction.................................................................................... 5
Features.......................................................................................... 5
Specification ................................................................................... 6
Contents Of Your Package ................................................................ 7
System Requirements...................................................................... 7
Hardware Installation ...................................................................... 8
PREPARE Y OUR COMPUTER FOR INSTALLATION.....................................................................8
DISABLE ON -BOARD AUDIO ...........................................................................................9
FIND A V ACANT EXPANSION SLOT ...................................................................................9
INSTALLING THE T YPHOON THEATRE...............................................................................10
INSTALLING THE CD-ROM AUDIO CABLE ........................................................................12
JOYSTICK CONNECTOR ................................................................................................12
COMPLETE THE INSTALLATION.......................................................................................12
Driver Installation..........................................................................13
WINDOWS XP ..........................................................................................................13
WINDOWS 2000.......................................................................................................17
WINDOWS M E ..........................................................................................................22
WINDOWS 98...........................................................................................................26
WINDOWS 95...........................................................................................................30
WINDOWS NT..........................................................................................................34
Audio Functions..............................................................................36
Software Installation......................................................................38
POWER DVD............................................................................................................38
CLICKR ADIO ............................................................................................................41
GAMESPY A RCADE......................................................................................................42
ATOMIX MP3 ............................................................................................................43
PCDJ.....................................................................................................................44
COSMI G AMES..........................................................................................................45
YAMAHA S OFTSYNTHESIZER S-YXG50...........................................................................47
Troubleshooting .............................................................................48
Limited Warranty ...........................................................................52
Contacting I/OMagic ......................................................................53
Register Your I/OMagic Product .....................................................53
- 4 -
Typhoon Theatre
User’s Guide
Introduction
Congratulations on purchasing the Typhoon Theatre PCI audio accelerator.
You have just acquired a sound card based on the most advanced 3D PCI
audio accelerator available today! The Typhoon Theatre PCI audio accelerator
sound card is a high performance 5.1 speaker PCI audio accelerator that
combines the most compelling 3D, quadraphonic and music synthesis
technologies available with full-featured digital outputs and a hardware
equalizer. The Typhoon Theatre PCI audio accelerator is powere d by one of
the most powerful audio accelerators available, the ESS Canyon 3D2 which
provides unrivaled features, performance, and audio quality. Bring the home
theater experience to your PC!
Features
• Powerful Canyon 3D2 DSP accelerates demanding PC gaming.
• Engulfing 5.1 Speaker output immerses you in sound.
• 64 accelerated DirectSound 3D streams.
• Hardware speaker equalization.
• S/PDIF Digital Output for Dolby Digital AC-3/PCM content.
• Surround Sound playback of MP3’s, Internet Audio, CD’s, and DVD’s.
• Sensaura 3D Positional Audio Technology.
• True Quadraphonic Sound.
- 5 -

Typhoon Theatre
Specification
Audio Accelerator/Digital Signal Processor:
• ESS Canyon3D-2 DSP for Unmatched 3D Audio Acceleration
Codecs:
• AC 97 CODEC
Bus Interface:
• 32 bit PCI Bus Master
• PCI 2.1 and PCI 2.2 Compliant
Game MIDI Interface:
• MPU-401 UART Support
Digital Audio Support:
• Up to 96 Accelerated 3D Audio Streams
• A3D 1.0, EAX 1.0, EAX 2.0, I3DL2, and DirectSound3D compatible
• Full-duplex, digital recording and playback at 48 kHz
• DirectInput device support
• 5 band hardware equalization
• S/PDIF Digital Output
Music Synthesis:
• Yamaha S-YXG50 Soft synthesizer
• Tone Generation: Wave Table
• Number of Voices: 676 Melody Voices + 42 SFX Voices+21
Drum/SFXKits
• Multi-timbral Parts: 16
• Maximum Polyphony: 128 notes
• Effect Processor: 8 Chorus + 8 Reverb + 36 Variation Effect
• Sampling Rate: 44/ 22/ 11kHz
• Digital Dynamic Filter is included
• Direct Sound (R) Support
• GM, XG compatible
Audio Specifications:
• Exceeds PC 99 and PC2001 audio requirements
• Frequency Response: 20Hz-20kHz
User’s Guide
- 6 -

Contents Of Your Package
• Typhoon Theatre Audio Accelerator
• Driver CD
• Installation Guide
• Warranty Card
• CD Audio Cable
• PowerDVD Software CD
System Requirements
• Pentium 266Mhz or faster CPU
• Windows XP/2000/Me/98/95/Me/NT4
• Intel or Compatible Motherboard
• 16Mb RAM
• 40Mb Hard Drive Space
• CD-ROM drive for driver installation
• One Available PCI Slot
• Powered Speakers Or Headphones
Typhoon Theatre
User’s Guide
- 7 -
Typhoon Theatre
User’s Guide
Hardware Installation
Prepare Your Computer for Installation
1 Prior to working on your computer, make sure the power to the
computer and any related equipment is turned off.
2 While the cables are still attached to your computer, you may want to
label them so you are sure to reconnect them properly when the
installation process is complete.
3 Disconnect all cables and connectors from the back of your computer.
Some cables may be attached to their connectors by small screws.
Make sure to unscrew any that are secured.
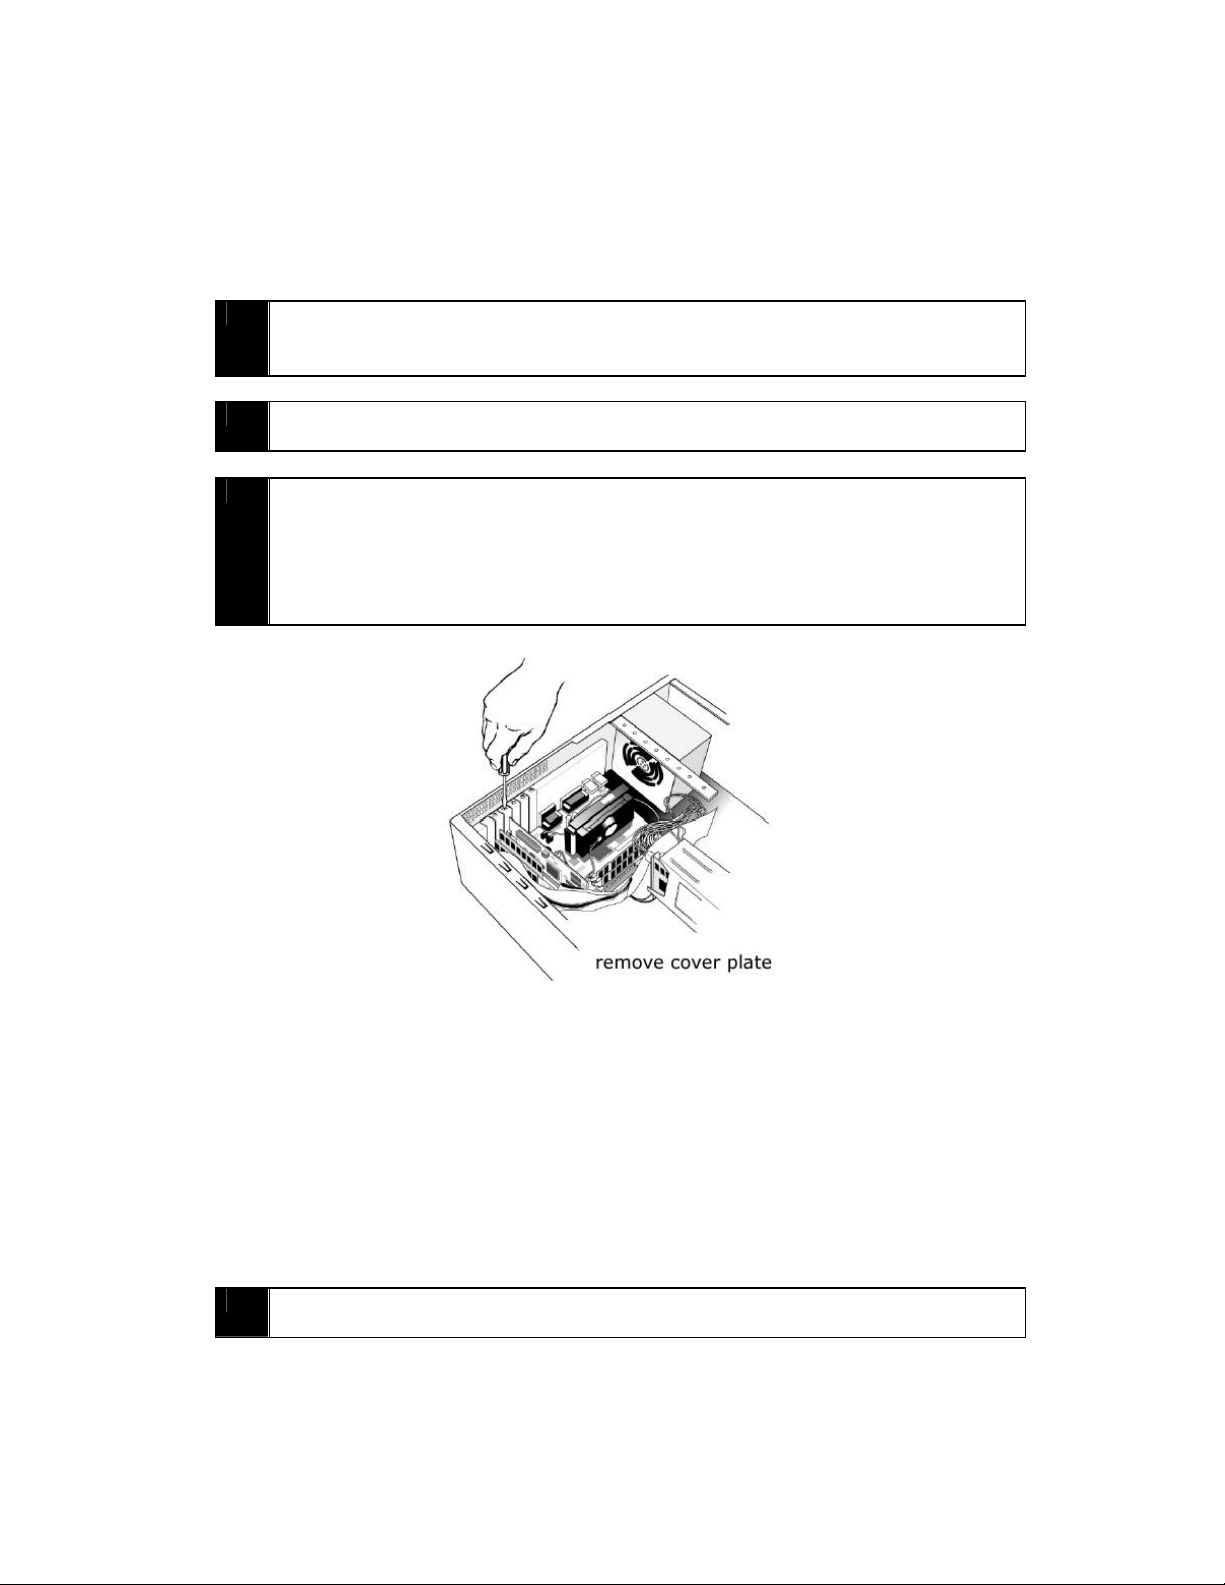
4 You are now ready to remove the cover from your computer. Generally,
there are several screws that must be removed to take the computer
cover off. Place the screws in a container so they do not get lost. If
you are working on a tower-style computer, you may want to lay it on
its side with the open side facing up.
Figure 1
Note:
Each manufacturer’s computer case may be different. If you
are unsure how to remove the case cover, consult your
computer owner’s guide.
- 8 -
Typhoon Theatre
User’s Guide
Disable On -Board Audio
The Typhoon Theatre PCI audio accelerator replaces your existing audio card.
If your system has built -in, “on-board” audio (that is, the audio chip is
mounted directly on the computer’s motherboard), you will need to disable it.
Consult your system documentation for information on how to do this. If this
is done via a jumper, you can disable the on-board audio later (see “Find A
Vacant Expansion Slot”). If it is done via software (usually in the system
BIOS setup), however, you will need to do this after you install the Typhoon
Theatre PCI audio accelerator.
Note: If your system motherboard has a built -in sound device, you may
experience difficulties in disabling it. Failure to disable the sound
device may create a conflict with your Typhoon Theatre PCI audio
accelerator causing neither to work. Refer to your motherboard and
BIOS documentation for instructions on disabling the built -in
device.
Find A Vacant Expansion Slot
If this is the first time you have opened up your computer, take a moment to
familiarize yourself with the layout of the inside of the computer. Notice that
there are different types of expansion slots.
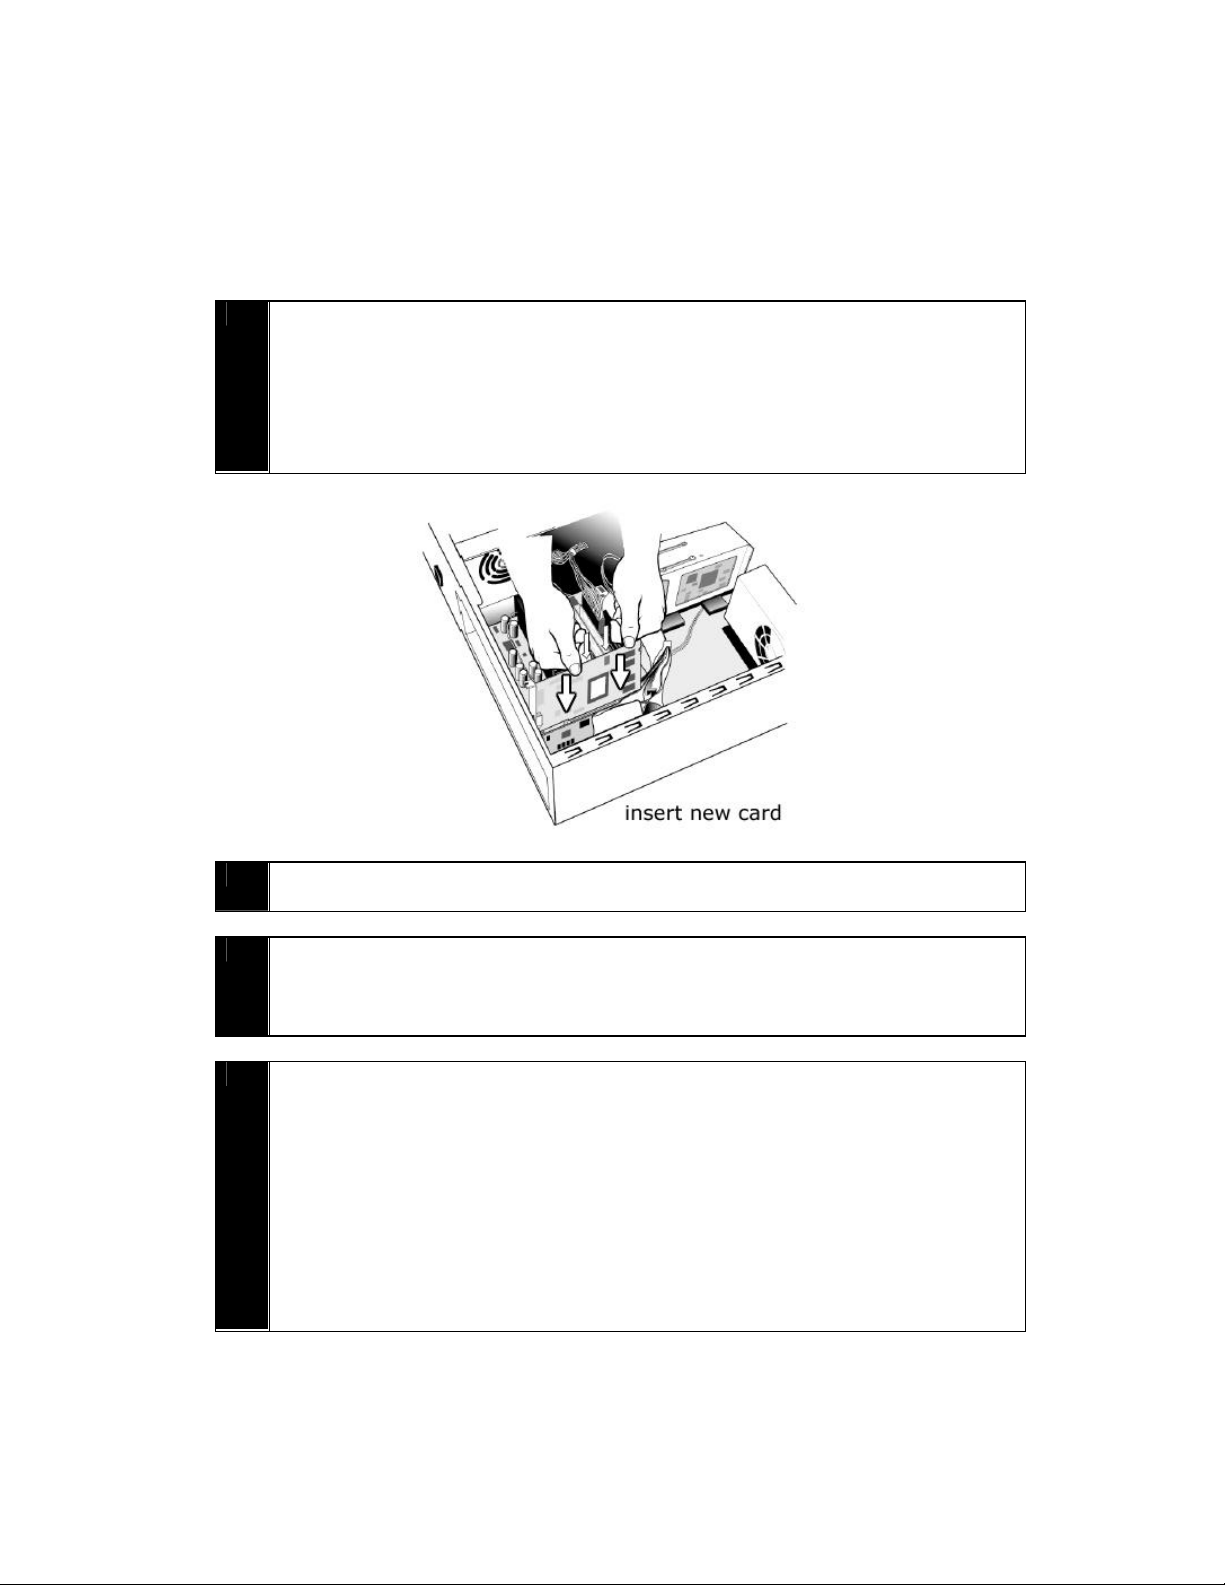
Figure 2
The Typhoon Theatre PCI audio accelerator
card fits in an available PCI slot
- 9 -
Typhoon Theatre
User’s Guide
1 Remove any existing Audio -type sound adapters in the system. If your
system has on-board audio that must be disabled via hardware (for
example, by using jumpers), do so now.
2 Identify the vacant PCI expansion slot where you want to install your
sound card.
3 If the slot is not the one from which you removed your old sound card,
follow the expansio n slot to the end closest to the outside of the
computer. You will find a metal or plastic cover over the part of the
computer case where expansion cards’ connectors are exposed. A
screw usually attaches the slot cover. Remove the slot cover. Save the
screw and the slot cover.
Installing The Typhoon Theatre
Take a moment to familiarize yourself with the Typhoon Theatre PCI audio
accelerator. On one long edge, you will notice several small metal connectors
in a comb-like “edge connector.” This connector fits into the computer’s
expansion slot. On one short edge is a wide metal bracket with a plug
connector on it. This connector faces the outside of the computer, through
the slot opening you chose in the previous section. The card fits into an
expansion slot only one way. Be careful not to use excessive force, as this
may damage your computer or the card.
1 Now remove the Typhoon Theatre PCI audio accelerator from its
wrapper.
- 10 -
Typhoon Theatre
User’s Guide
2 With your fingers on the top edge of the card, place it gently into the
expansion slot so that the edge connector rests against the expansion
slot. When you are sure the card is in the correct position, gently push
it into place. Some expansion slots may be snugger and will require
more pressure to seat the edge connector properly into the slot. Some
expansion slots may even give an audible “snap” when the card is fully
inserted, but make sure not to use excessive force.
3 Once in the slot, secure the audio card by screwing its metal bracket
into the computer chassis.
4 Connect your CD-ROM drive output audio connector to the CD input
connector found at the top of Typhoon Theatre PCI audio accelerator.
See the next section on installing a CD-ROM Audio Cable for more
information on how to do this.
5 You can now plug your speakers into the Typhoon Theatre PCI audio
accelerator. The speaker jack is identified on the bracket as “Front"
and “Surround”.
• If you have a joystick or midi device, it can be connected to the
jack, which is identified on the bracket by “Midi/Joystick”.
• If you have a microphone, it can be connected to the jack, which
is identified on the bracket by “Mic”.
• You can also attach an external stereo device to the jack
identified on the bracket by “Line-In”
• You can attach any digital devices that use S/PDIF input to the
jack identified on the bracket by “CEN/LFE or S/PDIF Out”
- 11 -
Typhoon Theatre
User’s Guide
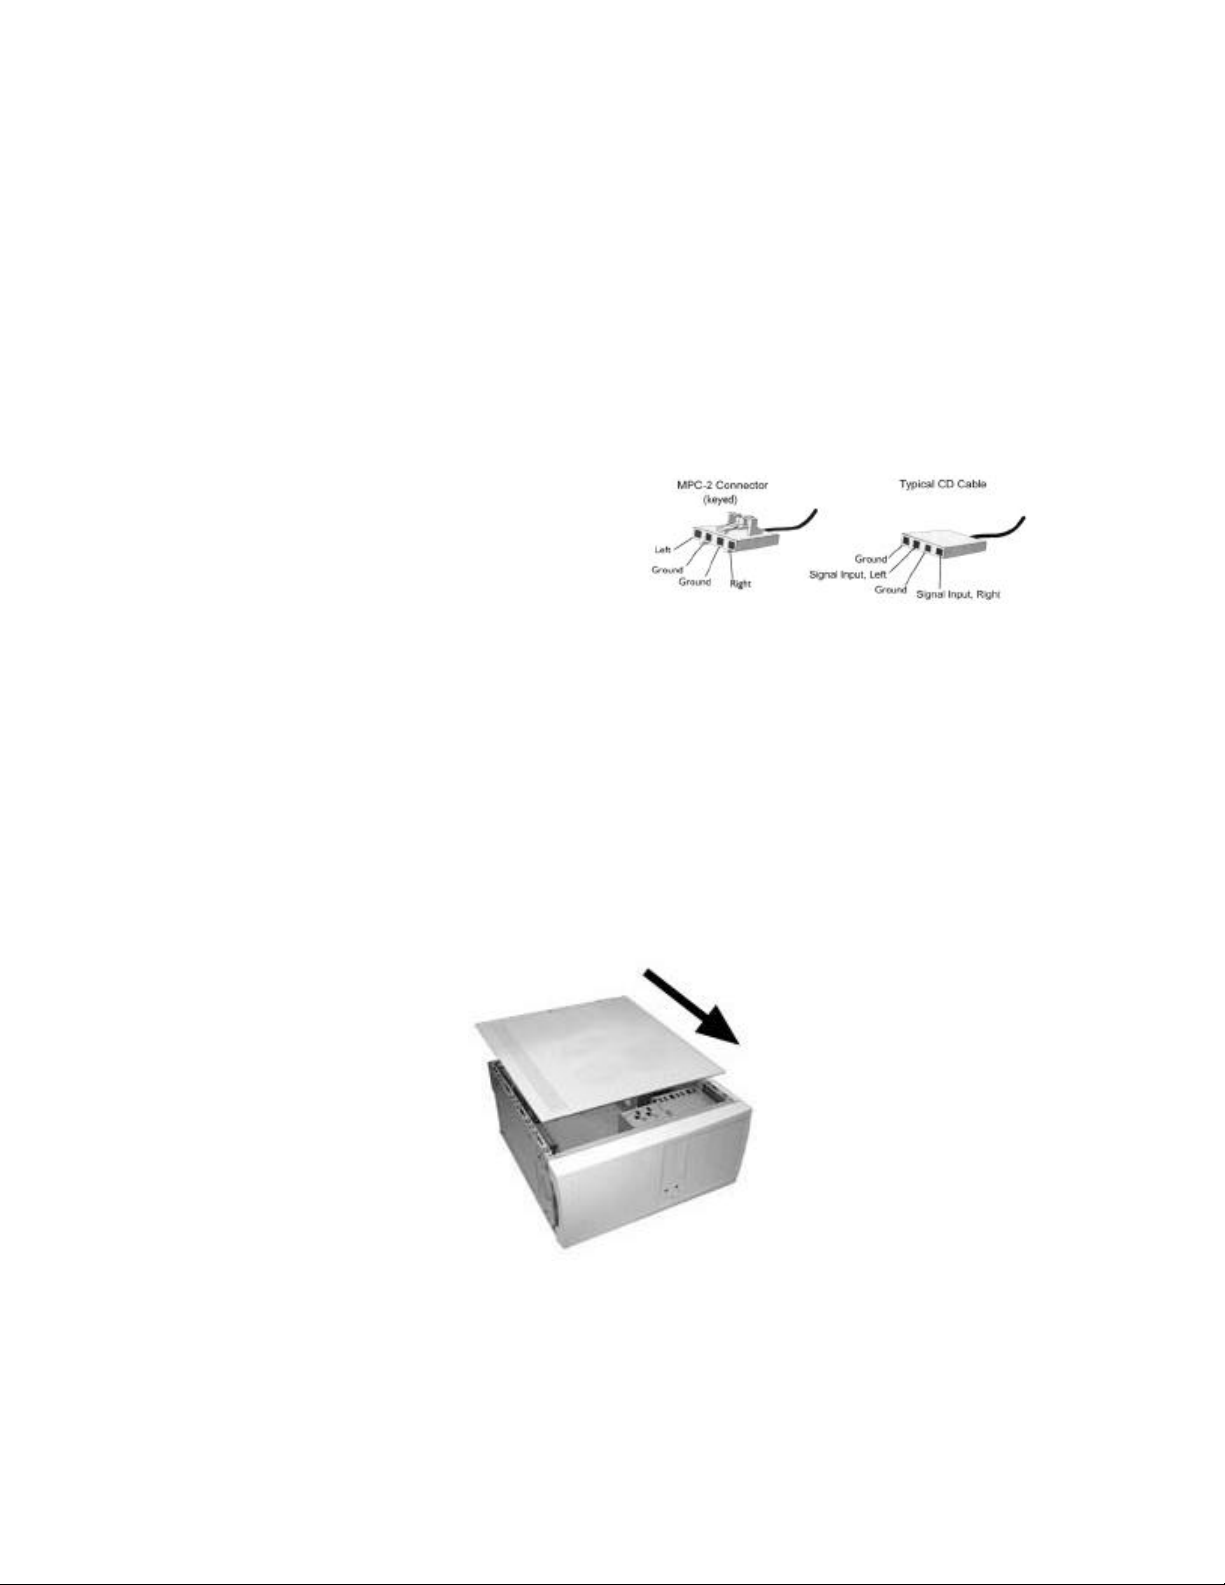
Installing The CD -ROM Audio Cable
If you have a CD-ROM installed in your system, then you can install the audio
cable that comes with your CD-ROM to the Typhoon Theatre PCI audio
accelerator. The cable should interface with all drives that adhere to the MPC2 (Multimedia PC) standard and have an MPC-2 jack.
Connect the MPC-2 connector to
your CD-ROM drive, and then
depending on the other end,
connect it to either J10, or J11. J10
is for MPC-2 connectors, and J11 is
for Mitsumi type connectors. Refer
to the following illustration:
Joystick Connector
If you want to connect a joystick to the Typhoon Theatre PCI audio
accelerator, the Sound card and drivers must be installed properly. If you
want to use the Joystick/MIDI port to connect to an external MIDI controller
in Windows 95, you must purchase a MIDI converter cable sold at many retail
outlets.
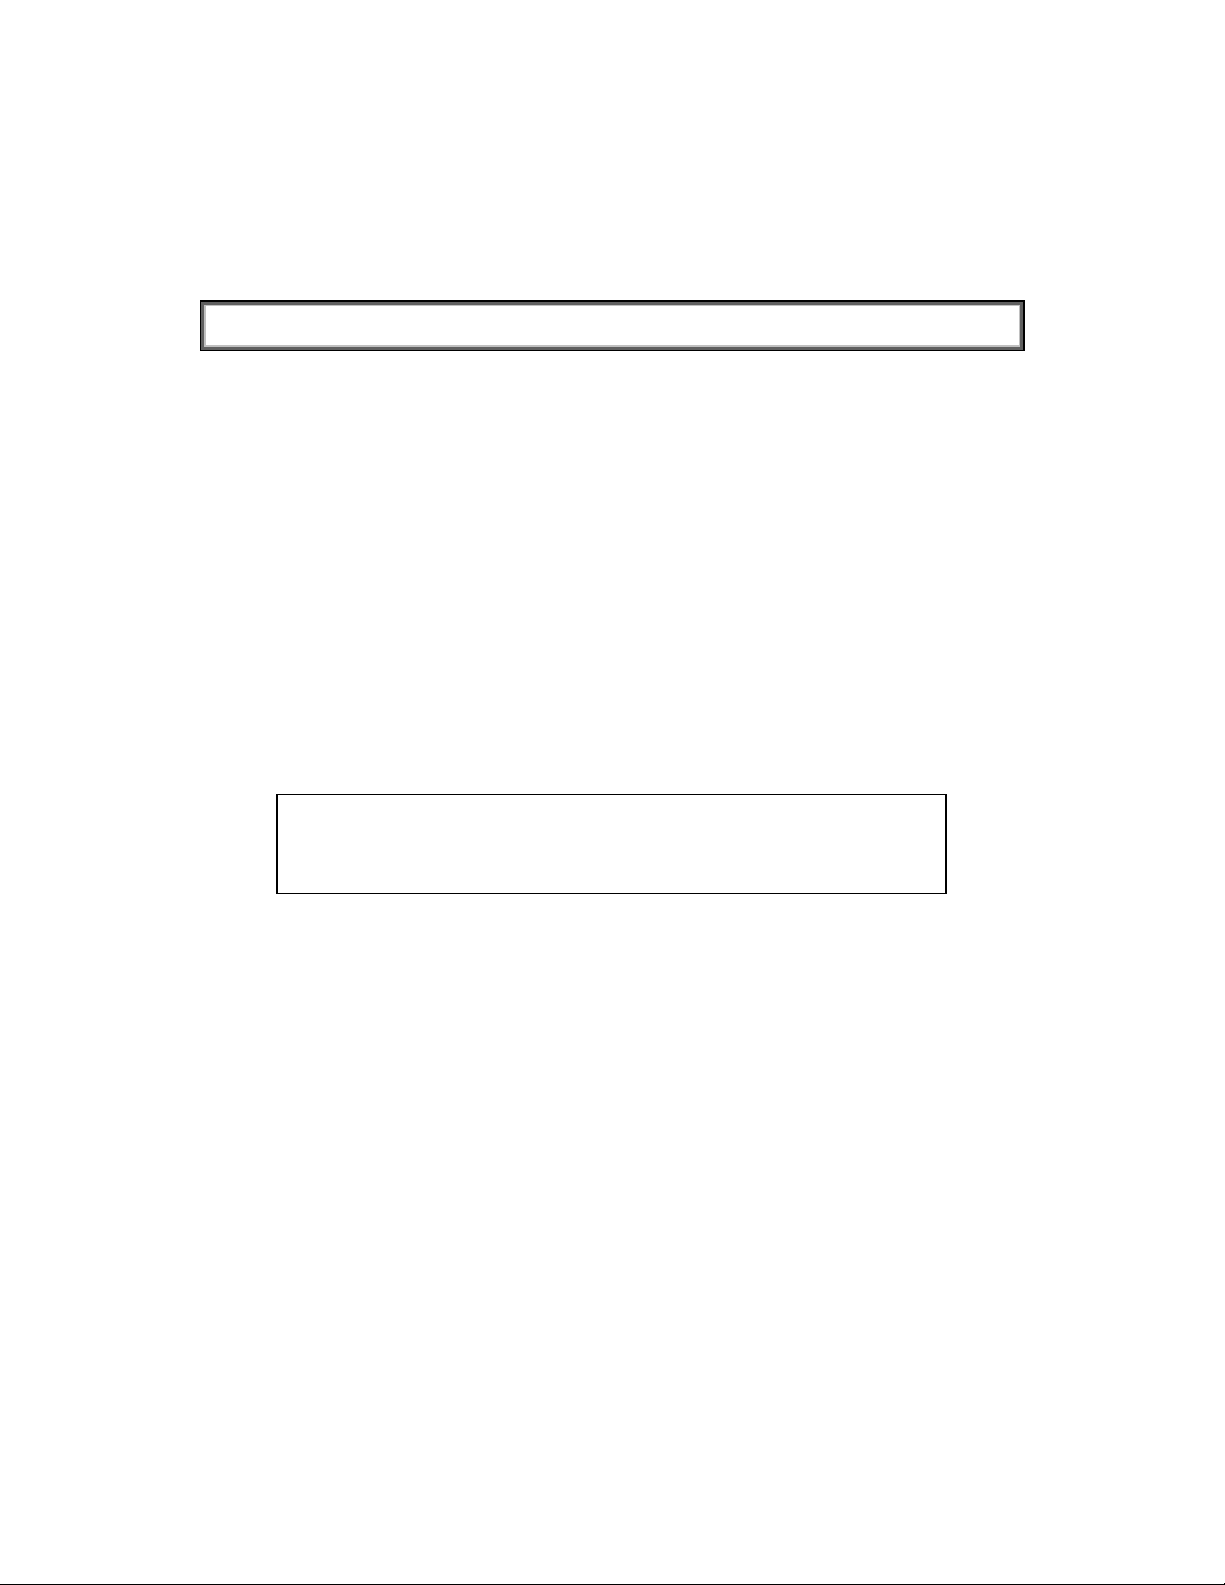
Complete the Installation
At this point, you should replace the computer case cover and secure it with
the screws you removed earlier in this procedure. Attach all the cables and
power connectors and power up your system.
- 12 -
Typhoon Theatre
User’s Guide
Driver Installation
Windows XP
For your convenience, we have designed an easy to use driver installat ion
process, which will walk you through the driver installation. You may install
drivers automatically using this process or manually using the Add New
Hardware Wizard.
Automatic Installation Procedures:
1. If the Add New Hardware Wizard window is up, press the “Cancel”
button.
2. Insert the I/OMagic Install CD into your CD-Rom. The install program
should run automatically.
3. Select the “Audio Drivers” option.
4. Select your appropriate operating system.
Note:
If drivers are already installed, an additional box will prompt
you to “Install, Repair, or Uninstall”. If you wish to uninstall
the drivers at this time, select the “Uninstall” button.
If Windows does not automatically start the install program:
1. Double click on “My Computer ”.
2. Double click on your CD-ROM drive.
3. Click on the “Drivers” directory
4. Click on the “WinXP ” directory and run “Setup.exe”
To manually install using the Add New Hardware Wizard, please follow the
steps on the following page:
- 13 -
Typhoon Theatre
User’s Guide
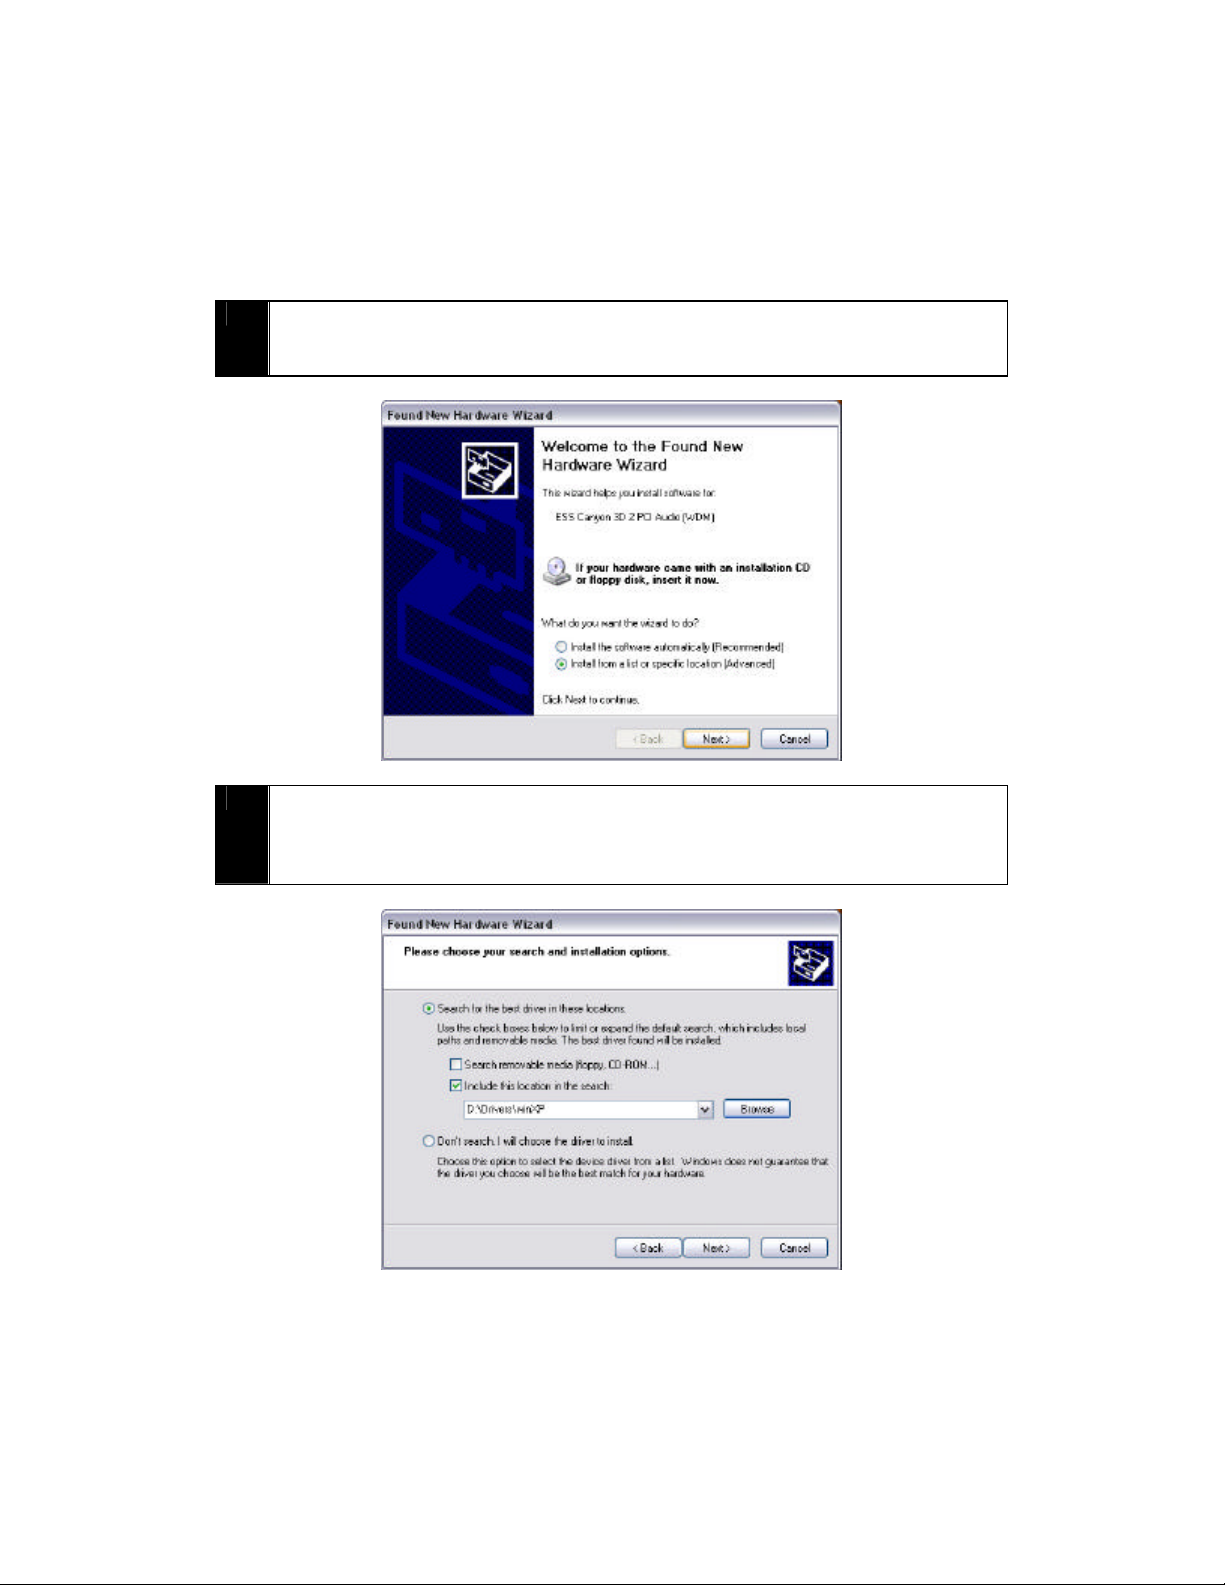
1 Power ON your system. When the "Found New Hardware Wizard"
comes up, select “Install from a list or specific location” and click
on the "Next" button.
2 Insert the Storm Surge driver CD into your CD-ROM drive. Select
“Search for the best driver ” and hit the “’Browse” button. Browse
to “D:\Drivers\WinXP ” where “D” is your CD-ROM drive, and hit the
“Next” button.
- 14 -
Typhoon Theatre
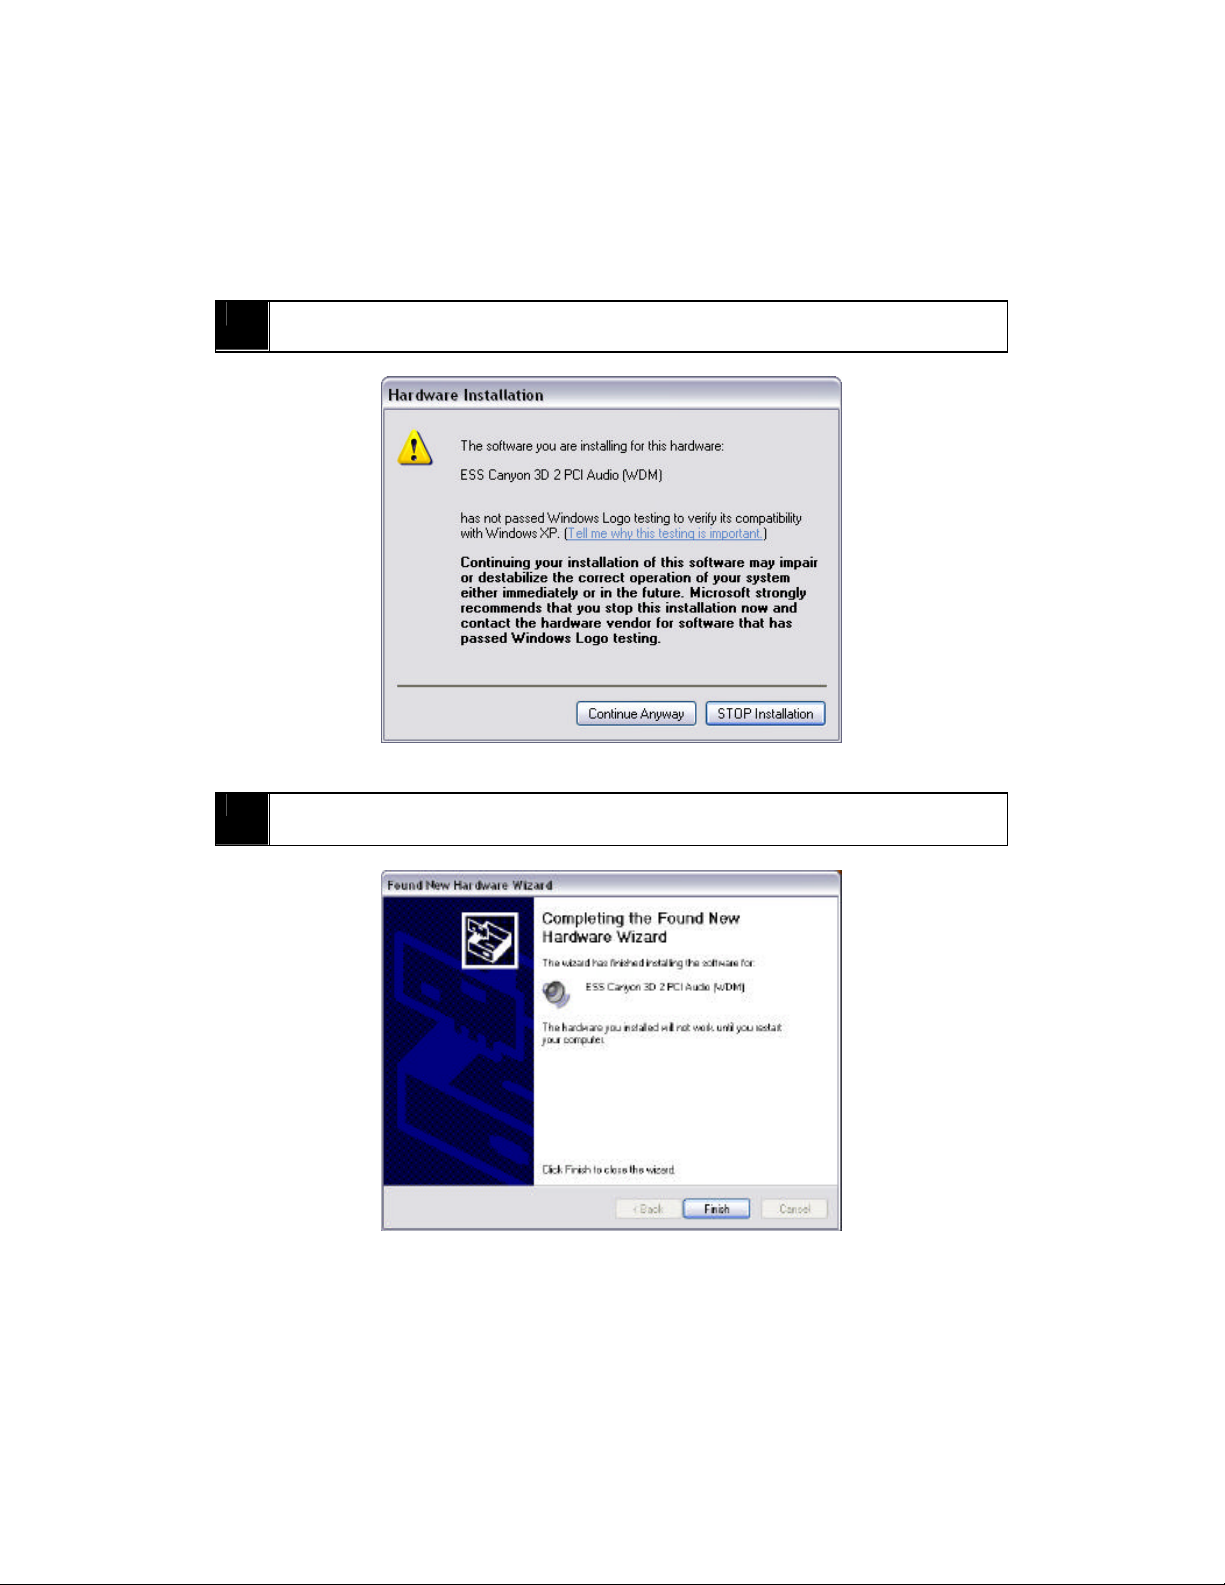
3 If you get a “Windows Logo Testing” dialog box, just press
“Continue Anyway” to continue
User’s Guide
4
Once done installing the drivers, press the “Finish” button to finish
your installation, and restart your computer.
- 15 -
Typhoon Theatre
User’s Guide
5
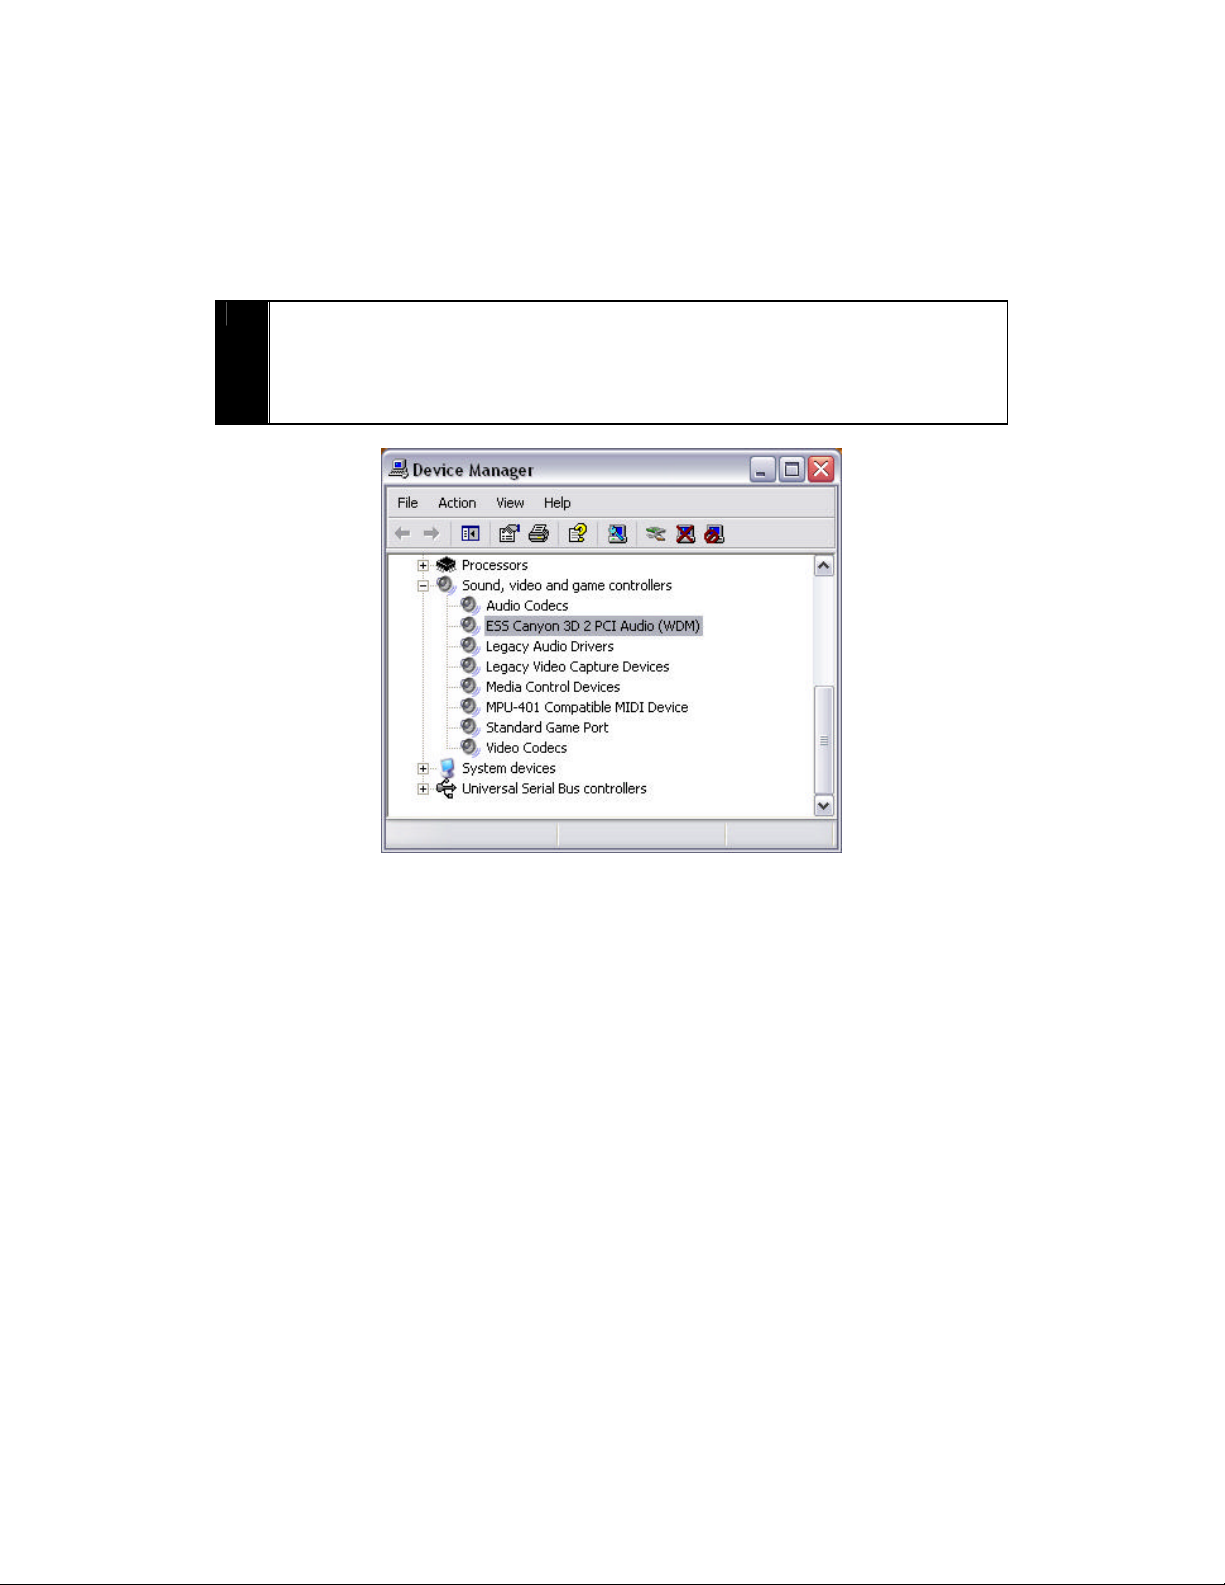
Check to make sure everything is installed correctly. Go to “Control
Panel” and select “System”. Select “Hardware” and select “Device
Manager” Click on the “+” sign next to “Sound Video and Game
Controllers” and make sure there is an “ESS Canyon 3D 2” device
listed below.
- 16 -

Typhoon Theatre
User’s Guide
Windows 2000
For your convenience, we have designed an easy to use driver installation
process, which will walk you through the driver installation. You may install
drivers automatically using this process or manually using the Add New
Hardware Wizard.
Automatic Installation Procedures:
5. If the Add New Hardware Wizard window is up, press the “Cancel”
button.
6. Insert the I/OMagic Install CD into your CD-Rom. The install progra m
should run automatically.
7. Select the “Audio Drivers” option.
8. Select your appropriate operating system.
Note:
If drivers are already installed, an additional box will prompt
you to “Install, Repair, or Uninstall”. If you wish to uninstall
the drivers at this time, select the “Uninstall” button.
If Windows does not automatically start the install program:
5. Double click on “My Computer ”.
6. Double click on your CD-ROM drive.
7. Click on the “Drivers” directory
8. Click on the “Win2000” directory and run “Setup.exe”
To manually install using the Add New Hardware Wizard, please follow the
steps on the following page:
- 17 -
 Loading...