

Page 1

USING Y OUR
SmarTrac
Signcutter
TM
I/S
Copyright © 1999, Ioline Corporation, All Rights Reserved
Printed in the United States of America
Text Revision 1, PN 106844
All Trademarks Are The Property Of Their Respective Owners
November 1999
Page 2
Ioline
2
A
B
C
D
E
H
F
G
J
K
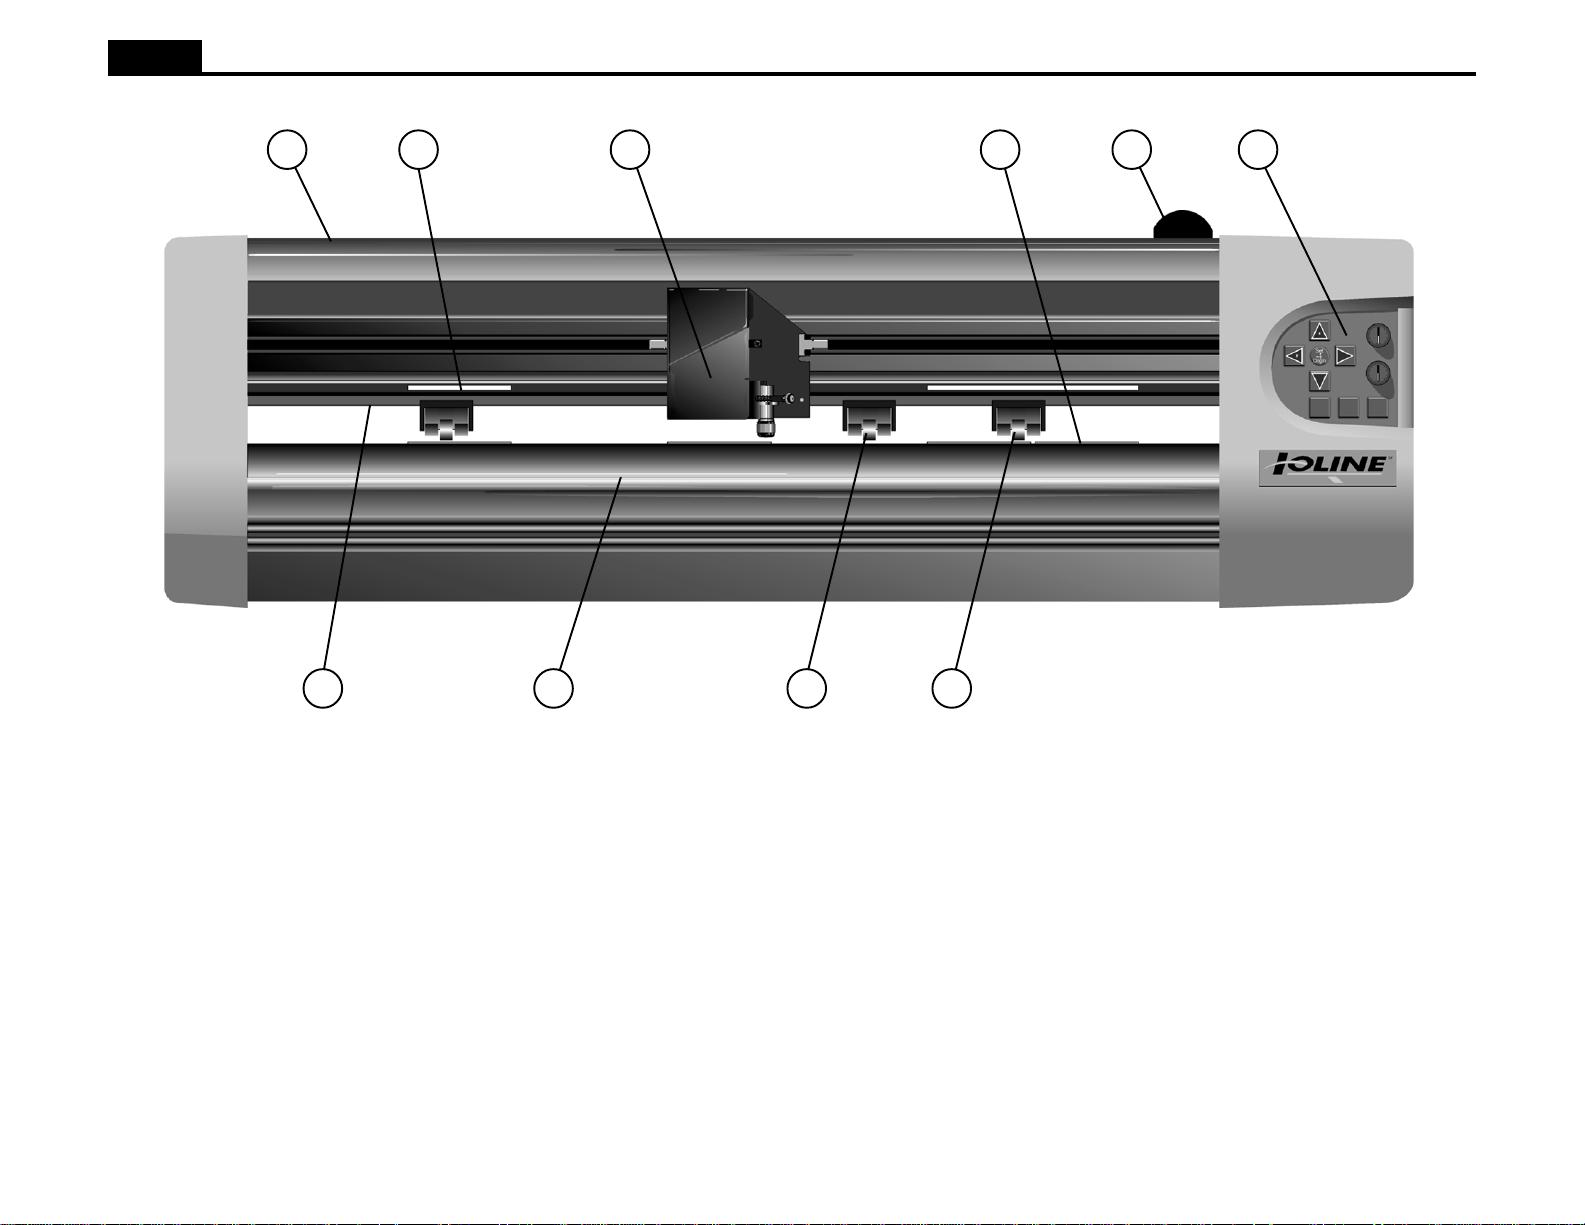
Figure 1. The Ioline I/S Signcutter.
A. Dust Cover B. Carriage Rail C. Drive Shaft Marker D. Platen E. Carriage F . Idler Wheel G. Pinchwheel H. Drive Shaft Segment J. Pinchwheel Lever K. Keypad
Page 3

Ioline
3
TABLE OF CONTENTS
THE I/S SIGNCUTTER ............................................. 4
SAFETY AND PRECAUTIONS ................................ 4
INSTALLATION ........................................................ 5
Unpack the Signcutter ....................................... 5
Assemble the Stand or Cradle (if Included) ....... 5
Attach the Signcutter ......................................... 5
Prepare the Area ............................................... 5
Connect the Signcutter to the Computer ........... 5
Power On........................................................... 5
Installing the Ioline Control Center.....................5
OPERATION............................................................. 6
Keypad Controls .................................................. 6
The Ioline Control Center .................................... 7
Changing System Settings ................................ 8
Menu Bar Features ............................................8
Screen Menu Options........................................8
Cutting a Sign..................................................... 10
General Guidelines ..........................................10
Power On......................................................... 10
Loading the Material ........................................ 10
Aligning the Material and Pinchwheels ............ 10
Adjusting the Pinchwheels............................... 11
Locking the Pinchwheels Off of the Platen ...... 11
Installing a Blade and the Blade Foot.............. 12
Installing a Blade Holder or Pen ...................... 12
Adjusting Blade Exposure and Force .............. 12
Sending a Cut/Plot File to the Signcutter......... 13
Pausing Cutting ............................................... 13
Canceling a Cut ............................................... 13
Suggested Settings ......................................... 14
Guidelines for Plotting Pens ............................ 15
Cutting Long Signs .......................................... 15
Cutting Small Characters (Under 1/4 in.)......... 16
How to Pounce ................................................ 17
Stencil Cutting.................................................. 17
COMMUNICATION TESTING ................................ 18
Communication Test........................................ 18
Testing the Signcutter Serial Port .................... 18
Testing the Computer Serial Port .................... 18
TROUBLESHOOTING............................................ 19
Troubleshooting Chart ..................................... 19
LED Codes ...................................................... 20
Troubleshooting the Parallel Port .................... 20
ROUTINE MAINTENANCE..................................... 21
Replacing the Blade......................................... 21
Cleaning the Drive Shaft.................................. 21
Calibration........................................................ 21
END NOTES ........................................................... 23
Getting Help..................................................... 23
The FCC Wants You to Know.......................... 24
Your Comments Are Requested...................... 24
Customer Service ............................................ 24
Limit of Liability Statement............................... 24
GLOSSARY ............................................................ 25
INDEX ..................................................................... 27
Page 4

Ioline
4
THE I/S SIGNCUTTER
Thank you for purchasing an Ioline signcutter. To make signs, you also need
a computer with design software. After you have used the design software to
create a sign, you will send it as a cut file to the Ioline signcutter . The signcutter will receive the file and cut the design. Check the following items before
you begin making signs:
• The design software, which helps you design signs, must be loaded into
the computer according to the installation instructions. If you have any
questions about the computer or the software, you will need to call the
dealer.
• The computer sends a cut file to the signcutter to create the signs. The
computer must be assembled and installed correctly before you connect
it, by cable, to the signcutter.
• The signcutter will cut the sign exactly as you have designed it. The sign
will be cut from the material that you have loaded into the signcutter.
• There is a specialized software program that comes with the signcutter
called the Ioline Control Center. You can load this software utility into a
PC compatible computer and use it to adjust signcutter settings and perform system diagnostics. Most design software provides drivers for Ioline signcutters. Contact Ioline customer service if you need assistance
with drivers.
SAFETY AND PRECAUTIONS
Please read these safety guidelines before beginning operation of the signcutter. The signcutter uses a very sharp blade when cutting. The parts can move
quickly . Always observe the following safety precautions:
• Do not allow the material to become suddenly taut between the plotter
and a roll of material during plotting. A service loop of unrolled material
is required for problem free operation. Using the Autoloop function (enabled in the Control Center) will create the required service loop by gently pulling a set amount of material from the roll before cutting. Ioline
recommends using the Autoloop function when plotting on a roll of material.
• Do not try to repair the machine without factory authorization. Only qualified service personnel should attempt any disassembly or access to internal components. If external mechanical adjustments are necessary, turn
off the signcutter and disconnect it from all power sources (both the computer and the wall outlet).
• Be careful with hair, jewelry, or loose clothing near the signcutter. They
can become caught in the mechanical parts.
• Never move the carriage by hand. Use the Arrow keys and let the machine do it.
• Keep hands away from the carriage when the signcutter is in operation.
The carriage will automatically move to its right end position when the
power is turned on.
• Be careful when lifting the signcutter. Hold the bottom surfaces of the
signcutter to lift or move it.
• Keep fingers away from the drive shaft when the signcutter is in operation.
• Use caution when changing a blade in the blade holder. See the Routine
Maintenance chapter of this User Guide for the recommended procedure.
• Be careful when handling the blades. They are sharp and could cause an
injury if mishandled. Although the blades are made of an extremely hard
material, they are brittle and can break if dropped or mishandled.
Page 5

Ioline
5
INSTALLATION
Unpack the Signcutter
W arning: Do not lift the signcutter by the plastic end covers, the dust
cover, or the carriage rail. This may permanently damage the signcutter. Use the bottom surfaces of the signcutter to lift or move it.
Carefully remove the signcutter from the box and place it on a flat-stable
surface. This procedure requires two people. Save all packing materials and
the box. Check the packing list to ensure that all of the accessories are present.
Assemble the Stand or Cradle (if Included)
If the signcutter was purchased with a stand or cradle, the assembly directions
and hardware are included in the accessory kit. Assemble the stand or cradle
and attach the signcutter according to the directions before attempting to plot.
Attach the Signcutter
Attach the signcutter to the stand (see above), cradle or feet depending on the
model configuration. The directions are included in the accessory kit. If using
a stand, make sure that the media rollers are properly installed and that the
signcutter is facing the correct direction.
Prepare the Area
Select the correct port in the design software or the Control Center after the
cables are correctly connected to the computer and signcutter. Consult the
design software manual or the dealer for further information.
Important Notes:
1. Always turn off the power to both the computer and the machine
before connecting any cables. This will pr otect the equipment and
reset the signcutter if changing between parallel and serial communication.
2. If connected to a parallel port, an LPT port designation (i.e. LPT 1,
LPT 2, etc.) must be selected. If connected to a serial port, a COM
port designation (i.e. COM 1, COM 2, etc.) must be selected. The
choice of a port for the signcutter will depend on the ports being
used by other devices on the computer. Consult with the dealer if a
port is not available.
Power On
Turn on the computer and the signcutter to make sure the y work. The signcutter power switch is located next to the power cord on the back. The carriage
will move toward the keypad side of the machine when the power is turned
on. Keep hands and loose clothing away from all moving parts of the signcutter. The red LED on the front panel will light when the start-up process is
finished.
Prepare a large clean area to work. Make sure the floor is clean and clear of
any obstacles. Pull the signcutter away from the wall so the material can mo ve
freely.
Connect the Signcutter to the Computer
Note: Make sure the computer and the signcutter have the power
turned off. Ioline recommends using a surge protector power strip
for the sign cutter and the computer.
Connect the signcutter to the computer with either a parallel or a serial cable.
A parallel cable is provided in the accessory kit. Standard serial cables are
available at a computer store or from Ioline if it is necessary to connect the
signcutter to a serial port on the computer. A serial connection to the signcutter is required with Windows 3.1 or DOS based software.
The parallel port receptacle on the computer is a 25 pin female receptacle.
The serial port is either a 9 pin or 25 pin male receptacle. If the computer has
a 9 pin serial port, a 9 to 25 pin adapter is necessary . Adaptors are ine xpensiv e
and available at computer stores or can be ordered from Ioline. The plotter
will not function if a serial cable is connected to a parallel port.
Installing the Ioline Control Center
The Control Center is an interface for adjusting parameters to optimize cutter
performance. The signcutter comes with a CD-R OM which has the Microsoft
Windows® 95, 98 and NT (3.51 or greater) version of the Ioline Control Center program.
1. Turn on the power to the computer and start Windows®.
2. Insert the Ioline CD ROM into the CD ROM drive (usually D:)
3. Select the Start button.
4. Choose Run.
5. T ype D:\SETUP (substitute the correct letter if the CD R OM driv e letter is
not D:) and Click OK.
6. Follow the instructions that appear on the screen.
7. Consult the Operation chapter of this manual for details on using the
Ioline Control Center software.
Page 6
Ioline
6
OPERATION
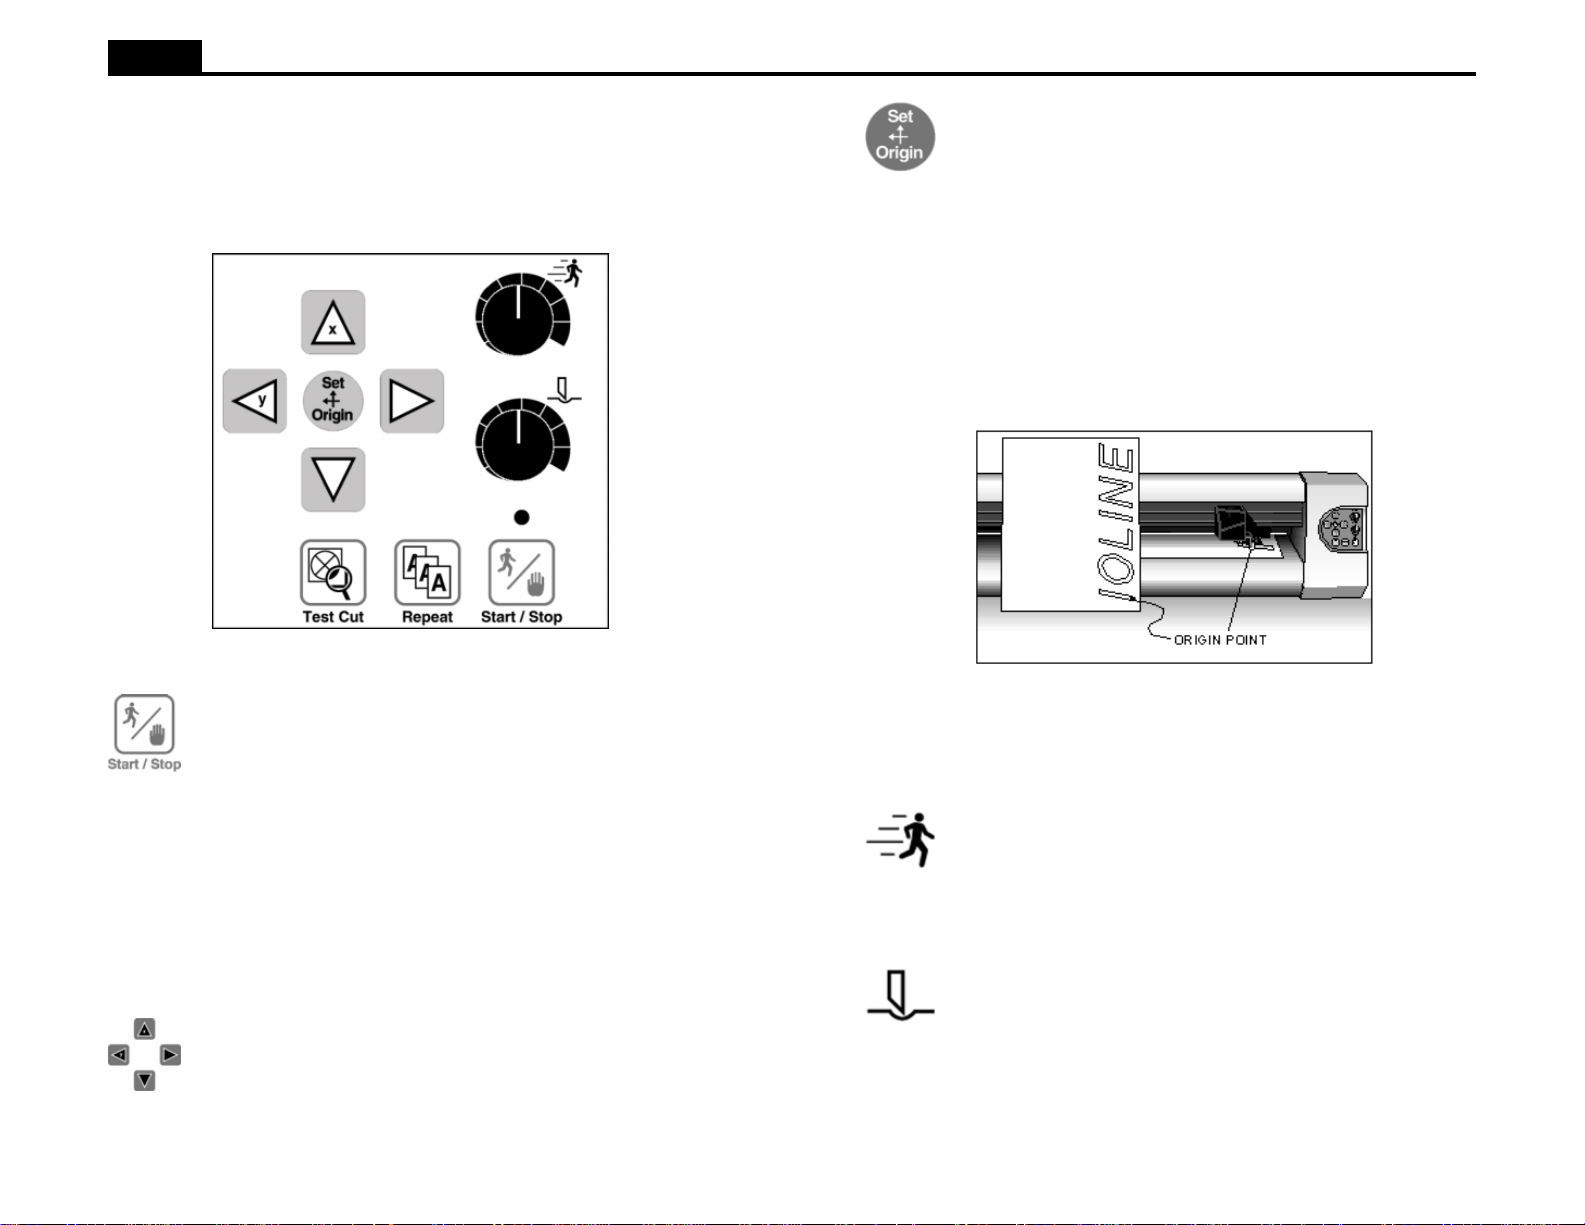
KEYPAD CONTROLS
The keypad allows access to the main signcutter functions.
Figure 2. The Signcutter Keypad.
Start/Stop
The Start/Stop key connects or disconnects communication between the computer and the signcutter. If the Start/Stop key is
pressed during cutting or plotting (Stop mode) the machine will
stop when the current vector is finished. The Arrow keys are active when in Stop mode. When the Start/Stop key is pressed again,
(Start mode) cutting will resume exactly where it stopped.
START green light Arrow keys inoperable, signcutter
online (ready to receive instructions).
STOP red light Arrow keys operable, signcutter offline
(not ready to receive instructions).
Arrow Keys
Pressing the Arrow keys moves the ma terial back and forth or the
carriage from side to side. The arrow k eys will not work unless the
signcutter is in Stop mode (see Start/Stop above).
Set Origin
The Set Origin key sets the initial origin or starting position for the sign. It is best to set a new origin before cutting each sign. If a new origin is not set before sending a file to the signcutter, the signcutter will begin at a point determined by the previous cut f ile. The software may give the option of selecting this ending point. The signcutter will then treat the new file as a continuation of the previous cut. This will affect the repeat function. Refer to the Re- peat section below . To set a new origin, make sure the signcutter is in Stop mode with the red light on. Use the Arrow keys to move the pen or blade to the intended origin of the cut, then press the Set
Origin key. The signcutter will then accept cut/plot files.
Figure 3. Origin Point.
Note: Design software usually refers to the origin as “lower left”
because it is the lower left corner of a sign. Because the cut is
usually oriented as shown, it is physically on the right side of the
signcutter.
Speed
Use the Speed knob on the front panel of the signcutter to adjust
the speed. T urn the knob clockwise to increase the speed, or counterclockwise to decrease the speed. Set the speed according to the
type of cutting and material being used. See the Cutting a Sign
section of this manual.
Force
Adjust the force by using the Force knob on the front panel. Turn
the Force knob clockwise to increase the force exerted on the pen
or blade. See the section on Cutting a Sign for the recommended
settings. The range of force available at the knob is adjusta ble in
the Control Center. The available range is 1 - 400 grams.
Note: Using too much force can cause excessive drag, damage
the pen or blade, or tear the material.
Page 7
Ioline
7
Test Cut
This button will cut a test pattern to help determine the proper
force (for knives or pens) and blade exposure for cutting signs.
The test cut will also show the effect of the blade of fset and overcut
settings in the Control Center. See the section on Cutting a Sign
for details on adjusting force and blade exposure. The Control
Center section has details about blade offset and overcut.
1. Make sure that material is loaded in the signcutter that the blade
holder is installed in the carriage. Position the blade over the
material near the right side of the signcutter.
2. Check for the red light. Press the Start/Stop key if it is not on.
3. Press the Test Cut key for one second. The plotter will cut a
small test pattern consisting of a circle within a square.
4. Adjust the force and blade e xposure up or down with the Force
knob and the blade foot. Repeat the test cut until the desired
line quality is obtained. See the section on Cutting a Sign for
details on adjusting force and blade exposure.
5. Successive test cuts will be automatically aligned to the left of
the last test cut.
6. If the Test Cut key is pressed for three seconds the plotter will
cut a 1.9 in. x 7.1 in. pattern.
Repeat
Pressing the Repeat key will generate one copy of the most recently created sign. The signcutter must be in Stop mode (red LED)
to use the Repeat key. To start the cut in a new location, move the
pen or blade to a new position with the Arrow ke ys before pressing the Repeat key. Repeat will do the following:
1. Individual files are repea table until the Set Origin key is pressed
and any new data is sent to the signcutter. This includes updating settings with the Update Display function.
2. If cut files are sent without setting an origin between them, they
will be stored in memory continuously as if they were one file.
This allows the user to repeat multiple files as a single group.
Pressing Repeat will cut all files sent since the last origin was
set (as long as the buffer size is not exceeded, see below).
3. If the file(s) sent exceed the capacity of the buf fer (1 meg abyte)
before an origin is set the repeat function is disabled. This feature allows the signcutter to handle files of limitless size. When
the buffer has overflowed it no longer holds a complete file so
repeat would produce unpredictable results.
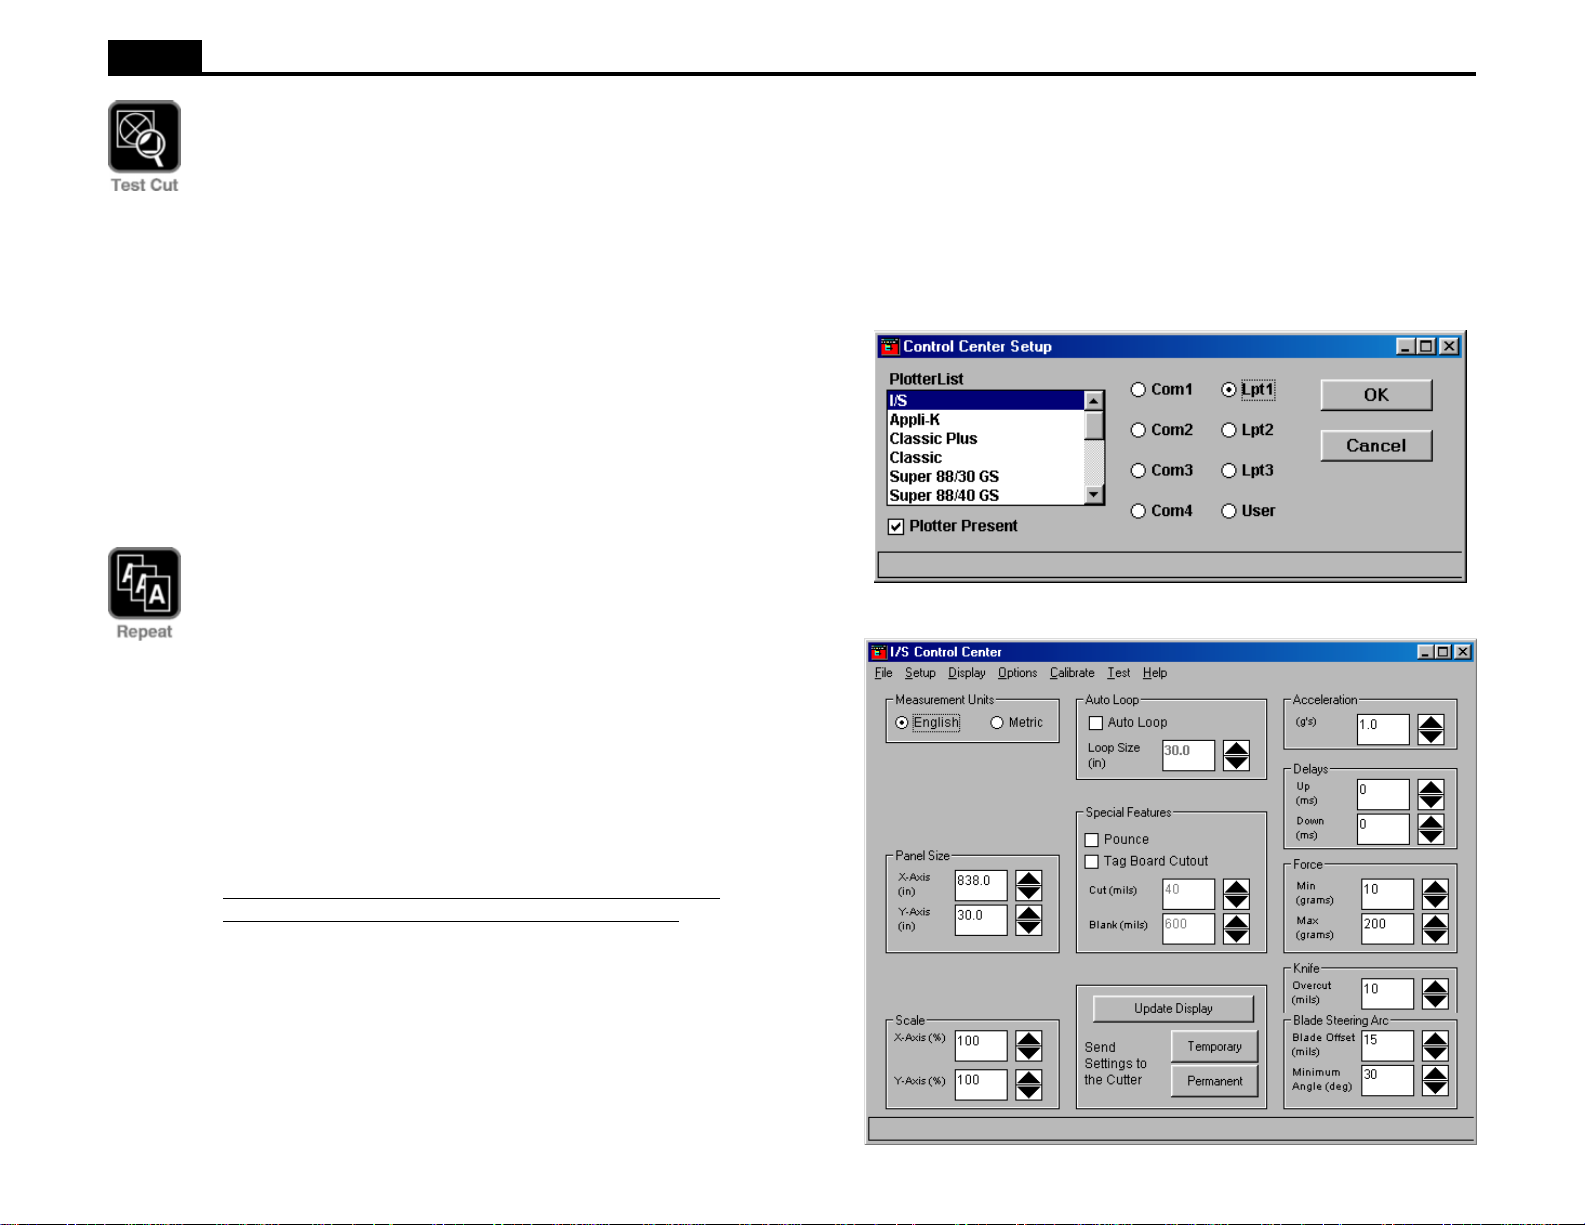
THE IOLINE CONTROL CENTER
The Ioline Control Center is a utility program that does three things:
• It allows adjustment of settings to tailor output from the computer.
• It allows a completed cut file to be sent to the signcutter.
• It includes several diagnostic tests for troubleshooting.
Note: To avoid communication port conflicts, do not simultaneously
run more than one application that is communicating with the plotter.
Figure 4. Control Center Setup Screen.
Note: If an origin is not set between files, two possible unintended
results can occur: if the combined cuts do not exceed the buffer,
repeat will cause them all to be recut or, if the combined files exceed the buffer size, repeat will be disabled.
Figure 5. Control Center Main Menu.
Page 8

Ioline
8
Changing System Settings
A variety of settings are adjustable to fit specific needs:
• The signcutter must be in Start mode (green LED on) when changing
system settings. Press the Start/Stop key and make sure the green light is
on before changing any settings.
• The Screen Menu displays the primary settings that are adjustable. The
Menu Bar contains utilities and less common signcutter settings.
• The selected changes will be in effect only after one of the Send Settings
buttons is pushed.
Note: The design software may be able to override the Control Center settings. Check to see if it has by pressing the Update Display button before and after a cut is completed. If the settings change, use the
design software to modify cutting parameters.
Menu Bar Features
The Ioline Control Center provides comprehensive help files to explain the
functions of the software options. Below is a brief summary Menu Bar items.
File
Send Cut/Plot File Send a cut (.plt) file to the signcutter . Open Settings File Restores sav ed settings files. Save Settings As Allows user to sav e settings files. Exit Exits the Control Center program.
Setup
Plotter Setup Allows user to select the correct signcutter model. Port Setup Allows user to select the communications port.
Display
Plotter Settings Allows user to vie w current signcutter settings. Factory Defaults ROM Version Displays installed ROM v e rsion. Memory Buffer Displays installed memory buffer size. Blade Status Displays whether or not the blade holder is installed.
Options
Filtering Allows user to toggle Filtering on and off. HPGL Setting Allows user to select HGPL language. Install New Firmware
Calibrate
Calibrate Plotter Allows user to calibrate signcutter.
Test
Serial Test Allows user to test serial communications. Computer Port Test Allows user to test computer port. Plotter Port Test Allows user to test signcutter port.
Help
Contents Lists contents of help files.
About Provides Control Center version information.
Allows user to view and restore original factory settings.
Installs new firmware into the signcutter.
Screen Menu Options
Measurement Units
English or Metric units are available when adjusting settings.
Panel Size
The Panel Size is the maximum area the signcutter can use for cutting. The
factory set (and maximum) X-axis panel length is 838 inches long (2129 cm).
The maximum Y-axis panel size depends on the machine width. The material
moves along the X-axis; the carriage mov es along the Y -axis. When cutting on
a Cut Sheet the panel values should be adjusted to match the sheet size.
Scale
The factory-set Scale is 100%. The signcutter will produce a cut in the exact
size of any cut file that is sent. If the scale is 50%, the signcutter will produce
a cut that is half the intended size. The scale of the signcutter can range from
1% to 999%. Note: Both X and Y axes are set independently.
Autoloop
Warning: Autoloop default is off. Do not allow the material to become taut when using a roll of material with A utoloop disabled. Manually create and maintain a service loop in the rear.
With Autoloop enabled the signcutter will create a service loop of material at
the beginning of the plot and whenever necessary during the cutting process.
The factory setting is 30 inches (76.2 cm), but the loop size is adjustable.
Disable Autoloop when cutting short pieces of vinyl.
Special Features
See the sections, How to P ounce and Stencil Cutting, for details on using these
features.
Pounce - The Pouncing feature will make a series of holes for transferring a pattern to a flat surface. Special pounce tools are required. The hole size and spacing is adjustable. See Cut and Blank below for more details.
Tag Board Cutout - Tag Board Cutout is for cutting stencil material (tag board). A standard blade holder and blade is required. An inter mittent cut is created so that the stencil stays in place during cutting. See Cut and Blank below for more details.
Cut - The Cut value is the length, in thousands of an inch (mils), that the blade
will cut when plotting the segmented line for pouncing or tag board cutout.
The default length is 40 mils (.04 inches) for pouncing and 2000 mils
Page 9

Ioline
9
for tag board. The maximum is 4000 mils for pouncing and 5000 mils for tag
board. The minimum is 40 mils for pouncing and 50 mils for tag board.
Blank - The Blank value is the length, in thousands of an inch (mils), that the blade will not cut when plotting the segmented line for pouncing or tag board cutout. The default length is 600 mils (.6 inches) for pouncing and 60 mils for tag board. The maximum is 4000 mils for pouncing and 5000 mils for tag board. The minimum is 40 mils for pouncing and 50 mils for tag board.
Update Display
Note: The design softwar e may override the Contr ol Center settings.
Check to see if it has by pressing the Update Display button before
and after a cut is completed. Check the plotter setup screens in the
design software to make adjustments if necessary.
Selecting this option will update all of the screen values with the current settings stored in the signcutter. For e xample, using Update Display after a blade
is inserted in the carriage will update the Control Center and allow access to
the Tag Board Cutout parameters.
Send Settings to Cutter: Temporary
After changing any setting, the changes must be sent to the signcutter . If Send
Settings to Cutter: Temporary is selected, all of the displayed settings will
be used for the current session. When the signcutter is turned of f these settings
will be lost and the previous permanent settings will be in effect when the
signcutter is turned on again. If any settings are changed, repeat the Test Cut
procedure to ensure that the results are satisfactory.
Send Settings to Cutter: Permanent
If Send Settings to Cutter: Permanent is selected, all of the displayed set-
tings will be sent to the signcutter and will be saved for all subsequent sessions, even after turning off the signcutter.
Force
The minimum and maximum force settings for the Force control knob on the
keypad is adjustable. The factory set and default minimum is 10 grams. The
maximum value is 400 grams. The default maximum force is 200 grams.
Blade Overcut
Blade overcut is the distance the blade travels beyond the end of a cut. Blade
overcut ensures that each cut actually reaches the point where one cut line
meets and slightly overlaps another cut line. This ensures that all of the pieces
of the sign will be cut completely, with no undercuts. The factory set blade
overcut is 10 mils. This setting is ignored when a pen is installed in the carriage.
Blade Steering Arc
Blade Offset
The blade offset is nominally 15 mils (or 47 mils on some blades), but specific
blades can vary within a tolerance. For close work , making some tiny test cuts
at several settings, then picking the best one, can improv e accurac y. This setting is ignored when a pen is installed in the carriage.
Minimum Angle
This is the minimum angle for which the signcutter blade will perform a blade
steering arc. For a very tiny cut, a small or zero angle can be specified. For
larger cuts a greater angle of up to 45 degrees is best. The factory set value
works well with most files. Adjusting this setting for small cuts may improve
performance. This setting is ignored when a pen is installed in the carriage.
Acceleration
The factory set acceleration is 1.0 g. The acceleration setting determines
how quickly the pen or blade will reach full speed when starting or ending a
cut line. Use the Control Center to change the setting within a range of 0.1 to
1.0 g. For long or difficult cuts, or when trying to achie ve maximum accurac y ,
use lower acceleration settings.
Up/Down Delays
The factory set up and down delays are both 0 milliseconds (ms) or 0 thousandths of a second. The delay setting controls the amount of time, in milliseconds, the signcutter pauses after lifting or lowering the pen or blade. Under normal circumstances this setting will not require adjustment. Thick material (e.g. sandblast mask) may require a delay of 25 to 50 ms.
Page 10

Ioline
10
CUTTING A SIGN
Before cutting a sign, turn the signcutter on, load it with vinyl, install a blade
holder, and set an origin. These steps are outlined below. In most cases the
design files are sent directly from the design software to the plotter. If necessary, use the Ioline Control Center software to send design files, adjust settings and test signcutter communication.
General Guidelines
1. Never let the material become suddenly taut between the plotter and
a roll of material during plotting. A service loop of unrolled material is
required for problem free operation. Ioline recommends using the Au toloop function (enabled in the Control Center). It will create the required
service loop by gently pulling a set amount of material from the roll before cutting. Autoloop def ault is off.
2. Use the Paneling feature in the design software f or long signs. Paneling will restrict the length of any X-axis move. Ioline suggests an X panel
size of 10 to 20 inches with no panels greater than 40 inches.
3. Force. Incorrect force can cause misalignment problems over the range
of a long cut. If the force is too high, the material may skew.
4. Prepare a large clean area to work.
Power On
Turn on the computer and the signcutter. The signcutter power switch is located next to the power cord on the back. The carriage will move when the
power comes on. Keep hands and loose clothing away from all moving parts
of the signcutter. T he red light on the front panel will come on when the start
up procedure is finished.
Loading the Material
Note: If Autoloop is not enabled in the Control Center, do not allow
the material to become taut between the signcutter and the material
roll. Manually create and maintain a service loop in the rear. See
Autoloop in the Ioline Control Center section f or more information.
If using a roll of vinyl: Place the roll between the media rollers (stand), on
the axle (cradle) or at the back of the machine (foot).
If using a roll of paper: Hang the paper roll on an axle if available. Use a
media roller or the cradle tube if the signcutter has them. Place the roll behind
the machine if the signcutter has only feet. Note: Do not place a paper roll
on two media rollers.
Aligning the Material and Pinchwheels
Ioline recommends using the, “Typewriter Method,” to align the material to
the platen. The drive shaft is optimized for most common material widths as
well as scraps. Use the drive shaft markers on the carriage rail to find the dri ve
shaft segments when material is loaded in the signcutter.
1. Lift the pinchwheels by raising the pinchwheel lever on the right side of
the signcutter. Bring the material up and through the space under the
pinchwheels. Pull down enough material to reach the media rollers on the
stand (I/S 80 model and larger) or about one foot (25 cm) on the tabletop
cradle mounted I/S 60 models.
2. Roughly align the material so that the edges are overlapping the wideright-drive shaft segment and one of the smaller se gments. Use the drive
shaft markers on the carriage rail to find the drive shaft segments when
they are covered by material.
3. Position the outer-pinchwheels on the material about one inch (2.5 cm)
from the edge. Make sure that the wheels are over a drive shaft segment
using the drive shaft markers on the carriage rail as a guide.
4. Slide the inner-idler wheels (when provided) so that they are as close to
evenly spaced between the outer wheels as possible while remaining ov er
a drive shaft segment. Use the drive shaft markers on carriage rail to
ensure that the wheels are positioned correctly.
5. W ith both hands, reach under the stand or cradle and clasp the front edges
of the sides of the material hanging from the front of the machine against
the edges of the material hanging from the back of the machine. Pull
downward on the material and square the edges so that they are parallel
front and back. Alternati v ely, align the edge of the material with the edge
of the material roll.
6. While maintaining the material square and taut, clamp the pinchwheels to
the material by lowering the pinchwheel lever on the right side of the
signcutter.
7. Warning: While checking alignment with the Arrow k eys, make sur e
that the material between the material roll and the signcutter is never
pulled taut with the drive shaft. Check alignment by using the arrow
keys to move the material forward and back. Observe the material edge to
make sure it is running straight.
If using a cut sheet or scrap: No special instructions are necessary.
Page 11

Ioline
11
Adjusting the Pinchwheels
Signcutter models 80 cm and wider have pinchwheels with adjustable spring
force*. This allows the user to use maximum force (24 lbs.) for holding vinyl
(which requires more force for better tracking) or less force (8 lbs.) for lightweight materials like paper and for sandblast resists that must be tracked directly on the rubber surface. The pinchwheels can also be set in a position that
keeps them completely off the surface so that the inner pinchwheels on lar ger
cutters will not interfere with pen plotting.
The force adjustment is set by turning a screw on the back of the pinchwheel
assembly.
1. Move the pinchwheel to the access hole on the back of the dust cover.
2. Insert a flat screwdriver into the slot and turn the adjustment screw 90
degrees. When the slot is in the vertical position on the outer wheels the
force is 24 lbs. The horizontal position indicates 8 lbs of force. On units
equipped with inner pinchwheels, force can be set to 12 lbs. (vertical
setting) or 4 lbs. (horizontal setting). The 12 lb. inner pinchwheel setting
is useful for heavier materials such as heavy sandblast or reflectiv e sheeting.
Cam
Locking the Pinchwheels Off of the Platen
The idler pinchwheels have a locking feature* that will hold them off of the
platen during cutting or plotting. This will reduce ink smearing if plotting
with a heavy ink marker.
1. Lift the idler pinchwheels off the platen with the pinchwheel lever.
2. Press on the handles at the rear of the idler pinchwheel arm.
3. Flip the locking clip into position with both thumbs. Make sure that the
clip is under the lower tabs.
4. When the pinchwheels are lowered onto the platen the idlers will stay in
the up position.
Lower Tab
Slot
High Force Position
Cam Slot Vertical
Figure 6. Adjusting Pinchwheel Pressure.
* This option is not available on all signcutter models.
Locking Clip
Figure 7. Locking the Idler Pinc hwheels Off of the Platen.
Low Force Position
Cam Slot Horizontal
* This option is not available on all signcutter models.
Page 12

Ioline
12
Installing a Blade and the Blade Foot
Note: Using a hard surface to insert the blade may damage it.
A blade and a blade holder are included in the accessory kit. The blades are
sharp and brittle and the tips can chip or break. Be very careful when handling
the blades. To install the blade and blade foot in to the blade holder:
1. Remove the foot from the assembly by unscrewing it counterclockwise.
2. Slide the blade into the hole in the blade holder until it bottoms out. The
blade should spin freely.
3. Screw the foot onto the shank (clockwise). Stop before the blade emerges.
Figures 8. Installing the Blade and the Blade Foot in the Holder.
Installing a Blade Holder or Pen
1. Rotate the clamp screw until there is enough room to insert the blade
holder or pen. Make sure that the clamp is rotated up out of the way.
2. If using a blade holder or plotter pen, slip the flange into the slot in the
carriage jaw. If using a regular pen, position the tip 1/10 inch off of the
platen when the jaw is in the up position. The signcutter can hold any pen
with a maximum barrel diameter of 7/8” (22 mm).
3. Tighten the clamp screw until the blade or pen is secure.
Adjusting Blade Exposure and Force
Properly adjust blade exposure and force to achieve good cutting results.
Adjusting Blade Exposure:
Figure 10. Proper blade exposure that lightly scores the backing.
1. Turn the Force knob clockwise to maximum. Set the Speed to 50% with
the keypad knob . T he maximum force setting is adjustable in the Control
Center to 400 grams if required for thick materials. A maximum force of
200 grams is sufficient for most materials.
2. Check that the blade tip is barely visible when viewing the blade from the
side. This technique approaches the correct blade exposure from too little
with no chance of having too much (which could damage the blade).
Figure 9. Installing a Blade Holder in the Carriage Jaw.
3. Press the Start/Stop button on the front panel until the LED is red. Move
the carriage until the blade is near the right edge of the material.
4. Press the Test Cut key for one second. The signcutter will cut a test sign.
There will be no cutting if the initial foot adjustment was correct.
Page 13

Ioline
Figure 11. Turning the foot to add more blade exposure.
13
Sending a Cut/Plot File to the Signcutter
Always load the signcutter and make test cuts to determine the correct settings before sending any files. See the Adjusting Blade Exposur e and Force
section for more details.
Important: Make sure that the carriage and material are in the proper
position and that an origin is set by pressing Set Origin on the keypad
(LED is green).
Send the file directly from the design software following the directions in the
documentation or;
From the Ioline Control Center:
1. From the menu bar select File, Send Cut/Plot File.
2. Either enter the path and file name of the cut or select the correct location
from the directory\file lists in the dialog box. For example, the path might
be:
5. T urn the foot 1/8 turn upward (clockwise from below). Press the Test Cut
key. Note: Successive cuts will automatically be positioned to the left of
the previous test cut. The material should have a light pattern.
6. Continue increasing the blade exposure and making test cuts. The test
sign will completely separate from the surrounding material and lightly
score the material backing when enough blade is exposed.
Force Adjustment:
Every type of material requires different cutting force. Before adjusting force
make sure that the blade exposure is adjusted first. See instructions above.
1. Turn the force knob down slightly from maximum, about one mark, and
repeat the test cut. Use full force if the test cut is not complete.
2. If the test cut is complete, turn the force down again and repeat the test
cut. Continue until the cut is incomplete. This indicates that there is not
enough force to push the exposed blade fully into the material. At this
point turn the force knob up one mark, which should be just enough.
Verification:
1. Press the Test Cut key for 3 seconds. The signcutter will cut a 1.9 inch x
7.1 inch design.
2. If the sign does not separate cleanly and leave a light scoring on the backing, try another 1/8 turn upward (counter clockwise from above) of blade
exposure and a very slight increase in force.
C:\IOLINE\<filename>.plt.
4. Select OK.
Pausing Cutting
W arning: Do not turn the material roll or pull material tight between
the drive shaft and the material roll while cutting is paused. If the
material becomes suddenly tight, the machine will jam.
1. Press the Start/Stop key to place the signcutter in Stop mode (red LED).
2. When cutting is interrupted, the carriage and material can be moved with
the keypad Arrow k eys.
3. Press the Start/Stop key to resume cutting. The signcutter will return to
the original cutting position and continue plotting where it stopped. The
keypad LED will change from red to green.
Canceling a Cut
1. Press the Start/Stop key to place the signcutter in Stop mode (red LED).
2. Cancel the cut from the design software (refer to the design software manual or consult software dealer) or cancel the cut in the Control Center software by clicking on the Abort button in the Send File window. Note: If this step is skipped the cut will continue when a new origin is set.
3. Press the Set Origin key to make the signcutter delete the cut data it has
already received but has not yet plotted.
Page 14

Ioline
Suggested Settings
There are many variables that determine signcutter output quality. Ioline recommends using low force and speed settings when making the initial test
cuts. Gradually increase these settings until the best values for the material are
found. Refer to Table 1 below for settings for a variety of material types.
Force values are for starting reference only. These settings may vary due to
manufacturer, color, age, and temperature of the material.
14
Material Thickness Blade Offset Force
mils mils grams
Amberlith™/Rubylith™ 1 45
o
15 30-60
Flock 15 Cobra 47 100-200
Polyester, Metalized 2 45
Reflective, Engineering Grade 5 45
Sandblast Mask
2
18
1
o
o
15 100-140
15 240-250
-- -
31 Cobra 47 220-260
36 Cobra 47 220-260
1
40
Stencil, Lacquer Adhering 1 45
Stencil, Vin yl 4 45
Stencil, Water Soluble 1 45
Ta g Board 10 45
Vinyl, Calender ed 3 45
-- -
o
o
o
o
o
15 80-100
15 200-220
15 125-135
15 300-400
15 100-150
Speed Acceleration Min. Angle Overcut Down Delay
ips g degrees mils milliseconds
med. 0.1 30
min. 1 15
max. 1 30
min. 1 30
o
o
o
o
0-5 0-50
10 0
10 0
10 0
-----
min. 1 15
min. 1 15
o
o
30 0
30 0
-----
max. 1 30
min. 1 30
med. 1 30
min. 0.1 30
med.-max. 1 30
o
o
o
o
o
10 0
10 0
10 0
10 0
10 0
Vinyl, Cast 2 45
1
These sandblasts typically have a backing which is designed for cutting by hand.
2
Use the low force setting on the pinchwheels if using a 80 cm or larger plotter .
o
15 100-150
Table 1. Suggested Settings for Different Material Types.
med.-max. 1 30
o
10 0
NOTE: Settings should be adjusted for cutting small letters or intricate
detail, refer to the Cutting Small Characters section.
Page 15

Ioline
15
Guidelines for Plotting Pens
Ioline has determined guidelines for plotting with a plotter pen. Refer to the
table below for recommended settings for a variety of pen types. Use Test Cut
and gradually increase these settings until the best value is found for the pen
being used. Remember that force values are for starting reference only . These
settings may vary due to manufacturer, color, age, and temperature of the
material.
repaP neP deepS ecroF
-yaLrepuSIMB
tnelaviuqero™talF
dnobytilauqhgih
"dnuoR®CIB
"drofnaS
"elyts-PH
elyts-PH
tniopllab
citS
tniopllab
eiprahS
pitrebif
mumixaM08-06/punepsm51
mumixaM002-081
mumixaM001-07
muideM001-07
smarg
stnemmoC
nepsm51
syalednwod
Cutting Long Signs
To cut long signs it is necessary for the signcutter to be properly calibrated
and to make sure the pinchwheels are correctly spaced. Additionally, some
system settings must be adjusted to achieve the best results. Use the Ioline
Control Center to make system changes. When cutting long signs, it becomes
increasingly important for the material to be aligned properly and for the settings to be properly adjusted. These suggestions can help produce fine quality
long signs.
1. Use a stand or cradle. The use of a stand or cr adle takes advantage of the
signcutter platen design. When the material is draped over the platen it
can benefit from its natural tendency to curl downward.
2. Build a material slide. Cut two cardboard pieces the width of the stand
large enough to lean against the signcutter stand legs. This prevents the
material from going under the machine and getting buckled with material
from the other side.
3. Check the material roll. Place the roll of material to the right of the
material cradle or media rollers. Make sure the roll is tightly wrapped and
even along the sides.
4. Load the material straight. See the previous sections Loading the Ma-
terial and Aligning the Material and Pinchwheels to properly load the
signcutter.
___pitcitsalP______toN
___pitcimareC______toN
___/knidiuqiL
pitlateM
Table 2. Plotter Pen Guidelines.
______toN
5. Lower Acceleration. Using the Ioline Control Center program, set the
dednemmoceR
dednemmoceR
dednemmoceR
acceleration to 0.5 g or less. Lower acceleration will help with overall
accuracy, especially in the transition between frames.
6. Use Autoloop. Autoloop will gently pull a set amount of ma terial from
the roll. This helps the material feed into the signcutter more accurately
and keeps it from “jerking” from the roll. Autoloop also helps to set up
the drive track in the backing of the material which helps keep the material aligned. Autoloop is enabled in the Control Center. Set Autoloop to
ON and set the Loop Size to the default of 30 inches. Setting the panel
size in the sign making software to the same length as the Loop Size
might help tracking accuracy . If Autoloop is OFF , maintain a service loop
of material behind the signcutter to prevent, “jerking,” material from the
roll.
7. Speed. Set the Speed knob to 50 percent or less. Moving the material at a
slower speed helps to keep it more stable and prev ents it from kinking or
buckling.
Page 16

Ioline
16
8. Force and Blade Depth. Incorrect cutting force and blade depth can
cause misalignment problems over the range of a long plot. If the force is
too high, the material may skew. If the blade depth is set too deep, it
could cut all the way through the material and/or cause the material to
become jammed under the blade.
9. Let the software help. Use the automatic sorting, ordering or contour
ordering feature in the design software (some software programs automatically handle this process). This will reduce the number of time consuming back and forth and side to side movements. Wear on the material backing (as well as the vinyl) is also decreased which will improve tracking. The more complex the file, the more difficult the problem.
10. Use the Paneling feature in the design softwar e. Paneling will restrict
the length of any x-axis move. Ioline suggests a panel size of 10 to 20
inches. With most sign making software, the paneling feature allows the
placement of a panel between characters.
Cutting Small Characters (Under 1/4 in.)
For cutting small characters or intricate detail in various material, it is necessary for the signcutter to be calibrated properly and to make sure the pinchwheels are spaced correctly. Also, some of the system settings should be adjusted to achieve more accurate detailed cutting. This is done by making
changes in the Ioline Control Center and by adjusting the dial controls on the
front panel. The following is a list of adjustments that should be made:
1. Lower Force. The lowest b lade force possible is the best for small, detailed cutting. Start by making test cuts with one quarter force. Gradually
increase the force until the vinyl is completely cut.
2. Slower Speed. The speed knob should be set halfway or less.
3. Foot Adjustment. After setting the lowest cutting force, adjust the foot
downward until the cut is not complete, then back it up just enough to get
a complete cut. Since some force is applied to the foot, a slight increase in
cutting force might be necessary . When the foot is adjusted properly, the
blade tip should just cut through the material.
4. Lower Accelera tion. When cutting Rubylith or Amberlith, set the Accel-
eration to 0.1 g in the Control Center. Set the Acceleration to 0.5g for all
other material.
5. Minimum Angle. This is listed in the Control Center under the
Blade Steering Arc heading. The minimum angle should be set at 0 degrees.
6. Overcut. Set this between 0-5 mils. If weeding becomes difficult at corners, increase overcut by one mil at a time until weeding is easier . A little
more force might help if the material has incomplete cutting not at the
corners.
7. Offset. Usually the offset listed for the blade is used as the offset in the
Control Center. For very small characters, tiny manufacturing variances
among blades can make a difference. Check this by cutting small characters with sharp turns, i.e. the letter “N”. W ith the standard 45 degree, .015
inch offset blade try sev eral tests using diff erent offset v alues, i.e. 13, 14,
15, 16, and 17 mils, then pick the value with the best result.
8. Position the Wheels. Place the pinchwheels near the cutting area to assure that the vinyl stays flat.
Page 17

Ioline
17
How to Pounce
Use the pounce feature with high quality paper. Ioline recommends 20 lb.
paper that lies flat. A pounce tool and a pounce blade (available from Ioline)
are also required.
1. Select Pounce in the Ioline Control Center. Make sure that Tag Board
Cutout is turned off. Put the signcutter in Start mode (green LED on).
Update the signcutter with the Send Settings (temporary or permanent)
buttons.
2. Slide the paper roll onto a media roller (use the roller as an axle). Ioline
does not recommend using two media rollers to cradle paper rolls.
3. Enable Autoloop or create a service loop of material.
4. Set the Speed knob to maximum. Set the Acceleration to 0.5 g. Performance will vary with different paper types. Experiment with lower settings if required.
5. Turn the Force knob to maximum (default is 200 grams).
6. Install the pounce tool and blade like a standard blade holder. Note: there
is no foot on the pounce blade assembly.
7. W ith the r ed light ON, press the Test Cut key for 3 seconds. The signcut-
ter will pounce a 1.9 inch x 7.1 inch design.
8. Increase or decrease the force on the Force Knob as needed for a complete puncture through the paper. If the pounce blade picks up the paper
and jams, try setting the force and/or acceleration to lower settings.
9. The Pouncing cut is intermittent - short pounce cut followed by a longer
uncut segment. The default length is 40 mils (.04 inches) for the cut and
600 mils (.6 inches) for the blank. The lengths of the cuts and blanks are
adjustable with the Control Center. Perform test cuts to determine the
proper settings for these parameters. See the section describing the Ioline
Control Center for more details on adjusting the cut and blank settings.
Hint: Try wider blank spacing for larger images.
Stencil Cutting
Stencil material (Tag Board) is handled much the same as vinyl with the
important exception of using much higher force.
1. Select Tag Board Cutout in the Ioline Control Center. Make sure that
Pounce is turned off. Put the signcutter in Start mode (green LED on).
Update the signcutter with the Send Settings (temporary or permanent)
buttons.
2. Slide the paper roll onto a media roller (use the roller as an axle). Ioline
does not recommend using two media rollers to cradle tag board rolls.
3. Enable Autoloop or create a service loop of material.
4. Install a blade holder in the carriage.
5. Perform test cuts to establish blade exposure and force settings. See the
section Adjusting Blade Exposure and Force for the proper procedure.
Note: Most tag board cuts are made at or near maximum force (400 grams).
Check the Control Center for the maximum force setting. Adjust as necessary. See the Suggested Settings in Table 1 for more details.
6. A Tag Board Cut is intermittent - a long cut length followed by a short
uncut segment. The default length is 2000 mils (2.0 inches) for the cut
and 60 mils (.06 inches) for the blank. The lengths of the cuts and blanks
are adjustable with the Control Center. Perform test cuts to determine the
proper settings for these parameters. See the section describing the Ioline
Control Center for more details on adjusting the cut and blank settings.
Page 18

Ioline
18
COMMUNICATION TESTING
There are three communication diagnostic tests availab le in the Control Center. These tests are designed to help determine if a communication problem
exists and to isolate where the problem is occurring.
A diagnostic module is required to run two of these tests. It will work on both
the computer and signcutter serial (COM) ports. It is availab le from Ioline or
an authorized dealer.
Communication Test
This test will determine if communication is working between the computer
and the plotter on the parallel (LPT) or serial (COM) ports. Run this test from
the Control Center, Test menu. The diagnostic module is not required to run
this test.
1. Turn the plotter off. Connect the plotter to the computer with either a
serial or parallel port cable. See the section Connect the Signcutter to the
Computer in the Installation chapter for more details.
2. Start the Ioline Control Center. Select Test, Communication Test from
the menu bar at the top of the window.
3. Turn on the signcutter while holding down the Test Cut key on the key-
pad. Hold down the Test Cut key until the signcutter beeps and the light
flashes three times. The signcutter is now in Test Mode.
4. If testing the serial (COM) port, press the Start/Stop key on the signcutter and verify that the handshake line (CTS) status displayed on the computer screen toggles On/Off. Leave the handshake line On. This is not
necessary for the parallel (LPT) port.
5. Press the Repeat key to switch the signcutter into Echo mode. The green
light will come on.
6. Press a key on the computer and verify that the character transmitted
equals the character received. If the characters match then the connection
between the signcutter and computer is working properly.
Testing the Signcutter Serial Port
The diagnostic module is required for this test.
1. Connect the diagnostic module directly to the signcutter COM port.
2. From the Control Center main menu, select Test, Plotter Port Test.
3. Turn on the signcutter while holding down the Test Cut key on the key-
pad. Hold down the Test Cut key until the signcutter beeps and the light
flashes three times. The signcutter is now in Test Mode.
4. Press any Arrow key on the keypad to transmit and receive characters.
Verify that the signcutter beeps.
5. Turn off the signcutter at the end of the test. This will exit Test Mode. If
this test fails, the signcutter port is faulty.
Testing the Computer Serial Port
The diagnostic module is required for this test.
1. Connect the diagnostic module directly to the COM port on the computer.
If the computer COM port has a nine pin connector, use a 9 pin to 25 pin
adapter between the COM port and diagnostic module.
2. From the Control Center main menu, select Test, Computer Port Test.
3. Verify that the COM port selected is the correct one. If it is not, select the
proper COM Port.
4. Verify the CTS handshake line is on.
5. Press any key on the computer keyboard and verify that the character
transmitted equals the character received.
6. Select the Exit button at the end of the test. This will exit Test Mode. If
this test fails, the computer port is faulty.
7. Select Exit after the communication test is complete.
8. Turn off the signcutter at the end of the test. This will exit Test Mode.
9. The next two tests are not necessary if serial (COM) port testing is successful.
Page 19
Ioline
19
TROUBLESHOOTING
If the system is not working correctly the problem could be with the computer, the cable, the design software, or with the signcutter. Changes to the
computer operating system or the installation of new peripherals or software
might cause conflicts. If the computer or the design software cause a problem,
consult the computer or software manuals or call the manufacturer or dealer.
If the problem is with the signcutter, begin by making sure power is on and
that the cable between the machines is connected correctly. Test the connection with the methods described in the Communication Testing section. Con-
sult the following chart for more detailed troubleshooting techniques:
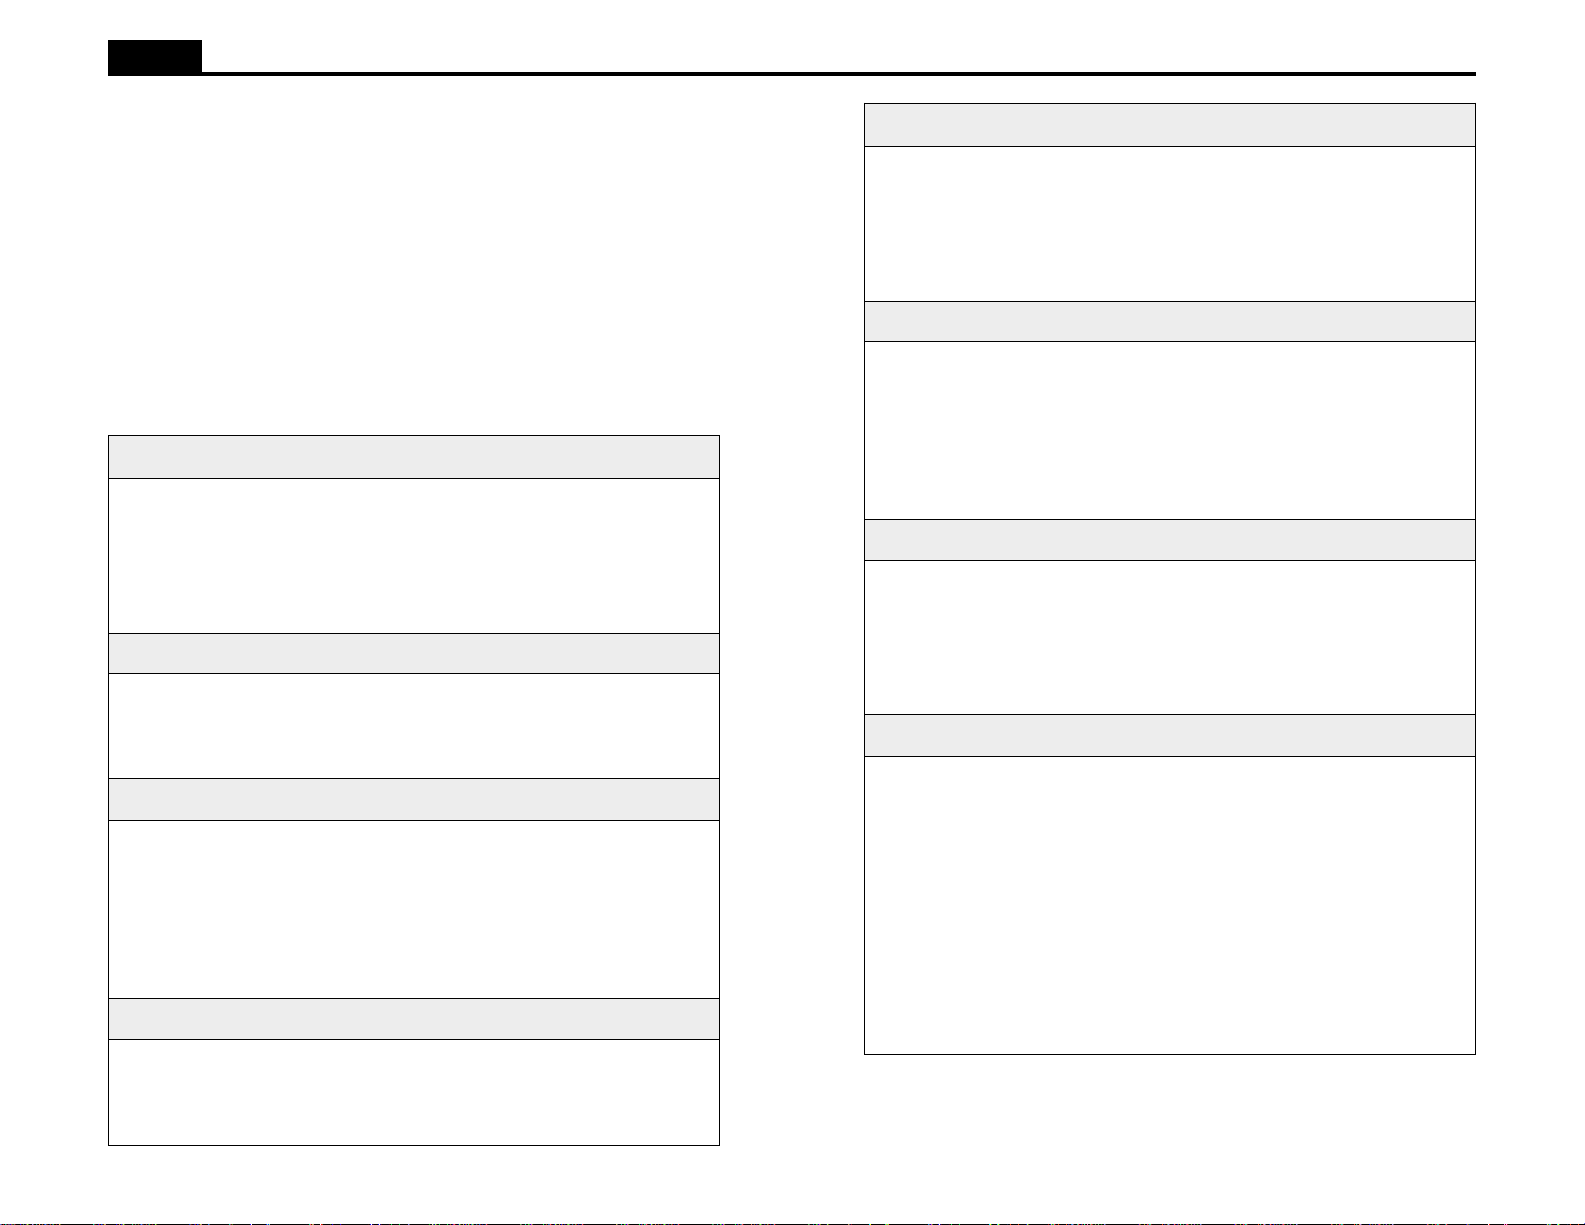
Troubleshooting Chart
:lairetamehtnotnioptcerrocehttatratstonseodtolpruoyfI
esuaCelbissoPnoituloS
ruoynidetcelesnigiroehT.1
enoehtnahttnereffidsierawtfos
.rettolpruoynodetcelesuoy
.nigironatestonevahuoY.2
ehtgnisserpfI taepeR :tolpsuoiverpehttaepertonseodyek
esuaCelbissoPnoituloS
.)3erugiFees,rettolpeht
.nigironateS.2
yllausu;edicniocyehtosmehttceleS.1
foedisthgirehtnosihcihw(tfel-rewol
esuaCelbissoPnoituloS
.nekorbrolludsiedalbehT.1
.wolootsiecrofedalbehT.2
.ytridsiedalbehT.3
esuaCelbissoPnoituloS
.gnippilssilairetamehT.1
.nekorbrolludsiedalbehT.2
.wolootsitucrevoedalbehT.3
.tcerrocnisitesffoehT.4
esuaCelbissoPnoituloS
.ecrofhguonetoN.1
.nekorbrolludsiedalbehT.2
.wolootsitucrevoedalbehT.3
.tcerrocnisitesffoehT.4
:gnittucnehwspiksrolairetamehtsraetedalbehtfI
.edalbehtecalpeR.1
.ecrofedalbehtesaercnI.2
.edalbehtecalperronaelC.3
:gniteemyletelpmoctonerastucrostolpehtfosrenrocehtfI
.tfahsevirdehtnaelC.1
.edalbehtecalpeR.2
.eulavtucrevoedalbrehgihaesU.3
ehtotrefeR.4 edalBtesffO
.noitces
:nrettapdetelpmocehtgnideewytluciffidevahuoyfI
.gnittesecrofesaercnI.1
.edalbehtecalpeR.2
.eulavtucrevoedalbrehgihaesU.3
ehtotrefeR.4 edalBtesffO .noitces
.ezisreffubsdeecxe
esuaCelbissoPnoituloS
nisirettolpruoY.1 potS .edom
.derrucco
esuaCelbissoPnoituloS
Table 3. Troubleshooting Chart.
-eziseliF:wolfrevOreffuB.1
sahmelborpnoitacinummocA.2
.nigironatestonevahuoY.3
htiweliftolpehttnesevahuoY.1
.egaugnalrettolpgnorweht
ehteeS.1 noitarepO ,retpahc taepeR
.noitces
:sneppahgnihtontub,eliftolpatnesevahuoyfI
ehtsserP.1 potS/tratS tupotyek
nirettolpruoy tratS edom
.relaedruoy
.nigironateS.3
:citarresituptuoehtdnaeliftolpatnesevahuoyfI
.detcelessi
:srorregnikcarteraerehtfI
esuaCelbissoPnoituloS
nodenoitisoperasleehwhcniP.1
.tfahsevirdehtfonoitceshtoomsa
.hgihoottessiecroF.2
.hgihoottessinoitareleccA.3
llacrostsetcitsongaidehtmrofreP.2
.rettolpeht
Table 3-Continued. Troubleshooting Chart.
gnittesrevirdtcerrocehterusekaM.1
.hgihoottessideepS.4
tisadekniksilairetamehT.5
foraerdnatnorfehtnisetalumucca
.tfahsevirdytriD.6
.noitacol
.ecrofehtecudeR.2
.tfahsevirdehtnaelC.6
wenaotsleehwhcnipehtevoM.1
.g5.otnoitareleccaehtteS.3
.sselro%05otdeepsehtecudeR.4
sniamerlairetamehterusekaM.5
gniruderauqsdna,talf,htooms
ehtnihtapaidemehtraelC.gnidaol
.rettolpehtforaerdnatnorf
Page 20

Ioline
20
LED Codes
.melborp
esuaCelbissoPnoituloS
.demmajsiegairracehTyawaraelcdnarettolpruoyffonruT
esuaCelbissoPnoituloS
.demmajsitfahsevirdehTyawaraelcdnarettolpruoyffonruT
esuaCelbissoPnoituloS
noitacinummocrowolfrevoreffuB
esuaCelbissoPnoituloS
Troubleshooting the Parallel Port
:ecnogniknilbsithgilneerglenaptnorfehtfI
.lairetamdemmajrosirbedyna
:ecnogniknilbsithgilderlenaptnorfehtfI
lairetamdemmajrosirbedyna
:eciwtgniknilbsithgilderlenaptnorfehtfI
llacrostsetcitsongaidehtmrofreP
.relaedruoy
:yletanretlagniknilberasthgilneergdnaderlenaptnorfehtfI
If the computer communicating with the signcutter is on a network, it is common for LPT 1 to be ‘captured’. If a port is captured, the data is redirected to
the network instead of flowing out of the parallel port on the back of the
computer. Ending the capture will allo w data to flo w normally from the computer to the plotter. Note: These instructions may vary depending on the W indows version.
1. Click the Start button, select Settings and then click Printers to open the
Printers window.
2. Right Click the printer icon for a network printer and select Properties.
3. Click on the ‘Capture Settings’ or ‘Details’ tab.
4. Click on ‘End Capture’. Select LPT 1 and click ‘OK’.
5. Assign the network printer path to another parallel port designation like
LPT 3. Set the printer to use that port or select a network print que path.
BIOS settings can also have an effect on parallel port performance. The
signcutter supports only SPP parallel port communication. ECP and EPP
modes are not supported. These instructions include editing the PC BIOS to
ensure that the port is in the proper mode prior to staring Windows.
1. Click the Start button, select Settings and then click Control Panel to
open the Control Panel window.
.rorrexatnysegaugnalrettolP.1
.detceles
.elifdetpurrocrodaB.2
Note: if any yellow lights are visible on the keypad, take note of how many
times the light blinks and contact Ioline Customer Service immediately. Ioline contact information is available at the end of this manual.
Table 4. LED Codes.
.elifetaerceR.2
sirevirdtcerrocehterusekaM.1
2 Double Click the System icon to open the System window and then click
the Device Manager tab.
3. Remove the parallel port by clicking Ports, selecting the port and clicking the Remove button.
4. Shut down Windows.
5. Restart or Reset the computer.
6. Enter the PC BIOS setup. This is usually done by hitting the DEL key or
ESC key during the boot sequence. Consult the computer manuals or
contact the manufacturer for more information about entering BIOS setup.
7. Find the parallel port setup options and set the port to be SPP (not ECP or
EPP). Also, make sure there is no DMA activity over with the port.
8. Save the BIOS settings and exit setup.
9. Restart the computer and allow Windows to start up. Windows should
find the port and install it using the new settings.
Page 21

Ioline
ROUTINE MAINTENANCE
Replacing the Blade
Note: The blade tip is sharp and fragile, be car eful when handling it.
If plot quality suddenly degrades the blade might be dull or broken. The tip of
the blade is very fragile and can chip or break if dropped. It is difficult to see
when the blade is damaged. A magnifying glass can be helpful. To replace the
blade:
1. Remove the adjustable blade foot by unscrewing it counterclockwise.
2. Remove the old blade with a pair of needle nose pliers and discard it.
3. Slide the new blade into the blade until it bottoms out. The blade should
spin freely.
21
Figure 13. Cleaning the Drive Shaft.
Calibration
4. Screw the foot onto the blade holder (clockwise). Stop just before the
blade tip emerges.
Figure 12. Replacing the Blade.
5. Perform test cuts as described in the Cutting a Sign section before continuing to use the signcutter.
Cleaning the Drive Shaft
Warning: Do not use any cleaning agents (beside alcohol), water or
brushes with metal bristles to clean parts of the plotter. Pay special
attention to keeping the drive shaft bearings free of all liquids
Clean the drive shaft regularly to mak e sure the cut lines remain accurate. To
clean the drive shaft:
1. Turn off the signcutter and disconnect the power cord.
2. Remove any accumulated dust and residue with a stiff bristle brush.
Over time, signcutters may require calibration to account for normal wear and
tear. Typically, the accuracy of a cut is within 0.2% overall. By using the calibration feature, the variance can be adjusted to within 0.05%. Note: The Scale
command does not effect the calibration values.
Prepare the signcutter:
1. Open the Ioline Control Center program. Put the signcutter in Start mode
(green LED).
2. Load the signcutter with material that is greater than 22 inches wide (60
cm model) or greater than 30 inches wide (80 cm or larger models) and a
minimum of 48 inches long. Install a blade holder (use vinyl material) or
pen (use paper material) in the carriage. Enable Autoloop or manually
create a service loop of material.
3. Move the carriage and material with the Arrow keys so that the blade or
pen is about one inch from both the right and front edge of the material.
Set an origin. See the Operation chapter for more details on preparing to
cut.
Gather the Calibration Data:
1. Select Calibrate, Calibrate Plotter from the Control Center menu bar.
2. Select Calibration Plot to cut the factory stored calibration cut. The
signcutter will plot a large box (see Figure 14).
3. Precisely measure both X-axis and Y-axis lines. Better accuracy in measurement equals better calibration.
4. Measure both sides and the top and bottom of the box.
Page 22

Ioline
22
Y1
X1 X2
Figure 14. The Calibration Box and Measurements.
5. Take the average of the horizontal (Y) values by adding them together
and dividing by 2. Repeat this procedure for the vertical (X) values.
Example:
If X1 = 39.750 in. and X2 = 39.700 in.
The sum is 79.450 in. (39.750 in. + 39.700 in. = 79.450 in.).
The average is 39.725 in. (79.450 in. / 2 = 39.725 in.)
The X calibration value is the average, 39.725 in.
Enter the Calibration Data:
1. Enter the measured values in the boxes in the Calibration window. Make
sure the signcutter is in Start mode (green LED). Select the Set Calibra-
tion button.
~40 in.
Y2
BLANK
2. The signcutter will send the calibration values and the new Calibration
Setting will be displayed in the boxes in the window.
3. Click on Done when finished.
Page 23
Ioline
23
END NOTES
Getting Help
Ioline is committed to providing the highest quality service and support to its
customers. If you need assistance with an Ioline signcutter, a number of resources are available:
1. First, refer to this User Guide for answers to your specific questions.
2. Consult the support section of the Ioline web site: www.ioline.com.
3. For additional assistance, contact your local dealer or Ioline Customer
Service. Contact information is listed on the last page of this User Guide.
Any warranty servicing of this product not specifically described in this manual
must be authorized in writing by Ioline Customer Service. You may obtain
service by calling or faxing Ioline Customer Service. The technicians will
help you determine the nature of the problem. If factory repair is necessary,
you will receive a RMA (Return Material Authorization). Please gather the
information indicated in the next column before contacting Ioline or your
dealer.
1. Carefully package the signcutter in its original container or equivalent.
You may purchase shipping containers from Ioline by contacting Ioline
Customer Service. Ioline is not responsible for any damage due to in-
adequate or improper packaging.
2. Carefully wrap and secure all items in the shipping container to prevent
damage. Seal the container and note the RMA near the address block.
3. Ship the container using FED-EX or another approved carrier . COD SHIP-
MENTS ARE NOT ACCEPTED. You will be contacted prior to the
start of work with an estimate of repair cost. All repairs are warranted for
90 days.
Please gather the following information about your signcutter before contacting Ioline or the dealer for technical support.
Name:
Company Name:
Phone Number: Fax:
Model:
Serial Number:
Date of Purchase:
Dealer:
Type of Material Used:
Type of Computer:
Type of design software:
New Software or Peripherals:
Service History (if any):
Note: Ioline Customer Service contact information is listed on the
last page of this section.
Page 24

Ioline
24
The FCC Wants You to Know...
This equipment generates and uses radio frequency energy and, if not installed and used properly (in strict accordance with manufacturer instructions),
it may cause interference to radio and television reception. Operation is subject to the following two conditions: (1) This device may not cause harmful
interference, and (2) this device must accept any interference received, including interference that may cause undesired operation. If this equipment
does cause interference to radio or television reception - which can be determined by turning the equipment off and on - you are encouraged to try to
correct the problem by one or more of the following measures:
• Use only shielded interface cables.
• Reorient the receiving antenna.
• Relocate the host computer with respect to the receiver.
• Move the host computer away from the receiver.
• Plug the host computer into a different outlet so that the host computer
and receiver are on different branch circuits.
If necessary, consult the dealer or an experienced radio/television technician
for additional suggestions. The following booklet, prepared by the Federal
Communications Commission, is a helpful reference:
How To Identify and Resolve Radio-TV Interference Problems:
The stock number is: 004-000-00345-4
This booklet is available from:
U.S. Government Printing Office
Washington, D.C. 20402
Your Comments Are Requested
Ioline Corporation is interested in comments on our documentation and products. Please send corrections or suggestions to:
IOLINE CORPORATION
14140 NE 200th Street
Woodinville, WA 98072 USA
Voice: (425) 398-8282
Fax: (425) 398-8383
www.ioline.com
info@ioline.com
This User Guide is provided for informational purposes only. The contents
are subject to change without notice, and Ioline Corporation assumes no responsibility for any errors that may be contained herein. No part of this User
Guide may be copied, disseminated, or distributed without the express written
consent of Ioline Corporation.
Customer Service
Ioline Corporation is committed to providing quality service and support to
our customers. If you need assistance with an Ioline product, contact your
local dealer or Ioline authorized service center. You may also contact the
Ioline Customer Service Department
Monday through Friday
7:00 A.M. - 5:00 P.M. U.S. Pacific Time
Voice: (425) 398-8282
Fax: (425) 398-8383
techsupport@ioline.com
www.ioline.com
Ioline has many years of experience working with sign makers and designers.
Feel free to contact us if you have questions or to share information.
Limit of Liability Statement
It is the responsibility of the operator of the signcutter to monitor the performance of the signcutter and maintain it in proper working condition by following the instructions in this User Guide. It is the responsibility of the operator of the signcutter to follow all safety precautions and warnings that are
described in this User Guide. Ioline is not responsible for injuries that may
occur as a result of unsafe operating procedures. Ioline is not responsible for
substandard operational performance as a result of failure to maintain the
signcutter as described in this User Guide.
Page 25

Ioline
25
GLOSSARY
A
Acceleration - The rate that a signcutter changes the velocity of the carriage
or the vinyl. Acceleration is measured in units of g (1 g = 32.2 ft/s2). Higher acceleration can increase throughput but may degrade cut quality.
Arc - A segment of a circle, also called a curve. Axis - The geometric guidelines used to place a coordinate. Used to deter-
mine pen or blade paths for signcutters.
B
Blade - Refers to the carbide steel cutting tool used by sign-cutting signcut-
ters. Blades are specified by offset (tip distance from center) and angle (relative to vinyl). They are designed to work with many different materials.
Blade Bevel - Angle of the vertical cutting edge of a blade. Lar ger angles help
the blade travel through thicker material that produce more drag between the
blade and the medium.
Blade Offset - The distance the blade tip trails behind the center of the blade.
Blade Steering Ar c - The arc follo w ed by the center of the blade as it rotates
around the (fixed) tip. This is used to align the blade in the direction of the
next vector so no tearing occurs.
C
Calendered - Polyvinyl chloride (PVC) sheeting squeezed between a series
of heated rollers to achieve a small enough thickness for cutting with a signcutter. Calendered f ilm is generally thicker and less expensi v e than cast vinyl,
but it sometimes tends to shrink or move back to its original thickness.
Cast - Polyvinyl chloride (PVC) sheeting formed by spreading a molten vinyl
mixture on a carrier sheet or web, and then baking at high temperatures to
remove solvents and fuse the remaining material into a f ilm. Cast f ilm is usually thinner and more expensive than calendered vinyl.
Control Panel - Panel on the right side of the machine where primary plotter
functions are accessible. Also called the Keypad.
Coordinate - A point that can be referenced by its position on the X or Y axes of a signcutter. The use of line or arc segments to connect coordinates creates paths for pens and knives to follow when cutting.
Cut Sheet - A single piece of material that is loaded into the signcutter but is
not pulled from a roll.
D
DM/PL - Programming instructions language used to connect a signcutter
with a computer. DM/PL is used in the plotter dri vers of some sign pr ograms.
Drive Shaft - The motor driven shaft that moves material through a friction
feed signcutter. The drive shaft has a rough surface that grips the material.
F
File Name Extensions - In MS-DOS® and Windows® based programs, the
three letters after the period in a file name. In sign files the three letters denote
a file type, such as the vector and bitmap based Encapsulated Postscript (EPS)
and the vector based Hewlett Packard Graphics Language (PLT).
Flange - The projecting rim around the edge that holds the pen or blade holder to the tool carriage. The signcutter automatically recognizes when a pen or blade is installed and changes cutting parameters accordingly.
Font - Refers to the style and width of a particular design of letters, numbers, and symbols, such as Helvetica Bold or Times Roman.
Force - In cutting, the downward pressure exerted on a pen or blade tip to ease
cutting through materials. Additional force can be added by adjusting the Control Center Force settings and updating the signcutter. Increasing the force
will darken pen lines or aid in cutting thicker materials like tag board.
Friction feed - Process where the material is fed through a signcutter by placing it between a motor-driven drive shaft and tensioned pinchwheels.
H
HPGL Setting - The signcutter supports three industry standard signcutter
languages: HPGL 7475, HPGL 7596, and DM/PL. Most design software uses
DM/PL or HPGL 7475 which have a lower left origin. DM/PL cannot be
selected in the Control Center because the signcutter will automatically recognize it. HPGL 7596 uses a center origin so cutting begins at the center of
the intended cutting area.
I
Idler Wheel - Secondary wheels that help keep wide material flat during cut-
ting.
K
Keypad - Panel on the right side of the machine where primary plotter func-
tions are accessible. Also called the Control Panel.
M
Mil - Thousandths of an inch or milliinches. For example; 75 mils is the same
as .075 inches. 1 mil is equal to .025mm
Page 26

Ioline
26
Minimum Angle - This is the minimum angle for which the machine will perform a blade steering arc.
O
Offset - The distance the tip of the blade trails behind the center of the blade.
Origin - Place marking the zero (0) coordinate on the X or Y axes. Used as a
starting reference by signcutters for pen or blade paths.
Overcut - Distance the blade travels beyond the end of each cut vector. Overlap - Amount of material cut in one panel (or tile) that duplicates what is
done in the previous panel (or tile). The overlapped image allows for alignment when assembling and installing a large image.
P
Panel - Production area of a signcutter. Signcutters have a size limit along the
Y axis (a few inches less than the width of the signcutter) and the X axis. If a
job exceeds the production area, consecutive panels must be set up by the sign
software. Also called tiling. Paneling a long cut will increase accuracy.
Parallel Communications - Method of sending information from a computer to a signcutter by sending 1 byte (8 bits) at a time through a cable. This method is faster than serial communication. The parallel port on a PC is a female (small holes) connector.
Plotter - A de vice that uses coordinates and vectors to create images. In electronic sign making, plotters recreate vectors on material with a set of coordinates stored in a computer file.
Pinchwheel - Wheeled roller, tensioned by springs, that clamps material between it and the drive shaft for transporting the material.
Pounce Pattern - A full sized pattern of any design to be painted. Once the pattern is created, the outline is perforated into paper using the Pounce feature. The pattern is then held firmly against the substrate and perforations patted with powder, charcoal or colored chalk dust, leaving an outline of the design.
R
Resolution - The smallest distance that a signcutter can move the material or
the carriage. Plotter resolution affects the accuracy that a plot file is reproduced on the material.
Roll Feed - A method of pulling material from a roll for plotting and cutting. Works in conjunction with panels.
S
Serial Communications - Method of sending information from a computer
to a signcutter by sending 1 bit at a time through a cable. The serial port on a
PC is a male (small pins) connector.
Service Loop - Slack material between the material roll and the signcutter.
Stencil - A thin sheet of material into which a design is cut. When a stencil is
placed on another substrate and paint or ink is applied, the image represented
by the cut out portion of the stencil is printed on the substrate below it.
T
Tag Board - A heavy paper (usually 150 pound) that is used in the apparel
industry for cutting patterns and stencils.
Throughput - The speed at which a signcutter completes a job. Represents
the ability to process information and produce an image.
V
Vector - In computerized sign making, a line segment between two coordi-
nates, on which a pen or blade path can be created for cutting.
Vinyl - Polyvinyl chloride (PVC) film that, in sign making, is backed with an
adhesive that will create a strong bond to a surface when pressure is applied.
W
Weeding - Process of pulling extraneous material away from a cut sign lea v-
ing only the sections representing the intended design.
X
X - Axis - Theoretical horizontal line providing a lengthwise reference point
for signcutters. Associated with vinyl movement over the platen on the signcutter.
Y
Y - Axis - Theoretical vertical line providing a longitudinal reference point
for signcutters. Associated with carriage movement on the signcutter.
Page 27

Ioline
27
INDEX
Symbols
9 to 25 pin adapter 5
A
Abort 13
Acceleration 9, 14, 15, 17, 25
Accessory kit 5, 12
Accuracy 21
Adjusting the Pinch Wheels 11
Aligning the Media 10
Amberlith™ 14
Arc 9, 25
Arrow Keys 6, 10
Autoloop 4, 8, 10, 15, 17
Automatic sorting 16
Axis 25
Axle 10
B
BIOS 20
Blade 4, 6, 7, 8, 9, 12, 14, 16, 17, 21, 25
Blade Depth 16
Blade Exposure 7, 12
Blade Foot 12
Blade Force 16
Blade Holder 4, 7, 8, 10, 12, 17, 21
Blade Offset 7, 9, 25
Blade Overcut 9
Blade Status 8
Blade Steering Arc 9, 16, 25
Blank 9, 17
Box 5
Buffer 7
C
Cable 19
Calendered 14, 25
Calibrate 8
Calibrate Plotter 8
Calibration 21
Calibration Box 22
Calibration window 22
Cam 11
Canceling a Cut 13
Carriage 2, 4, 5, 12, 13, 25
Carriage Jaw 12
Carriage Rail 2, 5, 10
Cast 14, 25
CD ROM 5
Clamp 12
Clamp screw 12
Cleaning agents 21
Cleaning the Drive Shaft 21
Communication port conflicts 7
Communication Test 18
Computer 4, 5, 7, 19, 24
Computer Port Test 8
Contour ordering 16
Control Center 4, 5, 6, 7, 8, 9, 10, 12, 15, 17, 18, 21
Control Panel 6, 25
Coordinate 25
Cradle 5, 10, 15
Cradle tube 10
Customer Service 24
Cut 8, 17
Cut Sheet 10, 25
D
Delays 9
Design software 4, 5, 10, 13, 16, 19
Display 8
DM/PL 25
DOS 5
Down Delay 14
Drive Shaft 4, 10, 21
Drive Shaft Marker 2, 10
Drive Shaft Segment 2
Drive Track 15
Dust Cover 2, 5
Page 28

Ioline
28
E
ECP 20
End cover 5
EPP 20
Exit 8
F
Factory Defaults 8
Feet 5
File 8, 10
File Name Extensions 25
Filtering 8
Flange 25
Flock 14
Font 25
Foot 13, 21
Foot Adjustment 16
Force 6, 9, 11, 12, 14, 15, 16, 17, 25
Friction Feed 25
G
Getting Help 23
H
Hardware 5
Help 8
HPGL 8, 25
HPGL 7475 25
HPGL 7596, 25
HPGL Setting 8
I
Idler Pinchwheels 11
Idler Wheel 25
Idler wheels 10
Install New Firmware 8
Installing a Blade 12
Ioline Corporation 24
J
Jaw 12
K
Keypad 2, 9, 12, 20, 25
L
LED Codes 20
Limit of Liability Statement 24
Line quality 7
locking feature 11
Loop Size 15
Lower Acceleration 16
LPT 18, 20
M
Main Menu 7
Material 10, 13, 14, 16
Material Roll 26
Material slide 15
Measurement Units 8
Media Roller 5, 10, 15, 17
Memory Buffer 8
Menu Bar 8
Metric 8
Mil 25
Min. Angle 14
Minimum Angle 9, 16, 25
O
Offset 14, 16, 26
Open Settings File 8
Operating system 19
Options 8
Ordering 16
Origin 6, 10, 25, 26
Output quality 14
Overcut 9, 14, 16, 26
Overflow 7
Overlap 26
P
Panel 26
Panel Size 8
Paneling 10, 16
Page 29

Ioline
29
Paper 11, 17
Paper roll 10
Parallel 5
Parallel cable 5
Parallel Communications 26
Parallel Port 20
Pausing Cutting 13
PC BIOS 20
Pen 7, 9, 12
Pinchwheel 2, 11, 15, 16, 26
Pinchwheel Lever 2, 10
Platen 2, 10, 12
Plot quality 21
Plotter 26
Plotter pen 12
Plotter Port Test 8
Plotter Settings 8
Plotter Setup 8
Plotting Pens 15
Polyester 14
Polyvinyl chloride 25
Port Setup 8
Pounce 8, 17
Pounce Blade 17
Pounce Pattern 26
Pounce tool 17
Pouncing 8, 9
Power cord 5, 21
Power On 5
Power strip 5
Power switch 5
R
Radio frequency energy 24
Reflective 14
Repeat 6, 7
Replacing the Blade 21
Resolution 26
Return Material Authorization 23
Roll Feed 26
ROM Version 8
Rubylith™ 14
S
Sandblast 9, 11, 14
Save Settings As 8
Scale 8
Scale command 21
Scrap 10
Screen Menu 8
Send Cut/Plot File 8
Send File 13
Send Settings to Cutter 9
Sending a Cut/Plot File 13
Serial 5
Serial Cable 5
Serial Communication 26
Serial Port 18
Serial Test 8
Service Loop 4, 17, 26
Set Origin 6, 7, 13
Setup 7, 8
Signcutter 19, 24
Small Characters 14, 16
Software 5, 13, 16
Special Features 8
Speed 6, 12, 14, 15, 16, 17
SPP 20
Stand 5, 15
Start mode 8, 17, 21, 22
Start/Stop 6, 8, 12
Steering arc 9
Stencil 14, 17, 26
Stop mode 6, 7, 13
Suggested Settings 14
Surge protector 5
T
Tag Board 8, 9, 14, 17, 26
Tag Board Cutout 8
Temperature 14, 15
Test 8
Test Cut 7, 12, 14, 15, 17
Throughput 25, 26
Troubleshooting 19
Troubleshooting the Parallel Port 20
Page 30

Ioline
Typewriter Method 10
U
Update Display 7, 8, 9
V
Vector 26
Vinyl 10, 11, 14, 17, 25, 26
W
Weeding 16, 26
Windows® 3.1 5
Windo ws® 95 5, 20
X
X - Axis 10, 26
Y
Y - Axis 26
30
 Loading...