

Page 1

Wireless USB Print Server 1 Port
User Manual (GPSR01U)
®
Page 2

Page 3

Thank you for purchasing one of the most f eature-rich wireless print servers on the market. IOGEAR®’s
Wireless USB Print Server’s are first rate connectivity accessories designed to help reduce the frustration of
dealing with cables in your home or office. IOGEAR®’s palm siz ed single-port Wireless USB Print Server
allows any networked computer to wirelessly share a USB printer .
We hope you enjo y using your IOGEAR® Wireless USB Print Server , another connectivity solution from
IOGEAR®.
©2004 IOGEAR. All Rights Reserved. PKG-M0083
IOGEAR®, the IOGEAR® logo, MiniView, VSE are trademarks or registered trademarks of IOGEAR®, Inc. Microsoft and
Windows are registered trademarks of Microsoft Corporation. IBM is a registered trademark of International Business
Machines, Inc. Macintosh, G3/G4 and iMac are registered trademarks of Apple Computer, Inc. IOGEAR® makes no warranty
of any kind with regards to the information presented in this document. All information furnished here is for informational
purposes only and is subject to change without notice. IOGEAR®, Inc. assumes no responsibility for any inaccuracies or errors
that may appear in this document.
Welcome
Page 4

Table of Contents
Pac kage Contents..................................................................................................................................
Overview.................................................................................................................................................
Features..................................................................................................................................................
Requirements.........................................................................................................................................
Introduction.............................................................................................................................................
Installation..............................................................................................................................................
- Hardware..............................................................................................................................................
- Software...............................................................................................................................................
Mac Installation......................................................................................................................................
Changing SSID on Print Server.............. ...............................................................................................
Internet Printing......................................................................................................................................
Web Based Configuration......................................................................................................................
03
04
05
06
07
09
09
10
28
41
54
57
Page 5

2
Un-installation.........................................................................................................................................
Appendix.................................................................................................................................................
T echnical Support...................................................................................................................................
Radio & TV Interference Statement.......................................................................................................
Limited Warranty .....................................................................................................................................
70
71
73
74
75
Page 6

Package Contents
This package contains:
1 – Wireless USB Print Server
1 – User Manual
1 – Installation CD
1 – W arranty/Registration card
1 – Pow er Adapter
* If any items are damaged or missing, please contact your dealer .
3
Page 7

4
IOGEAR
®
’s palm siz ed single-port Wireless USB Print Server allows any networked computer to wirelessly
share a USB printer. It complies with USB 1.1 specifications and the 802.11b Direct Sequence Spread
Spectrum (DSSS) standard. It supports data transmission rates of up to 11Mbps, and a wireless access range
of up to 150ft indoors and 500ft outdoors.
This unit also supports multiple protocols and multiple operating systems. Internet Printing Protocol (IPP) is
integrated within this print server, enab ling users to print from any computer ov er a LAN/WAN or the Internet
by specifying the device’s URL. The built-in web management f eature provides additional con venience b y
allowing the user to configure, monitor , and e v en reset the print server via a web bro wser . This eliminates the
need to place the printer right next to the computer. Print jobs can be sent to a printer in another country just
as easily as to a printer in the same office, eliminating the need to send often-illegible fax images .
Overview
Page 8

• Easily connect your USB printer to a wireless network
• Allows multiple computers to share one USB printer on the wireless network
• Print from any computer on your network or from across the Internet
• Supports DHCP Client and multiple network protocols
• W orks with 802.11b or 802.11g wireless networks
• Data transfer rate up to 11Mbps
• Up to 150 ft wireless indoor range and 500 ft wireless outdoor range
• Supports Telnet and W eb Management softw are
Features
5
Page 9

System Requirements
Operating Systems:
• Windows® 98SE/ME/2000/XP
• Novell (iBindery/NDS)
• Mac OS 8.6 or Later (supports-enabled Mac only)*
• Unix/Linux
* The print server only supports post-script printers under Mac OS 8.6 or later
Printers:
• Most printers with USB connections are supported
• Limited support on multi-function printers (Only supports printing function, visit IOGEAR® support site for
supported SKUs)
Network en vironment:
• 802.11b or 802.11g Wireless netw orks
6
Page 10

Product Overview
External print servers enhance capability by letting you place y our printers, plotters , or equality printers at
convenient locations directly on the Ethernet network, and by increasing network printer performance and
management.
Network Management
The print servers support the Simple Network Management Protocol (SNMP), which remote printer
management and a warning. A standard SNMP agent is permanent on these print servers. Any standard
SNMP-based application can be used to access and manage these print servers.
Network configuration
The print servers provide an embedded web server that can be accessed via a web browser . We also
include a Windows-based utility, PSAdmin, which helps y ou administer the print server environment. For
example, Netware , Windo ws 95/98/Me, Windows NT/2000/XP, Mac or Unix system.
Introduction
7
Page 11
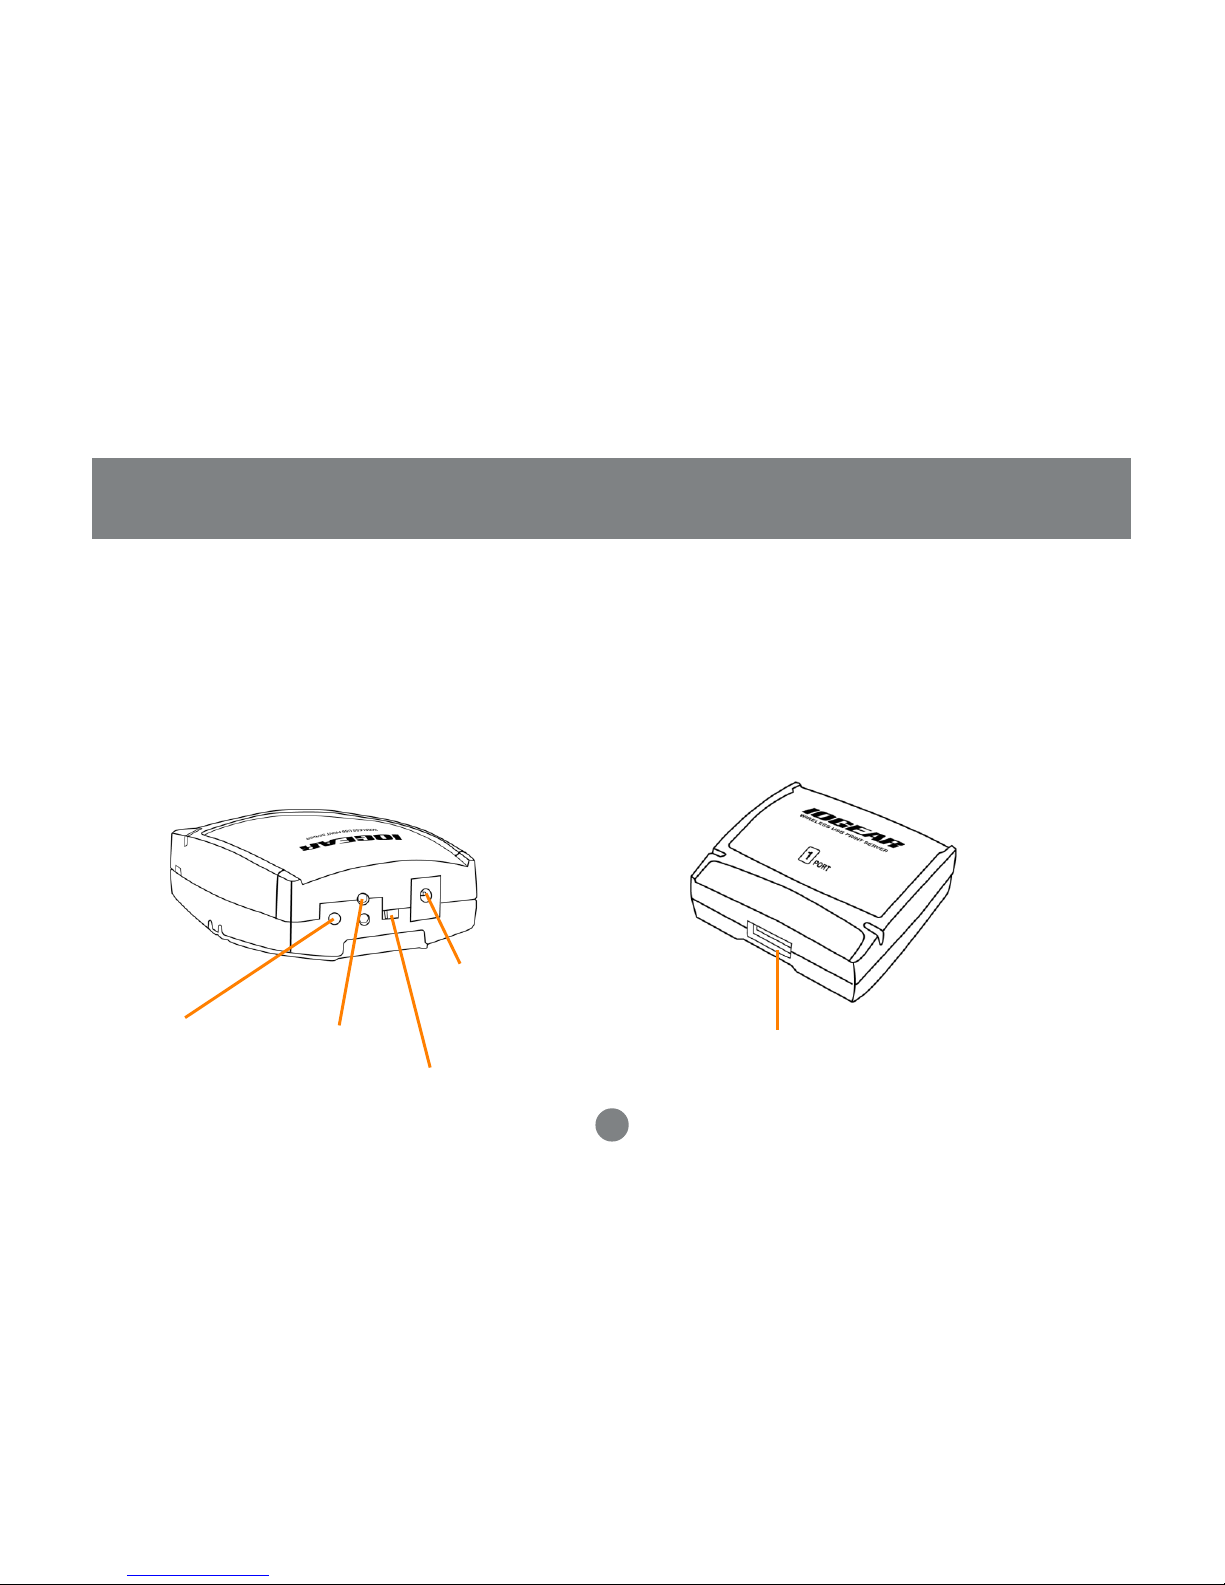
Reset Button
LED Indicator
Operation Mode
(Normal/DIAG)
Power
(3.3V 2A)
Pictorial Introduction:
Reset Button – Recessed button resets the unit.
LED Indicator – Yellow color indicates the Pow er/
POST process Green color indicated data is being
transmitted and received via the W -LAN port.
Operation mode – Normal / Diagnostic
Power – 3.3V 2A
USB Port – USB printer
USB Port
Introduction
8
Page 12

Installation
Before you start, you should prepare:
• One Windows® 98/Me/2000/XP PC with CD-ROM
• One 802.11b Access point and Wireless Adapter
• One USB printer
• Network Protocol TCP/IP must be installed
Hardware Installation
1. Turn the power off to the printer.
2. Connect the printer to the Print Server.
3. Plug the A C pow er module into the wall soc k et. The Print Server will be s witched on once y ou plug it in.
4. Turn the power on to your printer.
9
Page 13

Note: For some specific printers you may need to connect the pritner to the
computer and install the driver first and then connect it to the print server.
10
Installation
Software installation
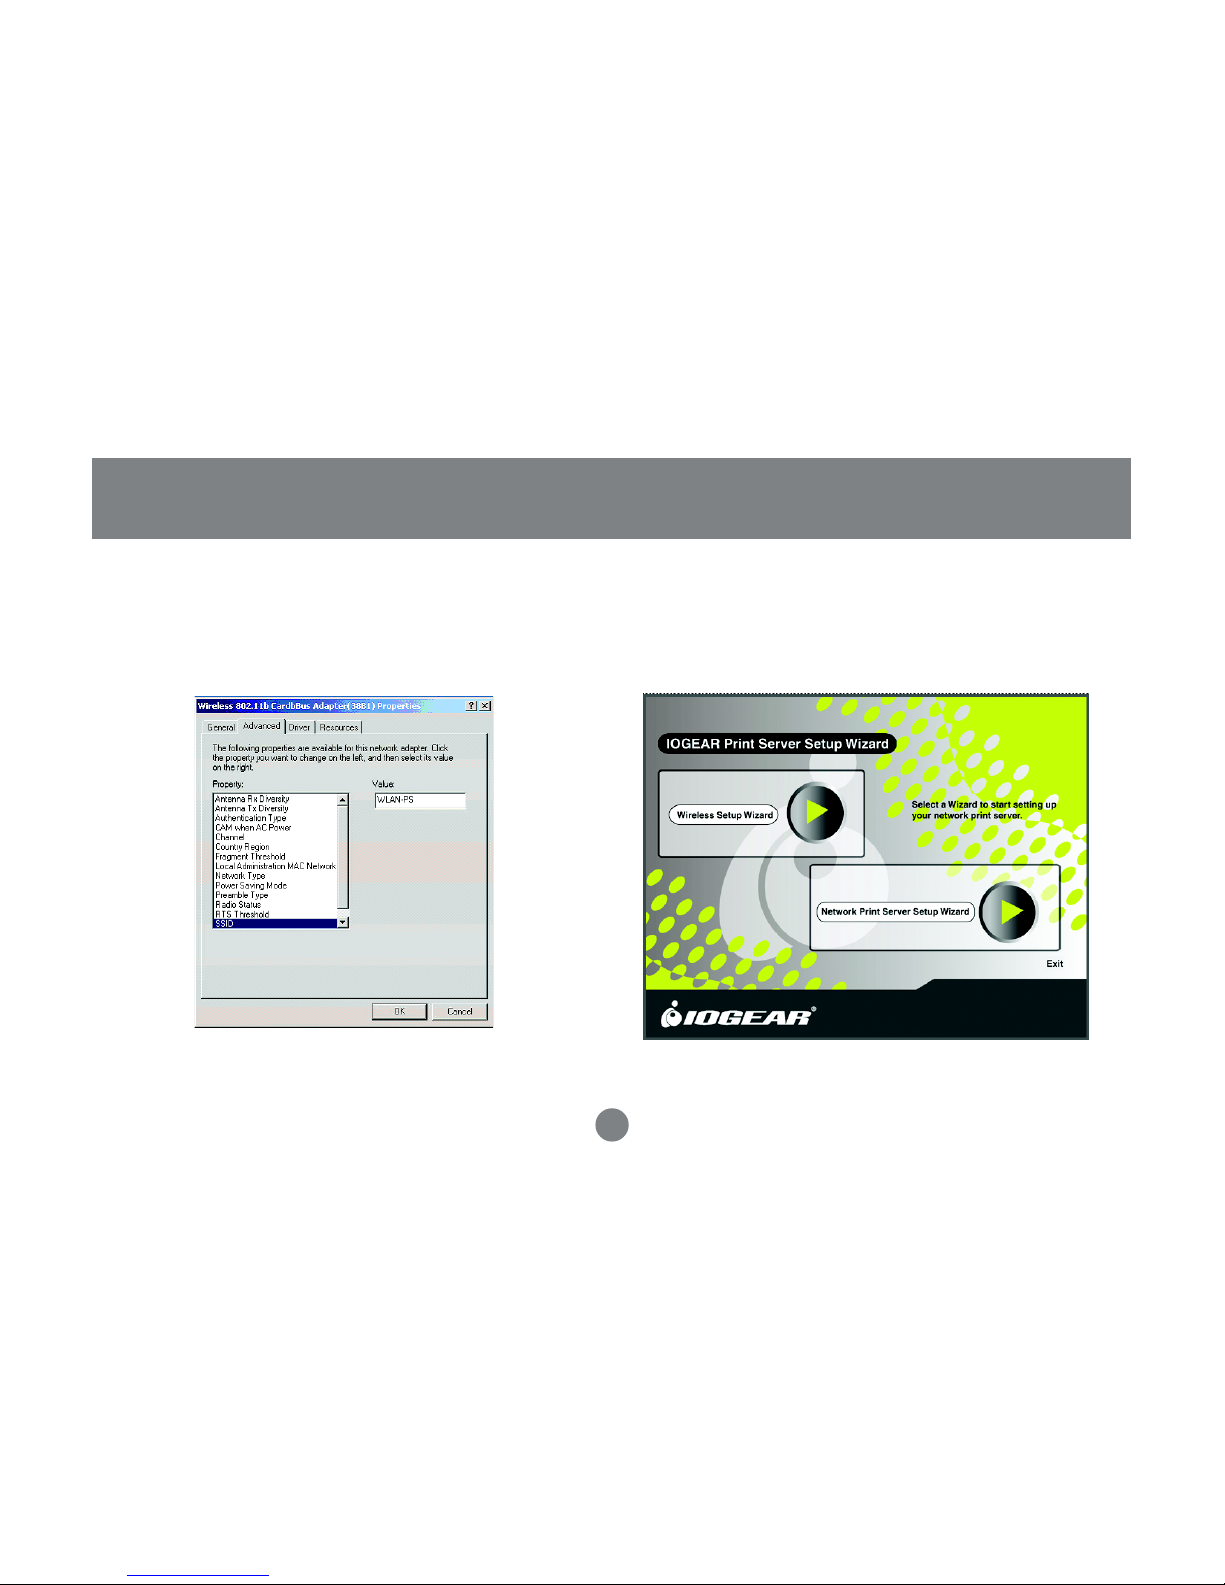
1. Insert the CD on any Windows 98/ME/2000/XP
computer and the Setup Wizard will start. Select
Driver Installation.
Select the Wireless Setup Wizard. The Wireless
Setup Wizard will install PS Admin, a utility used to
configure the Wireless Print Server.
2.
Page 14
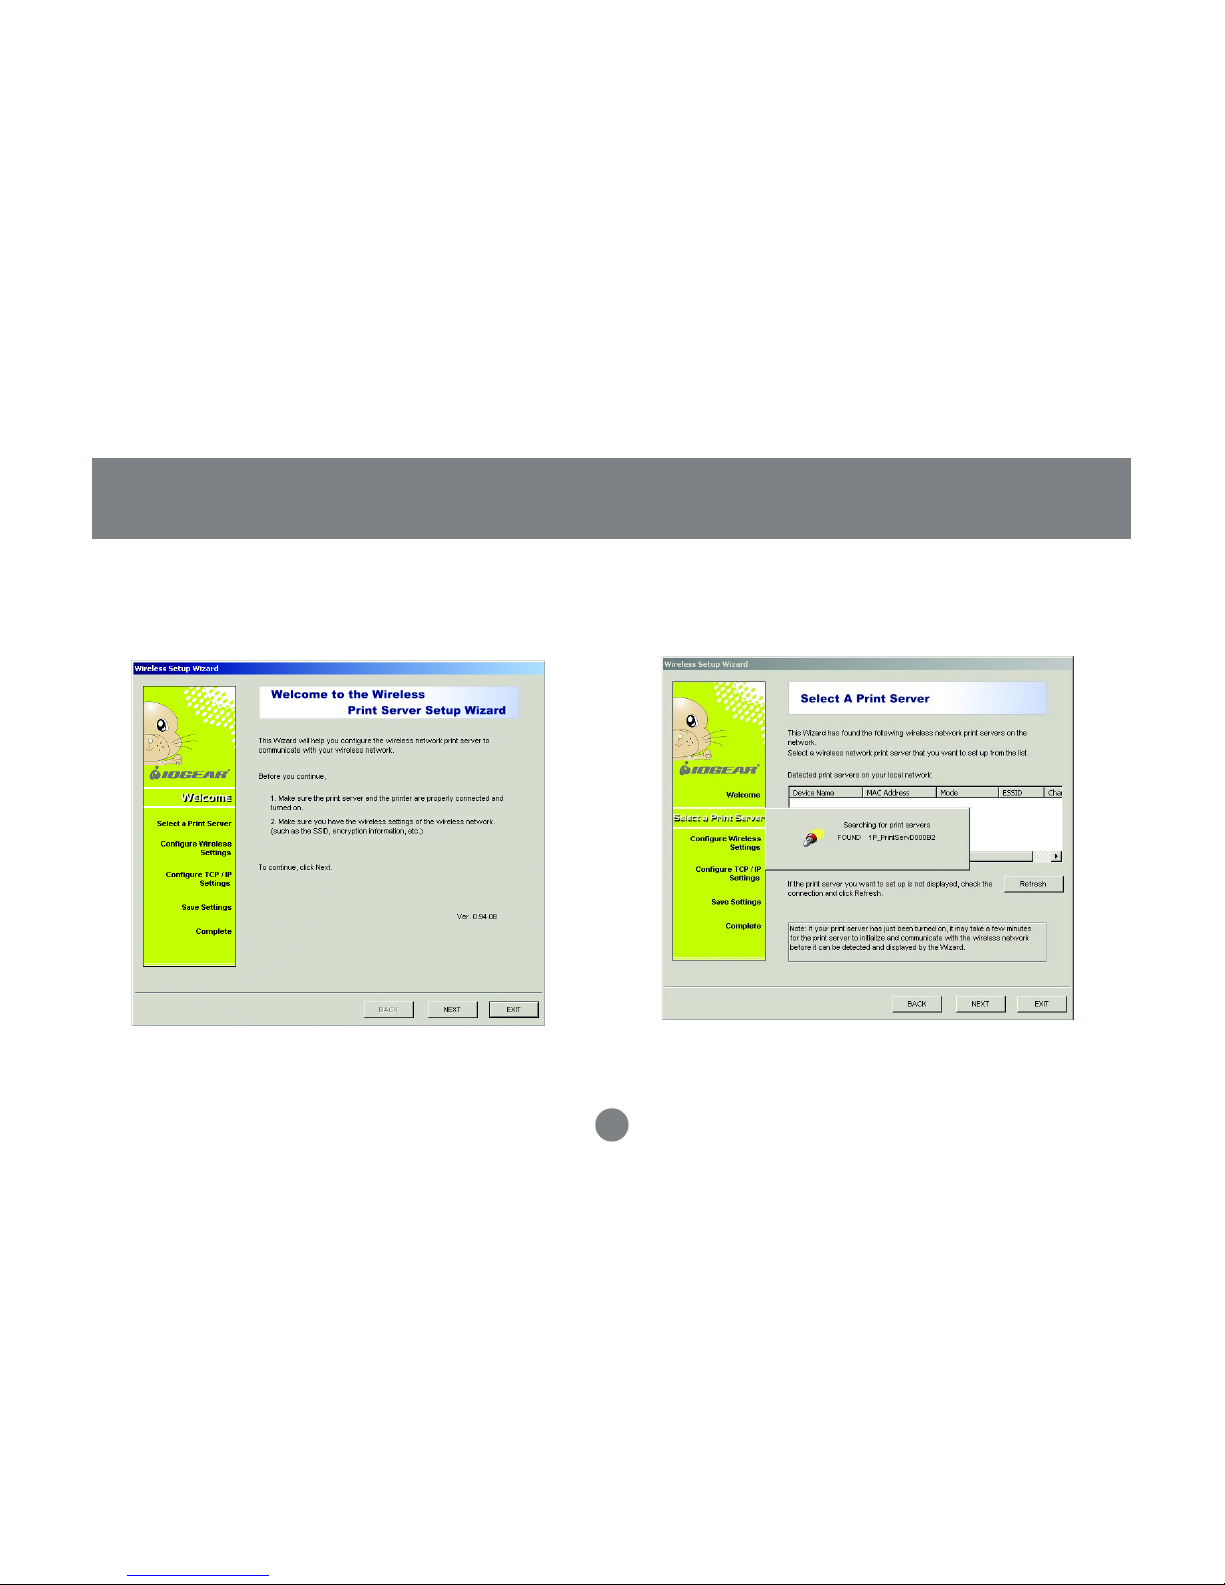
The Wizard will search f or the print server on your
network. If the print server does not show up , clic k
the [Refresh] button.
Note: If you’re Print Server does not show up after clicking the Refresh
button, you may need to change the SSID of the Print Server to match the
SSID of your network. To change the SSID on the Print Server, please see
the section labeled
“Changing the SSID on your Print Server.”
on Page 41.
Installation
11
Select Next in the follo wing window to initiate
the Setup Wizard.
3. 4.
Page 15
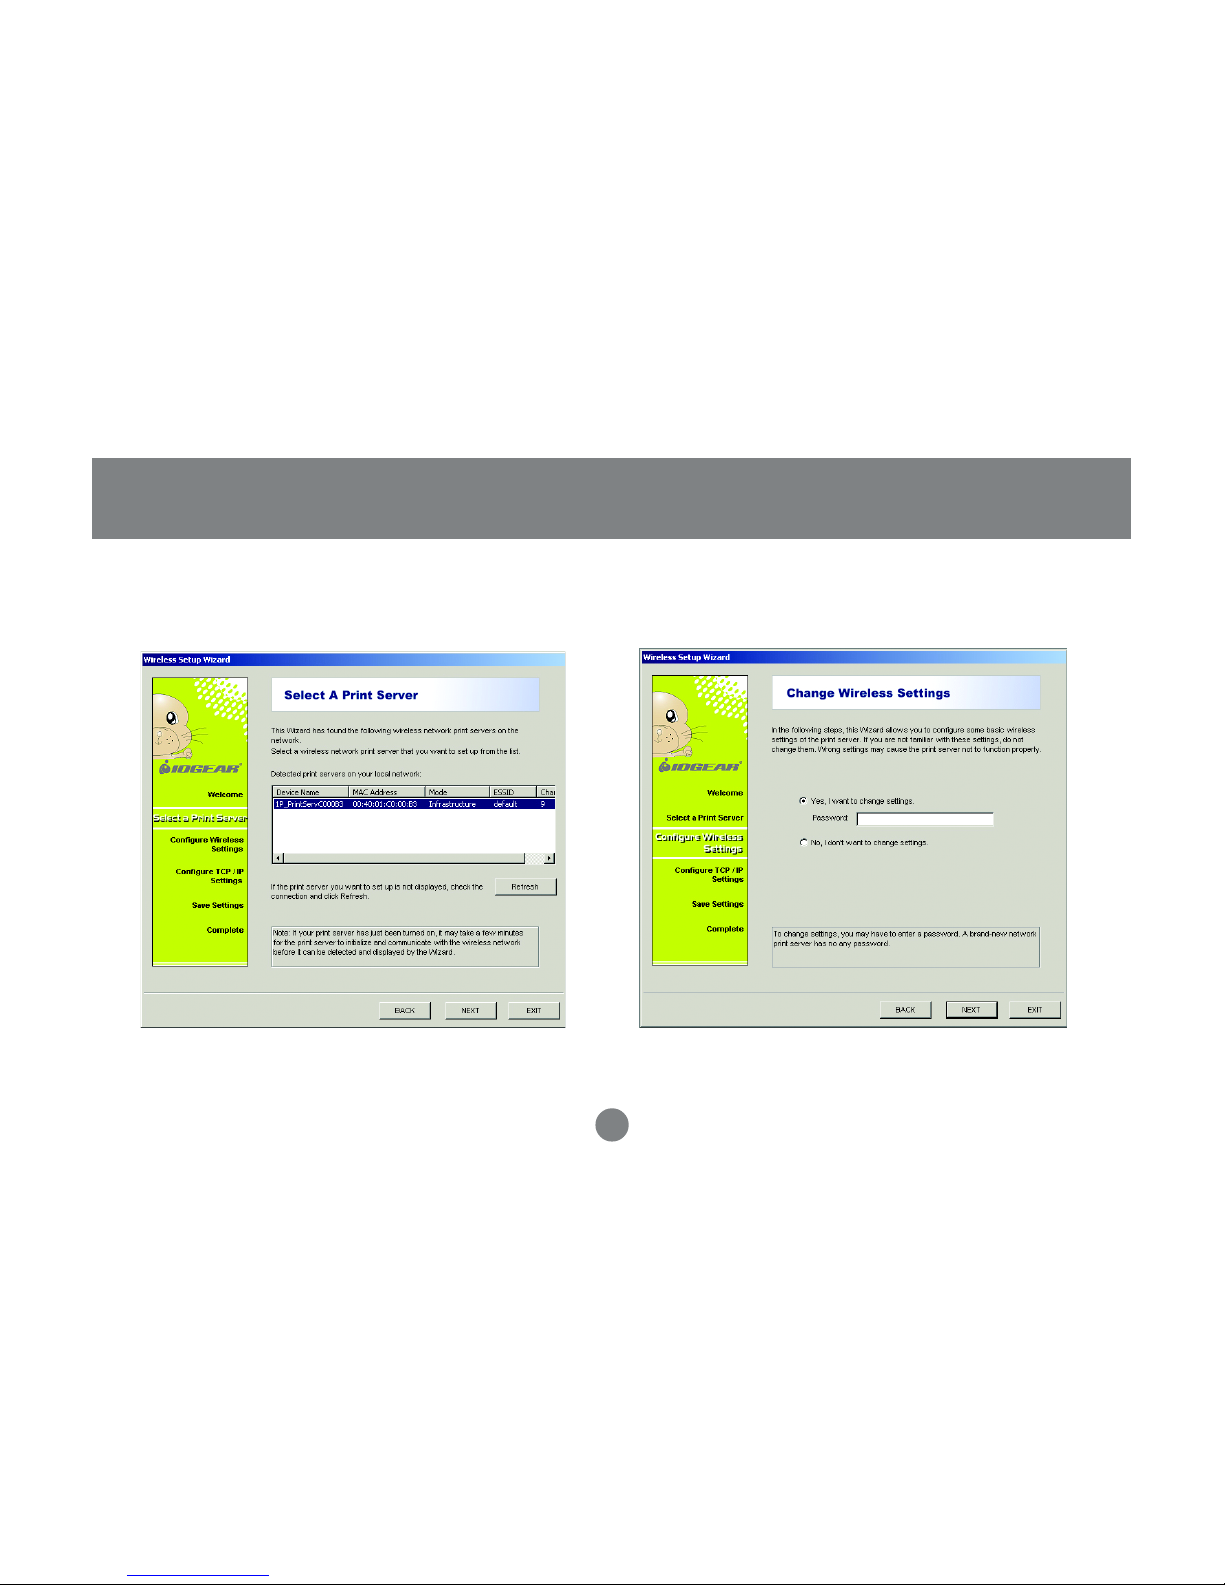
This window allows you to configure the print
server. Select “Yes, I want to change settings” and
click Next. By default, there is no password.
6.
12
Installation
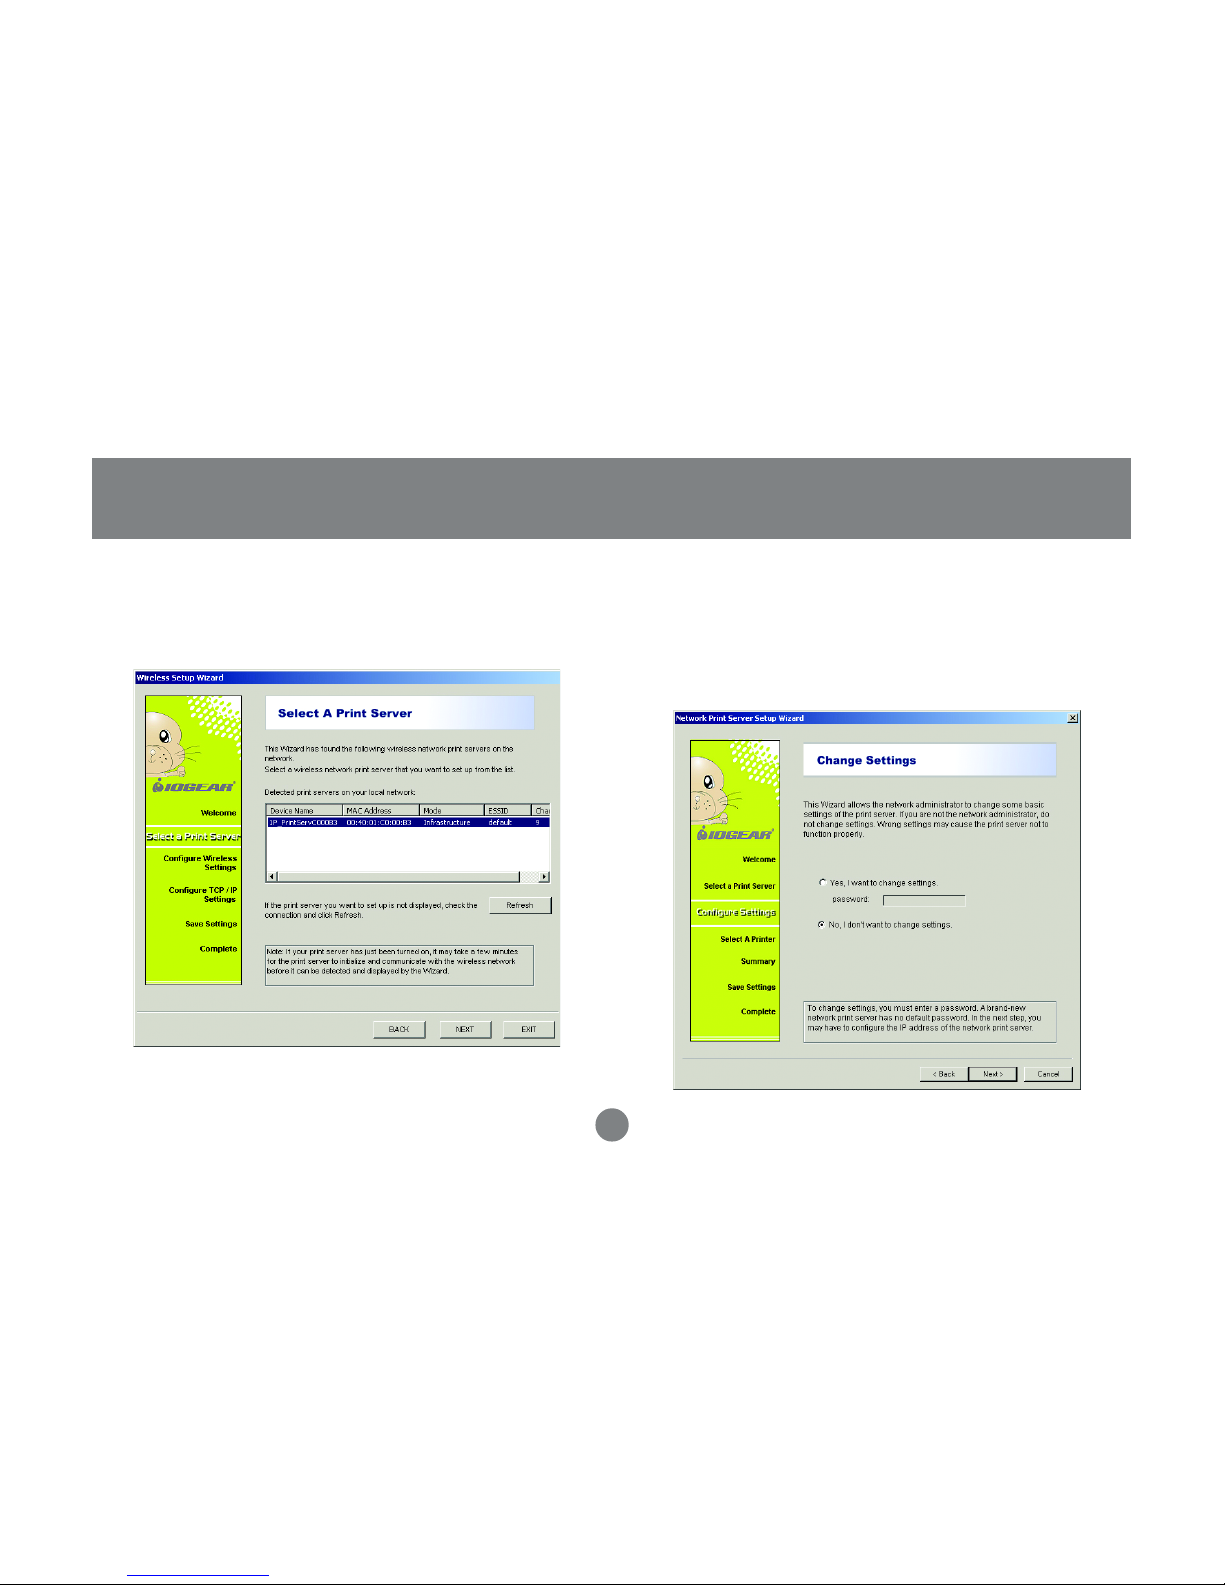
Once the wizard is finished searching, highlight
the print server and click Next.
5.
Page 16
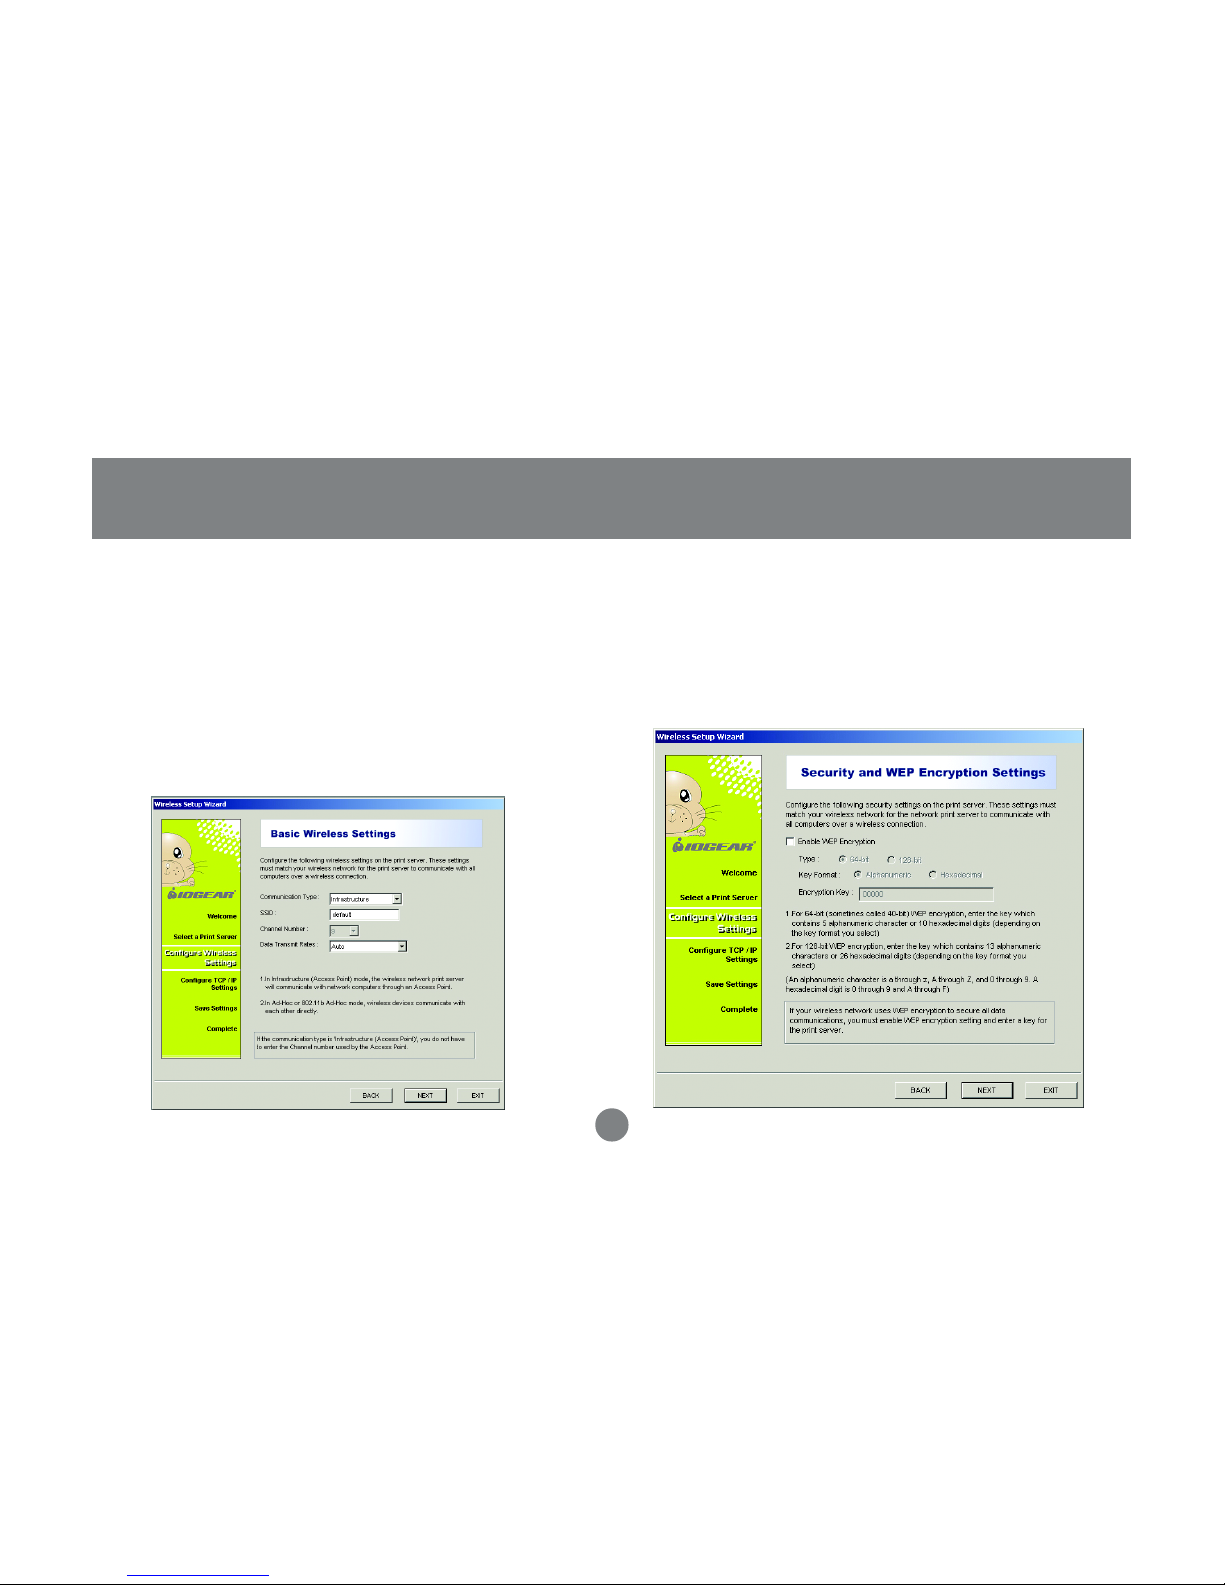
Basic Wireless Settings - In this window y ou can
change the Communication Type, SSID and
Data T ransmission rates.
Change the SSID to match your wireless
network SSID .
7. Unless you are concerned about unauthorized
access to the print server, or if your network utilizes
web encryption, leave the Enable W eb Encryption
box un-check ed and click Ne xt.
8.
13
Installation
Page 17

14
Installation
TCP/IP Settings – In this window you can
configure the Wireless Print Server to obtain an IP
address automatically from your DHCP server , or
you can specify an IP address if your network
does not have a DHCP server. Select which fits
your network best and click Next.
9. Confirm Settings – Verify that all the information
displayed on this screen is correct bef ore they are
saved. Select either Next to apply these changes
or Back to make any necessary changes.
10.
Page 18
15
Installation
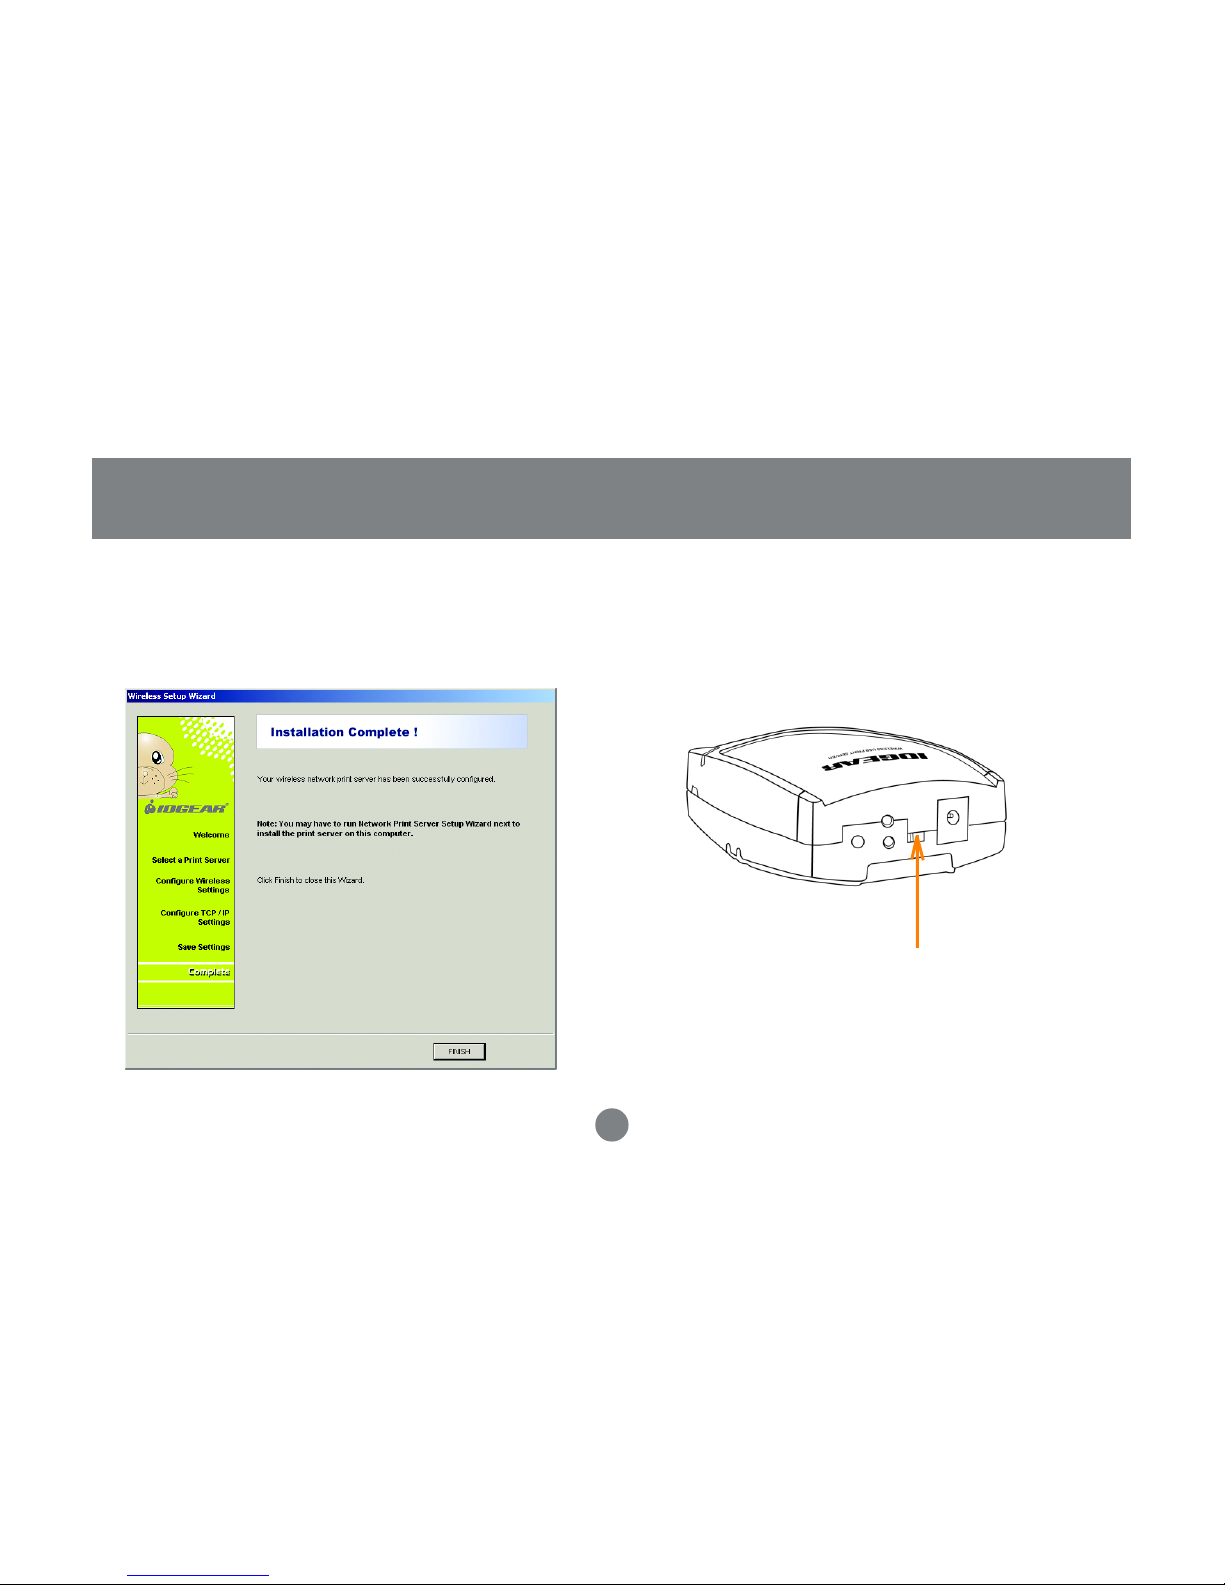
Installation complete. Click Finish to close the
wizard.
11.
NOTE: If you had to change the SSID of the print server to match
your network SSID, it can now be taken out of diagnostic mode.
Flip the dip switch to the left back to normal mode.
Page 19
16
Installation
Change the SSID of you network card back to the
SSID used on your network and change the
Network Type back to Infrastructure.
12. 13. Now select the Network Print Server Setup
Wizard. This wizard will guide you through the
installation of the network print server.
Page 20
The wizard will now search for print servers on
the network.
17
Installation
15.14. Be fore w e proceed, make sure y our print
server and printer are on. Once that is
verified, click Next.
Page 21
Once the server finds the print server, highlight
it and click Next.
18
Installation
16. 17. Since we have already set-up the print server in
the previous section, select “No, I don’t want to
change the settings,” and click Ne xt.
Page 22
19
Installation
18. The wizard will help you set up the printer that is
connected to the print server. Select “Add Ne w
Printer” . If y our driver is already installed, select
the driver and click Next.
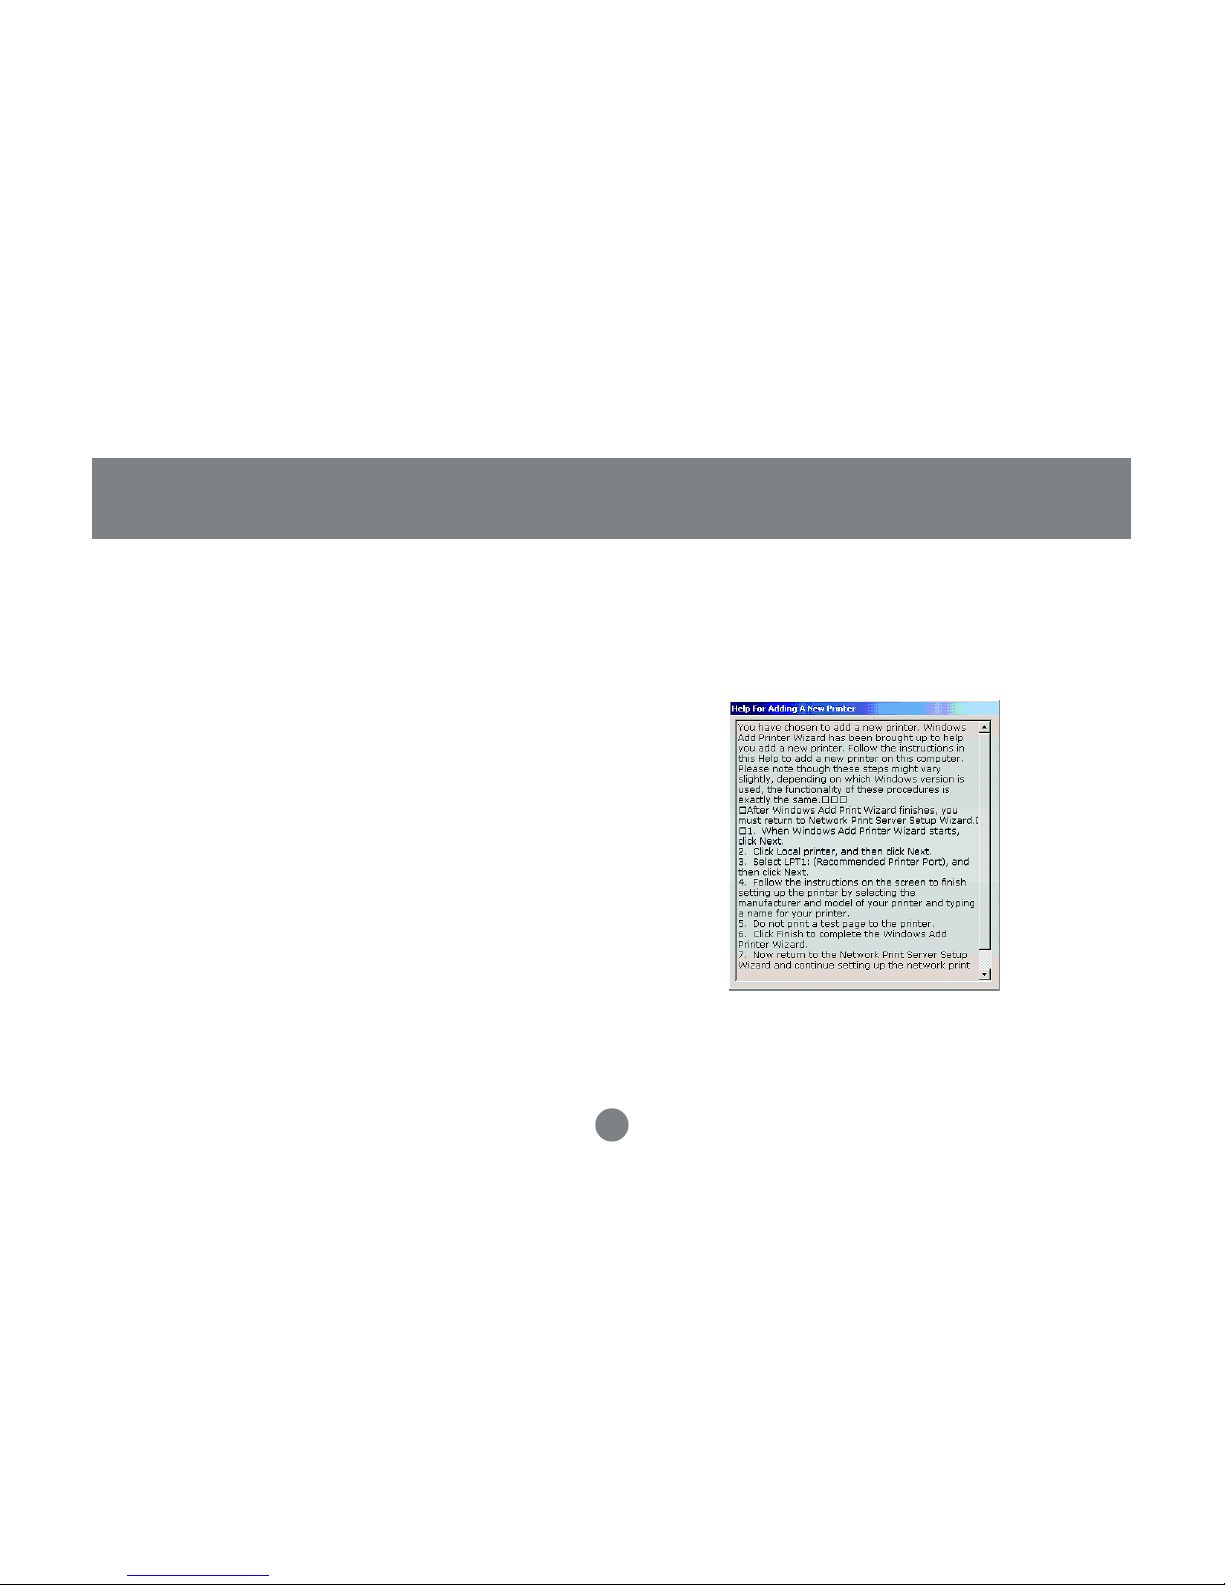
19. The “Help for Adding a New Printer” window has
specific instructions to help you add the printer.
Page 23
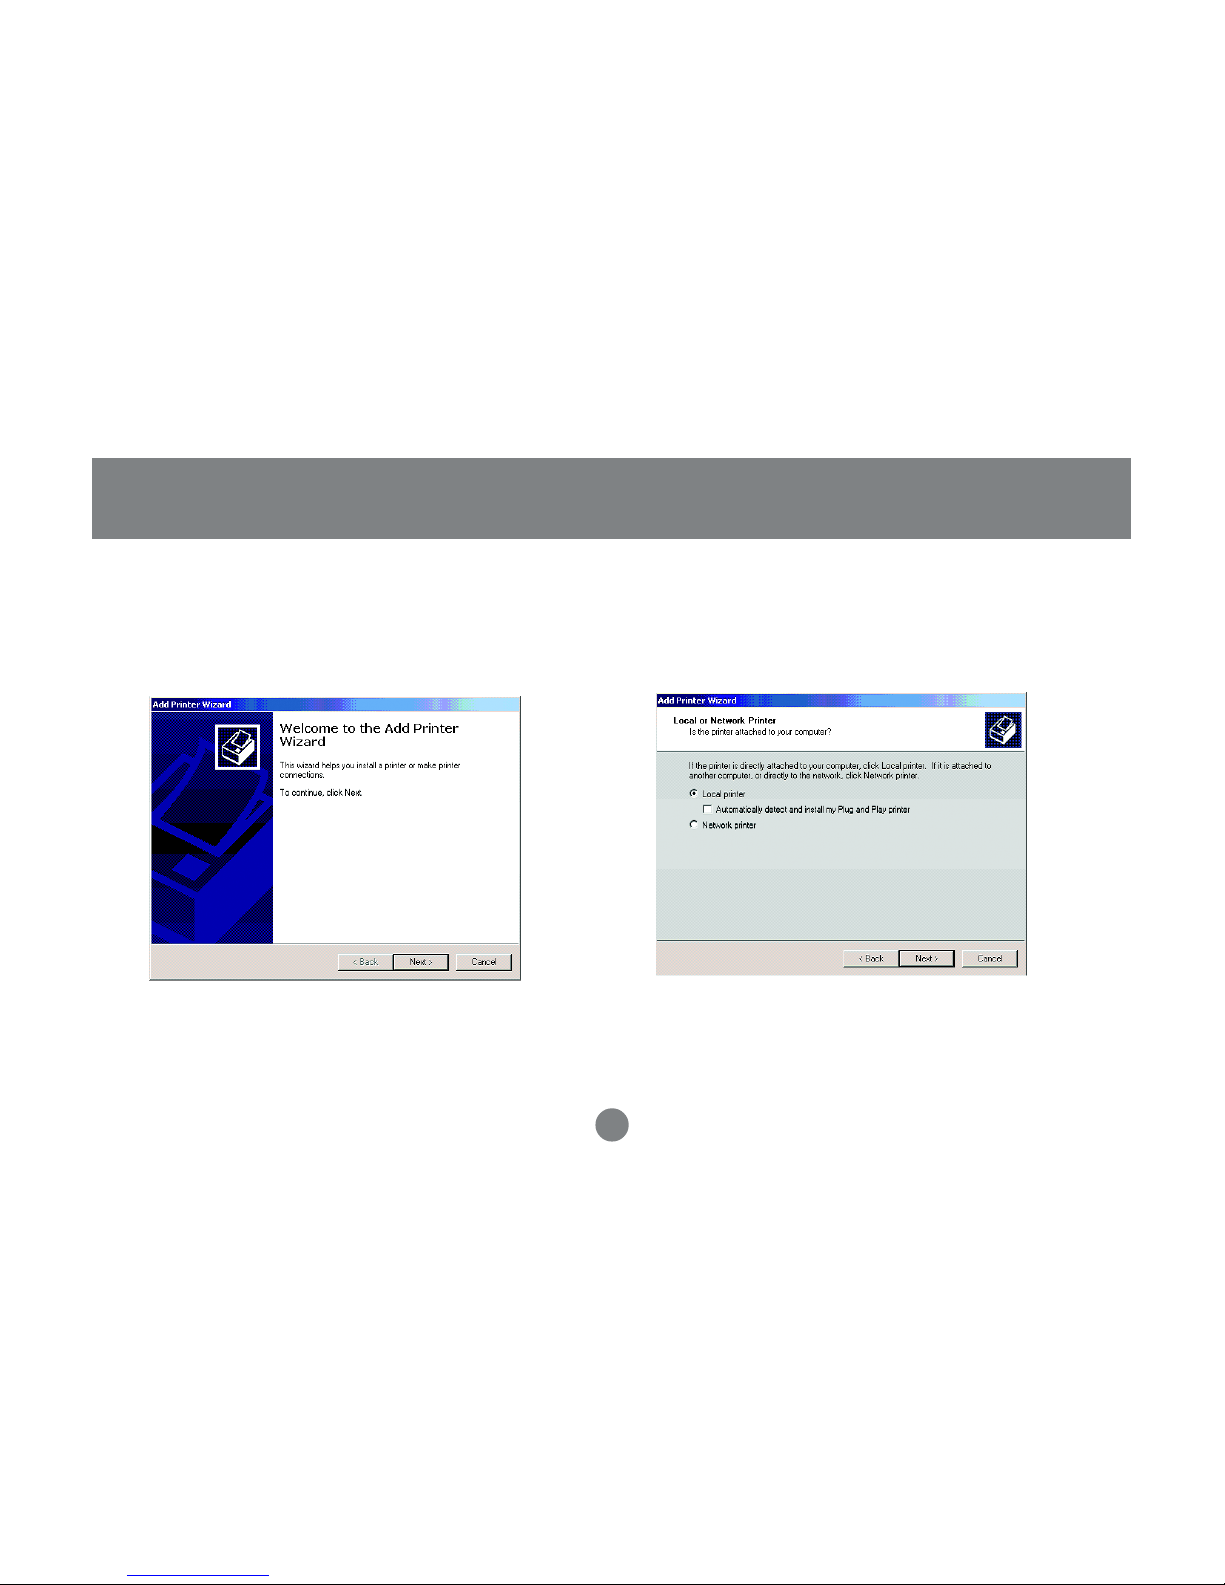
21. Select Local Printer. Click Next.
Make sure auto detect is not checked.
20
Installation
20. The next window is the Add Printer wizard. Click
Next.
Page 24
21
Installation
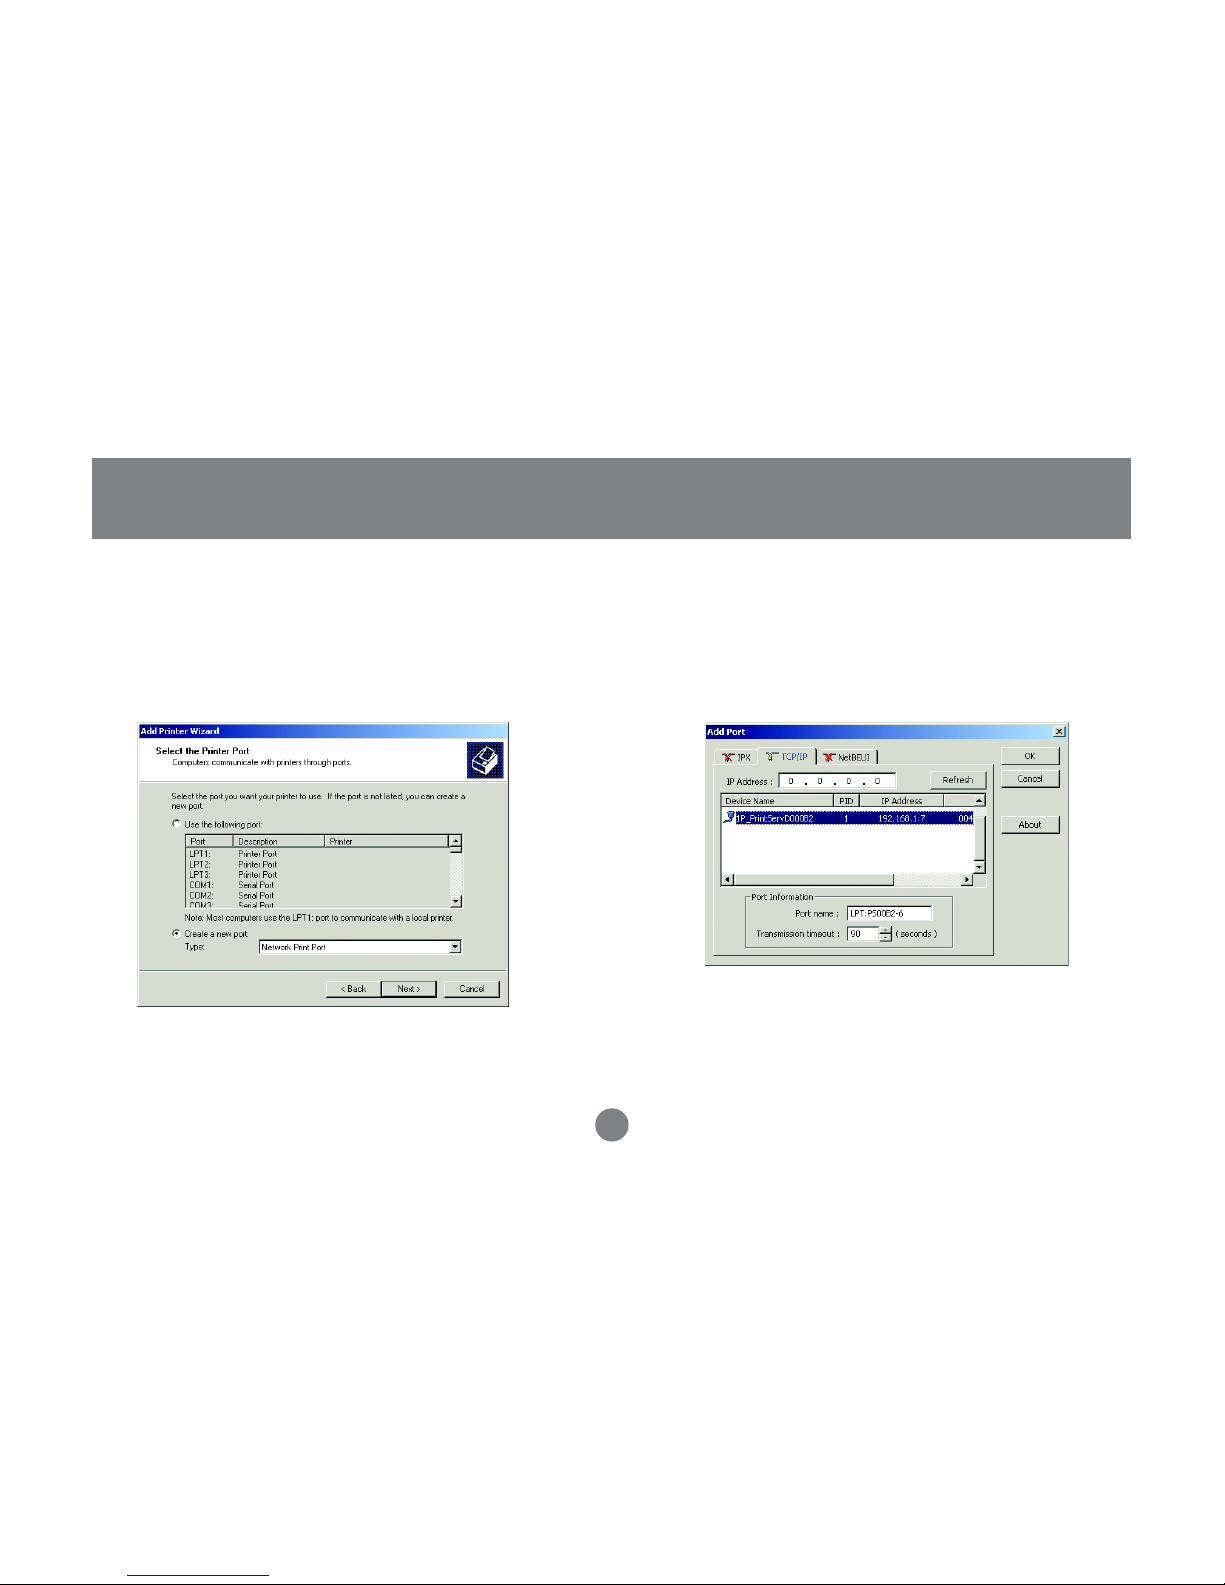
23. Click on the TCP/IP tab . The wizard will no w
search for y our print server . Highlight y our print
server and click OK. If y our print server does
not appear, select the Refresh b utton and the
wizard will look for your print server .
22. Select Create a new port and from the drop down
box select Network Printer P ort. Clic k Ne xt.
Page 25

22
Installation
24. Select your printer from the list and click “Ne xt”. 25. The wizard will ask you if you want to keep the
existing driver or use the new one . Select “K eep
existing driver (recommended)” and clic k Next.
Page 26

23
Installation
27. Indicate whether you want to share this printer
on your network and click Ne xt.
Note: There should be no reason to share it as the print server
will take care of that for you.
26. Assign your printer a name. Select Yes to set this
printer as the default printer.
Page 27

29. Click Finish to complete the Add Printer wizard.
24
Installation
28. On the print test page window, select Yes or No
whether you want to print a test page. Click Nex t
to continue.
Page 28

25
Installation
30. Now that you added your printer , it should sho w
up in the list. Highlight y our printer and click Ne xt.
31. The following window displa ys a summary of
your Wireless Print Server settings. Select Next.
Page 29

Select “Exit” to complete the installation.33.
26
Installation
32. Installation is complete. Select Finish to complete
the wizard.
Page 30

27
Macintosh Installation
IOGEAR Wireless Print Server Installation in Mac
OSX
1. Open the box the Wireless Print Server came in.
Follow the proper included instructions for hooking it
up to your Printer.
2. After the print server has been plugged in, mov e
the switch on top of the Wireless Print Server to
enable Ad Hoc mode. Flip the DIP switch to the right
side, the side near to the power connector .
3. W ait a f e w moments, after enab ling Ad Hoc mode,
then select the Airport status icon on the right side
of the menu bar .
Page 31

you may need to reset your Wireless Print
Server. You can do this by unplugging the
unit, plugging it back in, and waiting a f ew
moments. Repeat steps 2 through 4.
4. Select WLAN-PS from the drop-down list.
NOTE: If you see the f ollowing message ,
5. After y ou’v e selected WLAN-PS from the list, your
Mac is now directly connected and communicating
with the Wireless Print Server . Howev er , to access
the Wireless Print Server’s configuration menu, you
must connect to it via Safari or Internet Explorer.
The Wireless Print Server ships with a Static IP
address of: 192.168.5.1
Static means that the address never changes
unless otherwise changed by the end-user. Initially ,
you will need to access the configuration menu to
change the IP address to suit your Network.
NOTE: Expert Users – It is strongly recommended
that you DO NO T enab le DHCP on the Wireless
Print Server. You must set an unused, static IP
address that is not in use on your particular subnet.
28
Macintosh Installation
Page 32

29
Macintosh Installation
6. Since the IP address is 192.168.5.1, your network
may not be on the same subnet as the Wireless
Print Server. You will need to change your subnet
temporarily to alter the configuration of the Wireless
Print Server and tailor it to your setup .
7. Open System Preferences
Page 33

30
Macintosh Installation
8. Once you’v e opened the System Pref erences,
select Network
9. When y ou select Network, you will see the
network Status of your Mac.
Page 34

12. Once y ou select TCP/IP, there is a menu called
Configure Ipv4: Select Manually
31
Macintosh Installation
10. Select Airport, and then click Configure.
11. After y ou’v e clic ked Configure , y ou will be
presented with your Airport Network Settings.
Select TCP/IP from the menu
13. After y ou select Manually, enter 192.168.5.2 for
the IP Address and 255.255.255.0 f or the subnet
mask, and then click Apply No w.
Page 35

15. The Wireless Print Server’s web-interface will
appear. Click on Setup.
32
Macintosh Installation
14. After y ou click Apply No w, simply open Saf ari (or
Internet Explorer) and type in the following web
address: 192.168.5.1
Page 36

33
Macintosh Installation
16. Once y ou select Setup, you will now see the
configuration menus as you scroll down.
17. The first section is for the Print Server Status.
Device Name – Here you can name y our print
server. It must be a single name with no spaces.
System Contact – You may lea ve this b lank.
This is for administrative purposes and generally
holds the e-mail address of the network
administrator .
System Location – You may leave this blank.
This is for administrative purposes and generally
holds the physical location (ex. Graphics_room)
of the printer and print server .
Administrative Passwo rd – This is for security
purposes. You can set a password for this menu so no
one can access the setup and configuration menus of
the Print Server without a password. It is strongly
recommended that you write this password down since
it will not be possible to retriev e if lost, and can
permanently render your Wireless Print Server
inoperable.
Page 37

34
Macintosh Installation
18. This is the wireless section.
Basic Settings – Here you will configure the
Mode, SSID, Channel, and Data Transmission
rates of the Print Server.
Mode – Select Infrastructure
SSID – In the pull down box, select your Wireless
Router from the list.
Channel – This will def ault to what channel your
Wireless Router is set to.
NOTE: The rest of this section should be left at its
default settings. Unless y ou are an e xperienced
user with Wireless connectivity, we recommend
skipping the remaining parts of the wireless
section.
Page 38

35
Macintosh Installation
19. The next section is for setting up y our Print Server
in a Novell environment. These settings must be
tailored to how your Nov ell network is setup.
Unless you are using a Novell netw ork, this
section may be skipped.
20. The next section is for setting up TCP/IP
preferences. This section will require y ou to tailor
the Print Server to what your network settings
are.
Automatic – It is strongly recommended that
you do not set the Print Server to use DHCP in a
Mac environment, as you will not be ab le to
access the Setup & Configuration menus in the
future.
Manual – This is where you will tailor y our Print
Server to the same settings as your network. You
will need to ensure the IP address and Subnet
Mask chosen is on the same subnet as your
computer and router. The subnet is the same as
the one on your Wireless Router .
Ex. If your computer network is DHCP (Dynamic
IP Addressing) and uses an IP address pool of
192.168.1.x, then you will need to make the IP
Page 39

36
Macintosh Installation
address on the Print Server 192.168.1.254, or
192.168.1.253, etc. It will not matter what the last
series of numbers are (x.x.x.254) are as long as
they are not conflicting with anything else already
on your network. If y ou are unsure of y our network
settings, check the manual that came with your
Wireless router, or with your netw ork administrator.
Once you hav e changed this IP Address and
tailored it to your network settings, you ma y
continue.
21. This section is for SNMP Settings. Unless you
have a need to configure these (network
administrator), you may skip this section.
22. AppleTalk Settings You may leave these as
default.
Page 40

23. You may now Save y our settings.
37
Macintosh Installation
22. AppleTalk Settings You may leave these as
default.
24. Once y ou ha v e clic k ed Sa v e, y our Print Server will
reboot. W ait 20 seconds then clic k on the Home
link.
Page 41

25. During this time, y ou ma y change your Netw ork
Settings back to what you had them set to bef ore.
Ex. If y ou were using DHCP bef ore, y ou will
select it from the Configure menu, and then click
Apply Now .
26. You may now close the Network Preferences.
27. Mo v e the s witch on the top of y our Wireless
Print Server from Ad Hoc to Standard-mode.
28. In System Pref erences , select Printers (or Print
& Fax)
38
Macintosh Installation
Page 42

30. Clic k Add.
31. In the top pull do wn bo x, select IP Printing.
NOTE: You can select AppleTalk as w ell. It will not
require you to enter an IP address and will install
the same.
Printer Type – Leave as LPD/LPR
Printer Address – This is where you will type in
the IP address you entered in the Wireless Print
Server setup (ex. 192.168.1.254)
39
Macintosh Installation
29. Under the Printers Tab, select Set Up Printers…
Queue Name – Leave b lank f or default.
Page 43

Click Add when finished.
Please Note: Your Print Server is now installed
and should function properly . If you hav e an y
difficulties, please do not hesitate to contact us for
assistance.
33. Your printer will is now installed.
40
Macintosh Installation
32. Under Printer Model, select the model of printer
you hav e. In this example, it is an HP Printer.
Page 44

Changing the SSID on the Print Server
To change the SSID on the Print Server, you must
wirelessly connect to the print server in AD-HOC
(Computer-to-Computer) mode while the Print
Server is in a
Diagnostic mode
, unplug the unit, flip
the DIP switch to the right side, the side near the
power connector , and plug the unit back.
You need to change the properties of your wireless
card to Ad-Hoc and change the SSID to match the
wireless Print Server’ s SSID, WLAN-PS .
1. First, select on the start menu. Right-click on My
Network Places and click on properties.
Changing SSID on Print Server
41
Page 45

Next right-click on the wireless network connection
and click on properties.
In the general tab click on the wireless networks
tab.
2. 3.
Changing SSID on Print Server
42
Page 46

Take note of the name that is shown f or y our
wireless router. In the example below is “linksys”,
we are going to need that information later.
Click on the “Adv ance” button.
4. 5. Choose “Computer-to-computer (ad-hoc) networks
only .” Then select the Close b utton.
Changing SSID on Print Server
43
Page 47

6. After it goes back to the “Wireless Network
Connection Properties. ” Click the Add b utton.
7. On the Network name (SSID) enter “WLAN-PS”.
Uncheck other box es . Press the OK b utton.
Changing SSID on Print Server
44
Page 48

Changing SSID on Print Server
45
8. Go back to the Wireless Setup Wizard. Click on
refresh. The Print Server will show up this time.
9. Bring back the PS Admin. It should have
been installed in the Network print Server group.
As shown on the figure below .
Page 49

Changing SSID on Print Server
46
10. Once it is started, the PS Admin application will
show the Print Server on it. Doub le-click on it to
change its settings.
11. Tap on the Wireless tab.
Page 50

Changing SSID on Print Server
47
12. Change the SSID to match y our router SSID.
Mentioned on step 4. (Linksys in this e xample)
13. The printer server will get reset it and the changes
made will be completed.
Page 51

Changing SSID on Print Server
48
14. Turn the printer server off by unplugging it
Change the mode from AD_HOC on the Printer
Server Hardware, by flipping the DIP s witch to
the left-side, the side far from po wer connector .
Turn the printer server on by plugging it back .
Return the wireless connection to the normal
status (Any availab le Network).
Right-click on My Network Places and choose
properties.
15. Right-clic k on the wireless Network Connection and
choose Properties. Select the Wireless Networks
tab.
Page 52

Changing SSID on Print Server
49
16. Clic k on Advance.
17. Clic k on An y a vailab le Netw ork, and close.
Page 53

Changing SSID on Print Server
50
18. Go bac k to the “Wireless Setup Wizard.” Click on
Refresh. The Print server should show up on it.
Once printer server is found, click on Next.
19. On the f ollo wing screen, clic k on your choice of
changing the settings or not, then click Next.
Page 54

Changing SSID on Print Server
51
20. Select Finish.
Go back to the initial screen and choose Network
Print Server Setup wizard.
21. The following screen will show you the Print server
after it searches for it.
Page 55

Changing SSID on Print Server
52
23. The setting will be shown on the next screen.22. You can choose the printer to use.
Page 56

Changing SSID on Print Server
53
24. Clic k on Finish and proceed to use the ne w
printer.
Page 57

IPP Overview
Print server(s) support the Internet Printing Protocol
(IPP). Using the appropriate software on y our system,
you can create an IPP print path from your system as
Windows PC over the Internet.
Note: For incoming print path requests, the network
administrator has to configure the firewall to accept
incoming IPP requests.
Windows NT/2000/XP/2003
For Windows NT/2000/XP/2003, you can use a
supported Web Browser, for example , Netscape or
IE to view the embedded web server on the print
server. Contact your administrator to get the IP
address or URL of the printer and browse to the print
server’s web page .
For example, to install Windows 2000 by IPP service
you must follow belo w information:
1. Clic k Start button.
2. Select Settings, and then select “Printers”
option.
3. Click Add Printer icon. Appear welcome to the
add printer wizard, Click Next.
4. Select Netw ork printer option, and then click
“Next”.
5. Select Connect to a printer on the Internet or
on your intranet option.
Internet Printing
54
Installation
Page 58

Select the appropriate printer manufacturer and
printer type again and click Next.
8.In URL’s box, input print server’s IP address , f or
example, http://192.168.10.182/lp1. Then Click
Next.
** One port should be the port name as lp1.
** Three ports should be the port name as lp1, lp2, and lp3.
It will check if the print server is connected to the
printer, if not, the f ollowing windo w will appear . Click
OK to continue.
6.
7.
Internet Printing
55
Page 59

If you want your Windows-based programs to
use this printer as the default printer, please
select Yes, and click Next.
9. Click Finish.
10.
Internet Printing
56
Page 60

Configuration from Embedded Web Server
Web Based Configuration
Overview
The Print Server contains an embedded web server
that can be accessed through a supported web
browser on a LAN, for example , IE 4.0, Netscape 4.0
or above is recommended.
The embedded web server provides access to
configuration and management pages for the print
server and the connected peripheral device .
Using Embedded Web Server
Before you can use the embedded web serve r ,
the print server must be configured with an IP
address. There are many ways to configure the print
server’s IP address. For e xample, the Windowsbased of PSAdmin utility can easily set an IP
address with the print server, please see the
Properties – TCP/IP option.
After an IP address is established on the print
server, perf orm the following steps:
Status Menu
Once you hav e finished configuring the IP address,
you can use a web browser to vie w and manage the
print server. The status menu of the print server
helps the administrator view the print server’s
System, Printer, NetW are, TCP/IP, SNMP and
AppleTalk status.
Preparation
Enter the IP address of the print server as the URL,
for example, 192.168.1.7. Then the print server’ s
home page will appear in content of the web browser .
57
Page 61

You will be ab le to view system status, such as
Device Name, System Contact, System Location,
System Uptime, and Firmware V ersion.
Printer Status
Printer status displays the information for the printer
that is connected to the wireless printer server.
System Status
System Status displays the current state of the
wireless print server.
Web Based Configuration
It will allow you to vie w printer status, such as
Manufacturer , Model Number , and Printing Status.
58
Page 62

SSID: The Service Set ID . This should be set to the
same value as other wireless devices in y our
network. (Def ault: ANY)
Channel Number: The radio channel through which
the Print Server communicates.
Data Transmit Rate: Set the rate of data transmitted
from the Print Server. The lower the data rate, the
longer the transmission distance. (Default: 1,2,5.5,11
MBPS.)
WEP Encryption: Displays the WEP encryption
status.
TCP/IP Status
TCP/IP Status displays the TCP/IP settings of the
wireless printer server.
Wireless Status
Wireless Status displays the wireless settings of the
wireless print server.
Mode: Set the station operation mode to 802.11 AdHoc for network configurations that do not hav e an
access point, or to Infrastructure for configurations
with an access point (Infrastructure is the default
setting.)
AP’s MA C Address: Displa ys the MAC address of the
Print Server.
Web Based Configuration
59
Page 63

Use DHCP/BOOTP: This option allo ws y ou to view
DHCP/ BOOTP status. If there is a DHCP/BOOTP
server on your network, this option allows the print
server to obtain IP-related settings automatically from
your DHCP server .
IP Address: This option allows y ou to vie w IP address
from the print server. The IP address must meet the IP
addressing requirements of the network segment.
Subnet Mask: This option allo ws you to view subnet
mask from the print server. The IP address must meet
the IP addressing requirements of the network
segment.
Web Based Configuration
Gateway’s IP: This option allows you to view gate wa y
from the print server. The IP address of the gatewa y
must meet the router or gatewa y to go across of the
network segment.
Netware Status
This section displays the current NetW are Settings of
the wireless print server.
60
Page 64

Apple Talk
Apple Talk displays the AppleT alk settings of the print
server.
General Settings
Allows you to view NetWare Settings, such as Print
Server Name, P olling Time, Netw are NDS Setting,
Netware Bindery Setting, and the Name of the File
Server.
Web Based Configuration
It allows you to view Apple Talk Settings, such as
Zone Name, P ort Type , and Data F ormat.
SNMP Status
This section displays the SNMP settings of the print
server, such as SNMP Communities and SNMP Traps.
System Setup
Click Setup at the left navigation bar to start System
Setup. System Setup allows you to configure the
general system settings of the print server.
61
Page 65

Web Based Configuration
Device Name: This option allo ws you to input device
name of the print server. To correct the print server’ s
device name.
System Contact: This option allo ws you to input
contact name of the print server. To check the print
server’s contact name who in charge of this de vice .
System Location: This option allows y ou to type the
location of the print server.
Password: This option allows y ou to change the
password to the print servers web interface.
Re-type Passwo rd. Re-type the password.
Wireless Setup
This section allows you to configure the Wireless
settings of the wireless print server.
62
Page 66

WEP Settings
Use WEP: Enab le or Disab le encryption.
Key Format: Select whether y ou w ant the K e y
format to be either alphanumeric or hexadecimal.
WEP Key- Enter the alphanumeric or hexadecimal
WEP Key in this box. Click the “Help” button for
assistance.
Basic Settings
Mode: Set the station operation mode to 802.11
Ad-Hoc for network configurations that do not ha ve
an access point, or to Infrastructure for configurations with an access point (Infrastructure is the
default setting.)
SSID: The Service Set ID. This should be set to the
same value as other wireless de vices in your
network. (Def ault: ANY)
Site Survey: Click on the Site Surve y button to
display the SSID’ s of all the local wireless
networks.
Channel: The radio channel through which the
Print Server communicates.
Data Transmit Rates: Set the rate of data
transmitted from the Print Server. The lo wer the
data rate, the longer the transmission distance.
(Default: Auto)
Advanced Settings
Beacon Interval: Default Value - 100ms.
Preamble: Default setting – Long
Authentication Type: Default Value – Open System
Web Based Configuration
63
Page 67

TCP IP Status
This section allows you to configure the TCP/IP
settings of the wireless print server.
DHCP/BOOTP: This option allows y ou to select
DHCP/ BOOTP option. This option allo ws the print
server to obtain IP-related settings automatically
from your DHCP server.
IP Address: This option allows y ou to input an IP
address from the print server. The IP address must
meet the IP addressing requirements of the network
segment.
Web Based Configuration
Subnet Mask: This option allo ws you to input a subnet
mask for the print server . The IP address must meet
the IP addressing requirements of the network
segment.
Gateway: This option allows you to input a gate wa y f or
the print server. This IP address of gate wa y must meet
the router or gatewa y to go across of the network
segment.
64
Page 68

NetWare Setup
This section allows you to configure the NetWare
settings of the wireless print server.
Web Based Configuration
Print Server Name: This option allows y ou to input
print server name which configured by PSAdmin utility
or PCOMSOLE program.
Polling Time: The time interval in which the print
server unit polls the file server for servicing of print
queues.
Encrypted Passwo rd: This option allows you to input
encrypted password from the print server . The print
server login to NetWare server that administrator set
password from selected print server.
NDS Mode: To Enable NDS Mode, if you want to
setup NDS environment. To select Tree Name of
NetWare then input conte xt name in the Context box.
Bindery Mode: Enable Bindery Mode if you want to
setup a Bindery environment.
65
Page 69

Web Based Configuration
SNMP Setup
This section allows you to configure the SNMP
settings of the print server.
Support HP WebJetAdmin: This option allows user
determine to disable/enable the Support HP
WebJetAdmin.
SNMP Community: The print server supports up to
two community names. The def ault community name is
public
(case-sensitive), with
Read Only
access right in
default.
SNMP T raps: Enable the function of sending SNMP
Authentication F ailure trap message to the network
administrator, if the community name within a SNMP
request is not correct.
AppleTalk Setup
The print server can print jobs submitted from
Macintosh workstations connected to an Ethernet
using AppleTalk protocol. The basic configuration is for
the print server in an AppleTalk environment is
performed simply by opening the
Chooser
window
and selecting a printer that is connected to the print
server.
66
Page 70

Web Based Configuration
Zone Name: Type an AppleTalk Zone name that you
want the print server to belong to or leave it in def ault
(This enables the print server automatically search
and link itself to the default zone that is set on the
AppleTalk router)
. If no z ones e xists, the print server
displays the zone name as an asterisk (*) in the
current AppleTalk Status of the print server in the
web browser .
Port Name: Type a name f or identification purposes
or just leave it in def ault (recommended).
1.
2.
Note: The def ault print server’ s Chooser name
is as shown as follows :
<
ATALK_PS>-xxxxxx-1
, where xxxxxx
represents the last six digits of the device’ s
Node ID . For e xample: ATALK_PS-40EEED-1.
You ma y also change the <
ATALK_PS
> to a
name you like f or identification purpose in this
option. The print server will append the last six
digits to the name you specify.
Printer Type: By default, the print server is set
to LaserWriter (recommended).
Data Format: Data formats include ASCII,
TBCP and BCP.
3.
4.
67
Page 71

1. Click on the Browse button and search for the
binary file.
2. Once you’v e found the binary file, clic k the
Upgrade button.
Load Default
This button allows you to reset the Wireless Print
Server back to the factory settings.
Web Based Configuration
Upgrade
This section allows you to upgrade the Wireless Print
Servers firmware.
68
Page 72

Once you select the Load Default b utton, a windo w
will appear. The window will ask y ou if y ou w ant to
restore factory default settings. Click OK to restore
the settings.
Once you click OK and the settings ha v e been
successfully restored, a new window will appear .
Please wait for the print server to restart. Once it
restarts, it will bring you back to the homepage.
Reset
The reset button resets the wireless print server .
Web Based Configuration
69
Page 73

70
Uninstalling the PSAdmin on Windows PC
To help users easily remov e all installed software
components of the PSAdmin from their Windows PC ,
the PSAdmin software comes with an un-installation
wizard that can automatically remove the software
components from their Windows PC systems in
minutes. Please f ollow the directions listed below to
proceed with the un-installation procedure.
After the PSAdmin is removed, the print server is no
longer accessible via the PSAdmin. You have to reinstall the PSAdmin on your system in order to access
the print server again.
Procedure:
1. Clic k Start, point to Settings, and select Control
Panel.
2. Doub le click the Add/Remo ve Pr ograms icon.
Un-installation
3. Clic k Change or Remo ve Pr ograms tab.
4. Select Network Print Monitor f or Windows
95/98/NT/2000/XP and click Change/Remove
button.
5. The un-install wizard progr am will be
launched.
6. F ollow the directions on the screen to
complete the un-install procedure.
Page 74

Select the Wireless tab. Enter the ESSID , Channel,
Rates that meet your network environment, then
press OK.
71
5.
Appendix
Appendix: Diagnostic Mode
If you’ve had problems with the setup of your
print server in your wireless network, please
refer to the following steps:
1. Change the print server to diagnostic mode by
switching the DIP s witch to DIA G mode (the side
near to power connector .)
2. Change your wireless adapter to 802.11b Ad-hoc
mode, and the ESSID is WLAN-PS
3. Click Start > Programs > Network Print Server >
PSAdmin. Once PSAdmin starts, it will
automatically start searching for your print
server.
4. Once PSAdmin finds your print server , doub le
click on the Device name to open the properties
window .
Page 75

6. Done! The print server will restart.
Flip the DIP switch on the print server back to
normal mode (awa y from the power connector)
and change your wireless adapter setting back to
match the settings on your wireless network.
72
7.
Appendix
Page 76

73
If you are still experiencing problems after reading Product User Manual and the Troubleshooting section,
you may either contact our technical support by phone OR, simply visit our URL address
www.iogear.com to go to our company website and check the latest version and other information about
the product and/or software.
Technical Support
Technical support is available Monda y through F riday from 8:00 am to 5:00 pm PST and can be reached at
(949) 453-8782.
Page 77

Radio & TV Interference Statement
WARNING!!! This equipment generates, uses, and can radiate radio frequency energy and, if not installed and
used in accordance with the instruction manual, may cause interference to radio communications. This
equipment has been tested and found to comply with the limits f or a Class B computing de vice pursuant to
Subpart J of Part 15 of FCC Rules, which are designed to provide reasonable protection against such
interference when operated in a commercial environment. Operation of this equipment in a residential area is
likely to cause interference , in which case the user , at his own expense, will be required to take whatev er
measures may be required to correct the interference .
74
Page 78

IN NO EVENT SHALL THE DIRECT VENDOR’S LIABILITY FOR DIRECT, INDIRECT,
SPECIAL, INCIDENTAL OR CONSEQUENTIAL DAMAGES RESULTING FROM THE USE OF
THE PRODUCT, DISK OR ITS DOCUMENTATION EXCEED THE PRICE PAID FOR THE
PRODUCT.
The direct vendor makes no warranty or representation, expressed, implied, or statutory with
respect to the contents or use of this documentation, and especially disclaims its quality,
performance, merchantability, or fitness for any particular purpose.
The direct vendor also reserves the right to revise or update the device or documentation
without obligation to notify any individual or entity of such revisions, or updates. For further
inquires please contact your direct vendor.
Limited Warranty
75
Page 79

Page 80

23 Hubble • Irvine, CA 92618 • (P) 949.453.8782 • (F) 949.453.8785 • www.iogear.com
Contact info.
®
 Loading...