

Page 1

Quick Start Guide
Share Pro
TM
Mini Wireless HD Video Transmitter
and Receiver Kit
Guide de démarrage rapide
Share ProTM Mini Kit Émetteur et Récepteur Vidéo HD
Sans Fil
Guía de configuración rápide
Share ProTM Mini Transmisor de Video HD Inalámbrico
y Kit de Receptor
GWHD2DKIT
PART NO. Q1584-b
www.iogear.com
Page 2
Package Contents
1 x Mini wireless transmitter
1 x Mini wireless receiver
2 x HDMI cable extender
1 x 90° HDMI adapter
2 x USB-A male-to-USB micro power cables
1 x Quick Start Guide
1 x Warranty Card
1
System Requirements
• 1 HDMI source device (DVD, PS3, Satellite box, PC etc.) with USB-A connector
that carries power (and not used as a firmware upgrade port)
• 1 HDMI display device (HDTV, projector with HDMI port, etc.) with USB-A
connector that carries power (and not used as a firmware upgrade port)
Note: In the case that there is no USB-A port that supplies power, please use a 5V
USB power adapter with a minimum of 500mA output (not included in the package).
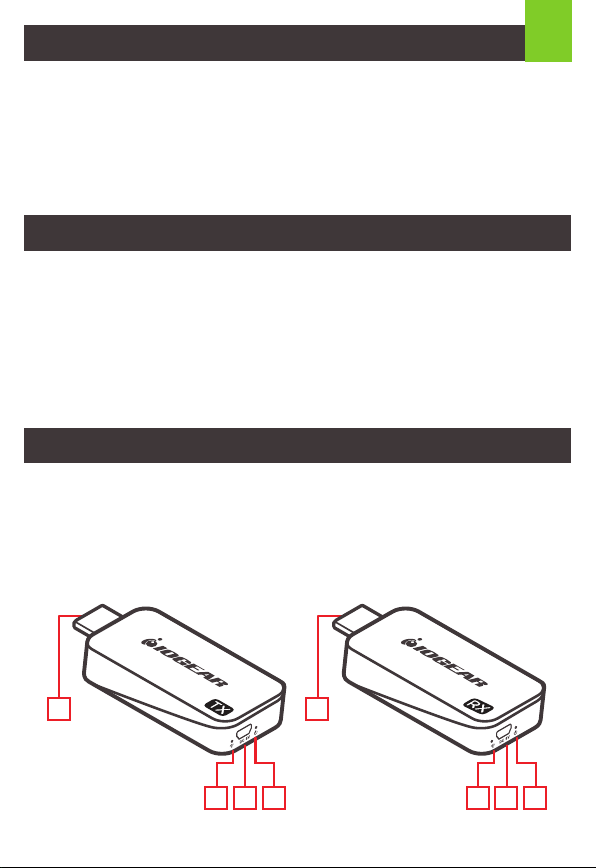
Overview
Transmitter
A. HDMI output male connector
B. Wireless signal indicator (Red LED)
C. Power input
D. Power indicator (Blue LED)
A E
B C D
Receiver
E. HDMI input male connector
F. Wireless signal indicator (Red LED)
G. Power input
H. Power indicator (Blue LED)
F G H
Page 3
Hardware Installation
STEP 1
Turn on both the video source and the display (TV or projector). Make sure that
the input source on your display corresponds to the HDMI port that the transmitter
is connected to.
STEP 2
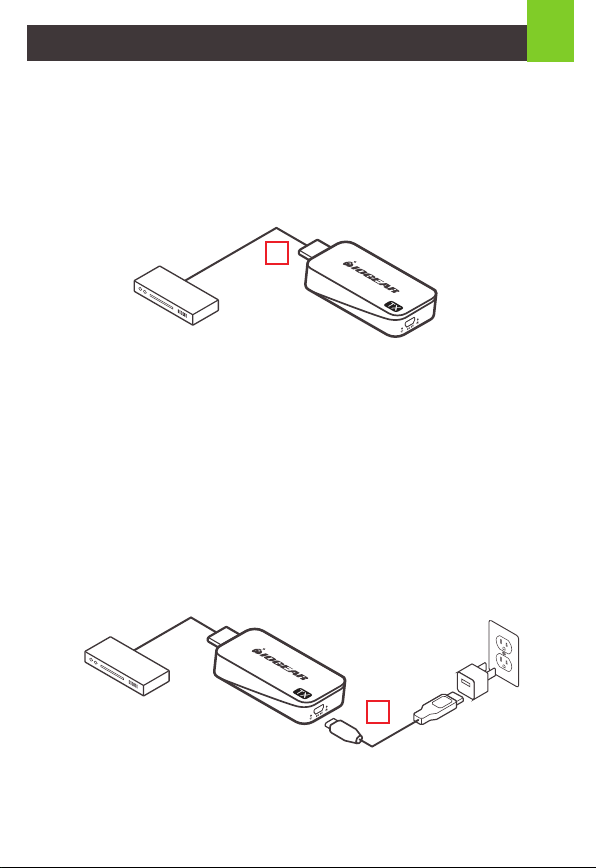
Insert the transmitter into the HDMI port of your video source device.
2
2
STEP 3
Use one of the USB charging cables to connect to the micro USB port of the
transmitter to a type USB-A port on the source device to obtain power. In a rare
case that the source device has no USB port, please use a 5V USB power adapter
with a minimum of 500mA output (not included in the package). At this time both
the power LED (blue) and the wireless LED (red) will light up solid and then the
wireless LED (red) will go out and come back on and both will remain solid.
In case the space around the HDMI port is too tight or the position is too awkward
and could cause a connection issue, use the HDMI cable extender or the 90
degree HDMI adapter included in the package to correct this issue or to increase
the spacing.
Transmitter
Transmitter
3
Page 4
3
STEP 4
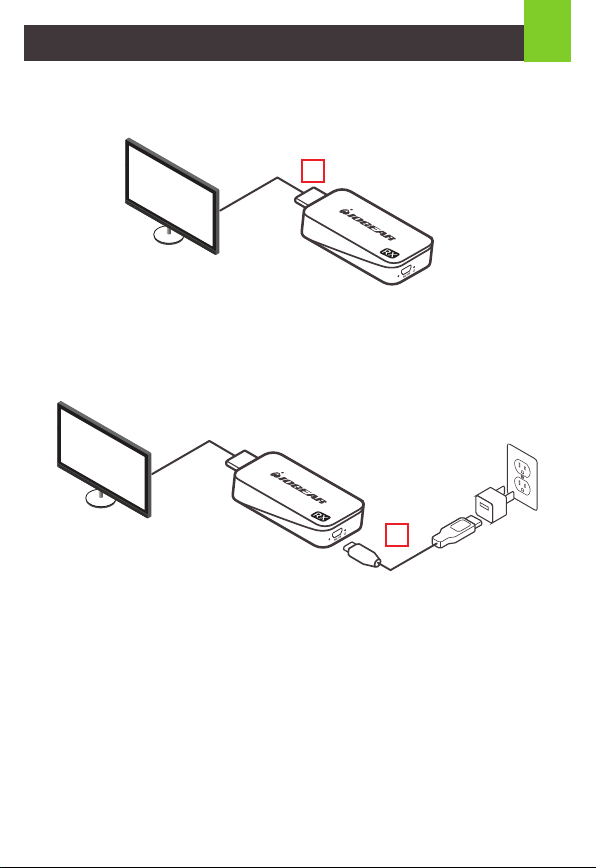
Insert the receiver into the HDMI port of your video display device
(TV, projector, etc.).
4
Receiver
STEP 5
Use one of the USB charging cables to connect to the micro USB port of the
receiver to a type USB-A port on the source device to obtain power. In a rare case
that the source device has no USB port, please use a 5V USB power adapter with
a minimum of 500mA output (not included in the package).
Receiver
5
STEP 6
The power LED (blue) will come on solid and a message will be displayed on your
TV/projector stating it is waiting for connection. After approximately 30 seconds the
wireless LED (red) on both the transmitter and the receiver will start to blink once
every second, the connection is now established.
STEP 7
Video from your source device will now be duplicated on your TV/projector.
NOTE: We recommend to use this device for line-of-sight use only as it is
designed as a short range device
Page 5

FAQ
Everything is connected, power LEDs are on for both devices, but no video on
the video display.
1. Make sure the video source device and the video display are turned on.
2. Check the HDMI cable connection at both sides on both the transmitter and
receiver to make sure they are plugged in firmly and completely.
3. Check the video input selection on the video display device, make sure that
the HDMI input port you selected is the same as the one you actually
plugged in.
4. If still no video after some time, connect the video source device directly to
the video display with an HDMI cable to make sure that there are no
compatibility issues.
5. If the direct connection is working, reconnect everything and restart (unplug
and then re-plug the USB power cables) both the transmitter and the receiver
and make sure the power and wireless LEDs both light up on both the
transmitter and the receiver.
Video is flickering or not stable on the video display.
1. Check the distance and environment; make sure no other wireless device
with a strong signal is within close proximity.
If all of the above has been checked and there are still no video displayed,
please contact IOGEAR Technical Support for further support.
4
Limited Warranty
Warranty Information
This product carries a 1 Year Limited Warranty. For the terms and conditions of this
warranty, please go to https://www.iogear.com/support/warranty
Register online at https://www.iogear.com/register
Important Product Information
Product Model___________________
Serial Number_
__________________
Page 6

Contact
WE’RE HERE TO HELP YOU!
NEED ASSISTANCE SETTING UP THIS PRODUCT?
Make sure you:
1. Visit www.iogear.com for more product information
2. Visit www.iogear.com/support for live help and product support
IOGEAR
https://iogear.custhelp.com
support@iogear.com
www.iogear.com
Compliance Information
Federal Communication Commission Interference Statement
This equipment has been tested and found to comply with the limits for a Class B digital
service, pursuant to Part 15 of the FCC rules. These limits are designed to provide
reasonable protection against harmful interference in a residential installation. Any changes
or modifications made to this equipment may void the user’s authority to operate this
equipment. This equipment generates, uses, and can radiate radio frequency energy. If not
installed and used in accordance with the instructions, may cause harmful interference to
radio communications. However, there is no guarantee that interference will not occur in a
particular installation. If this equipment does cause harmful interference to radio or television
reception, which can be determined by turning the equipment off and on, the user is
encouraged to try to correct the interference by one or more of the following measures:
- Reorient or relocate the receiving antenna
- Increase the separation between the equipment and receiver
- Connect the equipment into an outlet on a circuit different from that to which the receiver
is connected
- Consult the dealer or an experienced radio/TV technician for help
FCC Caution: Any changes or modifications not expressly approved by the party
responsible for compliance could void the user’s authority to operate this equipment.
This device complies with Part 15 of the FCC Rules. Operation is subject to the following
two conditions:
(1) this device may not cause harmful interference, and
(2) this device must accept any interference received, including interference that may cause
undesired operation.
CE Statement:
This device has been tested and found to comply with the following European Union
directives: Electromagnetic Capability (2004/108/EC), Low Voltage (2006/95/EC) and
R&TTED (1999/5/EC).
Page 7

Contenu de l'emballage
1 x Mini émetteur sans fil
1 x Mini récepteur sans fil
2 x Rallonge de câble HDMI
1 x Adaptateur HDMI à 90 °
2 x Câbles d'alimentation micro USB-A mâle à USB
1 x Guide de démarrage rapide
1 x Carte de garantie
Configuration requise
• 1 Périphérique source HDMI (DVD, PS3, boîtier satellite, PC, etc.) avec un
connecteurUSB-A alimenté (non utilisé comme port de mise à niveau
du microprogramme)
• 1 Périphérique d'affichage HDMI (HDTV, projecteur avec port HDMI, etc.)
avec un connecteur USB-A alimenté (non utilisé comme port de mise à niveau
du micrologiciel)
Remarque: dans le cas où aucun port USB-A ne serait alimenté, veuillez utiliser
un adaptateur secteur USB 5 V avec une sortie minimum de 500 mA (non inclus
dans l’emballage).
Vue d’ensemble
1
Émetteur
A. Connecteur mâle de sortie HDMI
B. Indicateur de signal sans fil
(DEL rouge)
C. Puissance absorbée
D. Indicateur d'alimentation
(LED bleue)
A E
B C D
Récepteur
E. Connecteur mâle d'entrée HDMI
F. Indicateur de signal sans fil
(DEL rouge)
G. Entrée de puissance
H. Indicateur d'alimentation
(LED bleue)
F G H
Page 8

Installation du matériel
ÉTAPE 1
Allumez la source vidéo et l’affichage (téléviseur ou projecteur). Assurez-vous
que la source d'entrée affichée correspond au port HDMI auquel l'émetteur
est connecté.
ÉTAPE 2
Insérez l'émetteur dans le port HDMI de votre périphérique source vidéo.
2
2
ÉTAPE 3
Utilisez l'un des câbles de chargement USB pour vous connecter au port micro
USB de l'émetteur à un port de type USB-A sur le périphérique source pour
obtenir l'alimentation. Dans de rares cas où le périphérique source n’a pas de port
USB, veuillez utiliser un adaptateur secteur USB 5 V avec une sortie minimum de
500 mA (non inclus dans l’emballage). À ce stade, les voyants d'alimentation
(bleu) et sans fil (rouge) s'allument, puis le voyant (rouge) s'éteint et se rallume et
les deux restent allumés. Si l'espace autour du port HDMI est trop étroit ou si la
position est trop inconfortable et risque de poser un problème de connexion,
utilisez l'extension de câble HDMI ou l'adaptateur HDMI de 90 degrés inclus dans
l'emballage pour corriger ce problème ou augmenter l'espacement.
Émetteur
Émetteur
3
Page 9

Installation du matériel
ÉTAPE 4
Insérez le récepteur dans le port HDMI de votre périphérique d'affichage vidéo
(téléviseur, projecteur, etc.).
4
Récepteur
ÉTAPE 5
Utilisez l'un des câbles de chargement USB pour vous connecter au port micro
USB de l'récepteur à un port de type USB-A sur le périphérique source pour
obtenir l'alimentation. Dans de rares cas où le périphérique source n’a pas de port
USB, veuillez utiliser un adaptateur secteur USB 5 V avec une sortie minimum de
500 mA (non inclus dans l’emballage).
Récepteur
5
ÉTAPE 6
Le voyant d’alimentation (bleu) s’allume et un message s’affiche sur votre
téléviseur / projecteur pour indiquer qu’il attend la connexion. Après environ 30
secondes, le voyant sans fil (rouge) de l'émetteur et du récepteur commence à
clignoter toutes les secondes, la connexion est maintenant établie.
ÉTAPE 7
La vidéo de votre périphérique source sera maintenant dupliquée sur votre
téléviseur / projecteur.
REMARQUE: Nous vous recommandons d'utiliser cet appareil uniquement pour
une visibilité directe, car il est conçu pour être utilisé comme appareil à courte
portée
3
Page 10

FAQ
Tout est connecté, les voyants d'alimentation sont allumés pour les deux
appareils, mais aucune vidéo sur l'écran vidéo.
1. Assurez-vous que le périphérique source vidéo et l'affichage vidéo
sont allumés.
2. Vérifiez la connexion du câble HDMI des deux côtés de l'émetteur et du
récepteur pour vous assurer qu'ils sont correctement branchés.
3. Vérifiez la sélection d'entrée vidéo sur le périphérique d'affichage vidéo et
assurez-vous que le port d'entrée HDMI que vous avez sélectionné est le
même que celui que vous avez réellement branché.
4. S'il n'y a toujours pas de vidéo après un certain temps, connectez le
périphérique source vidéo directement à l'écran avec un câble HDMI pour
vous assurer qu'il n'y a aucun problème de compatibilité.
5. Si la connexion directe fonctionne, reconnectez tout et redémarrez
(débranchez puis rebranchez les câbles d'alimentation USB) l'émetteur et le
récepteur et assurez-vous que les voyants d'alimentation et sans fil
s'allument à la fois sur l'émetteur et le récepteur.
La vidéo scintille ou n'est pas stable sur l'affichage vidéo.
1. Vérifiez la distance et l'environnement; assurez-vous qu'aucun autre appareil
sans fil avec un signal puissant n'est à proximité.
Si tout ce qui précède a été vérifié et qu'aucune vidéo n'est encore affichée,
veuillez contacter le support technique IOGEAR pour obtenir de l'aide.
Garantie limitée
Renseignements sur la garantie
Ce produit comporte une garantie limitée de 1 an. Pour connaître les modalités
de cette garantie,veuillez aller à https://www.iogear.com/support/warranty
Inscrivez-vous en ligne à https://www.iogear.com/register
Renseignements importants sur le produit
Modèle du produit___________________
Numéro de série___________________
4
Page 11

Contact
NOUS SOMMES LÀ POUR VOUS AIDER! BESOIN D'AIDE POUR LA
CONFIGURATION DE CE PRODUIT?
Assurez-vous de:
1. Visiter www.iogear.com pour plus d'information sur le produit
2. Visiter www.iogear.com/support pour obtenir de l'aide et un soutien
technique en ligne
IOGEAR
https://iogear.custhelp.com
support@iogear.com
www.iogear.com
Déclaration de Conformité
Recommandation en matière d’interférence de la Federal
Communications Commission
Cet appareil respecte les limites des caractéristiques d'immunité des appareils
numériques définies pour la classe B, conformément au chapitre 15 de la réglementation
de la FCC. La conformité aux spécifications de cette classe offre une garantie acceptable
contre les perturbations électromagnétiques dans les zones résidentielles. Toute
modification apportée à cet appareil peut compromettre l’autorité de l’utilisateur à le faire
fonctionner. Cet appareil génère, utilise et peut émettre de l'énergie radiofréquence. Il
risque de parasiter les communications radio s'il n'est pas installé conformément aux
instructions du fabricant. Cependant, rien ne garantit qu’il n’y ait aucune interférence dans
une zone précise. Si cet appareil cause des perturbations électromagnétiques à la
réception radio ou télé qui peuvent être déterminées en allumant et en éteignant celui-ci, il
est recommandé que l’utilisateur essaie de corriger l’interférence en exécutant une ou
plusieurs des mesures suivantes:
- Réorienter ou relocaliser l’antenne de réception
- Augmenter la distance entre l’appareil et le récepteur
- Brancher l’appareil dans la prise d’un circuit différent
de celui du récepteur
Déclaration de Conformité
- Communiquer avec le détaillant ou un technicien en
radio/télé qualifié pour obtenir de l’aide
Avertissement de la FCC: Toute modification non expressément approuvée par la partie
responsable de la conformité peut compromettre l’autorité de l’utilisateur à faire fonctionner
cet appareil.
Conformité CE
Cet appareil a été testé et est conforme aux directives de l’Union européenne suivantes:
Capacité électromagnétique (2004/108/EC), Basse tension (2006/95/EC) et R&TTED
(1999/5/EC).
Page 12

Contenido del paquete
1 x Mini transmisor inalámbrico
1 x Mini receptor inalámbrico
2 x Extensor de cable HDMI
1 x Adaptador HDMI de 90 °
2 x Cables de alimentación micro USB-A macho a USB
1 x Guía de inicio rápido
1 x Tarjeta de garantía
1
Requisitos del sistema
• 1 Dispositivo fuente HDMI (DVD, PS3, caja de satélite, PC, etc.) con conector
USB-A que transmite energía (y no se utiliza como un puerto de actualización
de firmware)
• 1 Dispositivo de pantalla HDMI (HDTV, proyector con puerto HDMI, etc.) con
conector USB-A que transporta energía (y no se utiliza como puerto de
actualización de firmware).
Nota: En el caso de que no haya un puerto USB-A que suministre alimentación,
use un adaptador de alimentación USB de 5 V con un mínimo de salida de 500 mA
(no incluido en el paquete).
Generalidades
Transmisor
A. Conector macho de salida HDMI
B. Indicador de señal inalámbrica
(LED rojo)
C. Entrada de energía
D. Indicador de encendido (LED azul)
A E
B C D
Receptor
E. Conector macho de entrada HDMI
F. Indicador de señal inalámbrica
(LED rojo)
G. Entrada de energía
H. Indicador de encendido (LED azul)
F G H
Page 13

Instalación del hardware
PASO 1
Encienda la fuente de video y la pantalla (TV o proyector). Asegúrese de que la
fuente de entrada en su pantalla corresponde al puerto HDMI al que está
conectado el transmisor.
PASO 2
Inserte el transmisor en el puerto HDMI de su dispositivo de fuente de video.
2
2
PASO 3
Use uno de los cables de carga USB para conectar el puerto micro USB del
transmisor a un puerto tipo USB-A en el dispositivo fuente para obtener
energía. En el caso poco frecuente de que el dispositivo fuente no tenga
puerto USB, use un adaptador de alimentación USB de 5 V con un mínimo de
salida de 500 mA (no incluido en el paquete). En este momento, tanto el LED
de encendido (azul) como el LED inalámbrico (rojo) se iluminarán permanentemente y luego el LED inalámbrico (rojo) se apagará y volverá a encenderse, y
ambos permanecerán encendidos.En caso de que el espacio alrededor del
puerto HDMI sea demasiado estrecho o la posición sea demasiado incómoda y
pueda causar un problema de conexión, use el extensor del cable HDMI o el
adaptador HDMI de 90 grados incluido en el paquete para corregir este
problema o para aumentar el espacio.
Transmisor
Transmisor
3
Page 14

Instalación del hardware
PASO 4
Inserte el receptor en el puerto HDMI de su dispositivo de visualización de
video (TV, proyector, etc.).
4
Receptor
PASO 5
Use uno de los cables de carga USB para conectar el puerto micro USB del
receptor a un puerto tipo USB-A en el dispositivo fuente para obtener energía.
En el caso poco frecuente de que el dispositivo fuente no tenga puerto USB,
use un adaptador de alimentación USB de 5 V con un mínimo de salida de 500
mA (no incluido en el paquete).
Receptor
5
3
PASO 6
El LED de encendido (azul) se encenderá de forma fija y aparecerá un
mensaje en su TV / proyector indicando que está esperando la conexión.
Después de aproximadamente 30 segundos, el LED inalámbrico (rojo) tanto en
el transmisor como en el receptor comenzará a parpadear una vez por
segundo, la conexión se habrá establecido.
PASO 7
El video de su dispositivo fuente ahora se duplicará en su TV / proyector.
NOTA: Recomendamos usar este dispositivo solo para uso de línea de vista ya
que está diseñado como un dispositivo de corto alcance.
Page 15

Preguntas Frecuentes
Todo está conectado, los LED de alimentación están encendidos para ambos
dispositivos, pero no hay video en la pantalla de video.
1. Asegúrese de que la fuente de video y la pantalla de video estén encendidas.
2. Verifique la conexión del cable HDMI en ambos lados, tanto en el transmisor
como en el receptor, para asegurarse de que estén enchufados firme
y completamente.
3. Verifique la selección de entrada de video en el dispositivo de visualización de
video, asegúrese de que el puerto de entrada HDMI que seleccionó sea el
mismo que el que realmente conectó.
4. Si aún no hay video después de algún tiempo, conecte el dispositivo fuente
de video directamente a la pantalla de video con un cable HDMI para
asegurarse de que no haya problemas de compatibilidad.
5. Si la conexión directa está funcionando, vuelva a conectar todo y reinicie
(desenchufe y vuelva a enchufar los cables de alimentación USB) tanto del
transmisor como del receptor y asegúrese de que los LED de alimentación
e inalámbricos se enciendan en el transmisor y el receptor.
El video parpadea o no es estable en la pantalla de video.
1. Compruebe la distancia y el medio ambiente; asegúrese de que ningún otro
dispositivo inalámbrico con una señal fuerte esté cerca.
Si se ha verificado todo lo anterior y todavía no se muestra ningún video,
comuníquese con el Soporte Técnico de IOGEAR para obtener más ayuda.
4
Garantía limitada
Garantía limitada
Información sobre la garantía
Este producto está protegido por una garantía limitada de 1 año. Para los términos
y condiciones de la garantía, visite
https://www.iogear.com/support/warranty
Registre el producto en línea en https://www.iogear.com/register
Información importante sobre el producto
Modelo___________________
Número de serie___________________
Page 16

Contacto
¡ESTAMOS AQUÍ PARA AYUDARLE! ¿NECESITA AYUDA CON ESTE
PRODUCTO?
Asegúrese de:
1. Visitar www.iogear.com para más información sobre nuestros productos
2. Visitar www.iogear.com/support para ayuda en directo y soporte técnico sobre
el producto
IOGEAR
Información de Conformidad
https://iogear.custhelp.com
support@iogear.com
www.iogear.com
Información de Conformidad
Declaración de Interferencia de la Comisión Federal de Comunicaciones
Este equipo ha sido probado y cumple con los límites para un servicio digital de
Clase B, de acuerdo con la Parte 15 de las Normas de la FCC. Estos límites están
diseñados para proporcionar una protección razonable frente a interferencias
perjudiciales en entornos residenciales. Este equipo genera, utiliza y puede irradiar
energía de radiofrecuencia y, si no se instala o utiliza de forma adecuada según las
instrucciones, puede provocar interferencias perjudiciales para las comunicaciones
de radio. Sin embargo, no se garantiza que las interferencias no se den en una
instalación en particular. Si este equipo causara interferencias perjudiciales en la
recepción de radio o televisión, lo cual puede determinarse apagando y encendiendo
el equipo, se ruega al usuario que intente corregir la interferencia mediante una o
varias de las siguientes medidas:
• Vuelva a orientar o ubicar la antena receptora.
• Aumente la distancia de separación entre el equipo y el receptor.
• Conecte el equipo a la salida d¬e un circuito diferente al que se encuentra
conectado el receptor.
• Consulte con su establecimiento de compra o con el representante de servicios
para obtener más sugerencias.
Advertencia FCC: Cualquier cambio o modificación que no esté expresamente
aprobada por la parte responsable del cumplimiento podría invalidar la autoridad del
usuario para operar este equipo.
Cumplimiento CE
Este dispositivo ha sido probado y cumple con las directivas de la Unión Europea
siguientes: Capacidad electromagnét ca (2004/108/CE), baja tensión (2006/95/EC) y R
& TTED (1999/5/CE).
 Loading...