

Page 1
NetShair Nano
Ultra Portable Wi-Fi Router/Access Point
Quick Start Guide
GWPAP1
PART NO. Q1376
www.iogear.com
Page 2
1
RS
2
3
5
6
4
1
7
8
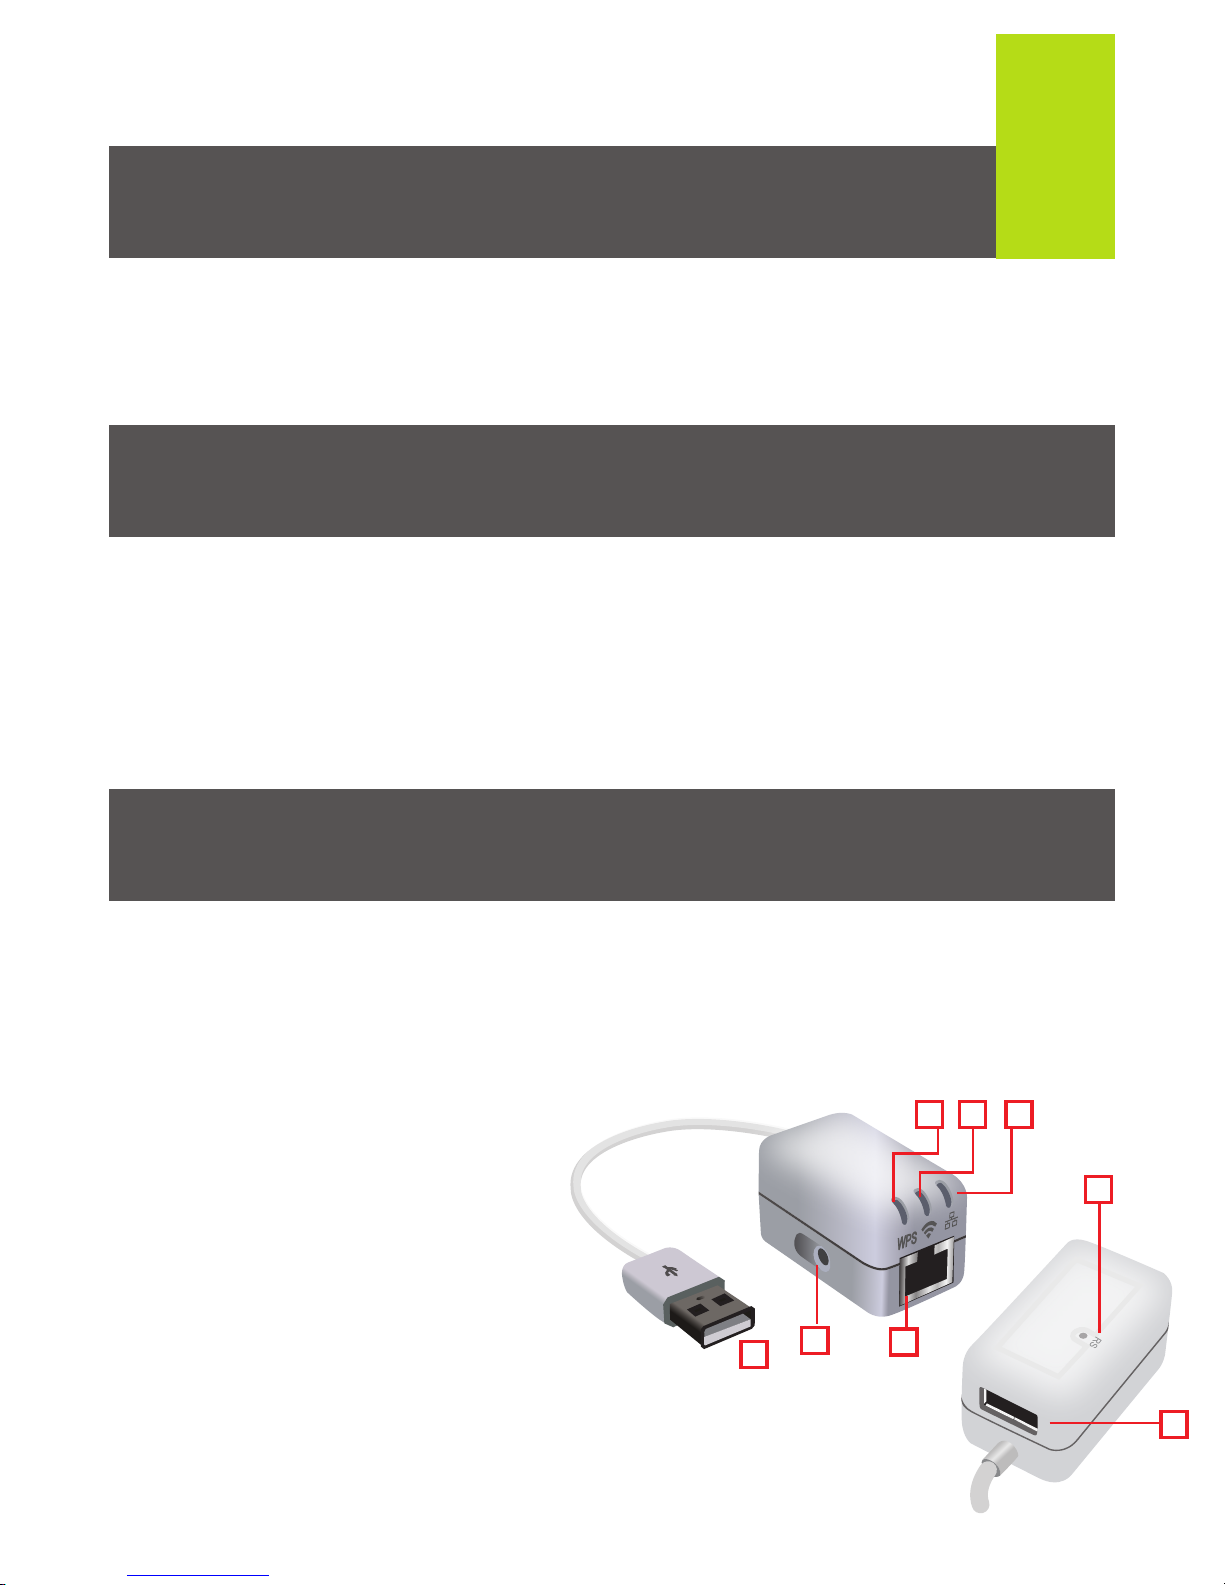
Package Contents
System Requirements
Overview
1 x NetShair Nano Wi-Fi
Router/Access Point
• USB port or USB charging adapter
• Wired Ethernet connection with standard RJ45 connector
• Wi-Fi equipped computer or wireless device
• Mobile devices require either Android 2.3.3 & up or iOS 5.1 & up
1. WPS green LED status indicator
Flashing = WPS mode active
Off = WPS mode off
2. WLAN blue LED status indicator
Flashing = Network active
Off = No active network
3. Network green LED
LED On = Port is linked
Flashing = Data is being
transmitted / received
Off = No active link
4. RJ-45 Ethernet port
5. WPS (Wi-Fi Protected Setup)
button
6. USB power connection
7. Reset button
8. USB pass-through
charging port
1 x Quick Start Guide
1 x Warranty Card
Page 3
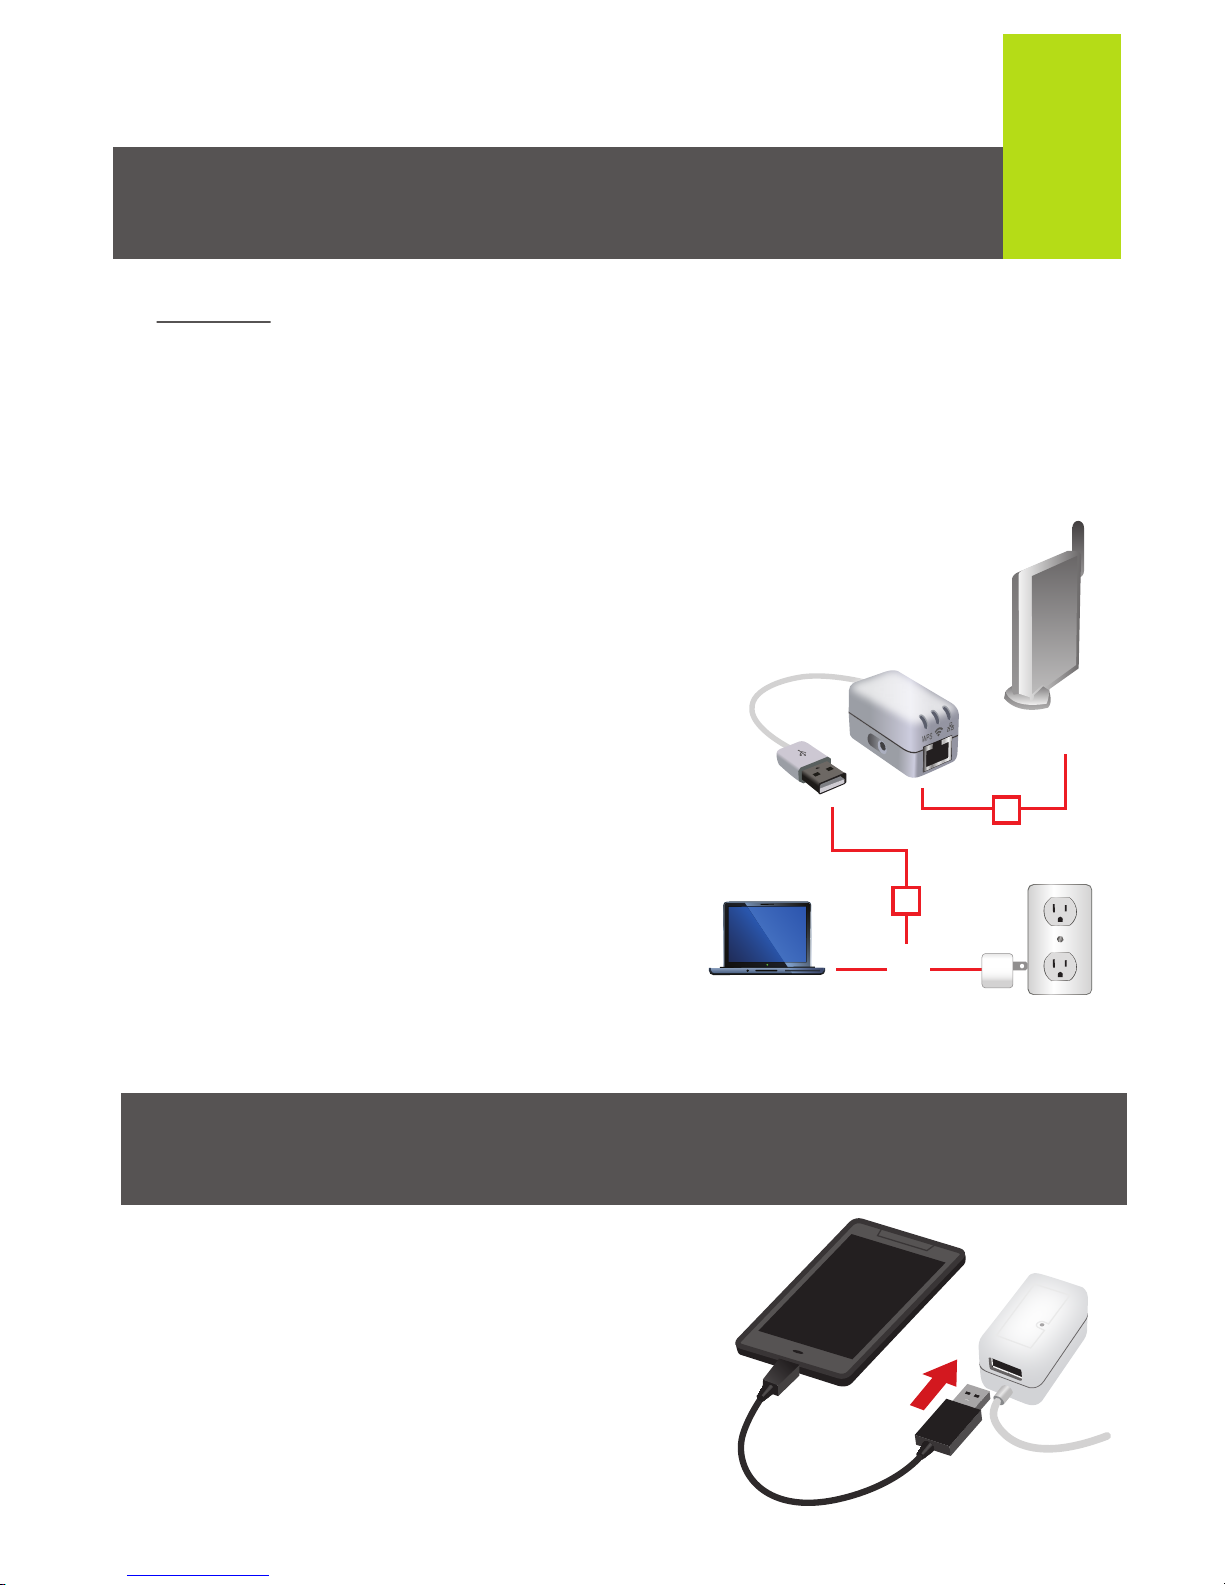
2
RS
Modem
or
1
5
1. To power on the NetShair Nano, plug into a USB port on
your computer or to a USB charging adapter for any
mobile device.
2. Download the NetShair Nano App for Android™ or
iPod
®
/iPhone®/iPad® from their respective App stores
Hardware Installation
Charging
USB pass-through charging port:
connect to charge most
smartphones and USB devices (1A
maximum pass-through current).
(App not required for PC/MAC).
3. Connect to the NetShair_Nano_XXXX
Wi-Fi network. Note: XXXX= Last 4
digits of the MAC ID.
4. Follow the software app/client
instructions shown for your device.
iOS users go to page 3, Android
page 8, PC users page 13.
5. Connect the Ethernet cable to
the NetShair Nano.
6. Launch your device browser to
access the internet
USB wall charger not included
Do not connect the Ethernet cable until app/client setup
is complete
Page 4
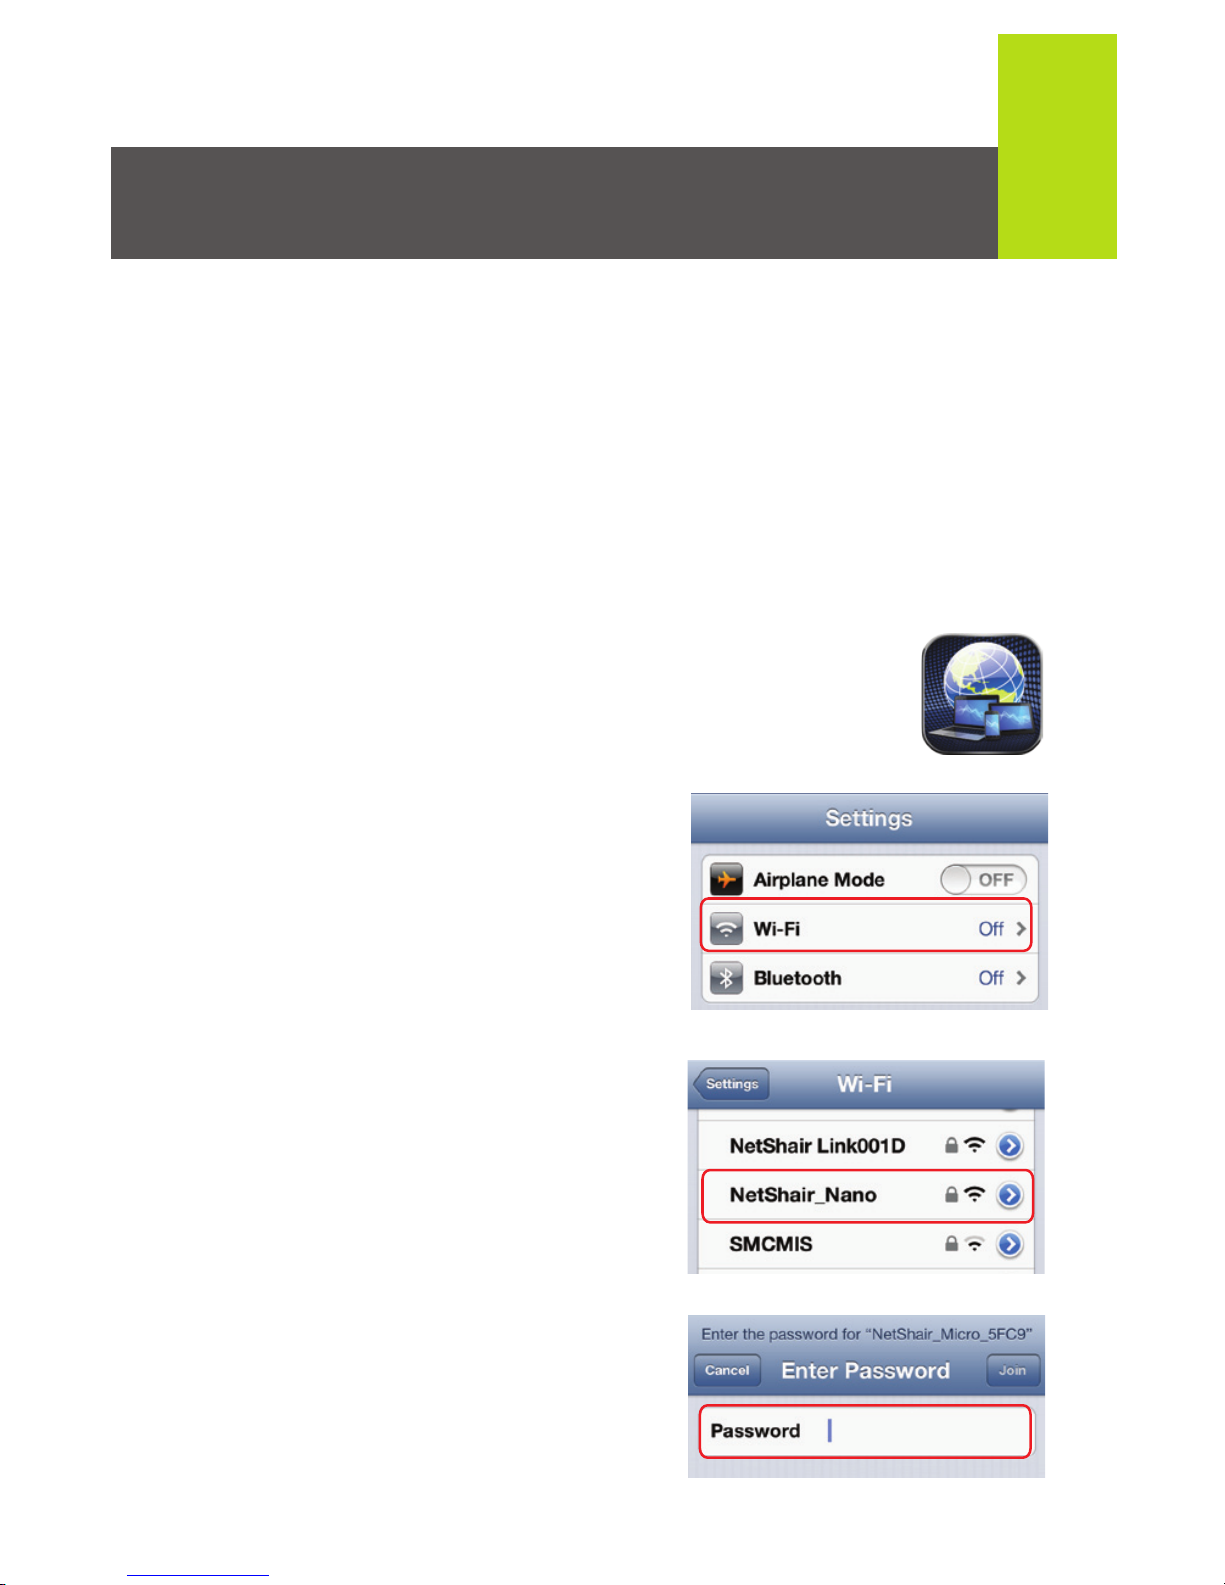
3
NetShair Nano Setup (iPod
®
/ iPhone® / iPad®)
1. Do not connect Ethernet cable until last step! (See Internet
Connection)
2. Connect the NetShair Nano to a powered USB port on your
computer or to a USB charging adapter for any mobile
device.
3. Open the App Store on your iPod®, iPhone® or iPad®.
Search for the "NetShair Nano" app and download it to
your device.
4. After installation is complete, the NetShair
Nano App icon will be shown on the device.
5. Open the Settings menu on your
device and set Wi-Fi to ON.
6. Choose "NetShair_Nano_XXXX"
network.
7. Enter the default password
"12345678" and tap Join to
connect. Wi-Fi will display
NetShair_Nano_XXXX.
Page 5
4
Internet Connection (iPod
®
/ iPhone® / iPad®)
Option 1: Router Mode
This option is used to convert an Ethernet connection to Wi-Fi
with DHCP support. Note: This is the most common Internet
configuration.
1. Make sure the “NetShair_Nano_XXXX” Wi-Fi network is
connected. Open the NetShair Nano App.
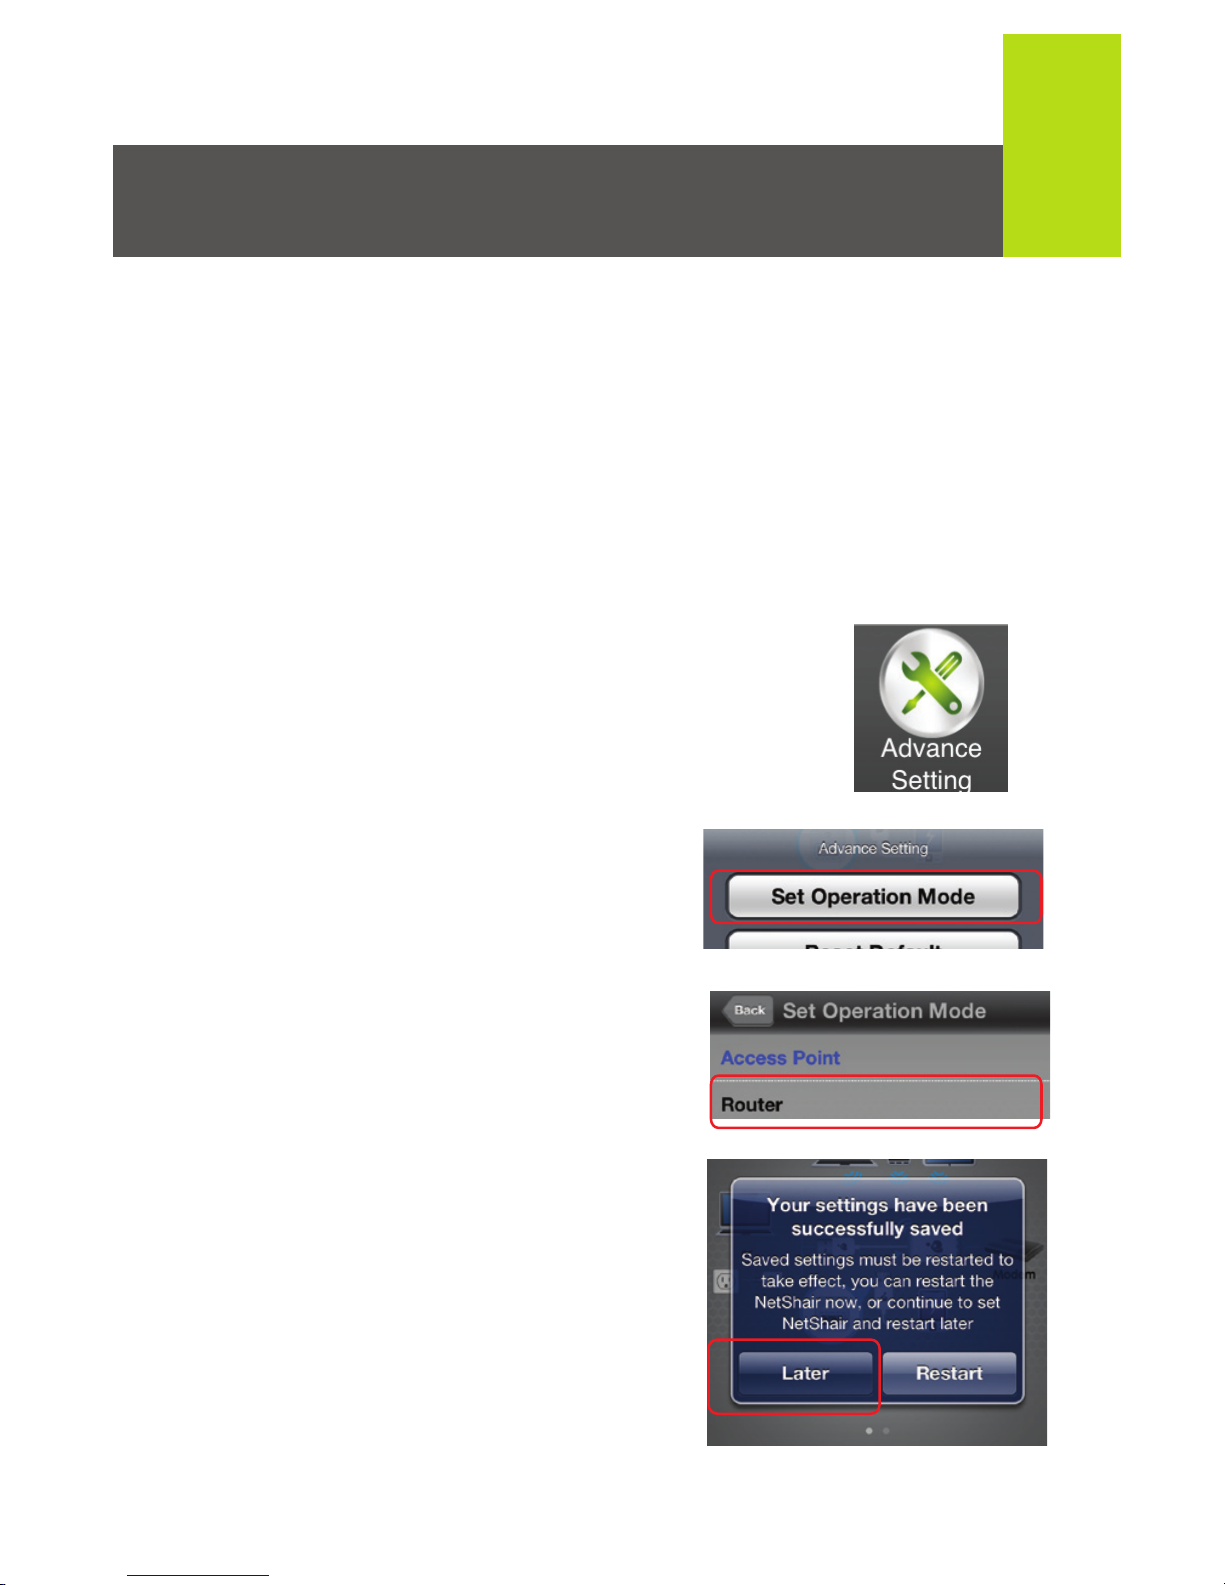
2. On the Home screen, tap Advance
Setting.
3. Tap the Set Operation Mode
button
4. Select Router for the Operation
Mode.
5. A notification saying your settings
have been saved will appear, tap
Later to continue without the
NetShair Nano rebooting.
Page 6
5
6. On the Home screen,
tap Advance Setting,
then Set WAN
Interface.
7. The default setting is DHCP client.
If the network requires a username
and password to access, select
PPPoE. Enter the username and
password then tap OK.
8. Tap Restart to sve settings.
9. After the NetShair Nano reboots,
connect an Ethernet cable to the
NetShair Nano. The Network LED
indictor will light solid once a
successful connection has been
made.
Page 7

6
Option 2: Access Point
This option is used to convert an Ethernet connection to Wi-Fi
Access Point without DHCP support.
1. Make sure the “NetShair_Nano_XXXX” Wi-Fi network is
connected. Open the NetShair Nano App.
2. On the Home screen, tap Advance Settings.
3. Tap Set Operation Mode and then tap
Access Point.
4. Tap Restart to save settings.
5. After the NetShair Nano reboots,
connect an Ethernet cable to the
NetShair Nano. The Network LED
indictor will light solid once a
successful connection has been made.
Page 8

7
Wireless Security Settings (iPod
®
/ iPhone® / iPad®)
Option 1: Wireless Password
To change the pre-shared network key, enter a new key with
a minimum of 8 characters.
1. Tap Basic Setting > Set Wireless Security >
Fill in new Password > Tap OK
Option 2: Network Name
To change the name of your wireless network (SSID) enter the
new name in the SSID box.
1. Tap Basic Setting > Set Wireless SSID > Fill in new SSID >
Tap OK
Page 9

8
NetShair Nano Setup (Android™)
1. Do not connect Ethernet cable until last step! (See
Internet Connection)
2. Connect the NetShair Nano to a powered USB port on
your PC or connect to a USB charging adapter for any
mobile device.
3. Open the Google Play™ Store on your Android™ device.
Search for the "NetShair Nano" app and download it to
your device.
4. After installation is complete, the NetShair Nano
App icon will be shown on the device.
5. Open the Settings menu on your
device and set Wi-Fi to ON.
6. Choose "NetShair_Nano_XXXX"
network.
7. Enter the default password
"12345678" and tap Connect.
Wi-Fi will display
NetShair_Nano_XXXX.
Page 10

9
Internet Connection (Android™)
Option 1: Router Mode
This option is used to convert an Ethernet connection to Wi-Fi
with DHCP support. Note: This is the most common Internet
configuration.
1. Make sure the “NetShair_Nano_XXXX” Wi-Fi network is
connected. Open the NetShair Nano App.
2. On the Home screen, tap
Advance Setting.
3. Tap Set Operation
Mode and then tap
Router and press OK.
4. A notification saying your settings
have been saved will appear, tap
Later to continue without the
NetShair Nano rebooting.
5. On the Home screen, tap Advance
Settings, then Set WAN
Interface.
6. By default the NetShair Nano is set
to DHCP client. If the network
requires a username and
password to access, select
PPPoE. Enter the username and
password then tap OK.
Page 11

10
Option 2: Access Point
This option is used to convert an Ethernet connection to
Wi-Fi Access Point without DHCP support.
1. Make sure the “NetShair_Nano_XXXX” Wi-Fi network is
connected. Open the NetShair Nano App.
2. On the Home screen, tap Advance Setting.
3. Tap Set Operation Mode and then Access
Point.
4. Tap Restart to save settings.
5. After the NetShair reboots,
connect an Ethernet cable. The
Network LED indictor will light
solid once a successful
connection has been made.
6. Tap Restart to save settings.
7. After the NetShair Nano reboots,
connect an Ethernet cable. The
Network LED indictor will light
solid once a successful connection
has been made.
Page 12

11
Wireless Security Settings (Android™)
Option 1: Wireless Password
To change the pre-shared network
key, enter a new key with a minimum
of 8 characters
1. Tap Basic Setting > Set Wireless
Security > Fill in new Password >
Tap OK
Option 2: Network Name
To change the name of your wireless network (SSID) enter the
new name in the SSID box.
1. Tap Basic Setting > Set Wireless SSID > Fill in new SSID >
Tap OK
Page 13

12
NetShair Nano Setup (Laptop / Computer)
1. Do not connect Ethernet cable until last step! (See Internet
Connection)
2. Power on the NetShair Nano by plugging it into a powered
USB port on your Laptop or Desktop or by plugging it into a
USB charging adapter for a USB mobile device.
3. Click on the wireless icon on the bottom right corner of the
screen.
4. Choose the
“NetShair_Nano_XXXX”
Network.
5. Enter the default password
“12345678” and then press
OK to connect.
6. Wireless Network
connection will show
NetShair_Nano_XXXX
connected.
Page 14

13
Internet Connection (Laptop / Computer)
Option 1: Router Mode
This option is used to convert an Ethernet connection to Wi-Fi
with DHCP support. Note: This is the most common Internet
configuration.
1. Make sure the
“NetShair_Nano_XXXX” Wi-Fi
network is connected. Open the
Browser and enter
192.168.1.254 into the address
bar to access the web client.
2. On the Operation Mode page,
click the drop down menu and
select Router, then click Apply
Change. A notification saying
your settings have been saved
will appear, click Reboot Later
to continue without the NetShair
Nano rebooting.
3. By default the NetShair Nano is set to
DHCP client. If the network the
NetShair Nano is connected to
requires a username and password to
access, select TCP/IP Settings, then
click WAN Interface.
Page 15

14
Enter the username and
password provided by the
administrator and click
Apply Changes.
4. The NetShair Nano will need to reboot to apply the changes
made. Click Reboot Now.
5. Once rebooted, connect an Ethernet
cable from the modem to the NetShair
Nano.
Page 16

15
Option 2: Access Point Mode
This option is used to convert an Ethernet connection to Wi-Fi
Access Point without DHCP support.
1. Make sure the
“NetShair_Nano_XXXX” Wi-Fi
network is connected. Open the
Browser and enter 192.168.1.254
into the address bar to access
the web client.
2. On the Operation Mode page,
click the drop down menu and
select AP, then click Apply
Change.
3. The NetShair Nano will need to
reboot to apply the changes
made. Click Reboot Now.
4. Once rebooted, connect an
Ethernet cable from the modem
to the NetShair Nano.
Page 17

16
Wireless Security Settings (Laptop/Computer)
Option 1: Wireless Password
1. Make sure the “NetShair_Nano_XXXX” Wi-Fi network is
connected. Open the Browser and enter 192.168.1.254 into
the address bar to access the web client.
2. Select Wireless, then click Security.
3. Click the drop down menu for Encryption and select from the
following: WEP, WPA, WPA2, or WPA-Mixed (Recommended).
4. Enter a new network key with a minimum of 8 characters and
click Apply Changes.
5. The NetShair Nano will need to reboot to apply the changes
made. Click Reboot Now.
Page 18

17
Option 2: Network Name (SSID)
1. Make sure the “NetShair_Nano_XXXX” Wi-Fi network is
connected. Open the Browser and enter 192.168.1.254 into
the address bar to access the web client.
2. Select Wireless, then click Basic Settings
3. Enter the new network name in the SSID box and click
Apply Changes.
4. The NetShair Nano will need to reboot to apply the changes
made. Click Reboot Now.
Page 19

Hotel Usage Explanation Note
FCC Statement
CE Statement
Hotel provides wired Internet access
1. Power on the NetShair Nano by plugging it into a powered
USB port on your Laptop or Desktop or by plugging it into a
USB charging adapter for a USB mobile device.
2. Connect your iPhone/iPad/Android Phone/Android
Tablet/Laptop to the device through Wi-Fi (Note: If hotel
requires user name & password for internet access, you must
connect your device to the NetShair Nano before you plug in
the Ethernet cable!).
3. Follow the setup directions shown for your device type.
4. Connect the Ethernet cable in hotel to the WAN port of device.
This product has been tested and found to comply with the
limits for a Class A digital device, pursuant to Part 15 of the FCC
Rules. These limits are designed to provide reasonable
protection against harmful radio frequency interference when
operated in a commercial environment. See User Manual for
additional information.
This device has been tested and found to comply with the
following European Union directives: Electromagnetic
Capability (2004/108/EC), Low Voltage (2006/95/EC) and
R&TTED (1999/5/EC).
Page 20

WE’RE HERE TO HELP YOU! NEED ASSISTANCE SETTING
UP THIS PRODUCT?
Make sure you:
1. Visit www.iogear.com for more product information
2. Visit www.iogear.com/support for live help and product
support
Warranty Information
This product carries a 1 Year Limited Warranty. For the terms
and conditions of this warranty, please go to
http://www.iogear.com/support/warranty
Register online at http://www.iogear.com/register
Important Product Information
Product Model
Serial Number
Limited Warranty
Contact
Toll Free 866-9-IOGEAR (USA)
Phone: 949-453-8782
19641 Da Vinci, Foothill Ranch, CA 92610
www.iogear.com
support@iogear.com
 Loading...