

Page 1

GUCE64
PART NO. Q1346
www.iogear.com
Quick Start Guide
USB 2.0 4-Port BoostLinq Ethernet – 164ft
Guide de demarrage rapide
Ethernet BoostLinq à 4 ports USB 2.0 - 164 pi (50 m)
Guia de confirguarcion rapide
Ethernet BoostLinq de 4 puertos USB 2.0 - 164ft
Page 2
1 x GUCE64 Local Unit
1 x GUCE64 Remote Unit
1 x USB Type A to B cable
1 x Power Adapter
1 x Quick Start Guide
1 x Warranty Card
Package Contents
System Requirements
Overview
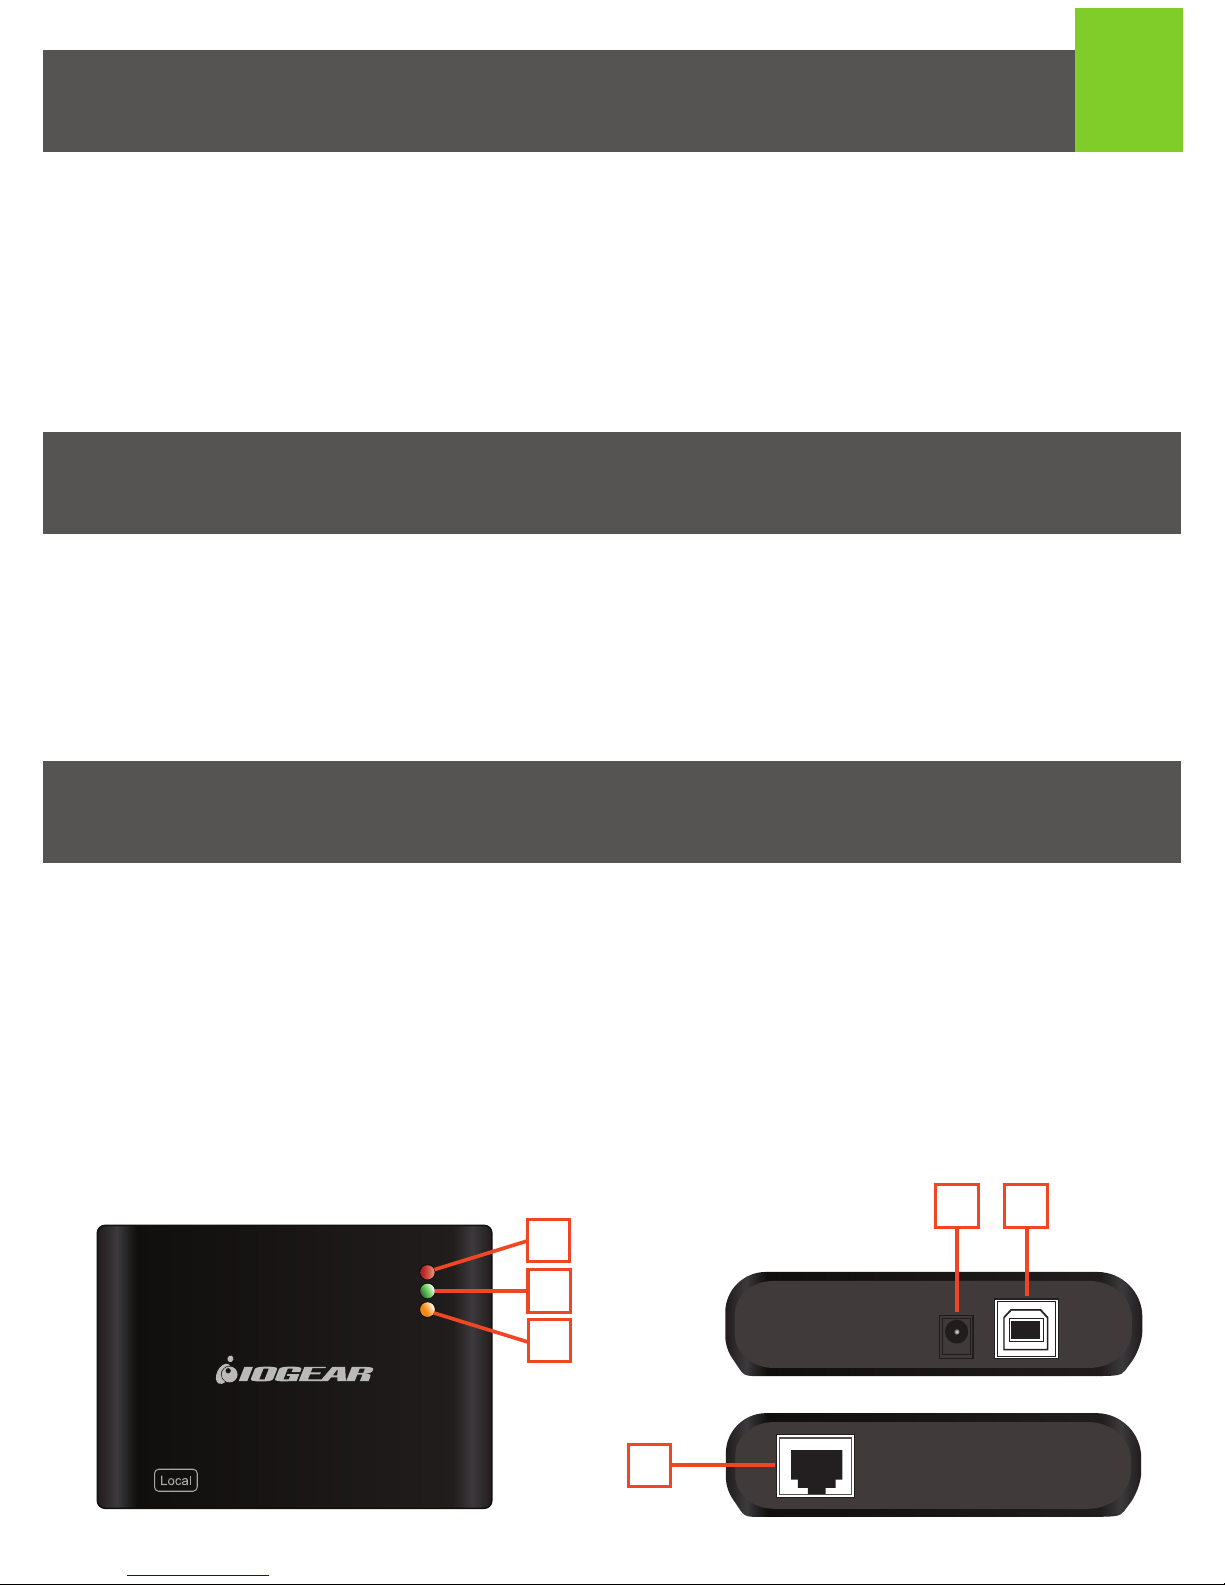
GUCE64 Local Unit
1. Power LED – Red (when Local Unit is connected to a computer)
2. Device LED – Green (when a USB device is connected to Local Unit)
3. Link LED – Orange (when Local Unit is connected to Remote Unit over Cat5,
Cat5e, or Cat6 cable)
4. Power Port (Not required)
5. USB Type B Port
6. RJ45 Port
Operating System:
• Windows Vista
®
, Windows® 7,
Windows
®
8, Windows® 8.1
• Mac OS X 10.3.9+
• USB Port
1
1
2
3
Power
Device
Link
4 5
6
Hardware:
• USB 2.0 port
• USB 2.0 device
• Cat5, Cat5e, or Cat6 RJ45 ethernet cable
Page 3
Hardware Installation
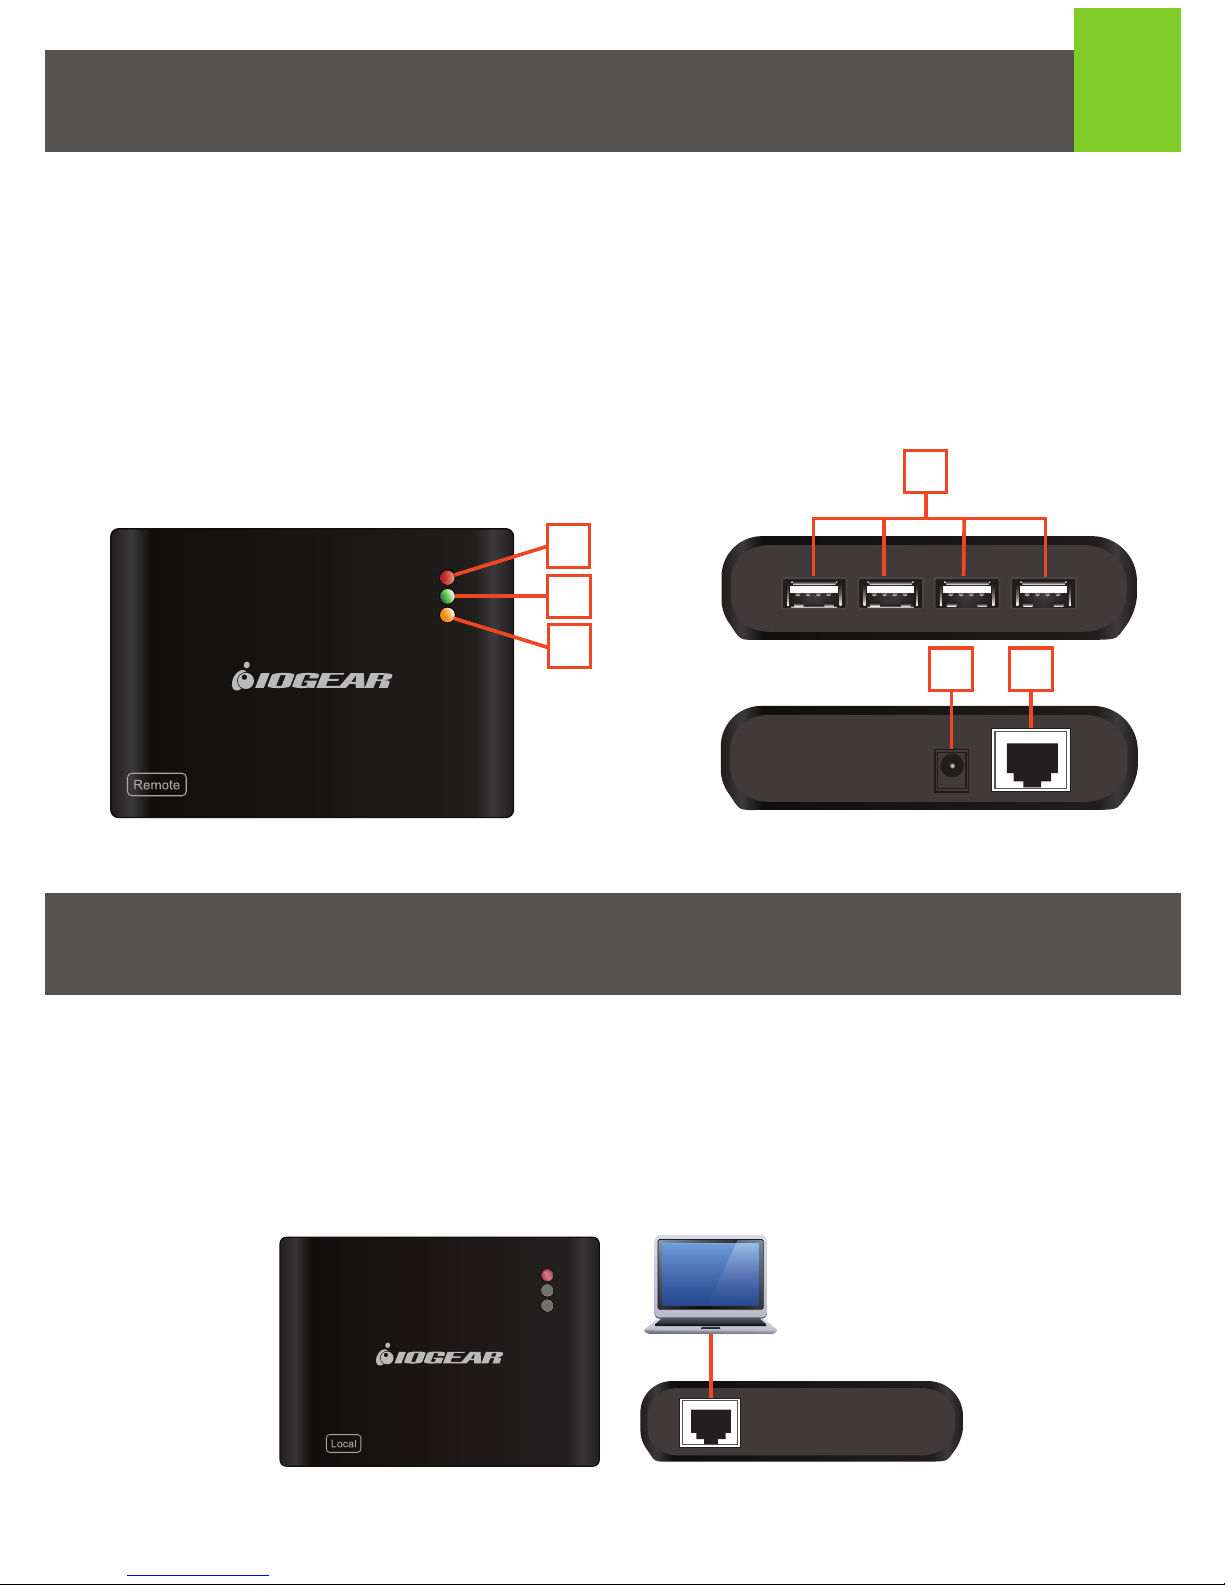
GUCE64 Remote Unit
1. Power LED – Red (when Remote Unit is connected to the power adapter)
2. Device LED - Green (when a USB device is connected to Local Unit)
3. Link LED - Orange (when Local Unit is connected to Remote Unit over Cat5,
Cat5e, or Cat6 cable)
4. USB Type A Ports x 4
5. Power Port
6. RJ45 Port
2
1
2
3
Power
Device
Link
4
5 6
1. Connect the GUCE64 BoostLinq Ethernet Local Unit to your computer, using the
included USB Type A to B cable. Plug the USB A end of the cable to your computer
and the USB B end to the GUCE64 Ethernet Local Unit. Power LED on Local Unit
should show red.
Local Unit
Power
Device
Link
Page 4
3
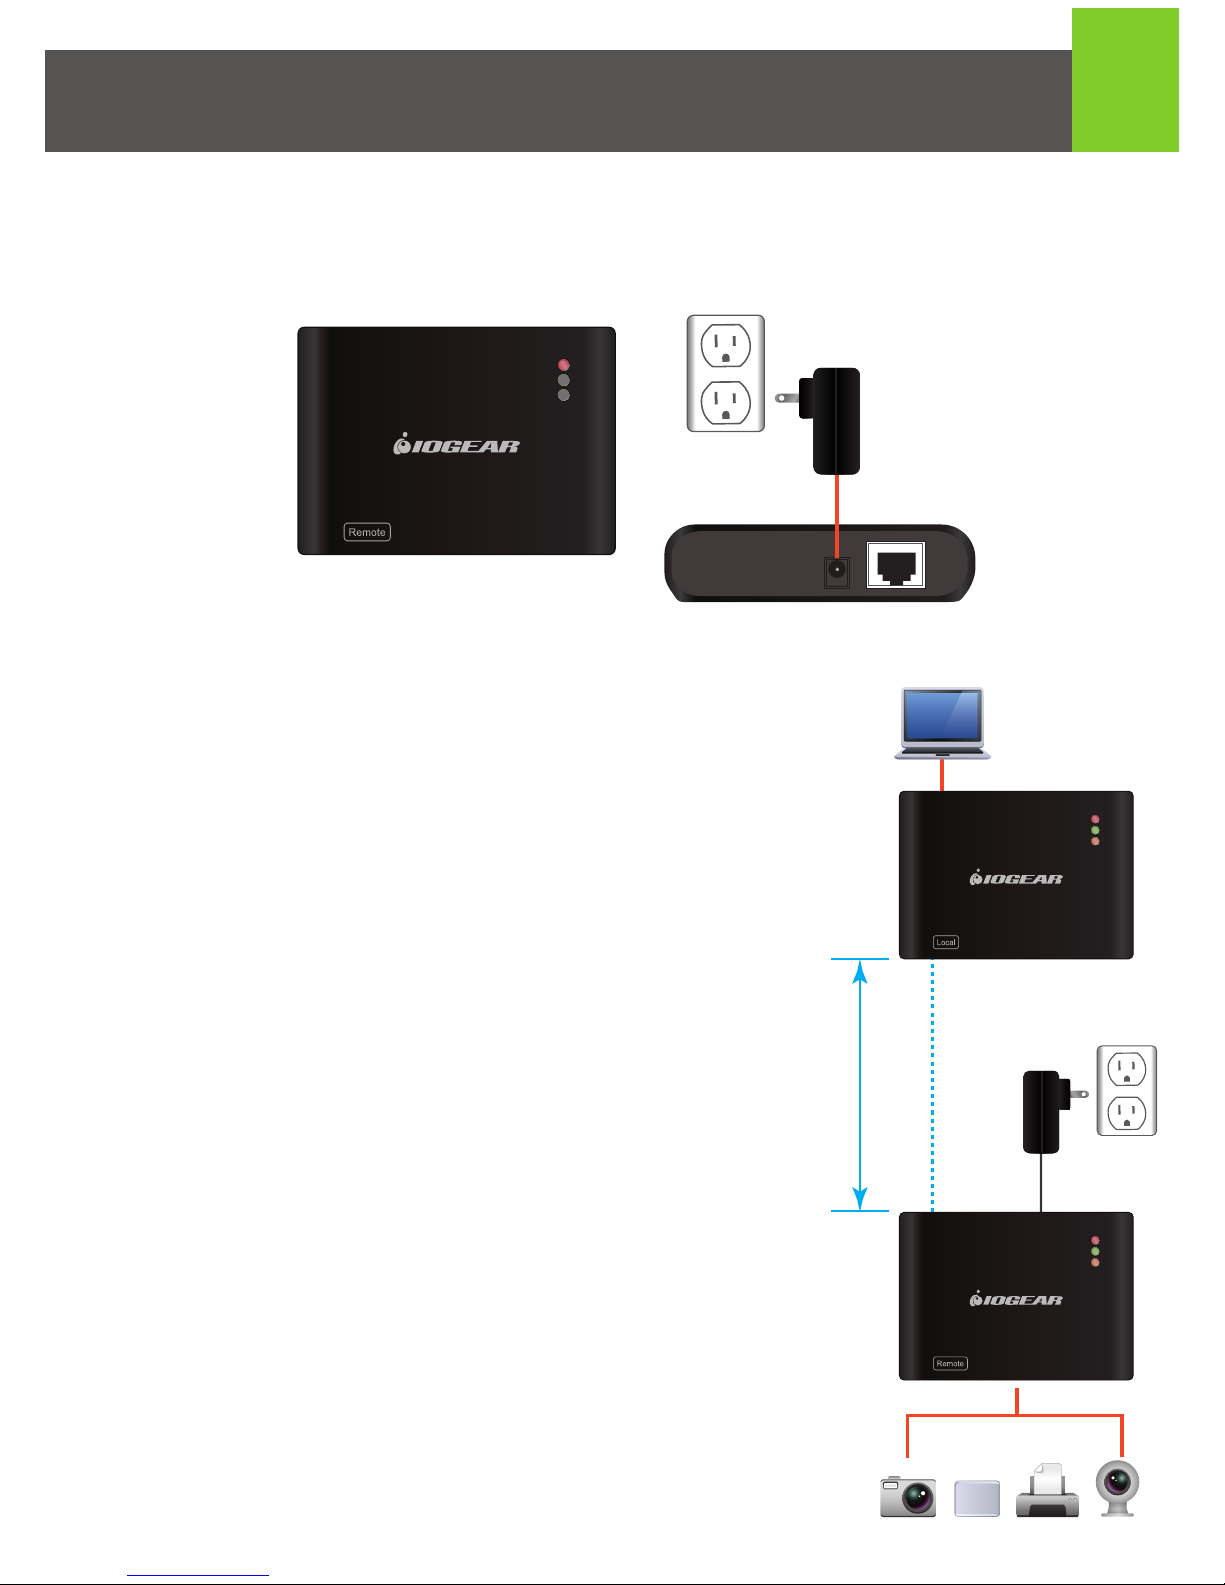
3. Connect the GUCE64 BoostLinq Ethernet Local
Unit with the Remote Unit, using a Cat5, Cat5e,
or Cat6 cable (not included). Link LED on both
Local and Remote Unit should show orange.
4. Plug up to four USB devices to the GUCE64
BoostLinq Ethernet Remote Unit. Device LED on
both Local and Remote Unit should show green.
5. The GUCE64 is plug-n-play, no additional driver or
software needed.
3.
4.
Power
Device
Link
Power
Device
Link
164ft
Cat5/Cat5e/Cat6
Remote Unit
Local Unit
HDD
2. Connect the GUCE64 BoostLinq Ethernet Remote Unit to a power source, using
the included power adapter. Power LED on Remote Unit should show red.
Remote Unit
Power
Device
Link
Page 5

Limited Warranty
This product carries a 3 Year Limited Warranty. For the terms and conditions of this
warranty, please go to http://www.iogear.com/support/warranty
Register online at http://www.iogear.com/register
Important Product Information
Product Model
Serial Number
Compliance Information
FCC Statement
This equipment has been tested and found to comply with the limits for a Class B
digital device, pursuant to Part 15 of the FCC Rules. These limits are designed to
provide reasonable protection against harmful interference in a residential setting.
This product generates, uses, and can radiate radio frequency energy and, if not
installed and used as directed, it may cause harmful interference to radio
communications. Although this product complies with the limits for a Class B
digital device, there is no guarantee that interference will not occur in a
particular installation.
CE Compliance
This device has been tested and found to comply with the following European Union
directives: Electromagnetic Capability (2004/108/EC).
Declaration of Conformity and related documents can be downloaded directly from
our website: http://www.iogear.com/product/GUCE64/certifications.
Page 6

Contact
WE’RE HERE TO HELP YOU!
NEED ASSISTANCE SETTING UP THIS PRODUCT?
Make sure you:
1. Visit www.iogear.com for more product information
2. Visit www.iogear.com/support for live help and product support
iogear.custhelp.com
support@iogear.com
www.iogear.com
19641 Da Vinci, Foothill Ranch, CA 92610
Page 7

4 5
6
1 x Unité locale GUCE64
1 x Unité distante GUCE64
1 x Câble USB A vers B
1 x Adaptateur d'alimentation
1 x Guide de démarrage rapide
1 x Carte de garantie
Contenu de l'emballage
Exigences système
Vue d'ensemble
Unité locale GUCE64
1. DEL d'alimentation - Rouge (connecté à un ordinateur)
2. DEL de périphérique - Verte (lorsqu'un périphérique USB est connecté à
l'unité locale)
3. DEL de liaison - Orange (lorsque l'unité locale est connectée à l'unité distante par
Cat5, Cat5e ou un câble Cat6)
4. Port RJ45
5. Port USB de Type B
6. Port d'alimentation (non requis)
Operating System:
• Windows Vista
®
, Windows® 7,
Windows
®
8, Windows® 8.1
• Mac OS X 10.3.9+
• Port USB
1
1
2
3
Power
Device
Link
Hardware:
• Port USB 2.0
• Périphérique USB 2.0
• Cat5, Cat5e, or Cat6 RJ45 ethernet cable
Page 8

2
Installation du matériel
Unité distante GUCE64
1. DEL d'alimentation - Rouge (lorsque l'unité distante est connectée à un
adaptateur d'alimentation)
2. DEL de périphérique - Verte (lorsqu'un périphérique USB est connecté à
l'unité locale)
3. DEL de liaison - Orange (lorsque l'unité distante est connectée à l'unité distante
par Cat5, Cat5e ou un câble Cat6)
4. Port RJ45
5. 4 Ports USB de Type A
6. Port d'alimentation
1
2
3
Power
Device
Link
4
5 6
1. Branchez l'unité locale Ethernet BoostLinq GUCE64 à votre ordinateur à l'aide du
câble USB A vers B inclus. Connectez l'extrémité USB A du câble à votre
ordinateur et l'extrémité USB B à l'unité locale Ethernet GUCE64. La DEL
d'alimentation de l'unité locale devrait être rouge.
Local Unit
Power
Device
Link
Page 9

3
3. Branchez l'unité locale Ethernet BoostLinq
GUCE64 à l'unité distante, à l'aide d'un câble Cat5,
Cat5e ou Cat6 (non inclus). La DEL de liaison de
l'unité locale et celle de l'unité distante devraient
être orange.
4. Branchez jusqu'à quatre périphériques USB sur
l'unité distante Ethernet BoostLinq GUCE64. La
DEL de périphérique de l'unité locale et celle de
l'unité distante devraient être vertes.
5. Le GUCE64 est prêt à l'emploi, aucun pilote
supplémentaire ou logiciel n'est nécessaire.
3.
4.
Power
Device
Link
Power
Device
Link
164ft
Cat5/Cat5e/Cat6
Remote Unit
Local Unit
HDD
2. Branchez l'unité distante Ethernet BoostLinq GUCE64 à une source d'alimentation,
à l'aide de l'adaptateur d'alimentation inclus. La DEL d'alimentation de l'unité
distante devrait être rouge.
Remote Unit
Power
Device
Link
Page 10

Garantie limitée
Renseignements sur la garantie
Ce produit comporte une garantie limitée de 1 an.
Pour connaître les modalités de cette garantie,
veuillez aller à http://www.iogear.com/support/warranty
Inscrivez-vous en ligne à http://www.iogear.com/register
Renseignements importants sur le produit
Modèle du produit
Numéro de série
Déclaration de Conformité
Déclaration de la FCC
Cet équipement a été testé et est conforme aux limitations établies pour les appareils
numériques de classe B, conformément à la section 15 du règlement de la FCC. Ces
limitations sont destinées à fournir une protection raisonnable contre les interférences
nuisibles en environnement résidentiel. Ce produit génère, utilise et peut émettre une
énergie de radiofréquence et, s’il n’est pas installé et utilisé conformément aux
instructions, peut causer des interférences nuisibles aux communications radio.
Conformité CE
Cet appareil a été testé et est conforme aux directives de l’Union européenne
suivantes: Capacité électromagnétique (2004/108/EC).
La déclaration de conformité et documents annexes peuvent être téléchargés sur
notre site web:
http://www.iogear.com/product/GUCE64/certifications
Page 11

Contact
NOUS SOMMES LÀ POUR VOUS AIDER! BESOIN D'AIDE POUR LA
CONFIGURATION DE CE PRODUIT?
Assurez-vous de:
1. Visiter www.iogear.com pour plus d'information sur le produit
2. Visiter www.iogear.com/support pour obtenir de l'aide et un soutien technique
en ligne
iogear.custhelp.com
support@iogear.com
www.iogear.com
19641 Da Vinci, Foothill Ranch, CA 92610
Page 12

4 5
6
1 x Unidad local GUCE64
1 x Unidad remota GUCE64
1 x Cable USB A a B
1 x Adaptador de corriente
1 x Guía rápida de inicio
1 x Tarjeta de garantía
Contenido del paquete
Requisitos del sistema
Generalidades
Unidad local GUCE64
1. LED indicador de corriente - Rojo (conectado a una computadora)
2. LED indicador de dispositivo - Verde (cuando un dispositivo USB está conectado
a una unidad local)
3. LED indicador de enlace - Anaranjado (cuando la unidad local está conectada a
una unidad remota con un cable Cat5, Cat5e o Cat6)
4. Puerto RJ45
5. Puerto USB Tipo B
6. Puerto de alimentación (no es necesario)
Operating System:
• Windows Vista
®
, Windows® 7,
Windows
®
8, Windows® 8.1
• Mac OS X 10.3.9+
• Puerto USB
1
1
2
3
Power
Device
Link
Hardware:
• Puerto USB 2.0
• Dispositivo USB 2.0
• Cat5, Cat5e, or Cat6 RJ45 ethernet cable
Page 13

Local Unit
Power
Device
Link
2
Instalación del hardware
Unidad remota GUCE64
1. LED indicador de corriente - Rojo (conectado a una adaptador de corriente)
2. LED indicador de dispositivo - Verde (cuando un dispositivo USB está conectado
a una unidad local)
3. LED indicador de enlace - Anaranjado (cuando la unidad local está conectada a
una unidad remota con un cable Cat5, Cat5e o Cat6)
4. Puerto RJ45
5. 4 x Puertos USB Tipo A
6. Puerto de alimentación
1
2
3
Power
Device
Link
4
5 6
1. Conecte la unidad local de Ethernet BoostLinq GUCE64 a su computadora usando
el cable USB Tipo A incluido al cable B. Enchufe el extremo A del cable USB a su
computadora y el extremo B del cable USB a la unidad local de Ethernet GUCE64.
El LED indicador de corriente de la unidad local debe estar en rojo.
Page 14

3
3. Conecte la unidad local de Ethernet BoostLinq
GUCE64 a la unidad remota, usando un cable
Cat5, Cat5e o Cat6 (no incluidos). El LED indicador
de enlace en la unidad local y la remota deben
estar en color anaranjado.
4. Conecte hasta cuatro dispositivos USB a la unidad
remota de Ethernet BoostLinq GUCE64. El LED
indicador de dispositivo en la unidad local y la
remota deben estar en color verde.
5. El GUCE64 es del tipo Conecta y funciona (plug
and play), y no se necesita software adicional
ni driver.
3.
4.
Power
Device
Link
Power
Device
Link
164ft
Cat5/Cat5e/Cat6
Remote Unit
Local Unit
HDD
2. Conecte la unidad remota de Ethernet BoostLinq GUCE64 a una fuente de
alimentación usando el adaptador de corriente incluido. El LED indicador de
corriente de la unidad local debe estar en rojo.
Remote Unit
Power
Device
Link
Page 15

Garantía limitada
Información sobre la garantía
Este producto está protegido por una garantía limitada de 1 año. Para los términos
y condiciones de la garantía, visite
http://www.iogear.com/support/warranty
Registre el producto en línea en http://www.iogear.com/register
Información importante sobre el producto
Modelo
Número de serie
Información de Conformidad
Declaración de la FCC
Este equipo ha sido probado y se determinó que cumple con los límites para un
dispositivo digital Clase B, conforme a la Parte 15 de las Normas FCC. Estos límites
están diseñados para proporcionar una protección razonable contra la interferencia
perjudicial en un entorno residencial. Este producto genera, utiliza y puede irradiar
energía de radiofrecuencia, y si no se instala y utiliza como se indica, puede
producir interferencia perjudicial en las radiocomunicaciones.
Cumplimiento CE
Este dispositivo ha sido probado y cumple con las directivas de la Unión Europea
siguientes: Capacidad electromagnética (2004/108/CE).
Declaration of Conformity and related documents can be downloaded directly from
our website: http://www.iogear.com/product/GUCE64/certifications
Page 16

Contacto
¡ESTAMOS AQUÍ PARA AYUDARLE!
¿NECESITA AYUDA CON ESTE PRODUCTO?
Asegúrese de:
1. Visitar www.iogear.com para más información sobre nuestros productos
2. Visitar www.iogear.com/support para ayuda en directo y soporte técnico sobre
el producto
iogear.custhelp.com
support@iogear.com
www.iogear.com
19641 Da Vinci, Foothill Ranch, CA 92610
 Loading...