

IOGear GCS1932M, GCS1934M, M1499-a, M1500-a User Manual

www.iogear.com
User Manual
2/4-Port 4K DisplayPortTM KVMPTM Switch with
Dual Video Out and RS-232
GCS1932M / GCS1934M
PART NO. M1499-a / M1500-a

©2018 IOGEAR. All Rights Reserved. Part No. M1499-a / M1500-a. IOGEAR, the IOGEAR logo is trademarks of IOGEAR.
Microsoft and Windows are registered trademarks of Microsoft Corporation. IOGEAR makes no warranty of any kind with regards
to the information presented in this document. All information furnished here is for informational purposes only and is subject to
change without notice. IOGEAR. assumes no responsibility for any inaccuracies or errors that may appear in this document.

3
Table of Contents
Introduction 4
Package Contents 4
Features 5
Requirements 6
Operating Systems 7
Overview 8
Hardware Setup 10
Basic Operation 12
Display Setup 14
Hotkey Operation 17
Troubleshooting 32
Compliance Information 32
Limited Warranty 33
Contact 33

4
IOGEAR’s GCS1932M/1934M 2/4-Port 4K DisplayPort KVMP Switch with Dual Video Out
and RS-232 takes a giant leap forward in KVM switch functionality by combining KVM
switch with a DisplayPort video interface, 2-Port USB 3.1 Gen1 hub and 2.1 channel audio
for rich bass in surround sound. DisplayPort technology provides up to 4K DCI - 4096 x
2160 @60Hz resolution that displays the most vivid high denition images available while
delivering premium sound for music, movies, and gaming.
GCS1932M/1934M allows users to access two or four DisplayPort computers from a single
USB keyboard, USB mouse, HDMI and/or DisplayPort monitor(s). In addition to the front
panel pushbuttons, hotkeys, and RS-232 commands, IOGEAR’s GCS1932M/1934M offers
the latest mouse port-switching functionality to change ports. Power ON detection feature
also ensures that if one computer is powered OFF, the GCS1932M/1934M will automatically
switch port to the next powered ON computer.
With built-in USB 3.1 Gen1 hub, each connected computer has SuperSpeed 5Gbps transfer
rate to all connected peripherals. GCS1932M/1934M’s independent (asynchronous)
switching feature allows the KVM to focus on one computer while the USB peripheral
focus on another. This eliminates the need to purchase separate USB hub or stand-alone
peripheral sharing device – such as printer server, modem splitter, etc.
IOGEAR’s GCS1932M/1934M’s built-in MST hub receives DisplayPort 1.2 signals from the
source device, independently splits and routes the video signals to multiple monitors.
Featuring a revolutionary combination of 4K resolutions, the next generation USB 3.0 Hub,
and enhanced user-friendly operation, IOGEAR’s GCS1932M/1934M provides the latest
innovations in desktop KVM technology.
Introduction
GCS1932M/1934M
1 x GCS1932M/ GCS1934M
2/4 x DisplayPort Cables
2/4 x USB 3.0 Cable Set
2/4 x Audio Cables
1 x Power Adapter
1 x User Manual
Package Contents
Please verify that all components are present and nothing was damaged in shipping. If you
encounter a problem, contact your dealer.
Read this manual thoroughly and follow the installation and operation procedure to prevent
any damage to the unit, and/or any of the devices connected to it.

5
• 2 (GCS1932M) or 4 (GCS1934M)-Port DisplayPort KVMP Switch with USB 3.1 Gen1 hub
and 2.1 surround sound audio
• One USB console controls two (GCS1932M) or four (GCS1934M) computers and two
USB 3.0 peripherals
• Computer selection via front panel pushbuttons, hotkeys, mouse1, and RS-232
2
• Independent switching of KVM, USB, and Audio focus
• Superior 4K video quality – 4K DCI (4096x2160 @60Hz)
• Dual-Mode DisplayPort (DP++) supports HDMI and DVI adapters
3
• 2-Port USB 3.0 Hub with SuperSpeed 5Gbps transfer rate
• DisplayPort 1.2 compliant and HDCP compliant
• Supports HD audio through DisplayPort
• Full bass response for high quality 2.1 channel surround sound systems
• Power On Detection – if a computer is powered OFF, GCS1932M/1934M automatically
switches to the next powered ON computer
• Hot pluggable – add or remove computers without turning GCS1932M/1934 power OFF
• Mouse emulation or bypass feature supports most mouse drivers and multifunction mice
• Multi-platform support
• Multilingual keyboard mapping supports English, French, and German keyboards
• Mac® keyboard support and emulation
4
• Auto Scan Mode feature to monitor all computers
• Firmware upgradeable
Note:
1. Mouse port switching supported by mouse emulation mode using a USB 3-button
mouse wheel.
2. DB9 to RJ-11 cable not included
3. DP++ active adapters are recommended if you are unsure of the video source’s
DP++ compatibility.
4. PC keyboard combinations emulate Mac® keyboards. Mac® keyboards only work using
their own Operating System.
Features

6
Console
• 1 DisplayPort or HDMI monitor capable of the highest possible resolution
• 1 USB mouse
• 1 USB keyboard
• Microphones and speakers (optional)
Computers
• DisplayPort port*
• USB Type-A port
• Audio ports (optional)
Cables
Use only the included IOGEAR DisplayPort KVM cable sets, designed specically to work
with the GCS1932M/1934M.
Note:
The quality of the display is affected by the quality and length of the cables. If you need
additional cable set, please contact your dealer or IOGEAR to purchase IOGEAR approved
cables.
*DisplayPort 1.1 PC source will result in mirror displays on 2 monitors. DisplayPort 1.2 MST
PC source may result in extend displays on 2 monitors. Certain graphic cards support up to
3 monitors with resolution on each monitor adjusted
Requirements
7
Operating Systems
OS Version
Windows
Linux
RedHat 9.0, Fedora and higher, RHEL AS 4, RHEL 5
SuSE 10 / 11.1 and higher; OpenSUSE 10.2; SLES 10 SP1
Debian
Ubuntu
IBM AIX
FreeBSD
Novell
3.1 / 4.0
7 / 10 and higher
7.04 / 7.10 and higher
Unix
4.3 / 5L (V5.2, V5.3) / V6 (V6.1)
Mac
5.5 / 6.1 /6.2
Netware 6.0 / 6.5
OS 10.1 / 10.2 / 10.3 / 10.4 / 10.5 / 10.7 / 10.8 and higher
8
CONSOLE
CONSOLE
4
5
2
6
1
1
2
7 4 6
3
4
5
7 4
3
GCS1932M Front View
GCS1932M Back View
Overview
GCS1934M Front View
GCS1934M Back View
9
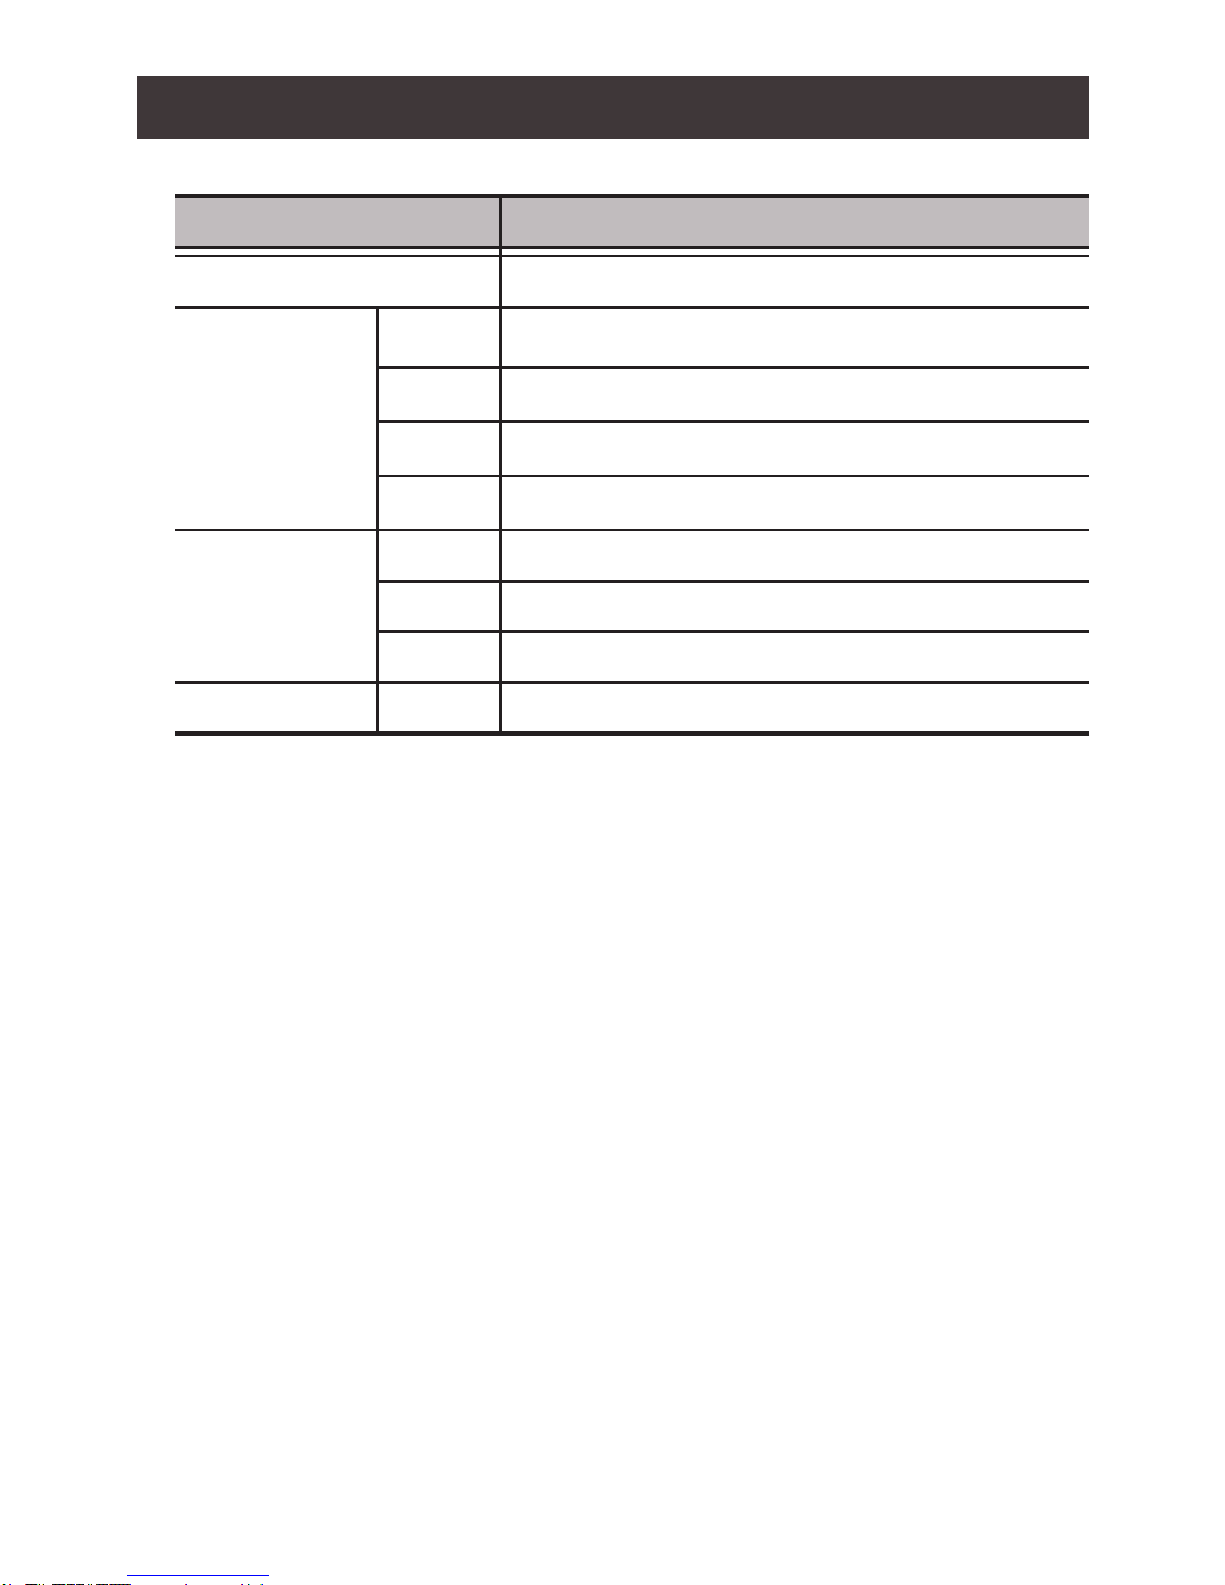
No. Component Description
1 Port Selection
Pushbuttons
For manual port selection (see Manual Switching)
• Press a port selection pushbutton for longer than two seconds to
bring the KVM, USB hub, and audio focus to the computer
connected to its corresponding port.
• Press a port selection pushbutton twice to bring the audio focus to
the computer connected to its corresponding port.
• Press a switch for less than two second to bring only the KVM focus
to the computer connected to its corresponding port.
• Press Auto Scan switch to start Auto Scan Mode or press pushbutton
1 and 2 simultaneously for two seconds.
• On GCS1934M, press K/M Reset to reset USB when it loses focus or
press switches 3 and 4 simultaneously to trigger this function.
2 Port LEDs The Port LEDs are built into the Port Selection Pushbuttons. The upper
LEDs are KVM Port LEDs, the lower LEDs are the USB LEDs:
KVM
• ONLINE LED lights DIM ORANGE to indicate that the computer
attached to the corresponding port is connected.
• Selected LED lights BRIGHT ORANGE to indicate that the
computer attached to the corresponding port is the one that has
the KVM FOCUS (Selected).
• LED ashes to indicate that the computer attached to its
corresponding port is being accessed under Auto Scan Mode.
USB
• Selected LED lights GREEN to indicate that the computer plugged
to its corresponding port has the access to the USB Peripherals.
3 Audio Ports The cables from the main microphone and speakers are to be
connected into these audio ports microphone and speakers connected
into these audio ports have priority over those connected in the rear
side panel of the GCS1932M/1934M.
4 USB 3.0 Hub USB peripherals (printers, scanners, etc.) can be connected into this
port. The built-in USB 3.0 ports feature 5 Gbps data transfer rates for
compatible USB peripherals.
5 Console
Ports
The cables from the DisplayPort monitor, USB keyboard, USB mouse,
speakers, and microphone are connected into these ports.
Connect RJ-11 cable to the serial port for RS-232 command control.
Each connector is marked with an appropriate icon to indicate its use.
6 KVM Ports The KVM cables that the computers to the GCS1932M/1934M are
connected into these ports.
Each KVM port section is comprised of a microphone jack, speaker
jack, USB type B socket and a DisplayPort connector.
7 Power Jack The power adapter cable is connected into this jack.

10
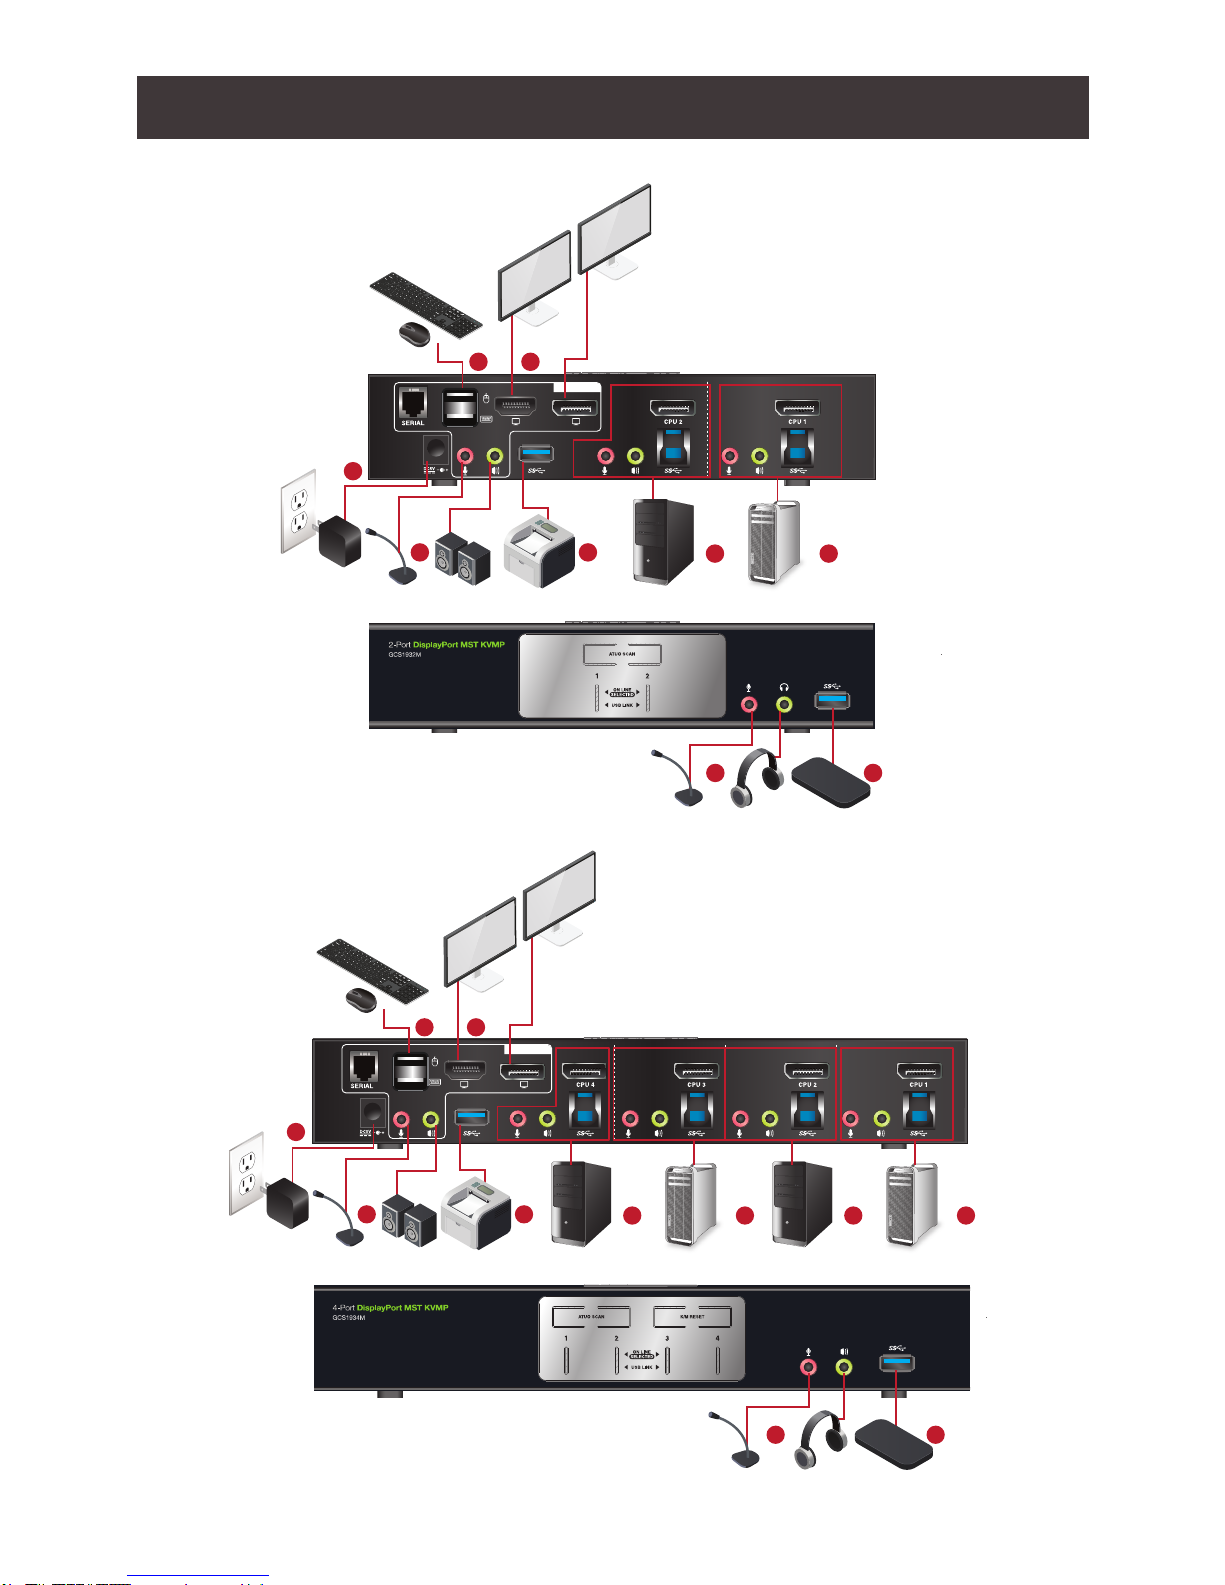
Hardware Setup
Please make sure that all devices including the GCS1932M/1934M, DisplayPort monitor,
and computers are powered OFF
1. Connect the USB keyboard and the USB mouse to the GCS1932M/1934M Console ports
located on the rear side panel.
2. Connect the HDMI and/or DisplayPort monitor(s) to the GCS1932M/1934M Console ports
located on the rear side panel. For multiple monitor setups, see Display Modes section.
3. Turn monitor(s) power to ON.
4. Connect the main microphone and speakers into the GCS1932M/1934M microphone and
speaker jacks located on the front side panel. The microphone and speakers connected
into this front port have priority over those connected on the rear port. (optional)
5. Connect the secondary microphone and speakers into the GCS1932M/1934M Console
microphone and speaker jacks located on the rear panel. (optional)
6. Using the provided cables with this package,
a. Connect the provided DisplayPort connector into any available DisplayPort
port in the KVM Port section of the GCS1932M/1934M
b. Connect the provided USB, microphone, and speaker connector into
their corresponding USB, microphone, and speaker ports on the
GCS1932M/1934M
c. Connect the other end of the KVM cables into their respective DisplayPort,
USB, microphone, and speaker ports on the computers
7. Connect up to two USB peripherals into the USB 3.0 type A ports (front and rear panel of
the GCS1932M/1934M).
8. Connect the provided power adapter to an AC power source. Then, connect the power
adapter cable into the GCS1932M/1934M power jack.
9.Turn all connected computers power to ON
Note:
Verify that all the connectors are on the same KVM Port sockets (all in Port 1, all in Port 2,
etc.) and that each socket is marked with an appropriate icon to indicate itself.
By default, the GCS1932M/1934M switches to the rst computer that is powered ON.
We recommend that the total video cable length from the computer to the console monitor
cannot exceed 3 meters.
Please make sure that only high quality video cables used in order to achieve 4K DCI (4096
x 2160 @60Hz) resolution.
Hardware Installation
11
CONSOLE
4 7
1 2
6 6
5
9
7
4
HDD
CONSOLE
4 7
6 6
5 7
1 2
6 6
9
HDD
GCS1932M
GCS1934M
 Loading...