

Page 1

Installation Guide
Installation
4 ports USB Net ShareStation
GUIP204
1
Part No. M1057
Page 2

3
Page 3

Table of Contents
Introduction 4
About this Manual 5
Features 6
Package Contents 7
System Requirements 8
Physical Description 9
Hardware Installation 10
Software Installation - XP 13
Connecting to a USB device 18
Connecting to a USB Printer / Multifunction Printer 20
Disconnecting a USB device 22
Request to Disconnect 23
Software Installation - VISTA 26
Connecting to a USB device in Vista 33
Connecting to a USB hard drive in VISTA 35
Disconnecting a USB device in Vista 36
Request to Disconnect in Vista 37
Setting the Polling Interval Widows -XP 39
Web Management Interface 40
Upload Firmware 44
Reset Device 45
Factory Default 46
Password Change 47
FAQ 48
Federal Communications Commission (FCC)
Statement
CE Statement 51
Customer Support 52
Limited Warranty 53
Contact 54
3
49
Page 4

5
Introduction
Thank you for purchasing the IOGEAR GUIP204 4-ports USB Net ShareStation (hereafter referred to as
“USB Net ShareStation”). The USB Net ShareStation is designed to connect your All-In-One/Multifunction
devices, standard printers, and USB storage devices (hard drives, ash drives, and memory card readers)
to your network, allowing all network users access to these shared USB resources.
4
Page 5

About this Manual
This manual provides introductory information as well as detailed instructions on how to set up and
manage the IOGEAR GUIP204 4-port USB Net ShareStation in various network environments.
To fully benet from this document, you should be familiar with basic networking principles. The
instructions described in this manual are based on the settings in a new server. If needed, you can reset
the server back to the factory defaults. For details, please refer to the chapter “Restore Factory Defaults”.
5
Page 6

7
Features
Share 4 USB devices through your home or ofce network•
Wirelessly share your USB devices through your wireless router.•
Share an external hard drive, ash drive or memory card reader with multiple users over your network •
Share a USB webcam over a network•
Enjoy music stored on any networked PC with a USB speaker* •
Allows multiple users to share a Multi-Function Printer (MFP) over a network to print, scan, and fax •
from any networked computer
Supported protocols:, LPR/LPD, DHCP, UPnP •
Supports USB 2.0 and 1.1 devices•
Supports Windows Vista Rally Technology•
Works with any home or ofce Ethernet network•
* Some USB devices require a direct connection for optimum performance
6
Page 7

Package Contents
Verify that nothing is missing from the package by using the checklist below. Please contact your dealer
if anything is missing or damaged. All packing materials are recyclable. Please conrm the items in the
package below:
1 x 4-port USB Net ShareStation
1 x User Manual
1 x Software CD
1 x Power Adapter
1 x Warranty/Registration card
1 x RJ45 Ethernet Cable
7
Page 8

9
System Requirements
Computer:
CPU of 1.7GHz and above •
Minimum 512MB RAM •
Windows XP/Vista •
Available Ethernet port in home/ofce network•
Support Devices:
Printer or Multi-function printer with USB connection* •
External USB hard drive •
USB speaker* •
USB webcam* •
USB ash drive •
USB memory card reader •
USB printer •
USB scanner•
Printer:
Multi-function printer with USB connection•
* Some USB devices require a direct connection for optimum performance
8
Page 9
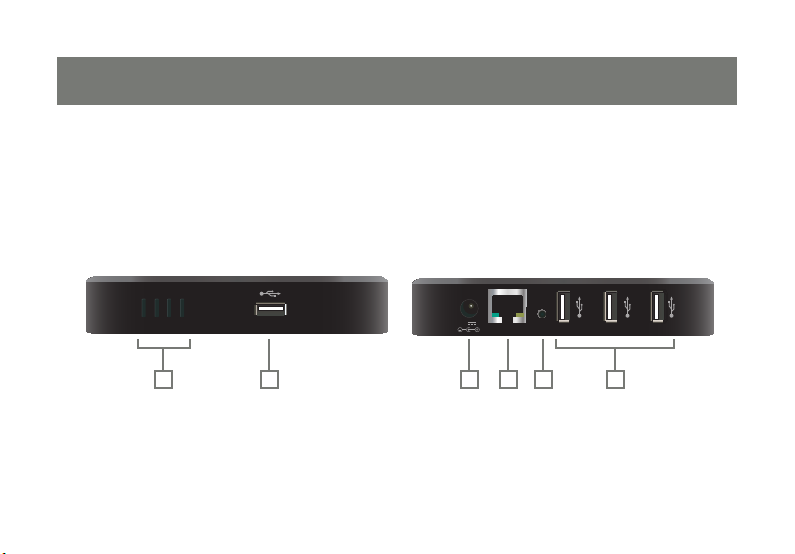
Physical Description
Ethernet
Reset
12Vdc 5A
USB connection LED1.
USB port2.
Power Adapter Port3.
Network Port4.
Reset Button5.
USB ports 6.
1 2 3 4 5 2
9
Page 10
11
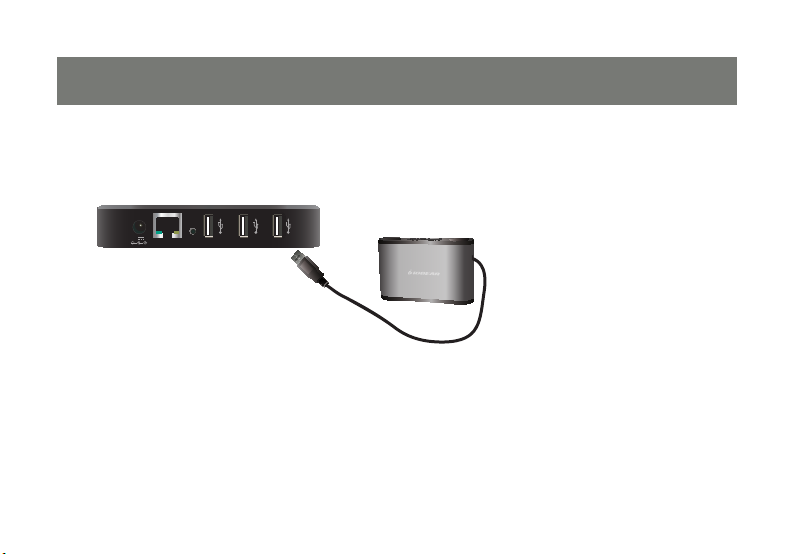
Hardware Installation
Ethernet
Reset
12Vdc 5A
*Make sure that your USB devices are switched off and that the server’s power adapter is disconnected.
1. Connect your USB device to any one of the USB ports of the USB Net ShareStation.
10
Page 11
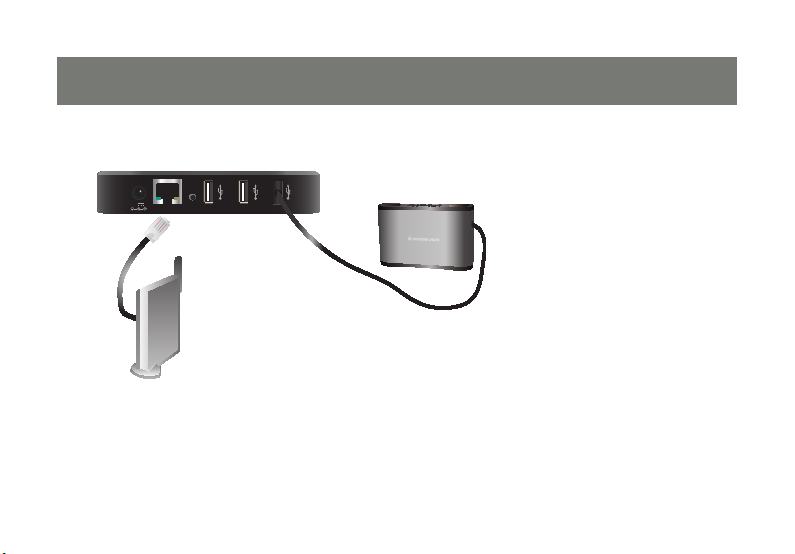
2. Connect the USB Net ShareStation server to the router or switch with the included Ethernet cable.
Ethernet
Reset
12Vdc 5A
11
Page 12
13
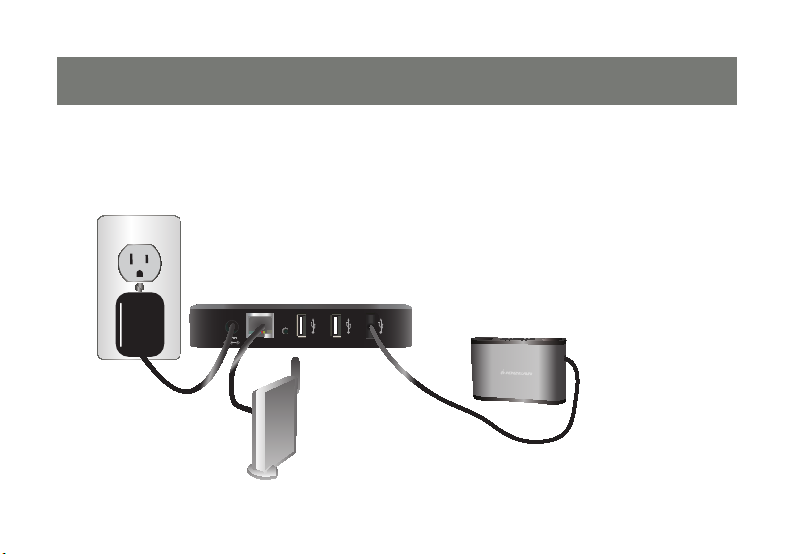
3. Connect the power adapter to the USB Net ShareStation server. The USB connection LED will turn on and the USB
Ethernet
Reset
12Vdc 5A
Net ShareStation is correctly connected to the network.
12
Page 13
Software Installation - XP
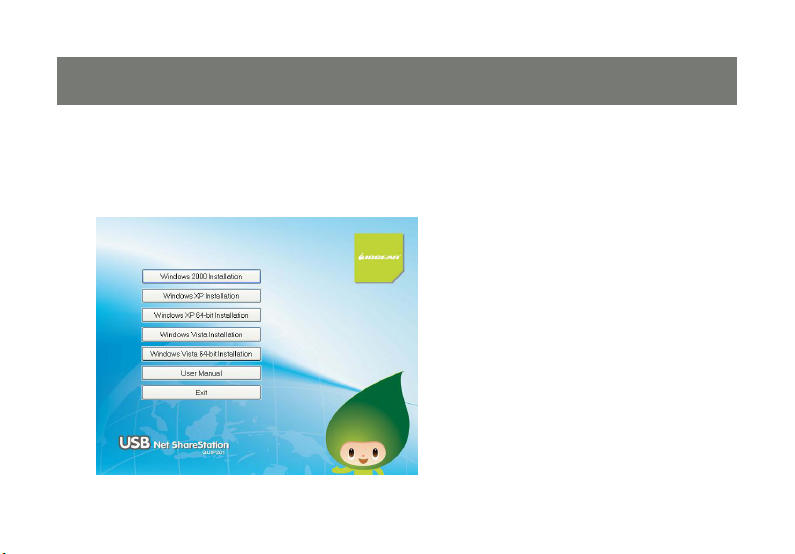
1. Insert the Software CD into your computer. A splash screen should appear with a menu of options, including
the option to install the appropriate USB Net ShareStation software, access the User Manual, or Exit out of
the splash menu. To install the appropriate USB Net ShareStation software, click the installation button that
corresponds to the operating system that is installed on your computer.
13
Page 14
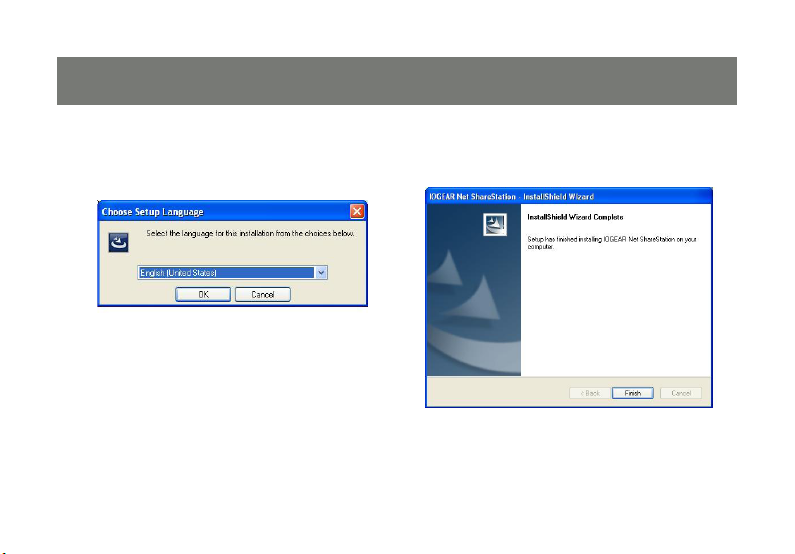
2. The installation wizard will start the installation
process, select the language you like to install the
software as, then click “
OK” to continue.
3. When the installation completes, click “
close the installation wizard.
Finish” to
Page 15
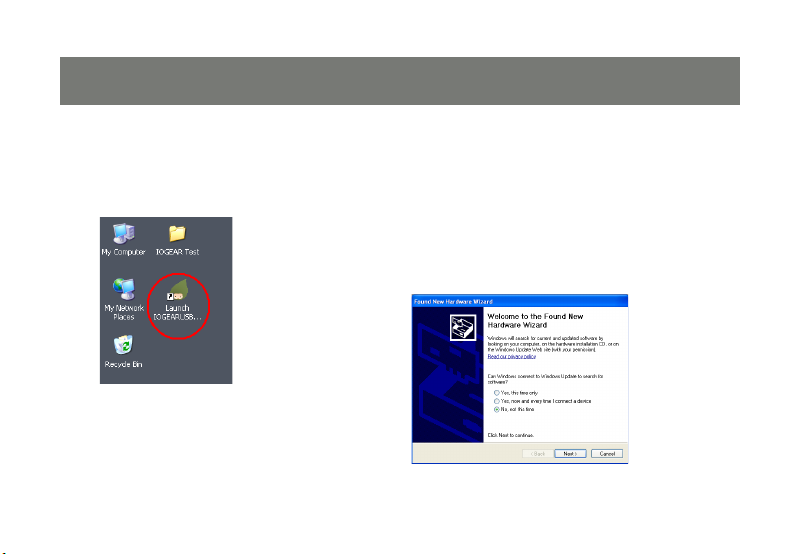
4. On your desktop you will see a new IOGEAR icon
Launch IOGEAR Net ShareStation”,
called “
double click the icon and it will bring up the IOGEAR
Net ShareStation server conguration utility.
5. Once the IOGEAR utility is launched Windows
will prompt you with a “Found New Hardware
” window. You will need to complete the
Wizard
wizard so that you will be able to use the USB Net
ShareStation on your computer
No, not this time” and click on ”Next” to
Select “
continue.
15
Page 16
17
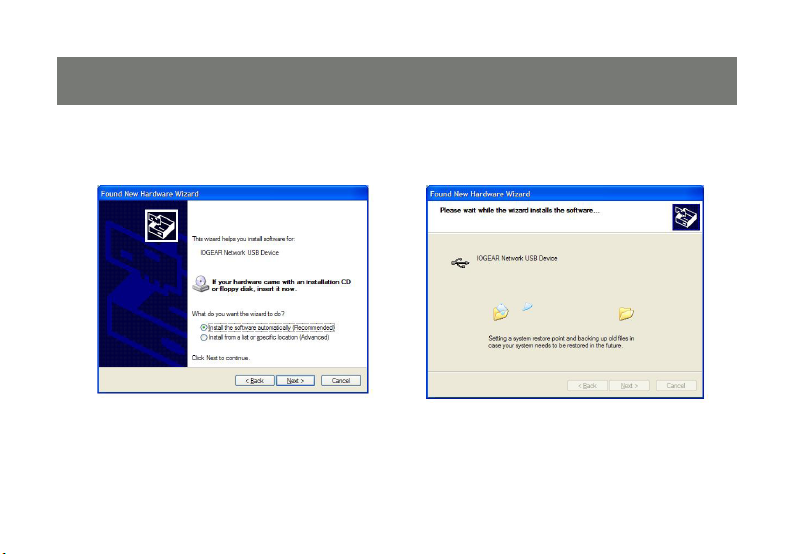
6. Click on “Install the software automatically
(Recommended)
” and click on Next to continue.
7. Windows will install the necessary drivers for the
USB Net ShareStation.
16
Page 17
8. Select Finish to complete the Found New
Hardware Wizard
.
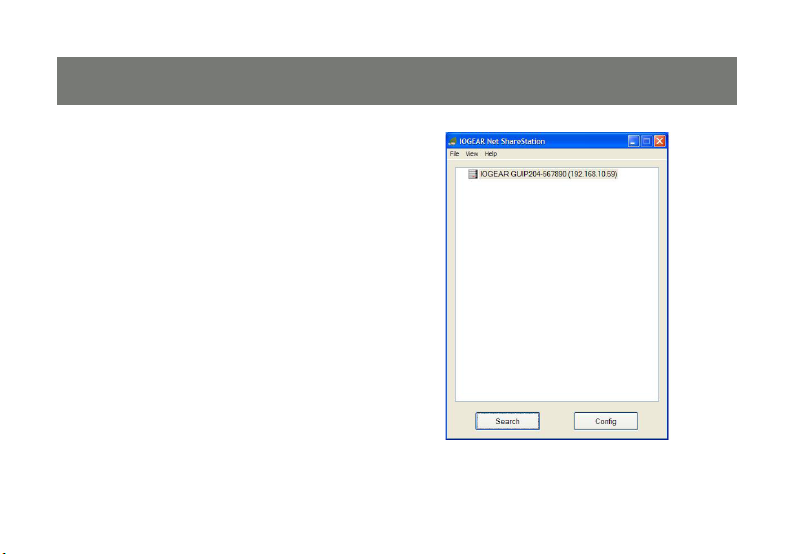
9. Once you are nished with the Found
New Hardware Wizard, the IOGEAR util-
ity will show up and display all the active
USB Net ShareStations connected on your
network. In this screen, you will see the
product listed as “IOGEAR GUIP204 – 567890
(192.168.10.59)”. The “567890” is the last 6
digits of the device’s MAC address, and the
“192.168.10.59” is the device’s IP address.
17
Page 18

19
Connecting to a USB device
1. Connect the USB cable on your USB device to one
of the USB ports on the USB Net ShareStation, and
make sure both the USB device and the USB Net
ShareStation are powered on. The USB device will
then show up on the
utility underneath the “
GREEN icon . The green icon indicates that the
USB device is ready to be connected. If for any
reason the USB device does not show up, please
click the “Search” button to refresh the control center.
Note: If your USB device does not show up on
the list, please try to disconnect and reconnect
the device to the GUIP204. Also, please make
sure the GUIP204 and your USB device are
powered on.
IOGEAR Net ShareStation
IOGEAR GUIP204..” as a
18
Page 19

2. Select the USB device that you will want to connect
and click on the “
Connect” button at the bottom
3. Once the device has been connected, the GREEN
icon will turn ORANGE to indicate that the
connection has been established. The USB device
now becomes available on your computer, and you
can use this USB device as if it was directly
connected to your computer.
19
Page 20

21
Connecting to a USB Printer / Multifunction Printer
1. Connect the USB cable on your printer or multi
function printer to the IOGEAR GUIP204 and make
sure your printer is powered on. You will then see
the connected printer show up in the
ShareStation
GUIP204…
on the “Connect” button.
utility underneath the “IOGEAR
” Select the printer from the list and click
Note: If your USB device does not show up on
the list, please try to disconnect and reconnect
the device to the GUIP204. Also, please make
sure the GUIP204 and your USB device are
powered on.
IOGEAR Net
20
Page 21

2. The printer will be detected as if it was plugged
directly into your computer.
3. If this printer is connected to your computer for the
rst time, then you will need to complete the setup
wizard for the printer software and driver installation.
Please follow the wizard to setup the printer. Make
sure you have the correct CD or drivers for your
printer and follow the on-screen steps in the wizard.
Once the wizard is completed, you will be able to
use the printer as if it was directly connected to your
computer.
Note: Please refer to your printer user manual
on how to setup your printer on the computer.
21
Page 22

23
Disconnecting a USB device
1. To disconnect a USB device, simply click on
the connected USB device on the list of the
utility software, and press the “Disconnect”
button. The device will then no longer stay
connected to your computer, however, you
may re-connect the USB device again once
the icon becomes GREEN .
22
Page 23

Request to Disconnect
1. If a USB device is being used by another
computer on your network, a RED icon
will be displayed in front of the device name.
You will not have the option to disconnect
the device, however, you may send a
courtesy message to request that the other
user disconnect/release the device.
2. To send the courtesy disconnect message,
right click on the USB device and select
“Request Disconnect”, as shown below.
A message will then be sent to the user
requesting that they disconnect from the
USB device.
NOTE: If the occupying user denies this
request, then you will not be able to send
any further requests to the same user for
5 minutes. This is to prevent any user from
ooding the occupying user with multiple
requests within a short period of time.
23
Page 24

25
The chart list below shows what each colored icon means in the conguration software.
USB device is available and ready to be connected
The device is not connected but has some type of problem such as out of ink
USB device has been established and is now connected
Error with USB device. Example: out of paper
USB device is in use by another user.
Problem with a USB device occupied by another user
Unsupported USB device
USB server is on a different network segment. USB device can not be connected. See page 49
24
Page 25

Software Installation - VISTA
1. Insert the Software CD into your computer.
A splash screen should appear with a
menu of options. Click on “Windows
Vista installation” to set up the USB Net
ShareStation on Windows Vista
2. Click OK to start the installation process
25
Page 26

27
3. During the driver installation a Windows Vista
security message will appear. Select “Install
this driver software anyway” to continue.
4. Click on Finish to complete the installation
process.
26
Page 27

5. Once the installation process has been
completed you will need to go to the
Network window to congure the USB Net
ShareStation. To do so, click on the Vista
logo on the lower right corner of your screen
and select Network from the right hand side
of the menu.
27
Page 28

29
6. The USB Net ShareStation icon will appear under other devices on the Network window. If the
USB Net ShareStation or any other network icons in the network window do not appear, then a
message will show up across the network screen indicating that Network Discovery is turned off.
28
Page 29

7. To turn Network Discovery on, right click on the message, then select “Turn on network
discovery and le sharing” from the list. Once Network Discovery has been enabled you will be
able to see the USB Net ShareStation icon under Other Devices.
29
Page 30

31
8. Select “Yes, turn on network discovery and le sharing for all public networks”.
30
Page 31

9. Right click on the USB Net ShareStation
“IOGEAR GUIP204…” icon, and select
“Install” to begin using the USB Net
ShareStation.
10.Click on the blinking window at the system
tray which is prompted by the “User
Account Control” permission window.
Click “Continue” to proceed with the
installation.
31
Page 32

33
11.After the driver installation has been
completed the “IOGEAR GUIP204…” icon
will change to a new product image. If the
new product image icon does not change,
press “F5” to refresh the Network window.
After driver installation the device icon will
change.
You are now ready to use the USB Net
ShareStation
Note: It is recommended to reboot your
computer after installation to ensure
optimal performance.
32
Page 33

Connecting to a USB device in Vista
1. After you have successfully installed the USB Net ShareStation driver, connect the USB cable of your
USB device into the USB port on the USB Net ShareStation, and make sure both the USB device and
the USB Net ShareStation are powered on.
2. When the USB device is connected, the USB Net ShareStation will detect the connection of the
device, and an icon of the device will show up in the Network window. In this example, we have
connected a Logitech USB speaker.
33
Page 34

35
3. Right click on the USB device that you will want to connect and select “Connect” to establish the
connection. You will see the device driver is installing and the status will show at the bottom right
corner on your system tray. This message will go away once the drivers have been installed.
After the installation is completed, the USB device will become available as if it were directly connected to
your computer.
34
Page 35

Connecting to a USB hard drive in VISTA
1. Connect the USB cable of the USB hard
drive to the USB port on the USB Net
ShareStation, and make sure both the USB
hard drive and the USB Net ShareStation
are powered on. Right click on the device
icon and select Connect to connect to the
device. Then right click again on the device
icon and select “My Computer” to bring up
My Computer window. Or you may simply
double click the hard drive icon to bring up
My Computer window.
2. You will now see the external hard drive
become available as if it were directly
connected to your computer.
35
Page 36

37
Disconnecting a USB device in Vista
To safely disconnect a USB device under the Network window, right click the USB device icon and select
“Disconnect” from the menu. Once the USB device has been disconnected, it will no longer be connected
to your computer, and you can unplug the USB cable of the USB device from the USB Net ShareStation.
If you would like to reconnect the USB device, simply right click on the USB icon and select “Connect”
again to establish the connection.
36
Page 37

Request to Disconnect in Vista
If you would like to use a USB device that is being occupied by another user you may send a courtesy
message asking the user to disconnect. You may do this by right clicking on the USB device icon that you
will like to use and selecting “Request Remote to Disconnect.” A message will then be sent to the user
requesting that they disconnect from the USB device.
NOTE: If the occupying user denies this request, then you will not be able to send any further request to
the same user for 5 minutes. This is to prevent any user from ooding the occupying user with multiple
requests within a short period of time.
37
Page 38

39
NOTE: after a system reboot, you might
not be able to connect to any USB device
for a short period of time. When right
clicking on a device, you will see the
following message instead of the option to
“Connect.”
Depending on the performance of your
PC and the number of active USB Net
ShareStations on your network, it may
take up to 3 minutes for your computer
to recognize all USB Net ShareStation.
This is because VISTA needs time to
probe the entire network before it loads
the necessary driver to run the USB Net
ShareStation. Once the driver has been
loaded, the option to “Connect” to the
device will be made available when
right-clicking a device.
38
Page 39

Setting the Polling Interval Widows -XP
The polling interval will allow the conguration
utility to pull information from your network to
nd out the status of all the connected USB Net
ShareStations and USB devices. By default,
this feature is not automatically congured. You
may set a time so that the server will perform
the polling automatically. To congure the polling
interval, in the IOGEAR USB Server utility, click
on File -> Settings -> Polling Interval.
You may set a number from 1 – 60 in the
“Seconds” box. Click on “Submit” to allow the
new interval setting to take effect. Once you
have set a number the utility will automatically
update any changes made to server in the main
dialog box.
39
Page 40

41
Web Management Interface
8. To access web management interface in XP,
in the IOGEAR Net ShareStation utility, select
the USB Server on the list, and click on the
“Cong” button.
40
Page 41

2. To access web management interface in
VISTA, in the Network window, right click on
the “IOGEAR GUIP204…” icon, and select
“View device webpage.”
41
Page 42

43
3. The left panel of the web management interface provides a list of different options to choose from.
Device Status: Displays the current USB device info and will tell you which computer a USB device is
connected to. The interface is limited to support up to 4 USB devices.
42
Page 43

Network: You can change the network settings according to your network specications. If you would
like to give the USB Net ShareStation a static IP address, you will need to Disable DHCP in the “DHCP
Setting” menu. Once DHCP is disabled, enter the desired IP address on the IP address eld along with
the subnet mask and click the “Submit” button to reboot the USB Net ShareStation. Please note that if
the USB Net ShareStation has a set password, you will need to enter it into the password eld box.
43
Page 44

45
Upload Firmware
The rmware link will allow you to upload the latest rmware on the USB Net ShareStation server. Click on
“Browse” to specify the rmware location on your PC. Once the location path of the rmware has been
set, click “Submit” to begin the update.
For all the latest rmware updates, please visit http://www.iogear.com/support/dm/
Please note that if the USB Net ShareStation has a set password, you will need to enter it into the
password eld box.
44
Page 45

Reset Device
The Reset Device window will allow you to reboot the USB Net ShareStation server. Please note that if the
USB Net ShareStation has a set password, you will need to enter it into the password eld box.
45
Page 46

47
Factory Default
Allows you to restore the USB Net ShareStation back to factory default. Please note that if the USB Net
ShareStation has a set password, you will need to enter it into the password eld box.
46
Page 47

Password Change
You can add or change an existing password on the USB Net ShareStation in this window. By default
the USB Net ShareStation does not come with a default password.
47
Page 48

49
FAQ
1. How come I cannot connect to my USB device to my computer through the USB Net
ShareStation?
Make sure the USB device functions normally when you plug it into your PC via USB cable.•
If the USB device, such as USB printer or multi-function printer, requires a driver, please make sure you •
have installed it on the computer you wish to use. Rebooting your PC after installing USB device driver
might also help.
Although the USB Net ShareStation could work with a very wide spectrum of USB devices, it still has •
limited support on some USB devices. Please refer to the supported device list for details.
2. How come I cannot see any servers on my IOGEAR USB Server listing window after installing it?
Please make sure that all of your USB Net ShareStations are correctly connected to your network. Also,
certain anti-virus programs come with rewall functions that might prevent the USB Net ShareStation
utility from accessing the network. Please make sure USB Net ShareStation utility is not being blocked
by your anti-virus program.
3. The connected USB devices are disconnected after my PC wakes up from Standby?
The connected devices will automatically be released for other users in case you forget to release them.
Please reconnect the USB devices again after your PC “wakes up.”
48
Page 49

Federal Communications Commission (FCC) Statement
15.21
You are cautioned that changes or modications not expressly approved by the part responsible for
compliance could void the user’s authority to operate the equipment.
15.105(b)
This equipment has been tested and found to comply with the limits for a Class B digital device,
pursuant to part 15 of the FCC rules. These limits are designed to provide reasonable protection
against harmful interference in a residential installation. This equipment generates, uses and can
radiate radio frequency energy and, if not installed and used in accordance with the instructions, may
cause harmful interference to radio communications. However, there is no guarantee that interference
will not occur in a particular installation. If this equipment does cause harmful interference to radio or
television reception, which can be determined by turning the equipment off and on, the user is
encouraged to try to correct the interference by one or more of the following measures:
-Reorient or relocate the receiving antenna.
-Increase the separation between the equipment and receiver.
-Connect the equipment into an outlet on a circuit different from that to which the receiver is connected.
-Consult the dealer or an experienced radio/TV technician for help.
49
Page 50

51
Operation is subject to the following two conditions:
1) this device may not cause interference and
2) this device must accept any interference, including interference that may cause undesired operation of
the device.
FCC RF Radiation Exposure Statement:
This equipment complies with FCC radiation exposure limits set forth for an uncontrolled environment.
End users must follow the specic operating instructions for satisfying RF exposure compliance. This
transmitter must not be co-located or operating in conjunction with any other antenna or transmitter.
50
Page 51

CE Statement
This device has been tested and found to comply with the requirements set up in the council directive
on the approximation of the law of member states relating to EMC Directive 89/336/EEC, Low Voltage
Directive 73/23/EEC and R&TTE Directive 99/5/EC.
51
Page 52

53
Customer Support
Should you require any technical assistance, call toll-free: 866-9-IOGEAR (866-946-4327) or visit our
website at http://www.iogear.com for the latest product information and support les. This document is
subject to change without prior notice.
52
Page 53

Limited Warranty
IN NO EVENT SHALL THE DIRECT VENDOR’S LIABILITY FOR DIRECT, INDIRECT, SPECIAL,
INCIDENTAL OR CONSEQUENTIAL DAMAGES RESULTING FROM THE USE OF THE PRODUCT, DISK
OR ITS DOCUMENTATION EXCEED THE PRICE PAID FOR THE PRODUCT.
The direct vendor makes no warranty or representation, expressed, implied, or statutory with respect to the
contents or use of this documentation, and especially disclaims its quality, performance, merchantability, or
tness for any particular purpose.
The direct vendor also reserves the right to revise or update the device or documentation without obligation
to notify any individual or entity of such revisions, or updates. For further inquires please contact your direct
vendor.
53
Page 54

55
Contact
IOGEAR, INC.
23 Hubble
Irvine, CA 92618
P 949.453.8782
F 949.453.8785
Visit us at: www.iogear.com
© 2008 IOGEAR. All Rights reserved. Part No. M1057
IOGEAR, the IOGEAR logo, are trademarks or registered trademarks of IOGEAR, Inc. Microsoft and Windows are registered trademarks of Microsoft Corporation. All other brand and product names are trademarks or registered trademarks
of their respective holders. IOGEAR makes no warranty of any kind with regards to the information presented in this
document. All information furnished here is for informational purposes only and is subject to change without notice.
IOGEAR, Inc. assumes no responsibility for any inaccuracies or errors that may appear in this document.
54
Page 55

55
Page 56

About Us
About Us
FUN
IOGEAR offers connectivity solutions that are innovative, fun, and stylish,
helping people enjoy daily life using our high technology products.
GREEN
IOGEAR is an environmentally conscious company that emphasizes the
importance of conserving natural resources. The use of our technology
solutions helps reduce electronic waste.
HEALTH
IOGEAR supports healthy and t lifestyles. By integrating products with the
latest scientic developments, IOGEAR’s solutions enhance the life of end-
users.
© 2008 IOGEAR, INC.
 Loading...