

IOGear KORONA KORE GKM600 Quick Start Manual

TM
Quick Start Guide
KORONA KORE
RGB Gaming Mouse & Keyboard
™
Guide de Démarrage Rapide
KORONA KORE
Souris et Clavier Pour Les Jeux RVB
™
Guía de Inicio Rápido
KORONA KORE
Ratón y Teclado Para Juegos RGB
GKM600
PART NO. Q11568
™


Table of Contents
Package Contents 4
System Requirements 4
Mouse Overview 5
Keyboard Overview 6
Installation 7
Operation for Mouse 8
Operation for Keyboard 9
Compliance Information 11
Limited Warranty 12
Contact 12
Contenu de l’emballage 13
Conguration requise 13
Souris vue d’ensemble 14
Clavier vue d’ensemble 15
Installation 16
Utilisation de la souris 17
Utilisation pour clavier 18
Informations de conformité 20
Garantie limitée 21
Contact 21
Contenidos del Paquete 22
Requisitos 22
Generalidades del ratón 23
Generalidades del telcado 24
Instalación 25
Funcionamiento ratón 26
Funcionamiento teclado 27
Información de cumplimiento 29
Limited Warranty 30
Contacto 30

Package Contents
1 x KORONA RGB Gaming Mouse
1 x KORE RGB Gaming Keyboard
1 x Quick Start Guide
1 x Warranty Card
System Requirements
®
• Windows Vista
• USB 2.0 port
, Windows® 7, Windows® 8, Windows® 8.1, Windows® 10
4
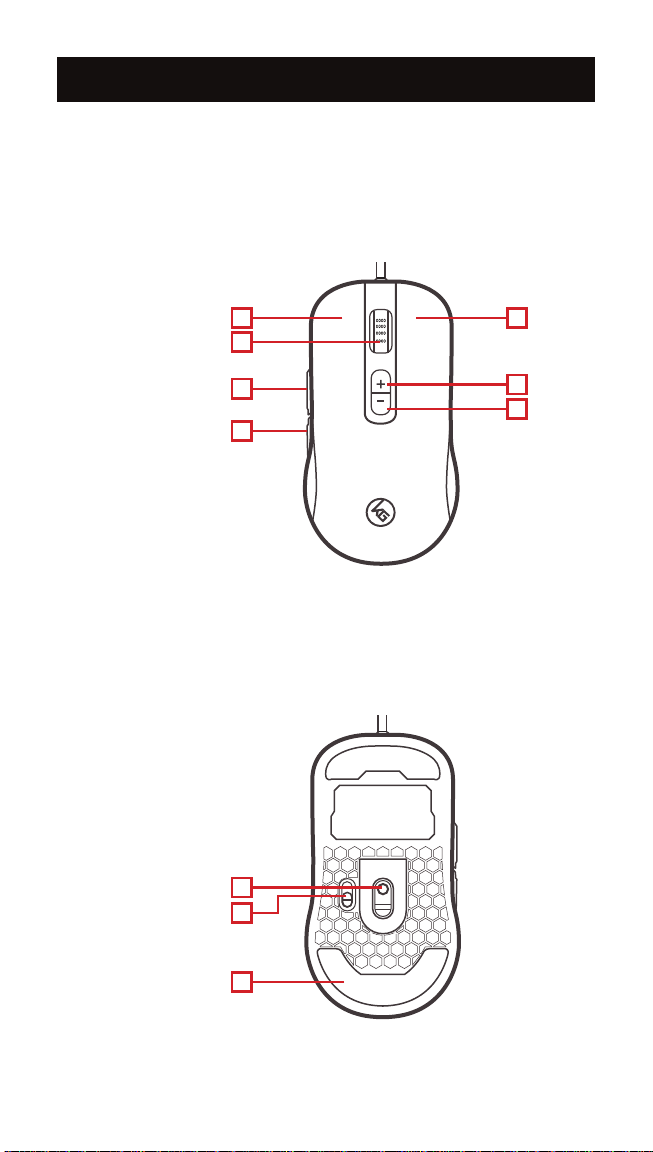
Mouse Overview
Mouse Front View
1. Left button / Select
2. Right button / Menu
3. Scroll wheel / 3rd button
4. 4th button / Forward
5. 5th button / Backward
6. DPI + / 6th button
7. DPI - / 7th button
1
3
4
5
Mouse Back View
1. Optical sensor
2. Reporting rate switch 125/500/1000 rps
3. Anti-friction base pad
1
2
2
6
7
3
F2 F3 F4 F5 F5 F7 F8 F9 F10 F11 F12F1
1
! @ # $ %
^
&
*
(
(
2 3 4 5 6 7 8 9 0
Esc
+
-
Back
Prt
Scr
Ins
Del
Home
End
Scr
Lk
Pau
brk
Tab
Q
A
Z X C V B N M
Fn
Shift
Ent
AltAlt
S D F G Q J K L
EW R T Y U I O P
?
Caps
Shift
Ctrl Ctrl
Pg
Up
Pg
Dn
W
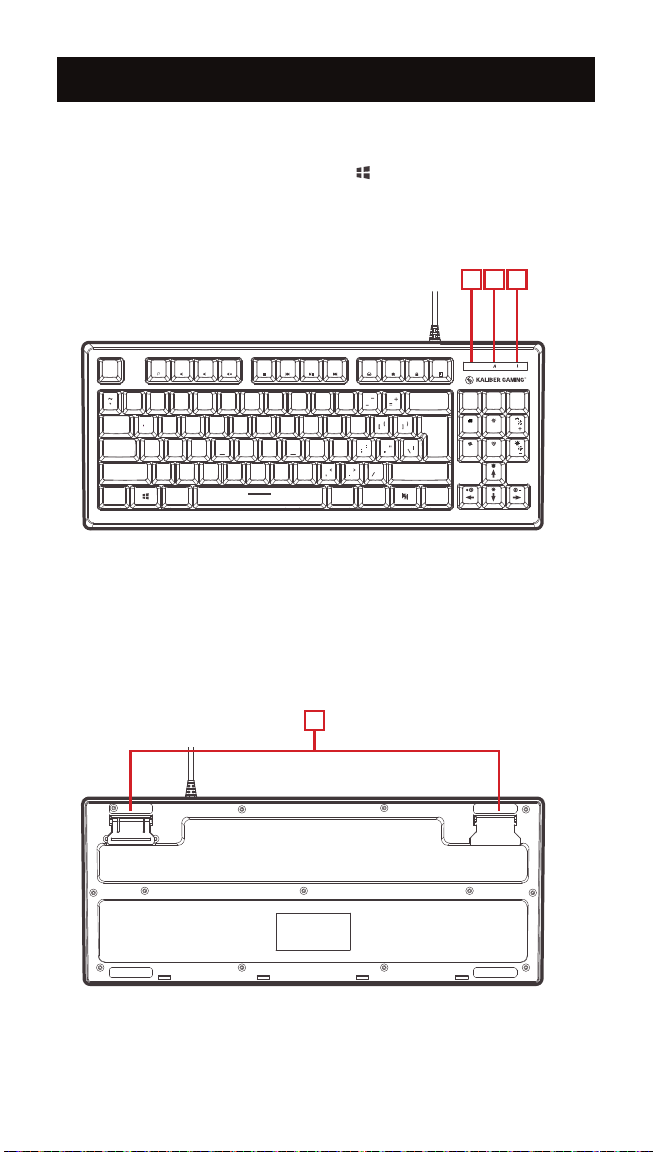
Keyboard Overview
Keyboard Front view
1. Windows Lock LED – turns on when Fn + is pressed
2. Caps Lock LED – turns on when Caps Lock key is pressed
3. Scroll Lock LED – turns on when Scroll Lock key is pressed
1 2 3
Esc
Tab
Caps
Ctrl Ctrl
F2 F3 F4 F5 F5 F7 F8 F9 F10 F11 F12F1
-
+
! @ # $ %
2 3 4 5 6 7 8 9 0
1
Q
EW R T Y U I O P
S D F G Q J K L
A
Z X C V B N M
Shift
^
&
(
*
AltAlt
Keyboard Back view
1. Foldable Legs – allow user to adjust the angle of keyboard
1
W
Pau
Prt
(
Back
?
Shift
Scr
brk
Scr
Lk
Pg
Ins
Home
Ent
Up
Pg
End
Del
Dn
Fn
6
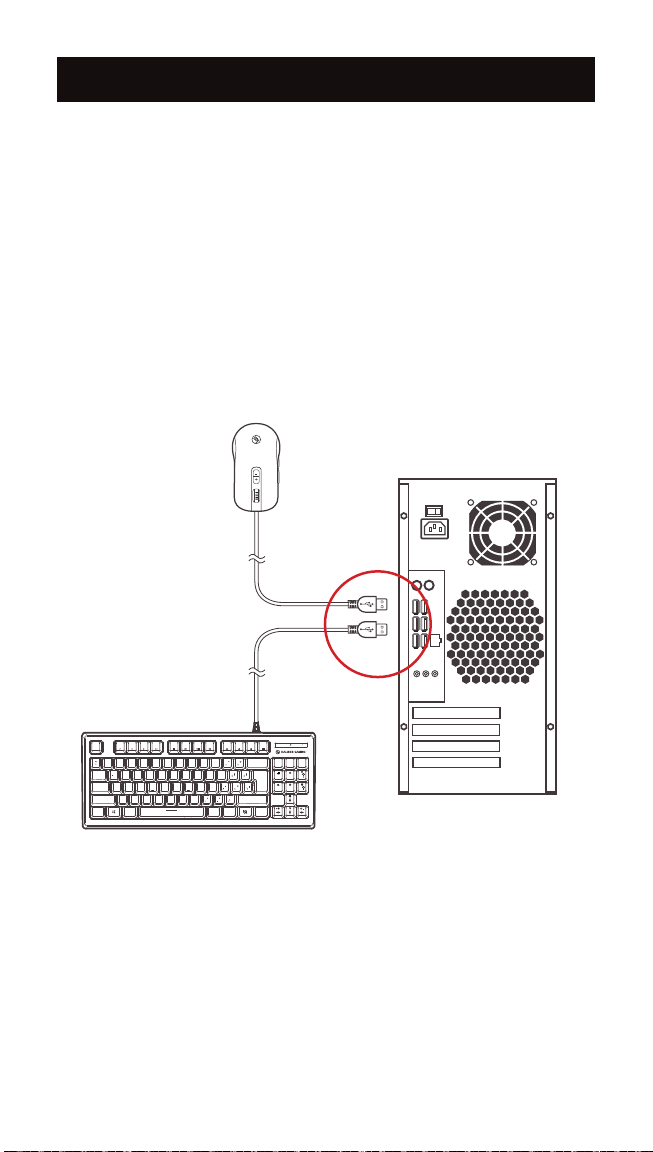
Installation
1. Plug USB connector into an available USB port on your computer.
2. Your operating system will install the device driver automatically.
3. To access the KORONA custom programming options, download
the user interface software (PC only) from
https://www.iogear.com/support/dm/driver/GME631.
4. Run the .exe le and follow the instructions on screen.
F2 F3 F4 F5 F5 F7 F8 F9 F10 F11 F12F1
Esc
+
! @ # $ %^&
1
2 3 4 5 6 7 8 9 0
Q
EW R T Y U I O P
Tab
Caps
S D F G Q J K L
A
Z X C V B N M
Shift
Ctrl Ctrl
(
(
*
?
AltAlt
Fn
W
Pau
Prt
Scr
Back
brk
Scr
Lk
Pg
Ins
Home
Up
Ent
Pg
End
Del
Dn
Shift
Operation for Mouse
DPI Setting:
The GME631’s dpi buttons cycles through 5 preset resolution settings or
through 5 custom settings that can be programmed with the user interface
software. Press the + or - dpi button to increase or decrease to the next
resolution setting. The illumination changes color to indicate the DPI has
been changed.
Default DPI Resolution LED Color
400 Red
800 Green
1600 Blue
3200 Yellow
5000 Purple
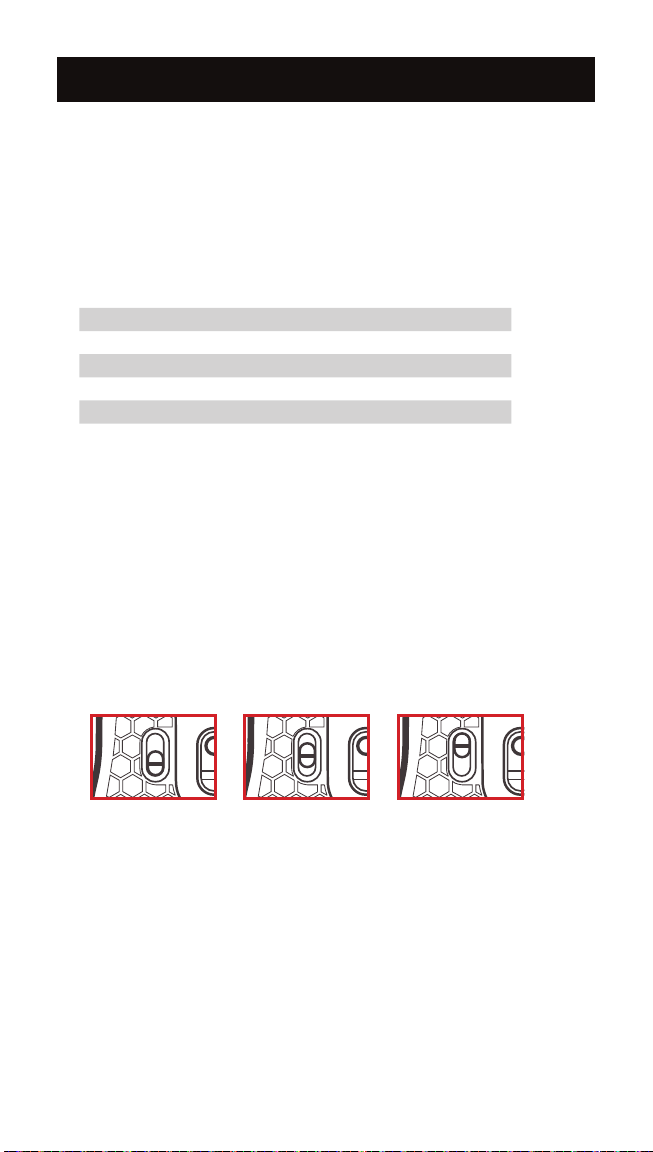
Report Rate Setting:
The GME631 features an adjustable reporting rate 125, 500 or 1000 reports
per second (rps) to better tailor the mouse to your system. Theoretically
speaking, the highest 1000 rps settings should be the best setting for gaming,
however due to the difference between system polling rates and refresh rates,
and availability of system resources, a lower setting of 500 or sometimes even
125 rps may provide improved motion smoothness with some games. Try
the different settings by moving the Report Rate Switch on the bottom of the
GME631, and see which works best for you.
1000 rps 500 rps 125 rps
8
F2 F3 F4 F5 F5 F7 F8 F9 F10 F11 F12F1
1
! @ # $ %
^
&
*
(
(
2 3 4 5 6 7 8 9 0
Esc
+
-
Back
Prt
Scr
Ins
Del
Home
End
Scr
Lk
Pau
brk
B N M
Shift
Ent
G Q J K L
T Y U I O P
?
Pg
Up
Pg
Dn
W
Operation for Keyboard
Windows Key Lockout
The Windows key lockout prevents the Windows menu from popping up and
interfering with your game if accidentally pressed while gaming. Press Fn +
key to lockout the Windows menu function. The Windows Lock LED will light
up to conrm the Windows key is locked out. Press Fn +
again to unlock the
Windows key.
All-Keys Lockout
If you take a break from gaming but wish to leave your system running, you can
lock your keyboard to prevent unwanted keystrokes while away. Press Fn + 11
to lock the keys, and press Fn + 11 again to unlock.
WASD Key Swap
The W, A, S, and D key functions can be
swapped with the arrow keys for better
functionality with certain games, especially MMO
(Massively Multiplayer Online) games. Press Fn
+ W to swap key functions, and press Fn + W
again to swap back to normal operation.
Tab
Caps
Shift
Q
S D F
A
Z X C V
EW R
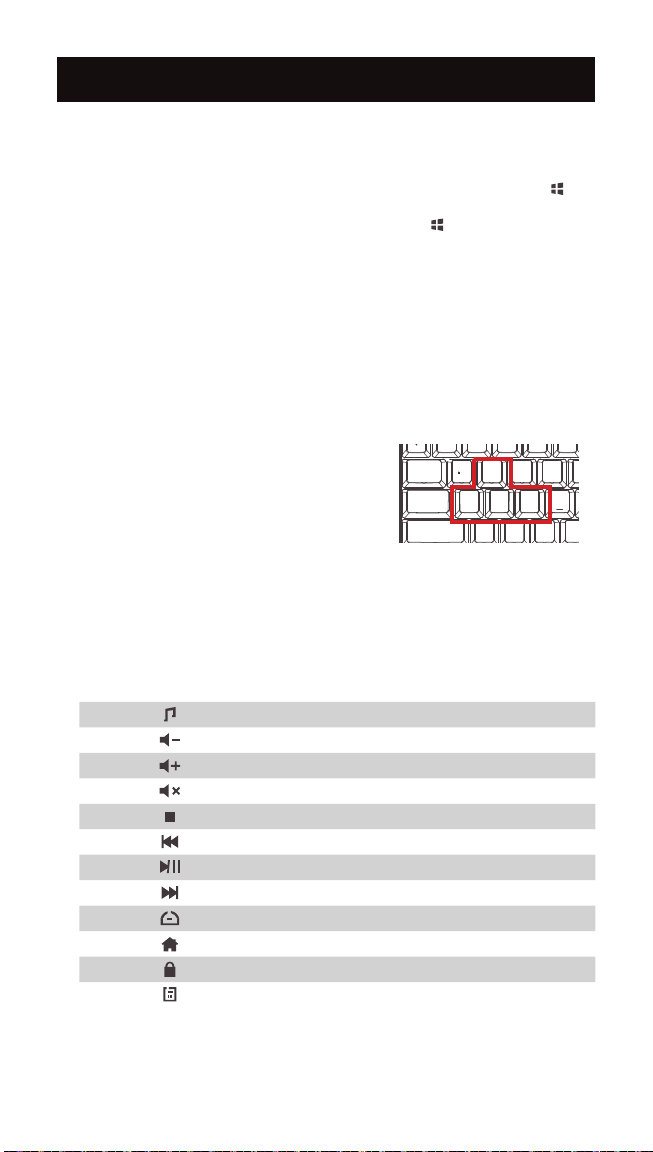
Hotkeys
There are 12 hotkeys, each with two different functions depending on the
keyboard mode. In Windows Mode (default) the F keys provide access to the
standard window functions listed below:
Windows Hotkeys Function
Fn + F1 Media Player
Fn + F2 Volume Down
Fn + F3 Volume up
Fn + F4 Mute
Fn + F5 Stop
Fn + F6 Previous Track
Fn + F7 Play/Pause
Fn + F8 Next Track
Fn + F9 Email
Fn + F10 Web/Home
Fn + F11 All functions keys locked/unlocked
Fn + F12 Calculator

Anti-Ghosting Keys
Your HVER features 26 full anti-ghosting keys to ensure all your keystrokes are
registered, especially during intense gaming sessions. These keys are:
Tab, Q, W, E, R, T, CapsLk, A, S, D, F, G, L Shift, Z, X, C, V, B, M, L Ctrl, L Alt,
Space , (UP), (Down), (Left), (Right).
RGB Backlight Functions
The RGB LED backlight has multiple lighting options. Press the Fn key plus
any key noted below to customize your lighting experience.
Fn + Ins Color change
Fn + Del Rainbow waves (subtle/bold)
Fn + Home Color rotation (7 colors + rainbow)
Fn + End Breathing (single color/rotate colors)
Fn + PgUp Custom lighting mode
Fn + PgDn Backlight On/Off
Custom Lighting Mode
To set the Custom Lighting Mode:
1. Press Fn + PgUp to start custom programming. The 3 status LEDs will
begin ashing.
2. Press FN + number key 2-6 to set the color for the lighting zone you want
to light. Each press will cycle the zone color as follows: Red, Blue, Green,
Purple, Cyan, Yellow, White, Off.
3. Press Fn + PgUp again to exit and save setting. The 3 status LEDS will
stop ashing. NOTE: The Custom Lighting Mode setting is not permanently
saved, so to reset the default setting, simply unplug the keyboard
then reconnect.
Backlight Pattern Adjustments
Press Fn + ▲ to increase brightness
Press Fn + ▼ to decrease brightness
Press Fn + ◄ to increase light speed
Press Fn + ► to decrease light speed
10
 Loading...