

Page 1
Quick Start Guide
Compact Wireless-N USB Adapter
GWU625
PART NO. Q1230-a
Page 2

Package Contents
1 x Wireless-N USB Adapter
1 x Quick Start Guide
1 x Installation CD
1 x Warranty / Registration Card
Requirements
• Windows XP, Windows Vista, Windows 7
• Mac OS X v10.4 and above
• Linux Fedora 10 (Kernel: 2.6.27.5-117)
• Available USB port
• Wireless network
Page 3
Software Installation - PC
1. Insert the CD-ROM, double–click Setup.exe to start the
software installation.
2. Follow the onscreen instructions to install the driver
software.
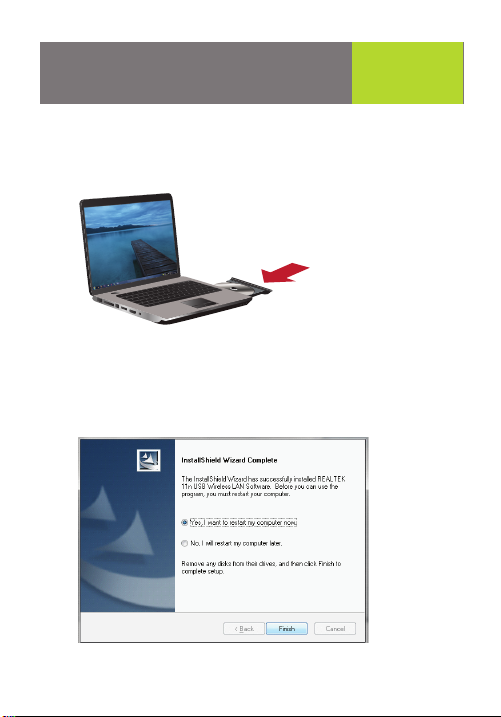
3. Restart your computer when installation is completed.
Start
Here!
Page 4
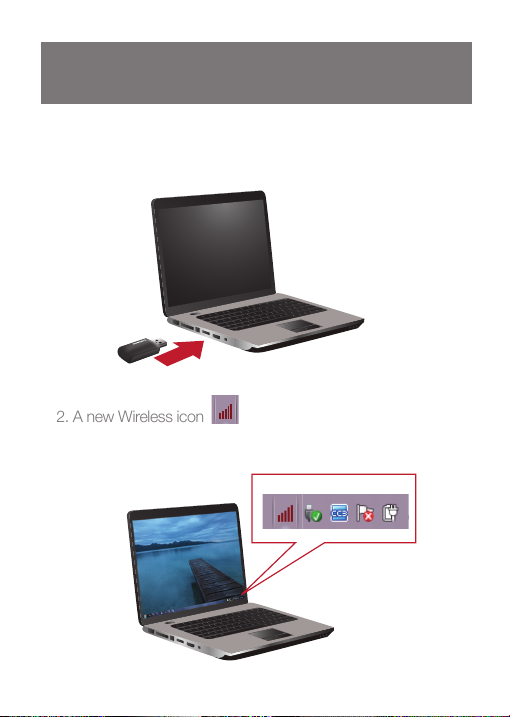
Insert the USB Adapter
1. After your computer is restarted, insert the Wireless-N
USB Adapter to an available USB port.
2. A new Wireless icon will appear in the system tray
after Windows finishes the driver installation process.
system tray
2 3
Page 5

3. If your Windows system tries to obtain the driver from
Windows Update, please click “Skip obtaining driver
software from Windows Update”. Windows should
load the driver you just installed automatically.
Page 6
Connect to a Wireless Network
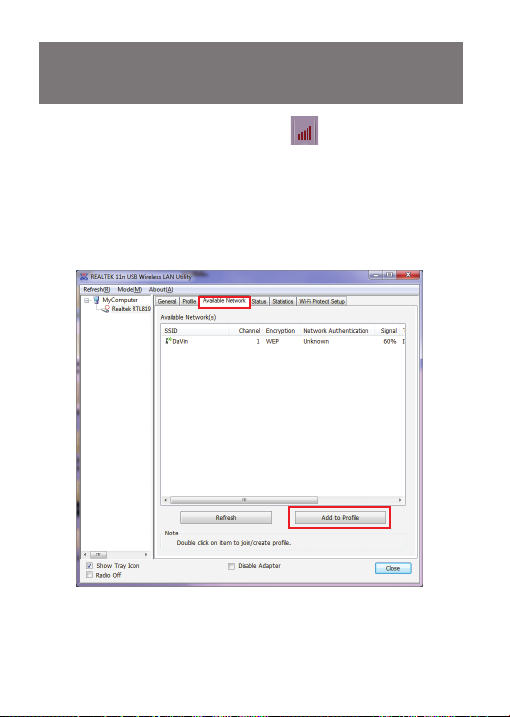
1. Double-click on the Wireless icon in the system tray
to open the Wireless setting wizard.
2. Click the “Available Network” tab and wait for the wizard
to search for wireless networks. The available networks
are listed in the table. Select your network and click “Add
to Profile”
41
Page 7
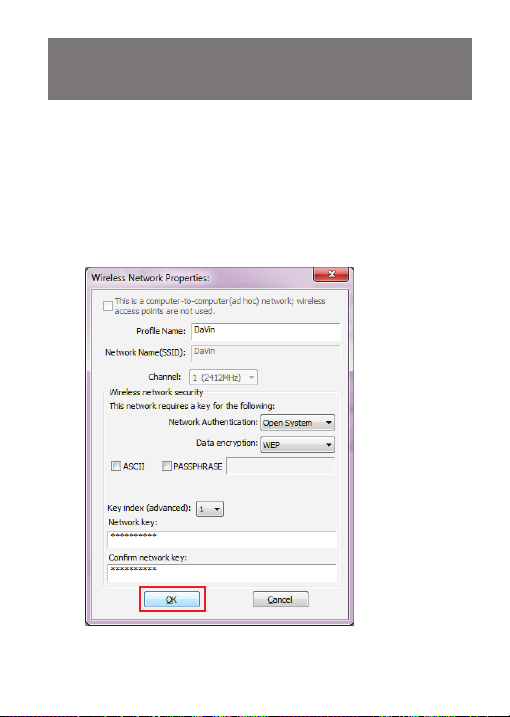
3. A profile window will appear. You can edit your profile
name, configure wireless security and other settings. Click
“OK” when done. If you are connecting to your own
wireless network, you may want to configure wireless
security on your router if you have not already done so.
Please refer to your router’s manual for more instructions.
5
Page 8
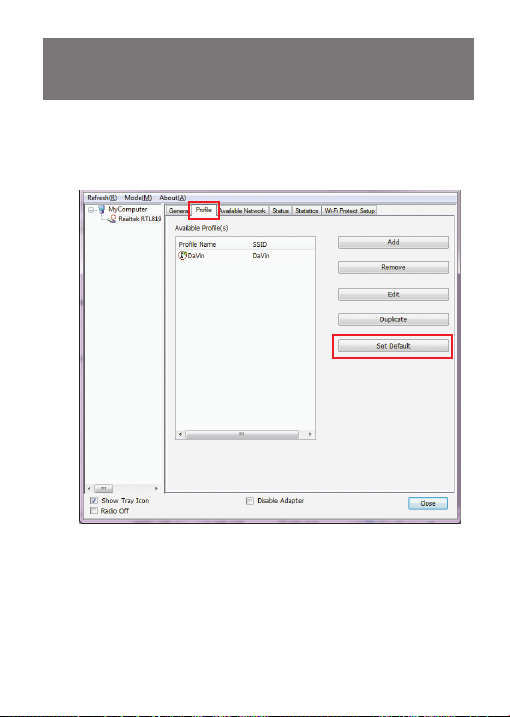
4. You may click the “Profile” tab and select your network
to “Set Default”.
6 7
Page 9

5. The wizard will now connect to your wireless network. You
may click the “General” tab to view the connection
status, “Signal Strength” and “Link Quality”.
On the bottom of the window, you can select if you want
to show the wireless icon in the system tray or disable
wireless signal / wireless adapter to conserve battery
power or meet in-flight requirements.
Page 10

Wi-Fi Protected Setup™ - PIN
WPS (WiFi Protected Setup) is a simple and secured way to
connect your computer to an existing network. Before you
start, please make sure your wireless router / AP supports
WPS feature. This optional certification feature provides two
easy-to-use methods to configure a network: Push-Button
Configuration or PIN / numeric code.
• PIN Configuration:
1. Click the “Pin Input Config” button.
8
Page 11

2. Click “Ye s” to select a
specific AP
3. Select the AP that you
want to configure.
4. Wait for your wireless
router to configure the
security setting.
9
Page 12

5. Refer to your wireless
router’s manual, enter
the generated PIN code
into your wireless router
setting page. The
screen you see may
vary.
Wi-Fi Protected Setup™ - PBC
• Push-button Configuration
1. Press and hold the physical button on the side of your
Wireless-N USB adapter for 5 seconds or the virtual button
on the WPS setup page.
WPS
10 11
Page 13

2. Refer to your wireless router’s manual, press the physical
button on your router or virtual WPS button on your
wireless router setting page. The screen you see may vary.
Wait for your wireless router to configure the security setting.
Page 14

Federal Communications
Commission (FCC) Statement
This product has been tested and found to comply with the
limits for a Class B device, pursuant to part 15 of the FCC
Rules. It is intended for use in residential setting, but may
also be used in commercial or industrial setting.
CE Compliance
This device has been tested and found to comply with the
following European Union directives: Electromagnetic
Capability (89/336/EMC), Low Voltage (73/23/EEC) and
R&TTED (1999/5/EC).
12
Page 15

Software Installation - Mac
NOTE: Do not install the GWU625 USB Wifi Dongle
until prompted to.
1. Open the Mac driver folder on the CD and double
click on “Installer.pkg”
2. Once the installer starts, click “Continue”.
Page 16

3. Next, click “Continue”.
4. Select your language and click “Continue”.
14 15
Page 17

5. Click “Agree” to continue.
6. Click “Install” to install the driver and utility.
Page 18

7. Enter your user name and password and click “OK”.
8. Click “Continue Installation” to continue.
9. The installation wizard will now install the necessary files.
1613
Page 19

10. Once the wizard has finished installing the drivers, the
Installation Was Successful screen will appear. Click
“Restart” to complete the installation and restart your
computer.
11. Once the computer has restarted, open a finder
window and click on Applications. You should see the
Realtek WLAN Client Utility.
17
Page 20

12. At this time, please insert the GWU625 USB Wifi Dongle
into the USB port on your computer. The Realtek WLAN
Client Utility should automatically start.
13. Click on the “Profiles” tab at the top of the utility. Next
click the “Add” button at the bottom of the utility to
set up the GWU625 for your network.
18 19
Page 21

14. Next, enter a profile name for your connection, the SSID
for your wireless network, the security settings and click
“OK”.
Page 22

15. Once you enter all your wireless network settings, the
link status tab will show if you are connected. If after
30 seconds the status does not show Connected,
please go back and verify all your settings are correct.
20
Page 23

Limited Warranty
WE’RE HERE TO HELP YOU!
NEED ASSISTANCE SETTING UP THIS PRODUCT?
Make sure you:
1. Use the live chat at www.iogear.com to try and solve
any issues you may be having with the product
2. Visit the Tech Info Library/FAQ on www.iogear.com
(under the Support tab)
3. Call the tech support line at 1-866-946-4327 (U.S.
only) or 949-453-8782
Warranty Information
This product carries a 3 Year Limited Warranty.
For the terms and conditions of this warranty, please go
to http://www.iogear.com/support/warranty or call
1-866-946-4327
Contact
Toll Free 866-946-4327 (USA)
Phone: 949-453-8782
19641 Da Vinci
Foothill Ranch, CA 92610
www.iogear.com
support@iogear.com
Page 24

About UsAbout Us
FUN
IOGEAR offers connectivity solutions that are
innovative, fun, and stylish, helping people
enjoy daily life using our high technology
products.
GREEN
IOGEAR is an environmentally conscious
company that emphasizes the importance of
conserving natural resources. The use of our
technology solutions helps reduce electronic
waste.
© 2011 IOGEAR
 Loading...