

Page 1
Quick Start Guide
NetShair Link Portable Wi-Fi Router &
USB Media Hub
GWRH1
PART NO. Q1238-a
www.iogear.com
Page 2
Package Contents
1
1 x NetShair Link module
1 x U.S. power plug
1 x Quick Start Guide
1 x Warranty Card
System Requirements
- Wired Ethernet connection with standard RJ45 connector
- Standard electrical outlet
- Optional extenal USB storage device to share media content
- Wi-Fi equipped wireless devices
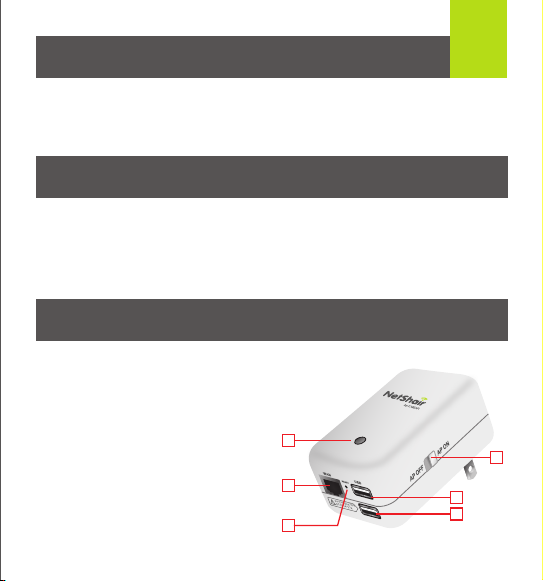
Overview
1. LED status indicator
Green LED = Connected to Internet
Orange LED = Network active, no Internet
Red LED = Network not active, resetting
2. Ethernet connector
3. Reset button
4. Power switch
5. USB media port
6. USB charging output (1A-2.1A)
1
2
For Charging Only
DC 5V 1A~2.1A
3
4
5
6
Page 3
For Charging Only
DC 5V 1A~2.1A
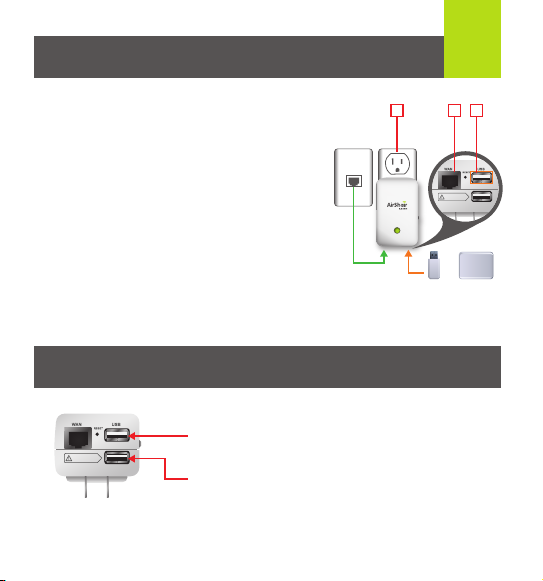
Hardware Installation
2
1. Plug the NetShair Link into a power source.
2. Connect an Ethernet cable from your modem to the
NetShair Link.
3. Connect a USB flash drive or external hard drive with
movies, music, photos or files.
4. Download the NetShair App for Android™ or iPod
®
iPhone
/ iPad® from their respective App stores (App
not required for PC/Mac).
5. Connect to the NetShair Link Wi-Fi network.
6. Follow the setup directions shown for your device type.
7. Launch your device browser to access the internet, or
launch the NetShair App to stream your media library
(PCs/Laptops simply open a browser to stream content).
Charging
USB Media Port: Connect to charge smartphones, mp3
players and other USB portable devices.
USB Charging Port: Connect to fast-charge tablets and
most smartphones (1A-2.1A output). For older devices
or devices that do not charge when connected to this
output, connect to the top USB port.
For Charging Only
DC 5V 1A~2.1A
®
/
RJ45
Connector
1 2 3
or
USB Device
HDD
Page 4
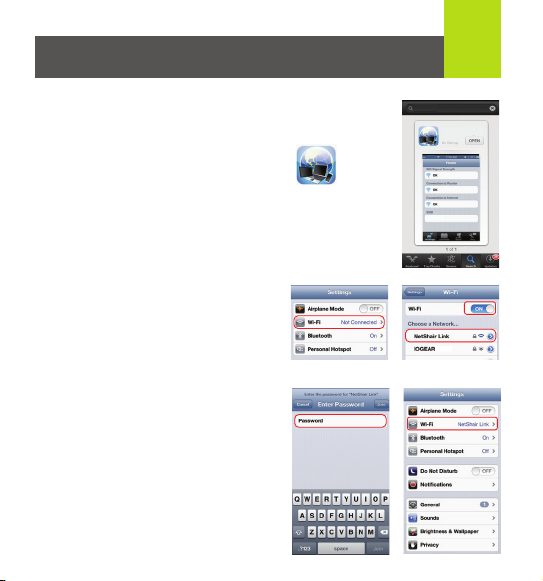
NetShair Link Setup (iPod / iPhone / iPad)
1. Open the App Store on your iPod, iPhone or iPad. Search for
the "NetShair" app and download it.
2. After installation is complete, the NetShair
App icon will be shown on the device.
3
NetShair
NetShair
NetShair
IOGEAR
3. Turn on the NetShair Link by sliding
the switch to “AP ON”.
4. Open the Settings menu on your
mobile device and set Wi-Fi to ON.
5. Choose "NetShair Link" network.
6. Enter the default password "12345678"
and tap Join to connect. Wi-Fi will
display NetShair Link.
NetShair Link
Page 5
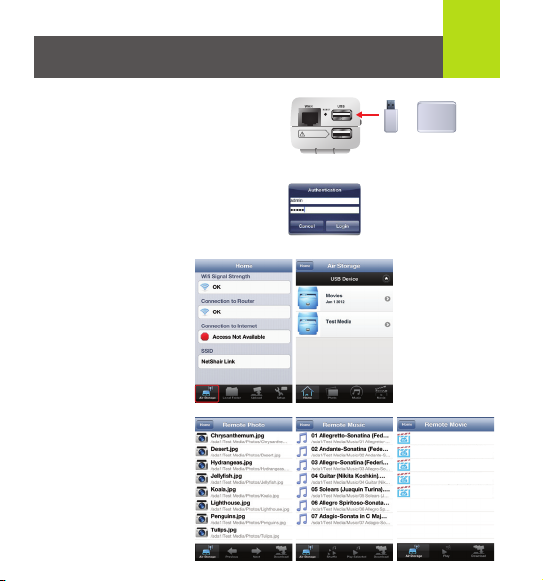
Viewing USB device (iPod / iPhone / iPad)
1. Connect your USB Flash Drive or USB
Hard Drive to the upper USB port.
2. Make sure the “NetShair Link” Wi-Fi
network is connected. Open the App
and log in (only necessary the first time).
Default Username: admin
Default Password: admin
Tap Login to log into the device.
3. On the Home screen,
tap the Air Storage
button to show the
USB contents.
For Charging Only
DC 5V 1A~2.1A
or
USB Device
4
HDD
4. Tap Photo, Music or
Movie button to see
media content select a
file to playback. To view
other file type such as
.pdf, .ppt, .doc, .xls,
.pages, .key or
.numbers, tap the folder
containing the file you
want then tap to view it.
Family June.mp4
/sda1/Movies/Family June.mp4
Family July.mp4
/sda1/Movies/Family July.mp4
Family March.mp4
/sda1/Movies/Family March.mp4
Kids.mp4
/sda1/Movies/Kids.mp4
Soccer Game.mp4
/sda1/Movies/Soccer Game.mp4
Page 6
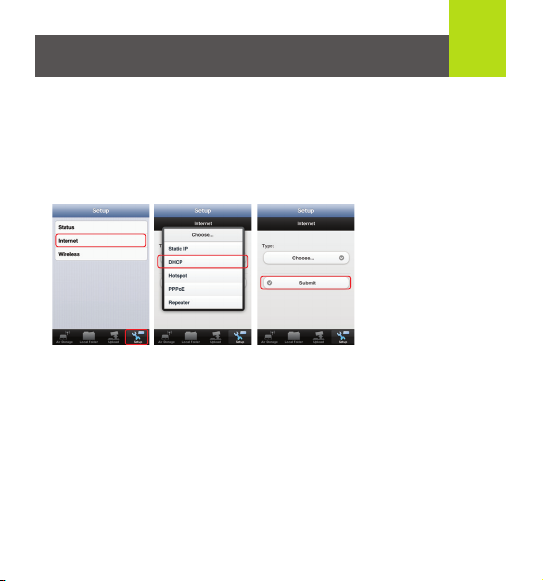
Internet Connection (iPod / iPhone / iPad)
Option 1: DHCP or PPPoE
Ethernet connection: Connect an Ethernet cable from the modem to the WAN port of the
NetShair Link. In the App, choose DHCP (for most users) and tap submit or select PPPoE
and enter username and password then tap submit. For Static IP setting please
download the full user manual from our website.
Tap Setup > Internet > Choose DHCP > Tap Submit
5
Page 7

6
Option 2: Hotspot or Repeater
To connect the NetShair Link to a wireless internet connection, choose Hotspot (creates
a new password protected hotspot) or Repeater (extends the signal of the current AP
without new security controls) then tap submit. Select an AP (wireless network) then tap
join and enter the pre-shared key.
Tap Setup > Internet > Choose Hotspot > Tap Submit
Select an AP to connect > Fill in wireless pre-shared key of the AP > Tap Join
IOGEAR
Meeting Room
Office
Warehouse
Page 8

Wireless Security Settings (iPod / iPhone / iPad)
Option 1: Wireless Password
To change the pre-shared network key, enter a new key with minimum 8 characters.
Tap Setup > Wireless > Fill in new Password > Tap Submit
Option 2: Network Name
To change the name of your wireless network (SSID) enter the new name in the SSID box.
Tap Setup > Wireless > Fill in new SSID > Tap Submit
●●●●●●●●●●●●●●●●
Your Network Name
7
Page 9

NetShair Link Setup (Android
Devices)
8
1. Open the Google Play store on your Android device.
Search for the "NetShair" app and download it.
2. After installation is complete,
the NetShair App icon will be
shown on the device.
3. Turn on the NetShair Link by sliding
the switch to “AP ON”.
4. Open the Settings menu on your
mobile device and set Wi-Fi to ON.
5. Choose "NetShair Link" network.
6. Enter the default password
"12345678" and tap Connect. Wi-Fi
will display NetShair Link.
NetShair
NetShair
NetShair
Page 10

Viewing USB device (Android
1. Connect your USB Flash Drive or USB
Hard Drive to the upper USB port.
2. Make sure the “NetShair Link” Wi-Fi network is connected.
Open the App and log in (only necessary the first time).
Default Username: admin Default Password: admin
Tap OK to log into the device.
3. On the Home screen, tap the
Remote Storage button to
show the USB contents.
4. Tap Photo, Music or
Movie button to see
media content select a
file to playback. To view
other file type such as
.pdf, .ppt, .doc, .xls,
.pages, .key or
.numbers, tap the
folder containing the file
you want then tap to
view it.
Devices)
For Charging Only
DC 5V 1A~2.1A
or
USB Device
9
HDD
Page 11

Internet Connection (Android
Option 1: DHCP or PPPoE
Ethernet connection: Connect an Ethernet cable from the modem to the WAN port of the
NetShair Link. In the APP, choose DHCP (most users) and tap submit or select PPPoE and
enter username and password then tap submit. For Static IP users please download the
full user manual from our website. For Static IP setting please see full user manual.
Tap Setup > Internet > Choose DHCP > Tap Submit
Devices)
10
Page 12

11
Option 2: Hotspot or Repeater
To connect the NetShair Link to a wireless internet connection, choose Hotspot (creates
a new password protected hotspot) or Repeater (extends the signal of the current AP
without new security controls) then tap submit. Select an AP (wireless network) then tap
join and enter the pre-shared key.
Tap Setup > Internet > Choose Hotspot > Tap Submit
Select an AP to connect > Fill in wireless pre-shared key of the AP > Tap Join
IOGEAR
Meeting Room
Office
Shop
Warehouse
Page 13

Wireless Security Settings (Android
Option 1: Wireless Password
To change the pre-shared network key, enter a new key with minimum 8 characters.
Tap Setup > Wireless > Fill in new Password > Tap Submit
Option 2: Network Name
To change the name of your wireless network (SSID) enter the new name in the SSID box.
Tap Setup > Wireless > Fill in new SSID > Tap Submit
Your Network Name
Devices)
12
Page 14

NetShair Link Setup (Laptop / Computer)
1. Turn on the NetShair Link by sliding the switch to “AP ON”.
2. Click on the wireless icon on
the bottom right corner of
the screen
3. Choose “NetShair Link”
Network.
4. Enter the default password
"12345678" and then press
"OK" to connect.
5. Wi-Fi will display NetShair Link
Connected.
13
Page 15

Internet Connection
1. Make sure the “NetShair Link” Wi-Fi
network is connected. Open the Brower
and enter 192.168.168.1 into the address
bar to log in.
Default Username: admin
Default Password: admin
2. Click Wizard icon to setup the NetShair Link.
3. On the setup Wizard screen click next.
4. Choose Gateway, Hotspot
or Repeater mode. Skip to
the section for Gateway or
Hotspot/Repeater.
14
Wizard
Page 16

15
Gateway
In Hotel/Office/Home (DSL/Cable Modem) applications using Ethernet connection to
access the Internet, select Gateway. Choose either DHCP Client and click Next, or
select PPPoE and enter User Name and Password then click Next.
Wireless Network Name and Password
To change the name of your wireless network (SSID) enter the new name in the SSID
box, then enter a new network key with minimum 8 characters and click Finished. To
keep the default settings just click Finished.
Page 17

16
Hotspot/Repeater
To connect the NetShair Link to a wireless internet connection, choose Hotspot (creates a new
password protected hotspot) or Repeater (extends the signal of the current AP without new
security controls) then tap Scan network. Select an AP (wireless network) then click Next.
Wireless Security
Enter the pre-shared netwrok key then click Finished.
Page 18

Viewing USB device
1. Connect your USB Flash Drive or USB
Hard Drive to the upper USB port.
2. Make sure the “NetShair Link” Wi-Fi network
is connected. Open the Brower and enter
192.168.168.1 into the address bar to log in.
Default Username: admin
Default Password: admin
3. Click File Server icon to
browse the USB contents.
4. Select a folder to open then
click on the file you want to
access.
For Charging Only
DC 5V 1A~2.1A
Wireless WAN System Setting
or
USB Device
File Server
17
HDD
Wizard
Page 19

Hotel Usage Explanation Note
A. Hotel provides wired Internet access
1. Turn on the NetShair Link by sliding the switch to “AP ON”.
2. Connect your iPhone/iPad/Android Phone/Android Tablet/Laptop to the device
through Wi-Fi (Note: if hotel requires user name & password for internet access, you
must connect your device to the NetShair Link before you plug in the Ethernet cable!)
3. Connect the Ethernet cable in hotel to the WAN port of device.
B. Hotel provides Wi-Fi access
1. Turn on the NetShair Link by sliding the switch to “AP ON”.
2. Connect your wireless devices to the NetShair Link through Wi-Fi.
3. Set NetShair Link to Hotspot mode and choose an AP to connect.
FCC Statement
This product has been tested and found to comply with the limits for a Class A digital device,
pursuant to Part 15 of the FCC Rules. These limits are designed to provide reasonable
protection against harmful radio frequency interference when operated in a commercial
environment. See User Manual for additional information.
CE Compliance
This device has been tested and found to comply with the following European Union
directives: Electromagnetic Capability (2004/108/EC), Low Voltage (2006/95/EC) and
R&TTED (1999/5/EC).
Page 20

Limited Warranty
WE’RE HERE TO HELP YOU! NEED ASSISTANCE SETTING UP THIS PRODUCT?
Make sure you:
1. Visit www.iogear.com for more product information
2. Visit www.iogear.com/support for live help and product support
Warranty Information
This product carries a 1 Year Limited Warranty. For the terms and conditions of this warranty, please go to
http://www.iogear.com/support/warranty
Register online at http://www.iogear.com/register
Important Product Information
Product Model
Serial Number
Contact
Toll Free: 866-946-4327 (USA)
Phone: 949-453-8782
Web Site: www.iogear.com
E-mail: support@iogear.com
This Quick Start Guide is intended to cover basic setup and key
functions to get you up and running quickly. For a complete
explanation of advanced setup and additional features, please
download the full GWRH1 User Manual from www.IOGEAR.com.
Address: 19641 Da Vinci,
Foothill Ranch, CA 92610, USA
© 2013 IOGEAR
®
 Loading...