

Page 1

Quick Start Guide
NetShair Nano
Ultra Portable Wi-Fi Router/Access Point
GWPAP1
PART NO. Q1376
1
www.iogear.com
Page 2

© 2014 IOGEAR® Part No. Q1376
IOGEAR, the IOGEAR logo, are trademarks or registered trademarks of IOGEAR.
Microsoft and Windows are registered trademarks of Microsoft Corporation. All other
brand and product names are trademarks or registered trademarks of their respective
holders. IOGEAR makes no warranty of any kind with regards to the information
presented in this document. All information furnished here is for informational purposes
only and is subject to change without notice. IOGEAR assumes no responsibility for any
inaccuracies or errors that may appear in this document.
Page 3

Table of Content
Package Contents 4
System Requirements 4
Overview 4
Charging 5
Router Mode or AP Mode 5
Hardware Installation 6
Software Setup: Which device do you have? 6
NetShair Nano Setup - iPod / iPhone / iPad 7
Internet Connection - iPod / iPhone / iPad 8
Wireless Security Settings - iPod / iPhone / iPad 12
NetShair Nano Setup - Android 13
Internet Connection - Android 14
Wireless Security Settings - Android 18
NetShair Nano Setup - Computer / Other 19
Internet Connection - Computer / Other 20
Wireless Security Settings - Computer / Other 24
Hotel Usage Explanation Note 26
Troubleshooting 26
IC Statement 27
FCC Statement 28
CE Statement 28
Limited Warranty 29
Contact 29
Page 4
Package Contents
1 x NetShair Nano Wi-Fi Router/
Access Point
1 x Quick Start Guide
1 x Warranty Card
System Requirements
• USB port or USB charger
• Wired Ethernet connection with standard RJ45 connector
• Wi-Fi enabled computer or mobile device with either Android
2.3.3+ or iOS 5.1+
• NetShair Nano App downloaded from Google Play Store™
or Apple App StoreSM (App not required for PC/MAC)
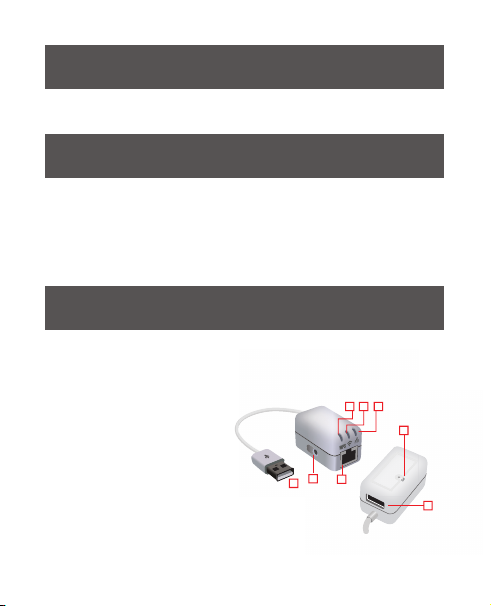
Overview
1. WPS green LED status indicator
Flashing = WPS mode active
Off = WPS mode off
2. WLAN blue LED status indicator
Flashing = Network active
Off = No active network
3. Network green LED
LED On = Port is linked
Flashing = Transmitting /
Receiving data
Off = No active link
4. RJ-45 Ethernet port
5. WPS (Wi-Fi Protected Setup) button
6. USB power connection
4
7. Reset button
8. USB pass-through
charging port
3
1
2
5
4
6
7
RS
8
Page 5
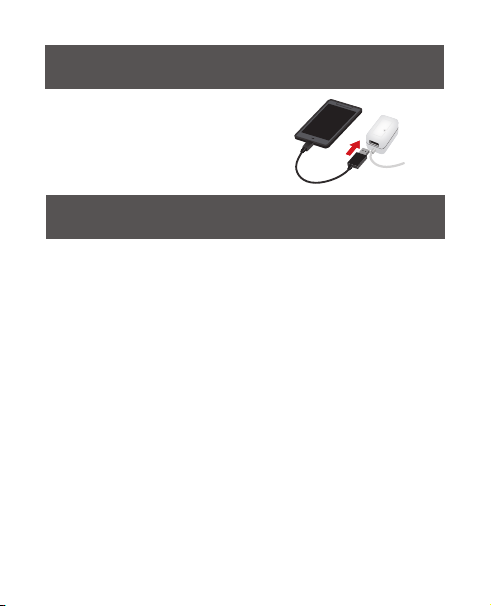
Charging
USB pass-through charging port:
connect to charge most smartphones
and USB devices (1A maximum
pass-through current).
R
S
Router Mode or AP Mode
The NetShair Nano can be used in one of two operating modes:
Router Mode and Access Point Mode
Router Mode:
This is the default setting and is commonly used for most
applications. Router Mode converts an Ethernet connection to
Wi-Fi with DHCP, enabling you to create a private Wi-Fi network
and share Internet access to multiple users and devices. If using
the NetShair Nano at home with a cable modem, use Router
Mode and the WAN setting for DHCP Client. If using at home
with a DSL modem, use Router Mode and the WAN setting for
PPPoE connection.
Access Point Mode (AP Mode):
This mode simply turns a wired network or Internet connection
into a wireless access point. AP Mode is suitable if you already
have a router managing DHCP and need a wireless internet
connection in places such as hotels, dorms and ofces where
only a wired network is available. Please note that when
connecting to networks in some hotels or places that charge a
5
Page 6
fee for each device connected, use Router Mode to share a single
IP address between your connected devices. Using AP mode on
these networks would require each device to have a separate IP
address, likely causing an access charge for each one.
Hardware Installation
Do not connect the Ethernet cable until app/client setup
is complete!
1. To power on the NetShair Nano,
plug into a USB port on your computer
or to a USB charging adapter of any
mobile device.
2. Download the NetShair Nano App
for your devices from their
respective app store. (App not required
for PC/MAC or other devices with full
HTML browser support).
3. Connect to the
NetShair_Nano_XXXX
Wi-Fi network.
Note: XXXX= Last 4
digits of the NetShair Nano’s MAC ID.
USB wall charger not included
1
or
Software Setup: Which device do you have?
iPod / iPhone / iPad................................................... page 7
Android ...................................................................... page 13
Computer / Other ...................................................... page 19
Page 7
NetShair Nano Setup iPod / iPhone / iPad
Do not connect Ethernet cable until last step!
(See Internet Connection)
1. Make sure you have downloaded the NetShair Nano App prior
to setup!
2. To download the NetShair Nano App, open the App StoreSM
on your iPod, iPhone or iPad. Search for the
“NetShair Nano” App and download it to your device.
3. After installation is complete, the NetShair Nano App icon will
be shown on the device. Connect the NetShair Nano to a
powered USB port on your computer or to a USB charging
adapter of any mobile device.
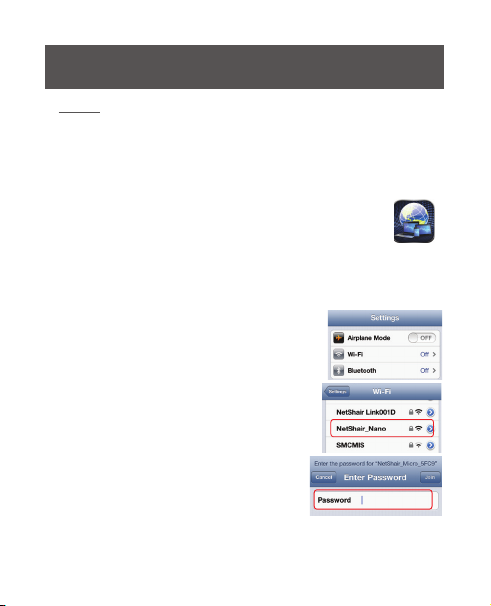
4. Open the Settings menu on your device
and set Wi-Fi to ON.
5. Choose “NetShair_Nano_XXXX”network.
6. Enter the default password “12345678”
and tap Join to connect. Wi-Fi will
display NetShair_Nano_XXXX.
7. See Internet Connection on the next page to set
operating mode.
7
Page 8
Internet Connection iPod / iPhone / iPad
Router Mode Setting
Follow the steps below to setup the NetShair Nano for Router
Mode. If you are unsure about which mode to use, see Router
Mode or AP Mode (page 5) to conrm the proper setting.
1. Make sure the “NetShair_Nano_XXXX” Wi-Fi network is
connected. Open the NetShair Nano App.
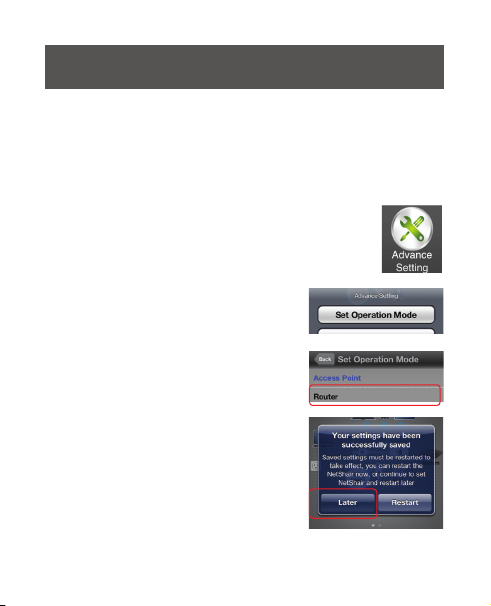
2. On the Home screen, tap Advance Setting.
3. Tap the Set Operation Mode button
4. Select Router for the Operation Mode.
5. A notication saying your settings
have been saved will appear,
tap Later to continue without the
NetShair Nano rebooting.
DHCP Setup continue to page 9
DSL Modem Setup continue to page 10
8
Page 9
Router Mode: DHCP (Default)
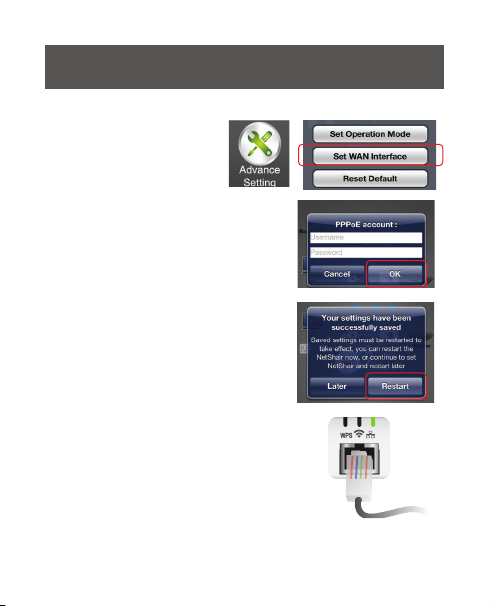
1. On the Home screen,
tap Advance Setting,
then Set WAN Interface.
2. The default setting is DHCP client.
If the network requires a username
and password to access, select
PPPoE. Enter the username and
password then tap OK.
3. Tap Restart to save settings.
4. After the NetShair Nano reboots,
connect an Ethernet cable to the
NetShair Nano. The Network LED
indicator will light solid once a
successful connection has been made.
5. Connect back to NetShair_Nano_XXXX
Wi-Fi network. Open your web browser to access the internet.
9
Page 10

Router Mode: PPPoE
NetShair Nano comes preset for DHCP Mode which is the
standard mode for cable internet providers. When using NetShair
Nano with a DSL Modem please follow the steps below:
1. Make sure the NetShair_Nano_XXXX Wi-Fi Network
is connected.
2. After setting the NetShair Nano in Router Mode (see Router
Mode Setting), tap on Advance Setting and then select
Set WAN Interface.
3. Select PPPoE from the menu and enter
username and password.
4. Tap OK, then Restart when
prompted. Wait approximately 60
seconds for the NetShair Nano to restart.
5. Once restarted, connect Ethernet cable
to Netshair Nano.
6. Connect back to NetShair_Nano_XXXX Wi-Fi Network.
Open your web browser to access the internet.
10
Page 11

Access Point Mode Setting
Follow the steps below to setup the NetShair Nano for AP Mode.
If you are unsure about which mode to use, see Router Mode or
AP Mode (page 5) to conrm the proper setting.
1. Make sure the “NetShair_Nano_XXXX” Wi-Fi network is
connected. Open the NetShair Nano App.
2. On the Home screen, tap Advance Settings.
3. Tap Set Operation Mode and then tap
Access Point.
4. Tap Restart to save settings.
5. After the NetShair Nano reboots,
connect an Ethernet cable to the
NetShair Nano. The Network LED indicator
will light solid once a successful connection
has been made.
6. Connect back to NetShair_Nano_XXXX
Wi-Fi network. Open your web browser to access the internet.
11
Page 12

Wireless Security Settings iPod / iPhone / iPad
In order to change the Network Name (SSID) or password
(Network Key) for the wireless network created by NetShair
Nano, please refer to the following steps:
Option 1: Wireless Password
To change the pre-shared network key, enter a new key with a
minimum of 8 characters.
1. Tap Basic Setting > Set Wireless Security >
Fill in new Password > Tap OK > Tap Restart
Option 2: Network Name
To change the name of your wireless network (SSID) enter the
new name in the SSID box.
1. Tap Basic Setting > Set Wireless SSID > Fill in new SSID
> Tap OK > Tap Restart
12
Page 13

NetShair Nano Setup Android
Do not connect Ethernet cable until last step!
(See Internet Connection)
1. Make sure you have downloaded the NetShair Nano App prior
to setup!
2. To download the NetShair Nano App, open the Google Play™
Store on your Android device. Search for the “NetShair
Nano” App and download it to your device.
3. After installation is complete, the NetShair
Nano App icon will be shown on the device.
Connect the NetShair Nano to a powered
USB port on your PC or connect to a
USB charging adapter for any mobile
device
4. Open the Settings menu on your
device and set Wi-Fi to ON.
5. Choose “NetShair_Nano_XXXX”
network.
6. Enter the default password
“12345678” and tap Connect. Wi-Fi
will display NetShair_Nano_XXXX.
7. See Internet Connection on next
page to set operating mode
13
Page 14

Internet Connection Android
Router Mode Setting
Follow the steps below to setup the NetShair Nano for Router
Mode. If you are unsure about which mode to use, see Router
Mode or AP Mode (page 5) to conrm the proper setting.
1. Make sure the “NetShair_Nano_XXXX” Wi-Fi network is
connected. Open the NetShair Nano App.
2. On the Home screen, tap
Advance Setting.
3. Tap Set Operation Mode and then
tap Router and press OK.
4. A notication saying your settings
have been saved will appear, tap
Later to continue without the
NetShair Nano rebooting.
DHCP Setup continue to page 15
DSL Modem Setup continue to page 16
14
Page 15

Router Mode: DHCP (Default)
1. On the Home screen, tap Advance
Settings, then Set WAN Interface.
2. By default the NetShair Nano is set
to DHCP client. If the network
requires a username and password
to access, select PPPoE. Enter the
username and password then tap OK.
3. Tap Restart to save settings.
4. After the NetShair Nano reboots,
connect an Ethernet cable. The
Network LED indictor will light solid
once a successful connection has
been made.
5. Connect back to NetShair_Nano_XXXX
Wi-Fi network. Open your web browser to access the internet.
15
Page 16

Router Mode: PPPoE
NetShair Nano comes preset for DHCP Mode which is the
standard mode for cable internet providers. When using NetShair
Nano with a DSL Modem please follow the steps below:
1. Make sure the NetShair_Nano_XXXX
Wi-Fi Network is connected.
2. After setting the NetShair Nano in
Router Mode (see Router Mode
Setting), tap on Advance Setting
and then select Set WAN Interface.
3. Select PPPoE from the menu and
enter username and password.
4. Tap OK, then Restart when
prompted. Wait approximately
60 seconds for the NetShair
Nano to restart.
5. Once restarted, connect Ethernet cable to Netshair Nano.
6. Connect back to NetShair_Nano_XXXX Wi-Fi Network. Open
your web browser to access the internet.
16
Page 17

Access Point Mode Setting
Follow the steps below to setup the NetShair Nano for AP
Mode. If you are unsure about which mode to use, see
Router Mode or AP Mode (page 5) to conrm the proper
setting.
1. Make sure the “NetShair_Nano_XXXX” Wi-Fi network is
connected. Open the NetShair Nano App.
2. On the Home screen, tap Advance Setting.
3. Tap Set Operation Mode and then
Access Point.
4. Tap Restart to save settings.
5. After the NetShair reboots, connect an Ethernet cable.
The Network LED indictor will light solid once a successful
connection has been made.
6. Connect back to NetShair_Nano_XXXX
Wi-Fi network. Go to a website and the Internet will be live.
17
Page 18

Wireless Security Settings Android
In order to change the Network Name
(SSID) or password (Network Key) for the
wireless network created by NetShair
Nano, please refer to the following steps:
Option 1: Wireless Password
To change the pre-shared network
key, enter a new key with a minimum
of 8 characters.
1. Tap Basic Setting > Set Wireless
Security > Fill in new Password >
Tap OK.
Option 2: Network Name
To change the name of your wireless network (SSID) enter
the new name in the SSID box.
1. Tap Basic Setting > Set Wireless SSID > Fill in new SSID
> Tap OK.
18
Page 19

NetShair Nano Setup Computer / Other
Note: Follow the steps below to setup NetShair Nano using
the web client for computers or mobile devices with a full
HTML browser.
Do not connect Ethernet cable until last step! (See Internet
Connection)
1. Power on the NetShair Nano by plugging it into a powered
USB port on your laptop / desktop or by plugging it into a
USB charging adapter of a USB mobile device.
2. Click on the wireless icon on the bottom right corner of
the screen.
3. Choose the
“NetShair_Nano_XXXX”
Network.
4. Enter the default password
“12345678” and then press
OK to connect.
5. Wireless Network connection
will show NetShair_Nano_
XXXX connected.
19
Page 20

Internet Connection Computer / Other
Router Mode Setting
Follow the steps below to setup the NetShair Nano for Router
Mode. If you are unsure about which mode to use, see Router
Mode or AP Mode (page 5) to conrm the proper setting.
1. Make sure the
“NetShair_Nano_XXXX”
Wi-Fi network is connected.
Open the Browser and enter
192.168.1.254 into the address
bar to access the web client.
2. On the Operation Mode page,
click the drop down menu and
select Router, then click
Apply Change. A notication
saying your settings have been
saved will appear, click
Reboot Later to continue
without the NetShair Nano
rebooting.
DHCP Setup continue to page 21
DSL Modem Setup continue to page 22
20
Page 21

Router Mode: DHCP (Default)
1. By default the NetShair Nano is set to
DHCP client. If the network the
NetShair Nano is connected to
requires a username and password to
access, select TCP/IP Settings, then
click WAN Interface.
Enter the username and
password provided by the
administrator and click Apply
Changes.
2. The NetShair Nano will need to reboot to apply the
changes made. Click Reboot Now.
21
Page 22

5. Once rebooted, connect an Ethernet cable
from the modem to the NetShair Nano.
6. Connect back to NetShair_Nano_XXXX Wi-Fi
network. Open your web browser to access
the internet.
Router Mode: PPPoE
NetShair Nano comes preset for DHCP Mode which is the
standard mode for cable internet providers. When using NetShair
Nano with a DSL Modem please follow the steps below:
1. Make sure the NetShair_Nano_XXXX Wi-Fi Network is connected.
2. After putting the NetShair Nano in Router Mode (see Router Mode
Setting), open a browser to 192.168.1.254 to get to the setup page.
3. Go to TC/IP setting then go to WAN Interface Setting.
4. Select PPPoE from
the drop down box
and enter username
and password.
Do not make any
other changes.
5. Click Apply Changes at the bottom of the page and wait
approximately 60 seconds for the NetShair Nano to restart.
6. Once restarted, connect Ethernet cable to NetShair Nano
7. Connect back to NetShair_Nano_XXXX Wi-Fi network.
Open your web browser to access the internet.
22
Page 23

Access Point Mode Setting
Follow the steps below to setup the NetShair Nano for AP
Mode. If you are unsure about which mode to use, see Router
Mode or AP Mode (page 5) to conrm the proper setting.
1. Make sure the “NetShair_Nano_XXXX”
Wi-Fi network is connected.
Open the Browser and enter
192.168.1.254 into the address
bar to access the web client.
2. On the Operation Mode page,
click the drop down menu and
select AP, then click Apply Change.
3. The NetShair Nano will need
to reboot to apply the changes
made. Click Reboot Now.
4. Once rebooted, connect an
Ethernet cable from the
modem to the NetShair Nano.
5. Connect back to NetShair_Nano_XXXX
Wi-Fi network. Open your web browser
to acess the internet.
23
Page 24

Wireless Security Settings Computer / Other
In order to change the Network Name (SSID) or password
(Network Key) for the wireless network created by NetShair
Nano, please refer to the following steps:
Option 1: Wireless Password
1. Make sure the “NetShair_Nano_XXXX” Wi-Fi network is
connected. Open the Browser and enter 192.168.1.254
into the address bar to access the web client.
2. Select Wireless, then click Security.
3. Click the drop down menu for Encryption and select from the
following: WEP, WPA, WPA2, or WPA-Mixed (Recommended).
4. Enter a new network key with a minimum of 8 characters and
click Apply Changes.
5. The NetShair Nano will need to reboot to apply the changes
made. Click Reboot Now.
24
Page 25

Option 2: Network Name (SSID)
1. Make sure the “NetShair_Nano_XXXX” Wi-Fi network is
connected. Open the Browser and enter 192.168.1.254 into
the address bar to access the web client.
2. Select Wireless, then click Basic Settings
3. Enter the new network name in the SSID box and click
Apply Changes.
4. The NetShair Nano will need to reboot to apply the changes
made. Click Reboot Now.
25
Page 26

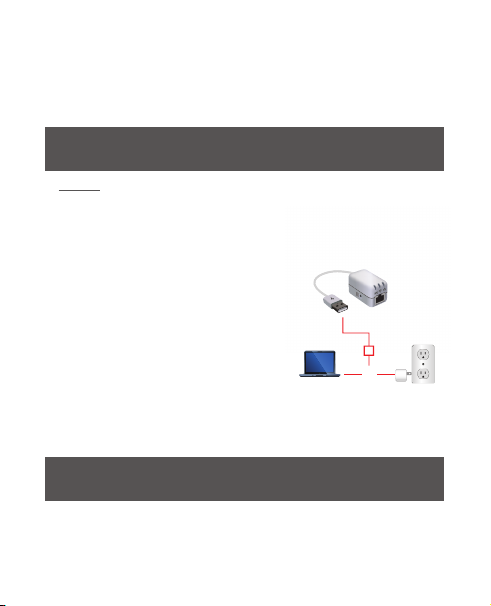
Hotel Usage Explanation Note
Hotel provides wired Internet access
1. Do not connect the Ethernet cable until app/client setup is
complete.
2. Power on the NetShair Nano by plugging it into a powered
USB port on your Laptop or Desktop or by plugging it into a
USB charging adapter of a USB mobile device.
3. Connect your iPhone/iPad/Android Phone/Android
Tablet/Laptop to the device through Wi-Fi.
4. Follow the setup directions shown for your device type.
5. Connect the Ethernet cable in hotel to the WAN port of device.
6. If hotel charges a fee for each device connected, make sure
to set the NetShair Nano to Router Mode.
Troubleshooting
If you are setting up the NetShair Nano using a web client
(Internet Browser) and cannot get to the 192.168.1.254 page,
you may have connected the Ethernet cable before completing
device setup. If this is the case, the NetShair Nano may have
experienced an IP conict and automatically changed the LAN
subnet to 192.168.0.254. Please enter 192.168.0.254 into your
browser and follow the setup instructions again.
26
Page 27

IC Statement
IC Caution:
This device complies with Industry Canada licence-exempt RSS
standard(s).
Operation is subject to the following two conditions:
(1) this device may not cause interference, and
(2) this device must accept any interference, including
interference that may cause undesired operation of the device.
Cet appareil est conforme la norme d’Industrie Canada de
licence RSS(s).
Son nctionnement est soumis aux deux conditions suivantes:
(1) cet appareil ne peut pas causer d’ interférences,et
(2) cet appareil doit accepater toute interférences,
y comparis les interferences qui peuvent causer un mauvais
fonctionnement de I’appareil.
French:
Le présent appareil est conforme aux CNR d’Industrie Canada
applicables aux appareils radio exempts de licence. L’exploitation
est autorisée aux deux conditions suivantes:
(1) l’appareil ne doit pas produire de brouillage, et
(2) l’utilisateur de l’appareil doit accepter tout brouillage
radioélectrique subi, même si le brouillage est susceptible d’en
compromettre le fonctionnement.
27
Page 28

FCC Statement
This product has been tested and found to comply with the
limits for a Class A digital device, pursuant to Part 15 of the
FCC Rules. These limits are designed to provide reasonable
protection against harmful radio frequency interference when
operated in a commercial environment. See User Manual for
additional information.
CE Statement
This device has been tested and found to comply with the
following European Union directives: Electromagnetic
Capability (2004/108/EC), Low Voltage (2006/95/EC) and
R&TTED (1999/5/EC).
28
Page 29

Limited Warranty
WE’RE HERE TO HELP YOU! NEED ASSISTANCE SETTING
UP THIS PRODUCT?
Make sure you:
1. Visit www.iogear.com for more product information
2. Visit www.iogear.com/support for live help and product
support
Warranty Information
This product carries a 1 Year Limited Warranty. For the terms
and conditions of this warranty, please go to
http://www.iogear.com/support/warranty
Register online at http://www.iogear.com/register
Important Product Information
Product Model
Serial Number
Contact
iogear.custhelp.com
support@iogear.com
www.iogear.com
19641 Da Vinci, Foothill Ranch, CA 92610
29
Page 30

© 2014 IOGEAR
®
 Loading...