

Page 1

Wireless-G Notebook Network CardWireless-G Notebook Network Card
Wireless-G Notebook Network Card
Wireless-G Notebook Network CardWireless-G Notebook Network Card
User Manual (GWP514)
Page 2

Welcome
Thank you for choosing IOGEAR® to serve your wireless needs. Soon, you will be sharing files or surfing
the Internet wirelessly. We hope you will have as much fun using your IOGEAR® Wireless-G Notebook
Network Card, as we had designing it.
Rest assured, your IOGEAR® Wireless-G Notebook Network Card is built rock-solid to ensure maximum uptime for you to stay up-and-running. If for any reason you have a problem, we stand behind our products
with an industry-leading 3 year factory warranty, so you can have peace-of-mind with your current and
future IOGEAR® purchases.
We want you to be happy with your purchase, so we have made every effort to ensure product quality,
reliability, and ease-of-use.
©2005 IOGEAR. All Rights Reserved. PKG-M0304
IOGEAR, the IOGEAR logo, is the trademark or registered trademarks of IOGEAR, Inc. Microsoft and Windows are registered trade-
marks of Microsoft Corporation. IBM is a registered trademark of International Business Machines, Inc. Macintosh, G3/G4 and iMac are
registered trademarks of Apple Computer, Inc. IOGEAR makes no warranty of any kind with regards to the information presented in this
document. All information furnished here is for informational purposes only and is subject to change without notice. IOGEAR, Inc. assumes
no responsibility for any inaccuracies or errors that may appear in this document.
Page 3

T able of Contents
Package Content
Overview
Features
Requirements
Introduction
Installation
Uninstallation
Configuration Utility
WinXP Zero Configuration Utility
WP A Configuration Utility
Specification
T echnical Support
○○○○○○○○○○○○○○○○○○○○○○○○○○○○○○
○○○○○○○○○○○○○○○○○○○○○○○○○○○○○○○○○
○○○○○○○○○○○○○○○○○○○○○○○○○○○○○○○○○○
○○○○○○○○○○○○○○○○○○○○○○○○○○○○○○○○
○○○○○○○○○○○○○○○○○○○○○○○○○○○○○○○○○
○○○○○○○○○○○○○○○○○○○○○○○○○○○○○○○○○
○○○○○○○○○○○○○○○○○○○○○○○○○○○○○○○○
○○○○○○○○○○○○○○○○○○○○○○○○○○○○○○
○○○○○○○○○○○○○○○○○○○○○○○○○
○○○○○○○○○○○○○○○○○○○○○○○○○○○○
○○○○○○○○○○○○○○○○○○○○○○○○○○○○○○○○
○○○○○○○○○○○○○○○○○○○○○○○○○○○○○○○
Radio and TV Interference Statement
Limited Warranty
○○○○○○○○○○○○○○○○○○○○○○○○○○○○○○○
Regulatory Compliance FCC Warning
○○○○○○○○○○○○○○○○○○○○○○○
○○○○○○○○○○○○○○○○○○○○○○○
2
3
4
5
6
10
31
34
56
67
74
75
76
77
78
Page 4

GWP514 package contains:
(1) 802.11g PC Card
(1) Installation and Manual CD
(1) Quick Start Guide
(1) Warranty/Registration Card
PKG-M0109B
Package Contents
2
Page 5

Overview
IOGEAR®’s Wireless-G Notebook Network Card is a sleek and versatile device for both small and
home office users. With IOGEAR®, you can surf the Internet, share files, chat with your friends,
and....Wirelessly!
Our simple, easy-to-use, setup wizard will have you up-and-running in minutes. Moreover, our turnkey
and Wireless Security packages keep you safe on the net.
Remember, IOGEAR®’s Wireless-G Notebook Network Card gives you the wireless connectivity all
in a small, cost-effective, and reliable setup. Go with IOGEAR®, and go Wireless!
3
Page 6

Features
• 54 Mbps wireless connection speed – up to five times faster than previous 802.11b technology
• Sleek, compact antenna is designed for minimum space
• Included IOGEAR client utility to support WLAN with WPA/WPA2 (Wi-Fi Protected Access) security
protocols, such as EAP-TLS,EAP-TTLS, PEAP-(EAPCGT), PEAP (EAP-MSCHAP V2), LEAP, LEAP FAST. (refer to User Manual for complete details) Ultra-easy installation in just a few simple steps.
• Compliant with FCC Part 15.247 for US, EN 300-328 for Europe, and RCR STD-33A and ARIB
STD-T66 for Japan
• Backward compatible with 802.11b wireless networks, access points, hot spots and other devices
• Solid 3-year manufacturer warranty - built to last!
4
Page 7

System Requirements
• Pentium® class notebook computers with one available CardBus slot
• Microsoft® Windows® 98SE, ME, 2000, XP
• CD-ROM drive
• Using WPA function, make sure there is a WPA-enabled Access Points in the network environment.
5
Page 8
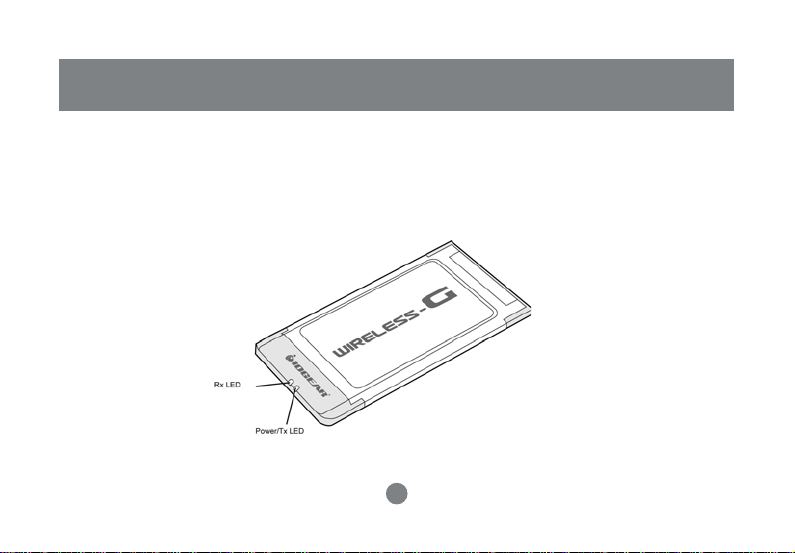
Introduction
When the adapter card is not associated with any wireless network devices, the Power/Tx Led will
stay solid greer Rx Led will be off. When both LEDs are blinking green, the adapter card is
scanning/connecting to an wireless network. When the adapter card is associated, Power/Tx LED
indicates transmitting activity; Rx LED indicate receiving activity.
6
Page 9
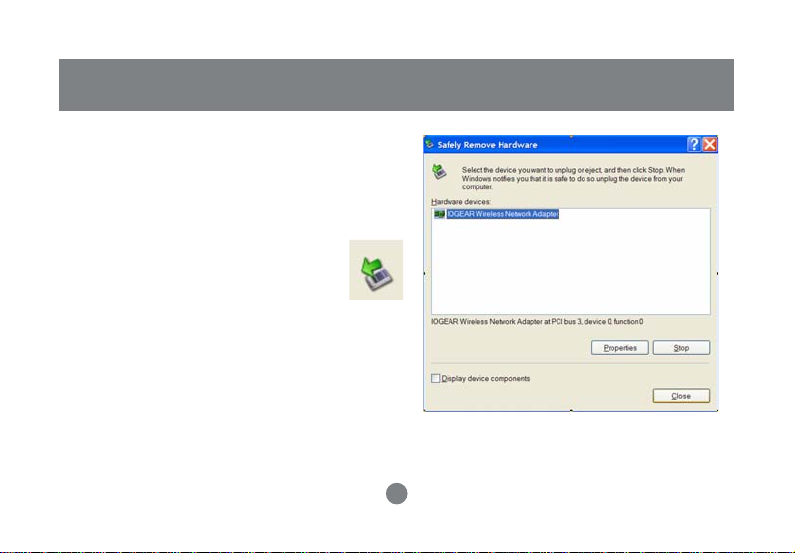
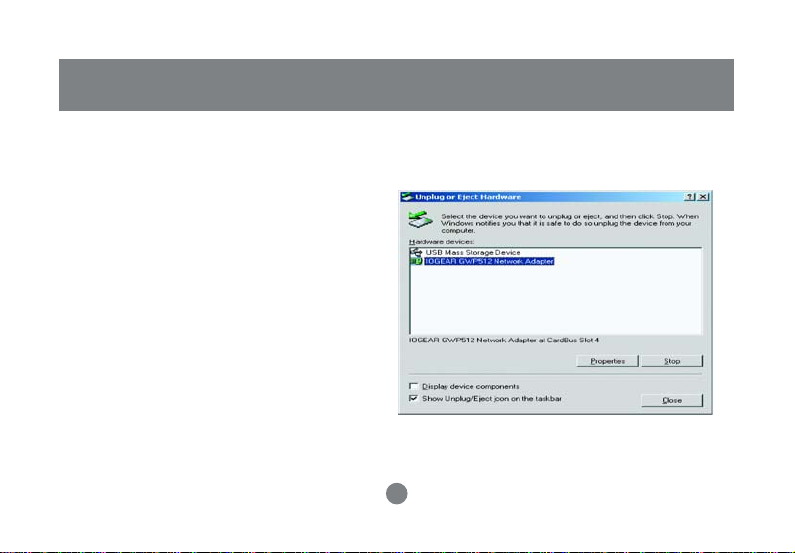
Introduction
Ejecting the Network Adapter
Please always disable the network adapter prior
removing the adapter from the PCMCIA slot. The
network adapter supports hot-swappable feature so
you don’t have to power off the notebook to remove
the adapter.
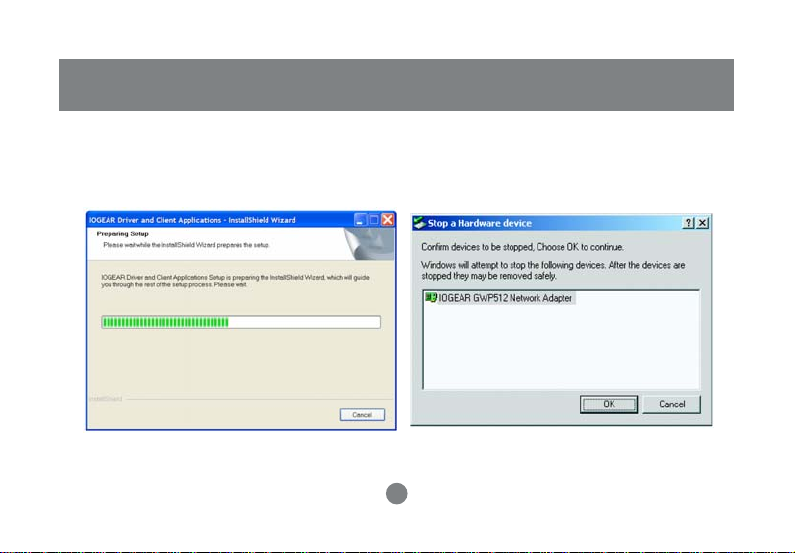
1. Double click the Unplug or Eject Hardware Icon
resides on the Windows system tray and click Stop
from the Unplug or Eject Hardware dialog box.
7
Page 10
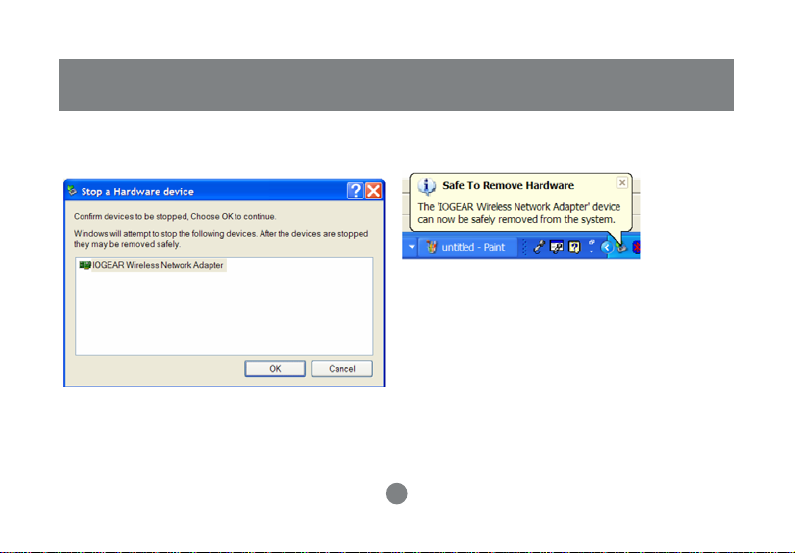
Introduction
2. Click OK to confirm that you are going to stop the
adapter.
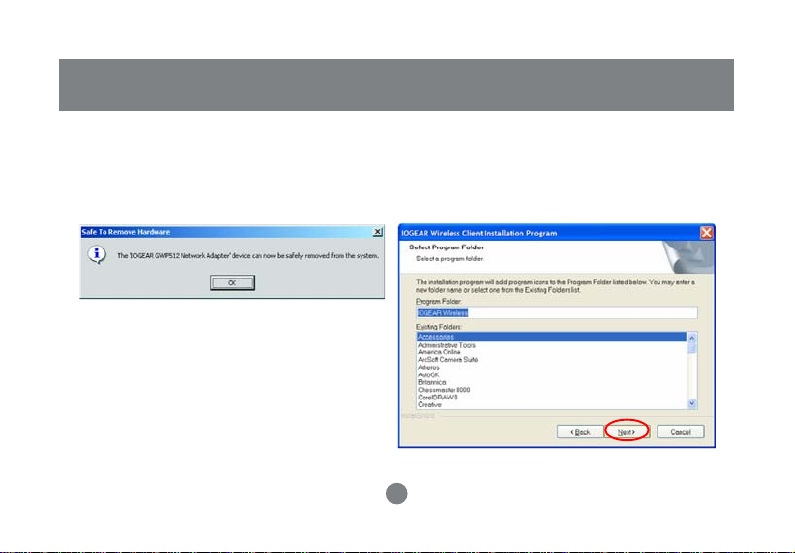
3. The following screen prompts that you can
remove the adapter.
4. Push the lever of your notebook PCMCIA slot
to eject the adapter now.
NOTE: Don’t eject the network adapter when data
transmission is taking place.
8
Page 11

Introduction
9
Page 12
Driver Installations
NOTE: If y ou have connected the GWP514 CardBus adapter to y our computer , please remo ve it first.
STEP 1
Insert the Driver and Utility CD into CD Drive
STEP 2
If your CD Autorun is enable, the Main Istallation
Menu will show. (Otherwise open your CD f older
and double-click on the “setup. exe” file)
STEP 3
A main installation Menu will show . Click the button
of IOGEAR GWP514 Driver Installation.
10
Page 13
Installation
4 Click the button of IOGEAR GWP514 Driver
Installation. The InstallShield wizard prepares for
installation.
5. The InstallShield Wizard prompts you for
confirmation. Click Next on the following menu.
11
Page 14
Installation
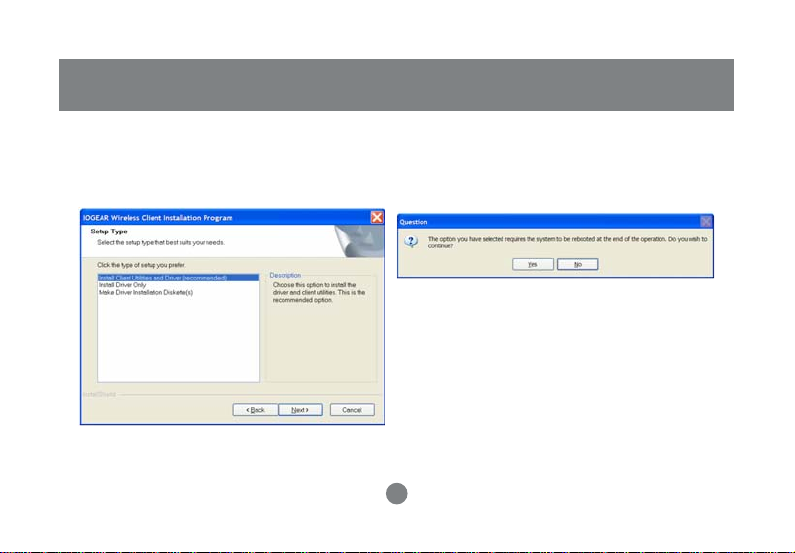
6. Check to install Client utility and driver or
install driver only. We recommend proceeding
with “Install client utilities and drivers”
7. A warning question will pop up, Click“YES”
12
Page 15
Installation
8. In the destination Folder screen you are asked to
confirm the Destination Folder for the application
software. If you would like, you may change the
destination folder to another location. Click Next
9. Select a program folder and click on Next.
13
Page 16

Installation
the Client Utility to be used. Click Next.
11. Choose the IOGEAR client utility. Click Next.10. The installation gives you information regarding
14
Page 17

Installation
12. At this moment please insert you GWP512
CardBus card in your Laptop, and Click OK.
13. If you have Windows XP Service Pack 2, you
will get the “Found News Hardware Wizard” menu,
click on Cancel.
15
Page 18

Installation
14. At the Found New Harware dialog box Cancel.
15. At the Hardware installation menu click
Continue Anyway.
16
Page 19

Installation
16. The setup configuration shows the installation
progress
17. Click Finish to complete the client utility
installation. Your computer will be rebooted.
17
Page 20

Installation
18. After rebooting, The IOGEAR Client Utility icon
resides on the Desktop at the System Tray
automatically.
If wireless-reception-four-bars does not launch
and cannot get wireless connection open the
configuration utility from Windows by
performing the following steps:
Start -> Programs -> IOGEAR Wireless -> IOGEAR
Wireless Client utility
After you launch the utility it will reside on the
windows system tray as illustrated above.
The device driver icon appears as a series of four
vertical bars. These bars provide
the following color coded indications of the received
signal strength:
·Red indicates poor quality (<5 dB)
·Yellow indicates average quality (5 to 10 dB)
·Green indicates from good (10 dB) to excellent (20
dB) quality
If you hold your mouse pointer over the icon, the
profiles, quality, ip address
display, along with the name of the current configuration profile.
18
Page 21

Installation
19. Press the right mouse button and click
Open IOGEAR Client Utility
The user can now use of the management
fuctions available in the IOGEAR Client
Configuration Utility . (Refer to the IOGEAR
CLIENT UTILITY section)
19
Page 22

Installation
Verifying Driver Installation:
1. Right-click mouse button on the My Computer
on your Windows desktop, and select
icon
Properties
from the pop-up menu.
2. The System properties screen will pop-up. Under
Hardware tab, click Device Manager.
3. After clicking Device manager, the following
screen will be shown.
20
Page 23

Installation
Click on the +symbol in front of “Network
adapters” and see if an item labeled
IOGEAR Network Adapter is visible.
If you don’t see the item below the network
adapter icon but a”?” or “!” symbol is displayed,
it means that the driver installation was unsuccessful.
Highlight “IOGEAR Network Adapter”, right-click
mouse button and select “Properties”.
4. Click the general tab, if the Device Status field
reports that “This device is working property”.
21
Page 24

Installation
TCP/IP Setup Procedure
After the network adapter driver and configuration
utility are installed, the TCP/IP address for the
network adapter must be set up in order to
communicate with other wireless LAN access.
1. Right-click on My Network Places and select
Properties from the pop-up menu.
2. Find the “Local Area Connection” that is
associated with the Network Adapter. Right
click on the connection and select Properties.
22
Page 25

Installation
3. Select “Internet Protocol (TCP/IP)” and click
Properties.
4. Select “Obtain an IP address automatically”,
if the network adapter will be linked to a Wireless AP
providing DHCP service. Or, please click “Use the
following IP address” and input an IP address and
subnet mask. IP configuration information (DHCP or
assigned IP address, Gateway and DNS server IP
addresses) is usually obtained from the corporate IT
staff.
23
Page 26

Installation
Note: The IP Address you assign to all computers
must be in the same IP Address range, and the
Subnet Mask must be the same for all computers
on your network.
For example:
If the first computer is assigned an IP Address of 10.35.1.3 with
a Subnet Mask of 255.255.255.0, then the second computer can
be assigned an IP Address of 10.35.1.4 with a Subnet Mask of
255.255.255.0,.. etc.
5. After completing IP configuration information,
click 7. Type “ipconfig” at the D:\> prompt to
determine OK to both “Internet Protocol (TCP/
IP) Properties” if the TCP/IP configuration has
taken effect. and “Local Area Connection
Properties” to complete the IP configuration.
24
Page 27

Installation
6. Choose Start > Programs > Accessories > Comand
Prompt to open the DOS command prompt window.
7. Type “iponfig” at the prompt to determine
if the TCP/IP configuration has taken effect.
IOGEAR CLIENT UTILITY
Current Status
25
Page 28

IOGEAR Client Utility
Click the Advanced button to see the advaced
status diagnostics.
26
Page 29

IOGEAR Client Utility
Advanced Status Information
27
Page 30

IOGEAR Client Utility
28
Page 31

IOGEAR Client Utility
Create or Modify a Configuration Profile
Auto Profile Selection Management
29
Page 32

IOGEAR Client Utility
30
Page 33

IOGEAR Client Utility
31
Page 34

IOGEAR Client Utility
32
Page 35

IOGEAR Client Utility
33
Page 36

Security T ab
Installation
34
Page 37

Installation
35
Page 38

Installation
36
Page 39

Installation
37
Page 40

Uninstallation
Uninstalling the Network Adapter Driver
1. To remove the driver from the
OS, go to
Start>Settings>Control Panel.
2. Double-click System.
38
Page 41

Uninstallation
3. Under Hardware tab, click Device Manager.
Double -click Network adapters. Right-click
mouse button on IOGEAR Network Adapter”.
and choose Uninstall. Click OK to uninstall
the device.
4. Click OK to confirm that you are going
to uninstall the driver.
39
Page 42

Uninstalling the Network Adapter Configuration Utility
1. The user can uninstall the Configuration Utility from
Windows Start menu -> Control Panel > Add-Remove
Programs to remove the configuration utility.
40
Uninstallation
Page 43

Specification
Frequency Band: 2.412 ~ 2.484GHz
Hardware Encryption: AES, TKIP, WEP
Media Access Technique: CSMA/CA
Tx/Rx Data Rate:
802.11g: 54, 48, 36, 24, 18, 12, 9, 6 Mbps
802.11b: 11, 5.5, 2, 1 Mbps
RF Output Power:
802.11g: 16dBm typical @ 54Mbps
41
Page 44

18dBm typical @ 48 ~ 6Mbps
802.11b: 20dBm typical @ 11Mbps
RF Receiving Sensitivity:
802.11g: -73dBm typical @ 54Mbps
-75dBm typical @ 48Mbps
-80dBm typical @ 36Mbps
-82dBm typical @ 24Mbps
-85dBm typical @ 18Mbps
-87dBm typical @ 12Mpbs
-89dBm typical @ 9Mbps
-90dBm typical @ 6Mbps
802.11b: -88dBm typical @ 11Mbps
42
Specification
Page 45

Te chnical Support
If you need technical support, please check out our IOGEAR Tech Info Library (T.I.L.) at
www.iogear.com/support for the latest tips, tricks, and troubleshooting. The IOGEAR
T.I.L. was designed to provide you with the latest technical information about our products.
Most of the answers to your questions can be found here, so please try it out before
contacting technical support.
Technical support is available Monday through Friday from 7:30 am to 5:30 pm PST
and can be reached at (949) 453-8782 or by email support@iogear.com
43
Page 46

Radio & TV Interference Statement
WARNING!!! This equipment generates, uses and can radiate radio frequency energy and, if not
installed and used in accordance with the instruction manual, may cause interference to radio
communications. This equipment has been tested and found to comply with the limits for a Class B
computing device pursuant to Subpart J of Part 15 of FCC Rules, which are designed to provide
reasonable protection against such interference when operated in a commercial environment. Operation of this equipment in a residential area is likely to cause interference, in which case the user at his
own expense will be required to take whatever measures may be required to correct the interference.
44
Page 47

Limited Warranty
IN NO EVENT SHALL THE DIRECT VENDOR’S LIABILITY FOR DIRECT , INDIRECT, SPECIAL, INCIDENTAL
OR CONSEQUENTIAL DAMAGES RESULTING FROM THE USE OF THE PRODUCT, DISK OR ITS DOCUMENT A TION EXCEED THE PRICE PAID FOR THE PRODUCT .
The direct vendor makes no warranty or representation, expressed, implied, or statutory with respect to the
contents or use of this documentation, and especially disclaims its quality, performance, merchantability, or
fitness for any particular purpose.
The direct vendor also reserves the right to revise or update the device or documentation without obligation
to notify any individual or entity of such revisions, or updates. For further inquires please contact your
direct vendor.
45
Page 48

Regulatory Compliance FCC Warning
This device complies with Part 15 of the FCC Rules.
Operation is subject to the following two conditions: (1) this device may not cause harmful interference, and (2)
this device must accept any interference received, including interference that may cause undesired operation.
This equipment has been tested and found to comply with the limits for a Class B digital device, pursuant to
part 15 of the FCC Rules. These limits are designed to provide reasonable protection against harmful
interference in a residential installation.
This equipment generates, uses and can radiate radio frequency energy and, if not installed and used in
accordance with the instructions, may cause harmful interference to radio communications. However, there is
no guarantee that interference will not occur in a particular installation. If this equipment does cause harmful
interference to radio or television reception, which can be determined by turning the equipment off and on, the
user is encouraged to try to correct the interference by one or more of the following measures:
• Reorient or relocate the receiving antenna.
• Increase the separation between the equipment and receiver.
• Connect the equipment into an outlet on a circuit different from that to which the receiver is connected.
• Consult the dealer or an experienced radio/TV technician for help.
Changes or modifications not expressly approved by the party responsible for compliance could void
your authority to operate the equipment.
1) To comply with FCC RF exposure compliance requirements, a separation distance of at least 20 cm must
be maintained between the antenna of this device and all persons.
2) This transmitter must not be co-located or operating in conjunction with any other antenna or transmitter.
46
Page 49

Contact Info.
23 Hubble · Irvine, CA 92618 · (P) 949.453.8785 · www.iogear.com
 Loading...