

Page 1
Quick Start Guide
MediaShair Wireless Media Hub
w/SD Card Slot & USB Port Plus Bulit-in Power Station
GWFRSDU
PART NO. Q11240
www.iogear.com
Page 2
Package Contents
1
1 x MediaShair Wireless Media Hub
1 x USB to Micro-USB Cable
1 x Car Charger
1 x User Manual
1 x Warranty Card
System Requirements
• Wi-Fi equipped wireless devices
• SD card or external USB storage device with media content
• Mobile devices require either Android 3.0 & up or iOS 4.0 & up
• Wired or wireless network available for Internet connection when using optional
Access Point feature*
*The MediaShair Hub can connect to a wired or wireless local network and use the
built-in Access Point to share Wi-Fi Internet access to multiple wireless devices.
Requires an Ethernet cable for access to wired networks, or the pre-shared security
key for wireless networks.
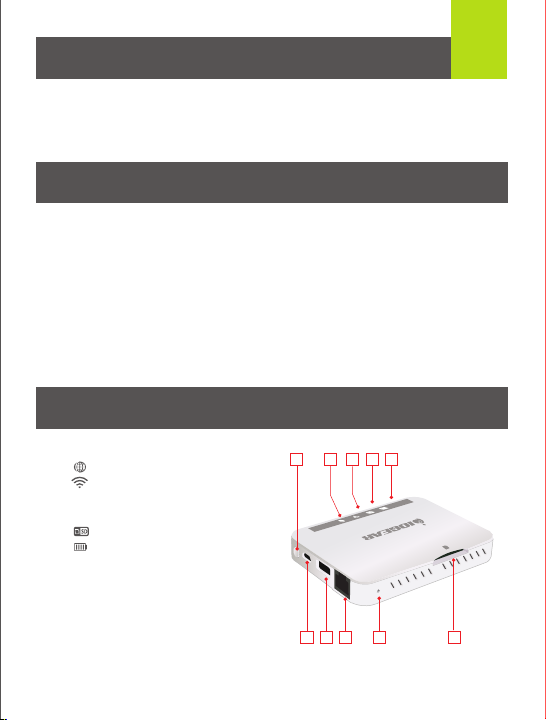
Overview
1. Power button
2. Internet indicator
3. Wi-Fi indicator
Flashing Blue - Wi-Fi network restarting
Solid Blue - Wi-Fi network ready
4. SD card indicator
5. Battery charging indicator
Solid Green - Power on
Flashing Green - Media Hub is charging
Red - Battery low, recharge required
6. SD Card slot
7. Reset button
8. RJ-45 Ethernet port
9. USB port (also works as an emergency
charging port)
10. Micro USB charging input
1 234 5
10
6789
Page 3

MediaShair Mode / Powerstation Mode
MediaShair Mode:
MediaShair mode is the normal operating mode which enables all features and
functions of the device. The Powerstation mode (described in the next section) turns
on only the charging output, and keeps the rest of the unit functions off to save power.
To turn on the MediaShair Hub and begin streaming your stored content:
1. Press and hold the power button for 5 seconds to turn MediaShair Hub on.
2. The green LED battery indicator will turn on.
3. The blue Wi-Fi indicator will begin flashing then light solid to indicate network is
ready.
4. Connect to the MediaShair Wi-Fi network as shown for your device.
5. Press and hold power button for 5 seconds to turn MediaShair Hub off.
Powerstation Mode:
The MediaShair Hub has a built-in Powerstation mode that can provide a quick boost
to mobile devices such as smartphones or MP3 players in the event of an emergency.
Please note that using the Powerstation mode can severely shorten the playback time
when streaming media content.
If the MediaShair Hub is already on:
1. Plug the charging cable for your mobile device into the MediaShair Hub USB port.
2. The device will begin charging.
If the MediaShair Hub is off:
1. Plug the charging cable for your mobile device into the MediaShair Hub USB port.
2. Press the power button once to turn Powerstation feature on.
3. The green LED battery indicator will turn on and the device will begin charging.
4. When you are done charging, press the power button once to turn Powerstation
feature off.
2
Recharging the MediaShair Hub
Your new MediaShair Hub is shipped fully charged and ready to use out of the box.
When the battery indicator turns red, the unit must be recharged. Connect
the included USB car charger, or nearly any USB wall charger such as those
included with most smartphones and tablets. For convenience the MediaShair Hub
can also be charged from any computer USB port, but due to the lower charging
current of computer USB ports it may take longer to reach a full charge.
Page 4
MediaShair Setup (iPod / iPhone / iPad)
3
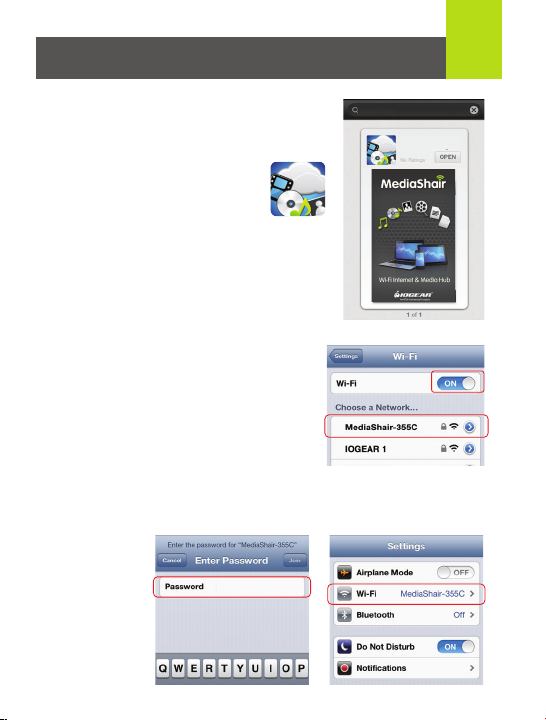
1. Open the App Store on your iPod, iPhone or iPad.
Search for the "MediaShair" app and download it
to your device.
2. After installation is complete, the
MediaShair App icon will be shown
on the device.
3. Press and hold the power button for 5 seconds to
turn on the MediaShair Hub.
4. Open the Settings menu on your device and
set Wi-Fi to ON.
5. Choose "MediaShair-xxxx" network.
6. Enter the default password "12345678" and tap Join to connect. Wi-Fi will display
MediaShair-xxxx (-xxxx is the last four digits of the device’s MAC ID).
MediaShair
MediaShair
IOGEAR
Page 5
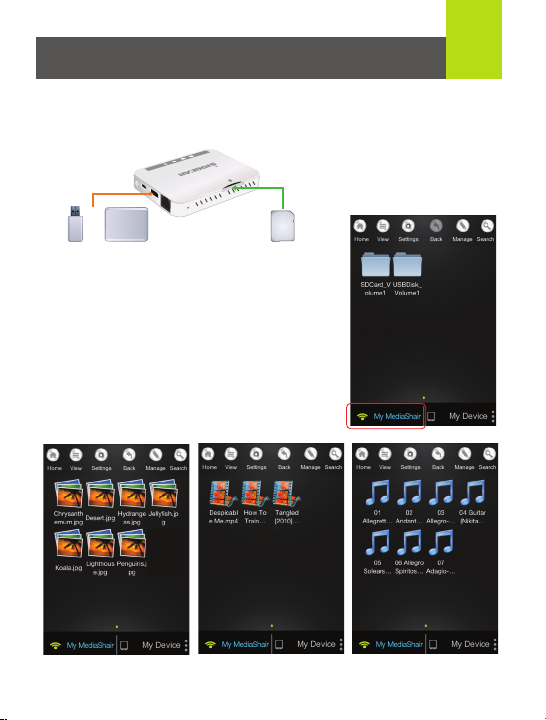
Viewing MediaShair Content (iPod / iPhone / iPad)
1. Insert a SD Card, USB Flash Drive or External Hard Drive with movies,
music, photos or files.
4
HDD
or
USB Device
2. Make sure the “MediaShair-xxxx” Wi-Fi network is
connected.
3. On the Home screen, tap the My MediaShair
button to show the SD Card and/or USB
contents.
4. Tap the file you wish to access and playback will
begin automatically. Note: Only iOS supported
formats can be played.
SD
SD Card
Page 6
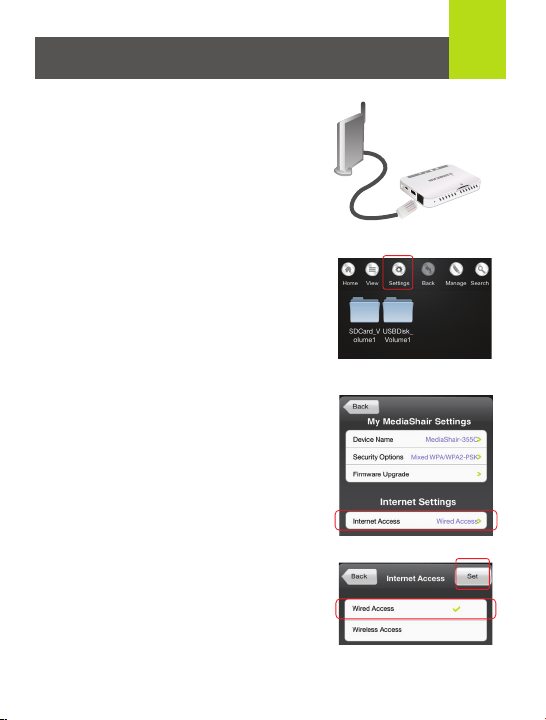
Internet Connection (iPod / iPhone / iPad)
Option 1: Wired Connection
1. Connect an Ethernet cable from the
modem to the RJ-45 Ethernet connector
on the MediaShair Hub.
2. From the App Home screen, tap Settings.
3. Select Internet Settings to bring up the option
for Wired Access (default) or Wireless
Access.
4. Select Wired Access and tap Set.
*To change security settings or set addtional
options, please see Full User Manual.
5
RJ45 Connector
Page 7

Option 2: Wireless Connection
1. From the App Home screen, tap Settings.
2. Select Internet Access to bring up the
option for Wired Access (default) or
Wireless Access.
3. Select Wireless Access and tap Set.
4. Under “Configure your
Wi-Fi connection”
select a wireless
network and enter
the password (Insert
Pre-shared network
key), then tap Join to
connect.
6
Password
Page 8

Wireless Security Settings
Option 1: Device Name
To change the name of your MediaShair Hub:
1. Tap Device Name.
2. Enter the new name into the SSID box
then tap the Set button.
Option 2: Security Options
To change the security mode and/or pre-shared
security key:
1. Tap Security Options.
2. To change the Security Mode select the
desired security mode from the list then tap
the Set button or go to step 3 to change the
security key.
3. To change the pre-shared security key, enter
the new key into the box then tap the Set
button. The security key is case sensitive.
4. The Mediashair Hub will need to reboot to
apply the changes made. Hit the OK button
and reconnect to the Wi-Fi once it has
finished.
7
Page 9

MediaShair Setup (Android
1. Open the App Store on your Android device.
Search for the "MediaShair" app and
download it.
2. After installation is complete,
the MediaShair App icon will be
shown on the device.
3. Press and hold the power button for 5 seconds to
turn on the MediaShair Hub.
4. Open the Settings menu on your
device and set Wi-Fi to ON.
5. Choose "MediaShair-xxxx" network.
6. Enter the default
password "12345678"
and tap Connect to
join. Wi-Fi will display
MediaShair-xxxx (-xxxx
is the last four digits of
the device’s MAC ID).
Devices)
8
Page 10

Viewing MediaShair Content (Android)
1. Connect your USB Flash Drive or USB Hard Drive
to the standard USB port.
9
HDD
or
USB Device
2. Make sure the “MediaShair-xxxx” Wi-Fi network is
connected.
3. On the Home screen, tap the My MediaShair
button to show the USB contents.
4. Tap the file you wish to access and playback will
begin automatically.
SD
SD Card
Page 11

Internet Connection (Android)
Option 1: Wired Connection
1. Connect an Ethernet cable from the modem
to the RJ-45 Ethernet connector on the
MediaShair Hub.
2. From the App Home screen, tap Settings.
3. Select Internet Settings to bring up the option
for Wired Access (default) or Wireless Access.
4. Select Wired Access and tap Set.
*To change security settings or set additional
options, please see full User Manual.
10
RJ45 Connector
Page 12

Option 2: Wireless Connection
1. From the App Home screen, tap Settings.
2. Select Internet Access to bring up the
option for Wired Access (default) or
Wireless Access.
3. Select Wireless Access and tap Set.
4. Under “Configure your
Wi-Fi connection” select
a wireless network and
then enter the password
(Insert Pre-shared
network key) then tap
Join to connect.
11
Page 13

Wireless Security Settings (Android)
Option 1: Device Name
To change the name of your MediaShair Hub:
1. Tap Device Name.
2. Enter the new name into the SSID
box and tap the Set button.
Option 2: Security Options
To change the security mode and/or pre-shared
security key:
1. Tap Security Options.
2. To change the Security Mode select the
desired security mode from the list then tap
the Set button or go to step 3 to change the
security key.
3. To change the pre-shared security key, enter
the new key into the box then tap the Set
button.
*Please note the security key is case sensitive
4. The Mediashair Hub will need to reboot to
apply the changes made. Hit the OK button
and reconnect to the Wi-Fi once it has
finished.
12
Page 14

MediaShair Setup (Laptop / Computer)
1. Press and hold the power button for 5 seconds to turn on the MediaShair Hub.
2. Click on the wireless icon on the bottom
right corner of the computer screen.
3. Choose “MediaShair-xxxx” Network.
4. Enter the default password
"12345678" and then press "OK"
to connect.
5. Wi-Fi will display MediaShair-xxxx
Connected.
13
Page 15

Internet Connection (Laptop / Computer)
1. Make sure the "MediaShair-XXXX" Wi-Fi network is connected, then open a browser
window and enter 10.10.10.254 into the address bar to login.
Default User Name: admin
Default Password: blank (No password)
2. If this is the first time connecting to the MediaShair Hub using a browser, the Setup
Wizard will automatically open. You can also click the Wizard icon to make
changes any time in the future.
14
Page 16

15
Option 1: Wired Connection
1. For easier use, the MediaShair Hub is
default configured for a wired internet
connection. On the Setup Wizard
screen “Wired Access” is
preselected, so just click Next to
continue. For wireless Internet
connection, select “Wireless Access”
then see Option 2: Wireless
Connection.
2. After clicking Next, you can continue
the easy setup by clicking Skip on
the pages for “Wi-Fi & LAN Settings”
and “User Setting” to keep the
default settings. The MediaShair
Hub will reboot after changing
settings or skipping the last page.
To change the security settings or
select additional options, please see
the full User Manual.
3. After the MediaShair Hub reboots, make sure you are connected to the
MediaShair-xxxx Wi-Fi network (you will have to reconnect if your computer is set to
automatically connect to other networks), and re-enter the User Name and Password.
4. You can now access the Internet by opening a browser window, or access your
MediaShair content by clicking the Explorer icon. See Viewing MediaShair Content.
Page 17

16
Option 2: Wireless Connection
1. On the Internet Setting page, select
“Wireless Access” then use the
drop down button in the SSID box
to choose a wireless network.
2. After selecting a network, enter
the pre-shared network key into
the Password box and click Next.
(Leave IP Address set to DHCP
unless you require a fixed IP
address).
3. After clicking Next, you can
continue the easy setup by clicking
Skip on the pages for “Wi-Fi & LAN
Settings” and “User Setting” to
keep the default settings.
4. The MediaShair Hub will
reboot after changing
settings or skipping the last
page. To change the security
settings or select additional
options, please see the full
User Manual.
5. After the MediaShair Hub reboots, make sure you are connected to the MediaShairxxxx Wi-Fi network (you will have to reconnect if your computer is set to automatically
connect to other networks), and re-enter the User Name and Password.
6. You can now access the Internet by opening a browser window, or access your
MediaShair content by clicking the Explorer icon. See Viewing MediaShair Content.
Page 18

Viewing MediaShair Content (Laptop)
1. Plug in a SD Card or connect your USB Flash Drive or USB Hard Drive to the
USB port.
2. Make sure the “MediaShair-xxxx” Wi-Fi
network is connected. Open the Browser and
log in.
Default Username: admin
Default Password: blank (no password)
3. Click “Explorer” icon to
browse the contents of
the SD Card or USB
device.
4. Select a folder to open,
then click on the file you
want to access.
Playback will begin
automatically.
17
Page 19

Hotel Usage Explanation Note
A. Hotel provides wired Internet access
1. Press the power button to turn on the MediaShair Hub.
2. Connect your iPhone/iPad/Android Phone/Android Tablet/Laptop to the device
through Wi-Fi (Note: if hotel requires user name & password for internet access,
you must connect your device to the MediaShair Hub before you plug in the
Ethernet cable!).
3. Connect the Ethernet cable in hotel to the WAN port of device.
B. Hotel provides Wi-Fi access
1. Press the power button to turn on the MediaShair Hub.
2. Connect your wireless devices to the MediaShair Hub through Wi-Fi.
3. Set MediaShair Hub to Wireless mode and choose a wireless network to connect.
FCC Statement
This product has been tested and found to comply with the limits for a Class A digital
device, pursuant to Part 15 of the FCC Rules. These limits are designed to provide
reasonable protection against harmful radio frequency interference when operated in
a commercial environment. See User Manual for additional information.
CE Compliance
This device has been tested and found to comply with the following European
Union directives: Electromagnetic Capability (2004/108/EC), Low Voltage
(2006/95/EC) and R&TTED (1999/5/EC).
Page 20

Limited Warranty
WE’RE HERE TO HELP YOU! NEED ASSISTANCE SETTING UP THIS PRODUCT?
Make sure you:
1. Visit www.iogear.com for more product information.
2. Visit www.iogear.com/support for live help and product support.
Warranty Information
This product carries a 1 Year Limited Warranty. For the terms and conditions of this
warranty, please go to http://www.iogear.com/support/warranty.
Register online at http://www.iogear.com/register
Important Product Information
Product Model
Serial Number
Contact
Toll Free: 866-946-4327 (USA)
Phone: 949-453-8782
Web Site: www.iogear.com
E-mail: support@iogear.com
Address: 19641 Da Vinci, Foothill Ranch, CA 92610, USA
This Quick Start Guide is intended to cover basic setup and key
functions to get you up and running quickly. For a complete
explanation of advanced setup and additional features, please
download the full GWFRSDU User Manual from www.IOGEAR.com.
© 2013 IOGEAR
®
 Loading...