

Page 1

Installation Guide
Installation
4-Port USB Sharing Hub
GUIP204
1
Part No. M1057-a
Page 2

Page 3

Table of Contents
Package Contents 4
System Requirements 5
Product Overview 6
Hardware Installation 7
Software Installation 10
Firewall Setting 12
Network Device Overview 14
Status of USB Device 15
Access a USB device 18
Server Congurations 20
Server Conguration - Network 23
Server Conguration - Firmware Update 24
Server Conguration - Reset Device 25
Server Conguration - Factory Default 26
Server Conguration - Password Change 27
Advanced Features - Automatic Printer Switch 28
Advanced Features - Device Auto Connect 29
Advanced Features - Auto Disconnect 31
Advanced Features - Program Shortcut 32
Advanced Features - Program Auto Launch 36
Advanced Features - Startup Settings 37
Advanced Features - Request Disconnect 38
Limited Warranty 39
Federal Communications Commission (FCC)
Statement
CE Statement 41
Contact 42
40
Page 4

5
Package Contents
1 x 4-Port USB Sharing Hub (also referred to as “server” or “Net ShareStation” in this document)
1 x RJ45 Ethernet Cable
1 x Software CD
1 x Power Adapter
1 x Quick Start Guide
1 x Warranty / Registration card
4
Page 5

System Requirements
Computer:
CPU of 1.7GHz and above •
Minimum 512MB RAM •
Windows XP, Windows Vista, Windows 7•
Available Ethernet port in home/ofce network •
Supported Devices:
Printer or Multi-function printer with USB connection* •
External USB hard drive •
USB speaker* •
USB webcam* •
USB ash drive •
USB memory card reader •
USB scanner •
*Note: Some USB devices may require a direct connection for optimum performance.
5
Page 6
7
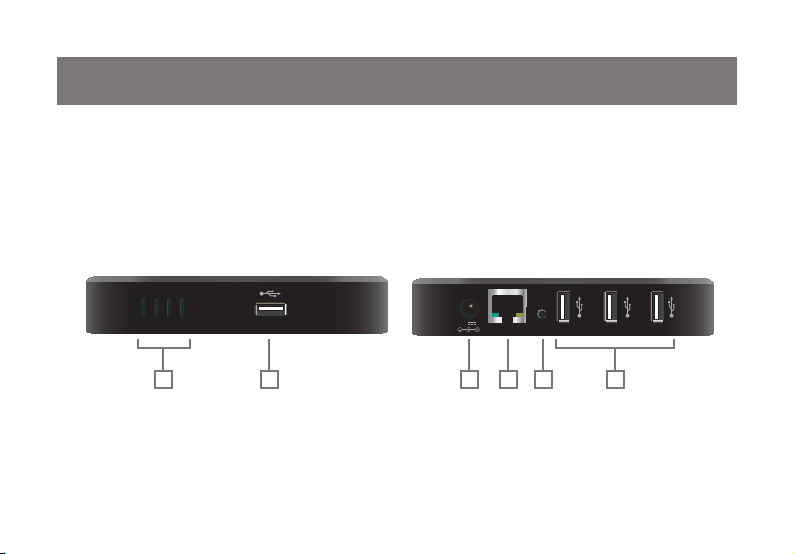
Product Overview
Ethernet
Reset
12Vdc 5A
USB connection LED (Port 4, Port 3, Port 2, Port 1)1.
USB port (Port 1)2.
Power Adapter Port3.
Network Port4.
Reset Button5.
USB ports (Port 2, Port 3, Port 4)6.
1 2 3 4 5 6
6
Page 7

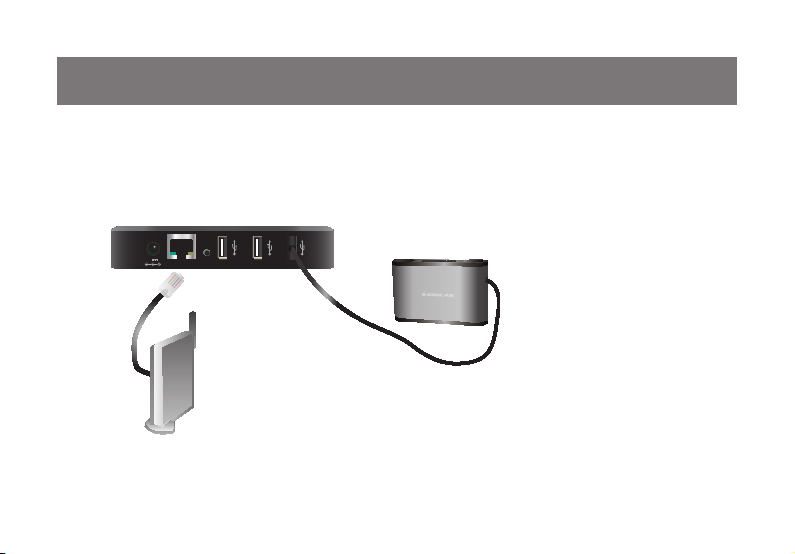
Hardware Installation
Ethernet
Reset
12Vdc 5A
NOTE: Before you connect your USB device to the network, please refer to the device’s user
manual and install the device’s driver and required software under the USB connection rst.
When the installation is completed, safely remove your USB devices from the system. Disconnect the power source from USB devices and GUIP204 USB Sharing Hub.
Connect your USB device to any one of the USB ports of the USB Sharing Hub.1.
USB device (not included)
7
Page 8
9
Ethernet
Reset
12Vdc 5A
Connect the USB Sharing Hub to the router or switch with the included Ethernet cable.2.
router (not included)
8
Page 9
Ethernet
Reset
12Vdc 5A
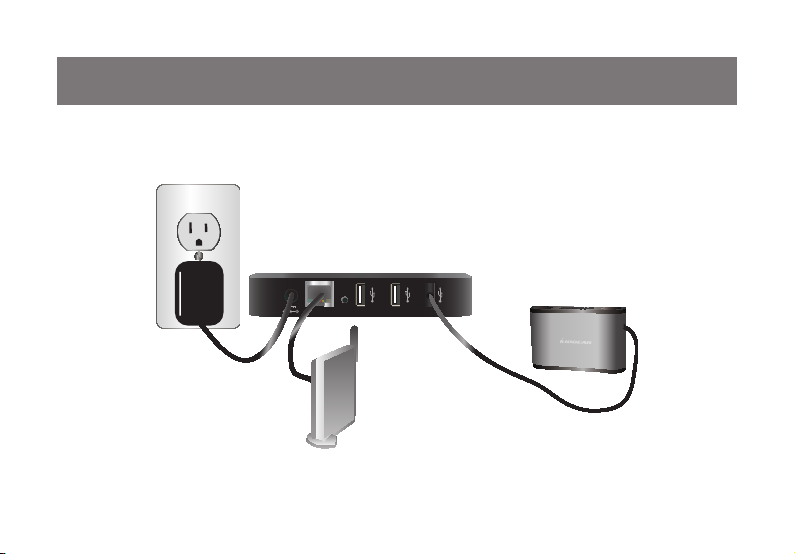
Connect the power adapter to the USB Sharing Hub. Turn on your USB device. The USB connection LED will turn on 3.
indicating that unit is correctly connected to the network.
9
Page 10
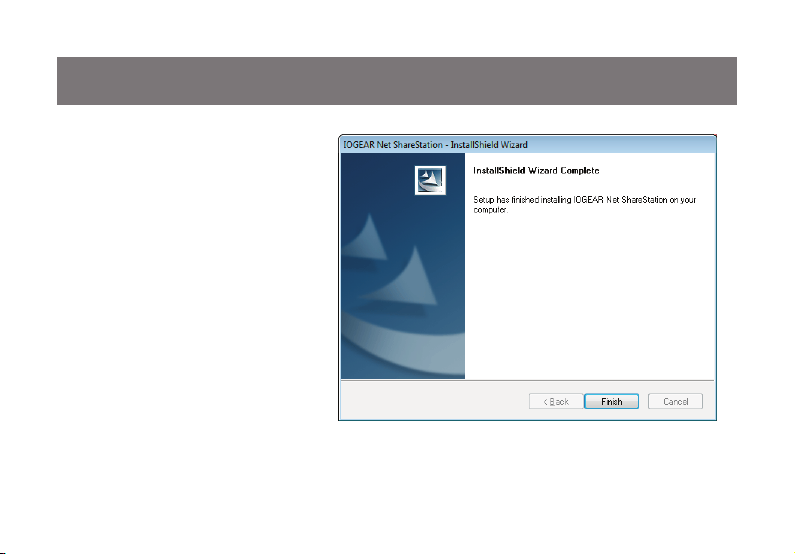
Software Installation
Please insert the driver CD into your PC.
The CD should auto play and bring up
the software installer.
If you have disabled the auto-play
function, please browse the CD and
install the driver program manually. Follow
the instructions of the wizard to complete
the installation process.
10
Page 11
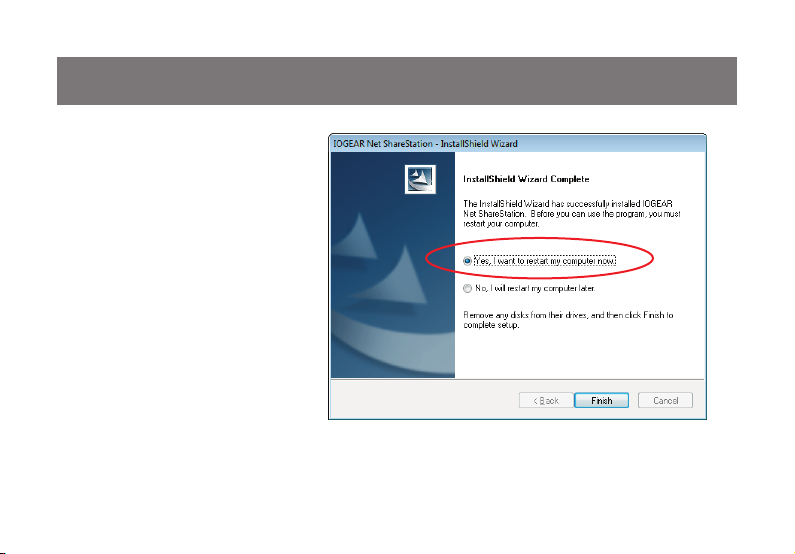
PLEASE RESTART THE SYSTEM
AS REQUESTED BY THE INSTALLER WHEN THE INSTALLATION COMPLETES, OTHERWISE
THE SOFTWARE MIGHT NOT
WORK PROPERLY.
11
Page 12
13
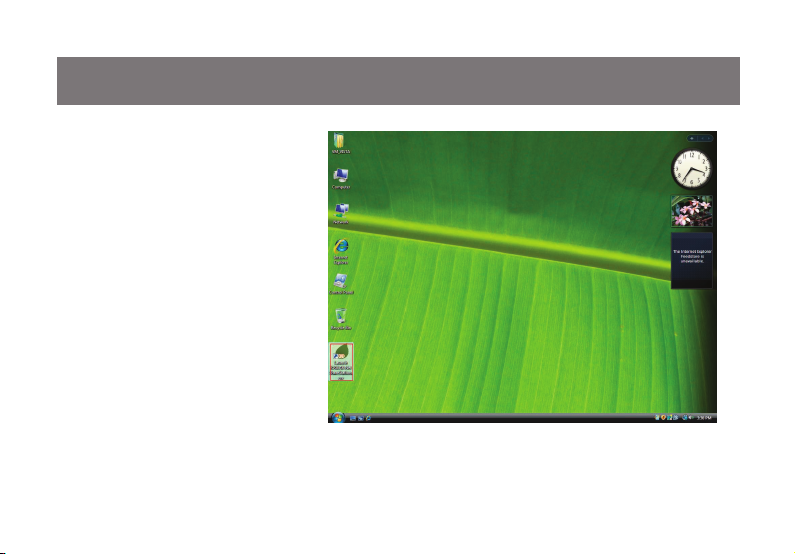
Firewall Setting
The software application should
automatically launch after your
computer restarts. If not, please
double click the shortcut icon on the
Desktop.
12
Page 13
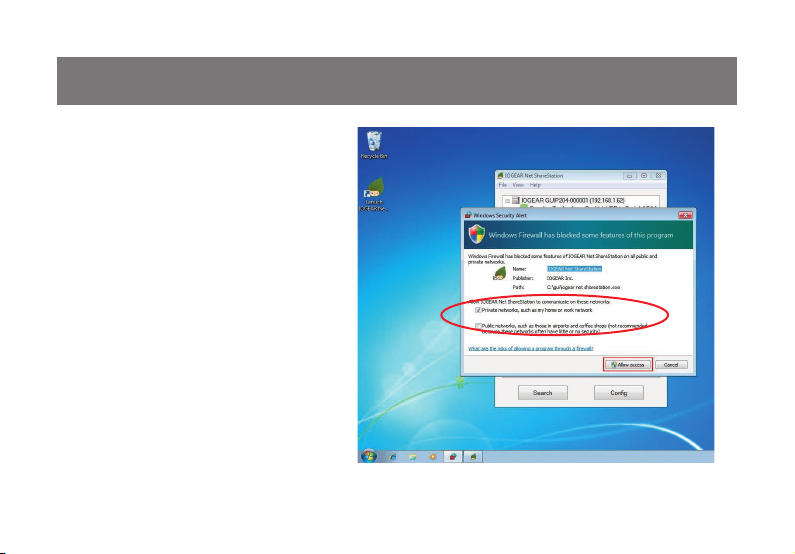
If your Windows system or rewall
program blocks the program, PLEASE
“UNBLOCK” or “ALLOW ACCESS” for
both Private and Public networks.
After you have done this once, the system
will remember your setting and not ask
you again.
Certain anti-virus or Internet security
programs have rewall functions that
might prevent this program from accessing the network. Please make sure that
you unblock this application from these
programs as well.
13
Page 14
15
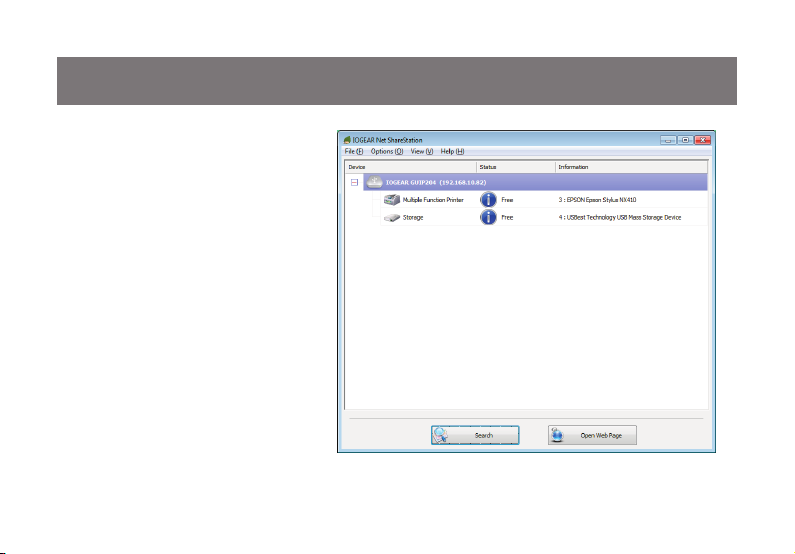
Network Device Overview
The main dialog box consists of a
Control Menu (File, Options, View and
Help) & a tree view in the middle that
displays a list of all the server and
devices discovered on the network. An
inaccessible USB device may not show
on the list. It is either disconnected from
the network, powered off or having
technical issues.
14
Page 15

Status of USB Device
The device might be in one of the
following states and there are different
things you can do with it in each of the
states. Each status is represented by a
specic icon.
Device Free
A device with Device Free status is
unoccupied and ready to be connected.
15
Page 16

17
Occupied by You
When you are Connected to a device,
the Blue icon turns into an Green
icon to show that the device is locally
connected.
16
Page 17

Occupied by Other User
This status icon indicates that the
device is occupied by another user on
your network and you can not connect
to that device at the moment.
To request other users to release a
USB device, please see instructions
under “Request Disconnect” on P.38.
Device on Different Segment
This icon with question mark indicates
that the server’s IP address is on a
different network segment from your
PC. You can NOT connect to a device
attached to such server. Please check
your network settings.
Some of the devices are not supported
by the USB hub. Such device will be
identied by a stop sign icon as shown.
17
Page 18

19
Access a USB device
To connect to a USB device, please select
it on the tree view and click on Connect
Device button or double-click on it.
This process might take a few seconds
or up to a minute, depending on the
complexity of the device. Then you can
operate a connected USB device as if it is
connected to your computer’s USB port
directly.
18
Page 19

To disconnect the USB device, select the
device and Disconnect Device.
Clicking on this button releases the
selected device for other users. Once you
see the icon turns back, the device has
been disconnected and other users will
then be able to connect to it.
This function is the same as
unplugging a USB device from your
PC’s USB port.
19
Page 20

21
Server Congurations
Users can congure the server settings using two
different methods. Select the USB server on the
tree view and right-click on the icon to bring up the
“Server Congurations”.
20
Page 21

Or click on the “Open Web Page” button
on the bottom.
21
Page 22

23
The main page of the conguration tool
shows the status of the USB Server and
the device(s) connected to it. Click on
“Device Status” from the Left menu will
bring you back to this page.
22
Page 23

Server Conguration - Network
Network
This page displays the current network
setting. If you need to assign the server
a static IP, please Disable the DHCP
option as well. Once you are done,
please click on the “Submit” button
and reboot the server.
NOTE: A Server with busy device(s)
connected is prohibited to be
congured to prevent interruption of
any on-going tasks.
23
Page 24

25
Server Conguration - Firmware Update
Firmware Update
Please check IOGEAR Website to see if any new rmware is available before you proceed.
http://www.iogear.com/support/dm/driver/GUIP204#display
If a new rmware is available, download
the rmware to your computer. Click
on the “Browse” button to select the
rmware you have downloaded. Then
click on the “Submit” button to update
the rmware. Leave the password eld
blank if no password was previously set
by the user.
Note: Keeping the rmware current
is highly recommended. Updating the
software & rmware will usually give you
improved performance and often extra
functionality.
24
Page 25

Server Conguration - Reset Device
Reset Device
Click on “Reset Device” to reboot the server. By default, there is no password set for the server therefore
you do not have to enter anything for the reset function to work. However, if you created a password
under the “Password Change” page before, you must enter it for this function to work.
25
Page 26

27
Server Conguration - Factory Default
Factory Default
Click on “Factory Default” to restore the server’s settings back to the factory default. Again, the
password is not necessary if no password was set by the user. Just leave the eld blank and click on the
“Factory Default” button to restore the default settings
26
Page 27

Server Conguration - Password Change
Password Change
To change the password, you must enter the current password, input new password, re-input new
password for conrmation, then click on “Submit”. If you are setting the password for the rst time, you
don’t have to provide the current password, simply leave the eld blank.
27
Page 28

29
Advanced Features - Automatic Printer Switch
Automatic Printer Switch
When you send a print job to a specic printer,
the server detects the task and AUTOMATICALLY
connects to this printer to print out the document.
When the printing task is done, the printer disconnects AUTOMATICALLY and allows the printer to
be available to other users.
Simply select the printer that you plan to switch,
right-click and set “Connect Automatically for
Printing”, the printer will automatically be connected when you print.
NOTE: Before you connect your printer or
USB device to the network, please refer
to the device’s user manual and install the
device’s driver and required software under
the USB connection rst.
28
Page 29

Advanced Features - Device Auto Connect
There are two ways to automatically connect
USB devices: automatic connection by device or
automatic connection by USB port.
Automatic Connection by Device
Select the device, right-click and check
“Connect this device when application starts”.
Once enabled, the particular USB device will be
connected automatically when:
The USB server software starts up and the 1.
device is powered-on and Free
The USB server software is already running 2.
and you turn on the device
The USB server software is already running 3.
and the device status changes to Free
However, if the user manually disconnects the
device later, it will NOT be automatically connected
again until the software has been restarted.
29
Page 30

31
Automatic Connection by USB Port
Select the USB server on the tree view and
right-click on the icon to bring up the Server
Congurations.
When this function is enabled for a specic port, the
USB device will be connected automatically when:
The USB server software starts up and the 1.
device is already plugged into the port
The USB server software is already running and 2.
you plug in the device
The USB server software is already running and 3.
the device status changes to Free
However, if the user manually disconnects the
device later, it will NOT be automatically connected
again until the software has been restarted.
30
Page 31

Advanced Features - Auto Disconnect
Auto Disconnect
This feature automatically disconnects a printer
or an external hard drive when a user is done
with the device or the device has been idle for
60 seconds. The device will then be available
to other users.
NOTE: This function may not work with some
mass storage devices such as ash drives.
These devices tend to periodically (on a millisecond base) communicate with the computer
even when the user is not accessing the drive.
Since it never actually stays “Idle” therefore
will never be disconnected by this function.
External USB hard drives do not exhibit this
characteristic.
31
Page 32

33
Advanced Features - Program Shortcut
Software Program Shortcut
This function creates a shortcut to start up a
software application and connect your computer
to a specic USB device at the same time.
For example, if you need to use a scanner, the
shortcut will launch the scanner utility software
and connect that scanner or multi-function printer
simultaneously.
Here we use a multi-function printer’s scanning
application as an example:
Select the scanner / printer, right-click, then 1.
check “Create a Shortcut on Your Desktop”
option.
32
Page 33

A wizard will guide you through the process. 2.
Refer to your device’s user manual, select the
specic scanning application that comes with
your scanner. Normally you’ll nd the software
shortcut on your Desktop. Browse and select
the application.
33
Page 34

35
Make sure that the program path has been 3.
correctly captured and then click on the OK
button.
A new shortcut has been created on your 4.
Desktop with a “Network” prex to the name
of the original shortcut.
34
Page 35

When you double click the new 5.
shortcut, the computer will launch the
software and connect to the MFP /
scanner at the same time. Now you
can operate your device and keep the
USB Server software minimized in the
system tray. When you are nished,
simply close the utility software and
the device will be disconnected
automatically to allow other users
to use.
35
Page 36

37
Advanced Features - Program Auto Launch
Device Property
You can check the device status or set an
automatically launched program from the
“Device Properties”.
If the USB device you connect requires a specic
software application, such as a scanning utility
program, you can check “Launch a program
when this device connects” and provide the
path to that application program. The software will
automatically launch after you connect the device.
36
Page 37

Advanced Features - Startup Settings
Server Settings
By default, the server application software
automatically launches when you start up your
computer. If you prefer not to run this program
automatically, you can uncheck “Run this
application when PC starts up” under
“Options”.
37
Page 38

39
Advanced Features - Request Disconnect
Connect Device or Disconnect Device:
Select a specic USB device, then connect
or disconnect the device under the top menu
“Options”.
Request Disconnect Device:
If a device is occupied by another user, you can
select that device and use this function to send a
message to that user. The user can either release
the device or deny the request if s/he is still using
the device.
38
Page 39

Limited Warranty
IN NO EVENT SHALL THE DIRECT VENDOR’S LIABILITY FOR DIRECT, INDIRECT, SPECIAL,
INCIDENTAL OR CONSEQUENTIAL DAMAGES RESULTING FROM THE USE OF THE PRODUCT,
DISK, OR ITS DOCUMENTATION EXCEED THE PRICE PAID FOR THE PRODUCT.
The direct vendor makes no warranty or representation, expressed, implied, or statutory with respect to
the contents or use of this documentation, and especially disclaims its quality, performance,
merchantability, or tness for any particular purpose.The direct vendor also reserves the right to revise
or update the device or documentation without obligation to notify any individual or entity of such
revisions, or updates. For further inquiries please contact IOGEAR.
39
Page 40

41
Federal Communications Commission (FCC) Statement
This equipment has been tested and found to comply with the limits for a Class B digital device, pursuant
to Part 15 of the FCC Rules. These limits are designed to provide reasonable protection against harmful
interference in a residential setting. This product generates, uses, and can radiate radio frequency energy
and, if not installed and used as directed, it may cause harmful interference to radio communications.
Although this product complies with the limits for a Class B digital device, there is no guarantee that interference will not occur in a particular installation.
40
Page 41

CE Statement
This device has been tested and found to comply with the requirements set up in the council directive
on the approximation of the law of member states relating to EMC Directive 89/336/EEC, Low Voltage
Directive 73/23/EEC and R&TTE Directive 99/5/EC.
41
Page 42

43
Contact
IOGEAR
19641 Da Vinci
Foothill Ranch, CA 92610
P 949.453.8782
F 949.453.8785
Visit us at: www.iogear.com
©2010 IOGEAR®. All Rights Reserved. PKG-M1057-a
IOGEAR, the IOGEAR logo, MiniView, VSE are trademarks or registered trademarks of IOGEAR. Microsoft
and Windows are registered trademarks of Microsoft Corporation. IBM is a registered trademark of
International Business Machines, Inc. Macintosh, G3/G4 and iMac are registered trademarks of Apple
Computer, Inc. IOGEAR makes no warranty of any kind with regards to the information presented in this
document. All information furnished here is for informational purposes only and is subject to change
without notice. IOGEAR assumes no responsibility for any inaccuracies or errors that may appear in this
document.
42
Page 43

43
Page 44

About Us
FUN
IOGEAR offers connectivity solutions that are innovative, fun, and stylish,
helping people enjoy daily life using our high technology products.
GREEN
IOGEAR is an environmentally conscious company that emphasizes the
importance of conserving natural resources. The use of our technology
solutions helps reduce electronic waste.
© 2010 IOGEAR
 Loading...