

Page 1
Quick Start Guide
USB 3.0 Universal Docking Station
GUD300
PART NO. Q11247-a
www.iogear.com
Page 2
Package Contents
1
1 x GUD300 Universal Docking Station
1 x SuperSpeed USB 3.0 Cable
1 x HDMI to DVI Adapter
1 x DVI to VGA Adapter
1 x Software Installation CD
1 x AC Adapter
1 x Quick Start Guide
1 x Warranty Card
System Requirements
Hardware
• Computer or tablet* with USB 3.0 or USB 2.0 port**
Select Windows 8 tablets. See IOGEAR.com for more details.
**
USB 3.0 speeds are not available when connected to a USB 2.0 port
**
Operation System
• Windows® Vista, Windows® 7 and Windows® 8
• MAC OSX 10.6 or later
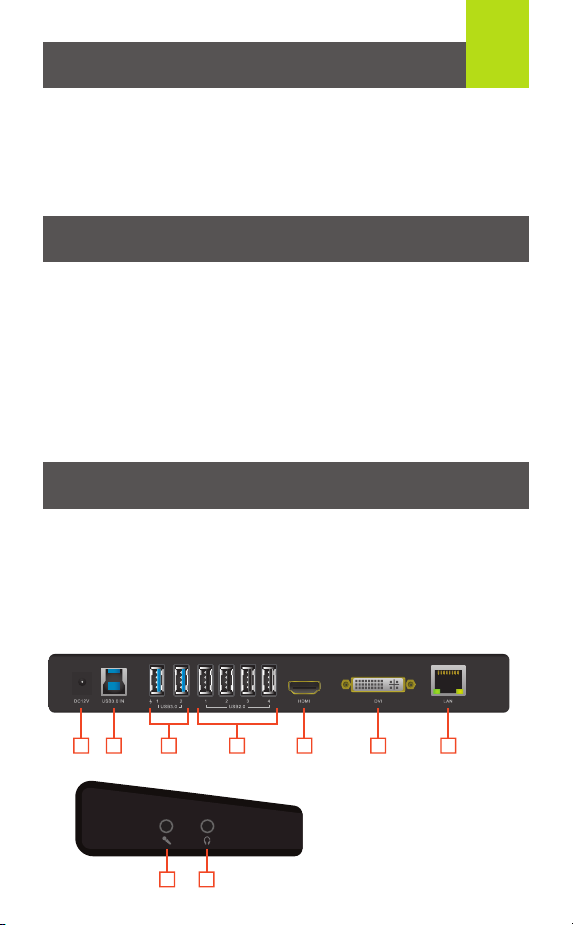
Overview
1. DC12V
2. USB 3.0 IN
3. USB 3.0 Ports
4. USB 2.0 Ports
5. HDMI Out
6. DVI Out
7. Gigabit LAN
8. Microphone Input
9. Headphone Output
1 2 5 6 73 4
8 9
Page 3
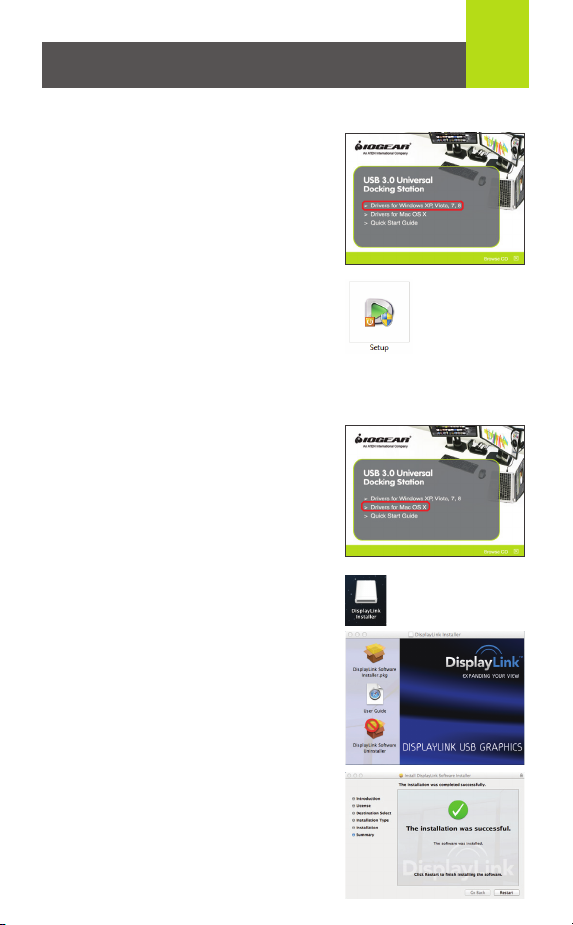
Software Installation
Windows® (XP/Vista®/7/8)
1. Before connecting the USB 3.0 Universal
Docking Station, install drivers using the
provided CD.
NOTE: If your PC does not have a CD drive, go
to the link below to download the latest drivers.
www.displaylink.com/support/downloads.php
2. Select Drivers for Windows and then
double click the Setup.exe to launch the
Installation Wizard.
3. Follow the on-screen instructions until the
installation is complete. Restart the
computer when prompted.
Mac OS X (10.6 or later)
1. Before connecting the USB 3.0 Universal
Docking Station, install drivers using the
provided CD.
NOTE: If your Mac does not have a CD drive, go
to the link below to download the latest drivers.
www.displaylink.com/support/mac_downloads.php
2. Double click the DisplayLink.dmg,
then double click the DisplayLink
Software Installer.pkg to launch the
software installer.
2
3. Follow the on-screen instructions
until the installation is complete.
Restart the computer when
prompted.
Page 4

Hardware Installation
1. Plug-in the AC adapter into the Universal Docking Station.
2. Connect the Universal Docking Station to an available USB 3.0 port
on the Ultrabook, laptop, or tablet.
3. Connect any USB 3.0 compatible devices here. USB 3.0 ports are
also backwards compatible with USB 2.0 and 1.1 devices.
4. Connect any USB 2.0 or 1.1 compatible devices here.
5. Your Universal Docking station can support an additional HDMI
monitor. Connect the monitor to the docking station and your
computer will automatically detect the additional display. A DVI
monitor may be connected using the included HDMI to DVI adapter.
6. Your Universal Docking station can also support an additional DVI
monitor. Connect the monitor to the docking station and your
computer will automatically detect the additional display. A VGA
monitor may be connected using the included DVI to VGA adapter.
7. Connect an Ethernet cable to the Gigabit WAN port for high speed
internet.
8. Connect an independent microphone for higher quality recording.
9. Connect external speakers or use with the microphone input for a
headset with built-in microphone.
3
1
5 7
43
2TB
HDD
2TB
HDD
USB 3.0 Device USB 2.0 Device
62
8
9
1 A
Backspace
Page 5

External Monitor Settings: Windows
Option 1: Extend Mode
1. Click the DisplayLink icon in the bottom right corner to
open the DisplayLink Manager Menu.
2. Roll the mouse cursor over IOGEAR USB 3.0 Dock to
bring up the Manager Menu.
3. Select Extend.
4. The monitor is now extended in the direction it was the last time the
display was in this mode. For more control, select Extend To and
choose one of the options. This puts the device into Extend Mode, and
places it to the Left/Right/Above/Below the main monitor
Option 2: Mirror Mode
1. Click the DisplayLink icon in the bottom right
corner to open the DisplayLink Manager Menu.
2. Roll the mouse cursor over IOGEAR USB 3.0
Dock to bring up the Manager Menu.
3. Select Mirror.
4. The resolution, color depth, and refresh rate of
the primary screen are copied on to the monitor
connected to the docking station.
4
Page 6

Option 3: Fit to TV Configuration
1. Click the DisplayLink icon in the bottom right corner to
open the DisplayLink Manager Menu.
2. Roll the mouse cursor over IOGEAR USB 3.0 Dock to
bring up the Manager Menu.
3. Select Fit to TV… and the following interface
appears
4. You will also see a red
border on the DisplayLink
screen.
5. The red border shows the
size of the new Windows
Desktop. Use the “+” and
“-” controls to change the
size of the red border until it
fits on the TV screen.
5
6. Once the red border is at
the edges of the TV screen,
click “Apply” to resize the
Windows Desktop.
Page 7

External Monitor Settings: Mac OS X
Option 1: Extend Mode
1. Open System Preferences and
click Displays.
2. Click on Arrangement to
change the position of the
displays currently connected.
Option 2: Mirror Mode
1. Open System Preferences
and click Displays.
2. Click on Arrangement.
3. Click the box marked
Mirror Displays.
6
Page 8

FCC Statement
This product has been tested and found to comply with the limits for a
Class B device, pursuant to part 15 of the FCC Rules. It is intended for
use in residential setting, but may also be used in commercial or
industrial setting.
CE Compliance
This device has been tested and found to comply with the following
European Union directives: Electromagnetic Capability (2004/108/EC),
Low Voltage (2006/95/EC) and R&TTED (1999/5/EC).
Limited Warranty
WE’RE HERE TO HELP YOU! NEED ASSISTANCE SETTING
UP THIS PRODUCT?
Make sure you:
1. Visit www.iogear.com for more product information
2. Visit www.iogear.com/support for live help and product support
Warranty Information
This product carries a 3 Year Limited Warranty. For the terms and
conditions of this warranty, please go to http://www.iogear.com/support/warranty
Register online at http://www.iogear.com/register
Important Product Information
Product Model
Serial Number
7
Contact
iogear.custhelp.com
support@iogear.com
www.iogear.com
19641 Da Vinci, Foothill
Ranch, CA 92610
© 2014 IOGEAR
®
 Loading...