

IOGear GTD732 Quick Start Manual

Quick Start Guide
Guide de démarrage rapide
Guía rápida de inicio
2 Port Thunderbolt™ 2 KVM
2 Ports Thunderbolt™ 2 KVM
2 Puertos Thunderbolt™ 2 KVM
GTD732
PART NO. Q1427
www.iogear.com

© 2016 IOGEAR® Part No. Q1427
IOGEAR, the IOGEAR logo, are trademarks or registered trademarks of IOGEAR. Microsoft and Windows are registered trademarks of Microsoft
Corporation. Mac Book Pro, Mac Pro, iMac, and Mac Mini are registered trademarks of Apple Inc., registered in the U.S. and other countries. All other
brand and product names are trademarks or registered trademarks of their respective holders. IOGEAR makes no warranty of any kind with regards
to the information presented in this document. All information furnished here is for informational purposes only and is subject to change without notice.
IOGEAR assumes no responsibility for any inaccuracies or errors that may appear in this document.

Table of Contents
Package Contents 4
System Requirements 4
Overview 5
Hardware Installation 6
Software Installation 8
Compliance Information 8
Limited Warranty 9
Contact 9
Contenu de l’emballage 10
Exigences système 10
Vue d’ensemble 11
Installation du matériel 12
Installation du logiciel 14
Déclaration de Conformité 14
Garantie limitée 15
Contact 15
Contenido del empaque 16
Requisitos del Sistema 16
Generalidades 17
Instalación del dispositivo 18
Instalación de software 20
Información de Conformidad 20
Garantía limitada 21
Contacto 21

4
1 x 2 Port Thunderbolt 2 KVM
1 x 1m (3ft) Thunderbolt Cable
1 x AC Power Adapter
1 x Base Stand
1 x Quick Start Guide
1 x Warranty Card
Thunderbolt enabled computers*
*Thunderbolt 2 Systems can take advantage of the 20Gbps transfer speed.
*Thunderbolt 3 Systems with extra legacy adapter (IOGEAR Part # GUC3TB32) can take
advantage of the 20Gbps transfer speed.
The following Mac models are Thunderbolt 2 capable:
• MacBook Pro (Retina, Late 2013 and later)
• Mac Pro (Late 2013)
• iMac (Retina 5K, 27-inch, Late 2014)
• Mac mini (Late 2014)
Package Contents
System Requirements
5
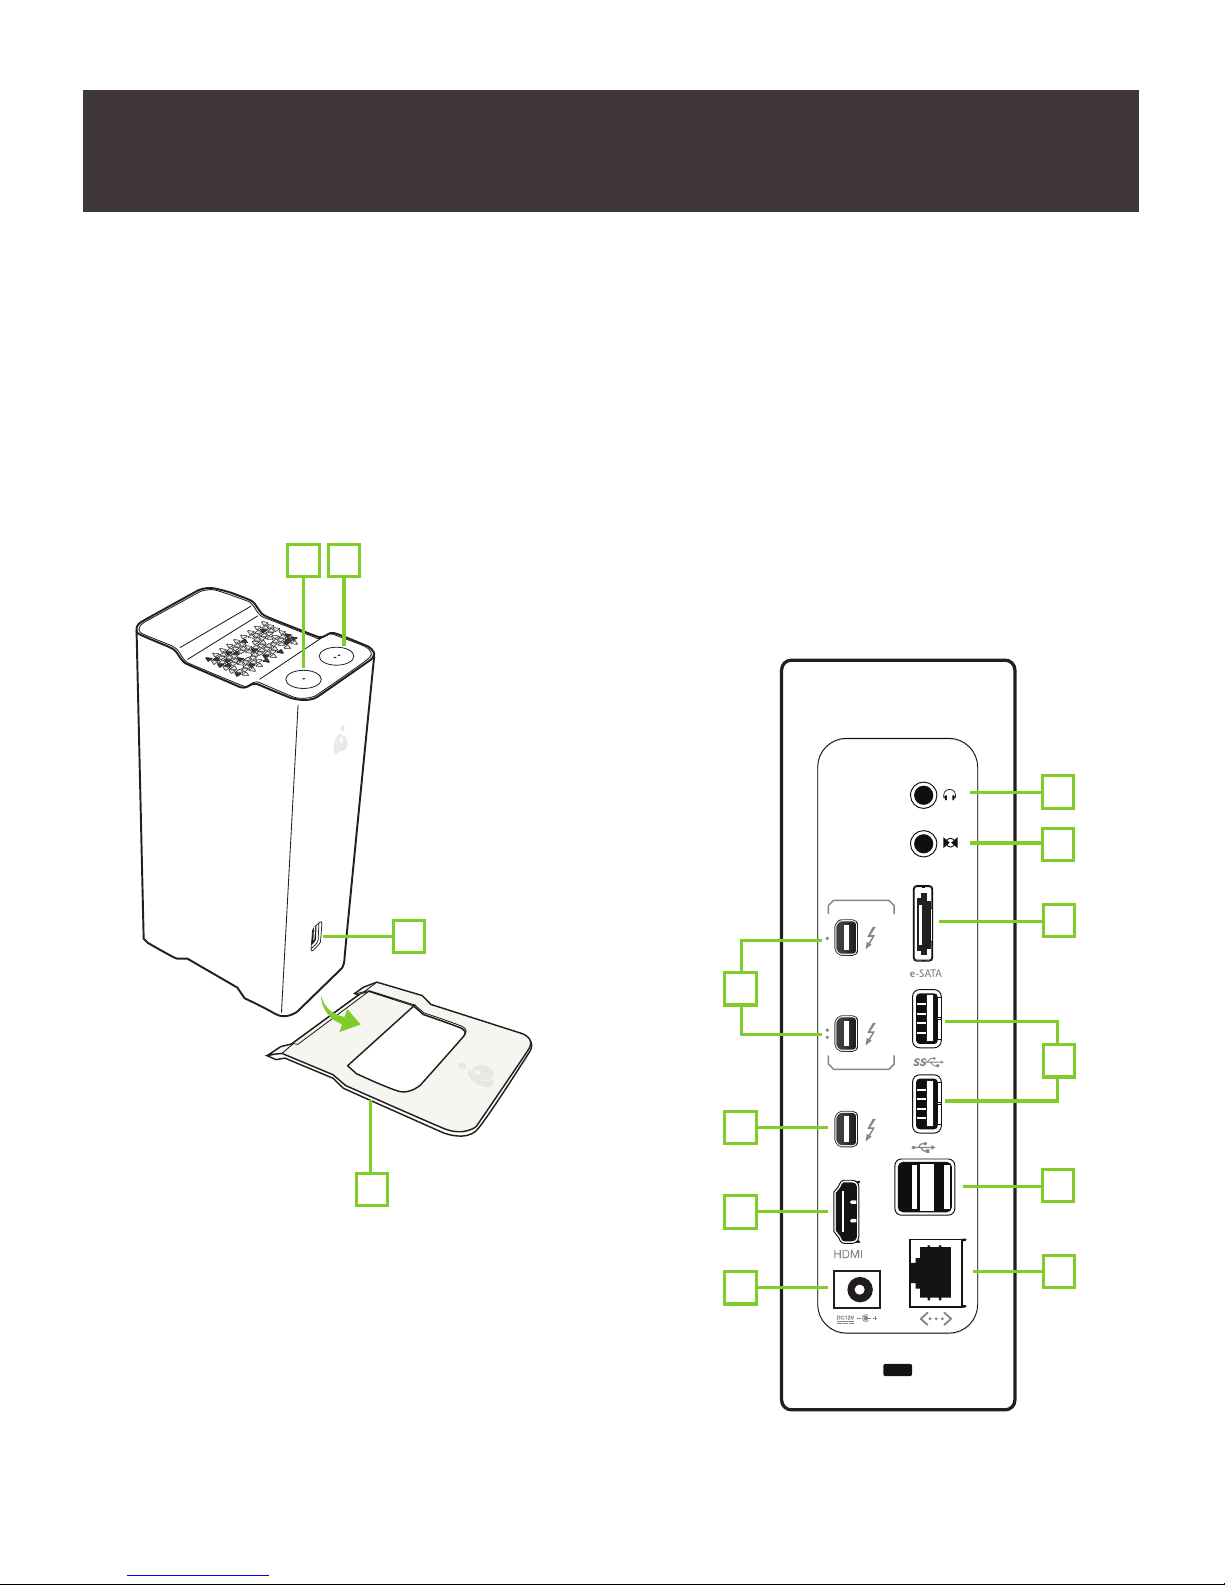
Back:
1.Thunderbolt 2
2. Thunderbolt 2 (Daisy Chain)
3. HDMI
4. AC Power Adapter
5. Audio Outtput
6. Audio Input
7. eSATA
8. USB 3.0
9. USB 2.0
10. Ethernet
Overview
Front:
1. Thunderbolt Switch Port Button 1
2. Thunderbolt Switch Port Button 2
3. USB 3.0
4. Base Stand
3
4
1
5
6
2
3
4
7
8
9
10
1
2

6
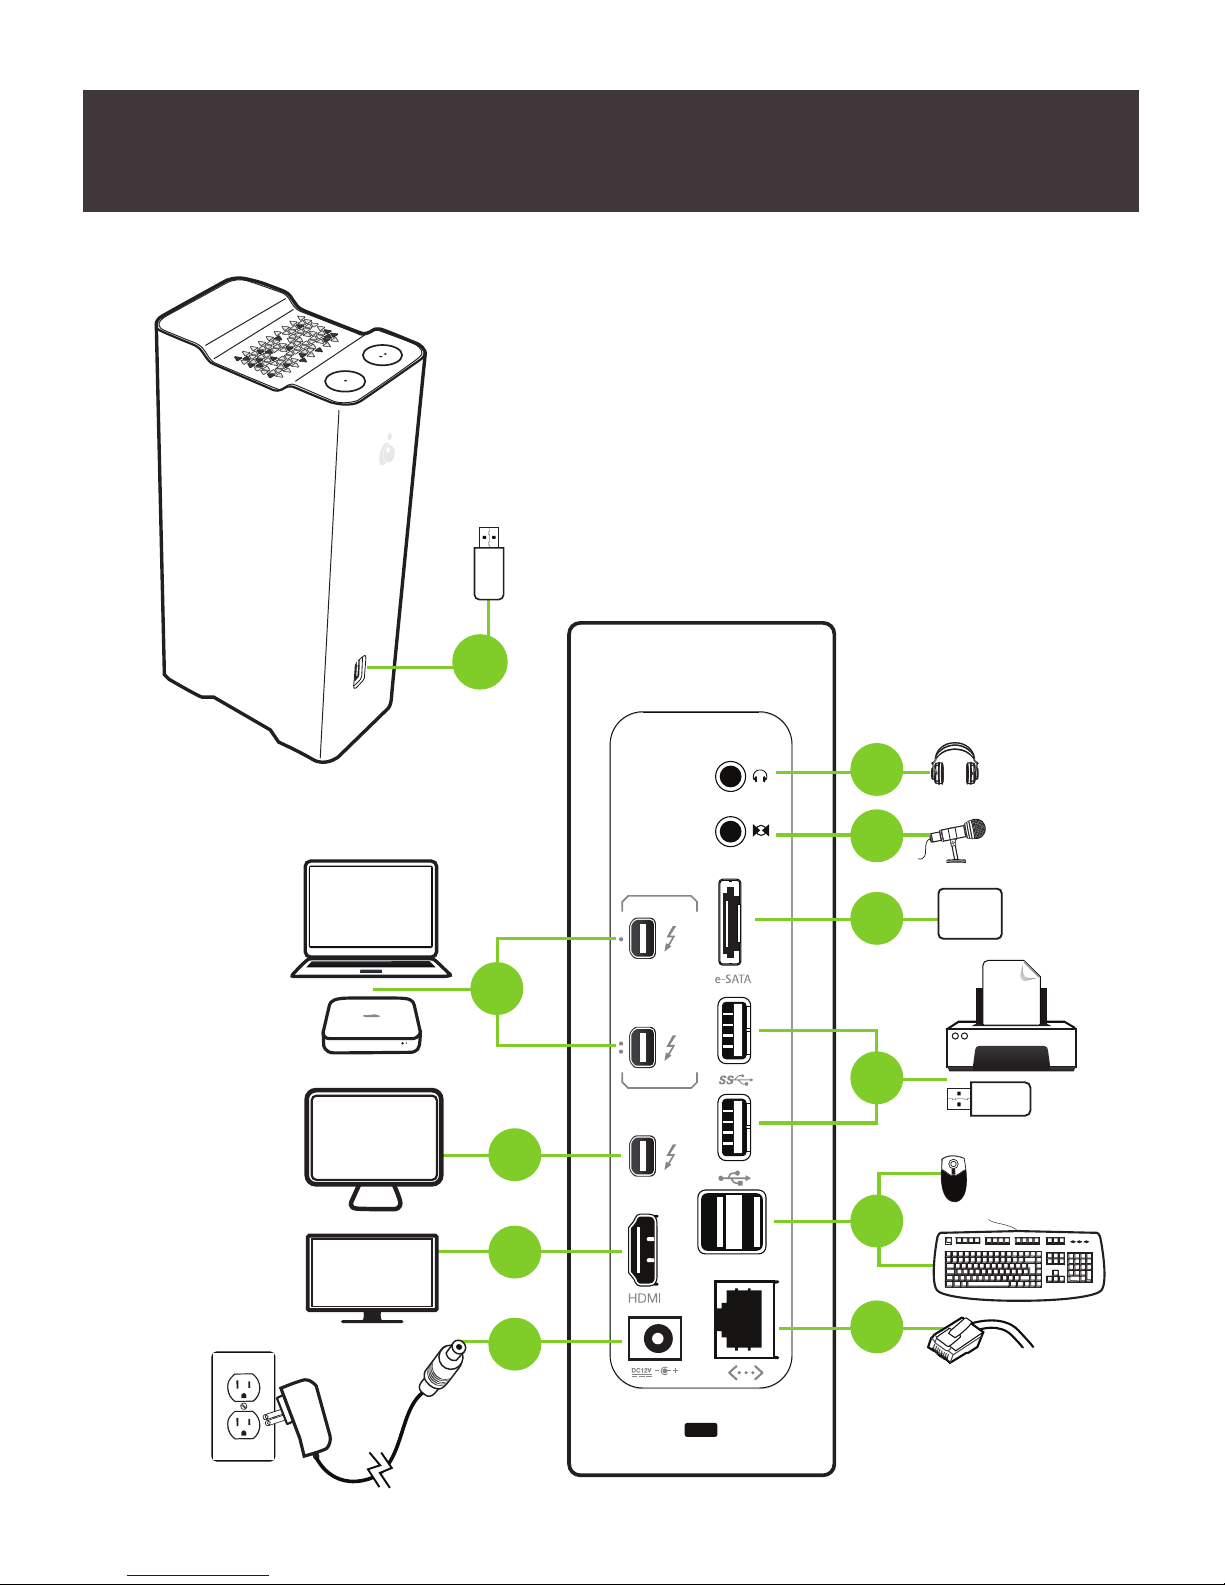
STEP 1
Plug the included AC power adapter into the DC-in port of the GTD732.
STEP 2
Using the included Thunderbolt cable, connect your Thunderbolt enabled Mac or PC to
one of the upstream Thunderbolt ports switch button (1 or 2) on the top cover of the unit.
STEP 3
Connect any USB compatible devices here. The front USB port is compatible with USB
3.0, 2.0 and 1.1 devices.
STEP 4
Connect an Ethernet cable to the Gigabit LAN port for high speed internet connection.
STEP 5
Connect any USB 2.0 /1.1 compatible devices such as keyboard and mouse.
STEP 6
Connect any USB 3.0/2.0/1.1 compatible devices as needed.
STEP 7
The GTD732 supports an additional Thunderbolt monitor. Connect the monitor to the
downstream thunderbolt port on the device. Your Thunderbolt monitor should
automatically detect the additional display.** (You can daisy-chain up to 4 additional
devices through one port)
STEP 8
The GTD732 supports an additional HDMI monitor. Connect the monitor to the HDMI port
on the GTD732. Your HDMI monitor should automatically detect the additional display.**
STEP 9
The GTD732 provides an eSATA port for connectivity with external eSATA devices
Plug the eSATA cable from your external storage device into the eSATA port.
STEP 10
Connect a mini digital optical (mini TOSLINK) or 3.5mm analog audio cable for external
speaker system. The Line-Out port supports optical signal for higher quality sound playback.*
STEP 11
Connect a mini digital optical (mini TOSLINK) audio cable for recording. The optical Audio
Line-In port supports optical signal for higher quality sound editing.*
Hardware Installation
7
HDD
2
10
11
9
6
5
4
7
8
1
3
 Loading...