

Page 1

Installation Guide
Installation
Personal Security Mouse with Biometric Fingerprint and Nano Technology
1
GMEFP1W6
Page 2

233
Page 3

Welcome
Thank you for purchasing this IOGEAR Personal Security Mouse that allows you to secure your computer
and sensitive files with the touch of a finger. In addition to using your own fingerprint to gain access to the
computer, our Personal Security software can use advanced encryption to prevent intruders from reading
your sensitive data even if your computer is lost or stolen. In addition, all your favorite website accounts can
be stored in an encrypted database and automatically filled in when you visit the site. All this without taking
any more desk or bag space than a normal mouse.
We hope that you will enjoy using your Personal Security Mouse and find it to be a useful solution.
Page 4

Table of Contents
Package Contents 5
Features
Requirments 7
Introduction
Driver Installation (Windows XP)
Driver Installation (Windows 2000)
Software Installation
User Setup 21
Windows Logon
6
8
9
13
18
28
Internet Explorer AutoLogin 31
SecureDisk
File and Folder Encryption 40
IE AutoLogin Database Maanger 46
Resize SecureDisk
Adding or Deleting Fingerprint Data 52
Changing Windows Login Settings
Screen Saver / Lock Settings
Quick Bar Auto Hiding 60
4
35
49
56
58
Page 5

5
Package Contents
This package contains:
1 USB Personal Security Mouse
•
1 User manual
•
1 Installation CD
•
•
1 Warranty/registration card
* If any items are damaged or missing, please contact your dealer.
5
Page 6

Features
Allows the security of long passwords without ever having to type one
•
Keeps track of all your favorite internet accounts for you
•
Secures sensitive files even if the user is already logged on
•
Comfortable, compact, and accurate optical mouse design
•
6
Page 7

7
Requirements
An available USB port
•
CD or DVD drive
•
Windows 2000 or XP
•
A working internet connection (for one-time activation only)
•
7
Page 8

Introduction
Most security measures make your computing experience more complicated and inconvenient. Your IOGEAR
Personal Security Mouse can provide you with extra security and actually make your life easier at the same
time. Gain access to your computer, or specific files, or an online account all with the swipe of one finger. All
your long, secure passwords are now safe and secure without needing any extra brain cells.
However, before you begin using your Personal Security Mouse, keep a few things in mind. The password
you use to log into Windows normally can always be used in place of your fingerprint. This means if your
mouse is broken or malfunctions you can continue using your computer normally, but it also means you must
still have one strong password memorized in case of emergency. Make sure each user account you are
securing has a valid password before installing.
Also remember that any files you encrypt are not portable. If you take a protected file off your computer you
will not be able to decrypt it, so make sure any backup solutions protect your entire installation of Windows
or store unprotected copies of your files. The Personal Security software is designed to secure your sensitive
data only while it is on your own computer.
8
Page 9
9
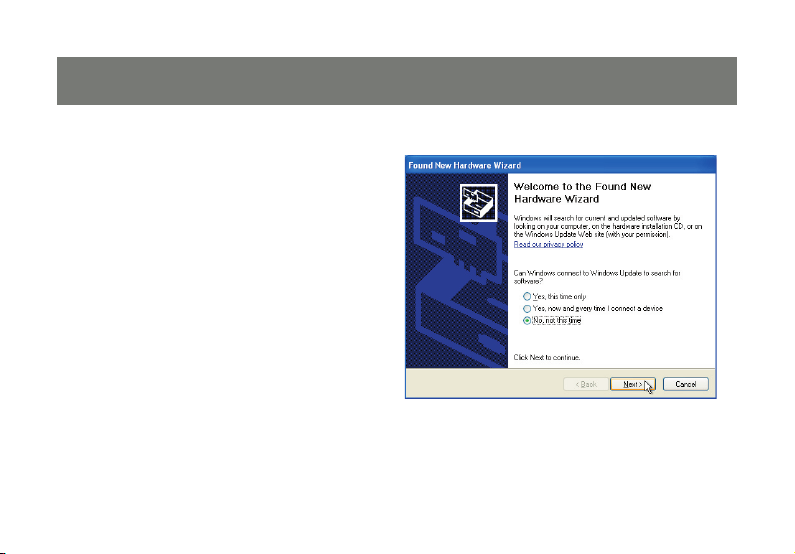
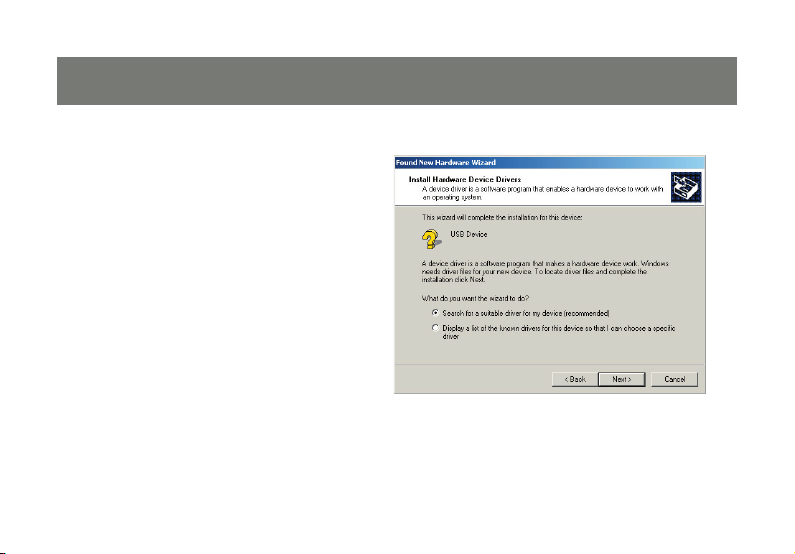
Driver Installation (Windows XP)
Insert the USB plug on your Personal Security
1.
Mouse into an available USB port on the
computer. A window will appear with the
Found New Hardware Wizard. If asked
whether to connect to Windows Update to find
drivers, choose No, not this time and click the
Next button to continue. In some cases this
question will be skipped and the wizard will
start with the next screen.
9
Page 10
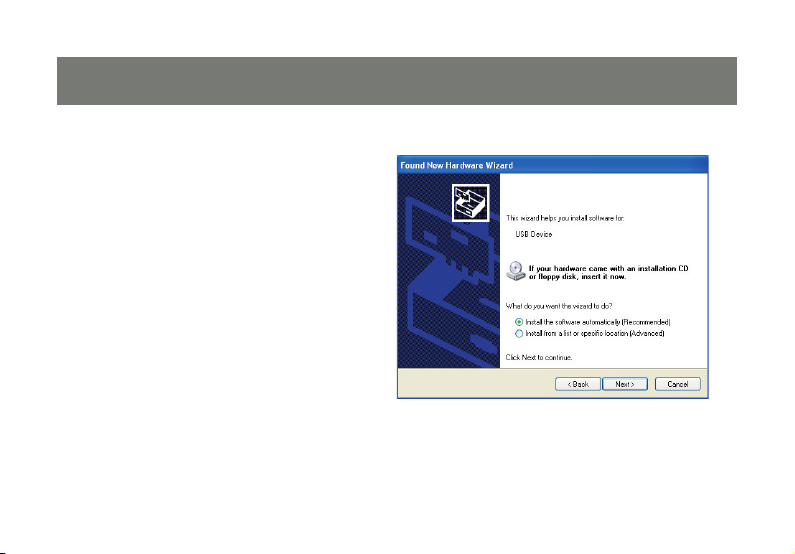
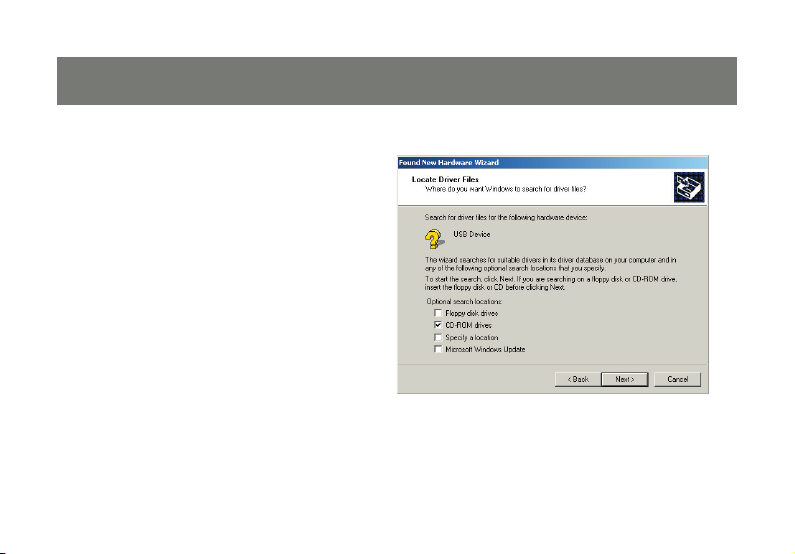
When you see the following screen, simply
2.
insert the driver CD and the drivers will be
found automatically.
10
Page 11
11
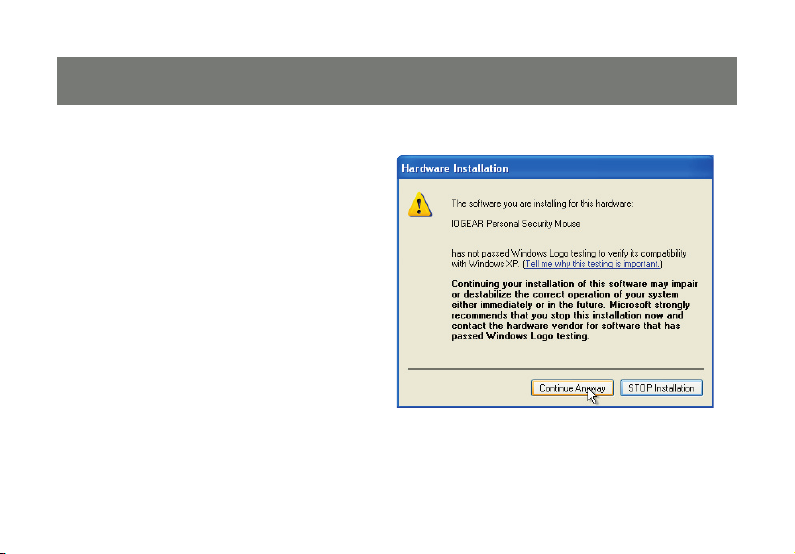
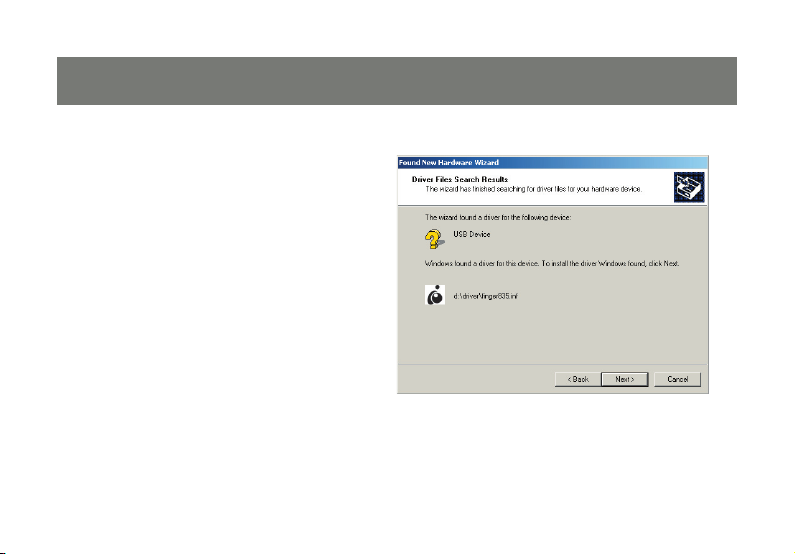
You may see a warning that the drivers have
3.12Driver installation for your mouse should now be
not passed the Windows Logo certification
process. Click Continue Anyway to proceed
with installation.
11
Page 12
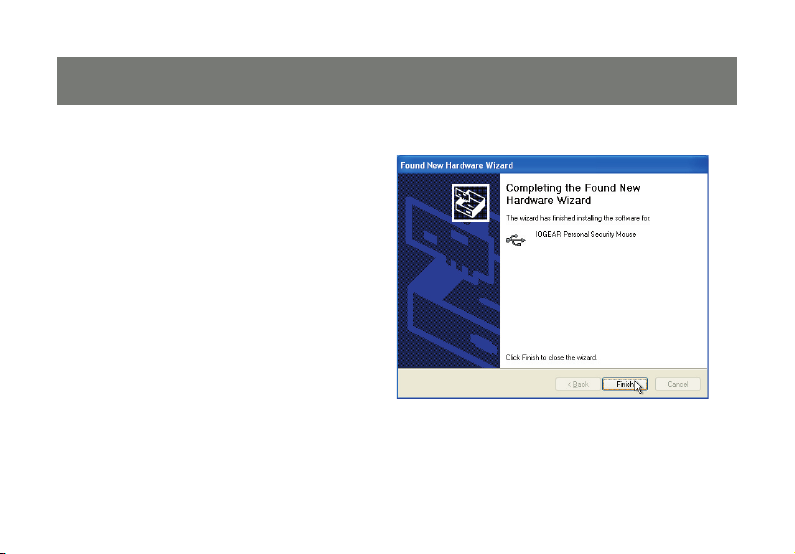
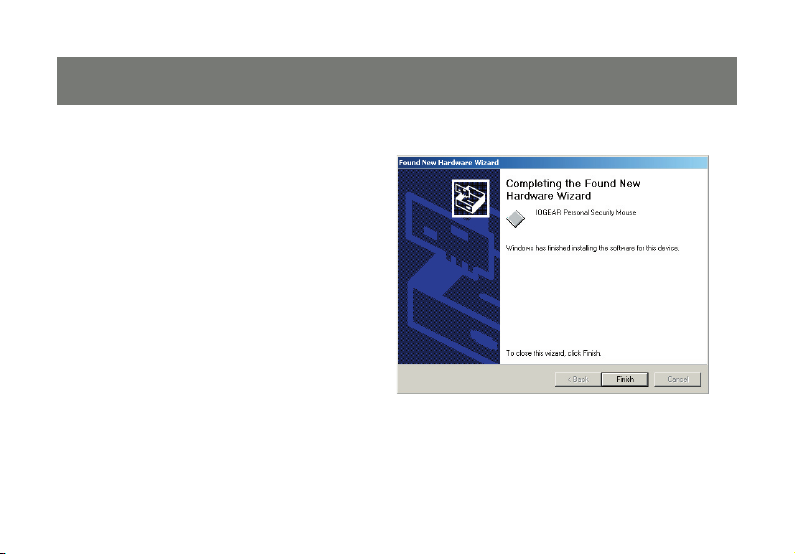
4.
complete. Click Finish to close the wizard.
Page 13

13
Driver Installation (Windows 2000)
Insert the USB plug on your Personal Security
1.14Leave the first option selected and click Next
Mouse into an available USB port on the
computer. A window will appear with the
Found New Hardware Wizard. Click Next to
continue.
13
Page 14
2.
to let Windows choose the type of driver that
is installed.
Page 15
15
On the next screen make sure CD-ROM drives
3.16The wizard will find a suitable driver on the CD
is selected, then click Next to begin the search.
15
Page 16
4.
and confirm that it is the one you want. Click
Next to continue.
Page 17
17
When installation is complete, click Finish to
5.
close the wizard.
17
Page 18
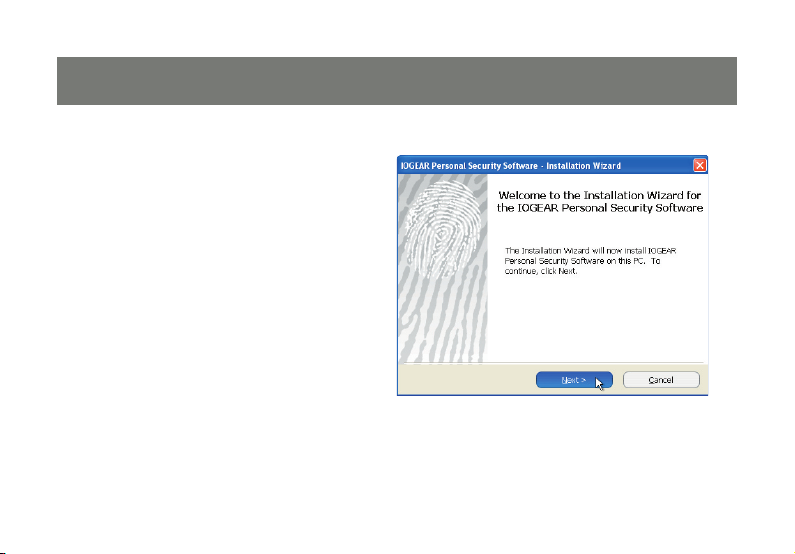
Software Installation
Open the My Computer window and then the
1.
D: drive (or whatever letter represents your
CD-ROM drive). Run the setup.exe file from the
CD. The install wizard for the Personal Security
Software will appear. Click Next to continue.
18
Page 19
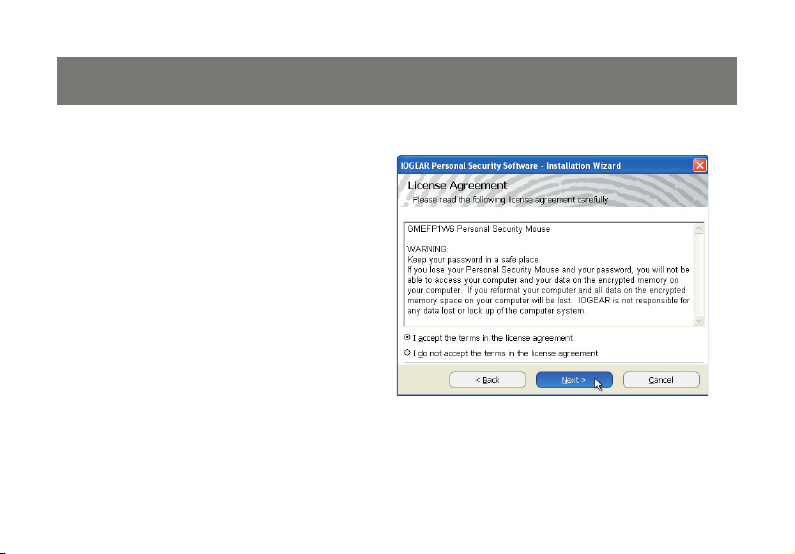
19
You must read and agree to the software
2.20Choose a folder to install the software into,
license to continue installation. Click Next
when you have done this.
19
Page 20

3.
or click Next to accept the standard location.
When the software has finished installing it will
immediately begin the user setup process (see
the next section of the manual).
Page 21

21
User Setup
You will need to perform the following steps
1.
once for each user account on the computer
that you would like to secure using a fingerprint.
Setup will begin automatically for the user that
installs the software, but all other users can set
up their account by clicking on the Personal
Security menu icon by the clock in the taskbar.
21
Page 22

The first step in securing an account is to
2.
enter the account password into the Personal
Security software. This password must match
the one you normally use to log into Windows.
If you do not wish to use your fingerprint to
log into your computer uncheck the checkbox
for Use as Windows Login. Click OK when
finished.
22
Page 23

23
Next you must store at least one of your
3.24You will be prompted to swipe your finger
fingerprints in the software. Click on the finger
you wish to scan and click Next.
23
Page 24

4.
across the sensor at least three times to get a
good reading. Use a smooth, even movement
and draw the finger or thumb back towards
yourself while applying steady pressure to the
sensor. Each swipe should take around a full
second or more to complete. When three
valid readings have been collected you will be
returned to the fingerprint registration screen.
Page 25

25
Fingers with a green highlight have fingerprint
5.26If this is the first time you have run the user
data stored. Click another finger and Next to
scan it as well. This can be very useful if your
preferred finger becomes unreadable due to
a cut or bandage. If you would like to delete
data for a finger, simply click on it and choose
Delete this finger. Note that you must leave at
least one print per user. Click Finish when you
are finished storing fingerprints.
25
Page 26

6.
setup after installation, you will be prompted to
restart your computer now. Click Yes to restart
and activate the changes to the login software
or click No if you would rather wait.
Page 27

27
After your next restart, you will be prompted to
7.
enter the serial code from the sticker on the
bottom of the mouse. Make sure that you
include hyphens and capital letters as needed.
Click Activate to register your software
automatically (an internet connection is
required to complete this activation).
27
Page 28

Windows Logon
If you choose to use the Windows Logon
1.
feature of the Personal Security mouse, you
will see a screen like this one when first starting
your computer. If you do not see this screen,
make sure your Personal Security mouse is
plugged in or press control-alt-delete to log
in normally using a password instead of a
fingerprint.
28
Page 29

29
Normally you will simply swipe your finger
2.30If you are having trouble scanning your
across the mouse when you are presented with
the Windows Logon screen. If that fingerprint
has been registered in the Personal Security
software, you will automatically log into the
user account it is registered for. You do not
need to choose a user first, nor do you need to
specify which finger you are scanning.
29
Page 30

3.
fingerprint or have not yet set up a fingerprint
for a user account, you can always log into an
account manually by pressing Cancel, then
typing in the name and password for the
appropriate user.
Page 31

31
Internet Explorer AutoLogin
Your Personal Security software can
1.32Next click the icon for the Personal Security
remember login information for all of your
favorite websites. To set up this feature for a
website, simply type the account information
into the web page normally but do not sign
in yet.
31
Page 32

2.
software icon by the clock on your taskbar.
Page 33

33
You will be prompted to identify yourself using
3.34From the IE AutoLogin menu, choose the
one of the stored fingerprints for this user.
Swipe the appropriate finger across the sensor
on the mouse.
33
Page 34

4.
option to Save ID and Password. This will add
the account information to an encrypted
database for future use on this website. On
your next visit to the site, you will be
immediately prompted to scan your finger.
When you do so, the login information will be
typed in for you automatically.
Page 35

35
SecureDisk
Your Personal Security software includes a
1.36You will be prompted to identify yourself using
virtual disk that is not accessible without your
fingerprint or password. The contents are
encrypted on the fly, so you can access the
contents with any program as if it were a
normal disk once you unlock it. As with all
features of your Personal Security mouse, start
by clicking the icon in the tray area by
the clock.
35
Page 36

2.
one of the stored fingerprints for this user.
Swipe the appropriate finger across the sensor
on the mouse to gain access to the main menu,
or click Password to gain access by entering
your account information manually.
Page 37

37
When the menu opens, point to the SecureDisk
3.38Your secure disk is now available under the
option and select Unlock Drive.
37
Page 38

4.
drive letter P: by default. You can open or save
files to this drive as if it were a floppy disk, zip
disk, or thumb drive.
Page 39

39
When you are done using the secure disk,
5.
you may lock it to ensure no one can view or
modify the contents. To do so, simply open
the Personal Security software, point to the
SecureDisk option and select Lock Drive.
39
Page 40

File and Folder Encryption
If moving files into the secure disk is not
1.
convenient, you may encrypt them directly
using a right-click. With the Personal Security
software installed, any file or folder in Windows
will have an option to encrypt it in place. You
will need to validate each encrypt/decrypt
action by swiping your fingerprint normally.
40
Page 41

41
When a file has been encrypted you can see a
2.42Normally you can open and decrypt a file at the
red padlock stamped onto the normal file icon.
It will no longer be readable if copied off your
computer, and even someone who is logged
onto your computer cannot open the file
without your fingerprint.
41
Page 42

3.
same time by simply double-clicking on it.
However, if you wish to decrypt a file without
opening it, there is an option to do so by
right-clicking the file again.
Page 43

43
If you wish to encrypt an entire folder, you may
4.44To decrypt individual files within a protected
do so with a right-click as well. The folder icon
will have a red padlock to show that files inside
are protected.
43
Page 44

5.
folder, you can simply drag them outside the
folder. As usual, your fingerprint is required to
perform the operation.
Page 45

45
If you would no longer like a folder and
6.
everything inside to be encrypted, right-click
the folder itself and choose the Decrypt Folder
option. All contents will be restored to normal.
45
Page 46

IE AutoLogin Database Manager
You may change the behavior of the AutoLogin
1.
feature using the Database Manager. As with
all features of your Personal Security mouse,
start by clicking the icon in the tray area by the
clock. Swipe your finger to access the main
menu.
46
Page 47

47
Under the IE AutoLogin menu, choose the
2.48From here you can see the websites that are
AutoLogin Database Manager.
47
Page 48

3.
currently set up for automatic login, along with
the account information stored for each site.
You can cancel the AutoLogin feature for a site
by selecting it from the list and clicking Delete.
You may also turn on automatic submitting
here. When this box is checked your account
information will not only be filled in
automatically, but also sent immediately
afterward.
Page 49

49
Resize SecureDisk
By default the secure disk for each user can
1.50You may change the size of the drive by
hold up to 128 MB of data. If you would like to
expand the disk simply bring up the Personal
Security software, and choose Resize from the
SecureDisk menu.
49
Page 50

2.
dragging the slider or by typing in an exact size
specified in megabytes. The space used by
the secure drive is taken from your C: drive and
immediately unavailable for other purposes, so
pay attention to the available free space on your
computer. Click Resize when you are ready to
apply the changes.
Page 51

51
All data on the secure drive will be preserved
3.
during the resize process. Click OK once the
change is complete.
51
Page 52

Adding or Deleting Fingerprint Data
Due to either preference or necessity, you may
1.
wish to change which finger is used when
accessing your Personal Security software.
Start by clicking the icon in the tray area by
the clock.
52
Page 53

53
You will be prompted to identify yourself using
2.54The Fingerprint Registration option is in the
one of the stored fingerprints for this user.
Swipe the appropriate finger across the
sensor on the mouse to gain access to the
main menu, or click Password to gain access
by entering your account information manually.
53
Page 54

3.
User Settings menu of your Personal Security
software.
Page 55

55
As before, click an unused finger and Next to
4.
begin scan in fingerprint data for that finger, or
click a stored fingerprint (highlighted in green)
and choose Delete this finger to remove all
data for that finger. You must leave at least one
fingerprint per user. Click Finish when you are
finished storing fingerprints.
55
Page 56

Changing Windows Login Settings
Your Personal Security software stores the
1.
name and password for your Windows account
and lets you log into your computer with a
swipe of a finger. If you decide you would
rather log into the computer normally you can
do so using the Windows Login setting option
under User Settings.
56
Page 57

57
By unchecking the box marked Use as
2.
Windows Login you will restore the normal
login procedure on your computer. This screen
may also be used to update the password
stored in the Personal Security software if the
password for your Windows account is
accidentally changed.
57
Page 58

Screen Saver / Lock Settings
By default your Personal Security software will
1.
lock the computer whenever your screensaver
is activated, as well as when you press the
Pause/Break key on your keyboard. If you
would like to change these settings, open the
Screen Saver Lock setting option under User
Settings.
58
Page 59

59
Here you may change the hotkey used to lock
2.
your computer and enable or disable automatic
locking when your screensaver activates.
59
Page 60

Quick Bar Auto Hiding
By default the Personal Security software will
1.
remain open until you select an option or click
the X in the top right to close it. You can turn
on the Auto Hiding feature if you prefer that the
menu close itself when unused. The Quick Bar
Auto Hiding feature can be found under User
Settings.
60
Page 61

61
Simply uncheck the box and choose the delay
2.
you prefer. If the mouse cursor leaves the
menu for that number of seconds, the menu
will close itself.
61
Page 62

Contact
IOGEAR, INC.
23 Hubble
Irvine, CA 92618
P 949.453.8782
F 949.453.8785
Visit us at: www.iogear.com
©2007 IOGEAR. All Rights Reserved. PKG-M0333
IOGEAR and the IOGEAR logo are trademarks or registered trademarks of IOGEAR, Inc. Microsoft and Windows are registered trademarks of
Microsoft Corporation. IBM is a registered trademark of International Business Machines, Inc. IOGEAR makes no warranty of any kind with regards to
the information presented in this document. All information furnished here is for informational purposes only and is subject to change without notice.
IOGEAR, Inc. assumes no responsibility for any inaccuracies or errors that may appear in this document.
62
Page 63

63
63
Page 64

© 2007 IOGEAR, INC
FUN
IOGEAR offers connectivity solutions that are innovative, fun, and stylish,
helping people enjoy daily life using our high technology products.
GREEN
IOGEAR is an environmentally conscious company that emphasizes the
importance of conserving natural resources. The use of our technology
solutions helps reduce electronic waste.
HEALTH
IOGEAR supports healthy and fi t lifestyles. By integrating products with
the latest scientifi c developments, IOGEAR’s solutions enhance the life of
end-users.
About Us
About Us
 Loading...