

Page 1

Wireless Bluetooth MiniMouseWireless Bluetooth MiniMouse
Wireless Bluetooth MiniMouse
Wireless Bluetooth MiniMouseWireless Bluetooth MiniMouse
User Manual
®
Page 2

Thank you for purchasing IOGEAR’s® Bluetooth Mouse. IOGEAR® only manufactures
high quality bluetooth devices, so we are sure you will be satisfied with your purchase.
®
IOGEAR
with your new bluetooth mouse.
To better serve you, IOGEAR
KVM, and other peripheral products. For more information, or to purchase additional
IOGEAR
We hope you enjoy using your new Bluetooth Mouse – another first-rate connectivity
solution from IOGEAR
is dedicated to customer service and satisfaction, and wishes you the best
®
offers an array of additional USB 2.0, USB, FireWire,
®
products, visit us at www.IOGEAR.com.
®
!
© 2004 IOGEAR®. All Rights Reserved. PKG-M0213
IOGEAR®, the IOGEAR® logo, ION™, are trademarks or registered trademarks of IOGEAR® Inc. Microsoft
and Windows® are registered trademarks of Microsoft® Corporation. IBM is a registered trademark of
International Business Machines, Inc. MAC, Macintosh, and Apple are registered trademarks of Apple
Computer, Inc. All other brand and product names are trademarks or registered trademarks of their respective
holders. IOGEAR® makes no warranty of any kind with regards to the information presented in this document. All
information furnished here is for informational purposes only and is subject to change without notice. IOGEAR
assumes no responsibility for any inaccuracies or errors that may appear in this document. Reproduction in
whole or part without permission is prohibited.
®
®
Page 3

Table of Contents
Package Contents.................................................................................
Overview................................................................................................
Features................................................................................................
Requirements........................................................................................
Additional Bluetooth products................................................................
Pictorial Introduction..............................................................................
Installation..............................................................................................
Operation...............................................................................................
Specification...........................................................................................
Radio & TV Interference Statement.......................................................
Limited Warranty....................................................................................
02
03
04
05
06
07
08
24
25
26
27
Page 4

Package Contents
This package contains:
1 Wireless Bluetooth MiniMouse
1 Carrying case
1 USB battery charger cable
1 User manual
2 AAA rechargeable batteries
1 Warranty/Registration card
If any of the items are missing or damaged, please contact your dealer immediately.
2
Page 5

Overview
IOGEAR's Wireless Bluetooth Mini Mouse delivers the convenience of a wireless mouse,
with the robustness offered by Bluetooth technology. This class 2 Bluetooth mouse gives
you a strong signal ranging up to 66 feet. The small and portable design saves precious
space in your mobile work area, and it is one less tangled wire in your laptop carrying
case.
The ergonomically contoured design and optical sensor offer comfortable use on most
surfaces, without the need for a mouse pad. This mouse features 800 dpi resolution,
meaning it offers twice the accuracy of typical mouse movement, which is ideal for graphic
designing or any other type of computing where precision matters.
For added convenience, the Wireless Bluetooth Mini Mouse also features a power On/Off
switch to avoid battery drainage during travel, and a USB charger cable for convenient
charging through the USB port on laptops. This mouse is the ultimate tool for the road
warrior of today.
3
Page 6

Features
• Compatible with any Bluetooth-enabled computer that supports HID profile
• Works up to 66 feet away from computer
• 800 dpi resolution offers twice the accuracy of typical mouse movement
• Operates on most surfaces without the need for a mouse pad
• Light and very portable, great for mobile professionals
• Saves precious space in your mobile work area
• Power on/off switch conserves electricity for maximum battery life
• Comes with a USB charger to allow you to charge batteries through the laptop
• Ergonomically contoured design for comfortable use
• 3 Year Limited Warranty
4
Page 7

Requirements
• Bluetooth enabled computer with HID profile support
• For MAC’s: OS X v10.3.5 or later
• If the computer is not Bluetooth enabled, a Bluetooth USB dongle will be required.
Please refer to IOGEAR part no. GBU311, GBU211 for details
5
5
Page 8

Additional Bluetooth Products
Bluetooth USB Adapter, class 2 (GBU211)
Bluetooth USB Adapter, class 1 (GBU311)
Bluetooth USB Printer Adapter, class 2 (GBP201)
Bluetooth Combo (USB/Parallel) Print Adapter, class 1 (GBP301)
Bluetooth GPS (GBGPS201)
6
6
Page 9
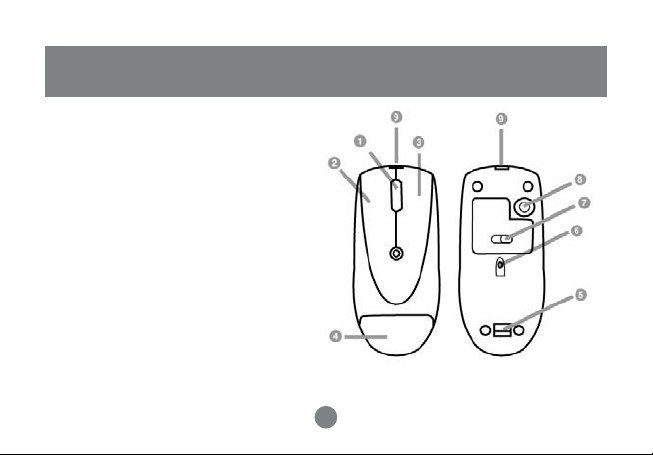
1. Scroll Wheel
2. Left Click Button
3. Right Click Button
4. Battery Compartment
5. Battery Cover Release
6. Optical Sensor
7. Power On/Off Switch
8. Connect Button
9. Battery Charging Connection
Pictorial Introduction
7
7
Page 10

Installation
BATTERY INSTALLATION
1. Pull the battery cover release toward the direction as indicated in the drawing
2. Insert the batteries (included in the package) into the battery compartment
3. Put the cover back on.
4. Make sure the power On/Off switch is at ON position. We do recommend
that you charge the batteries for 10 hours before using the mouse.
5. To charge the batteries, just plug the USB charger cable into the USB port on
you computer, and the mouse, and leave it on.
8
8
Page 11

Installation
INST ALLATION INSTR UCTIONS
Before you can use the IOGEAR Bluetooth mouse with your computer, you will first need
to establish communication and then connect to it. The procedures below may be different
for you, depending on the Bluetooth software you are using. If you need additional help,
please consult the manual for your Bluetooth software.
Keep in mind that for the initial configuration, the Bluetooth mouse will not be functional and that you will need to use a different mouse.
9
9
Page 12

Installation
WINDOWS SYSTEMS
In the example below, the Bluetooth software used was Widcomm stack version 1.4.2.
1. Make sure your computer is Bluetooth-enabled and that it supports the Bluetooth HID
profile.
2. Turn ON the mouse.
3. Open your Bluetooth software (My Bluetooth Places, in our example)
4. Press and hold the Connect button located under the mouse for approximately five (5)
seconds; this will set the mouse in discovery mode.
5. Start the search for Bluetooth devices (Search for devices in range)
6. The IOGEAR Bluetooth Mini
Mouse should be listed as
shown in the image. If the
mouse is not detected, repeat
step 4 and search for your
Bluetooth mouse again.
10
Page 13

Installation
7. Right-click the IOGEAR Bluetooth
mouse and select “Pair Device.” When
prompted to enter a pass key, enter
“1234”. Your computer and mouse
should now be paired.
8. Next, right-click on the mouse icon and
select “Connect Device” and when
prompted to connect, click Yes.
11
11
Page 14

Installation
9. You should now be able to use the IOGEAR Bluetooth Mini Mouse.
Once you have connected and paired your mouse with your Bluetooth-enabled computer,
you don’t need to repeat this procedure. Even if you turn on/off the Bluetooth mouse or
shut down your computer, the mouse will still connect to the computer when both devices
are turned on.
12
12
Page 15

MICROSOFT BLUETOO TH ST ACK (Windows XP SP2)
The instructions below apply to Windows
XP systems with Service Pack 2 installed.
1. Make sure that your computer is
Bluetooth-enabled and that the
Bluetooth icon shows on your traybar
2. Right-click on the Bluetooth icon and
select “Add a Bluetooth Device.”
13
Inst
Installation
13
Page 16

Installation
3. Before proceeding with the Bluetooth
Wizard, please do the following:
• Switch ON the Bluetooth mouse
• Press and hold the “connect” button
underneath the mouse for five (5)
seconds and then release
• Click the checkbox “My device is
setup and ready to be found” and
then click Next.
14
Page 17

4. Your computer will scan for
Bluetooth devices in your area and
display all found devices. On this
window, y ou should see “Bluetooth
Mouse” as shown below . Select
the mouse and click Next to
continue.
Installation
15
Page 18

Installation
5. To pair with the Bluetooth mouse,
select “Use the passkey found in
the documentation” and enter the
PIN code “1234”. Upon clicking
Next, Windows XP will pair with the
mouse and install the necessary
drivers for your mouse.
16
Page 19

6. At this point, the IOGEAR Bluetooth
mouse should be functional. Simply
click Finish to close the Wizard.
Installation
17
Page 20

Installation
MAC OS X (10.3.5 or later)
Bluetooth support is built-in in MAC OS X. In the example below, we used MAC OS X
v10.3.5 to configure the IOGEAR Bluetooth Mini Mouse.
1. Make sure your computer is Bluetooth-enabled and that it supports the Bluetooth HID
profile.
2. T urn ON the mouse.
3. Open System
Preferences and
double-click on the
Bluetooth icon.
18
14
Page 21

Installation
4. Under the settings tab, make sure that
Bluetooth is ON and that the box next
to Discoverable is checked.
5. Next, select the Devices tab and click
on Set Up New Device.
19
15
Page 22

Installation
6. This will start the Bluetooth Setup
Assistant. Click continue to proceed.
7. On the next window, select the Mouse
option and click Continue.
20
Page 23

Installation
8. T urn ON the IOGEAR Bluetooth Mini
Mouse, then press and hold the
Connect button located under the
mouse for approximately five (5)
seconds.
9. Once the IOGEAR Bluetooth Mini Mouse
is detected, it will be listed under the
window below . Select the mouse and
click Continue.
21
17
Page 24

Installation
10. Your computer will automatically pair
with the Bluetooth mouse. If prompted
to enter a PIN code, please use “1234”.
Upon successful connection, click
Continue.
22
Page 25

11. You are done! Your Bluetooth mouse
should now be functional. To exit the
Bluetooth Setup Assistant, click Quit.
Once you have connected and paired your
mouse with your Bluetooth-enabled
computer, you don’t need to repeat this
procedure. Even if you turn on/off the
Bluetooth mouse or shut down your
computer, the mouse will still connect to
the computer when both devices are turned
on.
Installation
23
Page 26

Operation
Please avoid using this mouse on glass, mirror and metal surfaces.
When traveling, it is advised that you turn the power On/Off switch to the OFF position
in order to save battery life.
When the mouse movements turn sluggish, it may be the time for you to recharge the
batteries. Just plug the USB charger cable into the USB port on your computer, and the
mouse, and leave it on for a few hours. You don’t need to turn off the power, and you can
use the mouse when it is charging the batteries. A completely depleted battery requires
10 hours to charge.
24
18
Page 27

Specification
Function
Battery Type
Frequency Band
Interface
Operating Range
Power
Resolution
Voltage
Amps
Specification
Ni-Mh
2.4 Ghz
Wireless
66 ft. (20m)
< 100mA
2.4 V
800 dpi
25
Specification
19
Page 28

Radio & TV Interference Statement
WARNING!!! This equipment generates, uses and can radiate radio
frequency energy and, if not installed and used in accordance with the
instruction manual, may cause interference to radio communications. This
equipment has been tested and found to comply with the limits for a Class B
computing device pursuant to Subpart J of Part 15 of FCC Rules, which are
designed to provide reasonable protection against such interference when
operated in a commercial environment. Operation of this equipment in a
residential area is likely to cause interference, in which case the user at his
own expense will be required to take whatever measures may be required to
correct the interference.
26
20
Page 29

Limited Warranty
IN NO EVENT SHALL THE DIRECT VENDOR’S LIABILITY FOR DIRECT,
INDIRECT, SPECIAL, INCIDENTAL OR CONSEQUENTIAL DAMAGES
RESULTING FROM THE USE OF THE PRODUCT, DISK, OR ITS DOCUMENTATION EXCEED THE PRICE PAID FOR THE PRODUCT.
The direct vendor makes no warranty or representation, expressed, implied,
or statutory with respect to the contents or use of this documentation, and
especially disclaims its quality, performance, merchantability, or fitness for
any particular purpose.
The direct vendor also reserves the right to revise or update the device or
documentation without obligation to notify any individual or entity of such
revisions, or updates. For further inquires please contact your direct vendor.
27
21
Page 30

®
Contact info.
23 Hubble • Irvine, CA 92618 • (P) 949.453.8782 • (F) 949.453.8785 • www.iogear.com
 Loading...