

Page 1

Installation Guide
Installation
Portable Media Player
GMD2025U120
1
Part No. M1032
Page 2

3
NOTE :
This product is intended to be used for your home and personal enjoyment. Copying and commercial use
of copyrighted material without permission of the copyright owner may be prohibited by law. The user of
this product is solely responsible for ensuring that this device is used in a manner which complies with all
copyright and applicable intellectual property laws.
Page 3

Table of Contents
Package Contents 4
Requirements 5
Part Reference 6
Initial Setup – Remote 14
Initial Setup - Adding Media 15
Setup – AV connections 17
Media Playback 20
Setup Menu 22
General Setup 23
Audio Setup 24
Video Setup 25
Introduction and Playback of the Media Files 28
Replacing the remote battery 32
File types 33
FCC 36
CE 38
MPEG Disclaimer 39
Contact 40
Warranty 41
3
Page 4

5
Package Contents
• 1 x Portable Media Player
• 1 x Remote Control
• 1 x Travel Pouch
• 1 x Universal power adapter
• 1 x USB Cable
• 1 x Component cable
• 1 x Audio cable
• 1 x User Manual
4
Page 5

Requirements
Desktop or Notebook PC with USB 2.0 port for USB 2.0 connection
Operating systems: Windows 2000/XP/2003/Vista
This unit is not for in-car entertainment use. Unstable power or vibration may damage the unit.
5
Page 6
6
7
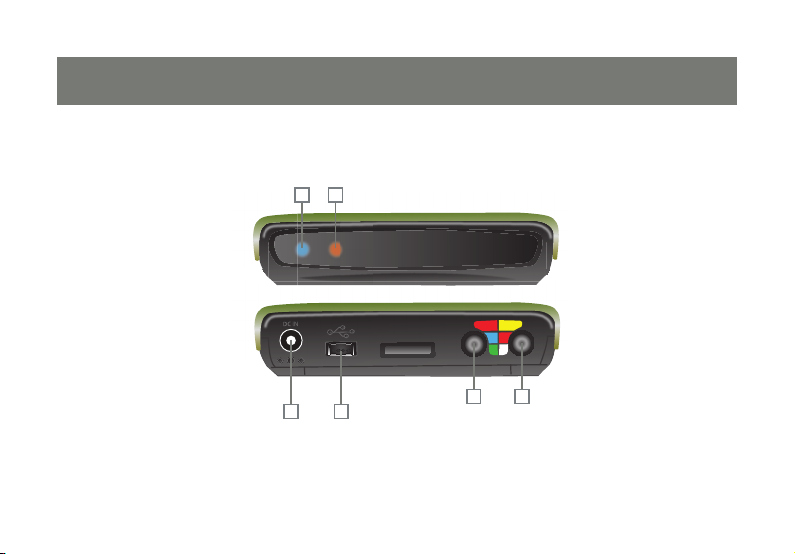
Part Reference
1
3
5
2
4
6
Page 7

1 - Power light (blue) On: The device is on.
Blinking: The device is booting up or being accessed
via USB.
2 - Remote light (orange)
3 - Composite audio/video
4 - Component video
5 - USB connector
6 - Power connector
One blink: Received a remote control command.
Three blinks: Remote control command not available - make sure device is
not connected to a PC.
Carries composite video and audio signals using the cable provided (yellow,
red, white).
Carries component video signals using the cable provided (red, blue, green).
Connects to a PC to add or remove content from the drive.
Connect to the AC adapter. (DC 5V, 2A)
7
Page 8
8
9
1 8 9 2 10
16 15 57 6 14 4 13 123
11
Page 9

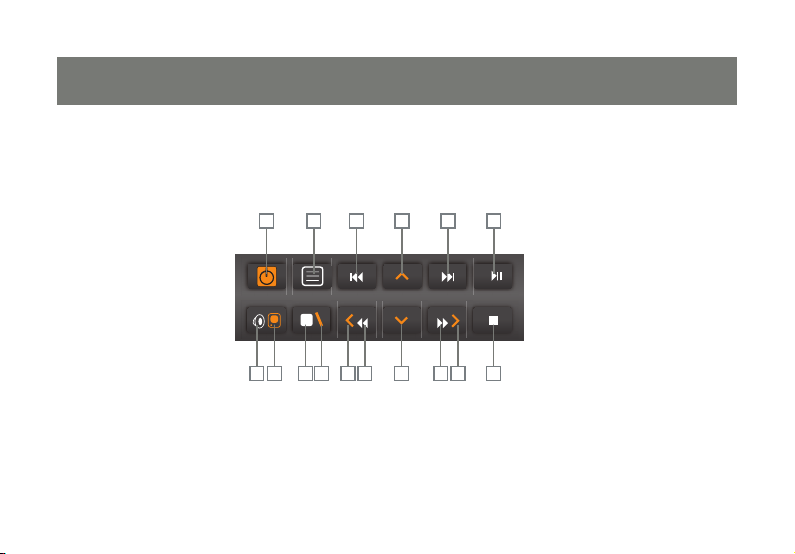
The drive buttons labeled in orange are used to navigate the browser interface.
1 - Power Power up / Enter standby mode
2 - Up arrow
3 - Right arrow
4 - Down arrow
5 - Left arrow
6 - Setup
Move the cursor up
Move the cursor right
Move the cursor down
Move the cursor left
Enter setup menu
7 - Video mode Changes video detail level
9
Page 10

11
The drive buttons labeled in white are used during media playback.
8 - Menu Switch to browse mode / DVD main menu
9 - Previous
10 - Next
11 - Play/Pause
12 - Stop
13 - FF
Play the previous le
Play the next le
Play current le or folder / Pause playback
Stop playback
Fast forward
14 - Rewind Rewind
15 - Subtitle Switch DVD / DivX subtitles
16 - Audio Switch audio channels
10
Page 11
11
Page 12

13
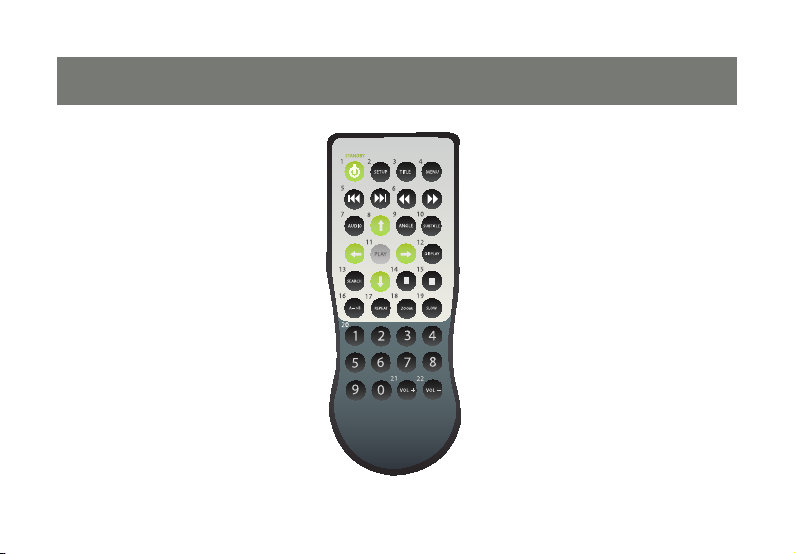
1 Power up / Enter standby mode
2
3
4
5
6
Enter setup menu
Open DVD title menu
Switch to browse mode / DVD main menu
Play the previous / next le
Fast rewind / Fast forward
7 Switch audio channels
8 Cursor keys
9 Switch DVD angles / Rotate image
10 Switch DVD / DivX subtitles
11
Play current le / folder
12
Page 13

12 Display le properties / played time
13
14
15
16
17
Search by Title / Time
Stop current playback
Pause current playback
Repeat from A to B
Change the repeat mode
18 Enlarge image
19 Slow motion playback
20 Number pad
21 Volume up
22
Volume Down
13
Page 14
14
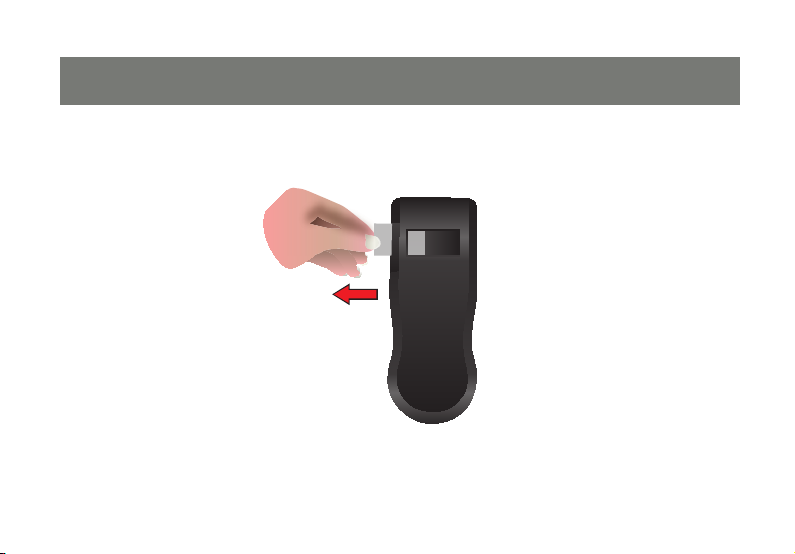
A protective tab is inserted into the battery compartment of the remote to maintain the charge of the battery.
Before rst using the remote you must pull gently on this tab to remove it completely.
Initial Setup – Remote
P U L L
Page 15

15
Before you can enjoy your pictures, music, and movies on the go you must copy them onto the drive from a
computer. Simply connect the included USB cable to the drive and an available USB port on your home laptop or
PC. In most cases you will not need to use the power cable, but if your computer is having dif culty recognizing
the drive then please connect it as well.
Initial Setup - Adding Media
No additional software is needed - your media drive should be recognized automatically. You will see a new drive
letter appear in the My Computer window. Treat your media drive the same as you would any storage device
such as a thumb drive or memory stick. Arrange your pictures, music, and movies in folders however you wish.
Keep in mind that placing many les in one large folder will take longer to browse than several well-organized
smaller folders.
Page 16

17
This device can play back MPEG1/VCD, MPEG2, DivX/Xvid(AVI), DVD Folder, MP3 and WAV music les,
JPEG photo and graphic les. You can store program and other data les on the drive as well.
When you have nished adding your own content to the media drive, look for a tray icon such as this one
called Safely Remove Hardware in the lower right and left click on it. Choose the menu option
that lists your media drive and wait for conrmation that it is safe to remove the drive before unplugging
the USB cable.
16
Page 17

17
When connecting your drive to a television, projector, or receiver you may use either composite or
component cabling.
Setup – AV connections
Composite cabling is the most common and supports only standard de nition. You will need only the
cable with the yellow, white, and red connections for a composite setup.
Page 18

18
19
Component cabling is considered higher quality and allows your drive to output a high resolution signal.
Keep in mind that even when your drive is displaying at high resolution the content is being scaled up
from standard resolution and is not truly high de nition.
When using component cabling you will need the cable with green, blue, and red connections. You will
also need the composite cable, but only for the audio (white and red) plugs.
Page 19

19
After the audio and video cables are connected simply plug in the power adapter, and turn on the drive
using the power button on the drive or remote control. After a few seconds the blue power light on the
drive should stop blinking and you should see the media drive interface on your screen. If you do not,
please press the video mode button on the drive (see reference above) until you see a clear picture.
If you prefer, you may also press the Menu and Fast Forward buttons on the remote
simultaneously to do the same thing. This will cycle the unit through available output modes
until you fi nd one that is supported by your display.
Page 20

21
Media Playback
When rst started, your media drive will display its contents in a list view called the browser interface. This
base level of the drive will be labeled ROOT. You may return to this point at any time by pressing the
Title button on the remote.
20
Page 21

The basic controls for the browser interface are:
• Select an item from the list by pressing the up or down arrows.
• Pressing the next or previous buttons will scroll the list one page at a time.
• Pressing the right arrow will open a folder and display its contents.
• Pressing the left arrow will return to the previous (higher level) folder.
• Pressing play on a le will display a picture, or play a music or video le.
• Pressing stop will return you to the browser interface.
• Pressing play on a folder of pictures will begin a slideshow.
• Pressing play on a folder of music or video les will play all les consecutively.
• Pressing menu will switch to thumbnail view, where all pictures show up as small icons.
• Pressing menu again will switch back to list view showing le names.
21
Page 22

23
Setup Menu
Operation of SETUP MENU
Press t o select the sub- menu.
Press
PLAY/
to enter the sub-menu.
Select EXIT SETUP and press
PLAY/
to
exit.
You can also press
SETUP
to exit directly.
Functions
Options
Operation of the Sub-menu
Press t o select the funct ion.
Press
/
to move to “Options”.
Press to select the setting.
Press
PLAY /
to confirm.
Press
/
to move to “Functions”.
Select MAIN PAGE and press
PLAY
to exit .
Press SETUP to display the Setup Menu. See the following to set up the functions:
22
Page 23

General Setup
OSD LANGUAGE
Select the language to display the SETUP
MENU, information and DivX subtitle.
AUDIO
Select the language for the default audio
when playing a DVD movie.
SUBTITLE
Select the language for the default subtitle when
playing a DVD movie. If “OFF” is selected, the
subtitle will not be displayed when play back.
DVD MENU
Select the language for the default menu when
playing a DVD movie.
ANGLE MARK
When playing a multi angle DVD movie, a mark
will be displayed on screen.
ON The angle mark will be displayed on
the screen for 3 seconds.
OFF The angle mark will not be displayed
on the screen.
CLOSED CAPTIONS
If a movie contains “Closed Captions”, it will
have “Closed Captions” or CC mark printed on
its retail box. Set this function “ON” to display
the Closed Captions contained.
23
Page 24

25
Audio Setup
This sub-menu can only be set when the
unit stops playback.
DOWNMIX
Set this function when output audio signal
via the Composite connectors:
LT/RT
Stereo Outputs stereo audio.
Outputs the left or right channel to
both channels.
24
Page 25

Video Setup
This sub-menu can only be set when the
unit stops playback.
TV STANDARD
NTSC: Outputs NTSC signal to TV.
PAL: Outputs PAL signal to TV.
TV STANDARD
4:3 PS
4:3 LB Displays the 16:9 images in
16:9 Connects to a 16:9 wide screen
Displays the 16:9 images in “Pan
and Scan” with a 4:3 ratio TV
connected.
“Letter Box” with a 4:3 ratio TV
connected.
TV.
25
Page 26

27
PICTURE MODE
AUTO
Follows the contents to output the
picture mode.
FILM Always output progressive scan.
VIDEO Always output interlaced scan.
SMART Enhanced picture quality of the
AUTO mode.
FOR UPSCALING IN HIGH DEFINITION
(720p) Play Back Only
In order to get an Up-Scaled HD 720p
resolution on your HDTV when watching videos
or Photos, please Press SETUP to display the
Setup Menu. Go under the Video Setup,
select Component Out – Select 720p – Exit
Setup and press PLAY to watch your content.
Under the Component Setup you will also see
the other two formats below. Select your
choice of format to t your TV Display.
26
Page 27

COMPONENT OUTPUT
SD INTERLACE
SD
PROGRESSIVE
When connecting to a TV equipped with Y/Cb/Cr video input.
When connecting to a TV equipped with Y/Pb/Pr video input. Enabling this option will
make VIDEO OUTPUT options disabled.
720P When connecting to a TV supports high denition video input, enabling this option will
output a 16:9 up-scaling component video format for High Denition displays.
Enabling this option will make TV STANDARD / TV DISPLAY / VIDEO OUTPUT
options disabled, and the DVD/JPEG ZOOM function will also be disabled at this mode.
Note You’ll have to exit the • SETUP MENU for these settings to take place.
By holding and then pressing • MENU button on the remote control, or pressing
the button on the keypad, the video output format can be switched in the following
sequence: 720p SD PROGRESSIVE SD INTERLACE NTSC / PAL (toggle)
and so on. If you nd the display incorrect, try this method to get back to standard
NTSC or PAL video output, and then congure the video setup correct.
After Exiting the settings, choose the movie folder that you want by using the up and down
arrows on your remote. Press Play to View.
27
Page 28

28
29
Introduction and Playback of the Media Files
Folder Play DVD Folder
This device introduces a convenient feature
named “Folder Play”. You can play all media les
contained in one folder by simply pressing the
PLAY button on that folder icon. A maximum of
2048 les/folders can be categorized into one
single folder. By selecting the parental folder
icon ( ...) or pressing the button, you can
come up a level in its directory tree.
“DVD Folder” means a folder contains complete
DVD movie les. This device can directly play
back this folder just like playing back a DVD
disc. To establish a DVD folder on this device,
just insert the DVD disc into a computer’s optical
drive, and then go to “My Computer” to browse
the disc. Copy the entire “VIDEO_TS” folder on
the DVD to this device. Some DVD discs can’t
be copied because they have been protected
(with the CSS protection). The back-up operation of any DVD content must obey your local
law of copyright/ intellectual property rights.
Please respect copyright, do not copy DVDs
with copyright and do not distribute them to
other people.
Folder1
A folder
.. The parental folder
Movie1
A IFO le
Movie1 A VOB le
Page 29

29
To play the “DVD Folder” movie, simply select
the folder and then press the PLAY button. Or
you can play it by selecting the VIDEO_TS
IFO le, and then press the PLAY button.
DivX Files
This kind of media les includes DivX and Xvid les.
Most of them are available as separate video les
(the lename extensions include avi, divx, and xvid)
and subtitle les.
To play these media les, select the video le or the
folder that contains these les, and then press the
PLAY button. The subtitle has to be named exactly
the same lename as the movie le in order to
display automatically.
For text type subtitle les encoded in ANSI code,
the OSD Language must be set to match the
language of the subtitle; while the ones encoded in
Unicode (UCS2) fashion can be displayed properly
regardless of the OSD Language setting.
Movie2
A DivX video le
Movie2 A DivX subtitle le (its
lename must be the
same as the movie le)
If the DVD Folder is incomplete,
you can still play back the VOB
les directly, while some functions
will be lost, such as the selection
of subtitles, chapters, and angles.
UTF-8 subtitles are not supported.
Page 30

30
31
VCD and MPEG1 Files
MPEG2 Files
Music Files
This kind of media les includes les that meet the
MPEG1 format (the lename extensions include
dat, mpg, mpe, and mpeg). To play these media
les, select the media le or the folder that contains
these les, and then press the PLAY button.
This kind of media les includes les that meet
the MPEG2 format (the lename extensions
included mpg, mpe, mpeg, vob, m2p). To play
these media les, select the movie le or the
folder that contains these les, and then press
the PLAY button.
If the VOB le is in a “DVD Folder”, please follow
the instructions of “DVD Folder” section to play
back the entire movie. Playing back a single
VOB le directly will cause some DVD functions
to be lost, such as the selection of subtitles,
chapter and angle.
This device can play both MP3 and WAV music
les. To play these music les, select a le or a
folder that contains these les, and then press
the PLAY button. While the music is playing,
the playback seek slider will be displayed on
the screen. The title, performer, and the album
information from the ID3 tag of an MP3 le will
be displayed on the screen also.
Movie3
A MPEG1 media le
Movie3
A MPEG1 media le
Music1
A MP3 music le
Music2 A WAV music le
Page 31

31
Photo and Graphic Files Other Files
This device can also be used for Power Point
Presentations when connected to your Projector.
Make sure to save all the slides as JPEG before
transferring it in to the media player.
You can perform the same function referenced
above for the Photos and Graphic Files.
FOR MORE IN DEPTH INFORMATION ON THE
AV PLAYBACK FUNCTIONS PLEASE VISIT
www.IOGEAR.com
This kind of media les includes les that meet
the JPEG format (the lename extensions include
jpg, jpe, jpeg). Most digital cameras store photo
images in this format.
To play back these graphic les, select a le or
a folder that contains these les, and then press
the PLAY button. This device will play all graphic
les in one folder sequentially with a xed interval
(slide-show mode). You can con gure this
functions in SETUP MENU > PREFERENCE
PAGE > S.S. INTERVAL.
Photo1
A JPEG graphic le
If you don’t want to display the photos in
the slide-show mode, you can press the
button and then press or button for
previous or next photo le.
Page 32

32
33
If your remote control stops working you may need to replace the included battery. Your remote uses
a standard button battery, model CR2025. To open the battery tray you will need to slide the locking
mechanism down and then pull out on the tray simultaneously. The replacement battery should be placed
into the tray with the positive side facing up. Then slide the tray back into the remote until you hear the
locking mechanism click.
Replacing the remote battery
+
CR2025
3V
+
CR2025
3V
+
CR2025
3V
Page 33

File types
Unsupported Files
There may be some media les that your drive cannot display yet. File types like MPEG4 (mp4), Windows
Media Video (wmv), and QuickTime (mov) are not supported at this time. Files that are supported are
listed below.
DVD Folder
“DVD Folder” means a folder containing complete DVD movie les. These les can be found in the
VIDEO_TS folder on the DVD. Some DVD discs may not be copied this way because of CSS copy
protection. To play a “DVD Folder” movie, simply select the
then press the Play button.
DivX Files
Most DivX movies are self-contained video and audio in a single le. A le with subtitles can be provided
as well, and must have the same le name as the movie. File extensions for DivX movies include avi, divx,
and xvid. To play these movies, simply select the video le or a folder that contains these les, and then
press the Play button.
33
IFO le or the folder containing it, and
Page 34

35
VCD and MPEG1 Files
MPEG 1 les (found on VCDs) are self-contained video and audio. File extensions can include dat, mpg,
mpe, and mpeg. To play an MPEG 1 movie, simply select the le or a folder that contains these les, and
then press the Play button.
MPEG2 Files
MPEG 2 les (often found on DVDs) can have le extensions of mpg, mpe, mpeg, vob, or m2p. To play
these media les, select the movie le or the folder that contains these les, and then press the Play
button. If a VOB le is from a DVD, please follow the instructions in the “DVD Folder” section to play back
the entire movie. Playing back a single VOB le directly will disable some DVD functions, such as the
selection of subtitles, chapter and angle.
Music Files
This device can play both MP3 and WAV music les. To play these music les, select one or a folder
that contains these les, and then press the Play button. While music is playing, a progress bar will be
displayed on the screen. If an MP3 le has embedded ID3 information the title, performer, and the album
information will also be displayed on the screen.
34
Page 35

Picture Files
In order to be displayed by your media drive, pictures must be in the JPEG format. File extensions can
include jpg, jpe, or jpeg. To view a single picture, select it from the list view or thumbnail view and press
Play. To begin a slideshow of all pictures in a folder, press Play while selecting the folder.
35
Page 36

37
Federal Communications Commission (FCC) Statement
15.21
You are cautioned that changes or modications not expressly approved by the part responsible for compliance could void the user’s authority to operate the equipment.
15.105(b)
This equipment has been tested and found to comply with the limits for a Class B digital device, pursuant
to part 15 of the FCC rules. These limits are designed to provide reasonable protection against harmful
interference in a residential installation. This equipment generates, uses and can radiate radio frequency
energy and, if not installed and used in accordance with the instructions, may cause harmful interference
to radio communications. However, there is no guarantee that interference will not occur in a particular installation. If this equipment does cause harmful interference to radio or television reception, which can be
determined by turning the equipment off and on, the user is encouraged to try to correct the interference
by one or more of the following measures:
-Reorient or relocate the receiving antenna.
-Increase the separation between the equipment and receiver.
-Connect the equipment into an outlet on a circuit different from that to which the receiver is connected.
-Consult the dealer or an experienced radio/TV technician for help.
36
Page 37

Operation is subject to the following two conditions:
1) this device may not cause interference and
2) this device must accept any interference, including interference that may cause undesired operation of
the device.
FCC RF Radiation Exposure Statement:
This equipment complies with FCC radiation exposure limits set forth for an uncontrolled environment.
End users must follow the specic operating instructions for satisfying RF exposure compliance. This
transmitter must not be co-located or operating in conjunction with any other antenna or transmitter.
37
Page 38

39
CE Statement
This device has been tested and found to comply with the requirements set up in the council directive
on the approximation of the law of member states relating to EMC Directive 89/336/EEC, Low Voltage
Directive 73/23/EEC and R&TTE Directive 99/5/EC.
38
Page 39

MPEG Disclaimer
THIS PRODUCT IS LICENSED UNDER THE MPEG-4 VISUAL PATENT PORTFOLIO LICENSE FOR THE
PERSONAL AND NON-COMMERCIAL USE OF A CONSUMER FOR (i) ENCODING VIDEO IN COMPLIANCE
WITH THE MPEG-4 VISUAL STANDARD (“MPEG-4 VIDEO”) AND/OR (ii) DECODING MPEG-4 VIDEO THAT
WAS ENCODED BY A CONSUMER ENGAGED IN A PERSONAL AND NON-COMMERCIAL ACTIVITY AND/
OR WAS OBTAINED FROM A VIDEO PROVIDER LICENSED BY MPEG LA TO PROVIDE MPEG-4 VIDEO.
NO LICENSE IS GRANTED OR SHALL BE IMPLIED FOR ANY OTHER USE. ADDITIONAL INFORMATION
INCLUDING THAT RELATING TO PROMOTIONAL, INTERNAL AND COMMERCIAL USES AND LICENSING
MAY BE OBTAINED FROM MPEG LA, LLC. SEE HTTP://WWW.MPEGLA.COM.
39
Page 40

41
Contact
IOGEAR, INC.
23 Hubble
Irvine, CA 92618
P 949.453.8782
F 949.453.8785
Visit us at: www.iogear.com
© 2008 IOGEAR. All Rights reserved. Part No. M1032
IOGEAR, the IOGEAR logo, are trademarks or registered trademarks of IOGEAR, Inc. Microsoft and Windows are
registered trademarks of Microsoft Corporation. All other brand and product names are trademarks or registered
trademarks of their respective holders. IOGEAR makes no warranty of any kind with regards to the information presented
in this document. All information furnished here is for informational purposes only and is subject to change without
notice. IOGEAR, Inc. assumes no responsibility for any inaccuracies or errors that may appear in this document.
40
Page 41

Warranty
WE’RE HERE TO HELP YOU!
NEED ASSISTANCE SETTING UP THIS PRODUCT?
Make sure you:
1. Use the live chat at www.iogear.com to try and solve any issues you may be having with the product
2. Visit the Tech Info Library/FAQ on www.iogear.com (under the Support tab)
3. Call the 24/7 tech support line at 1(866) 946-4327 (U.S. only) or (949) 453-8782
Warranty Information
This product carries a 1 Year Limited Warranty. For the terms and conditions of this warranty, please go
to http://www.iogear.com/support/warranty or call 1-866-946-4327
Register online at http://www.iogear.com/register
Important Product Information
Product Model _________________
Serial # _______________________
41
Page 42

42
43
Page 43

43
Page 44

About Us
About Us
FUN
IOGEAR offers connectivity solutions that are innovative, fun, and stylish,
helping people enjoy daily life using our high technology products.
GREEN
IOGEAR is an environmentally conscious company that emphasizes the
importance of conserving natural resources. The use of our technology
solutions helps reduce electronic waste.
HEALTH
IOGEAR supports healthy and t lifestyles. By integrating products with the
latest scientic developments, IOGEAR’s solutions enhance the life of end-
users.
© 2007 IOGEAR, INC.
 Loading...