

Page 1

GKMB02
PART NO. M1256
KeyShair
Page 2

Table of Contents
Package Contents ............................................................................................................................. 3
System Requirements ....................................................................................................................... 3
Product Overview ............................................................................................................................. 3
Getting Started ................................................................................................................................. 4
KeyShair Installation ......................................................................................................................... 4
Windows ................................................................................................................................................................... 4
Mac OS X ................................................................................................................................................................... 5
Additional Steps for users with OS X 10.9 ................................................................................................................. 5
KeyShair Operation ........................................................................................................................... 7
Pairing Setup ............................................................................................................................................................. 7
Multi Pairing ........................................................................................................................................................... 10
Remove Pairing ....................................................................................................................................................... 10
Basic Controls ................................................................................................................................. 11
Switch keyboard/mouse focus from computer to a connected device ................................................................... 11
Copy & Paste text from your computer to the connected Bluetooth device ........................................................... 12
Change Hotkey Shortcuts for switching keyboard/mouse focus ............................................................................. 13
ShortKeys Functionality – assigning shortkeys to devices ....................................................................................... 15
Disconnecting KeyShair .................................................................................................................. 17
Federal Communications Commission (FCC) Statement ................................................................ 18
CE Compliance ................................................................................................................................ 18
Need assistance setting up this product?....................................................................................... 18
Limited Warranty ............................................................................................................................ 18
Important Product Information ...................................................................................................... 18
Contact ............................................................................................................................................ 19
2
Page 3
Package Contents
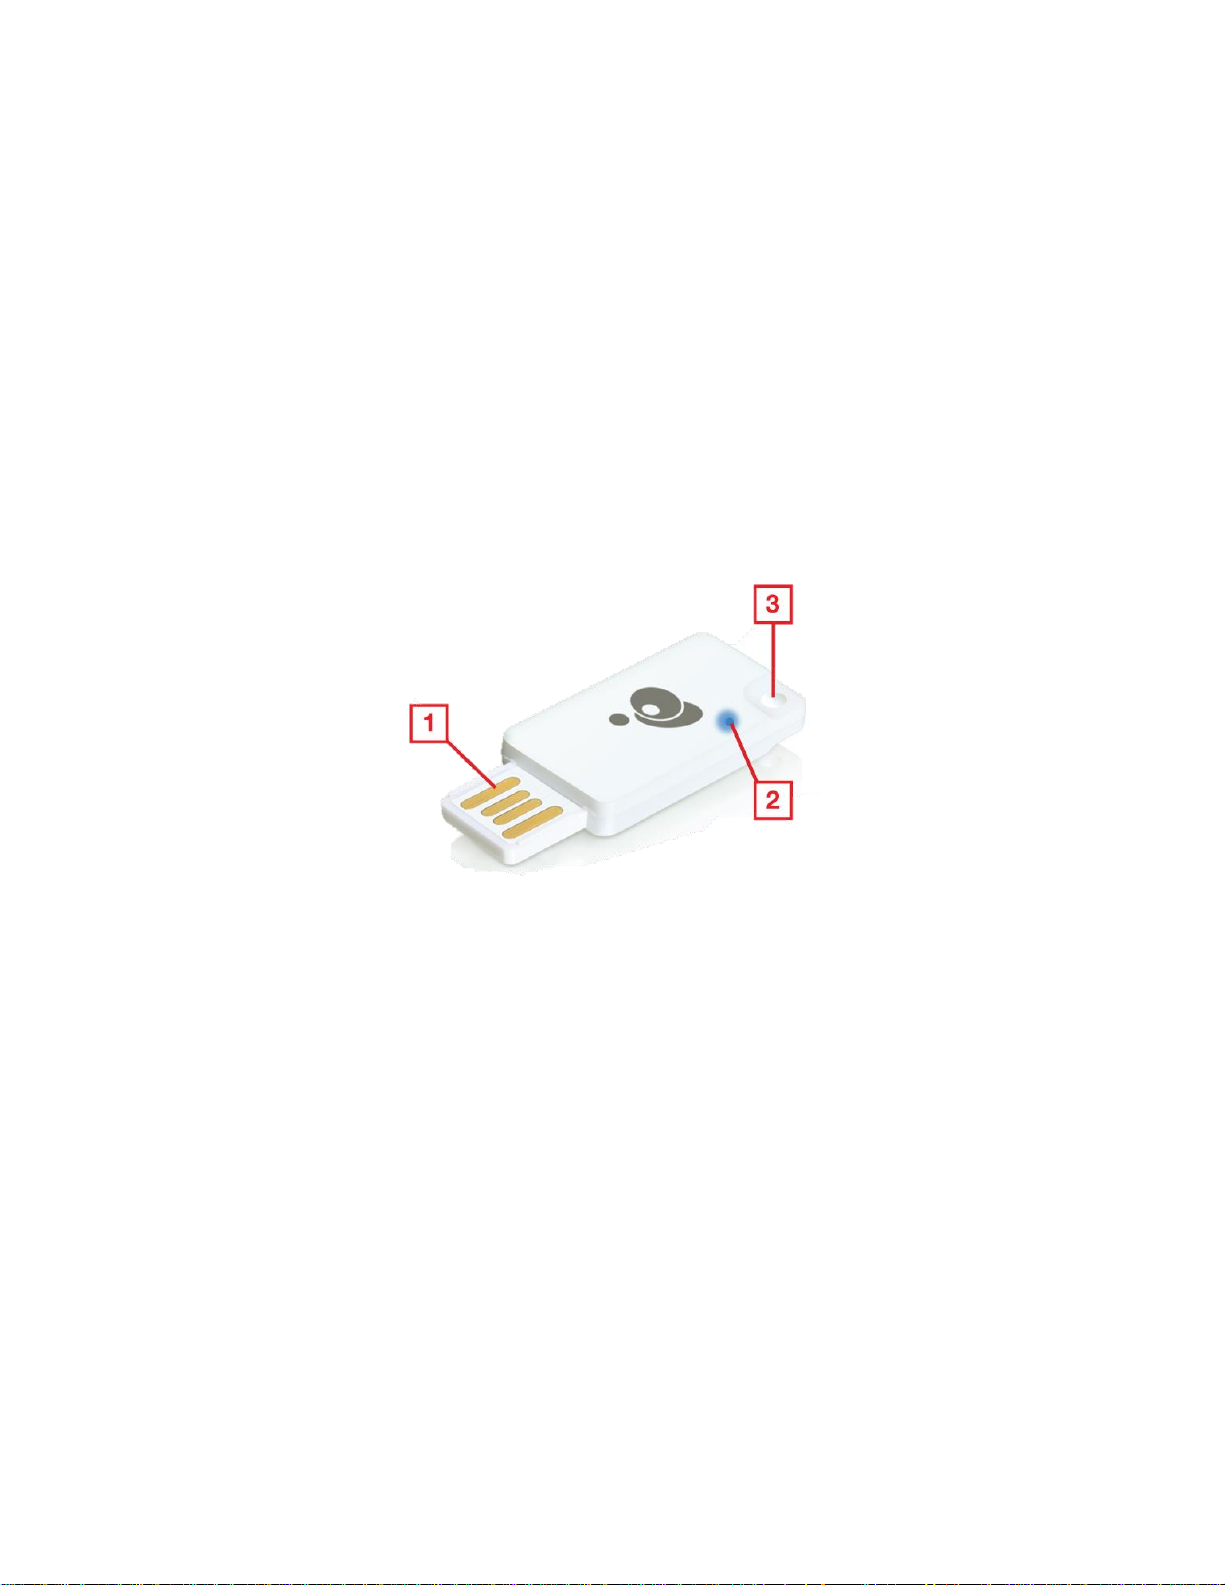
1. USB Connector
1 x KeyShair Module
1 x Quick Start Guide
1 x Warranty Card
System Requirements
Bluetooth device with HID keyboard compatibility
Windows Vista®, Windows® 7, Windows® 8, Windows® 8.1
Mac OS® X 10.6+
Mobile devices with Android 2.3+ or iOS 4.0+
USB 2.0 port
Product Overview
2. LED Indicator
3. 3.5mm Headphone plug
loop
3
Page 4
Getting Started
Bluetooth: Version 3.0 BDR
Supports: HID Profile Keyboard / Mouse
Operating Range: 10M (Class 2)
Operating Voltage: 5VDC
Windows OS: Windows Vista®, Windows® 7, Windows® 8, Windows® 8.1
Mac OS: Mac 10.6 Snow Leopard+
Power: USB powered
Some mobile devices do not support mouse function; please consult your mobile device
manufacturers for details.
KeyShair Installation
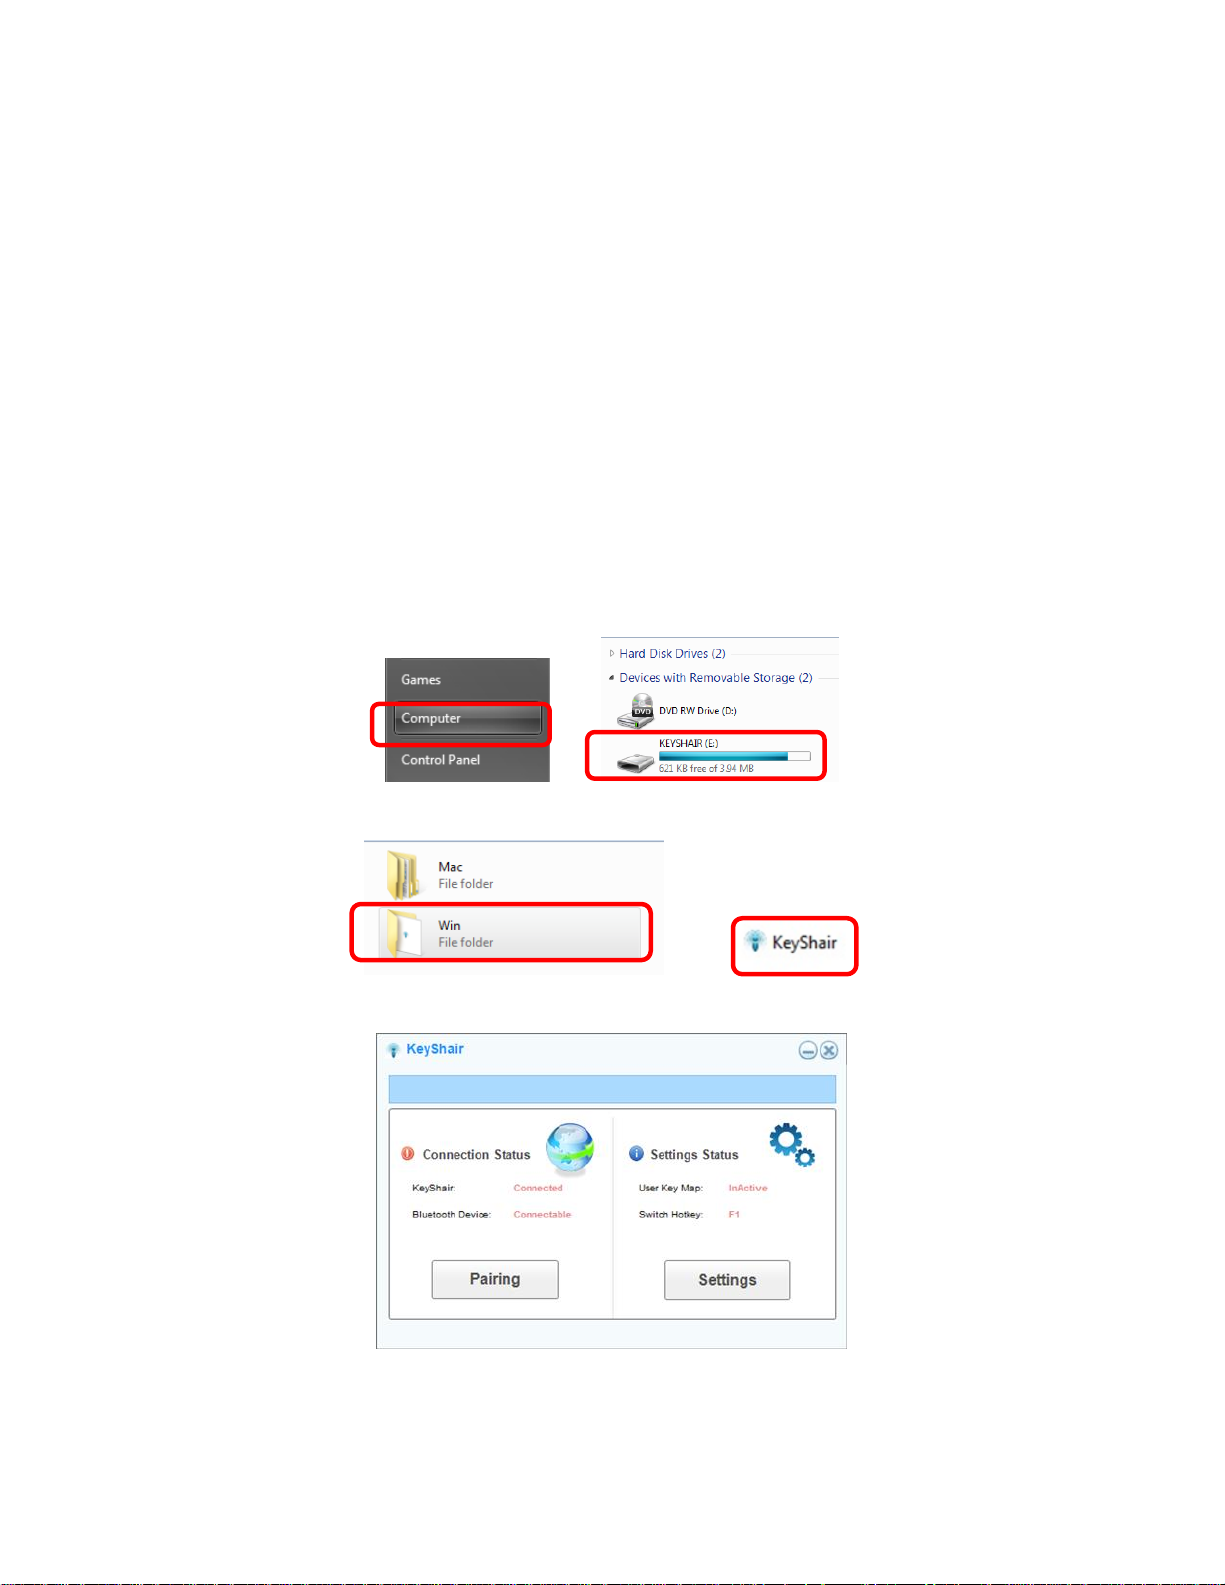
Windows
1. Connect the IOGEAR KeyShair to any available USB port on your PC, laptop or Ultrabook®.
2. Open Computer from the Start Menu and double click on KeyShair.
3. Open the Win folder and double click the KeyShair.exe file.
4. The pairing window will appear and is ready to pair with your Bluetooth enabled devices.
4
Page 5
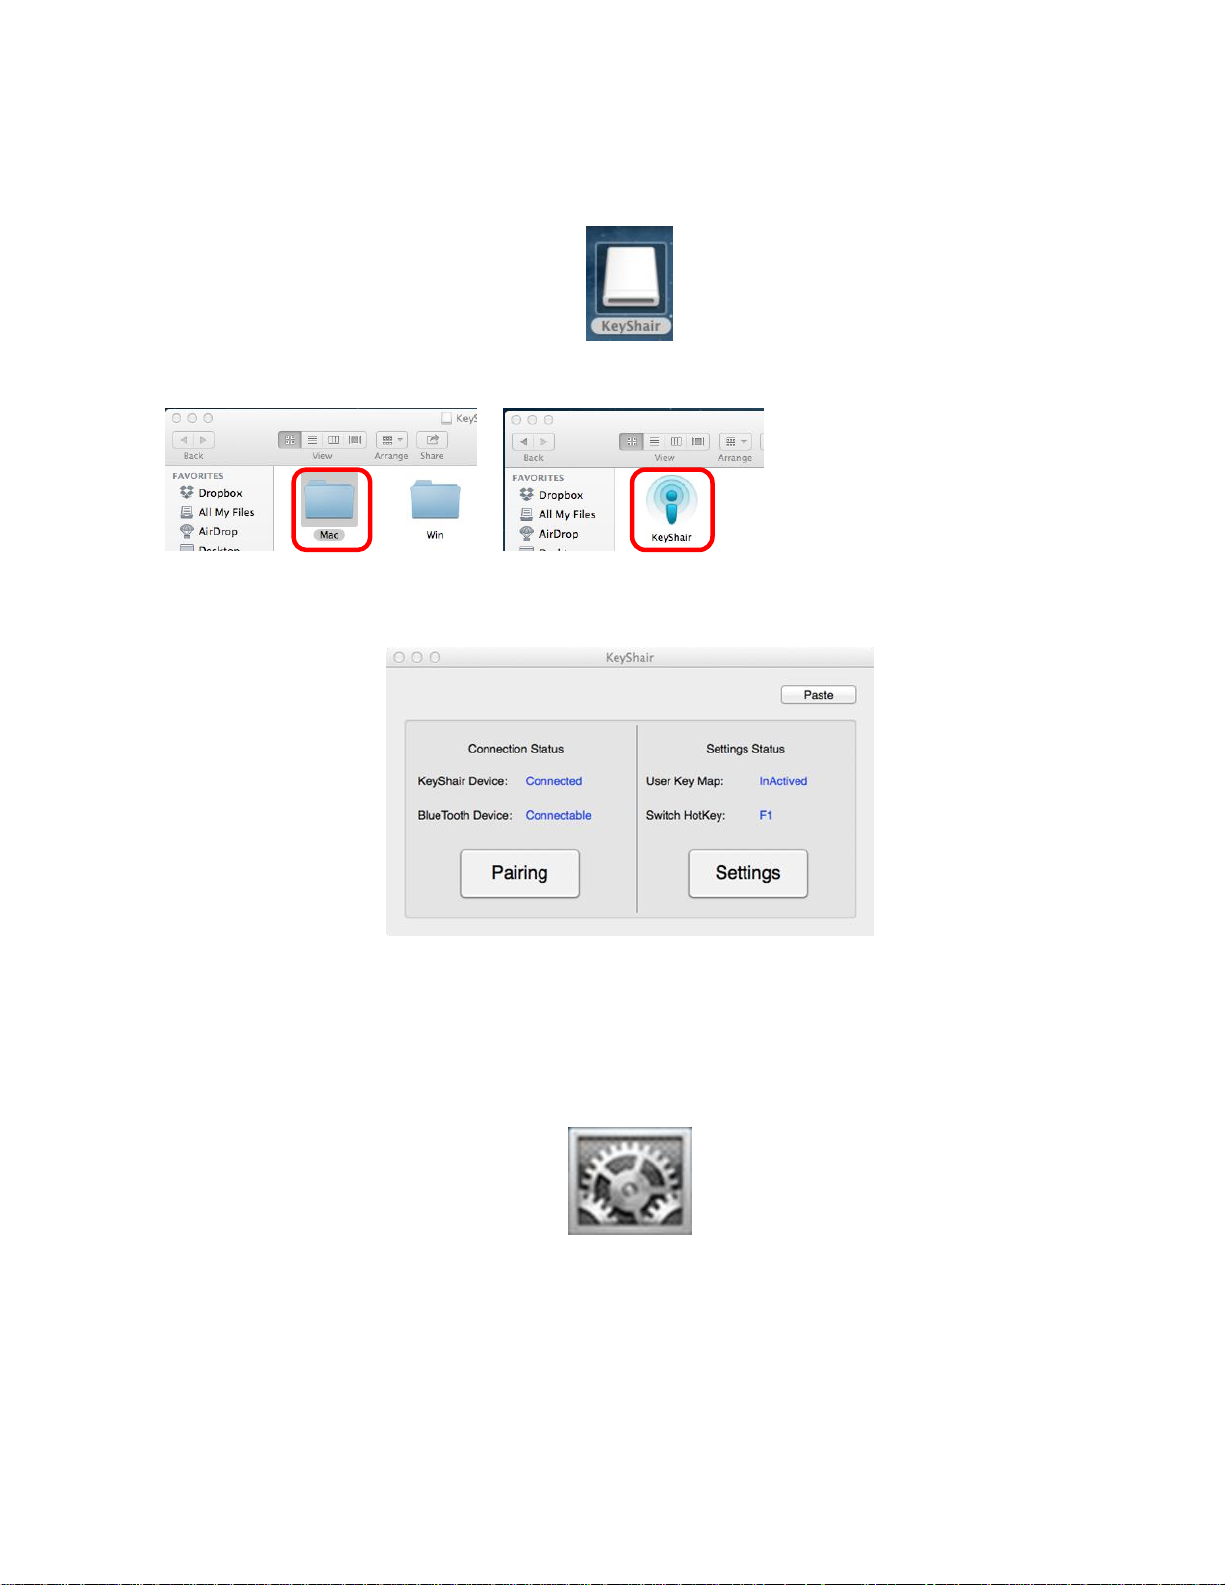
Mac OS X
1. Connect the IOGEAR KeyShair to any available USB port on your Mac.
2. Double click KeyShair icon on the desktop.
3. Open the Mac folder and double click the KeyShair app.
4. The pairing window will appear and is ready to pair to your Bluetooth enabled device.
Additional Steps for users with OS X 10.9
When connecting KeyShair to a Mac with OS X 10.9 installed, follow these steps:
1. Open System Preferences
5
Page 6
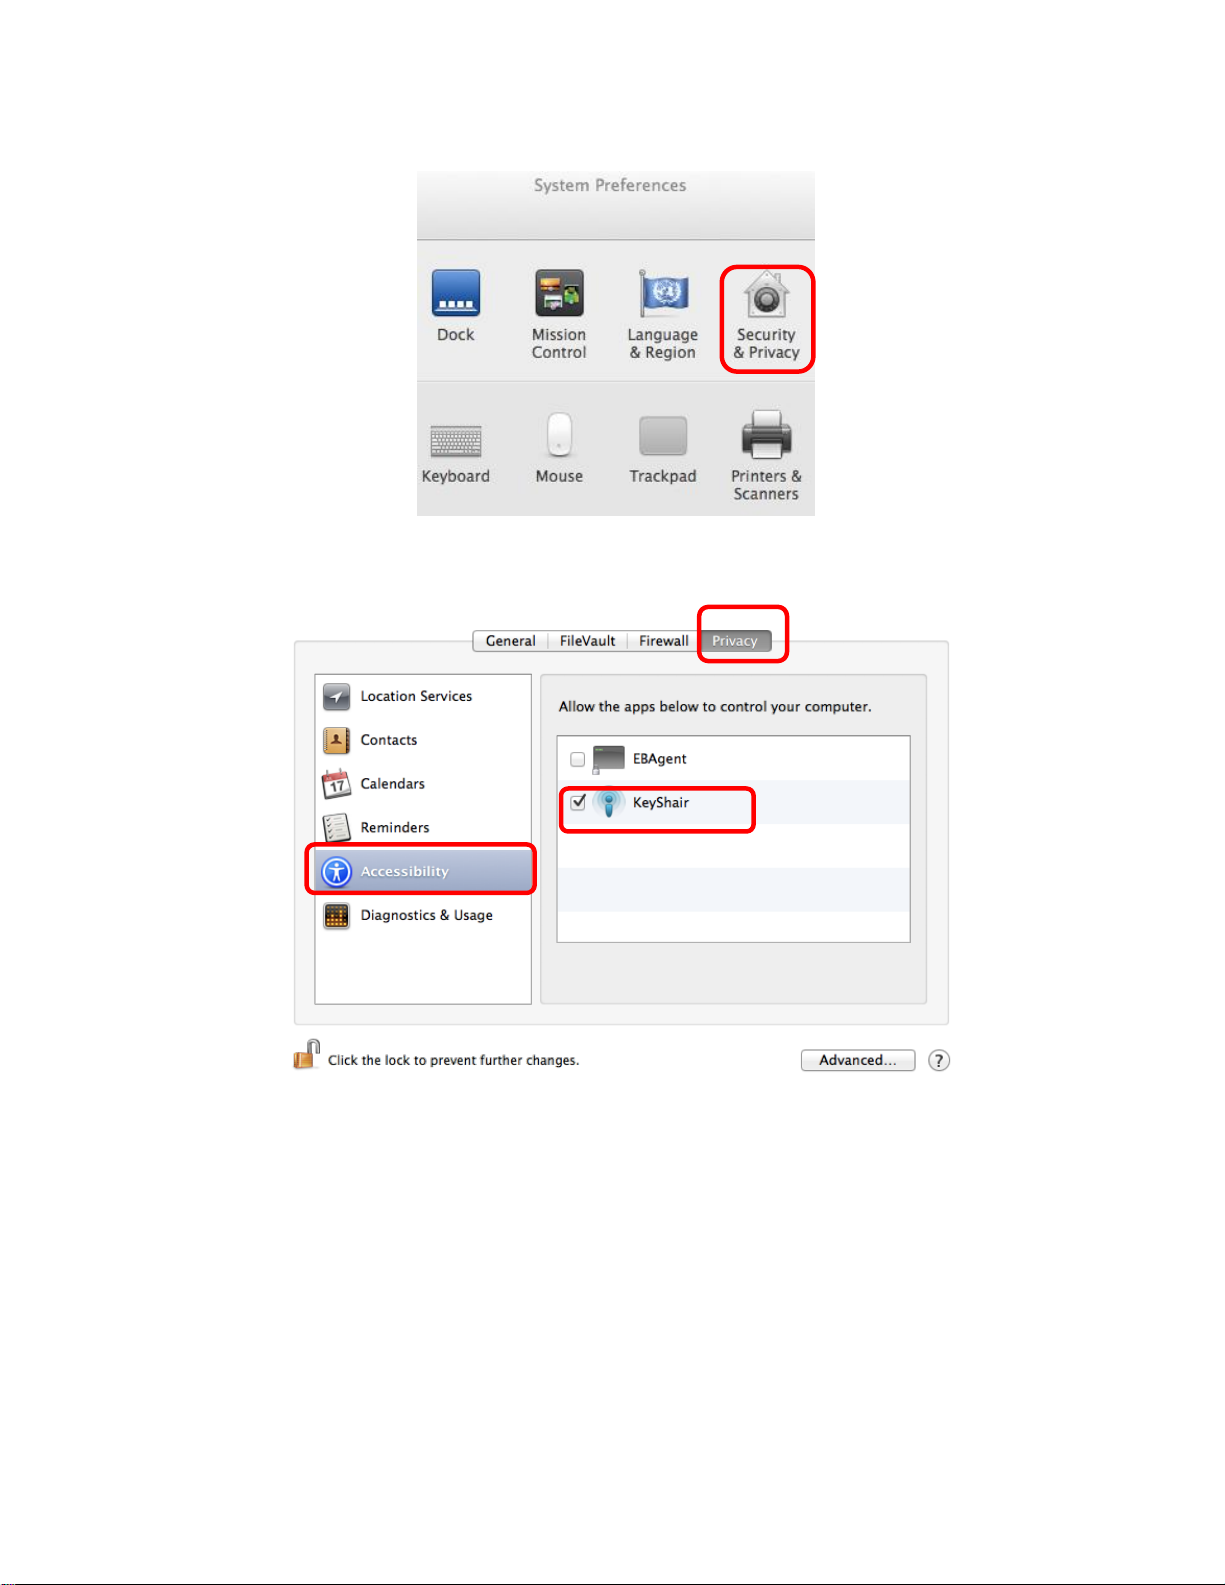
2. Select Security & Privacy
3. Click the Privacy tab on top and select Accessibility. If a password is used to unlock
your Mac, click the lock icon and type in your password to change your settings.
6
Page 7

4. Check the box next to KeyShair to enable the app to control keyboard and mouse
functionality and click the lock to prevent further changes.
KeyShair Operation
Pairing Setup
Note: Please initiate pairing of device again when firmware is upgraded
1. Click on Pairing in the KeyShair pairing window.
7
Page 8

2. A pairing authorization window will appear asking for an input pin from the device
attempting to connect.
3. To cancel Pairing, click on Cancel
4. Open the settings menu on your mobile device and set Bluetooth to ON.
On iPod®/iPhone®/iPad
®
On Android™
8
Page 9

5. Select KeyShair from your Devices list
On iPod/iPhone/iPad
On Android
6. Type in the PIN from your device into the pairing authorization window on your computer,
and then click OK.
On iPod®/iPhone®/iPad
®
On Android
7. Once paired, your device will read CONNECTED in the Bluetooth settings menu
On iPod/iPhone/iPad
On Android
8. Once the connection has been made, KeyShair will store the pairing information for future
use.
Note: KeyShair can be paired with up to 4 different devices
9
Page 10

Multi Pairing
To pair another Bluetooth device to your KeyShair, follow the steps under KeyShair Pairing
Setup for your specific device type.
To switch between each of the devices connected to your KeyShair, press Ctrl+1 for the first
device, Ctrl +2 for the second device, Ctrl + 3 for the third device and Ctrl + 4 for the fourth
device.
Note: Firmware 2.4
On Windows, press Ctrl+F1 for the first device, Ctrl+F2 for the second device, Ctrl+F3 for the
third device and Ctrl+F4 for the fourth device.
On Mac, press Ctrl+Fn+F1 for the first device, Ctrl+Fn+F2 for the second device, Ctrl+Fn+F3 for
the third device and Ctrl+Fn+F4 for the fourth device.
Remove Pairing
1. Open the KeyShair app and click the Settings button.
2. Select the Expert tab and click the Set Button.
On Windows
10
Page 11

On Mac
3. Click the trash icon next to the device that you would like to remove from the KeyShair’s
memory and click Yes to confirm removal.
Basic Controls
Switch keyboard/mouse focus from computer to a connected device
11
Page 12

On Windows:
1. Press the F1 key to switch the keyboard/mouse focus from your computer to a connected
Bluetooth device.
2. To return the keyboard and mouse focus from a connected Bluetooth device to your
computer, press the F1 key.
On Mac:
1. Press Fn + F1 on your Mac keyboard to turn ON the KeyShair keyboard functionality
2. Press Fn + F1 again on your Mac keyboard to turn OFF the KeyShair keyboard functionality
Copy & Paste text from your computer to the connected Bluetooth device
1. Highlight desired text and Copy (using Ctrl + C for Windows or Cmd + C for Mac) or right
click and select Copy.
2. Switch keyboard/mouse functionality to the KeyShair by pressing F1 for Windows or Fn +
F1 for Mac.
3. Paste the copied text onto the connected Bluetooth device by pressing Ctrl + V for
Windows or Cmd + V for Mac.
Note: Copy and paste from mobile device to computer is not supported
Click Paste tab and make sure that the Enable Ctrl + V function is on and click OK
On Windows
12
Page 13

On Mac
Change Hotkey Shortcuts for switching keyboard/mouse focus
1. Click Settings in the KeyShair app window
2. Under Basic, click Change under the Hotkey Settings, type in the new Hotkey, and press OK
13
Page 14

On Windows
On Mac
14
Page 15

ShortKeys Functionality – assigning shortkeys to devices
ShortKeys allow users to control functionality of paired devices via keyboard. They are
customizable depending on the type of devices being used.
1. Assign devices under Special Key based on your preferred groups. For example, iPhone and
iPad can be categorized under Group1, whereas Samsung Tab and Samsung Galaxy can be
categorized under Group2, and so on. Click OK when you are done.
2. Click Special Key Settings to open up a list of different special keys
15
Page 16

3. You may use the Preset Special Keys
Or set new Special Keys by entering the shortcuts for each Group (not device) under F1, F2, …
and F12.
16
Page 17

4. Click Apply to save the Special Keys configuration
5. On this example, Bluetooth 1 device would be under Special Key Group1, Bluetooth 2
device would be under Special Key Group2, and Bluetooth 3 and 4 devices would be under
Special Key Group 3.
On Bluetooth 1 device, clicking F2 on keyboard will show Menu on Bluetooth 1 device. On
Bluetooth 2 device, clicking F1 on keyboard will show Home on Bluetooth 2 device. On
Bluetooth 3 and Bluetooth 4 devices, clicking F10 on keyboard will Mute volume on
Bluetooth 3 and 4 devices.
6. Special keys can be used for each group when functionality is switched from keyboard to
the device of that specific group. Special Keys that work for one device may not work for
another.
Disconnecting KeyShair
Disconnecting KeyShair from your computer
17
Page 18

1. Right click on KeyShair icon and click on quit.
2. Click on Yes(Y) to quit the program and remove KeyShair from your computer
Federal Communications Commission (FCC) Statement
This equipment has been tested and found to comply with the limits for a Class B digital device,
pursuant to Part 15 of the FCC Rules. These limits are designed to provide reasonable
protection against harmful interference in a residential setting. This product generates, uses,
and can radiate radio frequency energy and, if not installed and used as directed, it may cause
harmful interference to radio communications. Although this product complies with the limits
for a Class B digital device, there is no guarantee that interference will not occur in a particular
installation.
CE Compliance
This device has been tested and found to comply with the following European Union directives:
Electromagnetic Capability (2004/108/EC), Low Voltage (2006/95/EC) and R&TTED
(1999/5/EC).
Need assistance setting up this product?
We’re here to help you!
Make sure you:
1. Visit www.iogear.com for more product information
2. Visit www.iogear.com/support for live help and product support
Limited Warranty
This product carries a 1 Year Limited Warranty. For the terms and conditions of this warranty,
please go to http://www.iogear.com/support/warranty
Register online at http://www.iogear.com/register
Important Product Information
Product Model __________________________
Serial Number __________________________
18
Page 19

Contact
IOGEAR
19641 Da Vinci, Foothill Ranch, CA92610
www.iogear.com
support@iogear.com
19
 Loading...