

Page 1

2.4G Wireless RF Keyboard/2.4G Wireless RF Keyboard/
2.4G Wireless RF Keyboard/
2.4G Wireless RF Keyboard/2.4G Wireless RF Keyboard/
Optical Mouse ComboOptical Mouse Combo
Optical Mouse Combo
Optical Mouse ComboOptical Mouse Combo
User Manual (GKM541R)
®
®
Page 2

©2006 IOGEAR. All Rights Reserved. M0393
IOGEAR, the IOGEAR logo, are trademarks or registered trademarks of IOGEAR, Inc. Microsoft and Windows are registered
trademarks of Microsoft Corporation. IBM is a registered trademark of International Business Machines, Inc. Macintosh, G3/G4 and
iMac are registered trademarks of Apple Computer, Inc. All other brand and product names are trademarks or registered trademarks
of their respective holders. IOGEAR makes no warranty of any kind with regards to the information presented in this document. All
information furnished here is for informational purposes only and is subject to change without notice. IOGEAR, Inc. assumes no
responsibility for any inaccuracies or errors that may appear in this document.
Page 3

Table of Contents
Welcome
Package Contents
Features
Requirements
Introduction
Hardware Installation
○○○○○○○○○○○○○○○○○○○○○○○○○○○○○○○○○
○○○○○○○○○○○○○○○○○○○○○○○○○○○○○
○○○○○○○○○○○○○○○○○○○○○○○○○○○○○○○○○
○○○○○○○○○○○○○○○○○○○○○○○○○○○○○○
○○○○○○○○○○○○○○○○○○○○○○○○○○○○○○○○
○○○○○○○○○○○○○○○○○○○○○○○○○○○○
Software Installation (Windows 98/ME/2000/XP)
Mouse Configuration
Function Keys
FAQs/Troubleshooting
Specification
Technical Support
Radio & TV Interference Statement
Limited Warranty
○○○○○○○○○○○○○○○○○○○○○○○○○○○○○
○○○○○○○○○○○○○○○○○○○○○○○○○○○○○○○
○○○○○○○○○○○○○○○○○○○○○○○○○○○○
○○○○○○○○○○○○○○○○○○○○○○○○○○○○○○○○
○○○○○○○○○○○○○○○○○○○○○○○○○○○○○○
○○○○○○○○○○○○○○○○○○○○○○○
○○○○○○○○○○○○○○○○○○○○○○○○○○○○○○
○○○○○○○○○○○○○○○○○○
02
03
04
05
06
14
17
23
29
34
35
37
38
39
Page 4

Welcome
Thank you for purchasing the 2.4G Wireless RF Keyboard/Optical Mouse Combo. Enjoy the freedom of
wireless connectivity with IOGEAR’s wireless keyboard/mouse combo. The keyboard and mouse allow
you to work up to 6 feet away from the USB receiver connected to your computer. In addition, the
optical mouse provides great accuracy over most surfaces and minimal hand movement due to its 800
dpi resolution.
Easily interact and take complete control of your entertainment center with multimedia features of this
combo. The different hotkeys give you quick access to some of your most common tasks such as email access, volume control, My Computer, Calculator, Media Player, and launching your web browser at the push of a button. In addition, the included software makes your web surfing experience much
more efficient with the use of Enhanced function keys. The customizable function keys, allow you to
launch your favorite websites to make your web experience easy and convenient.
2
Page 5

This package contains:
1 Wireless keyboard
1 Wireless mouse
1 Charging station/receiver
1 Power adapter
1 Utility software CD
1 User manual
1 Warranty/registration Card
2 AA Ni-MH Rechargeable Batteries for the mouse
2 AAA batteries for the keyboard
Package Contents
3
Page 6

Features
· 2.4G RF technology offers greater range up to 33 feet away from the USB receiver, and enable less
interferences in your WiFi environment
· 800 dpi high resolution optical mouse delivers precise cursor movement and can be used on most surfaces
· Ultra thin, portable and long range keyboard make ideal presentation tool
· Control our home entertainment functions with multimedia features on the keyboard.
· Control keyboard and mouse with one USB receiver
· Newly designed slim and stylish keyboard provides better tactile feel and accurate key response
· Hotkeys give you quick access to some of your most common tasks such as e-mail access, volume
control, play/pause, My Computer, Calculator, Media Player, and launching your web browser - at the push of
a button
· Rechargeable mouse batteries save you time and money; simply place the mouse in the charging
station to charge the batteries
· Programmable function keys let you fully customize the keyboard to fit your web surfing needs
· Easy Installation has you running in minutes
· Solid 3-year limited warranty
4
Page 7

• Available USB port
• CD-ROM or DVD-ROM drive
• IBM-compatible PC or Mac*
• PC System requires Windows 98/SE/ME/2000/XP
• Mac System requires MAC OS X (10.2.x or later)*
*Multimedia/Function keys not supported with Mac
Requirements
5
Page 8

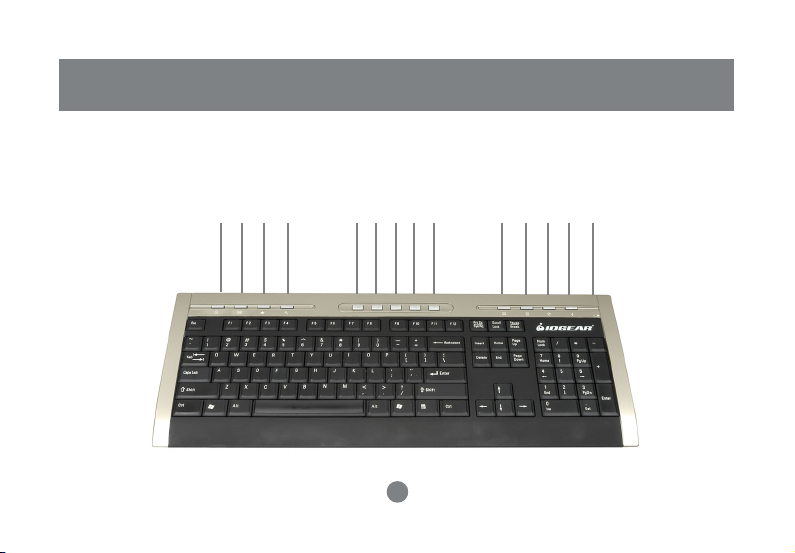
Introduction
Keyboard-Front View
01. Battery LED – turn red when batteries are getting weak
02. House button – launches your default web browser
03. Envelop button – launches your email program such as Outlook Express or Outlook
04. Star button – gives you quick link to your favorite websites
05. Magnify glass button – launches search program
06. Play/Pause button – play or pause your music or video CD
07. Forward button – fast forward your music or video CD
08. Volume Down button – decrease the volume of your system
09. Mute button – mute button to turn volume off
10. Volume Up button –increase the volume of your system
11. Computer button – launches My Computer
12. Calculator button – launches Calculator program
13. CD button – launches your default media player program
14. Moon button – takes your computer into sleep mode
(Refer to the image on next page)
6
Page 9
Keyboard-Front View
Introduction
1108 09 10 12 13 14
7
01070605040302
Page 10

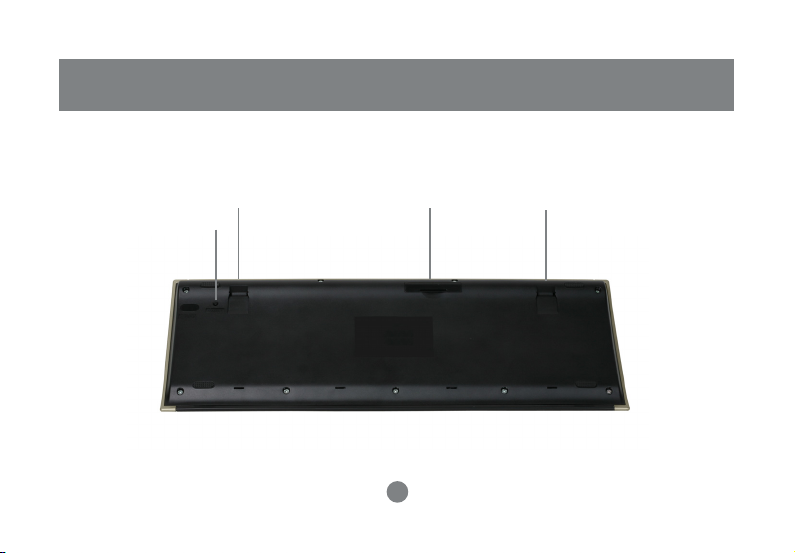
Keyboard-Back View
01.Foldable legs – allow you to adjust the angle of the keyboard
02.Connect button – press to connect to the receive
03.Battery compartment – store the two batteries
(Refer to the image on next page)
8
Page 11
Keyboard-Back View
0301
02
9
01
Page 12

Introduction
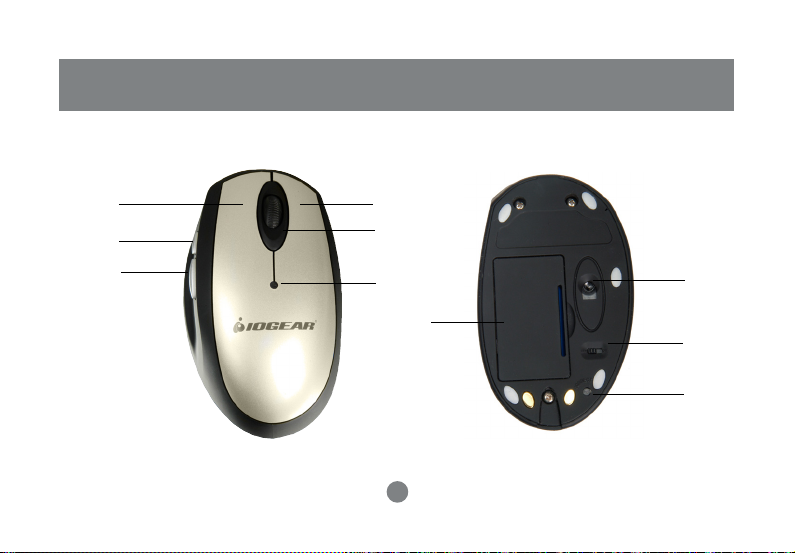
Mouse
1. Battery Compartment – place the included batteries here
2. Connect Button – press and hold button to establish connection to receiver
3. Optical Sensor – 800 dpi optical sensor
4. ON/OFF Switch – turn mouse ON/OFF for extended battery life
5. Power LED – turns on when the mouse is charging
6. Left-click button
7. Right-click button
8. Scroll Wheel (button #3)
9. Programmable button (button #4)
10. Programmable button (button #5)
(Refer to the image on next page)
10
Page 13
Introduction
6
9
10
7
8
5
1
11
3
4
2
Page 14

Introduction
USB Receiver/Charger
1. USB Type A cable – connect cable to USB port on your computer
2. Power Jack – plug the power to charge batteries
3. Connect Button – press this button to connect receiver to keyboard/mouse
4. Caps Lock LED – turns on when Caps Lock key is pressed
5. Num Lock LED - turns on when Num Lock key is pressed
(Refer to the image on next page)
12
Page 15

USB Receiver/Charger
Introduction
4
3
1
5
2
13
Page 16

Hardware Installation
Fig1. Finished Setup
1. Batteries installation
The first step is the installation of the batteries.
Open the battery compartment of the mouse and
put the two rechargeable batteries in the
compartment and then close it. Plug the AC/DC
adapter into the charging cradle and allow
batteries to charge for at least 2 hours.
Open up the battery compartment of the
keyboard and install the 2 batteries provided in
the package.
WARNING: Do not place regular AAA batteries into the mouse
battery compartment and try to charge via the USB Charging station
as this will possibly damage your equipment.
14
Page 17

Hardware Installation
2. Replace existing keyboard and
mouse with the new IOGEAR Wireless
Keyboard/Mouse combo
Checklist – please check the following before
proceeding:
• Make sure your system has an available USB
port and the OS supports USB Hot-plugging
• You have connected the USB receiver to your
computer (your computer should detect it and
install all necessary drivers automatically)
CONNECT THE MOUSE
1. Look for the ON/OFF switch on the bottom of
the mouse and make sure that it is set to the
ON position
2. Press the Connect button on the USB
receiver; the connect LED will light up green.
3. Press and hold the connect button, located
on the bottom of the mouse, for a few
seconds
4. Move the mouse around and make sure that
it is functioning properly. If the mouse does
not work, please repeat the procedure again.
CONNECT THE KEYBOARD
1. Press the Connect button on the USB
receiver; the connect LED will light up green
2. Press and hold the connect button, located
on the bottom of the keyboard, for a few
seconds
3. Tap the keys on the keyboard or type
something to verify that it is working properly.
If it doesn’t work, please repeat the
procedure again
Note: If your system has any problems detecting the wireless keyboard
and mouse, please turn off your computer before following the steps
above. With your computer turned off, connect the USB receiver to an
available USB port, and then power on your computer. Upon boot-up,
the system should detect the wireless keyboard/mouse combo, and
install all necessary drivers automatically.
15
Page 18

Hardware Installation
3. Install the wireless combo on a brand
new computer system
- Before you turn on the system, make sure the
batteries are installed for both keyboard and
mouse and mouse batteries have been charged
for at least two hours;
- Plug the USB charging station/receiver into an
available USB port on your computer
- Power ON your computer
- Upon boot-up, your Operating System should
detect the IOGEAR wireless keyboard/mouse
combo and install any drivers, if necessary.
- Press the connect button on the USB Receiver
- Press the connect button located on the bottom
of the mouse for a few seconds
- Move the mouse and make sure it is working
properly
- Press the connect button on the USB Receiver
- Press the connect button located on the bottom
of the keyboard for a few seconds
- Your IOGEAR Wireless Keyboard/Mouse Combo
should now work wirelessly. If not, repeat the
steps above again.
16
Page 19

Note: There is no software for MAC Operating System;
multimedia/functions keys are not supported on MAC platform.
Windows 98SE/ME/2000/XP
1.Insert the utility software CD into the computer
2.The installation will Auto-start and prompt you
to install the Keyboard and Mouse drivers.
Please make sure both boxes are checked
and click Install.
Software Installation
3. Select your desired language and click Next.
17
Page 20

Software Installation
On the Welcome screen, click Next to
4. 5.
proceed with the driver installation
18
For the mouse type, please select 5 Button
Mouse and then click Next.
Page 21

Software Installation
Select the destination directory for installation
6.
and then click Next.
7. Enter a program folder name and click Next.
19
Page 22

Software Installation
8. 9.
To start copying the installation files, please
press Next.
20
Once setup is completed, press Finish to end
the installation.
Page 23

10.
If you also selected the “Keyboard Driver” box
at the beginning of the installation, the
keyboard drivers will install next. Press Next
to continue.
Software Installation
Read the License Agreement and press Next.11.
21
Page 24

Software Installation
Upon completion of driver installation, you will
12.
have to restart your computer.
22
Page 25

Mouse Configureation
MOUSE CONFIGURATION
On this part of the configuration, we will show you
how to program the mouse programmable buttons
(buttons 3, 4, and 5).
Alter you have installed the keyboard and
1.
mouse software, and restarted your system,
you will see the following icons on your tray bar
Right-click on the mouse icon which will bring
2.
up the menu below. Click on Setting to access
the mouse settings panel
23
Page 26

Mouse Configureation
3. From the tabs on the top, click
on Button.
Note: Please ignore the mouse diagram shown on the
left-side of this window, as this is provided as an
example. To see a diagram of your specific mouse,
please refer to the image “Figure 1: Mouse Buttons”
where you can clearly identify buttons 3, 4, and 5.
24
Page 27

Figure 1: Mouse Buttons
3
4
5
Mouse Configureation
25
Page 28

Mouse Configureation
As you can see on the right-hand
4.
side panel, you can assign a
function to the mouse programmable buttons 3, 4, and 5 from this
window. To do this, click on
“System Default” to see a list of the
functions that can be assigned to
each of the mouse buttons.
Note: If you don’t see the options shown below
under the Button tab, it may be the case that you
selected a 3-button mouse during installation,
instead of a 5-button mouse. To correct this,
simply reinstall the mouse drivers from the
Installation CD and make sure to choose 5button mouse.
26
Page 29

As an example, we will assign the
5.
following functions to the mouse:
Button 3 (scroll wheel) – Enter [this
is the equivalent of a left-click on the
mouse]
Button 4 – Internet Explorer
Forward [this is the equivalent of
pressing the forward button on your
web browser]
Button 5 – Internet Explorer
Backward [this is the equivalent of
pressing the backward button on
your web browser]
Mouse Configureation
27
Page 30

Mouse Configureation
Once you have assigned a function to each
6.
mouse button, simply click OK to apply the
changes.
Tip: If you wish to assign a different function to
the mouse buttons in the future, simply follow the
same procedure and select a different function
for each button. If you wish to disable any of the
buttons (3, 4, 5), simply set that button to
“System Default.”
28
Page 31

Function Keys on the Keyboard
Once you have installed the Keyboard drivers
from the Installation CD, the functions keys (F2
through F12) on your IOGEAR Wireless keyboard
will have added functionality when using your
web browser. These functions are supported for
the following web browsers: Internet Explorer,
Netscape Navigator, AOL, or NeoPlanet.
Each function key (with the exception of F1 and
F5), is pre-programmed to launch a specific web
site, when pressed. Furthermore, the function
keys are organized into categories that include
web sites for Auctions, Entertainment, Shopping,
and so on.
Function Keys
Using the Function Keys
1.
Open your default web browser
Press any function key (other than F1 and F5)
2.
to launch one of the pre-programmed web
sites.
29
Page 32

Function Keys
Customizing the Function Keys
You may reprogram the function keys to launch
web sites from the pre-defined categories:
1.
Open your default web browser
2.
Press and hold down the Function key you
wish to reprogram. This will bring up a menu
like the one shown on the right:
3.
From the menu, select a web site that you
wish to assign to this function key.
The Function key has now been re-
4.
programmed.
30
Page 33

If you wish to reprogram the function keys to web
sites not listed in the category menu, please follow
the following procedure:
Open your default web browser
1.
Go to the website you wish to assign to
2.
one of the function keys
Press and hold down your desired function key
3.
to bring up the configuration menu.
4.
Go down the menu and click on Special à Save
The Function key has now been re-programmed
5.
with the currently active web site.
Function Keys
31
Page 34

Fucntion Keys
Disable Function Keys
1.
Open your default web browser
2.
Press and hold down the function key you
would like to disable
3.
Go down the menu and click on Special →
Disable
Disable All Function Keys
1.
Open your default web browser
Press and hold down any function key (except F1/
2.
F5) to bring up the configuration menu
3.
Go down the menu and click on Options → Exit
4.
This will completely disable the special Internet
features of the function keys.
32
Page 35

Fucntion Keys
Re-Enable Function Keys
If you followed the procedure above “Disable All
Function Keys” and would like to re-enable the
function keys, follow the steps below.
Go to the Installation directory of the
1.
Keyboard drivers and launch the executable
application located there
2.
Alternatively, you may just restart the
computer and the software will launch on
the background automatically upon boot-up.
Uninstall Software
Go to Control Panel
1.
2.
Select Add/Remove Programs
To remove mouse driver, highlight
3.
OmniMouse driver and select Remove/
Uninstall
To remove keyboard driver, highlight
4.
OmniKey driver and select Remove/Uninstall
5.
Close all your currently opened windows and
save your work
6.
Restart your computer
33
Page 36

FAQs and Troubleshooting
Q1. When I press the Multimedia keys Volume Up/Down/Mute, nothing happens. What is wrong?
Some of the multimedia keys will not work until you install the keyboard drivers included on the
installation CD. Please be sure to install the drivers.
Q2. Why are the function keys not working?
The Function keys (F2-F12) will act as “shortcut” Internet keys only after the Keyboard drivers from the
Installation CD have been installed. If you haven’t done so, please install the keyboard drivers.
In addition, the function keys will NOT launch the web browser. You must already have the web browser
opened and selected for this function keys to work.
Q3. How do I reconfigure the shortcut keys to go to different websites?
Please see the section in the manual called “Customizing the Function Keys.”
Q4. The two side-buttons and scroll wheel on the mouse do not work, what is wrong?
The side-buttons and scroll wheel need to be programmed before they can be used. Please consult the
section “Mouse Configuration” in the manual.
34
Page 37

Optical Mouse Technical Specifications
Specification
35
Page 38

Specification
Multimedia Keyboard Technical Specifications
* The utility software and function keys does not support Mac.
36
Page 39

Technical Support
If you need technical support, please check out our IOGEAR Tech Info Library (T.I.L.) at
www.iogear.com/support for the latest tips, tricks, and troubleshooting. The IOGEAR
T.I.L. was designed to provide you with the latest technical information about our
products. Most of the answers to your questions can be found here, so please try it out
before contacting technical support.
Technical support is available Monday through Friday from 8:00 am to 5:00 pm PST and
can be reached at (949) 453-8782 or by email support@iogear.com.
37
Page 40

Radio & TV Interference Statement
WARNING!!! This equipment generates, uses and can radiate radio frequency energy
and, if not installed and used in accordance with the instruction manual, may cause
interference to radio communications. This equipment has been tested and found to
comply with the limits for a Class B computing device pursuant to Subpart J of Part 15 of
FCC Rules, which are designed to provide reasonable protection against such interference
when operated in a commercial environment. Operation of this equipment in a residential
area is likely to cause interference, in which case the user at his own expense will be
required to take whatever measures may be required to correct the interference.
38
Page 41

Limited Warranty
IN NO EVENT SHALL THE DIRECT VENDOR’S LIABILITY FOR DIRECT, INDIRECT,
SPECIAL, INCIDENTAL OR CONSEQUENTIAL DAMAGES RESULTING FROM THE
USE OF THE PRODUCT, DISK OR ITS DOCUMENTATION EXCEED THE PRICE PAID
FOR THE PRODUCT.
The direct vendor makes no warranty or representation, expressed, implied, or statutory
with respect to the contents or use of this documentation, and especially disclaims its
quality, performance, merchantability, or fitness for any particular purpose.
The direct vendor also reserves the right to revise or update the device or documentation
without obligation to notify any individual or entity of such revisions, or updates. For
further inquires please contact your direct vendor.
39
Page 42

®
Contact info.
23 Hubble • Irvine, CA 92618 • (P) 949.453.8782 • (F) 949.453.8785 • www.iogear.com
 Loading...