

Page 1

ION™ Drive
3.5” Hi-Speed USB 2.0 HardDrive (GHE135U Installation Manual)
Page 2

Thank you for purchasing IOGEAR’s® ION™ Drive, one of the fastest Hi-Speed USB 2.0 HardDrives on the
market. IOGEAR® only manuf actures high quality storage devices so we are sure y ou will be satisfied with your
purchase. IOGEAR® is dedicated to customer service and satisfaction, and wishes y ou the best with your ne w
ION™ Drive.
T o better serve you, IOGEAR® off ers an arr ay of additional USB 2.0, USB , FireWire, KVM, and other peripheral
products. F or more information, or to purchase additional IOGEAR® products, visit us at www.IOGEAR®.com.
We hope you enjoy using y our ION™ Drive, yet another first-rate connectivity solution from IOGEAR®.
© 2002 IOGEAR®. All Rights Reserved. PKG-M0011
IOGEAR®, the IOGEAR® logo, ION™, are trademarks or registered trademarks of IOGEAR® Inc. Microsoft and Windows are registered
trademarks of Microsoft Corporation. IBM is a registered trademark of International Business Machines, Inc. MAC, Macintosh, G3, G4,
iMac, Apple are registered trademarks of Apple Computer, Inc. Classic is a registered trademark, licensed to Apple Computer, Inc. Finder
is a trademark of Apple Computer, Inc. All other brand and product names are trademarks or registered trademarks of their respective
holders. IOGEAR® makes no warranty of any kind with regards to the information presented in this document. All information furnished
here is for informational purposes only and is subject to change without notice. IOGEAR® assumes no responsibility for any inaccuracies
or errors that may appear in this document. Reproduction in whole or part without permission is prohibited.
Page 3

Table of Contents
Table of Contents:
Package Contents
Overview
Features
○○○○○○○○○○○○○○○○○○○○○○○○○○○○○○○
○○○○○○○○○○○○○○○○○○○○○○○○○○○○○○○
Requirements
Introduction
Installation (Hard Drive, ION Drive Software)
Connecting ION Drive to Your Computer
Device Removal
Driver Removal
Care & Handling
T rouble Shooting
T echnical Support
Appendix
○○○○○○○○○○○○○○○○○○○○○○○○○○○○○○○
Specification
Radio & TV Interf erence Statement
Limited Warranty
○○○○○○○○○○○○○○○○○○○○○○○○○○○
○○○○○○○○○○○○○○○○○○○○○○○○○○○○○
○○○○○○○○○○○○○○○○○○○○○○○○○○○○○○
○○○○○○○○○○○○○○○○○○○○○○○○○○○○
○○○○○○○○○○○○○○○○○○○○○○○○○○○○
○○○○○○○○○○○○○○○○○○○○○○○○○○○
○○○○○○○○○○○○○○○○○○○○○○○○○○○
○○○○○○○○○○○○○○○○○○○○○○○○○○○
○○○○○○○○○○○○○○○○○○○○○○○○○○○○○○
○○○○○○○○○○○○○○○○○○○○
○○○○○○○○○○○○○○○○○○○○○○○○○○○○○
○○○○○○○○○○○○○○○○
○○○○○○○○○○○○○○○○○
02
03
04
05
06
10
20
22
24
26
27
29
30
31
32
33
Page 4

Package Contents
This package contains:
1 ION™ Drive
1 Hi-Speed USB 2.0 Type A to B Cable (6 f eet)
1 IOGEAR Installation CD
1 Power Adapter
1 User Manual
1 Warranty Card
If any of the items are missing or damaged please contact your dealer immediately .
2
Page 5

Overview
Overview
The ION™ Drive is yet another innovative Hi-Speed USB 2.0 solution de veloped by IOGEAR®. The ION™ Drive
offers a complete high speed storage solution at the fraction of the cost of other external HardDrives.
Setup is fast and easy , simply plug in the drive , install the software, and you’ re ready to go. The ION™ Drive off ers
a feature rich interface, complete with the latest in Hi-Speed technology.
IOGEAR® brings the next generation of USB to your computer . You will enjoy the convenience and reliability that
has made traditional USB an industry standard when it comes to connecting multiple high-tech peripheral devices.
USB 2.0 is the next generation of USB connectivity, providing additional bandwidth thus broadening the range of
peripherals that may be attached to your computers. USB 2.0 allows you to move data at a blazing rate of 480
Mbps (Megabits per second). Hi-Speed USB 2.0 is fully backward compatible with the first generation of USB
devices. With the increase in speed, USB 2.0 offers increased functionality , allo wing more devices to share the
increased bandwidth.
USB 2.0 is the right choice for your external storage environment.
3
Page 6

Features
Features
- 40 Times F aster Than The Original USB
- Supports High Speed Data T r ansfer Rates of up to 480 Mbps
- Supports Windows® 98, 98SE, 2000, ME, XP
- Fully Backward Compatible With USB 1.1
- Hot Swappable - Plug-N-Play
- Mass Storage Compliant
- Space Age Cooling System
- 3 -Y ear Limited W arranty
4
Page 7

For PC Users
- PC compatible 200 MHz or greater
- PC running Windows® 98SE, 2000, ME, XP
- Minimum 64MB RAM
- CD-ROM drive
- Available Hi-Speed USB 2.0 P ort
For Mac Users*
- Mac OS X or Later
- Available Hi-speed USB 2.0 Port
- CD-ROM drive
* Base Upon the Availability of the Mac Driv er
Accessories / additional Products
Hi-Speed USB 2.0 4 Port Hub (GUH204)
Hi-Speed USB 2.0 A to B Cable (G2LUAB06)
Hi-Speed USB 2.0 PCI Card (GIC250U)
Hi-Speed USB 2.0 PCMCIA CardBus Card (GPU202)
HI-Speed USB 2.0 / FireWire Combo Card (GUF220)
Requirements
5
Page 8

Introduction
Introduction of the ION™ Drive’s Underlying Technology
Hi-Speed USB 2.0 is the backbone of our ION™ Drive. USB 2.0 is the next generation of USB connectivity,
providing additional bandwidth thus broadening the range of peripherals that may be attached to your computers .
USB 2.0 will move data at a blazing rate of 480 Mbps (Megabits per second), and is fully bac kward compatible
with the first generation of USB devices. With the increase in speed, USB 2.0 will offer increased functionality,
allowing more devices to share the increased bandwidth.
With the increase in demand for USB 2.0 products IOGEAR® decided to provide our customers with a total
solution. We hav e taken some of the top peripherals on the market and hav e upgraded them to the new USB 2.0
standard.
USB is now faster and easier to use than it has ev er been. Moving data at a blazing speed of 480Mbps (40 times
faster than the original USB) now allows for high speed devices to take full advantage of the bandwidth and
reliability offered by the new technology.
6
Page 9

Introduction
This manual contains information on the installation and capabilities of your new ION™ drive .
In sections of the manual where sequential steps are listed, each action is listed with no indentation. Additional
text is included, but indented, to further explain each of these actions. A glossary has been added at the end of
the manual so you may look up unf amiliar terms.
A few things should be mentioned before e xplaining the installation procedure:
All IOGEAR® ION™ drives are tested before they are shipped.
The connectors on a Hi-Speed USB 2.0 cable designed in such a way as to pre vent plugging the cable in upside
down, backwards, or into a diff erent type of connector.
At time of print, most computers do not have Hi-Speed USB 2.0 capabilities. To ensure optimum compatibility ,
please make sure your computer is USB 2.0 compatible or has had a USB 2.0 upgrade card added to your
computer system.
7
Page 10
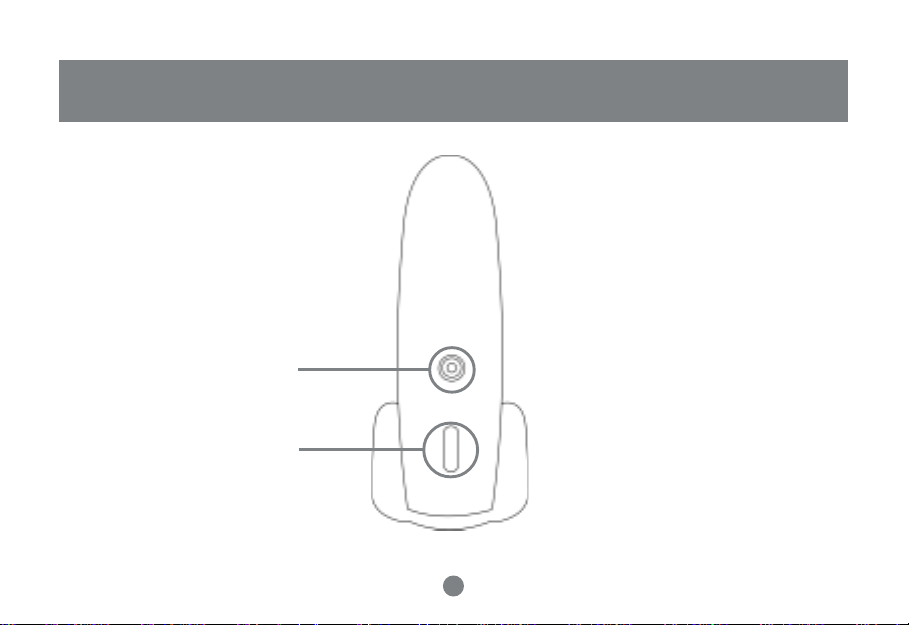
Pictorial Introduction
Front View
1
2
1. P ower Light
2. On/Off Switch
8
Page 11
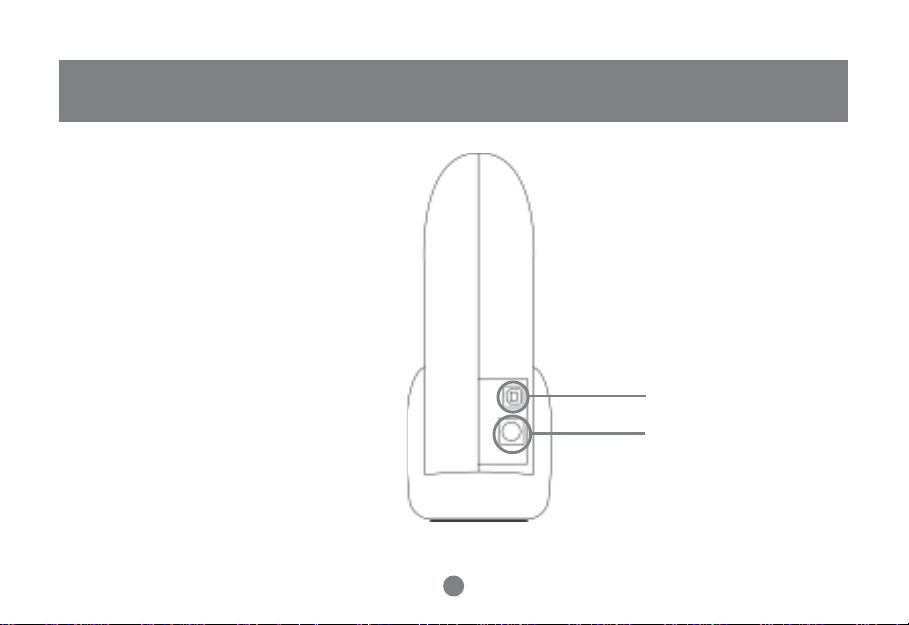
Back View
1. Hi-Speed USB 2.0 Mini-B port
2. Power Port
Pictorial Introduction
1
2
9
Page 12

Installation of Hard Drive
Step. 1 Please have the following ready
1 Phillip screw driver (not included in the package)
Step. 2 Remove Base
Remove Phillips screw from bottom
edge of side panel.
Note: For the best performance f or the USB 2.0 device , please use the cerified USB 2.0 cable provided
with this product.
10
Page 13

Installation of Hard Drive
Step. 3
Remove side panel in a backward direction.
Step. 4
Remove two screws in hard driv e retention bracket.
11
Page 14

Installation of Hard Drive
Step. 5
Remove hard drive retention brac ket from enclosure.
Slide in an upward direction towards the top of the
enclosure to free the drive bracket. Lift the drive
bracket out of the enclosure.
12
Page 15

Step. 6 Inspect all the components again:
1. Enclosure with one side panel attached
2. Side panel
3. Drive brac ket
4. One small screw
5. Two long screws with nylon collar
6. A C adapter
7. A C adapter cord
8. USB A to B cab le
Installation of Hard Drive
1
2
3
4
5
6
7
13
8
Page 16

Installation of Hard Drive
Step. 7
Attach the hard drive into the hard drive bracket.
Screw the four screws into the driv e bracket that were
provided with the hard drive. Mak e sure you take all
the necesssary steps to avoid ESD (electric static
discharge).
14
Page 17

Step. 8
Attach the signal cable to the hard drive connector of
the hard drive with bracket attached. Attach the power
cable to the hard drive in the powere socket. Attach
the bracket with drive attached into the enclosure and
seat over the base plate. Line up the holes in br ac ket
with the base plate.
Installation of Hard Drive
15
Page 18

Installation of Hard Drive
Step. 9
Insert two screws through bracket and
tighten down bracket to base plate.
16
Page 19

Installation of Hard Drive
Step. 10
Place side cover on enclosure and secure by sliding
in forward direction. Replace screw in side panel in
bottom edge.
Step. 11
Place assembled enclosure back into the base.
17
Page 20

Installation of ION Drive Software
Step. 1
Insert the IOGEAR Installation CD into your
computer’s CDR OM tra y (It is not necessary to
install this driver under Window 2000, ME, and XP).
Step. 2
Select “ION” in My Computer .
Step. 3
Double click “ION” d river .
18
Page 21

Installation of ION Drive Software
(Continued) Step. 5
We recommend to choose “Complete” when
prompted how to install.
Step. 4
Click “Ne xt” on Installation Wizard screen.
Step. 6
After the installation, you will be able to find
the hard drive in My Computer after you turn
on the power of ION.
19
Page 22

Connecting ION Drive to Your Computer
1
2
Note: Before you begin, please make sure that the power to the de vice and your computer has been turned
off.
Step 1. Plug the Hi-Speed USB 2.0 cable with Type A connector into the back of the ION™ Drive
Step 2. Plug the Power Adapter into the bac k of the ION™ Drive
20
Page 23

Connecting ION Drive to Your Computer
1
Step 3. Plug the Hi-Speed USB 2.0 Cable (T ype A Connector) into the Hi-Speed USB 2.0 P ort (T ype A
Slot) located on the back of your computer in the PCI Card Bays.
Step 4. Plug power into your power strip
Step 5. Once complete, Turn the ION™ Drive and your computer on. Y our computer will automatically identify
the ION™ Drive and load all necessary drivers.
21
Page 24

Device Removal
Step. 1 Step. 2
Before you unplug the ION drive, clic k on the
green arrow on the lower right corner of the
Window.
A message of [safely Remove…] will appear , click
on this message to remove the device.
22
Page 25

Device Removal Continued
Step. 3
The system will tell you that you can safely unplug y our ION drive now.
23
Device Removal
Page 26

Driver Removal
Driver RemovalDriver Removal
Step. 1
Follow the path of “Start”>”Settings”>”Control Panel”.
Step. 2
Click on “Add/Remove Prog rams”.
24
Page 27

Driver Removal
Step. 3
The “Add/Remove Programs Properties” will
appear. Select [TPP Storage Driver ...], then clic k
“Add/Remove”.
Step. 4
Click on “OK” when the system ask y ou if you want to
remove driver.
Step. 5
After the removal of the driver , select Restart
Computer and click on Finish.
25
Page 28

Care & Handling
Care & Handling of your ION™ Drive
Y our IOGEAR® storage de vice is a high performance Hi-Speed USB 2.0 HardDrive (ION™ Drive). The head that
reads the information on the disk is a fragile piece of technology . Therefore, care must be taken not to bump the
ION™ Drive while it is operating. Care m ust also be taken not to bump the ION™ Drive e xcessively when the drive
is turned off.
T o insure the maximum reliability of the ION™ Drive please f ollow the guidelines listed below:
- DO NOT block the air circulation around the v ents of the driv e.
- DO NOT move or b ump the drive while it is operating.
- DO NOT open the drive case for it will VOID your WARRANTY.
- Keep all cables out of isles and off desktops where they can be hooked and pulled.
- Keep the drive firmly secured in the shipping container when shipping the drive.
- Keep the environment around the drive clean and free of excessiv e dust and chemicals.
- Use a damp cloth to clean the drive. NEVER put cleansers directly on the driv e case .
- Use surge protectors with the drive.
- DO NOT expose the ION™ Drive to e xtreme temperatures.
- DO NOT expose the ION™ Drive to direct sun light f or e xtended periods of time.
- DO NOT get the ION™ Drive wet.
- DO NOT place the ION™ Drive in an area with an excessiv e amount of dirt.
26
Page 29

Trouble Shooting
Basic Troubleshooting
ION™
- Make sure the drive is turned on before you start-up your computer .
- Make your new IOGEAR® ION™ Drive is the only de vice hooked into the USB 2.0 port.
- Do not use a hub or repeater in connecting your drive to the computer.
- Use the Hi-Speed USB 2.0 Cable that was shipped with your ION™ Drive.
- Check all cable connections.
- Use other IOGEAR® Hi-Speed USB 2.0 Cables if you have an y extra.
- Make sure you have Critical Updates from the Microsoft® Website at http://windowsupdate.microsoft.com;
then, click on “Product Updates”, select the latest Critical Update package for y our Windo ws® OS, and
then click “Download”.
Other Issues
At the very least, make sure your computer has all av ailable updates provided by the man ufacture of both yo ur
hardware and software. Updates can be found at http://www.versiontracker.com, http://www.download.com or
http://www.usbman.com. Upg rade y our CPU firmware to the latest revision. Please read all text on the download pages to determine which firmware update is appropriate for your computer.
27
Page 30

Trouble Shooting
Notes:
All URLs are subject to change. If the URLs listed in this manual are no longer v alid, you can find the majority of
necessary updates at http://www.versiontracker.com or http://www.download.com.
OSD Operation
Contacting IOGEAR® Service Support
If you are still experiencing problems using your IOGEAR® ION™ Drive, please follow the directions below on
contacting IOGEAR’s Service Support department for your technical support needs.
28
Page 31

Technical Support
T o help IOGEAR® customers obtain the highest lev el of performance f orm their ION™ Drive, IOGEAR® Service
Support team is available to answer your technical questions. Do not hesitate to call if you are having trouble
getting your drive to work correctly . IOGEAR® Service Support can be reached by phone from 8am to 5pm Pacific
Standard Time, Monda y through Frida y or at the following address:
23 Hubble Drive
Irvine, CA 92618
Y ou ma y also reach us online at www.iogear.com/support 24 hours a day. Please be ready to give a brief description of the problem, and what you were doing when the problem occurred, bef ore calling Service Support. The
Service Support representative will be able to serve you much quicker if you are prepared to answer the ten
questions listed below.
1) What is the purchase date and serial number of the driv e?
2) Were any messages display ed on the screen when the error occurred? If so, what w as the exact wording of the
message?
3) What type of Computer are you using?
4) When does the problem occur?
5) Can the problem be reproduced? If so, what are the steps necessary to reproduce the problem?
6) What version of the OS are you using?
7) Are you on a network? If so, what type of network is it?
8) What have y ou already tried to get the problem resolved?
9) What type of data are you trying to record?
29
OSD Operation
Page 32

Appendix
Glossary
Desktop - The background area on the computers monitor screen. This area also includes the menu bar.
Document windows are not part of the desktop; rather they sit on the desktop .
Icon - Symbols used to represent a particular object. For example a disk has an icon on the desktop which
represents the disk. When you double click the disk icon it tells finder to displa y information related to that disk.
Mount - Makes the computer aware of a disk.
Power Adapter P ort - The plug on the ION™ Driv e into which the power-cord is plugged into .
Service Support - The team of IOGEAR employ ees dedicated to help you resolv e your technical issues.
Spin down - The act of the disk inside the drive or cartridge ceasing its rotation.
Spin up - The act of the disk inside the drive getting up to the proper rotations per min ute. The disk inside the
drive must spin at the proper speed for the disk to work.
30
Page 33

Product Specification (MODEL: GHE135U)
Function Specification
Power Consumption
Input Voltage
Connector Type
Storage Temperature 0-70 C (Celsius)
Operating Temperature
Operating H umidi t y
Dimensions
Weight
EMI FCC Class B
Specification
15w
12V DC, 1.6A
USB 2.0 Type A
0-50 C (Celsius)
20 to 89% (Non Condensing)
3.5" x 6.0" x 8.0"
1.5 pounds
31
Page 34

Radio & TV Interference Statement
Radio & TV Interference Statement
WARNING!!! This equipment generates, uses and can radiate r adio frequency energy and, if not installed and
used in accordance with the instruction manual, may cause interference to radio communications . This equipment
has been tested and found to comply with the limits for a Class B computing device pursuant to Subpart J of Part
15 of FCC Rules, which are designed to provide reasonable protection against such interference when operated in
a commercial environment. Operation of this equipment in a residential area is likely to cause interference , in
which case the user at his own expense will be required to take whatev er measures ma y be required to correct
the interference.
32
Page 35

Limited Warranty
Limited Warranty
IN NO EVENT SHALL THE DIRECT VENDOR’S LIABILITY FOR DIRECT , INDIRECT, SPECIAL, INCIDENT AL
OR CONSEQUENTIAL DAMA GES RESULTING FROM THE USE OF THE PR ODUCT, DISK, OR ITS DOCUMENT ATION EXCEED THE PRICE PAID FOR THE PRODUCT .
The direct vendor makes no warranty or representation, e xpressed, implied, or statutory with respect to the
contents or use of this documentation, and especially disclaims its quality , performance, merchantability , or fitness
for any particular purpose.
The direct vendor also reserves the right to revise or update the device or documentation without ob ligation to
notify any individual or entity of such revisions, or updates. F or further inquires please contact your direct vendor .
33
Page 36

Contact info.
23 Hubble Drive • Irvine, CA 92618 • (P) 949.428.1111 • (F) 949.428.1100 • www.iogear.com
 Loading...