

Page 1

3.5” T ri-Select COMBO ION™ Drive
TM
Hi-Speed External Hard Drive
featuring Dantz Retrospect Backup Software
User Manual (3.5” FireWire / USB 2.0 TRI-Select Backup ION Series)
®
Page 2

Thank you for purchasing IOGEAR’s® ION™ Drive featuring TRI-Select Backup Technology, one of the fastest Hi-Speed
external Hard Drives on the market. IOGEAR® only manufactures high quality storage devices, so we are sure you will be
satisfied with your purchase. IOGEAR® is dedicated to customer service and satisfaction, and wishes you the best with
your new TRI-Select ION™ drive.
To better serve you, IOGEAR® offers an array of additional USB 2.0, USB, FireWire, KVM, and other peripheral products.
For more information, or to purchase additional IOGEAR® products, visit us at www.IOGEAR.com.
We hope you enjoy using your new TRI-Select ION™ Drive – another first-rate connectivity solution from IOGEAR®!
© 2004 IOGEAR®. All Rights Reserved. PKG-M0120
IOGEAR®, the IOGEAR® logo, ION™, are trademarks or registered trademarks of IOGEAR® Inc. Microsoft® and Windows® are registered
trademarks of Microsoft® Corporation. IBM is a registered trademark of International Business Machines, Inc. MAC, Macintosh, and Apple are
registered trademarks of Apple Computer, Inc. All other brand and product names are trademarks or registered trademarks of their respective holders.
IOGEAR® makes no warranty of any kind with regards to the information presented in this document. All information furnished here is for informational
purposes only and is subject to change without notice. IOGEAR® assumes no responsibility for any inaccuracies or errors that mayappear in this
document. Reproduction in whole or part without permission is prohibited.
Page 3

Table of Contents
Package Contents....................................................................................................................................
Overview.................................................................................................................................................
Features..................................................................................................................................................
Requirements...........................................................................................................................................
Introduction.............................................................................................................................................
Pictorial Introduction.................................................................................................................................
Drive Installation (Enclosure Only)...............................................................................................................
ION Drive Setup.......................................................................................................................................
Installation of ION Drive Software...............................................................................................................
Dantz Restropect Setup............................................................................................................................
Troubleshooting........................................................................................................................................
Care and Handling.....................................................................................................................................
Technical Support.....................................................................................................................................
Appendix.................................................................................................................................................
Specification............................................................................................................................................
Radio & TV Interference Statement..............................................................................................................
Limited Warranty.......................................................................................................................................
2
3
4
5
6
8
10
16
20
22
32
34
35
37
39
40
41
Page 4

Package Contents
This package contains:
1 - 3.5” ION™ Drive featuring TRI-Select Backup Technology
1 - Base (with screws)
1 - Hi-Speed USB 2.0 (Type A to Type B) Cable
1 - FireWire® (6 pin – 6 pin) cable
1 - Power Adapter
1 - Power cable
1 - Quick Start Guide
1 - IOGEAR® Installation CD with Electronic Manual
1 - Warranty / Registration Card
If any of the items are missing or damaged, please contact your dealer immediately.
2
Page 5

Overview
The TRI-Select ION™ Drive is yet another innovative FireWire® 400 and Hi-Speed USB 2.0 solution developed by IOGEAR®. It
offers complete Hi-Speed storage and backup solutions at the fraction of the cost of other external Hard Drives.
Setup is fast and easy. Simply plug in the drive, install the software, and you’re ready to go. The TRI-Select ION™ Drive offers
a feature rich interface, complete with the latest in Hi-Speed technology.
IOGEAR® brings FireWire® and the next generation of USB to your computer. You will enjoy the convenience and reliability that
has made these two technologies an industry standard when it comes to connecting multiple high-tech peripheral devices.
FireWire®, also know as Sony’s® iLink or IEEE 1394, developed by Apple Computer, Inc., is the latest connectivity standard for
high speed digital devices like DV Camcorders. FireWire has a transfer rate up to 400Mbps (Megabits per second) and allows
you to connect up to 63 separate devices simultaneously.
USB 2.0 is the next generation of USB connectivity, providing additional bandwidth thus broadening the range of peripherals
that may be attached to your computers. USB 2.0 allows you to move data at a blazing rate of 480 Mbps (Megabits per second).
Hi-Speed USB 2.0 is fully backward compatible with the first generation of USB devices. With the increase in speed, USB 2.0
offers increased functionality, allowing more devices to share the increased bandwidth.
The combination of FireWire® and USB 2.0 is the right choice for your external storage environment.
3
Page 6

Features
• Transfer or backup pictures, music, and data at speeds up to 480 Mbps – Transfer 1 GB in under 30 seconds
• 3-Button Backup Solution that automates backups with Dantz Retrospect Backup software
• Ideal for backup, storage expansion, file sharing, software installation, and data management
• 3 connectivity solutions in one (FireWire® 400, USB 2.0, and USB 1.1)
• Hot-plug capable, hot swappable, and Plug-N-Play
• Preformatted for your convenience so you are up and running in no time (for those with preinstalled drives)
• FireWire® interface supports data transfer rates of up to 400 Mbps
• USB 2.0 interface – supporting high speed data transfer rates of up to 480 Mbps
• One-year limited warranty
4
Page 7

Requirements
To access FireWire® or USB 2.0 speeds, the computer system must be FireWire® and/or Hi-Speed USB 2.0 enabled. The
Tri-Select ION™ Drive will work at FireWire® 400 and/or USB 1.1 speeds with FireWire® enabled and USB 2.0 and/or USB
1.1 enabled computers.
For Mac Users
• Mac OS X (10.2) or greater
• Available FireWire port
• Available USB 2.0 or 1.1 port
*Drivers are provided by the supporting OS or host card software.
FireWire 400 - Mac OS X(10.2) or greater, Windows 98SE, ME, 2000 & XP
USB 2.0 - Mac OS X (10.2) or greater, Windows 2000 & XP
USB 1.1 - Mac OS X(10.2)or greater, Windows 2000 & XP
Accessories / Additional Products
8-in-1 Hi-Speed USB 2.0 Memory Bank™(GFR280)
KVMP™ Extreme Switch – 2 and 4 port USB PS/2 KVMP™ switch (GCS1732/34)
BOSS™, Router, FTP Server, NAS, VPN end point (GNS1000)
For PC Users
• PC Compatible, 200MHz or greater
• Windows® 98SE*, ME*, 2000, XP
• Minimum 64MB RAM
• Available Hi-Speed USB 2.0, 1.1 port or FireWire port
• CD-ROM drive
5
Page 8

Introduction
Introduction of the ION™ Drive’s Underlying Technology
The combination of FireWire®, USB 1.1 and Hi-Speed USB 2.0 is the backbone of our ION™ Drives. USB 2.0 is the next
generation of USB connectivity, providing additional bandwidth thus broadening the range of peripherals that may be attached
to your computers. USB 2.0 will move data at a blazing rate of 480Mbps (Megabits per second) and is fully backward compatible
with the first generation of USB 1.1 devices. With the increase in speed, USB 2.0 will offer increased functionality, allowing more
devices to share the increased bandwidth.
With the increase in demand for FireWire® and USB 2.0 products, IOGEAR® decided to provide its customers with a total
solution. We have taken some of the top peripherals on the market and upgraded them to the new FireWire® and/or USB 2.0
standard.
Today’s connectivity standards are faster and easier to use than ever. Moving data at the blazing speed of 400Mbps and
480Mbps allow high-speed devices to take full advantage of the bandwidth and reliability offered by these new technologies.
6
Page 9

Introduction
This manual contains information on the installation and capabilities of your new TRI-Select ION™ Drive. In sections of the
manual where sequential steps are listed, each action is listed with no indentation. Additional text is included, but indented,
to further explain each of these actions. A glossary has been added at the end of the manual so you may look up unfamiliar
terms.
A few things should be mentioned before explaining the installation procedure:
All IOGEAR® ION™ Drives are tested prior to shipment to ensure product quality.
The connectors on a FireWire® and Hi-Speed USB 2.0 cable are designed in such a way as to prevent plugging the cable in
upside down, backwards, or into a different type of connector.
At time of print, some computers do not have FireWire® and Hi-Speed USB 2.0 capabilities. To ensure optimum compatibility,
please make sure your computer is FireWire® and USB 2.0 compatible, or that you have had a FireWire® and/or USB 2.0 upgrade
card added to your computer system.
7
Page 10
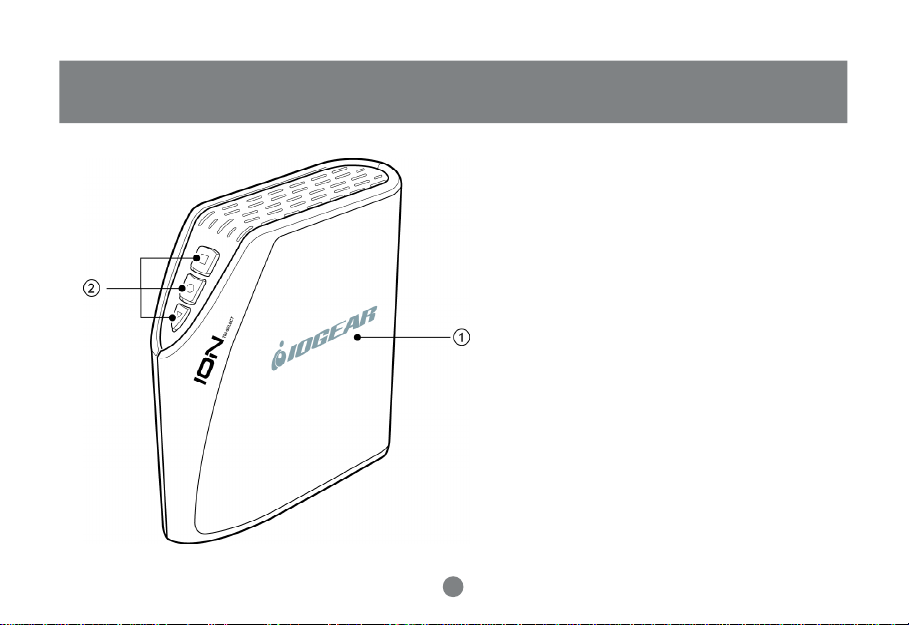
Pictorial Introduction
Front View
1. The IOGEAR® Logo - a mark of quality.
2. Tri-Select Backup Buttons
8
Page 11
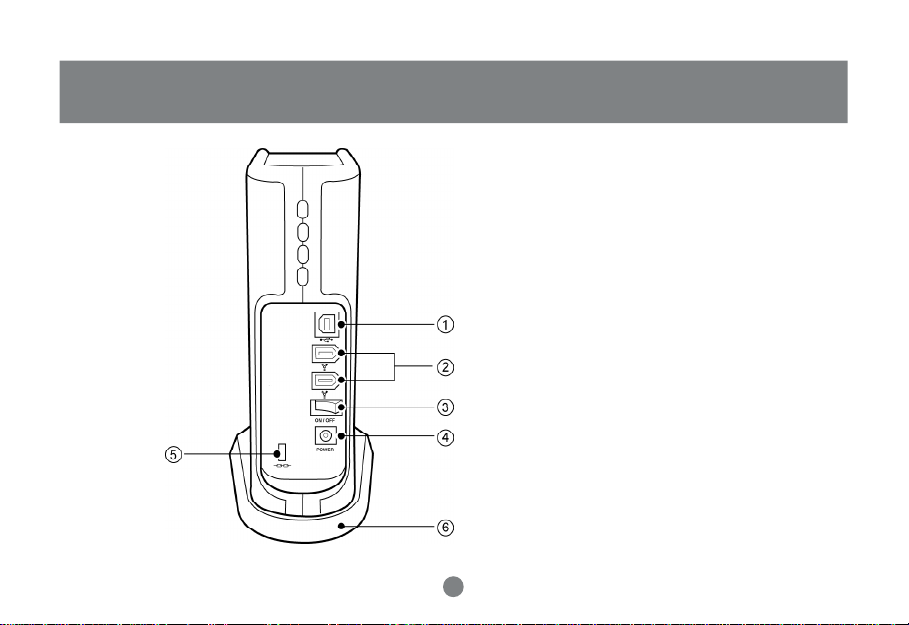
Pictorial Introduction
Back View
1. USB 2.0 Type B Port (female)
2. FireWire 6-pin Ports (female)
3. Power Switch
4. Power Port
5. Lock Port
6. Stand (Optional, screws included)
9
Page 12
Drive Installation (Enclosure Only)
For those with pre-installed HardDrives please move on to
page 16.
ATTENTION: This section only applies to you if you
purchased the Enclosure only model (GHE335C). If the
product you purchased already has a hard drive inside skip
to page 16. If you have any questions please refer to page
35 to call our TOLL FREE Tech Support line.
WARNING: Opening an ION™ Drive with a built-in Hard Drive
(GHD335C80, GHD335C120, etc...) WILL VOID YOUR WARRANTY.
Before beginning please take all proper Electro Static
Discharge (ESD) precautions during the installation of your
new hardware. For further information on ESD please visit
http://www.esda.org.
10
Page 13
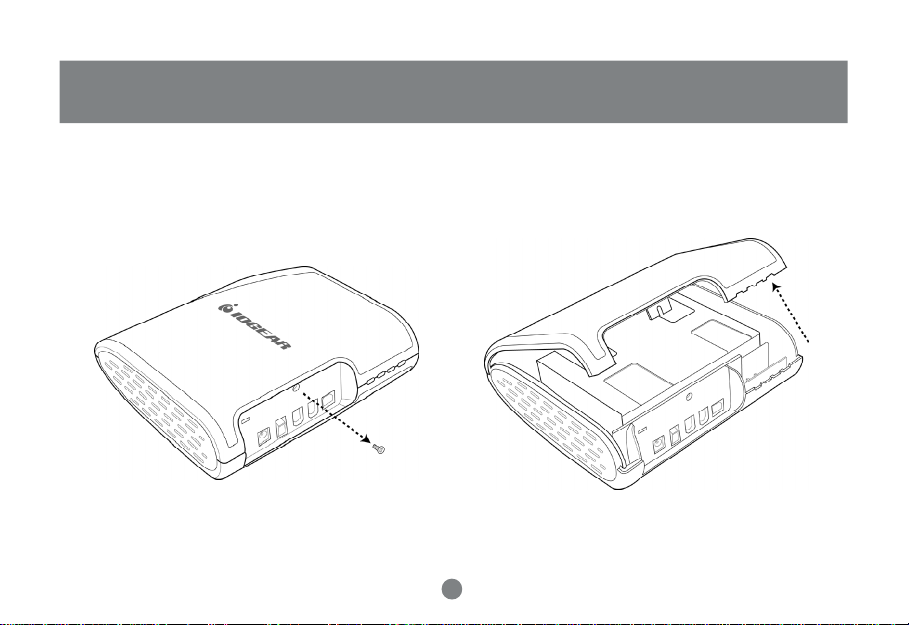
Drive Installation (Enclosure Only)
Step 1. Remove Phillips screw from back side of the
enclosure.
Step 2. Pull the right side panel off the enclosure from
the back.
11
Page 14
Drive Installation (Enclosure Only)
Step 3. Remove the two thumb screws on the left side of
the hard drive bracket.
Step 4. Slide the hard drive braket in an upward direction
towards the top of the enclosure to free the drive bracket.
Lift the drive bracket out of the enclosure.
12
Page 15

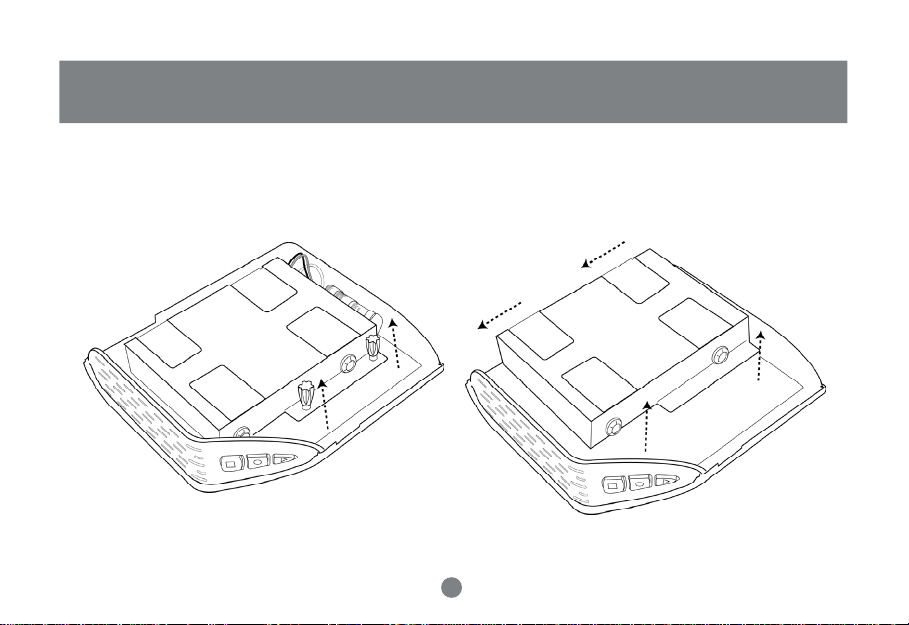
Drive Installation (Enclosure Only)
Step 5. Place the hard drive into the bracket making sure the screw holes line up with the blue vibration
dampener donuts. Insert the four screws through the donuts into the hard drive and tighten them securely.
NOTE: Ensure the hard drive’s jumper is set as “MASTER” or
“Primary”. Please consult the drive jumper chart (usually affixed to the
HDD itself) on how to set your specific Hard Disk Drive to MASTER or
Primary.
If you have Windows 98SE/ME the drive must be PRE-FORMATTED,
meaning the drive has already been formatted for use as a Hard Disk
Drive in a computer.
For instructions on how to format your drive in other operating systems,
please visit the following link on our website:
http://www.iogear.com/support/til/
index.php?func=TILDisplay&TIL_ID=10087
13
Page 16

Drive Installation (Enclosure Only)
Step 6. Attach the ATAPI1 and power2 cables to the hard drive in the appropriate ports. Place the bracketed hard drive
into the enclosure making sure to slide into place lining up the holes in the bracket with the base plate.
2
1
14
Page 17

Drive Installation (Enclosure Only)
Step 7. Insert the two thumb screws through bracket,
tighten to secure bracket to the internal base plate.
Congratulations! You have installed your hard drive into the TRI-Select ION Enclosure.
Step 8. Place the side cover on the enclosure and secure
by hooking on the front first and firmly pressing the back
together. Finally replace the phillips screw into the back
of the enclosure
15
Page 18

ION™ Drive Setup
FireWire Installation
(It is not necessary to install a driver for FireWire under any OS,
however please make sure your computer has all of the latest
updates, critical updates, service packs, service releases, OS
patches, security updates, and all other OS updates provided
by the respective developers.)
Note: Before you begin, please make sure that the power to the device and your
computer has been turned off.
Step 1. Plug the FireWire 6 pin connector into the back of the
ION™ Drive.
Step 2. Plug the Power Adapter into the back of the ION™
Drive (you must connect the power adapter in order to utilize
the drive).
16
Page 19

FireWire Installation Cont.
Step 3. Plug the FireWire® 6 pin connector into your
computer’s FireWire Port.
Note: if your computer has a 4 pin FireWire® or iLink® connection please
use a FireWire 4 pin(m) to 6 pin(m) cable. IOGEAR part# G2L13946-6;
or you may pick one up at any local electronics store or catalog reseller.
ION™ Drive Setup
Step 4. Plug the power adapter into a surge protector.
Step 5. Once complete, turn the ION™ Drive and your
computer on. Your computer will automatically identify the
ION™ Drive and load all necessary drivers.
17
Page 20

ION™ Drive Setup
Hi-Speed USB 2.0 Installation
Note: Before you begin, please make sure that the power to the device and your
computer has been turned off.
Step 1. Plug the USB Type B connector into the back of the
ION™ Drive.
Step 2. Plug the Power Adapter into the back of the ION™
Drive (you must connect the power adapter in order to utilize
the drive).
18
Page 21

Hi-Speed USB 2.0 Installation Cont.
Step 3. Plug the USB Type A connector into your computer’s
USB 2.0 Port.
ION™ Drive Setup
Step 4. Plug the power adapter into a surge protector.
Step 5. Once complete, turn on ION™ Drive and your
computer on. Your computer will automatically identify the
ION™ Drive and load all the necessary drivers.
19
Page 22

Installation of ION™ Drive Software (PC)
For Windows® 98SE Users Only
Step 1. Inserting the CD will launch the software installer.
Clicking on the first button will copy the installer of the driver
to your internal hard drive.
Step 2. The installer will be copied into “C:\IOGEAR
GHD335C”. Double-click on the installer icon to begin the
driver install.
20
Page 23

Installation of ION™ Drive Software (PC)
Step 3. Click [Next] to begin the install.
Step 4. The next screen will ask you to click [Finish] to end
the wizard. After the wizard has quit you simply need to
connect the ION Drive to the computer and the driver will be
loaded for the drive.
21
Page 24

Dantz Retropspect Express & TRI-Select Button Management Software
Dantz Retrospect Express and the TRI-Select Button Management Software work together to provide you with up to three
backup options (per drive) at the touch of a button. The TRISelect Button Management Software connects your drive and
its buttons with Dantz Retrospect Express. This section will
take you through the installation and setup of both the TRISelect Button Management Software and Dantz Retrospect
Express, once you have finished you should have three full
backup scripts setup and ready to go.
Installation (PC)
From the Software CD installer click on the appropriate buttons
to install Dantz Retrospect Express and the TRI-Select Button
Management Software separately. Each will launch and installer that will step you through the process. Please install
the Dantz software first and restart after the TRI-Select software is installed.
Once your computer has restarted you should find an IOGEAR
icon1 in your systray, click on it to begin using the TRI-Select
Button Management Software.
1
Installation (Mac)
On this CD you will find two folders. Inside the Dantz Retrospect Express folder you will need to choose from your appropriate language and launch the installer. Inside the TRISelect folder simply run the installer and then restart your
computer.
After your computer restarts you can begin using the TRISelect Button Management Software. You will find it in your
application folder.
22
Page 25

Dantz Retropspect Express & TRI-Select Button Management Software
TRI-Select Button Management Software Introduction
The TRI-Select Button Management Software allows you to
configure each button for your custom backup sets as you
wish. The Button Management Software identifies each disk
for you by drive letter1 and serial number2. When selected the
drive letter and serial number are red and you can begin configuring the buttons. Each button is identified by the shape
that appears on it. The top button is the square3, the middle
button is the circle4 and the bottom button is the triangle5.
1 2
3
4
5
9
6
8
7
In the software you will see a box6 next to each shape, this
is where the path to the selected backup script will be
displayed. To choose a backup script for that button you
want to click on the folder icon7 below its box. If you ever
decide you no longer want that button active simply click
the red X8 next to the folder icon and it will clear the box of
your selected path.
Whenever you have a drive connected you want the TRISelect Button Management Software active so be sure to
minimize rather than close it whenever you are done using
it. If you connect a new drive and want to configure its
buttons be sure to click the Refresh button9 and the
software will scan for all new drives and list them as it finds
them.
23
Page 26

Dantz Retrospect Setup
Button 1
To begin setting up the square (top) button on your TRI-Select
ION Drive simply press the button. At this point Retrospect
Express should launch and begin the backup set tutorial, to
begin click [Next].
Step 1. Choose the volume you want to backup from, and click
[NEXT] to continue.
Step 2. Choose what you want backed up, backing up your
“Documents only” will backup all documents in your hard drive.
Choosing “Entire volume” will backup you entire hard drive.
When you have chosen click [Next] to continue.
24
Page 27

Dantz Retrospect Setup
Step 3. Choose your appropriate TRI-Select ION Drive as
the destination. Once you have chosen click [Next] to
continue.
Step 4. Finally you can click [Finish] to complete the setup
or you can click [Start Now] to complete the setup and
begin the backup now.
2 5
Page 28

Dantz Retrospect Setup
Buttons 2 & 3
To begin setting up the next two buttons, launch Dantz Retrospect from your Programs Folder in your Start menu.
Step 1. First click on the new script icon1 in the upper left of
the tool bar, then choose what kind of backup script you would
like to make. Your choices are “Backup”, “Duplicate” or “Archive”.
Then Retrospect will ask you to name your script, do so and
click [OK].
1
Step 2. Then name the script and it will prompt you to
choose your Source(s) and Destination. Click on [Sources]
to begin.
2 6
OSD Operation
Page 29

Dantz Retrospect Setup
Step 3. Your source is the folder and files you want backed
up. When you are finished selecting everything you want to
backup then click [OK].
Step 4. Click on [Destinations] and it will prompt you to
choose your destinations(s). For your first script you will
have to click [Creat New] to add a destination option. It will
then ask what type of media you want to back up to, to
backup your ION Drive choose “Disk”, click [Next] to
continue.
2 7
Page 30

Dantz Retrospect Setup
Step 5. Name your Disk Backup Set and click the [Select…]
button to choose a disk as your destination, click [OK] after
you have selected your disk, then [Next] to continue.
Step 6. Choose an encryption type, you can choose from
None, Password only and SimpleCrypt. Encryption will protect
your data so only you can recover it as needed. Click [Next]
to continue.
2 8
Page 31

Dantz Retrospect Setup
Step 7. Either use the default location for your Disk Backup
Set or click [Browse…] to choose your own. Click [Next] to
continue when you are ready. Then click [Finish] on the next
screen to complete your Disk Backup Set.
Step 8. Now choose your Disk Backup Set from in the window
and click [OK].
2 9
Page 32

Dantz Retrospect Setup
Step 9. If you wish, you can click the [Selecting…] button to
filter what kind of files are backed up, by default Retrospect
will backup “All Files” from your specified destination. Once
satisfied with your backup just click on the Run & Save1 icon
at the top.
1
Step 10. Then choose Make a “run document” from the choices
and click [Save…]. Retrospect will then prompt you to save
the script in your desired location. Please choose your desired location and save the script.
30
Page 33

Dantz Retrospect Setup
Now that you’ve finished your script you can choose to run it from one of the buttons on your TRI-Select ION Drive. To do
so, open up the TRI-Select Button Management Software and decide which button you want to run your script from. Then
click on the appropriate folder icon to pick the script from the location you saved it to. Once you have selected the script
as the launch item for a specific button you will be able to run that backup script any time you want to by pressing that
button on the drive.
To setup another script go back to page 26.
For more information, advanced techniques and other uses of Dantz Retrospect Express refer to the Manual in the Dantz
Retrospect folder which is located in your Program Files folder.
31
Page 34

Troubleshooting
Basic Troubleshooting for the IOGEAR ION™ Drive
Although we make every attempt to ensure 100% compatibility and uptime, problems can and may arise from time to
time; rest assured, we at IOGEAR will do everything possible to ensure both.
We understand that most of our customers will first call or e-mail our Service Support Department. As always, we are
dedicated to assisting our new and current customers with their IOGEAR products.
Before you contact us, please try the following troubleshooting procedures…
• Make sure the drive is turned on before you start-up your computer.
• Make sure your new IOGEAR® ION™ Drive is the only device hooked into the FireWire® USB 2.0 port.
• Do not use a hub or repeater in connecting your drive to the computer.
• Use the cable that was shipped with your ION™ Drive.
• Check all cable connections.
• Use other IOGEAR® cables if you have any extra.
Other Issues
At the very least, make sure your computer has all available updates provided by the manufacture of both your hardware
and software. Updates can be found at http://www.versiontracker.com or http://www.download.com. Upgrade your CPU
firmware to the latest revision. Please read all text on the download pages to determine which firmware update is
appropriate for your computer.
• Make sure you have Critical Updates from the Microsoft® Website at http://windowsupdate.microsoft.com; then, click
on “Product Updates,” select the latest Critical Update package for your Windows® OS, and then click “Download”.
32
Page 35

Troubleshooting
Notes:
All URLs are subject to change. If the URLs listed in this manual are no longer valid, you can find the majority of necessary
updates at http://www.versiontracker.com or http://www.download.com.
Contacting IOGEAR® Service Support
If you are still experiencing problems using your IOGEAR® ION™ Drive, please follow the directions on pg. 35 on how to
contact IOGEAR®’s Service Support department for your technical support needs.
Seagate Trouble Shooting Tip
Set up the jumper on the Seagate drive to the secondary, submissive or slave position.
Setting up your drive:
If for some reason you need to re-partition your ION™ drive, you will need to keep in mind that FAT32 limits the partition
size that can be created, through the USB interface, to roughly 32GB when using the FAT32 file system. If you have
Windows 2000 or XP you can format the drive with NTFS which has no limit on the partition size.
If you have Mac OS 9.2 or greater, you can format the drive with HFS+ (which has no limit on the partition size) using the
Disk utility found in Mac OS 10.x.x.
Compatibility Note:
FAT32 is compatible with Windows 98/98SE/2000/ME/XP and the Mac OS
NTFS is only compatible with Windows 2000 & XP
HFS+ is only compatible with Mac OS 8.6 or greater
33
Page 36

Care & Handling
Your IOGEAR® storage device is a high performance FireWire® 400/Hi-Speed USB 2.0 Hard Drive (ION™ Drive). The head
that reads the information on the disk is a fragile piece of technology. Therefore, care must be taken not to bump the ION™
Drive while it is operating. Please do not bump the ION™ Drive excessively when the drive is turned off.
To insure maximum reliability of the ION™ Drive, please follow the guidelines listed below:
(Remember: We wouldn’t say it if someone hadn’t tried it!)
• DO NOT block the air circulation around the drive.
• DO NOT move or bump the drive while it is operating.
• DO NOT open the drive case for it will VOID your WARRANTY.
• Keep all cables out of isles and off desktops where they can be hooked and pulled.
• Keep the drive firmly secured in the shipping container when shipping the drive.
• DO NOT cover any vents, make sure they are clear of debris.
• Keep the environment around the drive clean and free of excessive dust and chemicals.
• Use a damp cloth to clean the drive. NEVER put cleansers directly on the drive case.
• Use surge protectors with the drive.
• DO NOT expose the ION™ Drive to extreme temperatures.
• DO NOT expose the ION™ Drive to direct sun light for extended periods of time.
• DO NOT get the ION™ Drive wet.
• DO NOT place the ION™ Drive in an area with an excessive amount of dirt.
34
Page 37

Technical Support
To help IOGEAR® customers obtain the highest level of performance from their ION™ Drive, the IOGEAR Service
Support team is available to answer your technical questions.
Please be sure to visit our Technical Information Library (TIL) is available on our website: http://www.iogear.com/
support . Our TIL has answers to many common questions and problems that may already have solutions available.
IOGEAR Service & Support can be reached from 8am to 5pm (PST) Monday through Friday, or at the following address:
IOGEAR, Inc.
23 Hubble Drive
Irvine, CA 92618
866-9-IOGEAR (866-946-4327) (Press “4” for Technical Support)
You may also e-mail us 24-hours a day, 7 days a week by sending your inquiry to: support@iogear.com.
Please Note: We will generally respond to your inquiry within 24-48 hours; however, due to increasing demand
for pre-sales and technical information for our products, response times can and may fluctuate. Therefore, if
you have an urgent inquiry, we recommend calling our Service Support Department for immediate assistance.
Please be ready to give a brief description of the problem, and what you were doing when the problem occurred, before
calling Service Support.
35
OSD Operation
Page 38

Technical Support
The IOGEAR Service Support representative will be able to serve you much quicker if you are prepared to answer the
following questions listed below.
• What type of Computer are you using?
(Mac, PC, or Other)
• What Operating System are you running on your computer?
(Mac OS X Panther, Mac OS 9, Windows XP, Windows 98, etc.)
• What is the Model# of the product you have?
(It is located on the front of the box and starts with the letter “G”)
• What is the Serial# of the product you have?
(The Serial # is usually located underneath or on the side of your product)
• Can the problem be reproduced? If so, what are the steps necessary to reproduce the problem?
(Please document any Error Messages (Blue Screen of Death, Kernel Panic, etc.) you have received)
• When does the problem occur?
(Does it happen when you’re checking your e-mail, playing a game, etc.)
36
Page 39

Appendix
Glossary
Cache - High-speed Random Access Memory (RAM) used as a buffer between the CPU and a hard drive. The cache retains recently accessed
information to speed up subsequent accesses to the same data. When data is read from or written to disk, a copy is saved in the cache along with the
associated disk address. The cache monitors the addresses of subsequent read operations to see if the required data is already in the cache. If it is, the
drive returns the data immediately. If it is not in the cache, then it is fetched from the disk and saved in the cache.
Capacity - The amount of data, defined by bytes, Kilobytes (KB), Megabytes (MB) and Gigabytes (GB), that a drive can hold.
Desktop - The background area on the computers monitor. Document windows are not part of the desktop; they appear in front of the desktop.
Driver - The software that tells the computer how to use devices connected to it. Any device connected to your computer will require a driver, sometimes
the driver is included in the OS which saves the user from having to install on their own.
FAT32 – 32-bit File Allocation Table. The standard file system used by Windows 98SE/ME, it is also supported by Windows 2000, XP and Mac OS 8.6 and
above.
FireWire - A technology developed by Apple to allow for peripherals to be connected to your computer, it is the standard used by Digital Video and Audio
professionals for capturing content. Also known as IEEE 1394 or iLink.
Format - Formatting a drive sets up the file system on the drive, it will also erase all data currently stored on the drive. Your drive was shipped with the
FAT32 file system formatted on it.
FTP - File Transfer Protocol. The standard protocol used for downloading and uploading files on the Internet
HFS+ - Hierarchical File System Extended Format. The standard file system used by Mac OS 8.6 and above.
HTTP - Hyper Text Transfer Protocol. HTTP is the method of which Web Pages are delivered to your computer.
37
Page 40

Appendix
Glossary cont.
Icon - Symbols used to represent a particular object. For example a disk can have an icon on the desktop which represents it. When you double click the disk
icon it tells the computer to display information related to that disk.
Mount - Makes the computer aware of a disk.
NTFS - New Technology File System. The standard file system used by Windows 2000 and XP.
Operating System - The software that determines how the computer can be used. Any flavor of Windows is an operating system. Operating System is often
abbreviated as OS.
Partitioning - A method for creating a logical file structure that the operating system can access. Creating multiple partitions on the drive allows the
operating system to treat it as more than one drive.
Power Adapter Port - The plug on the ION™ Drive into which the power-cord is plugged into.
Service Support - The team of IOGEAR employees dedicated to help you resolve your technical issues.
Spin down - The act of the disk inside the drive or cartridge ceasing its rotation.
Spin up - The act of the disk inside the drive getting up to the proper rotations per minute. The disk inside the drive must spin at the proper speed for the disk
to work.
USB - Universal Serial Bus, a standard created by Intel for connecting external peripherals to your computer.
WWW - World Wide Web. Generally the prefix to web addresses (ex. www.iogear.com )
Volume - A portion of a physical disk that functions as though it were a physically separate disk.
38
Page 41

Product Specifications
Specifications
39
Page 42

Radio & TV Interference Statement
WARNING!!! This equipment generates, uses and can radiate radio frequency energy and, if not installed and used in
accordance with the instruction manual, may cause interference to radio communications. This equipment has been tested and
found to comply with the limits for a Class B computing device pursuant to Subpart J of Part 15 of FCC Rules, which are
designed to provide reasonable protection against such interference when operated in a commercial environment. Operation of
this equipment in a residential area is likely to cause interference, in which case the user at his own expense will be required
to take whatever measures may be required to correct the interference.
40
Page 43

Limited Warranty
IN NO EVENT SHALL THE DIRECT VENDOR’S LIABILITY FOR DIRECT, INDIRECT, SPECIAL, INCIDENTAL
OR CONSEQUENTIAL DAMAGES RESULTING FROM THE USE OF THE PRODUCT, DISK, OR ITS DOCUMENTATION
EXCEED THE PRICE PAID FOR THE PRODUCT.
The direct vendor makes no warranty or representation, expressed, implied, or statutory with respect to the contents or use
of this documentation, and especially disclaims its quality, performance, merchantability, or fitness for any particular
purpose.
The direct vendor also reserves the right to revise or update the device or documentation without obligation to notify any
individual or entity of such revisions, or updates. For further inquires please contact your direct vendor.
41
Page 44

®
Contact info.
23 Hubble • Irvine, CA 92618 • (P) 949.453.8782 • (F) 949.453.8785 • www.iogear.com
 Loading...