

Page 1

Quick Start Guide
Controller Emulator for use with
Game Consoles
GE1337P
PART NO. Q1257-a
www.iogear.com
Page 2

Package Contents
1 x GE1337P KeyMander Controller Emulator
2 x USB A to USB Mini B Cables
1 x Quick Start Guide
1 x Warranty Card
System Requirements
Hardware
Game Consoles:
• PlayStation® 3
• Xbox® 360
• Xbox® One
Console Controller:
• PlayStation® 3 Dual Shock 3 Controller (Optional)
• Xbox® 360 Wired Controller (REQUIRED)
• Xbox® One Controller with Micro USB cable (REQUIRED)
• USB keyboard & USB mouse*
Computer with available USB 2.0 port
1
OS
• Windows Vista®, Windows® 7 and Windows® 8 / 8.1
*Compatible with select wireless keyboard/mouse devices
Page 3
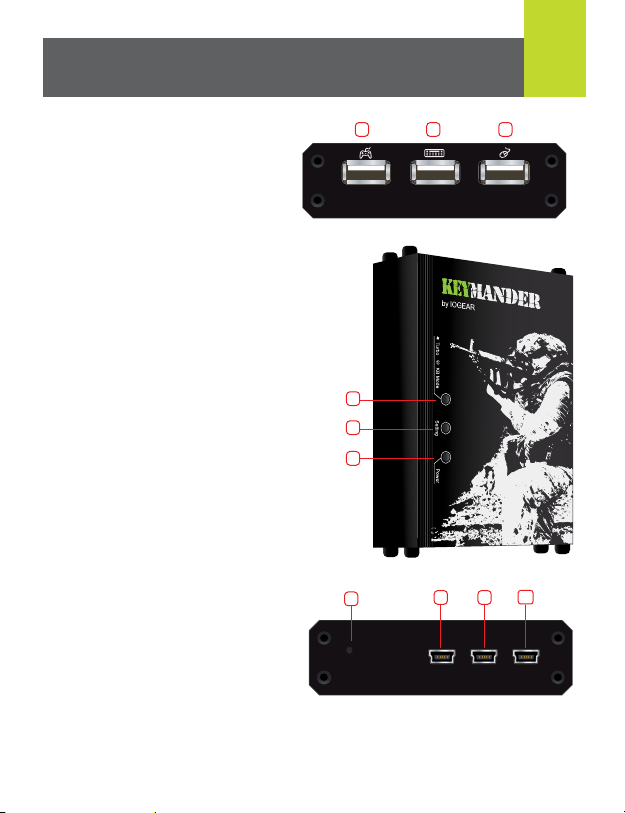
Overview
2
1. Gamepad port
2. Keyboard port
3. Mouse port
4. Turbo/Keyboard Mode LED
Indicator:
a. Lights solid ORANGE
when Turbo Mode is ON
b. Flashes ORANGE when
Keyboard Mode is ON
5. Setting LED indicator:
a. Lights solid BLUE when PC port
is connected to a computer.
b. Flashes (Fast) BLUE when
uploading a profile from a
computer to the KeyMander.
c. Flashes (Slow) BLUE when Direct
Mapping Mode is on.
6. Power LED indicator
7. Reset button
8. Game Console connection port
9. PC connection port
10. Power port (optional).
Connect to an optional
5VDC power supply for high
current keyboards, such as
those with built-in USB hubs
and headphone ports, etc.
1 2 3
Gamepad
4
5
6
7
Keyboard
Mouse
9
8
10
*
Reset
Game
PowerPC
Some gaming keyboards may have accessories that require more power than the
*
KeyMander can supply, requiring an external power supply. Please visit
www.shopiogear.com to order part GPA60002 1A USB power supply. Connect
supplied USB A to Mini B cable between KeyMander and power supply.
Page 4
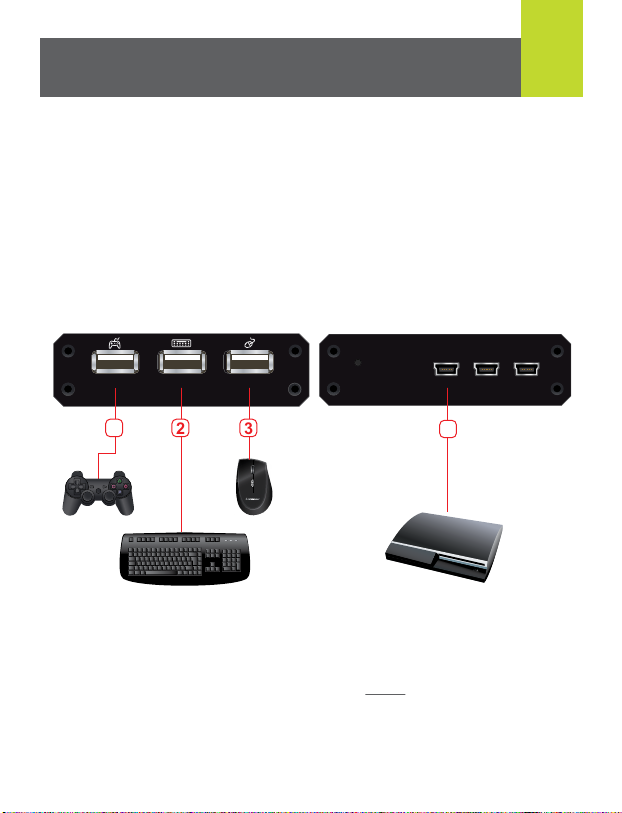
Hardware Setup
1. Connect your console controller to the Gamepad Port.
2. Connect your USB Keyboard to the Keyboard Port.
3. Connect your USB Mouse to the Mouse Port.
4. Using the included USB cable, connect the mini USB B plug to the
Game Port on the back of KeyMander, then connect the USB A plug to
controller port #1 on the front of the console.
5. Power on the console and your KeyMander is ready to use.
6. Enter Keyboard Mode by pressing F9.
*
3
Gamepad
L
SELECT
START
Keyboard
21
R
Mouse
3
Reset
Game
PowerPC
4
Note: KeyMander is compatible with some, but not all PC gaming devices such as
keyboards, keypads and mice. When using a compatible PC configurable device,
be sure to setup/program your device on the PC before connecting it to
KeyMander. You may need to try different device settings and/or Keymander
settings to achieve best performance.
When using a wireless keyboard & mouse set, plug the receiver into the Keyboard
*
Port. Some wireless keyboard & mouse sets may not be supported.
Page 5
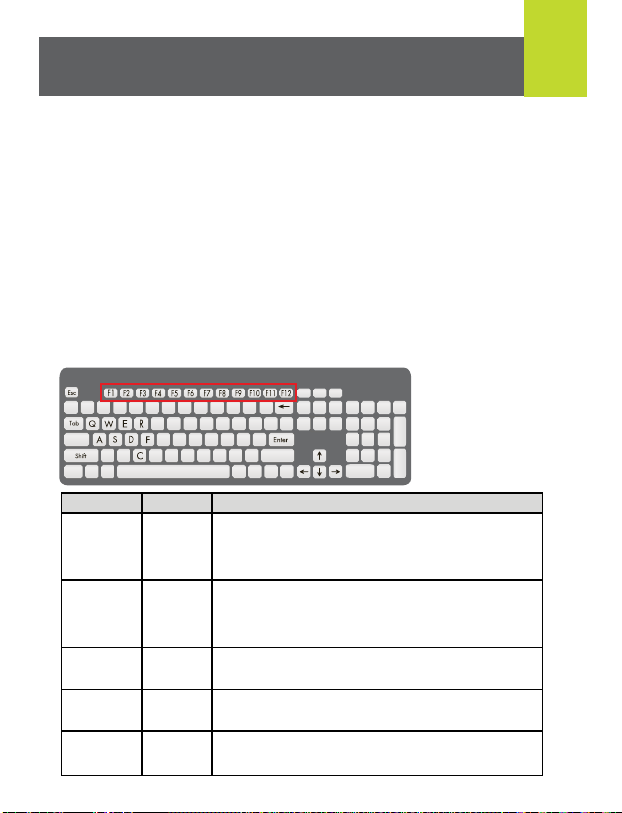
Hotkeys
4
Keyboard / Gamepad Mode
Use the [F9] hotkey to switch between Keyboard Mode and Gamepad Mode:
Single Beep - Keyboard Mode On
Double Beep - Gamepad Mode On
Keyboard Mode activates the normal typing function of the keyboard for
operating in system menus, chatting during gameplay, or when using the
internet functions of the gaming console.
Gamepad Mode activates the controller emulation for gaming functions
using the keyboard & mouse. Gamepad Mode is the default setting. Must be
in Gamepad Mode when in game.
Hotkey
[F1] ~ [F8]
[F9]
[F10] Turbo Mode
[F11] Macro Mode
[F12] Play Mode
Function Description
Switch
Profile
Keyboard /
Controller
Mode
Switches to a Profile in the Group in Use-according to the
Profile Selection Hotkey assigned to the profile.
[F1]: Default PS3 Profile
[F2]: Defualt Xbox Profile
Toggles between Keyboard and Controller Mode.
Keyboard Mode: Allows you to type text during gameplay.
Controller Mode: Allows you to use the keyboard as a game
controller on the PS3 / Xbox.
Turns Turbo Mode on and off. When Turbo Mode
is on, controller buttons with Turbo settings work.
Turns Macro Mode on and off. When on, Macro keys that are
pressed will execute macro commands.
Play mode allows you to use a laptop’s keyboard and touchpad
for gameplay.
Page 6

SELECT
START
R
1
2
1
2
Basic Operation - Keyboard Layout (PS3)
Default keyboard map for PS3 controller functions:
5
Tab
Backspace
2
1
L
D-Pad
Left Shift
Esc
Enter
SELECT
3 R3
L
START
E
A D
Q
2
1
R
F
R
C
Spacebar
W
S
Players
Movement
Left Analog Stick
=
Movement
Page 7

Basic Operation - Mouse Layout (PS3)
Default mouse map for PS3 controller functions:
6
Right Mouse click
2
1
L
SELECT
Mouse
Movement
START
Right Analog
=
Stick movement
Left Mouse click
2
1
R
Page 8

Basic Operation - Keyboard Layout (Xbox)
Default keyboard map for Xbox controller functions:
7
Q
Left Shift
Players
Movement
LB
LC
D-Pad
W
S
A D
Left Analog Stick
=
Movement
Tab
Enter
Esc
RC
G
RB
1
C
Space Bar
R
E
Page 9

Basic Operation - Mouse Layout (Xbox)
Default mouse map for Xbox controller functions:
8
Right Mouse click
LB
Left Mouse click
LT
Mouse
Movement
=
RT
RB
Right Analog
Stick movement
Page 10

Direct Button Mapping
9
Direct Button Mapping Mode
Direct Button Mapping allows you to change keyboard or mouse maps
without connecting KeyMander to your PC. Direct Button Mapping requires
connection of your PS3/Xbox controller to the KeyMander for basic setup.
To use Direct Mapping:
1. Connect your controller using your USB cable to the Gamepad port on
the KeyMander.
2. Press Select + Start (PS3), Back + Start (Xbox) or View + Menu (Xbox
One) buttons at the same time. You will hear 1 beep from KeyMander
and the Setting LED will flash slowly.
3. Press PS, Xbox Guide, or Xbox button. KeyMander will beep once
again and Setting LED will now flash rapidly. You are now in Direct
Mapping Mode.
a. Press the desired PS3/Xbox controller button you wish to map.
KeyMander will beep once to confirm.
b. Press any key on the keyboard or mouse and the controller button
will be mapped to that key. KeyMander will beep once to confirm.
c. Continue steps 3a & 3b until all desired buttons have been mapped
to keyboard or mouse.
4. Press Select + Start (PS3), Back + Start (Xbox) or View + Menu (Xbox
One) buttons at the same time to exit Direct Mapping Mode.
KeyMander will beep twice and the Setting LED will stop flashing.
L
2
3
R
2
3
Note: Changes made to Direct Mapping Mode are not permanently saved
to a profile.
Page 11

In-Game Mouse Sensitivity Adjustment
The KeyMander has the ability to have both Aim/Look and Aim Down Sight
(ADS) Sensitivity adjusted without having to use the KeyMander software
through the In-Game Mouse Sensitivity Mode feature.
To enter into In-Game Mouse Sensitivity Mode:
1. Press Select + Start (PS3), Back + Start (Xbox) or View + Menu (Xbox
One) buttons at the same time. You will hear 1 beep from KeyMander
and the Setting LED will flash.
2. You are now in Mouse Sensitivity Mode.
3. To adjust Aim/Look sensitivity, Press UP or DOWN on the D-Pad. Each
press corresponds to 1 level of sensitivity.
4. To adjust ADS sensitivity, Press LEFT (to decrease) or RIGHT (to
increase) on the D-Pad.
5. Once the desired level of sensitivity has been reached, Press Select +
Start (PS3), Back + Start (Xbox) or View + Menu (Xbox One) buttons to
exit out of Mouse Sensitivity Mode. The KeyMander will beep twice and
the Setting LED will stop flashing.
Note: Changes made in In-Game Mouse Sensivity Mode are not
permanently saved to a profile.
10
Page 12

Software Installation
CD Installation
1. Insert included CD into CD/DVD drive.
2. Follow on screen instructions.
3. Launch the software by double-clicking on the software icon.
Online Installation
To download the KeyMander software:
1. Go to www.IOGEAR.com/software/GE1337P/
2. Select the KeyMander Software link to begin download.
3. Once finished, unzip the file to your hard drive.
4. Drag the application icon to the desktop or to a desired file folder
to save the application.
5. Launch the software by double-clicking on the software icon.
11
Page 13

Firmware Upgrade
Upgrading KeyMander Firmware
To upgrade the firmware on your KeyMander, follow the steps below:
1. Go to www.IOGEAR.com/software/GE1337P/
2. Select the latest firmware link and download to your PC.
3. Once finished, unzip the file and remember the saved location.
4. Connect your KeyMander to your PC:
a. Plug one of the included mini USB B cables to the PC Port located
on the back of the KeyMander.
b. Plug the other included mini USB B cable to the Power Port
located on the back of the KeyMander.
c. Connect both USB cables to your PC
5. Launch the KeyMander software and click “Connect”.
6. On the “Groups & Profiles” page, click “Menu” then “Upgrade
Firmware”.
7. Locate the unzipped “firmware.exe” file and click “Open”.
8. The KeyMander software will close and the KeyMander firmware
upgrade utility will launch automatically.
9. Click “Next” to begin the upgrade process. When the firmware
upgrade is complete, click “Finish” and the utility will close.
This Quick Start Guide is intended to cover
basic setup and key functions to get you up
and running quickly.
12
For a complete explanation of advanced
setup and additional features, please
download the KeyMander User Manual from
www.IOGEAR.com/Product/GE1337P
Page 14

FCC Statement
This equipment has been tested and found to comply with the limits for
a Class B digital device, pursuant to Part 15 of the FCC Rules. These
limits are designed to provide reasonable protection against harmful
interference in a residential setting. This product generates, uses, and
can radiate radio frequency energy and, if not installed and used as
directed, it may cause harmful interference to radio communications.
Although this product complies with the limits for a Class B digital
device, there is no guarantee that interference will not occur in a
particular installation.
CE Compliance
This device has been tested and found to comply with the following
European Union directives: Electromagnetic Capability (2004/108/EC),
Low Voltage (2006/95/EC) and R&TTED (1999/5/EC).
Page 15

Limited Warranty
WE’RE HERE TO HELP YOU!
NEED ASSISTANCE SETTING UP THIS PRODUCT?
Make sure you:
1. Visit www.iogear.com for more product information.
2. Visit www.iogear.com/support for live help and product support.
Warranty Information
This product carries a 3 Year Limited Warranty. For the terms and
conditions of this warranty, please go to
http://www.iogear.com/support/warranty.
Register online at http://www.iogear.com/register
Important Product Information
Product Model
Serial Number
Page 16

Contact
IOGEAR
iogear.custhelp.com
support@iogear.com
www.iogear.com
19641 Da Vinci, Foothill Ranch, CA 92610
© 2014 IOGEAR
®
 Loading...