

Page 1

User Manual
4-Port USB KVM Switch
Installation Guide
Installation
4-Port USB KVM Switch
GCS634U
PART NO. Q1013-a
1
www.iogear.com
GCS634UW6
Part No. M1013-a
Page 2

©2012 IOGEAR®. All Rights Reserved. PKG-M0320-a
IOGEAR, the IOGEAR logo, MiniView, VSE are trademarks or registered trademarks of IOGEAR,
Inc. Microsoft and Windows are registered trademarks of Microsoft Corporation. IBM is a registered
trademark of International Business Machines, Inc. Macintosh, G3/G4 and iMac are registered trademarks
of Apple Computer, Inc. IOGEAR makes no warranty of any kind with regards to the information
presented in this document. All information furnished here is for informational purposes only and is
subject to change without notice. IOGEAR assumes no responsibility for any inaccuracies or errors that
may appear in this document.
Page 3

Table of Contents
Package Contents 4
System requirement 5
Introduction 6
Installation 7
Operation 8
Limited Warranty 17
Federal Communications Commission (FCC) Statement 18
CE Compliance 19
Contact 20
3
Page 4

Package Contents
This package contains:
• 1 4-Port KVM Switch (two cables built-in)
• 2 Detachable custom KVM cables
• 1 User Manual
• 1 Quick Start Guide
• 1 Warranty Registration Card
If any items are damaged or missing, please contact your dealer.
4
Page 5

System requirement
Console
• A VGA, SVGA, or Multisync monitor capable of the highest resolution that you will be using on any .
computer in the installation
• A USB Keyboard
• A USB Mouse
Computers
The following equipment must be installed on each computer that is to be connected to the system:
• A VGA, SVGA or Multisync card
• A USB type A port
• A multimedia sound card for audio sharing
Speakers
• Only 2-channel, powered speakers are supported
5
Page 6
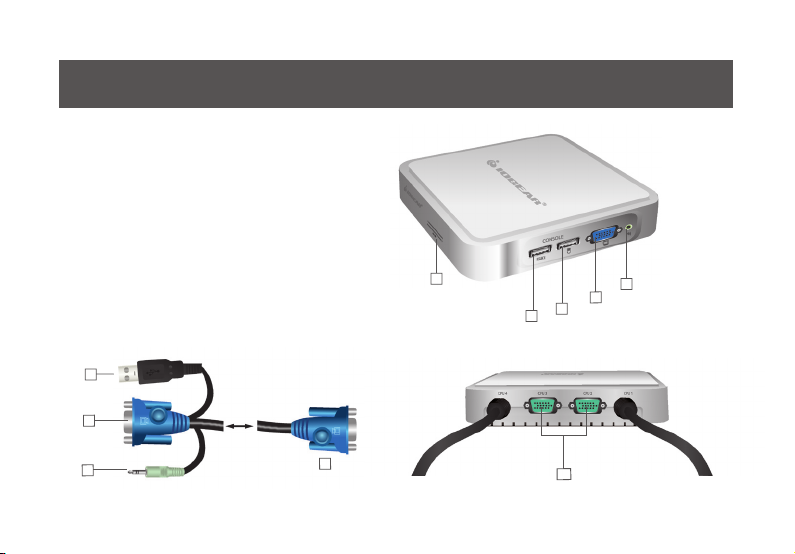
Introduction
1) Port LEDs
2) USB Keyboard Port
3) USB Mouse Port
4) VGA Monitor Port
5) Stereo Speaker Port
6) USB Plug (black)
7) VGA Plug (blue)
8) Audio Plug (light green)
9) Custom KVM Plug (dark green)
10) Custom KVM Ports
6
7
1
3
2
5
4
8
9
10
6
Page 7

Installation
1. Plug your keyboard and mouse into the correct USB ports on the side of the switch. If using a
wireless keyboard and mouse whose receiver has only one USB plug, make sure it is inserted into
the keyboard port and not the mouse port.
2. Plug your monitor into the VGA port on the side of the switch.
3. Plug your powered speakers into the audio jack on the side of the switch.
4. Plug the extra KVM cables into the green ports on the back of the switch using the custom green
connectors. (You may skip both or only one of these cables if only using two or three computers)
5. Plug the VGA, USB, and audio connections on each of the KVM cables into each of your
computers.
7
Page 8

Operation
Switching between computers (Toggle keys)
By default, all of the following commands begin by pressing the [Scroll Lock] key twice. A few PC keyboards and all Apple keyboards do not have a [Scroll Lock] key. If you have one of these keyboards you
must use the alternate toggle key of [Control] instead. Enter advanced hotkey mode as described in the
next section and press [T]. Then all of the following commands will work by simply pressing the [Control]
key in place of the [Scroll Lock] key.
[Scroll Lock] [Scroll Lock] [Enter]
This will switch everything (KVM and sound) to the next port.
[Scroll Lock] [Scroll Lock] (number) [Enter]
This will switch everything (KVM and sound) to the exact port number typed. The number must be between 1 and 4, and you must use the numbers across the top of the keyboard, not the number pad. This
command will work even if the computer on that port is not powered on.
8
Page 9

[Scroll Lock] [Scroll Lock] [a] [Enter]
This will start the Auto Scan mode, the KVM focus cycles from port to port at a 5 second interval.
[Scroll Lock] [Scroll Lock] [a] [n] [Enter]
This will start the Auto Scan mode, the KVM focus cycles from port to port at a [n] second interval.
To exit Auto Scan mode, press [Esc] or [Spacebar].
9
Page 10

Advanced Hotkeys
You may enter advanced hotkey mode by pressing and holding [Num Lock] on the number pad, then
pressing the [-] key on the number pad and immediately releasing both keys. On Apple keyboards the
[Clear] key on the number pad should be used in place of [Num Lock]. If you have done this correctly the
Caps Lock and Scroll Lock lights on the keyboard should begin ashing. This means you are in hotkey
mode, which will be shortened to just [HKM] below. If you are having trouble entering hotkey mode press
[Esc] and try again.
Please read the following pages to learn how to use advanced hot keys to change the keyboard into Mac
mode or Sun mode, in order to use the special keys on Mac and Sun keyboards.
10
Page 11

Mac keyboard
Clear
11
Minus
Page 12

PC keyboard
Num Lock
12
Minus
Page 13

[HKM] [T] – This will change the toggle key used to switch between computers. Each time you enter this
command the toggle key will switch between the default of [Scroll Lock] and the alternate of [Control].
[HKM] [H] – This will change the hotkey used to enter hotkey mode. Each time you enter this command
the keys used to enter HKM will switch between the default of [Num Lock]+[-] and the alternate of
[Control]+[F12]. Please note that you must hold [Control] while pressing [F12] in exactly the same way you
must hold [Num Lock] while pressing [-].
[HKM] [F2] – This will manually set the operating system of the currently active port to Macintosh. This
will allow the KVM to emulate special keys that are normally only present on an Apple keyboard.
[HKM] [F3] – This will manually set the operating system of the currently active port to Sun. This will
allow the KVM to emulate special keys that are normally only present on a Sun keyboard. On some Sun
computers it is necessary to set up the KVM in this way before the system will properly boot up.
[HKM] [F10] – This will set the operating system of the currently active port to Automatic. The KVM will
auto-detect the type of computer on that port to allow emulation of whatever keys are most appropriate to
that computer. This is the default setting for all ports and is appropriate for PC systems.
13
Page 14

[HKM] [F4] – This will type out a list of current KVM settings. Open a word processor before using this
command in order to see how the KVM is congured.
[HKM] [F5] – This will reset the USB ports on the switch, and may clear up any keyboard or mouse
problems.
[HKM] [R] [Enter] – This will reset all KVM settings to their defaults.
14
Page 15

Using a PC keyboard to emulate a Sun
PC Keyboard Mac Keyboard
[Shift]Shift
[Ctrl] Ctrl
[Win]
[Ctrl] [4]
[Alt]L Alt/Option
[Prt_Sc] F13
[Scroll Lock] F14
[Desktop Menu] =
[Enter] Return
[Back Space] Delete
[Ins] Help
[Ctrl] [Win]F15
[Ctrl] [1]Mult
[Ctrl] [2]V_DN
[Ctrl] [3]V_UP
Keyboard
After you set up the appropriate Keyboard
Platform,
you will be able to use a PC (101/104) key
keyboard to emulate the functions of the Sun
keyboard when the Control key [Ctrl] is used in
conjunction with other keys. The corresponding
functions are shown in the table to the right.
NOTE: When using [Ctrl] combinations, press and
release the [Ctrl] key, then press and release the
activation key.
15
Page 16

Using a PC keyboard to emulate a Mac
PC Keyboard Sun Keyboard
[Ctrl] [T] Stop
[Ctrl] [F2]Again
[Ctrl] [F3]Props
[Ctrl] [F4]Undo
[Ctrl] [F5]Front
[Ctrl] [F6]Copy
[Ctrl] [F7]Open
[Ctrl] [F8]Paste
[Ctrl] [F9]Find
[Ctrl] [F10] Cut
[Ctrl] [1]
[Ctrl] [2]
[Ctrl] [3]
[Ctrl] [4]
[Ctrl] [H]Help
Compose
Meta
Keyboard
After you set up the appropriate Keyboard
Platform, you will be able to use a PC (101/104)
key keyboard to emulate the functions of the
Mac keyboard. The corresponding functions are
shown in the table to the right.
NOTE: When using key combinations, press
and release the rst key [Ctrl] or [Alt]), then
press and release the activation key.
16
Page 17

Limited Warranty
WE’RE HERE TO HELP YOU!
NEED ASSISTANCE SETTING UP THIS PRODUCT?
Make sure you:
1. Visit www.iogear.com for more product information
2. Visit www.iogear.com/support for live help and product support
Warranty Information
This product carries a 3 Year Limited Warranty. For the terms and conditions of this warranty, please go to
http://www.iogear.com/support/warranty
Register online at http://www.iogear.com/register
Important Product Information
Product Model
Serial Number
17
Page 18

Federal Communications Commission (FCC) Statement
This equipment has been tested and found to comply with the limits for a Class A digital device, pursuant
to Part 15 of the FCC Rules. These limits are designed to provide reasonable protection against harmful
interference in a residential setting. This product generates, uses, and can radiate radio frequency energy
and, if not installed and used as directed, it may cause harmful interference to radio communications.
Although this product complies with the limits for a Class A digital device, there is no guarantee that
interference will not occur in a particular installation.
18
Page 19

CE Compliance
This device has been tested and found to comply with the following European Union directives:
Electromagnetic Capability (2004/108/EC), Low Voltage (2006/95/EC) and R&TTED (1999/5/EC).
19
Page 20

Contact
IOGEAR
Toll Free 866-9-IOGEAR (USA)
Phone: 949-453-8782
19641 Da Vinci, Foothill Ranch, CA92610
www.iogear.com
support@iogear.com
20
Page 21

Page 22

 Loading...