

Page 1

Bluetooth to Serial Adapter
Quick Start Guide
GBS301
PART NO. Q1229
Page 2
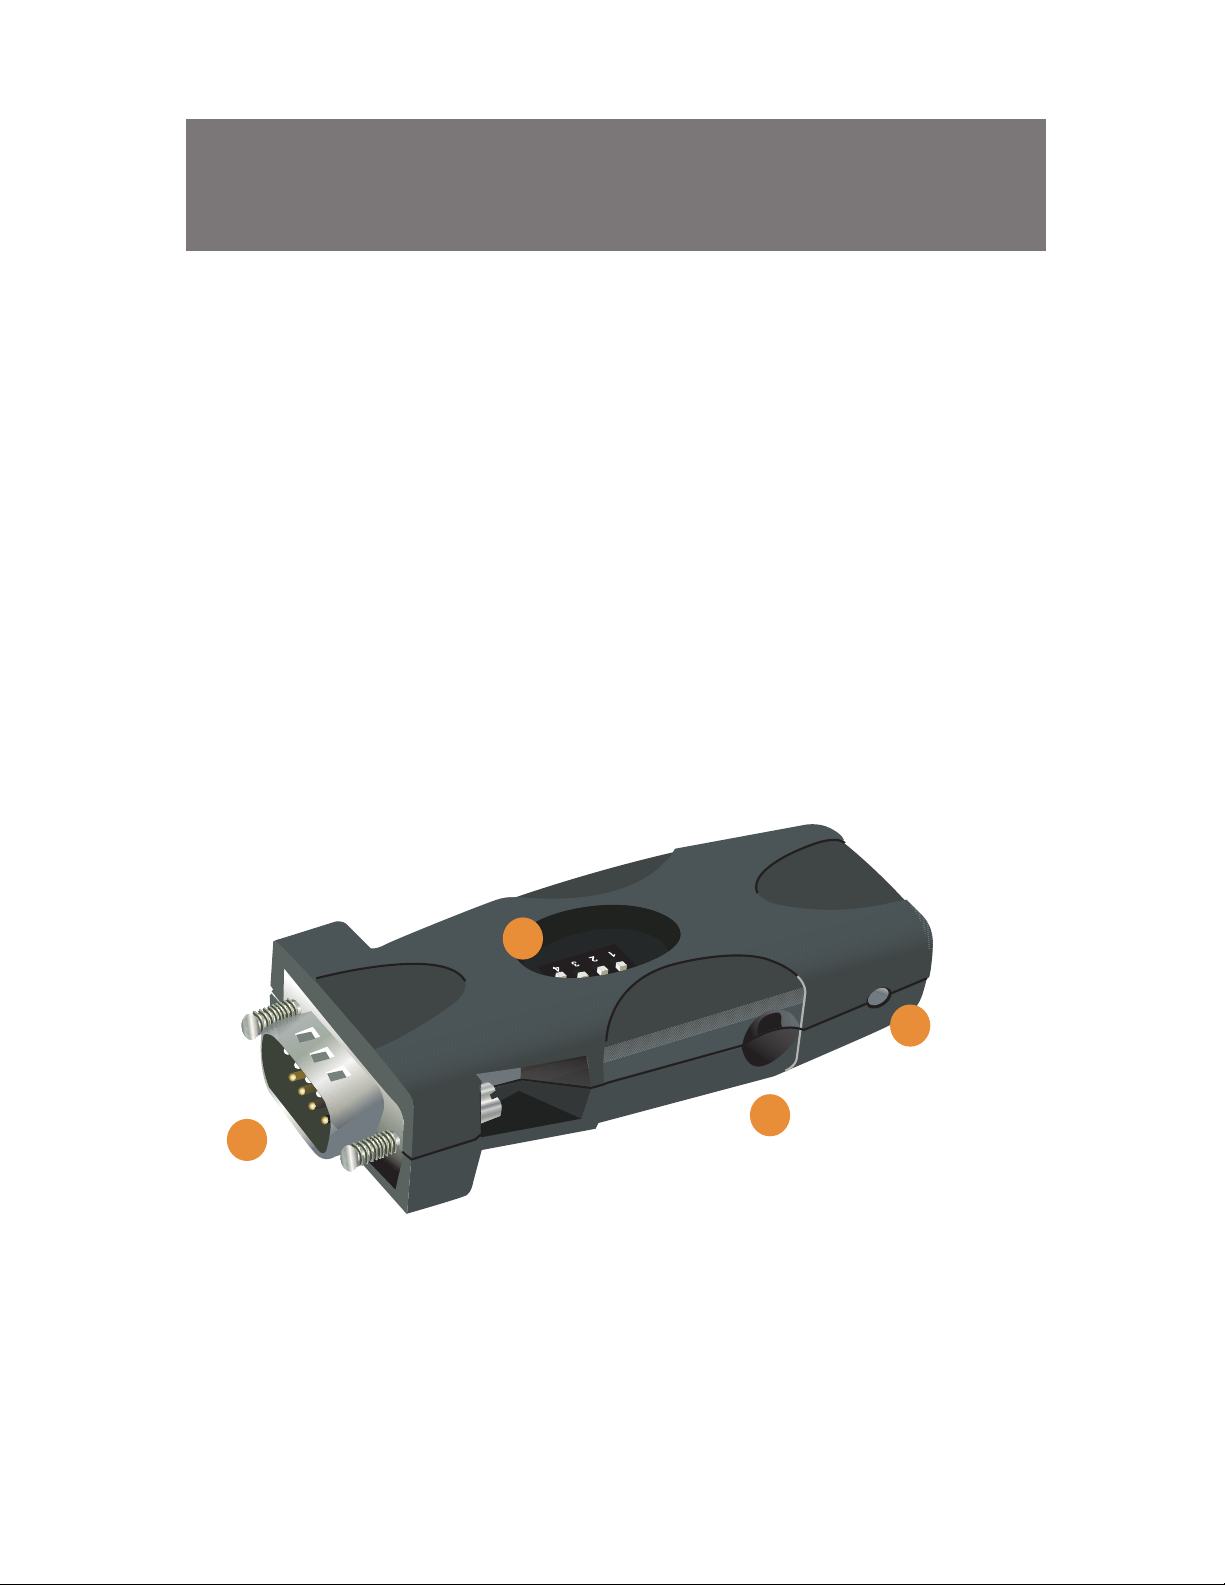
1. DIP Switches
2. Status LED
3. Power Jack
4. RS-232 interface
3
1
4
Introduction
2
Page 3

Factory Settings
When using the Bluetooth serial adapter with your serial devices,
you must make sure that all the settings below match on both
devices; otherwise, you may encounter problems communicating.
Below are the factory default settings of this unit:
Encryption = disabled
Authentication = enabled
PIN key = 1234
Baud rate = selection from dip switch
Stop bits = 1
Parity = none
NOTE: If your serial device requires you to change any of the
default settings, consult the Advanced Configuration section of
the User Manual for more details.
Operation
Start Here!
1
Page 4

DIP Switches
Switches 1-3
DIP Switches 1, 2, and 3 are used to configure the baud rate.
NOTE: Most computer serial ports only support baud rate up to
115200. For higher baud rates, you may need to install a
high-speed serial card in your computer. In addition, if you need
to set a lower baud rate for your application, see the Advanced
Configuration section in the User manual.
Switch 4
DIP Switch 4 is used to set the serial adapter as master or slave:
0DVWHUPRGH6ZLWFK21
6ODYHPRGH6ZLWFK2))
Switch 2 Switch 3 Baud Rate
Table 1
Switch 1
ON
OFF
ON
OFF
ON
OFF
ON
OFF
ON
ON
OFF
OFF
ON
ON
OFF
OFF
ON
ON
ON
ON
OFF
OFF
OFF
OFF
9600
19200
38400
57600
115200
230400
460800
921600
2
Page 5

Master Mode
If you are interconnecting two IOGEAR Bluetooth adapters,
you must set one of them to master and the other to slave.
Slave Mode
Keep in mind that Bluetooth software applications (like
Widcomm) will only be able to discover and connect to slave
devices.
Therefore, if you are connecting this unit to a serial device to
be accessed by a Bluetooth-enabled PC/PDA at the other
end, make sure to set the IOGEAR Bluetooth serial adapter to
slave mode.
3
Page 6

Connecting Bluetooth serial adapter with
Bluetooth-enabled device
The Bluetooth serial adapter has built-in dip switches for fast
and easy configuration.
If you would like to change any of the default settings, consult
the Advanced Configuration section in the User Manual.
Bluetooth enabled laptop
Serial Device
(hand-held scanner)
wireless signal
330 ft range
IOGEAR’s
Bluetooth to Serial
Adapter
(GBS301)
Basic Configuration
4
Page 7

Using table 1, set the baud rate on the Bluetooth serial adapter
by using the on-board DIP switches. Make sure that this baud
rate matches with that used by your serial device.
If you are unsure what baud rate your serial device uses, please
consult the manufacturer of that product.
Plug in the Bluetooth serial adapter to your serial device. If your
device has a male RS232 interface, use the included null
modem adapter.
When using the Bluetooth serial adapter with a Bluetoothenabled device (PC/PDA), you must set the Bluetooth serial
adapter in slave mode (Switch 4 = Off).
Step. 1
Set baud rate
Step. 2
Step. 3
Set device mode
Plug in
Step. 4
Power ON
Plug in the power cable to your Bluetooth serial adapter; the blue
LED will start blinking after approximately fifteen (15) seconds.
Once the blue LED is blinking once every 2-3 seconds, this
indicates that the Bluetooth serial adapter is in discovery mode;
in other words, ready to accept a Bluetooth connection.
5
Page 8

Use your Bluetooth software to search for Bluetooth devices in
range. Once the Bluetooth serial adapter is detected, pair to
it. If prompted for a PIN code, enter “1234” (without the
quotes).
Once paired, establish a connection using the Bluetooth serial
port profile (SPP). If you’re not sure how to do this, please
consult the documentation for your Bluetooth
hardware/software.
Once you have established a Bluetooth serial port connection,
the blue LED will turn off. You’re done!
Step. 5
Pair and Connect
6
Page 9

Interconnecting two IOGEAR Bluetooth
serial adapters
When using two IOGEAR Bluetooth serial adapters, there are
two methods you can use to pair and connect them:
1 Auto-pairing
2. Back-to-Back
Pairing Procedure
NOTE: If you have previously paired to the Bluetooth serial
adapter(s), make sure to follow the unpairing procedure
described in the User Manual before attempting to connect to
a new device.
wireless signal
330 ft range
GBS301 connects
to a laptop serial port
GBS301 connects
to a printer serial port
Method 1 Auto-Pairing
The Bluetooth serial adapter (master only) has the capability to
search and automatically connect to another Bluetooth serial
adapter (slave). Follow the steps below:
7
Page 10

1. Set one serial adapter to Master (Switch 4 = On), and
the other to Slave (Switch 4 = Off).
2. Set matching baud rates as needed
3. Power On both serial adapters and wait approximately
fifteen (15) seconds
s%OXH/('RQVODYHDGDSWHUZLOOVORZO\EOLQNRQFH
every 2-3 seconds)
s%OXH/('RQPDVWHUDGDSWHUZLOOUDSLGO\EOLQN
4. Wait approximately two minutes for the serial adapters
to automatically pair and connect
5. Upon successful connection, the blue LED on both
adapters will turn off and remain off
6. You’re done!
NOTE: Once you have paired both Bluetooth serial
adapters, if you turn them off, please allow approximately
sixty (60) seconds when turning them back on to
re-establish a connection.
Method 2 Back to Back Pairing
Follow this procedure to pair two
(2) IOGEAR Bluetooth Serial Adapters.
8
Page 11

1. Make sure both Serial adapters are TURNED OFF
2. Set one adapter as Master (Switch 4 = On), and the other
as Slave (Switch 4 = Off)
3. Make sure to set matching Baud rates on both serial
adapters; else they will not be able to communicate.
4. Connect the serial adapters back-to-back, using the
included Null Modem adapter
5. Power ON both Serial adapters
6. Almost instantly, the Blue LED will light up and stay solid;
this indicates successful pairing
7. Disconnect both serial adapters and Power them OFF
8. You may now connect each adapter to your desired serial
device for communication
9. Power ON both serial adapters, the blue LED will blink on
both serial adapters indicating connection is in progress;
which usually takes about sixty (60) seconds
10. After successful connection is made, the blue LED on both
serial adapters will turn off and remain off
NOTE: Once you have paired both Bluetooth serial adapters, if
you turn them off, please allow approximately sixty (60)
seconds when turning them back on to re-establish a
connection.
9
Page 12

Any time that you want to pair the Bluetooth serial device with
a new Bluetooth adapter/device, you must follow the
unpairing procedure as indicated below.
There are two different methods that you can follow to unpair
the Bluetooth serial adapter
Method 1
1. Power OFF the serial adapter
2. Change the position of Dip Switch 4
3. Power ON the serial adapter. The LED will blink once,
indicating successful unpairing.
4. Power OFF the serial adapter
5. Change dip switch 4 back to its original position
6. You can now pair the Bluetooth serial adapter with
another device
Method 2
If using two (2) IOGEAR Bluetooth serial adapters, follow the
back-to-back pairing procedure indicated earlier; which will
retain the latest pairing information
Unpairing Procedure
10
Page 13

Federal Communications
Commission (FCC) Statement
15.21
You are cautioned that changes or modifications not expressly
approved by the part responsible for compliance could void the
user’s authority to operate the equipment.
15.105(b)
This equipment has been tested and found to comply with the
limits for a Class B digital device, pursuant to part 15 of the
FCC rules. These limits are designed to provide reasonable
protection against harmful interference in a residential
installation. This equipment generates, uses and can radiate
radio frequency energy and, if not installed and used in
accordance with the instructions, may cause harmful
interference to radio communications. However, there is no
guarantee that interference will not occur in a particular
installation. If this equipment does cause harmful interference
to radio or television reception, which can be determined by
turning the equipment off and on, the user is encouraged to try
to correct the interference by one or more of the following
measures:
- Reorient or relocate the receiving antenna.
- Increase the separation between the equipment and receiver.
- Connect the equipment into an outlet on a circuit different
from that to which the receiver is connected.
- Consult the dealer or an experienced radio/TV technician for
help.
Operation is subject to the following two conditions:
1) this device may not cause interference and
2) this device must accept any interference, including
interference that may cause undesired operation of the
device.
11
Page 14

FCC RF Radiation Exposure Statement:
This equipment complies with FCC radiation exposure limits
set forth for an uncontrolled environment. End users must
follow the specific operating instructions for satisfying RF
exposure compliance. This transmitter must not be
co-located or operating in conjunction with any other
antenna or transmitter.
This device has been tested and found to comply with the
requirements set up in the council directive on the
approximation of the law of member states relating to EMC
Directive 89/336/EEC, Low Voltage Directive 73/23/EEC
and R&TTE Directive 99/5/EC.
CE Statement
12
Page 15

Limited Warranty
Contact
IN NO EVENT SHALL THE DIRECT VENDOR'S LIABILITY
FOR DIRECT, INDIRECT, SPECIAL, INCIDENTAL OR
CONSEQUENTIAL DAMAGES RESULTING FROM THE
USE OF THE PRODUCT, DISK, OR ITS DOCUMENTATION
EXCEED THE PRICE PAID FOR THE PRODUCT.
The direct vendor makes no warranty or representation,
expressed, implied, or statutory with respect to the contents
or use of this documentation, and especially disclaims its
quality, performance, merchantability, or fitness for any
particular purpose.
The direct vendor also reserves the right to revise or update
the device or documentation without obligation to notify any
individual or entity of such revisions, or updates. For further
inquiries please contact your direct vendor.
Toll Free 866-946-4327 (USA)
Phone: 949-453-8782
19641 Da Vinci
Foothill Ranch, CA 92610
www.iogear.com
support@iogear.com
Page 16

About UsAbout Us
FUN
IOGEAR offers connectivity solutions that are
innovative, fun, and stylish, helping people
enjoy daily life using our high technology
products.
GREEN
IOGEAR is an environmentally conscious
company that emphasizes the importance of
conserving natural resources. The use of our
technology solutions helps reduce electronic
waste.
© 2010 IOGEAR
 Loading...