

Page 1

Bluetooth Combo Print Adapter
User Manual (GBP301)
Page 2

Page 3

Welcome
Thank you for purchasing the IOGEAR Bluetooth Combo print adapter supporting both parallel and
USB printers. This print adapter is a first rate connectivity accessory designed to help reduce the
frustration of dealing with cables in your home or office. IOGEAR Combo print adapter with Bluetooth
T echnology allo ws Bluetooth enab led computers to send print job wirelessly to either parallel or USB
printers.
©2004 IOGEAR. All Rights Reserved. PKG-M0112
IOGEAR, the IOGEAR logo, MiniView, VSE are trademarks or registered trademarks of IOGEAR, Inc. Microsoft and Windows
are registered trademarks of Microsoft Corporation. IBM is a registered trademark of International Business Machines, Inc.
Macintosh, G3/G4 and iMac are registered trademarks of Apple Computer, Inc. IOGEAR makes no warranty of any kind with
regards to the information presented in this document. All information furnished here is for informational purposes only and is
subject to change without notice. IOGEAR, Inc. assumes no responsibility for any inaccuracies or errors that may appear in this
document.
Page 4

T able of Contents
Package Content
Overview
Features
Requirements
Introduction
Installation
Application
- Print from Computers
- Print from PDAs
The Utility Software
Specification
T echnical Support
○○○○○○○○○○○○○○○○○○○○○○○○○○○○○○○
○○○○○○○○○○○○○○○○○○○○○○○○○○○○○○○○○○○
○○○○○○○○○○○○○○○○○○○○○○○○○○○○○○○○○○○
○○○○○○○○○○○○○○○○○○○○○○○○○○○○○○○○○
○○○○○○○○○○○○○○○○○○○○○○○○○○○○○○○○○○
○○○○○○○○○○○○○○○○○○○○○○○○○○○○○○○○○○
○○○○○○○○○○○○○○○○○○○○○○○○○○○○○○○○○○
○○○○○○○○○○○○○○○○○○○○○○○○○○○○○○
○○○○○○○○○○○○○○○○○○○○○○○○○○○○○○○○
○○○○○○○○○○○○○○○○○○○○○○○○○○○○○○
○○○○○○○○○○○○○○○○○○○○○○○○○○○○○○○○○
○○○○○○○○○○○○○○○○○○○○○○○○○○○○○○○○
Radio and TV Interference Statement
Limited Warranty
○○○○○○○○○○○○○○○○○○○○○○○○○○○○○○○○
○○○○○○○○○○○○○○○○○○○○○○○○
2
3
4
5
6
8
12
12
13
31
32
33
34
35
Page 5

This package contains:
1– Bluetooth Print Adapter
1– Manual on CD
1– Quick Start Guide
1– Warranty/Registration Card
1– Power Adapter
* If any items are damaged or missing, please contact your dealer.
2
Package Contents
Page 6

Overview
IOGEAR’s palm sized Combo Wireless Print Adapter with Bluetooth Technology allows any Bluetooth enabled
computer or PDA to wirelessly send the print job to a USB or a parallel printer. It complies with USB 1.1,
IEEE 1284, and the Bluetooth 1.1 specifications. It supports data transmission rates of up to 723 Kbps, and
a wireless access range of up to 330ft (100 meters).
This unit supports HCRP (Hardcopy Cable Replacement Profile) and SPP (Serial Port Profile), all of which
resides on onboard flash memory. The RF circuitry on the RF chip includes complete receiver and transmitter
functions.
This is a plug-n-play unit, it doesn’t require any special driver, plug it in the USB or parallel printer is all that
entails.
3
Page 7

Features
• Allows any Bluetooth enabled computer or PDA to wirelessly send print jobs to a USB or a parallel printer
• Plug and Play, easy to install
• Bluetooth Class 1 device with a 330 ft range (100 meters)
• Supports data rate of 723 Kbps
• Supports Pico-net and Scatter-net and up 7 devices
• Complies with USB 1.1, IEEE 1284, and the Bluetooth 1.1 specifications
• Supports HCRP (Hardcopy Cable Replacement Profile) and SPP (Serial Port Profile)
4
Page 8

System Requirements
Computers and PDAs:
• Windows based & Bluetooth enabled
• Additional software may be required for PDAs
Printer:
• Either a USB or a parallel printer.*
*Only 1 printer is recommended to be connected, does not support two printers simultaneously.
Multifunction printers not supported.
5
Page 9
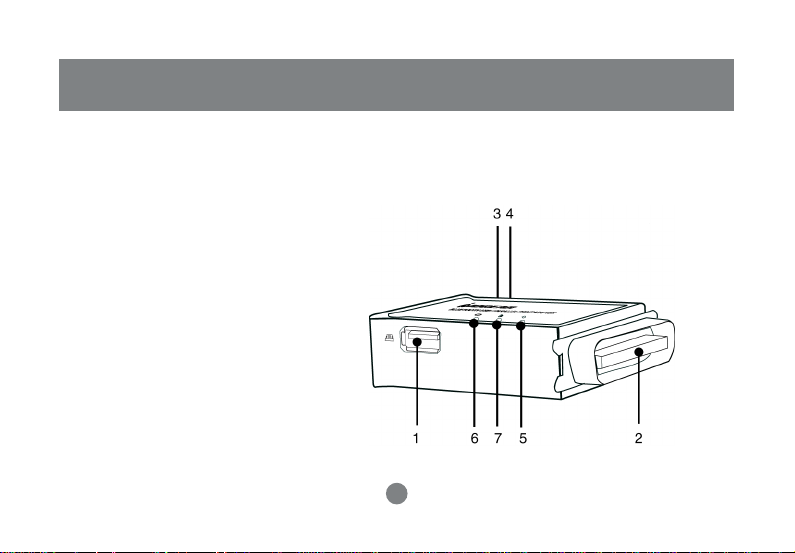
Introduction
IOGEAR Bluetooth Combo Print Adapter supports both IEEE1284 and USB printers, but only one connection
at a time. In other words, it doesn’t support two printers simultaneously. If you plug printers to both parallel
and USB ports, only the parallel printer connected will work.
1. USB printer port
2. IEEE1284 parallel printer port
3. Power connection
4. Reset button
5. Power LED
6. Bluetooth LED
7. Printer LED
6
Page 10

Introduction
The RESET button is to re-initialize the printer adapter. Use a pointed object to initialize the Reset process.
The Power LED turns on when power is supplied through the power adapter.
The Bluetooth LED blinks when Bluetooth link is established but no data is transmitted on the line. It stays
on when data is transmitted.
The Printer LED is on when there is a USB or parallel printer connected to the Bluetooth print combo adapter.
It is OFF when no printer is connected. It blinks when the print combo adapter is receiving data transmission.
7
Page 11
1. Plug the print adapter into the available port on the
printer, either parallel or USB. Plug the power
adapter into the power port of the print adapter.
Turn on the power for the print adapter and plug the
power adapter to the printer.
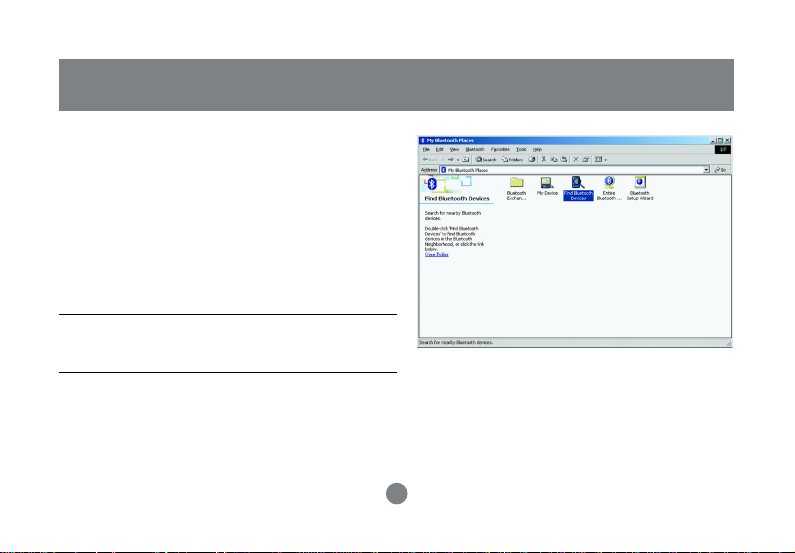
2. From the Bluetooth enabled computer, double click
the Bluetooth icon to open My Bluetooth Place,
and select Find Bluetooth Device.
Note: This example is based upon Widcomm
Bluetooth software, the installation screens may look
different if you use some other software.
Installation
8
Page 12
Installation
3. The computer starts searching for nearby
Bluetooth devices right after double click the icon
of Find Bluetooth Devices. You should see the
printer adapter icon soon after that.
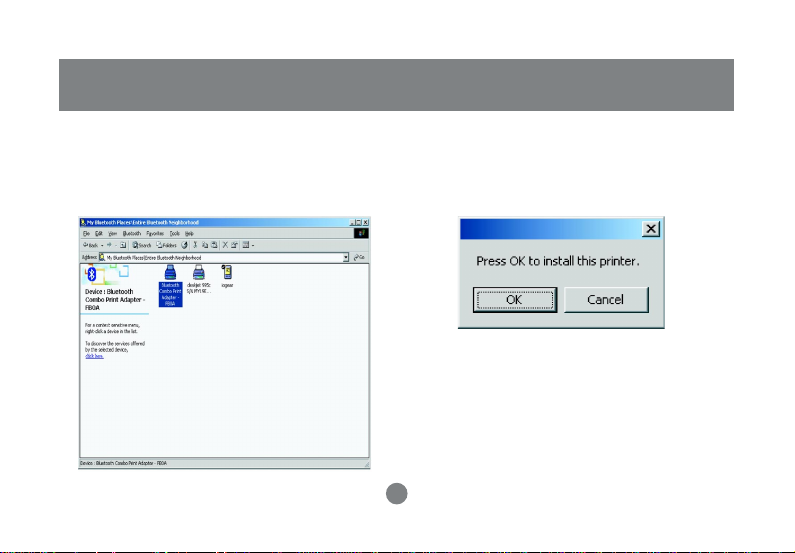
4. Double click the print adapter icon, the following
question will be prompted:
9
Page 13

Installation
5. Click OK. The Add Printer Wizard will appear.
Select the right printer and then click OK. In this
case, we use Epson C62. If the printer is not on
the list, you will need to install the driver by using
a driver CD provided by the printer manufacturer
or download the driver on line.
6. The printer Properties window should appear now.
You can rename the printer at this time. Click on
Print Test Page. If you see the printer start
printing the test page, then the installation is
successful.
10
Page 14

Installation
7. In case the printer is not printing test page, or you
are curious about the port selection, you can click
on Ports on the Properties window, the correct
port is the Bluetooth Combo print adapter port.
Another way to verify this is to go to the Control
Panel, select Printers, you should see the printer
you just installed through the Bluetooth adapter
listed in the printer file.
Congratulations! You have completed installing the
IOGEAR Bluetooth Combo Print Adapter.
11
Page 15

1. Print from a Bluetooth enabled computer
From your application (i.e. MS Word) choose to print
as a normal printer.
If there are more than one printers, select the printer
connected to the Combo Print Adapter as the printer
you are going to send the print job to. Then click OK.
Application
You can have up to seven devices (computers or
PDAs) connected to the Bluetooth Combo Print
Adapter, it works on first come first serve basis.
12
Page 16

Application
2. Print from a Bluetooth enabled PDA
There are various PDA operating systems, in this
manual we will cover Pocket PC 2003 and Windows
CE 3.0.
Setup and Print from a Bluetooth enabled PDA
using Microsoft Pocket PC 2003 Professional
Edition.
The PDA we used for the following example is the HP
iPAQ Pocket PC h1945.
You need to download and install HP Mobile Printing
from the HP website to add printing function to the
PDA.
1. Turn on the PDA, and click on the Bluetooth icon.
Turn on Bluetooth by tapping at the Bluetooth
Manager.
Bluetooth
Icon
13
Page 17

Application
2. The Bluetooth Manager window appears, tap at
the middle the screen where it says “Tap New”.
3. The Connection Wizard window appears, highlight
Explore a Bluetooth device and then tap on Next.
14
Page 18

Application
4. Tap on Device (where it says No device selected),
and then tap on Next.
5. At the Bluetooth Browser window, select Bluetooth
Combo Print Adapter.
15
Page 19

Application
6. This takes you back to the Wizard window, and you
can see the Combo Print Adapter is already
selected as the device.
7. Tap on next, you are prompted that the shortcut
is already created, tap on Finish.
16
Page 20

Application
see that the shortcut is already created. Close this
window by tapping on “ x ” at the upper right corner
of the screen.
9. Tap on Start again and select HP Mobile Printing.8. Now from the Bluetooth Manager window, you can
17
Page 21

Application
10. Tap on Start Using the Program in the HP Mobile
Printing window.
11. Select the target document to be printed, then
tap on Print.
18
Page 22

Application
12. The Print Configuration window appears, tap on
Configure.
13. Tap on Add in the following screen.
19
Page 23

Application
14. Highlight Bluetooth and then tap on Next.
15. Highlight Search for a Bluetooth printer near me,
and tap on Next.
20
Page 24

Application
16. Highlight Bluetooth Combo Print Adapter and
then tap on Next.
17. At the following screen, choose the printer
connected to the Bluetooth Print Adapter, then
you can either tap on Print Test Page, or just tap
on Finish to print the target document that you
intend to print.
21
Page 25

Setup and Printing with Windo ws CE 3.0
Windows CE3.0 and some other older PDA OS do not
include print function. The users need to download
and install additional PDA printing software. In the
following case, we installed PrintPocketCE. You can
purchase and download this software from
www.fieldsoftware.com.
After you install the PrintPocketCE on your PDA, you
need to go through the following steps to perform
Bluetooth PDA printing:
1. From the Start window, tap on Start, then select
Settings, and tap System at the bottom of the
Setting window.
Application
22
Page 26

Application
2. Tap on the Bluetooth Icon. From the profile
selections at the bottom of the window, select
Serial Port.
The following window will appear, make sure
Enable Service is checked, and REMEMBER THE
OUTBOUND COM PORT!!
You will need the Outbound COM Port later. In our
case the Outbound COM Port is COM port 7. Tap
on the OK button at the right upper corner.
23
Page 27

Application
3. For the first time you use the Combo print
adapter, you need to create the shortcut in the
Bluetooth Manager. Tap the Bluetooth Connection
Wizard button at the bottom of the screen.
4. Select Explore Bluetooth Device and then tap on
Next.
24
Page 28

Application
5. Tap on the Device section (where it says No
device selected) and the Bluetooth Browser will
appear.
6. Select the Bluetooth Combo Print Adapter from the
list, which will take you back to the Connection
Wizard.
25
Page 29

7. You can see that the Combo Print Adapter is
selected as a device already. Tap on Next to set
up the security, in this case, we choose not to
use passkey.
Application
26
Page 30

Application
8. Tap on Next on the previous screen, you can see
that the service used is Bluetooth Serial Port.
Select Bluetooth serial port and tap on Next.
9. You can see that the Combo Print Adapter is
already on the shortcut list of the Bluetooth
Manager.
27
Page 31

Application
To fur ther investigate the connection, tap on
Bluetooth Combo Print Adapter, you can see the
following screen.
Tap OK to close this screen. Now if you tap the
Active Connections at the bottom of the Bluetooth
Manager window, you can see that the Bluetooth
Combo Print Adapter is connected to the PDA.
28
Page 32

Application
10. Tap on OK to close the previous screen. Now tap
on start, then select Program, and select
PrintPocketCE as the program by tapping its icon.
11. At the PrintPocketCE window, select the target
document.
29
Page 33

Application
12. You can see the COM7 is already connected to
the Epson C62 through the combo print adapter.
13. Click on Start Printing. Then select Bluetooth
Combo Print Adapter in the following screen.
Done!
30
Page 34

The Utility Software
The Utility Software
The utility software in the CD is designed to help you to change the passkeys of the Bluetooth combo print
adapter. The installation process of this software involves uninstall and reinstall of your Bluetooth stack, we
do not recommend you to use this software unless you have some security concerns.
Another limitation of this software is that it is only compatible with Bluetooth device (not the combo print
adapter) with CSR chip (Cambridge Silicon Radios), it may not support other chip manufacturers’ Bluetooth
module.
After you decide necessity and limitation of the utility software, please go to IOGEAR website to download
the instruction manual to use this utility software.
31
Page 35

Specification
32
Page 36

Tec hnical Support
If you need technical support, please check out our IOGEAR Tech Info Library (T.I.L.) at
www.iogear.com/support for the latest tips, tricks, and troubleshooting. The IOGEAR T.I.L. was
designed to provide you with the latest technical information about our products. Most of the answers to
your questions can be found here, so please try it out before contacting technical support.
Technical support is available Monday through Friday from 7:30 am to 5:30 pm PST and can be reached
at (949) 453-8782 or by email support@iogear.com.
33
Page 37

Radio & TV Interference Statement
WARNING!!! This equipment generates, uses and can radiate radio frequency energy and, if not installed and
used in accordance with the instruction manual, may cause interference to radio communications. This
equipment has been tested and found to comply with the limits for a Class B computing device pursuant to
Subpart J of Part 15 of FCC Rules, which are designed to provide reasonable protection against such
interference when operated in a commercial environment. Operation of this equipment in a residential area is
likely to cause interference, in which case the user at his own expense will be required to take whatever
measures may be required to correct the interference.
34
Page 38

Limited Warranty
IN NO EVENT SHALL THE DIRECT VENDOR’S LIABILITY FOR DIRECT , INDIRECT, SPECIAL, INCIDENTAL
OR CONSEQUENTIAL DAMAGES RESUL TING FR OM THE USE OF THE PRODUCT, DISK OR ITS DOCUMENT A TION EXCEED THE PRICE P AID FOR THE PRODUCT .
The direct vendor makes no warranty or representation, expressed, implied, or statutory with respect to the
contents or use of this documentation, and especially disclaims its quality, performance, merchantability, or
fitness for any particular purpose.
The direct vendor also reserves the right to revise or update the device or documentation without obligation
to notify any individual or entity of such revisions, or updates. For further inquires please contact your
direct vendor.
35
Page 39

Page 40

Contact info.
23 Hubble • Irvine, CA 92618 • (P)949.453.8782 • (F)949.453.8785 • www.iogear.com
 Loading...