

Page 1

Bluetooth™ GPS with Navigation Software
Hardware Quick Start Guide (GBGPS201)
Page 2

©2004 IOGEAR. All Rights Reserved. PKG-M0129
IOGEAR, the IOGEAR logo, MiniView, VSE are trademarks or registered trademarks of IOGEAR, Inc. Microsoft
and Windows are registered trademarks of Microsoft Corporation. IBM is a registered trademark of International
Business Machines, Inc. Macintosh, G3/G4 and iMac are registered trademarks of Apple Computer, Inc.
IOGEAR makes no warranty of any kind with regards to the information presented in this document. All
information furnished here is for informational purposes only and is subject to change without notice. IOGEAR,
Inc. assumes no responsibility for any inaccuracies or errors that may appear in this document.
Page 3

Welcome
The IOGEAR Bluetooth GPS system is a real-time navigation system. The Bluetooth GPS
receiver allows you to receive positioning data from satellites and connect to mobile computing
devices via Bluetooth, without cables. It provides high position accuracy and reliable tracking
capabilities. The ultra low-power design and long-life rechargeable battery gives you 25 hours of
continuous usage and eliminates constant recharging between uses. It is portable and
lightweight, so you can put it on the dashboard or any other location that provides a direct line of
sight to the sky.
You will never get lost again!
Page 4

Features
Bluetooth enabled GPS system to take advantage of your Bluetooth enabled PDA or computer*
Map and navigation software included
Highly sensitive unit to assure effective tracking and navigating
Superior power saving circuitry to allow at least 25 hour operation
Class 2 Bluetooth device.
Easy to connect the GPS receiver to your favorite mobile devices
Page 5

This package contains:
• 1 Bluetooth GPS receiver
• 1 AC-DC Charger
• 1 Car Charger
• 1 Pouch
• 1 Neck Strap
• 1 Quick Start Guide for Hardware
• 1 Quick Start Guide for Map Software
• CDs with User Documentation, GPS software and Map data
• 1 Warranty/Registration Card
Package Contents
2
Page 6
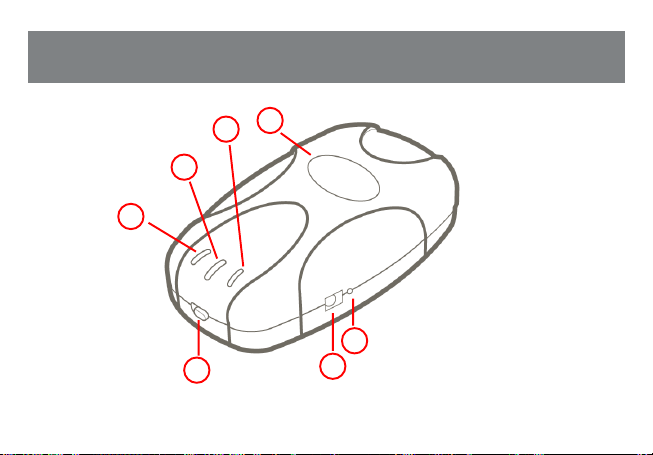
Introduction
4.
7.
6.
5.
3.
1.
3
2.
Page 7

Introduction
1. Power Switch
To turn the IOGEAR GPS unit ON/OFF, slide the switch
towards the desired position as indicated below.
ON – Slide switch to the right position to turn on
OFF – Slide switch to the left position to turn it off
2. Power Jack
Before you can use the IOGEAR GPS unit, you need to
charge it for approximately 3 hours to fully charge. In the
box, you should have received both an AC-DC charger, and
car charger
• AC Charger – Can be connected to any power outlet
found in your home.
• DC Charger – For vehicle use; connects to the
cigarette lighter port.
To charge the built-in battery, simply connect one of the
included chargers to the power jack on your GPS unit.
3. Reset Switch
The main function of the reset switch is to perform a Cold Start of
the GPS unit. Essentially, a cold start wipes off all the data - such
as satellite IDs, position information, etc. - stored in the GPS
memory. After the GPS unit is “cold-started” it will obtain all
required information from scratch.
Instances when you would need to do a cold start of the GPS unit
include:
GPS cannot establish communication with the satellites even
after long periods of waiting
You have moved to another location (such as to a different
state/country) with the GPS unit OFF and now it cannot
establish its position
Cold-Start Procedure
1. Turn the GPS ON
2. Press and hold the reset button for 5 seconds
3. Release reset button
After performing a cold-start, the GPS unit should take about 5
minutes to establish its position, since it needs to gather all GPS
data from scratch. However, depending on your location/
environment, this process may take up to 15 minutes.
4
Page 8

Introduction
4. GPS Status LED (Green)
• Blinking - GPS receiver is attempting to establish position.
• Steady light - indicates the GPS position is established..
5. Bluetooth Status LED (Blue)
• Slow Blinking (every four seconds) – GPS receiver is ready to
accept Bluetooth connections, but is not yet connected to any
Bluetooth device.
• Fast Blinking (every second) – GPS receiver has established
communication with another Bluetooth device.
6. Power Status LED (Yellow/Orange/Red)
• No light – If the unit is ON, it indicates the receiver is operating
on battery power and has sufficient charge
• Steady yellow light - Battery is charging and GPS is ON
• Steady orange light – Battery is charging and GPS is OFF
• Blinking red light - indicates a battery fault. This can occur if
the GPS unit is exposed to extreme temperature conditions.
In this case, place the GPS in a location that allows it to return
to a normal operating temperature.
• Steady red light – indicates system fault. This occurs when
internal electrical damage or system malfunction is detected.
(GPS)
5
7. External Antenna Jack
The external antenna jack allows you to connect an external
antenna in cases when it’s not possible for the GPS unit to have a
direct view to the sky. This may be the case if your vehicle does
not have an area where you can easily mount your GPS unit.
Another instance is if your vehicle’s surrounding causes
interference with the GPS wireless signals. With the external
antenna, you can place the GPS unit anywhere on your vehicle and
mount the antenna on the roof.
Page 9

Requirements
Safety
Carefully read all instructions before using the IOGEAR
GPS unit and set-up all your equipment in the car before
driving. DO NOT attempt to follow any of the instructions
provided here while you drive as this may present danger
not only to yourself but to others on the road as well.
When using this unit, make sure to obey all traffic laws and
regulations. Always use good judgment and safety
precautions.
Extreme Temperatures
The Lithium-Ion battery inside the GPS unit is sensitive to
extreme temperatures. Do not leave the receiver in a
location where temperatures are higher than 60° C (140°
F). In case of extreme temperatures, please allow the GPS
to warm or cool before normal operation.
Obstruction and Interference
The first time you power on your GPS unit, it may take up to 15
minutes to establish its position. The actual amount of time it takes
to establish its position, may increase or decrease, depending on
many environmental factors.
Among the factors that could cause interference are:
Tall buildings
Enclosed or Indoor areas
Metal or other type of objects that interfere with wireless
signals
For best results, have the GPS unit in a place where it has a clear
view to the sky and away from large/tall structures.
6
Page 10

Operation
HARDWARE
Step 1: Charging Battery
Before you can use the GPS receiver, you need to fully charge
the internal battery. Plug one of the included chargers into the
GPS power Jack and then to your power source. The GPS
receiver needs to be charged for approximately 3 hours for a full
charge. A fully charged unit will give you about 25 hours of
continuous operation.
Step 2: Establish GPS Position .
1.
Slide the power switch of the GPS towards the ON position.
2.
Your receiver will automatically begin accepting
GPS and Bluetooth signals when the power is turned on.
7
3. Establish GPS Position
The green GPS LED will glow continuously while the
GPS position is being established, which may take
up to 15 minutes the first time the unit is turned on.
Once the GPS has established position, the GPS
LED will remain steady. If the GPS receiver does
not establish position after about 15 minutes, try
placing/moving the unit to a different where it has a
clear view of the sky.
Once you have established GPS position (green
LED is steady), proceed to next step below.
4. Bluetooth Connectivity
The blue LED will blink approximately every four
seconds to let you know the Bluetooth radio is
active and ready to accept a Bluetooth connection.
Please follow the steps below to establish Bluetooth
communication between your GPS and Bluetooth
PDA/Laptop.
Page 11

Operation
Once you establish connection with your Bluetooth
device, the blue LED will remain solid blue.
Note: If you encounter any connectivity problems, please
consult User Manual for advanced troubleshooting.
Step 3: Connect GPS Receiver to your Bluetooth-enabled
device
In order to connect the IOGEAR GPS receiver to your Bluetooth-
enabled device, you will have to establish a Serial Port connection
between the two devices. The instructions below are to demonstrate
an example on how this is setup; this will probably vary depending
on your equipment and the Bluetooth software version that you are
using.
If you have any problems establishing the connection between the
GPS receiver and your Bluetooth device, please consult the manual
of your Bluetooth device. Also, for more detailed instructions,
consult the User manual of your IOGEAR Bluetooth GPS unit.
Connect GPS Receiver to your PDA
Check List
Complete the following checklist before beginning operation:
• Navigation software application and maps are
correctly installed on your PDA.
• Bluetooth GPS battery is fully charged
• PDA battery is fully charged, if not directly
connected to a power outlet
• Verify that Bluetooth functionality is enabled and
working on your PDA.
8
Page 12

Operation
Make sure Bluetooth is ON.
2.
Tap on the Bluetooth icon to access the Bluetooth
services on your PDA.
Tap on “Bluetooth Manager” to open it.
3.
9
4.1.
Tap on “New” and then select “Connect”
Page 13

Operation
Make sure “Explore a Bluetooth device” is
5.
highlighted and then tap “Next”
Tap the box where it says “No Device selected”6.
10
Page 14

Operation
7.
Tap the icon “IOGEAR GPS” When prompted for
a PIN code, enter “0000” (four zeroes).
11
Under the Service Election Tap “SPP for GPS”
8.
and then click “Next”
Page 15

Operation
9.
Tap “Finish”
10.
Tap and hold until sub menu appears, then select
Connect
12
Page 16

Operation
Close Bluetooth Manager
11.
You may now proceed to the “GPS Software
12.
Quick Start Guide” to complete the GPS
connection setup.
Note: In some cases, the Bluetooth connection
between your PDA and GPS may be terminated
if not used within a specified time interval.
Please make sure that when you follow the steps
in the “Configure Software to use with GPS”
section of the software quick start guide, that
your Bluetooth connection is still active. If it isn’t,
please re-establish the connection again.
Connect GPS Receiver to your Laptop
In the example below, the Bluetooth software used
was Widcomm stack version 1.4.2. The procedure
given here is for your reference and may vary
depending on your Bluetooth software and version that
you are using.
Make sure that Bluetooth is ON. In our case, this is
1.
shown by the blue/white Bluetooth icon on the
Windows tray bar.
13
Page 17

Operation
Double-click on the “My Bluetooth Places” icon to
2. Right-click on the GPS unit and select “Pair Device”
open the Bluetooth software. And then do a
“Search for devices in range” to discover the
Bluetooth GPS unit.
3.
from the pop-up menu.
14
Page 18

Operation
When prompted to enter PIN code, please enter “0000” (four zeroes), and then click OK.
4.
When prompted to enter PIN code, please enter “0000” (four zeroes), and then click OK.
5.
15
Page 19

Operation
6. Double-click on the GPS icon to see a list of the
services offered by this device. The service
offered by the unit is the Serial Port service. To
connect to the serial port, please double-click on
the icon.
Your laptop will then start connecting to the serial
7.
port on the GPS. Upon connection, you should
receive a message informing you of the COM port #
used for connection. In our case, the laptop
connected to COM 5 on the GPS unit. Simply click
OK and close your Bluetooth software.
16
Page 20

Operation
You may now proceed to the “GPS Software Quick
8.
Start Guide” to complete the GPS connection setup.
Note: In some cases, the Bluetooth connection
between your computer/GPS may be terminated if
not used within a specified time interval. Please
make sure that when you follow the steps in the
“Configure Software to use with GPS” section of the
software quick start guide, that your Bluetooth
connection is still active. If it isn’t, please reestablish the connection again.
17
Page 21

Contact info.
23 Hubble • Irvine, CA 92618 • (P) 949.453.8782 • (F) 949.453.8785 • www.iogear.com
 Loading...