

Page 1

®
Bluetooth Wireless Headset
User Manual (GBE201)
Page 2

©2004 IOGEAR. All Rights Reserved. PKG-M0134
IOGEAR, the IOGEAR logo, are trademarks or registered trademarks of IOGEAR,
Inc. Microsoft and Windows are registered trademarks of Microsoft Corporation.
IBM is a registered trademark of International Business Machines, Inc. Macintosh,
G3/G4 and iMac are registered trademarks of Apple Computer, Inc. All other
brand and product names are trademarks or registered trademarks of their
respective holders. IOGEAR makes no warranty of any kind with regards to the
information presented in this document. All information furnished here is for
informational purposes only and is subject to change without notice. IOGEAR, Inc.
assumes no responsibility for any inaccuracies or errors that may appear in this
document.
Page 3

Enjoy true hands-free freedom with the IOGEAR Wireless Bluetooth
Headset. This ultra-lightweight headset enables you to wirelessly use
your Bluetooth cell phone, ending messy and potentially dangerous
wire tangles. The IOGEAR Bluetooth Headset will clearly transmit all
your phone calls wirelessly to your phone via Bluetooth radio
technology.
Its stylish and compact design makes it very easy and comfortable
to wear.
Among its many features are a built-in rechargeable battery for long
battery life, easy-to-reach volume control, and ear hook for secure
wearing.
Welcome
Page 4

The GBE201 follows the Bluetooth 1.1 specification and supports the
headset and hands-free profile.
The Bluetooth headset also comes with a USB charger cable to
make it convenient for mobile users to charge the unit while on the
road.
Welcome
Page 5

2
3
4
5
12
17
19
21
23
40
Package Contents
Features
System Requirements
Introduction
Pairing to Bluetooth Phone
How to use headset
· Making a call
· Ending a call
· Answering a call
Connecting Headset
to PC/laptop
FAQ/Troubleshooting
Specification
Technical Support
Radio & TV Interference
Statement
Limited Warranty
○○○○
○○○○○○○
○○○
○○○○○○
○○
○○○○○
○○○○○
○○○○
○○○○○○
○○○○○
○○○
○○○
○ ○○○
Table of Contents
42
43
45
46
○ ○ ○○○○
Page 6

2
1 Bluetooth headset
1 Ear hook
1 Neck strap
1 Power adapter
1 USB charging cable
1 User manual
1 Warranty/Registration card
Package Contents
Page 7

3
• Hands-free communications via your Bluetooth cell phone
• Use headset on your PC/Laptop to make calls using programs
like Skype, MSN messenger, etc.
• Compatible with Bluetooth 1.1 specifications
• Support both Headset profile and Hands-free profile
• Easy operation and comfortable wear
• Ear hook included to ensure secure wearing
• Volume control included
• Built-in re-chargeable battery
• Light and attractive design
Features
Page 8

4
Bluetooth cell phone with either Headset profile or Hands-free profile
Requirements
Page 9

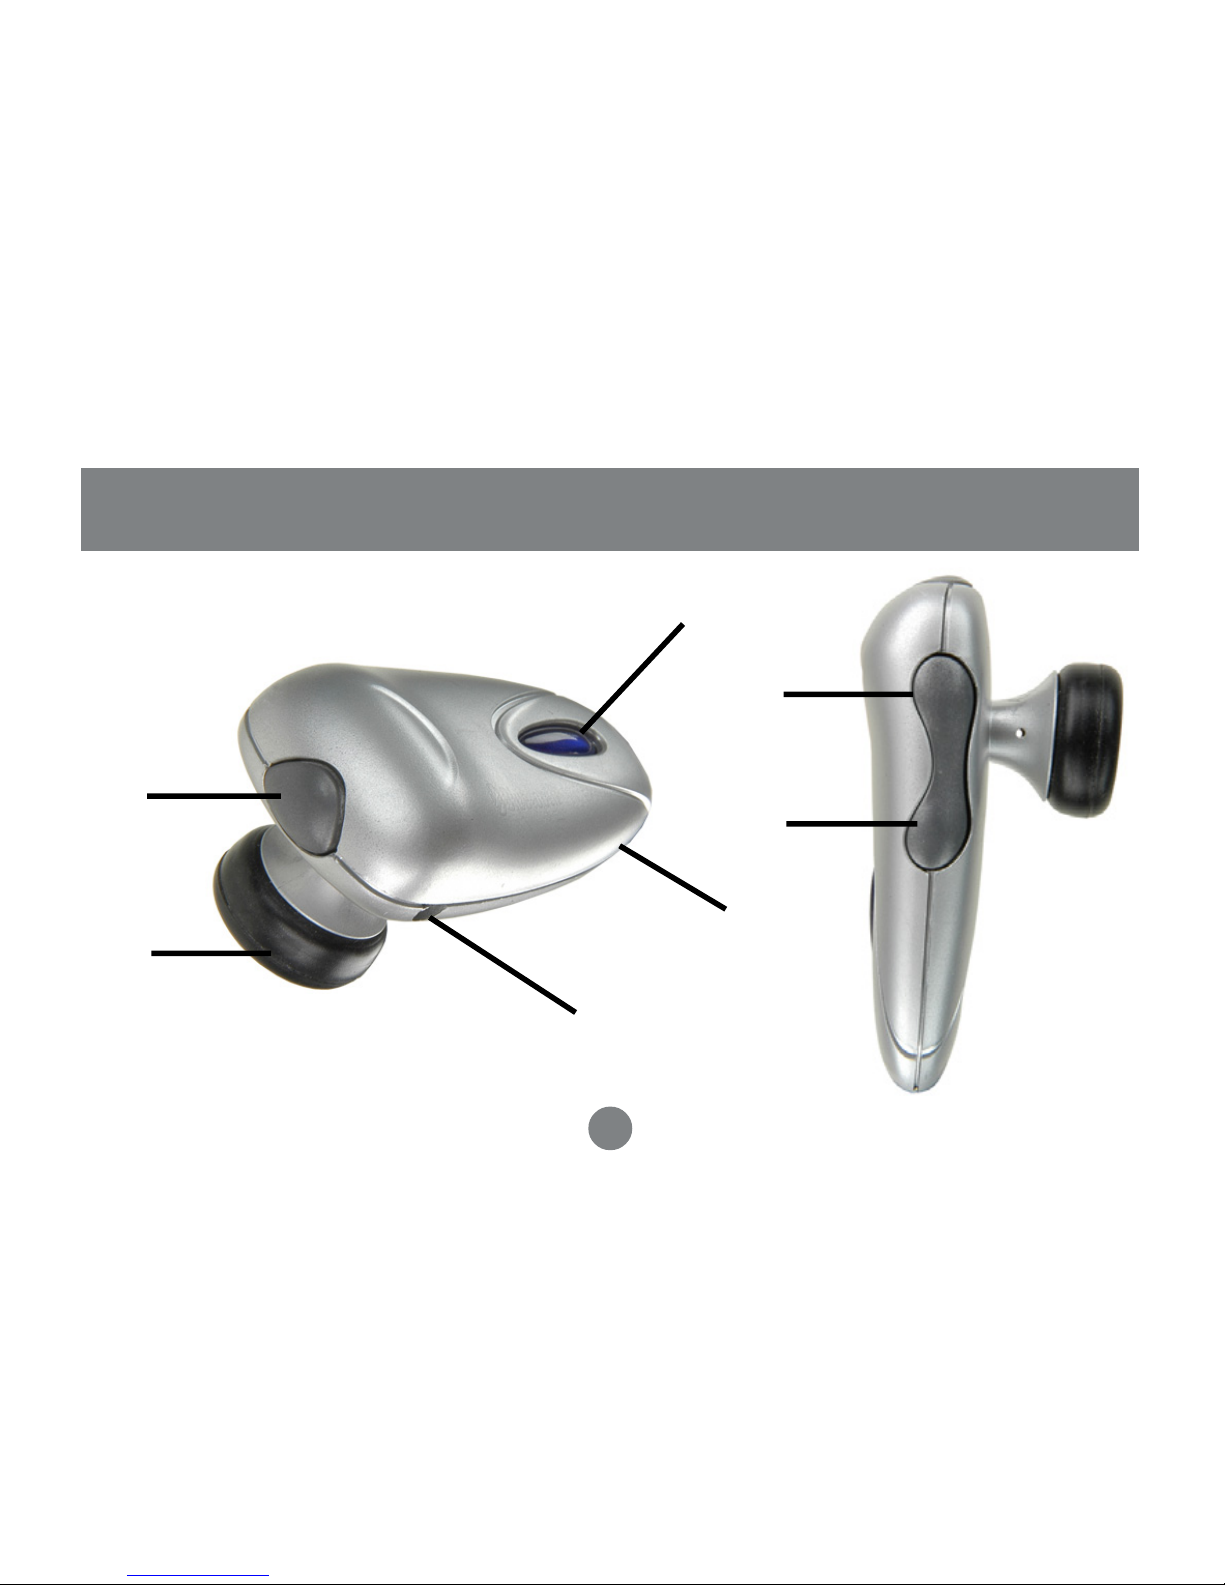
1. Multi-function – used to turn headset ON/OFF, set it in
discovery mode for pairing, and answer/terminating calls
2. Volume up – increase the volume on the headset
3. Volume down – decrease the volume on the headset
4. Power jack – insert power cable to charge internal battery
5. LED window – displays red and blue LEDs
6. Speaker – this is the speaker for incoming voice calls
7. Microphone – this is the microphone for outgoing voice calls
please refer to the picture on the next page
Introduction
5
Page 10
Introduction
6
1
2
3
4
5
7
6
Page 11

LED Indicator lights
Blue LED:
• Flashes approximately every six (6) seconds when the headset
is ON (standby mode)
• Flashes very rapidly when in discovery mode to pair with your
Bluetooth phone
Red LED:
• Remains ON while headset is charging and also when in
discovery mode
• Flashes when the headset battery is low.
Introduction
7
Page 12

8
Introduction
Turn ON the headset
1. Press and hold the multi-function button for about six (6)
seconds; the blue LED will flash quickly four (4) times.
Thereafter, it will flash once every six seconds.
Turn OFF the headset
1. Press and hold the multi-function button for about three (3)
seconds; the red LED will flash four (4) times and then turn off.
Page 13

Charging the Battery
You must charge the internal battery of the Bluetooth headset before
your first use. Thereafter, the red LED will flash when the battery is
low and emit a warning sound.
A fully-charged battery will give you approximately 4.5 hours of talk time, and 100
hours stand-by time.
To charge the battery, follow the procedure below:
1. Turn OFF the headset
2. Connect either the
USB charger cable or AC adapter
into the
power jack of the Bluetooth headset
3. The Red LED will remain ON while the headset is charging.
Once the headset is fully charged, the red LED will turn OFF. It
takes about 2.5 hours to fully charge the headset.
Introduction
9
Page 14

10
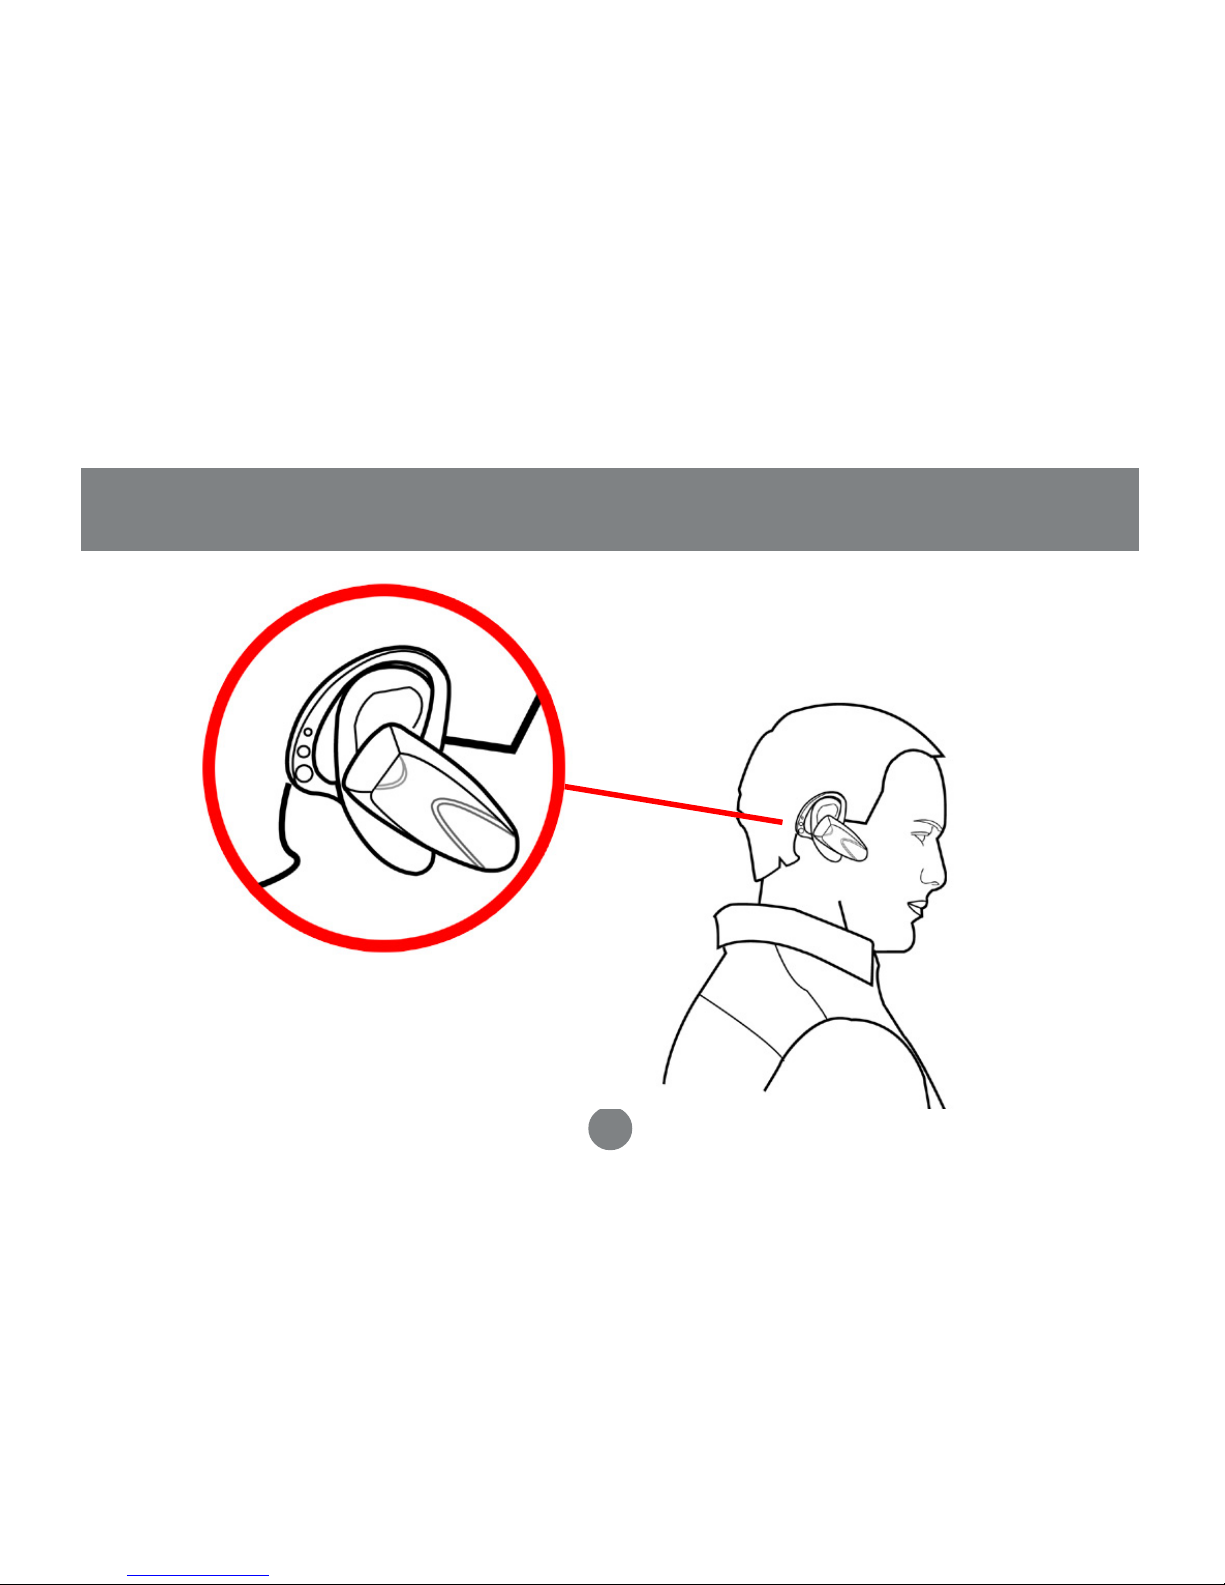
Attaching ear hook (for right ear wearing)
1. Position the headset with the speaker pointing inward (see
image on the next page)
2. Position the ear hook with the clip-on facing down
3. Snap the ear hook onto the neck of the speaker
TIP: To use the headset on the left ear, follow the steps as above, except that on
#1, position the headset with the speaker pointing outward.
Placing headset on your ear
1. Wrap the ear hook around your ear
2. Insert the speaker piece into your ear
Introduction
please see image on next page
Page 15
Introduction
11
Page 16

Pairing Procedure
Pairing is a Bluetooth function that enables Bluetooth devices to
remain permanently linked to each other. By pairing devices, you
only need to authenticate and authorize communication between
your devices once. During the pairing procedure, a PIN code is
required for secure authentication. Thereafter, communication
between your two Bluetooth devices is done automatically without
requiring authentication or confirmation.
For the procedure below, you will need to know how to use your cell
phone’s Bluetooth feature for discovering, connecting, and pairing to
other Bluetooth devices. If you’re not sure how to do this, please
consult your cell phone user manual.
Pairing to Bluetooth Phone
12
Page 17

To pair the IOGEAR Bluetooth headset with your Bluetooth phone,
follow the procedure below:
1. Make sure that the IOGEAR Bluetooth headset is OFF.
2. Press and hold the multi-function button for about nine (9)
seconds; the red LED will turn ON and the blue LED will start
rapidly flashing; the headset is now in pairing mode.
NOTE: If only the blue LED is on, the headset is in stand-by mode; repeat the
step again and make sure the red LED is on and blue LED is blinking. The
Bluetooth headset will remain in pairing mode for approximately five minutes.
If no pairing takes place during that time interval, it will switch to stand-by
mode.
Pairing to Bluetooth Phone
13
Page 18

3. Follow your cell phone’s instructions to search for Bluetooth
devices. The IOGEAR Bluetooth headset will show up as
“IOGEAR BT Headset.” If the headset is not found on your first
attempt, try again as it may take a few tries the first time you
search for the device.
4. Select the Bluetooth headset (“IOGEAR BT Headset”) and
select the pairing option. If you are prompted for a PIN code,
enter “1234”
5. You are now paired to the headset!
Below are two examples for your reference. The instructions will vary
depending on the brand/model of phone that you have. If you still
have problems using the Bluetooth functionality of your phone,
please consult your cell phone’s user manual.
Pairing to Bluetooth Phone
14
Page 19

Example 1 – Nokia 3650
1. Make sure that the IOGEAR Bluetooth headset is OFF.
2. Set the Bluetooth headset in pairing mode as indicated in the
pairing procedure.
3. Nokia 3650 pairing procedure:
4. You are now paired to the IOGEAR Bluetooth headset!
a. Go to the phone menu
b. From the list, select Connectivity
c. Click on Bluetooth, and then select Options
d. Now, click on “New paired device” – this will start searching for the
Bluetooth headset
e. The headset will be displayed as “IOGEAR BT Headset”
f. Select the headset and when prompted for a Passcode/PIN, enter
“1234”
Pairing to Bluetooth Phone
15
Page 20

Pairing to Bluetooth Phone
Example 2 – Sony Ericsson T616
1. Make sure that the IOGEAR Bluetooth headset is OFF.
2. Set the Bluetooth headset in pairing mode as indicated in the
pairing procedure.
3. Ericsson T616 pairing procedure:
4. You are now paired to the IOGEAR Bluetooth headset!
a. Access the main menu
b. Select the “Connect” option and then select Bluetooth
c. Make sure Bluetooth function is turned ON (if not click on Turn On)
d. Go down to the option “My Devices” to see a list of Bluetooth devices
e. To search for the Bluetooth headset, click on “New Device” which will
start looking for the Bluetooth headset
f. The headset will be displayed as IOGEAR BT Headset.
g. Select it and when prompted for a Passcode/PIN, enter “1234” and then
select OK
16
Page 21

How to Use Headset
Before proceeding, please check the following:
First, make sure that you have already paired the Bluetooth headset
with your cell phone. Otherwise, you will be prompted to authorize
the connection every time the Bluetooth headset communicates with
your phone. Please refer to the section “Pairing to Bluetooth Phone”
for additional information.
Making a call
1. Put on the Bluetooth headset (make sure that it’s turned on).
2. Dial the desired number using your phone’s keypads
3. Press the connect/send button to initiate the call
4. The call should automatically be transferred to the Bluetooth
headset.
17
Page 22

NOTE: If the phone call is not automatically transferred to the Bluetooth headset,
press the multi-function button once to transfer the call to the headset. Your phone
may prompt you if you wish to accept the connection from the Bluetooth headset;
simply click Yes/OK.
If you still cannot get your phone to transfer calls to the Bluetooth headset, we
suggest you to consult your cell phone’s user manual for instructions on configuring
your phone to use with a headset.
How to Use Headset
18
Page 23

Ending a call
If you wish to terminate a call while using the Bluetooth headset,
please do the following:
1. Press the multi-function button once to hang up
2. You should now hear a beep sound from the headset indicating
call has terminated
Alternatively, you can terminate the phone call in the usual way using
your cell phone’s keypads.
How to Use Headset
19
Page 24

Redial a number
If you wish to redial the last number using the Bluetooth headset,
please follow the procedure below:
1. Press and hold any of the volume buttons (volume up or volume
down) for approximately 3-5 seconds.
Note: If your phone has not previously used the headset, this may take longer
as the phone will ask for confirmation to use the Bluetooth headset
2. Your cell phone will start redialing the last number
How to Use Headset
20
Page 25

Answering a call
Before proceeding, make sure you have already paired your
Bluetooth phone and headset.
1. Put on the Bluetooth headset (make sure that it’s turned on).
2. When you hear the ring tone on the headset, simply press the
multi-function button once to pick up the call.
Note: If the call is being transferred to your cell phone directly instead of the
Bluetooth headset, press the multi-function button once on the headset to
force your phone to use the headset.
If you still cannot get your phone to transfer calls to the Bluetooth
headset, we suggest you to consult your cell phone’s user manual for
instructions on configuring your phone to use with a headset.
How to Use Headset
21
Page 26

Reject a call
To reject a call using the headset, do the following:
1. You will hear the ringing tone on your Bluetooth headset
2. Press and hold the multi-function button for 3 seconds until your
phone stops ringing
How to Use Headset
22
Page 27

Connecting Headset to PC/laptp
The IOGEAR Bluetooth headset can also be used on your PC/
Laptop. Why would you want to use your headset on your computer?
The answer is simple:
• Voice Over IP
Please note that in order for this to work, the Bluetooth software on
your PC/Laptop, must support the Headset profile. For the examples
shown below, we used the WIDCOMM Bluetooth software v3.0.x
which supports Headset profile.
If you’re not sure what profiles your Bluetooth software supports,
please check with the vendor of your Bluetooth device/software.
23
Page 28

Connecting Headset to PC/Laptop
24
1. Open My Bluetooth Places and click on
Search for devices in
range
. The headset will be displayed as “IOGEAR BT Headset”
Page 29

2.
Right-click on the icon representing the IOGEAR headset, and
select “Pair Device.” When prompted for a PIN code, enter “1234”
Connecting Headset to PC/Laptop
25
Page 30

3. To access the services offered by the headset, double-click the
IOGEAR headset icon. Now, right click on the icon displayed
below and select “Connect Headset.”
Connecting Headset to PC/Laptop
26
Page 31

4. Upon successful connection, the icon will turn green and it will
say “connected” as shown below. Also note that the Bluetooth
icon on your tray bar will turn green.
Connecting Headset to PC/Laptop
27
Page 32

5. If you hear a long-beep sound on the headset, click the multi-
function button once to transfer the audio on your computer to
the headset.
Connecting Headset to PC/Laptop
28
Page 33

Voice Over IP
With Voice-Over-IP programs, you can use your Internet connection
to make calls to your family/friends over the Internet. Examples of
these are chat programs that let you have voice conversations such
as MSN messenger, yahoo messenger, etc. The instructions below
are provided as an example, but they should work for most VoiceOver-IP programs, with minor configuration necessary. Here we
show two examples of Voice-OVER-IP programs:
- SKYPE
- MSN Instant Messenger
Connecting Headset to PC/Laptop
29
Page 34

Bluetooth Audio Drivers
Before proceeding, you need to check that your Bluetooth software
has properly installed all Audio drivers necessary; otherwise, you will
not be able to use the Bluetooth headset as an audio device. To
verify this, go to Control Panel and look under
Sound, video and
game controllers
, as shown below.
In our example, you can see that the Bluetooth audio drivers have
been added to our system and appear as “Bluetooth Audio Device”
(the name and location might vary in your case). If your system does
not show any Bluetooth audio drivers that you can see, please
consult your Bluetooth software manual or check with your device
vendor.
Connecting Headset to PC/Laptop
30
Page 35

Connecting Headset to PC/Laptop
31
→
Page 36

SKYPE
Configure software
Before you can use the Bluetooth
headset with your Voice-Over-IP
program, you need to first specify the
headset as the source for Audio-IN and
Audio-OUT.
1. First, click on the File menu and
select Options
Connecting Headset to PC/Laptop
32
Page 37

2. Now go to the Hand/
Headsets tab. As you
see below, the sound
device specified is the
Windows default device
(most likely your PC/
Laptop speakers).
Connecting Headset to PC/Laptop
33
Page 38

3. Click on each of the
menu options and
select Bluetooth Audio
and then click Save.
NOTE: The name of the
audio device shown here is
what was displayed in
Control Panel under the
Sound, video and game
controllers
section.
Connecting Headset to PC/Laptop
34
Page 39

4. You should now be able to use the IOGEAR Bluetooth headset
as your audio device with your Voice-Over-IP software. If you
encounter any problems, please consult your software
documentation.
Connecting Headset to PC/Laptop
35
Page 40

MSN Messenger Voice chat
Configure software
Before you can use the Bluetooth
headset with your Voice-Over-IP
program, you need to first specify the
headset as the source for Audio-IN
and Audio-OUT.
1. First, click on the Tools menu and
select Audio Tuning Wizard
Connecting Headset to PC/Laptop
36
Page 41

2. When prompted to specify
your Audio device, make
sure to select Bluetooth
Audio, and then click Next.
NOTE: The name of the audio
device shown here is what was
displayed in Control Panel under
the
Sound, video and game
controllers
section.
Connecting Headset to PC/Laptop
37
Page 42

3. Once the wizard has completed, click on
Actions > Start a Voice Conversation,
and select the person you want to invite
to your conversation.
Connecting Headset to PC/Laptop
38
Page 43

4. You are done!
Connecting Headset to PC/Laptop
39
Page 44

Q1. My Bluetooth phone cannot find the IOGEAR Bluetooth
headset, what is wrong?
Please make sure that you have set the headset in pairing mode
(discoverable mode) as indicated in the “Pairing Procedure” section
of this manual. Please keep in mind that if the Blue LED is blinking,
but the red LED is off, the headset is in stand-by mode. In order for
the headset to be in pairing mode, the blue LED must be blinking
and red LED must be ON.
Q2. Why won’t my Bluetooth headset turn on?
Before you can use the IOGEAR Bluetooth headset, you must fully
charge it for at least 2.5 hours.
FAQ/Troubleshooting
40
Page 45

FAQ/Troubleshooting
Q3. What Bluetooth phones are compatible with the IOGEAR
Bluetooth headset?
Most phones that are compatible with the Headset or Handsfree profile
should work with the headset. If your phone is Bluetooth-enabled, but
does not support either of these profiles, it will not work with the
headset. Please check with your phone manufacturer if you’re not sure.
Q4. How do I use the USB charging cable?
Simply connect the USB charging cable to an available USB port on your
computer to charge the IOGEAR Bluetooth headset. Make sure that your
computer is turned ON so that it provides power to the headset. Please
note that if you connect the charging cable to a USB non-powered hub,
the headset may not receive enough power to charge
.
41
Page 46

Specifications
42
Page 47

Technical Support
To help IOGEAR® customers obtain the highest level of performance
from their ION™ Drive, the IOGEAR Service Support team is
available to answer your technical questions.
Please be sure to visit our Technical Information Library (TIL) is
available on our website: http://www.iogear.com/support . Our
TIL has answers to many common questions and problems that may
already have solutions available.
IOGEAR Service & Support can be reached from 8am to 5pm (PST)
Monday through Friday, or at the following address:
23 Hubble Drive, Irvine, CA 92618
43
Page 48

866-9-IOGEAR (866-946-4327) (Press “4” for Technical Support)
You may also e-mail us 24-hours a day, 7 days a week by sending
your inquiry to: support@iogear.com.
Please Note: We will generally respond to your inquiry within 24-48 hours;
however, due to increasing demand for pre-sales and technical information for our
products, response times can and may fluctuate. Therefore, if you have an urgent
inquiry, we recommend calling our Service Support Department for immediate
assistance.
Please be ready to give a brief description of the problem, and what you were
doing when the problem occurred, before calling Service Support.
Technical Support
44
Page 49

Radio & TV Interference Statement
WARNING!!! This equipment generates, uses and can radiate radio
frequency energy and, if not installed and used in accordance with
the instruction manual, may cause interference to radio communications. This equipment has been tested and found to comply with the
limits for a Class B computing device pursuant to Subpart J of Part
15 of FCC Rules, which are designed to provide reasonable
protection against such interference when operated in a commercial
environment. Operation of this equipment in a residential area is
likely to cause interference, in which case the user at his own
expense will be required to take whatever measures may be required
to correct the interference.
45
Page 50

IN NO EVENT SHALL THE DIRECT VENDOR’S LIABILITY FOR
DIRECT, INDIRECT, SPECIAL, INCIDENTAL OR CONSEQUENTIAL
DAMAGES RESULTING FROM THE USE OF THE PRODUCT, DISK,
OR ITS DOCUMENTATION EXCEED THE PRICE PAID FOR THE
PRODUCT.
The direct vendor makes no warranty or representation, expressed,
implied, or statutory with respect to the contents or use of this
documentation, and especially disclaims its quality, performance,
merchantability, or fitness for any particular purpose.
Warranty
46
Page 51

The direct vendor also reserves the right to revise or update the
device or documentation without obligation to notify any individual or
entity of such revisions, or updates. For further inquires please
contact your direct vendor.
Warranty
47
Page 52

®
23 Hubble • Irvine, CA 92618 • (P)949.453.8782 • (F)949.453.8785 • www.iogear.com
Contact info.
 Loading...