

Page 1

Bluetooth
User Manual (GBC201)
™
CompactFlash Card
Page 2

Thank you for purchasing IOGEAR Bluetooth CompactFlash card for PDAs!
The IOGEAR Bluetooth Compact Flash Card for PDAs fits into both Type I and Type II CF slots on your PDA,
and makes your PDA Bluetooth enabled. Connect your Bluetooth ready PDA and other Bluetooth devices and
enjoy the freedom and flexibility of wireless information sharing. You can print, transfer files, synchronize data,
and share Internet access, without cables.
This unit complies with Bluetooth 1.1 specifications and provides you with a 723 Kbps date rate at ranges up
to 66 feet. The low power consumption design maximizes your PDA's battery life. It is easy to install and use,
and it is compatible with all PDAs that have Microsoft Pocket PC.
We hope you enjoy using your IOGEAR Bluetooth CompactFlash card for PDAs, another connectivity solution
from IOGEAR.
©2002 IOGEAR. All Rights Reserved. PKG-M0036
IOGEAR, the IOGEAR logo, MiniView, VSE are trademarks or registered trademarks of IOGEAR, Inc. Microsoft and Windows
are registered trademarks of Microsoft Corporation. IBM is a registered trademark of International Business Machines, Inc.
Macintosh, G3/G4 and iMac are registered trademarks of Apple Computer, Inc. IOGEAR makes no warranty of any kind with
regards to the information presented in this document. All information furnished here is for informational purposes only and is
subject to change without notice. IOGEAR, Inc. assumes no responsibility for any inaccuracies or errors that may appear in
this document.
Page 3

Table of Contents
Package Contents....................................................................................................................
Overview...................................................................................................................................
Features...................................................................................................................................
System Requirements..............................................................................................................
Installation................................................................................................................................
Configure and Setting Your Bluetooth™ Compact Flash Card..............................................
Connecting Your Bluetooth™ Compact Flash Card To Other Bluetooth Devices.................
How to Connect to a Printer.....................................................................................................
How to use PrintPocketCE.......................................................................................................
Network Access/Internet Sharing Through Bluetooth™ Enabled Computers.......................
How to Connect to a Cellular Phone.........................................................................................
Frequently Asked Questions....................................................................................................
What is Pairing?.......................................................................................................................
1
03
04
06
07
08
14
20
20
26
28
33
36
36
Page 4

Table of Contents
What does “Pairing” Mean in Terms of Security?..................................................................
What is a Pass Key?...............................................................................................................
Pairing Devices........................................................................................................................
Unpairing Devices...................................................................................................................
Specifications..........................................................................................................................
Technical Support...................................................................................................................
Radio & TV Interference Statement.......................................................................................
Limited Warranty.....................................................................................................................
2
36
36
37
37
38
40
41
42
Page 5

The complete Bluetooth™ CompactFlash Card package consists of:
1. GBC201 Bluetooth™CompactFlash Card
2. Installation CD
3. User manual
4. Warranty registration card
If any of these items are missing or damaged please contact your dealer
immediately.
3
Package Contents
Page 6

Overview
Bluetooth™ is a low-power wireless networking standard which uses short radio links that allow
electronic devices to communicate with each other without using cables.
The following services are supported by Bluetooth technology:
• Dial up to the Internet on your computer over your Bluetooth cellular phone.
Send a fax from your computer over your Bluetooth™ cellular phone.
• Synchronize your Bluetooth™ PDA with your computer.
• Send your business card to anyone who has a Bluetooth™ device.
• Send or receive files to or from anyone who has a Bluetooth™ enabled device.
• Chat with anyone who has a Bluetooth™ enabled computer.
• Play a one-on-one serial game without a cable.
• Send an e-mail without being wired to the network.
4
Page 7

Overview
The IOGEAR Bluetooth Compact Flash Card for PDAs fits into both Type I and Type II CF
slots on your PDA, and makes your PDA Bluetooth enabled. Connect your Bluetooth ready
PDA and other Bluetooth devices and enjoy the freedom and flexibility of wireless information
sharing. You can print, transfer files, synchronize data, and share Internet access, without
cables.
This unit complies with Bluetooth 1.1 specifications and provides you with a 723 Kbps data
rate at ranges up to 66 feet. The low power consumption design maximizes your PDA's
battery life. It is easy to install and use, and it is compatible with all PDAs that have Microsoft
Pocket PC.
5
Page 8

Features
• Enable a PDA with Bluetooth capability
• Type I CompactFlash card, fits both Type I and II CompactFlash slots
• Allows wireless working distances of up to 66 feet (20 meters)
• Connects with computers, printers, cell phones and other devices on your Bluetooth
Personal Area Network
• Features user-friendly software
• Low power consumption maximizes your PDA’s battery life
• Built-in encryption and authentication for safe, secure wireless communication
• Supports data transfer rates of up to 723 Kbps
6
Page 9

Requirements
System Requirements:
• PDAs with either Type I or Type II CompactFlash slot
• Operating System: Microsoft® Pocket PC 2000 or Pocket PC 2002
• IOGEAR has a full line of KVM, FireWire, USB, USB 2.0, and Bluetooth™ products. Please visit our website at
www.support@iogear.com for further information.
7
Page 10
Installation
NOTE:
Before installing the IOGEAR Bluetooth™ CompactFlash Card software, make sure
that Microsoft® ActiveSync has been properly setup on the PC, and that the PDA
and the PC are connected via the USB data transfer cable.
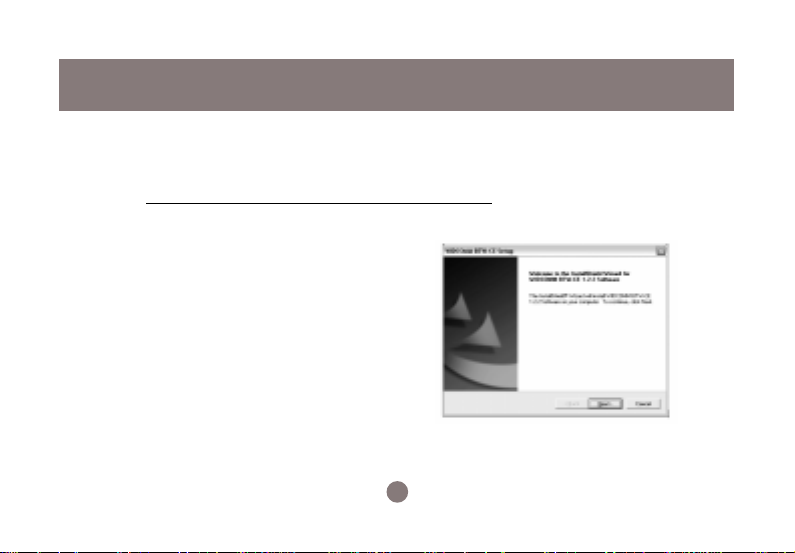
1. Insert the IOGEAR Bluetooth
CompactFlash Card Installation CD
into the CD-ROM drive.
2. The Installation CD will auto-play and
the InstallShield Wizard will pop up.
In case Auto-Play has been disabled,
manually start the Setup file on the
Installation CD.
8
Page 11
Installation
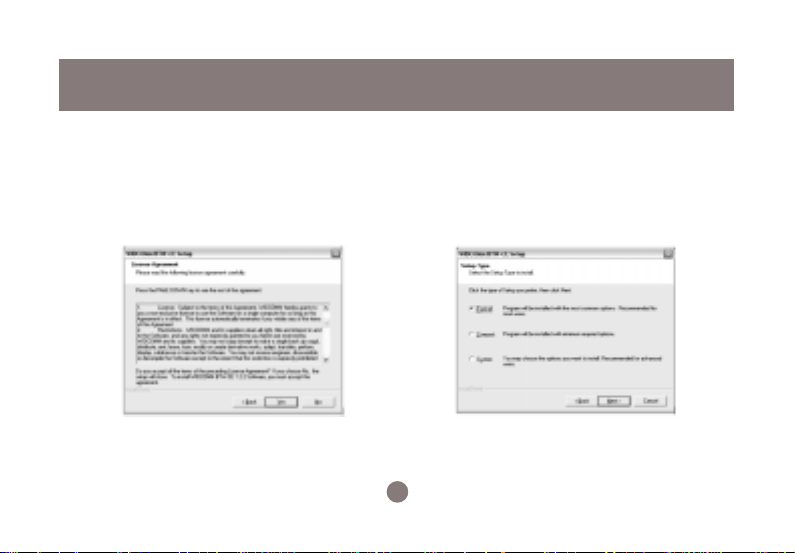
3. Read and agree to the License
Agreement by clicking on
Yes.
4. Select the desired Setup type and
click on
9
OK.
Page 12
Installation
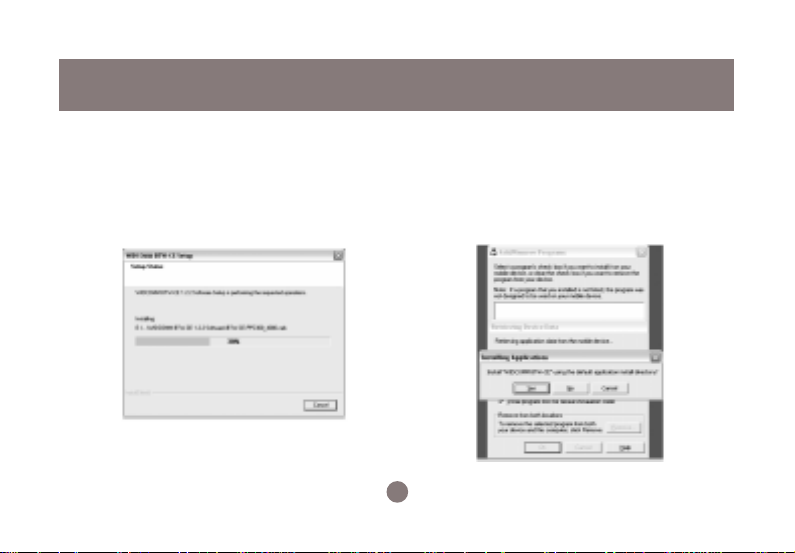
5. The Installation may take a few
minutes.
6. After the installation process, the
InstallShield Wizard will install the
Windows CE software onto the PDA.
Click
Yes
default directory on the PDA
10
to install the software into the
Page 13
Installation
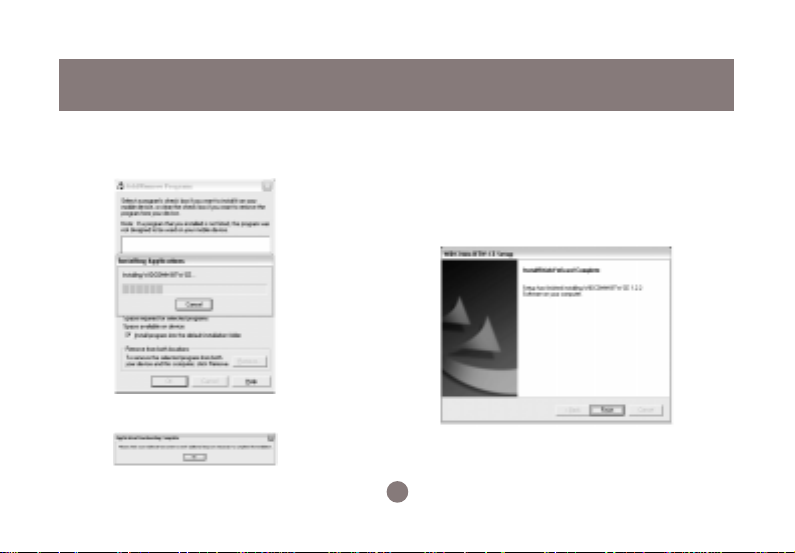
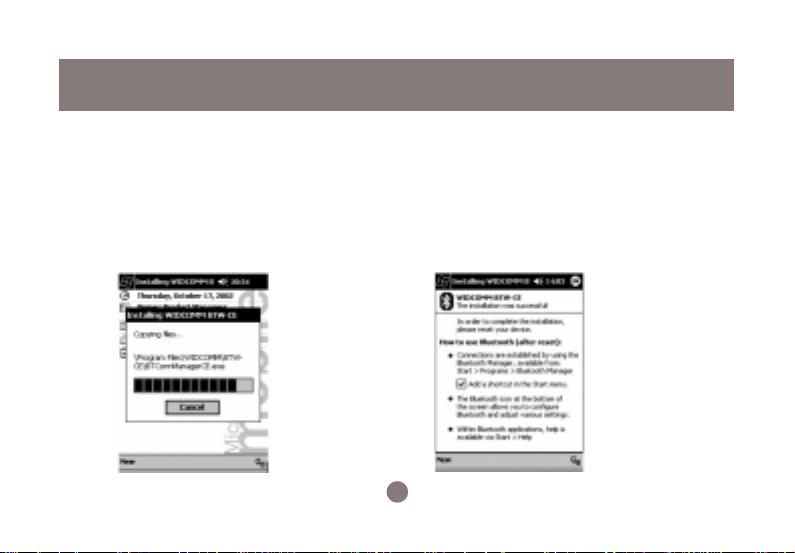
7. Copying the necessary files onto
the PDA may take a few minutes.
8. Click on
OK.
9. Click on
installation on your PC.
11
Finish
to complete the
Page 14
Installation
10. If the PDA is connected to your
computer, the software will be
immediately installed and configured.
Otherwise, the software will be
installed the next time, the PDA
synchronizes with the computer using
MS ActiveSync
.
11. After the installation has been completed,
a dialogue box will appear and confirm
that the installation was successful. Read
the instructions on the screen and make
sure to check
menu
corner.
12
Add a shortcut in the Start
. Tap on
OK
in the upper-right
Page 15

Installation
12. Unplug and reset the PDA.
Note: Please refer to the PDA manufacturer’s manual regarding the “factory reset” of the
PDA. Turning the PDA “On” and “Off” does not reset the PDA.
13. Insert the Bluetooth™ Compact Flash Card into the compact flash slot on your PDA
Congratulations! The IOGEAR Bluetooth Manager has been successfully installed on your PDA.
13
Page 16

Configuring and Setting Your IOGEAR Bluetooth™ CompactFlash Card
Before using your newly installed IOGEAR Bluetooth™ CompactFlash Card, make sure that
your Bluetooth™ CompactFlash Card is configured properly.
NOTE: The default settings should work with your current Bluetooth™ setup and only
need to be changed if there is a conflict between Bluetooth™ devices.
14
Page 17

Configuration
1. Double-tap on the Bluetooth™ icon in the
lower-left corner to access the configurations and settings menus.
The General Bluetooth™ tab shows the
2.
current profile and status of your
Bluetooth™ CompactFlash card. Doubletapping the Bluetooth™ Manager link will
allow you to set the connections (refer to
next topic: Connecting Your IOGEAR
Bluetooth™ CompactFlash Card To Other
Bluetooth Devices).
15
Page 18

Configuration
3. The Accessibility tab allows you to
change the device’s name and allow other
Bluetooth™ devices to connect to your
Bluetooth™ -enabled PDA. Checking the
option of Other devices can discover me
allows other Bluetooth™ devices to see
and pair to this PDA.
The File Transfer tab allows you to set the
4.
security level of file transfer service and
specify the folder for sharing. In the following
sample, “My Document\Business” folder is
shared and allow access by other devices.
You are able to set various security levels
such as requiring authorization and requiring
authorization with passkey.
16
Page 19

Configuration
5. The Information Exchange tab allows
you to set the security level of the
information exchange service and you can
also specify the vCard (If a vCard
business card has already been setup) to
be used.
The Serial Port tab allows you to set the
6.
security level of the serial port service. You
can also check which COM ports are being
used for incoming and outbound data.
17
Page 20

Configuration
7. The Bluetooth™ Dial-Up Networking
tab allows you to set the security level of
the Dial-Up Networking service and to
configure the modem options.
The About tab displays the Bluetooth™
8.
driver information.
18
Page 21

Tapping on the Advanced tab will allow you
9.
to check each component’s driver version
number
Configuration
19
Page 22

Operation
Connecting Your IOGEAR Bluetooth™ CompactFlash Card To Other Bluetooth Devices
Using the Bluetooth Manager, it is easy to configure and setup your IOGEAR Bluetooth™
CompactFlash Card. All other Bluetooth™ - enabled devices within range will be recognized
instantly such as printers, computers, cellular phones, and other PDAs (Personal Digital
Assistant). Creating a connection between your Bluetooth™ - enabled Pocket PC PDA and a
networked computer will allow you to share its Internet Connection (only if that computer has
access to the Internet), synchronize with other devices, and share files.
3How to Connect to a Printer:
NOTE: A 3rd party application such as PrintPocketCE MUST be installed on the PDA
before printing is possible. The software can be obtained at www.fieldsoftware.com/
PrintPocketCE.htm.
20
Page 23

Operation
1. Go to Start > Bluetooth Manager.
2. Tap on
New
and select Connect.
on the lower taskbar
3. Click on
click on
21
Explore a Bluetooth device
Next.
and
Page 24

Operation
4. Follow the instructions on the screen
and tap inside the device selection
box.
5. Select the printer (e.g. deskjet 995c) by
tapping on it.
6. The printer will appear inside the
selection box.
22
Page 25

Operation
7. Click on
Next.
8. Select the desired Security setting
and tap on
9. The Bluetooth Connection Wizard will
detect available services for the printer.
the printer.
23
Next.
Page 26

Operation
10. Select the desired service (e.g. Serial
Port) and tap on
Next.
11. A shortcut will be created and put into
My Shortcuts folder. Tap on
24
Finish.
Page 27

Operation
12. Install a 3rd party application, such
as PrintPocketCE to print to a
printer.
13. Start PrintPocketPC under Programs.
25
Page 28

Operation
How to use PrintPocketCE:
14. Select on the desired file to be
printed (any Word, Excel, or e-mail
file).
15. In the next screen, select the right printer
under Printer and the right port under Port.
If other settings need to be modified, tap
on
More Settings
26
.
Page 29

Operation
16. Make all necessary modifications (if
applicable), then tap on
OK
.
17. Back at the previous screen, tap on
Printing.
A dialogue box will prompt that
printing is in progress. Tap on
any time to abort the printing process.
After all data has been sent, the printer will
start printing.
27
Cancel
Start
at
Page 30

Operation
Network Access/Internet Sharing Through Bluetooth Enabled Computers
Note: The computer has to have an active Internet connection and set up for
Internet sharing, and Microsoft ActiveSync 3.5 or higher has already been
installed before attempting to synchronize.
Follow the directions under ActiveSync via Bluetooth. After the PDA has been
linked to the computer via ActiveSync, it is possible to browse the Internet on
the PDA.
(Windows 98 and ME do not support Internet Sharing because of the lack of
routing capabilities. Some third party software may allow Internet Sharing for
Windows 98 and ME, but is NOT support by IOGEAR.)
28
Page 31

Operation
1. Go to Start > Bluetooth Manager.
2. Tap on
3. Tap on
4. Follow the instructions on the screen,
New
select Connect.
on the lower taskbar and
ActiveSync via Bluetooth.
then tap on
Next.
5. Follow the instructions on the screen,
then tap on
29
Next.
Page 32

Operation
6. Follow the instructions on the screen
and tap inside the device selection box.
1. Follow the instructions on the screen and tap inside the device selection box.
7. Select the computer with Internet
access and tap on
30
Next
.
Page 33

Operation
8. The computer will appear inside the
selection box.
9. Tap on
Next.
10. Select the desired Security setting and tap
on
Next.
31
Page 34

Operation
11. Click on
the My Shortcuts folder.
Finish
to create a shortcut in
12. Tapping twice on the ActiveSync shortcut
will initiate synchronization.
You can browse the Internet on your
PDA now.
32
Page 35

Operation
Using PDA with Bluetooth Ready Cellular
Phones
1. Go to Start > Bluetooth Manager.
2. Tap on
3. Tap on
4. Select the Bluetooth™ cellular phone
New
select Connect.
on the lower taskbar and
Partner with a cell phone.
under Phone selection.
.5. Follow the instructions on the screen and
tap on
Next.
6. Select the appropriate phone from the list.
The phone will appear inside the selection
box.
33
Page 36

Operation
7. Tap on
8. Follow the instructions on the screen
9. The Bluetooth™ enabled cell phone
Next.
and enter a Passkey (See Frequently
asked questions: What is Pairing?).
Tap on
Next.
will prompt for the Passkey.
10. Enter the Passkey (must be identical to
the Passkey chosen on the Pocket PC.)
NOTE: Some Bluetooth™ cell phones (e.g.
Sony Ericsson T68) MUST initiate the pairing
process in order to successfully pair.
Please pay close attention to the on-screen
instructions.
34
Page 37

Operation
11. The dialogue box will confirm that both
devices have been paired. Tap on
Finish.
12. All necessary shortcuts are out into the My
Shortcuts folder.
IMPORTANT:
In order to use all the services of the mobile phone,
please refer to the mobile phone manufacturer’s manual.
35
Page 38

Frequently Asked Questions
What is “Pairing”?
Pairing is a Bluetooth™ function that enables Bluetooth™ devices to remain permanently linked
to another.
What does “Pairing” Mean in Terms of Security?
The Pass Key authentication is perpetuated in Pairing, meaning that devices will not ask for a
Pass Key once they are paired. Paired devices will remain linked, even if other paired devices
are turned off. Once a paired device turns back on, it is ready to be used and service requests
will not ask for the Pass Key again. The Built-in 128 bit security encryption of Bluetooth™
assures the privacy of your paired devices.
Note: If devices are unpaired, it is necessary to enter a pass key each time a service
request is made from or to another Bluetooth™ device.
What is a Pass Key?
A Pass Key (sometimes referred to as a Link Key) is a unique password set by the user, when
devices are paired or when Bluetooth™ - enabled devices are being accessed. The Pass Key
is case-sensitive and can be alphanumeric, numbers, or letters. The Pass Key must consist of
one (1) or more characters.
36
Page 39

Frequently Asked Questions
How to Pair Devices
1. Right-click on the Bluetooth™ device and click on “Pair device.”
2. Enter a Pass Key when asked.
Note: The Pass Key on both devices must be the same!
Example: If Device 1 tries to pair with Device 2, Device 1 will prompt for a Pass Key.
Enter any Pass Key. Device 2 will then ask for a Pass Key. Enter the Pass Key, which
has been set for Device 1. Done!
3. The Device is now paired.
How to Unpair Devices
1. Right-click on the paired Bluetooth™ device in the list and click on “Unpair device.”
2. Device is now unpaired.
37
Page 40

Specifications
38
Page 41

Specifications
39
Page 42

Technical Support
If you need technical support, please check out our IOGEAR Tech Info Library (T.I.L.) at
www.iogear.com/support for the latest tips, tricks, and troubleshooting. The IOGEAR T.I.L.
was designed to provide you with the latest technical information about our products. Most of
the answers to your questions can be found here, so please try it out before contacting
technical support.
Technical support is available Monday through Friday from 8:00 am to 5:00 pm PST and can
be reached at (949) 428-1111
40
Page 43

Radio & TV Interference Statement
WARNING!!! This equipment generates, uses and can radiate radio frequency energy and,
if not installed and used in accordance with the instruction manual, may cause interference
to radio communications. This equipment has been tested and found to comply with the
limits for a Class B computing device pursuant to subpart J of Part 15 of FCC Rules, which
are designed to provide reasonable protection against such interference when operated in
a commercial environment. Operation of this equipment in a residential area is likely to
cause interference, in which case the user at their own expense will be required to take
whatever measures may be required to correct the interference.
41
Page 44

Limited Warranty
IN NO EVENT SHALL THE DIRECT VENDOR’S LIABILITY FOR DIRECT, INDIRECT,
SPECIAL, INCIDENTAL OR CONSEQUENTIAL DAMAGES RESULTING FROM THE
USE OF THE PRODUCT, DISK, OR ITS DOCUMENTATION EXCEED THE PRICE PAID
FOR THE PRODUCT.
The direct vendor makes no warranty or representation, expressed, implied, or statutory
with respect to the contents or use of this documentation, and especially disclaims its
quality, performance, merchantability, or fitness for any particular purpose.
The direct vendor also reserves the right to revise or update the device or documentation
without obligation to notify any individual or entity of such revisions, or updates. For
further inquiries please contact your direct vendor.
42
Page 45

Contact info.
23 Hubble • Irvine, CA 92618 • (P) 949.453.8782 • (F) 949.453.8785 • www.iogear.com
 Loading...