

Page 1

www.iogear.com
GWAVRKIT
PART NO. Q1371
Quick Start Guide
Duplicast Wireless Screen Mirroring
Guide de demarrage rapide
Mise en miroir d'écran sans fil Duplicast
Page 2
1
Package Contents
1 x GWAVR Wireless A/V Receiver
1 x Wireless USB Transmitter
1 x USB Power Adapter
1 x Micro USB Power Cable
1 x HDMI Cable
1 x Installation CD
1 x Quick Start Guide
1 x Warranty Card
System Requirements
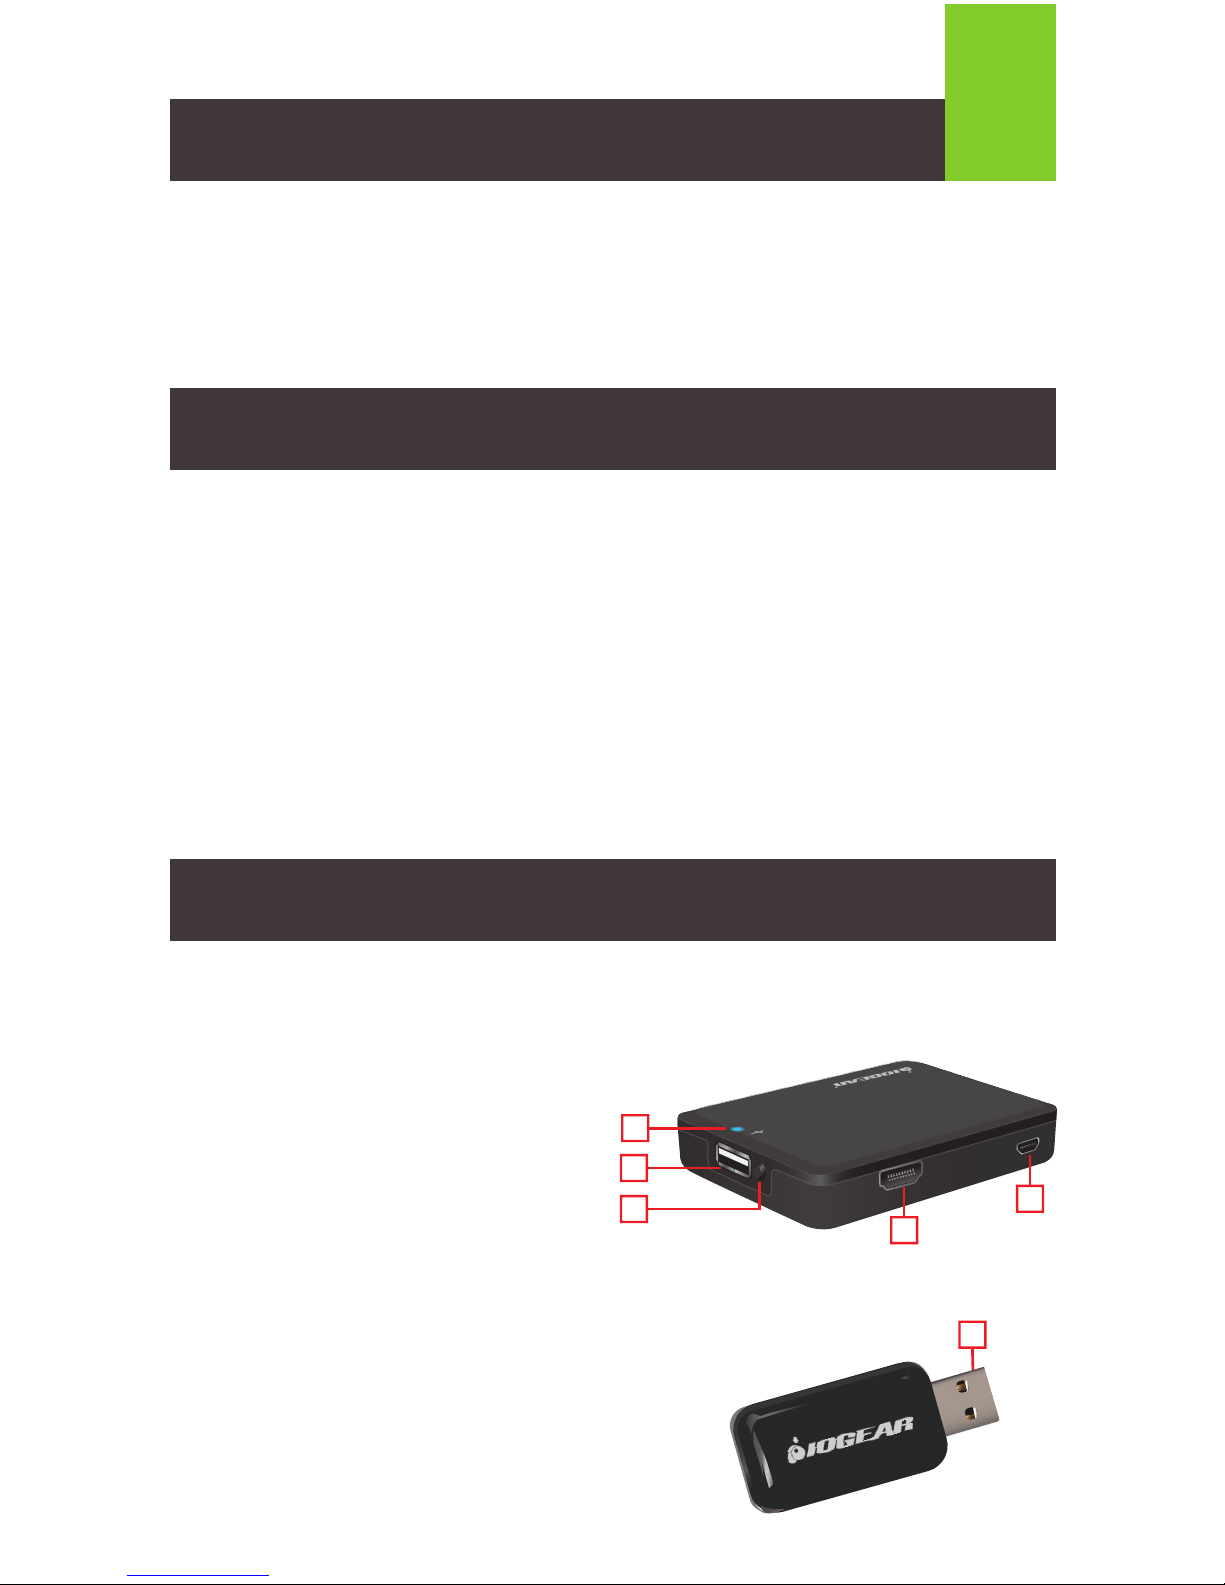
Overview
Receiver:
1. Power LED
- LED lights solid blue when
connected to the power adapter.
2. USB Port
- This port is reserved for
service and future updates.
3. Mode Button
4. HDMI Out
5. USB Micro-B Power Port
- Connect the power adapter to this
port to supply power to the device.
Transmitter:
6. USB Type-A Connector
PC (Minimum Requirements)
• Intel Core i5 2nd Gen or AMD Phenom II X4 equivalent or newer
• 2GB of system memory (RAM)
• Available USB Port
Operating Systems
• Windows
®
7, Windows® 8 or Windows® 8.1
Display
• HDTV or Projector with HDMI port
Micro USB
HDTV
Mode
1
2
3
5
4
6
Page 3
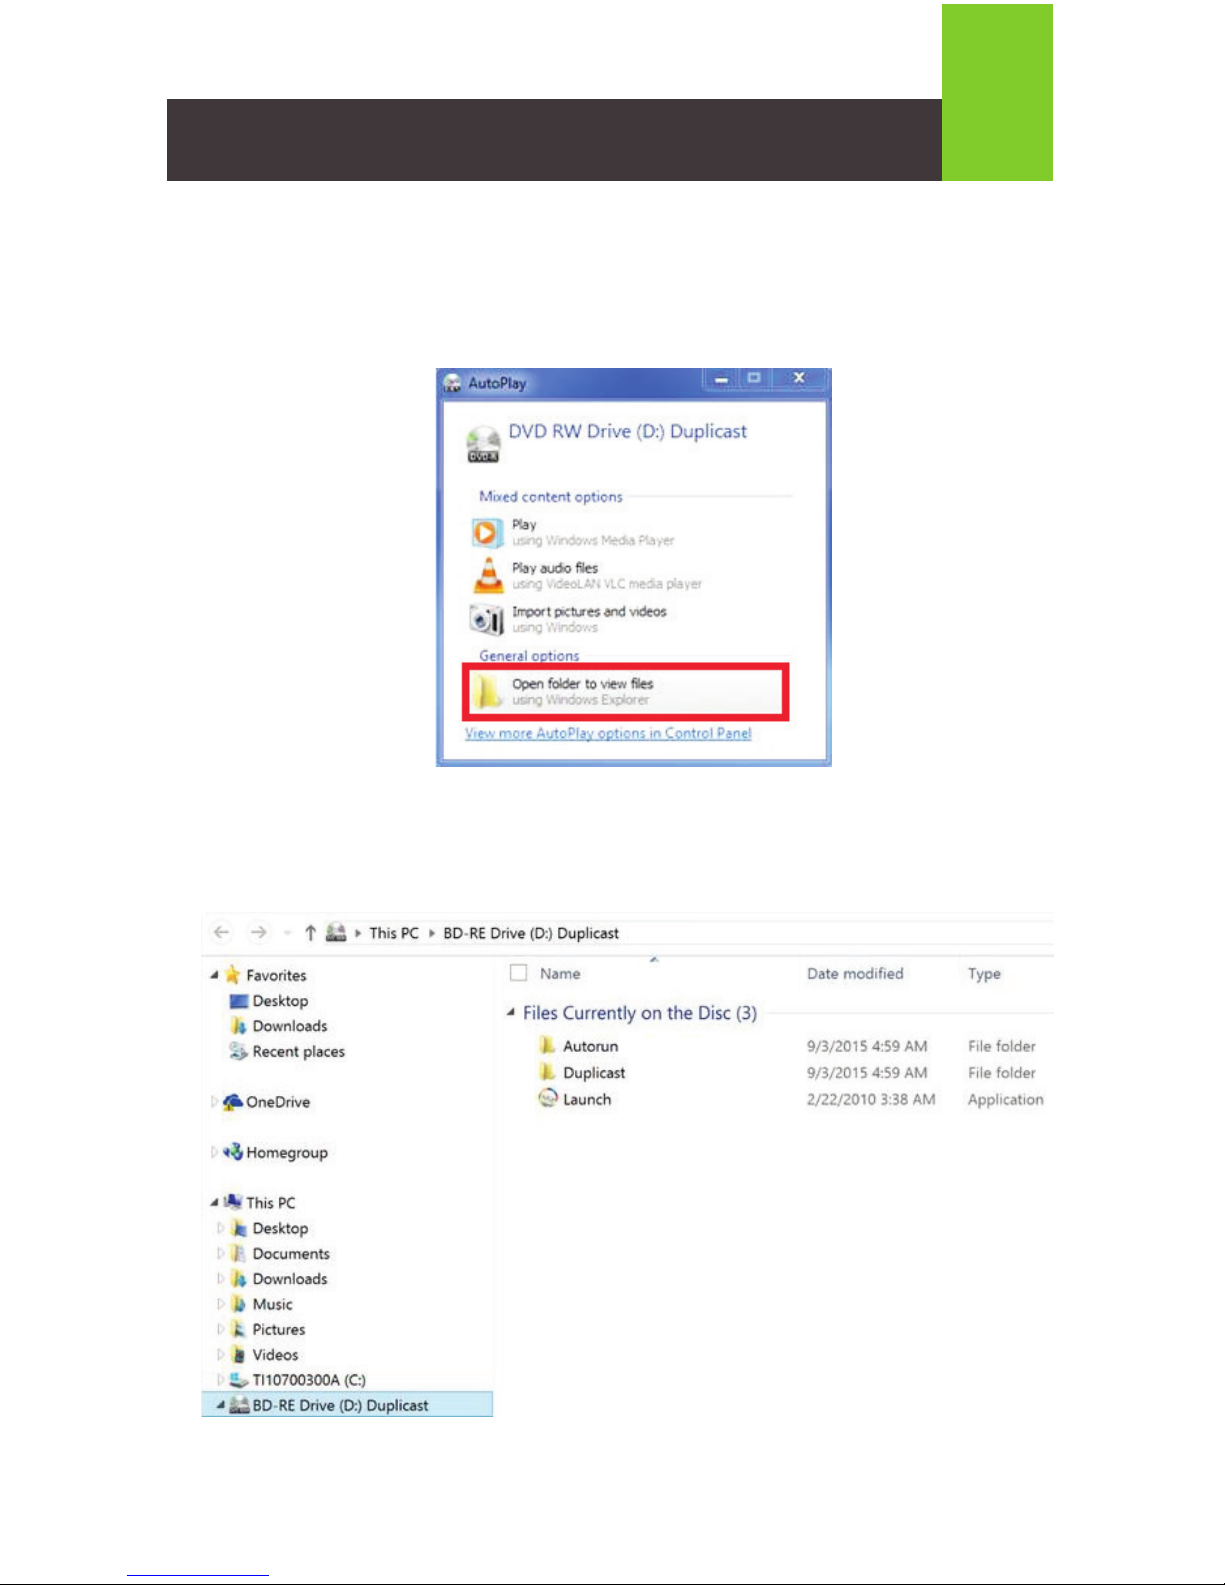
Software Installation
2
1. Close all other applications
2. Insert Installation CD into the CD/DVD drive of your PC.
3. Windows
®
7: AutoPlay window will automatically launch. Select Open
folder to view files.
Windows
®
8 / Windows® 8.1: File Explorer will automatically launch to display
CD files.
Page 4

3
4. Double click on the Launch Application file
5. The Duplicast Installation menu will appear, select Duplicast Installation
to proceed.
Page 5
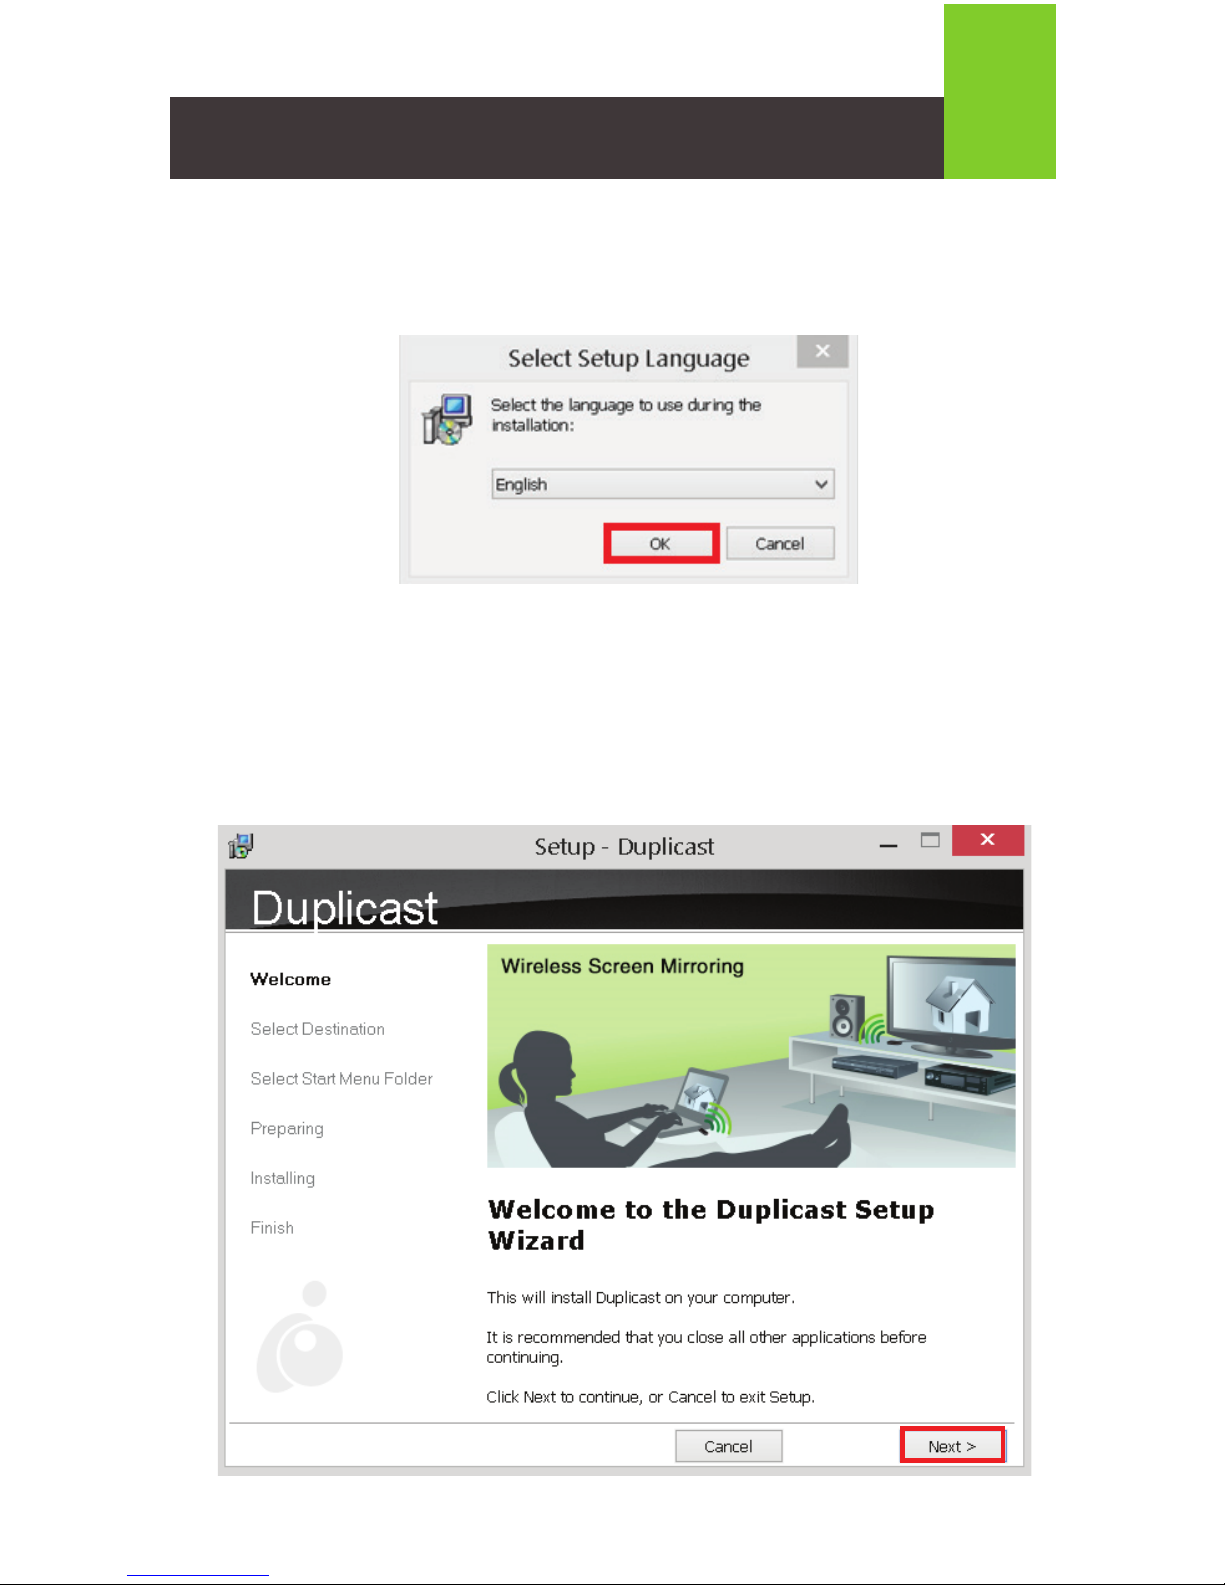
6. The Select Setup Language box will appear. Select the preferred language
from the dropdown menu and click OK.
7. The Welcome window will launch. Select Next.
4
Page 6
5
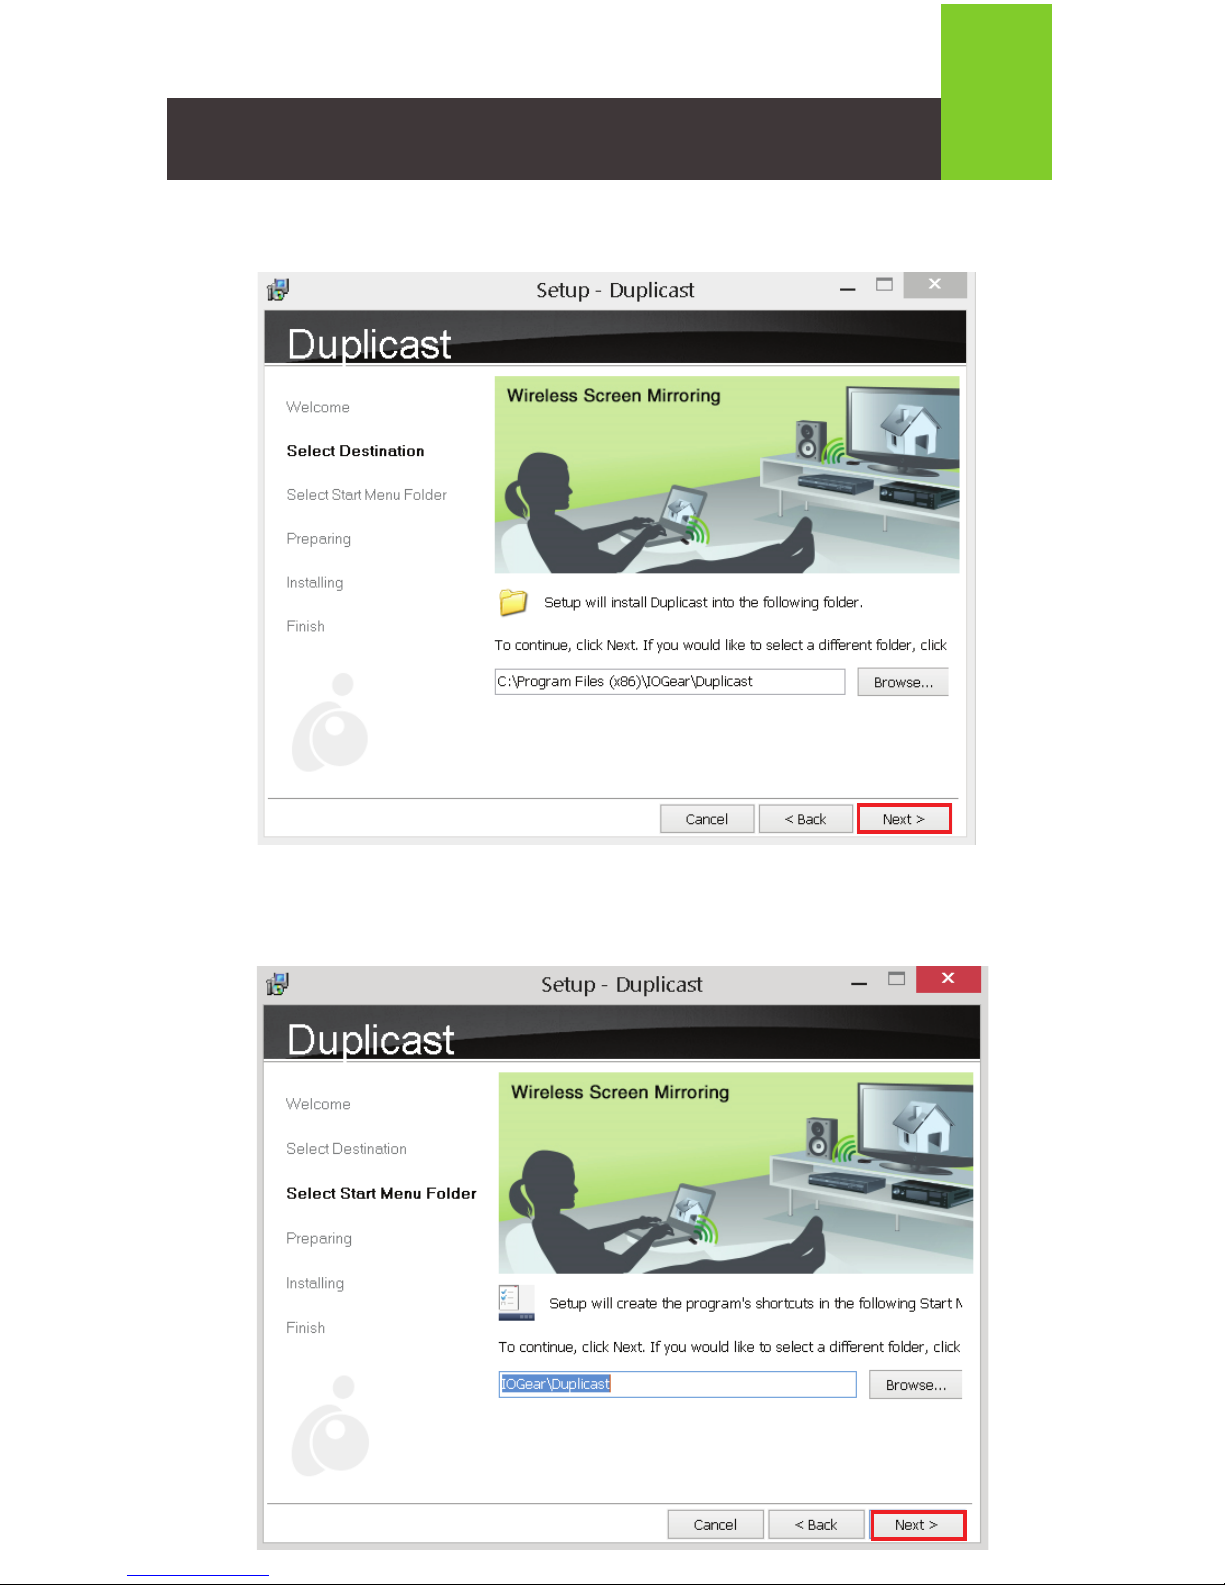
8. The Select Destination window will appear. Click Next.
9. Select Next on the Select Start Menu Folder screen.
Page 7

6
10. On the Preparing window, click the Install button.
11. Installation process will begin and will take you to the Finish screen
where you will be prompted to restart your computer. Click Finish to
complete the installation and restart your PC.
Page 8

7
Setting Up Your Duplicast Wireless Screen Mirroring Kit:
Connect the GWAVR Wireless A/V Receiver
1. Connect one end of the included HDMI Cable into an available HDMI input
on your HDTV or HD Projector.
2. Connect the other end of the HDMI cable to the HDMI port on the
Wireless Receiver.
3. Plug the Micro USB end of the Power Cable into the USB-Micro B port on
the Wireless Receiver.
4. Plug the other end of the USB Power Cable into the USB Power Adapter.
Plug the USB Power Adapter into an available power outlet. The Power
LED will light solid blue and after 60 seconds the following screen
will appear:
Pairing Wireless USB Transmitter to the Wireless Receiver
1.
Insert the Wireless USB Transmitter into an available USB port on your PC.
2. The Pairing Wizard will automatically launch. Select “GWAVK xxx” from
the dropdown menu and click Ok.
Page 9

Compliance Information
FCC Statement
This equipment has been tested and found to comply with the limits for a
Class B digital device, pursuant to Part 15 of the FCC Rules. These limits
are designed to provide reasonable protection against harmful interference in
a residential setting. This product generates, uses, and can radiate radio
frequency energy and, if not installed and used as directed, it may cause
harmful interference to radio communications. Although this product
complies with the limits for a Class B digital device, there is no guarantee
that interference will not occur in a particular installation.
8
3. The Duplicast control panel will automatically launch and the TV will mirror
the display from your PC. The Transmitter is now paired to the Receiver.
4. Future use will not require pairing. Simply insert the Transmitter and
wireless screen mirroring will begin.
This Quick Start Guide is intended to cover basic setup and key
functions to get you up and running quickly.
For a complete explanation of setup and features, please
download the Duplicast Wireless Screen Mirroring Manual from
www.IOGEAR.com/product/GWAVRKIT.
Page 10

Limited Warranty
Contact
WE’RE HERE TO HELP YOU! NEED ASSISTANCE SETTING UP
THIS PRODUCT?
Make sure you:
1. Visit www.iogear.com for more product information
2. Visit www.iogear.com/support for live help and product support
19641 Da Vinci,
Foothill Ranch, CA 92610
www.iogear.com
iogear.custhelp.com
support@iogear.com
Warranty Information
This product carries a 1 Year Limited Warranty. For the terms and
conditions of this warranty, please go to
http://www.iogear.com/support/warranty
Register online at http://www.iogear.com/register
Important Product Information
Product Model
Serial Number
IC Compliance
This device complies with Industry Canada license-exempt RSS
standard(s). Operation is subject to the following two conditions:
(1) This device may not cause interference,
and
(2) this device must accept any interference, including interference
that may cause undesired operation of the device.
Page 11

1
Contenu de l’emballage
1 x Récepteur A/V sans fil GWAVR
1 x Transmetteur USB sans fil
1 x Adaptateur d'alimentation USB
1 x Câble d'alimentation micro USB
1 x Câble HDMI
1 x CD d’installation
1 x Guide de démarrage rapide
1 x Carte de garantie
Configuration
Vue d'ensemble
Récepteur:
1. Voyant DEL d'alimentation
-Le voyant DEL s'allume en bleu
continu lorsqu'il est connecté à
l'adaptateur d'alimentation.
2. Port USB
-Ce port est réservé pour l'entretien
et les mises à jour futures.
3. Bouton Mode
4. Sortie HDMI
5. Port d'alimentation USB Micro-B
-Branchez l'adaptateur d'alimentation
à ce port pour alimenter l'appareil.
Émetteur:
6. Connecteur USB de Type A
PC (configuration minimum)
• Intel Core i5 2e Gén. ou AMD Phenom II X4 équivalent ou plus récent
• 2 Go de mémoire système (mémoire vive)
• Port USB disponible
Systèmes d'exploitation
• Windows
®
7, Windows 8® ou Windows® 8.1
Affichage
• TVHD ou projecteur avec port HDMI
Micro USB
HDTV
Mode
1
2
3
5
4
6
Page 12

Installation du logiciel
2
1. Fermez toutes les autres applications.
2. Insérez le CD d'installation dans le lecteur CD/DVD de votre PC.
3. Windows
®
7: La fenêtre de lecture automatique s’ouvre automatiquement.
Sélectionnez Ouvrir le dossier pour afficher les fichiers.
Windows
®
8 / Windows® 8.1: L’Explorateur de fichiers s’ouvre automatiquement
pour afficher les fichiers du CD.
Page 13

3
4. Cliquez à deux reprises sur le fichier d'application Launch.exe.
5. Le menu d'installation Duplicast s'affiche alors. Sélectionnez Duplicast
Installation (Installation de Duplicast) pour continuer.
Page 14

6. L'encadré Select Setup Language (Sélectionner la langue de configuration) s'affiche. Sélectionnez la langue préférée dans le menu déroulant,
puis cliquez sur OK.
7. La fenêtre de bienvenue s'ouvre alors. Sélectionnez Next (Suivant).
4
Page 15

5
8. La fenêtre Sélectionner une destination s'affiche. Cliquez sur Next (Suivant).
9. Sélectionnez Next (Suivant) sur l'écran de sélection de dossier du
menu Démarrer.
5
Page 16

6
10. Dans la fenêtre de préparation, cliquez sur le bouton Install (Installer).
11. Le processus d'installation débute alors et vous amène à l'écran Finish
(Terminer) où vous serez invité à redémarrer votre ordinateur. Cliquez sur
Finish (Terminer) pour compléter l'installation et redémarrer votre PC.
Page 17

7
Configuration de votre trousse de mise en miroir sans
fil Duplicast
Connexion du récepteur A/V sans fil GWAVR
1. Branchez une extrémité du câble HDMI inclus dans une entrée HDMI
disponible sur votre TVHD ou votre projecteur HD.
2. Branchez l'autre extrémité du câble HDMI au port HDMI du récepteur sans fil.
3. Branchez l'extrémité Micro USB du câble d'alimentation au port USB
Micro-B du récepteur sans fil.
4. Branchez l'autre extrémité du câble d'alimentation USB dans l'adaptateur
d'alimentation USB. Branchez l'adaptateur d'alimentation USB dans une
prise de courant disponible. Le voyant DEL d'alimentation s'allume alors
en bleu continu et après 60 secondes, l'écran suivant s'affiche:
Pairing Wireless USB Transmitter to the Wireless Receiver (Jumelage
de l'émetteur USB sans fil au récepteur sans fil)
1. Insérez l'émetteur USB sans fil dans un port USB disponible sur votre PC.
2. L'Assistant de jumelage se lance alors automatiquement. Sélectionnez «
GWAVRK xxx » dans le menu déroulant, puis cliquez sur OK.
Page 18

8
3. Le panneau de contrôle Duplicast se lance alors automatiquement et le
téléviseur fera une mise en miroir de l'écran de votre PC. L'émetteur est
maintenant jumelé au récepteur.
4. Aucun jumelage ne sera requis lors des utilisations subséquentes. Il suffira
alors d'insérer l'émetteur et la mise en miroir sans fil de l'écran
s'effectuera.
Ce guide de démarrage rapide couvre la configuration de base et les
principales fonctions pour que vous puissiez rapidement utiliser le produit.
Pour obtenir une explication complète de la configuration et des
caractéristiques, veuillez télécharger le manuel de l'utilisateur de la
Duplicast Wireless Screen Mirroring Manual à
www.IOGEAR.com/product/GWAVRKIT.
Déclaration de Conformité
Déclaration de la FCC
Cet équipement a été testé et est conforme aux limitations établies pour les
appareils numériques de classe B, conformément à la section 15 du
règlement de la FCC. Ces limitations sont destinées à fournir une protection
raisonnable contre les interférences nuisibles en environnement résidentiel.
Ce produit génère, utilise et peut émettre une énergie de radiofréquence et,
s’il n’est pas installé et utilisé conformément aux instructions, peut causer
des interférences nuisibles aux communications radio.
Page 19

Garantie limitée
Contact
NOUS SOMMES LÀ POUR VOUS AIDER! BESOIN D'AIDE POUR LA
CONFIGURATION DE CE PRODUIT?
Assurez-vous de:
1. Visiter www.iogear.com pour plus d'information sur le produit
2. Visiter www.iogear.com/support pour obtenir de l'aide et un
soutien technique en ligne
iogear.custhelp.com
support@iogear.com
www.iogear.com
19641 Da Vinci, Foothill Ranch, CA 92610
Conformité IC
Le présent appareil est conforme aux CNR d'Industrie Canada
applicables aux appareils radio exempts de licence. L'exploitation est autorisée aux
deux conditions suivantes:
(1) l'appareil ne doit pas produire de brouillage
et
(2) l'utilisateur de l'appareil doit accepter tout brouillage
radioélectrique subi, même si le brouillage est susceptible
d'en compromettre le fonctionnement.
Renseignements sur la garantie
Ce produit comporte une garantie limitée de 1 an. Pour connaître les
modalités de cette garantie,veuillez aller à
http://www.iogear.com/support/warranty
Inscrivez-vous en ligne à http://www.iogear.com/register
Renseignements importants sur le produit
Modèle du produit
Numéro de série
Page 20

 Loading...