

Page 1

Source Devices
• HDMI Type A output connector(s)
Note: A DVI/HDMI adapter is required when connecting a DVI source device.
Display Devices
• Display devices or receivers with an HDMI Type A input connector
Cables
• 1 HDMI cable for each source device you will be connecting
• 1 HDMI cable for each display device you will be connecting
Note:
1. No cables are included in this package. We strongly recommend that you purchase high-quality cables
of appropriate length since this will affect the quality of the audio and video display. Contact your
dealer to purchase the correct cable sets.
2. If you wish to utilize the GHMS8044’s high-end serial controller function, you need to purchase an
appropriate RS-232 cable.
4x4 HD Matrix Switch
Quick Start Guide
GHMS8044
Part No. Q1141
About UsAbout Us
FUN
IOGEAR offers connectivity solutions that are innovative, fun, and stylish,
helping people enjoy daily life using our high technology products.
GREEN
IOGEAR is an environmentally conscious company that emphasizes the
importance of conserving natural resources. The use of our technology
solutions helps reduce electronic waste.
© 2012 IOGEAR
®
Package Contents
Requirements
1 x GHMS8044 4x4 HDMI Matrix Switch
1 x IR Remote Control Unit
1 x Power Adapter
1 x Feet Kit
This device has been tested and found to comply with the following European Union directives:
Electromagnetic Capability (2004/108/EC), Low Voltage (2006/95/EC) and R&TTED (1999/5/EC).
Federal Communications
Commission (FCC) Statement
CE Compliance
Toll Free: 866-946-4327 (USA)
Phone: 949-453-8782
Address: 19641 Da Vinci, Foothill Ranch, CA 92610, USA
Web Site: www.iogear.com
E-mail: support@iogear.com
Limited Warranty
Contact
1 x Rack Mount Kit
1 x User Manual
1 x Quick Start Guide
1 x Warranty Card
This equipment has been tested and found to comply with the limits for a Class B digital device, pursuant
to Part 15 of the FCC Rules. These limits are designed to provide reasonable protection against harmful
interference in a residential setting. This product generates, uses, and can radiate radio frequency energy
and, if not installed and used as directed, it may cause harmful interference to radio communications.
Although this product complies with the limits for a Class B digital device, there is no guarantee that
interference will not occur in a particular installation.
All information, documentation, and specifications contained in this media are subject to change without prior
notification by the manufacturer. Please visit our website to find the most up to date version.
WE’RE HERE TO HELP YOU! NEED ASSISTANCE SETTING UP
THIS PRODUCT?
Make sure you:
1. Visit www.iogear.com for more product information
2. Visit www.iogear.com/support for live help and product support
Warranty Information
This product carries a 3 Year Limited Warranty. For the terms and
conditions of this warranty, please go to
http://www.iogear.com/support/warranty
Register online at http://www.iogear.com/register
Important Product Information
Product Model
Serial Number
1
Page 2
4x4 HD Audio / Video
Matrix Switch
1 1 1 12 2 2 2
3 3 3 34 4 4 4
RS-232
HDMI OUT HDMI OUT HDMI OUTHDMI OUT
RS-232
HDMI OUT HDMI OUT HDMI OUTHDMI OUT
RS-232 Controller
2
3
1
3
4
OUTPUT
INPUT
GHMS8044
Direct 4
Max 64 (via cascade)
4
Device: HDMI In 4 x HDMI Type A Female (Black)
Display: HDMI out 4 x HDMI Type A Female (Black)
RS-232 Port 1 x DB-9 Female (Black)
Power 1 x DC Jack
Switches Port Selection 4 x Pushbuttons
LEDs Selected 16 (Green)
HDTV resolutions up to 1080p;
Computer resolutions up to WUXGA (1920x1200)
DC 5.3 V, 9 W (max.)
Operating Temp. 0 - 50°C (32°F - 122°F)
Storage Temp. 20°C - 60°C (68°F - 140°F)
Humidity 0-80%
RH, Non-condensing
Housing Metal
Weight 4.1 lbs.
Dimensions
(L x W x H)
17 x 6 x 1.73 inch
Video Resolutions
Power Resolutions
Enviornment
Physical Properties
Function
Display Connections
HDMI Input Connections
Connectors
Specifications
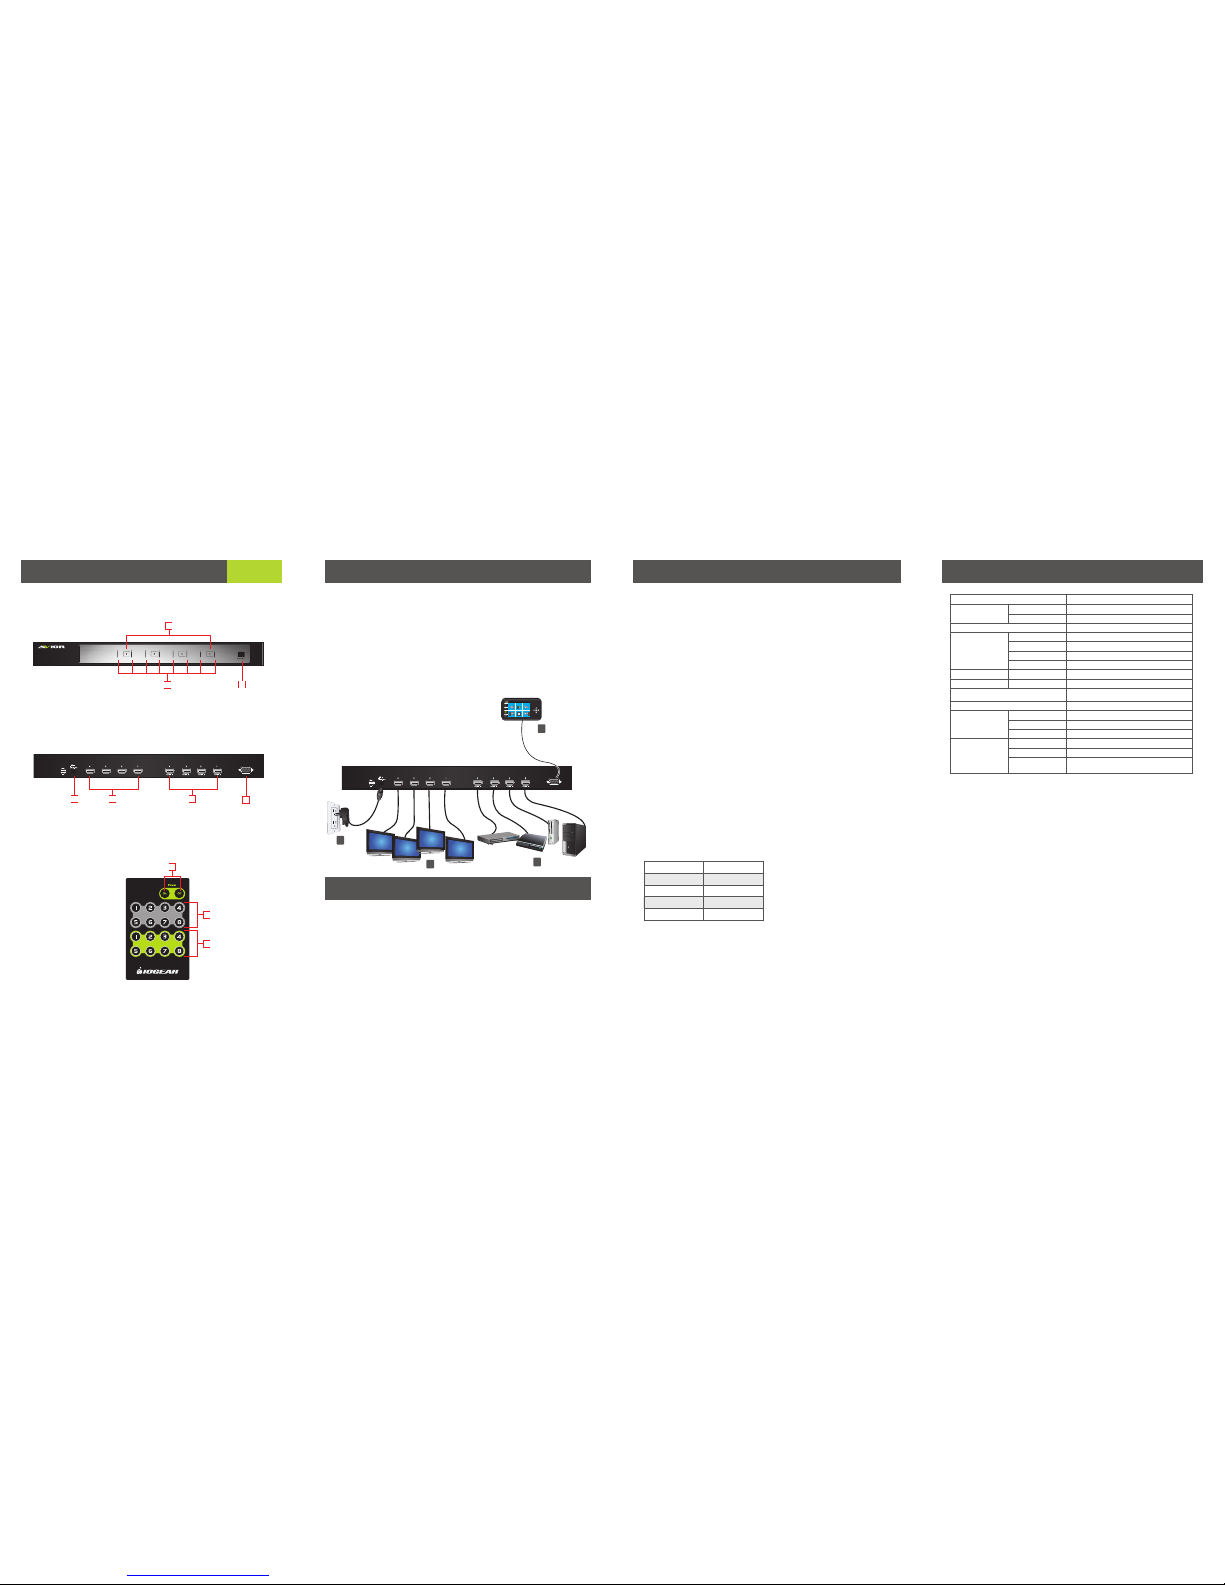
Overview
Front View
1. Input Port Selection Pushbuttons
2. Input Port LEDs
3. IR Receiver
Back View
1. Power Jack
2. HDMI Output Ports
3. HDMI Input Ports
4. RS-232 Serial Port
IR Remote Control
1. Power On/Off Buttons
2. Display Selection Buttons
3. Source Selection Buttons
OperationHardware Installation
Cascading
Start Here!
1
2
2
1. Make sure that the power to any device that you connect to the installation has been turned off.
2. Make sure that all devices you will be installing are properly grounded.
Installation of the GHMS8044 is simply a matter of plugging in the appropriate cables.
1
4
2 3
Step 1
Use HDMI cables to connect the “HDMI In” ports on the
video display devices to the “HDMI Out” ports on the rear
of the GHMS8044.
Step 2
Use HDMI cables to connect the “HDMI Out” ports on the
source device(s) to the “HDMI In” ports on the rear of the
GHMS8044.
Step 3***
Plug the provided power adapter into an appropriate AC
power source; plug the power adapter cable into the
Power Jack on the GHMS8044. This completes the basic
installation of the 4x4 HDMI Matrix Switch. You may now
power on the display and source devices.
***Note: The matrix can take 15sec. to 60sec. to boot up
and capture EDID data.
To provide even more HDMI displays, additional GHMS8044 units can be cascaded from the parent
GHMS8044's HDMI Out ports, making it an excellent solution for digital signage systems. Simply use
additional Male-to-Male Type A HDMI cables to connect an HDMI Out port on the parent matrix to the
HDMI In port on the child matrix.
Recommended distances between devices in all cascade levels for transmitting a high resolution signal
are as follows:
Source device to GHMS8044 1.8m (5.9ft)
GHMS8044 to GHMS8044 15m (49ft)
GHMS8044 to display device 20m (65.6ft)
Source Device Selection
The GHMS8044 offers easy and flexible source and display device selection with either the front panel
pushbuttons, with the remote control, or through the RS-232 serial interface.
Manual Selection
To manually select an HDMI source for a display, press the pushbutton that corresponds to the port the
display device is connected to. Pressing the pushbutton will cycle the four attached HDMI source devices
through the display devices.
Note: The Port LEDs light to indicates which source device is currently selected for each display
Remote Control Selection
• To turn On and Off the GHMS8044, press the On and Off buttons on the remote control unit to the
desired setting.
• To select an HDMI source with the remote control, press the Input number button that corresponds to
the port the source device is connected to.
• To select an HDMI display with the remote control, press the Output number that corresponds to the port
the display device is connected to.
Note: Aim the remote control unit at the IR receiver located on the front panel of the GHMS8044. For
optimum performance, make sure there is a clear line-of-sight between the remote control unit and the IR
receiver. The Input and Output buttons 5, 6, 7, 8 are not used on the GHMS8044 and will have no effect
on the operation of the GHMS8044.
EDID Mode Selection
The GHMS8044 has 3 EDID mode that can be selected via the front panel butttons as follows:
1. Press button 1 for 3 sec. to enter the remix edit mode. All connected display’s EDID will be detected and
a best resolution for all will be selected to display.
2. Press button 2 for 3 sec. to enter the default mode. IOGEAR’s default EDID(highest 720p) will be passed
to the video source.
3. Press button 3 for 3 sec. to enter the port 1 EDID mode.
The EDID from the Port 1 Display will be
passed to the video source.
RS-232 Serial Interface
The GHMS8044’s built-in bi-directional RS-232 serial interface allows system control through a high-end
controller, PC, and/or home automation / home theater software package.(not included)
Configuring the Serial Port
The controller’s serial port should be configured as follows:
Baud Rate
Data Bits
Parity
Stop Bits
Flow Control
19200
8
None
1
None
Installing the RS-232 Controller
Step 4
In order to use the RS-232 serial interface,
attach a high-end controller (such as a PC) to
the GHMS8044 using a serial cable such as a
modem cable.
1
2
3
2 53 4
 Loading...