

ioCorp 2677e User Manual
2677e Ethernet Display
User’s Guide
Copyright and Trademark notices
Copyright 2014 I-O Corporation.
ALL RIGHTS RESERVED.
Information in this document is subject to change without notice and does not represent a commitment
on the part of the manufacturer. No part of this guide may be reproduced or transmitted in any form or
means, electronic or mechanical, including photocopying and recording, for any purpose, without the
express written permission of the manufacturer.
Every effort has been made to make this guide as complete and accurate as possible, but no warranty of
fitness is implied. The authors and the publisher shall have neither responsibility nor liability to any person
or entity with respect to loss or damages arising from the use of information contained in this guide. This
disclaimer does not apply in countries where such provisions are inconsistent with local law. I-O is a
registered trademark of I-O Corporation. All trademarks are acknowledged.
I-O Corporation
14852 South Heritage Crest Way, Unit 1-A, Bluffdale Utah 84065
801-973-6767 www.iocorp.com
Copyright and Trademark Notices

I-O 2677e Ethernet Display User s Guide
2
Preface
Thank you for purchasing the 2677e Ethernet Display. This guide contains information to setup and use
I-O’s text based 5250 Ethernet display.
The guide consists of the following chapters:
• Introduction: Provides an overview of the product.
• Installation: Provides detailed information on the installation of the hardware, the installation of I-O
Configuration Utility for remote management of I-O LAN based products, configuration of the display
station, and configuration of the AS/400 iSeries host.
• Display Operation: Provides detailed instructions on the use of the display sessions.
• Printing Operation: Provides a detailed overview of laser and dot matrix printers and how they
emulate the IBM 3812 and 4214 printers. Includes description of basic and advanced functions
added by I-O.
• Troubleshooting: Provides solutions to problems that you may encounter while using the product.
• Manufacturer’s Warranty & Repair Policy: States the warranty and how to obtain service and
Support.
The following symbols are used in this guide.
Caution: This symbol highlights procedures that, if not correctly performed or adhered to, could
damage or corrupt the product or adversely affect the security and functionality of the product. Do
not proceed beyond such points until the required conditions are fully understood and achieved.
Note: This symbol denotes useful additional information that is relevant to the procedure or
feature being described.
Tip: This symbol denotes a hint, shortcut or alternate method to aid or supplement the procedure
being described.
Consistent with our policy of continuous development, the product you received may have
Features different from those described in this guide. Please visit our web-site www.iocorp.com
for current information.

I-O 2677e Ethernet Display User s Guide
3
Preface
Table of Contents
INTRODUCTION .................................................................................................................................................................. 5
OVERVIEW .............................................................................................................................................................................. 5
STANDARD FEATURES ............................................................................................................................................................ 5
UNPACKING ............................................................................................................................................................................ 6
ABOUT THE 2677e ETHERNET DISPLAY ................................................................................................................................. 6
LED Indicators ...................................................................................................................................................................... 7
Physical Connectors ........................................................................................................................................................... 7
INSTALLATION .................................................................................................................................................................... 8
HARDWARE INSTALLATION .................................................................................................................................................... 8
CONFIGURE THE 2677e ETHERNET DISPLAY .......................................................................................................................... 8
Configuring the 2677e using Local Setup with Connection Manager ................................................................................ 8
GUI Overrides .................................................................................................................................................................. 11
Configuring a 5250 Printer Emulation ............................................................................................................................. 13
Locking out the Configuration tab ................................................................ ................................ .................................... 16
Configuring the 2677e using the I-O Configuration Utility .............................................................................................. 17
CONFIGURE THE AS/400 ................................................................................................................................................. 18
RUNNING DISPLAY AND PRINTER SESSIONS .......................................................................................................... 19
STARTING DISPLAY SESSIONS .............................................................................................................................................. 19
STARTING THE PRINTER SESSION ......................................................................................................................................... 19
RE-CONNECT SESSIONS ........................................................................................................................................................ 19
DISCONNECT SESSIONS......................................................................................................................................................... 20
DISPLAY OPERATION ....................................................................................................................................................... 20
MULTIPLE SESSIONS ............................................................................................................................................................. 20
STATUS LINE INDICATORS .................................................................................................................................................... 20
SHORTCUT KEY SEQUENCES ................................................................................................................................................ 21
Jump to Another Session ................................................................................................................................................... 21
Ruler ................................................................................................................................................................................. 22
Keyboard Mapping ........................................................................................................................................................... 22
Keyboard Click ................................................................................................................................................................. 22
Connect All Telnet Sessions ................................................................................................................................ .............. 22
Disconnect all Telnet Sessions .......................................................................................................................................... 23
Local Screen Print ............................................................................................................................................................ 23
Printer Test ....................................................................................................................................................................... 23
USING THE KEYBOARD ......................................................................................................................................................... 23
Shift and Alt Keys.............................................................................................................................................................. 23
Other Keys ........................................................................................................................................................................ 23
RECORD / PLAYBACK ........................................................................................................................................................... 25
Recording Keystroke Sequences.........................................................................................................................................25
Recording with a Pause......................................................................................................................................................26
Deleting Recorded Sequence..............................................................................................................................................26
Playing Sequences..............................................................................................................................................................26
Playing a Sequence with a Pause .......................................................................................................................................26
USING AN ATTACHED PRINTER..............................................................................................................................................27
PRINTING OPERATION......................................................................................................................................................27
LASER PRINTER OPERATION.................................................................................................................................................27
Changing Typestyles…..........................................................................................................................................................28
Font Change Commands…...................................................................................................................................................28

I-O 2677e Ethernet Display User s Guide
4
Table of Contents
Paper Output Bin Selection…...............................................................................................................................................29
Print Orientation ..................................................................................................................................................................29
COR Flow chart....................................................................................................................................................................30
Changing Page Rotation.......................................................................................................................................................33
Envelope Printing..................................................................................................................................................................34
Office Vision/400 Envelope Printing….................................................................................................................................34
Duplex Printing ....................................................................................................................................................................35
Other Printer Commands......................................................................................................................................................36
MATRIX PRINTER OPERATION................................................................................................................................................36
IBM Matrix printer emulations.............................................................................................................................................36
Graphics Printing .................................................................................................................................................................37
Generic Mode…....................................................................................................................................................................37
COMMAND PASS-THRU™ .....................................................................................................................................................37
HOST DOWNLOAD COMMANDS .............................................................................................................................................38
Issuing a Host Download Command. ...................................................................................................................................39
Description of Host Download Commands ..........................................................................................................................39
TROUBLESHOOTING .........................................................................................................................................................54
GENERAL DISPLAY STATION PROBLEMS ..............................................................................................................................54
Video Problems…..................................................................................................................................................................57
Keyboard Problems...............................................................................................................................................................58
Printing Problems.................................................................................................................................................................59
I-O 5250 Printer Connection Status......................................................................................................................................61
IBM Error Codes...................................................................................................................................................................61
Record/ Playback Error Codes.............................................................................................................................................66
APPENDIX A: ¬Q Font References.........................................................................................................................................68
APPENDIX B: ¬F Font References..........................................................................................................................................77
APPENDIX C: 104-key Keyboard Layout..............................................................................................................................79
MANUFACTURER S WARRANTY & REPAIR POLICY...............................................................................................81

I-O 2677e Ethernet Display User s Guide
Printer Operation 5
Introduction
This chapter provides a brief overview of the I-O 2677e Ethernet Display.
Overview
The I-O 2677e Ethernet Display is a simple to use IBM AS/400 iSeries 5250 display and printer device.
Connection to the IBM host is accomplished over the Ethernet link using TN5250e (a TCP/IP display
and printing protocol created for use with IBM iSeries AS/400 hosts).
Configuration is required only on the 2677e as the IBM host will automatically create display devices
and, if desired, a print device, writer and spooler. The IBM host will either create its own name for the
display or printer session, or you may setup a name of your choice. The IBM host must be configured
to use TCP/IP, TN5250e and set for automatic device configuration.
With TN5250e, the IBM host recognizes two types of display devices, (3477fc for color or 3477fg for
monochrome) and one type of printer device, a 3812 laser printer.
The TN5250e display emulation functions just like I-O s 2677m Modular Twinax Display using the same
122 and 102-key 5250 keyboards. All typical twinax display functions are implemented in the 2677e.
This allows users to move from legacy twinax displays (whether I-O s own products, IBM s or another
competitor s product) to an Ethernet environment without losing any functionality or relearning
procedures or keyboards.
I-O s implementation of TN5250e printer emulation has been enhanced with a 3812 to 4214 conversion
capability. This allows not only laser printers, but also dot-matrix and thermal printers to be attached to
the 2677e and appear to the IBM host as a 3812 laser printer.
Print jobs sent from the IBM host are issued in IBM s EBCDIC character set and use SNA Character
String (SCS) command structure. The 5250 Printer Emulation converts EBCDIC to ASCII and the SCS
command structure to the printer’s command structure (PCL, Epson, or Proprinter).
I-O also has included a number of advanced features in the I-O 5250 Printer Emulation. These include
the ability to send printer specific commands as part of the SCS data stream that the IBM host does not
know the printer is capable of performing. Other features include I-O’s bar code language, graphing
language, and even color support.
NOTE: CERTAIN DOT-MATRIX PRINTER FUNCTIONS SUCH AS BACK SPACE, BOLD, UNDERSCORE OR
OVERSTRIKE ARE NOT SUPPORTED THROUGH IBM’S TN5250E. FOR FORMS ALIGNMENT MESSAGES,
CHANGE THE FORM FEED OPTION IN THE HOST PRINTER CONFIGURATION TO *CONT.
Standard Features
I-O 2677e Ethernet Display contains the following features:
Display sessions supported
26 +
Host status indicators on the 25th line
Yes
Record/Playback function key descriptions
No
Display emulation supported
3477FC/FG
80/132 split screen support
No
75/60 hertz screen support (color/monochrome)
Yes
Printer sessions supported
1
Printer emulations supported
3812
3812 to 4214 SCS command conversion
Yes

I-O 2677e Ethernet Display User s Guide
Printer Operation 6
122 and 102/103-key 5250 keyboards
Yes
Parallel port connection
USB/Parallel
Serial port connection
USB/Serial
Customizable Telnet port number
Yes
DHCP
Yes
10/100 Base T
Yes
Command PassThru
Yes
APO/COR
Yes
I-O’s Scripting Language (excludes bar codes,
graphics and color features)
Yes
Host Download Commands
Yes
Unpacking
When you receive the 2677e, check the packaging for water or physical damage, and notify the carrier
immediately if any damage is evident.
Keep the original packaging in case the interface needs to be moved or shipped. The following items
are included in the package:
• An I-O 2677e Ethernet Box
• Power Supply
• A CD-ROM containing:
• I-O Configuration Utility
• Quick Setup Guide
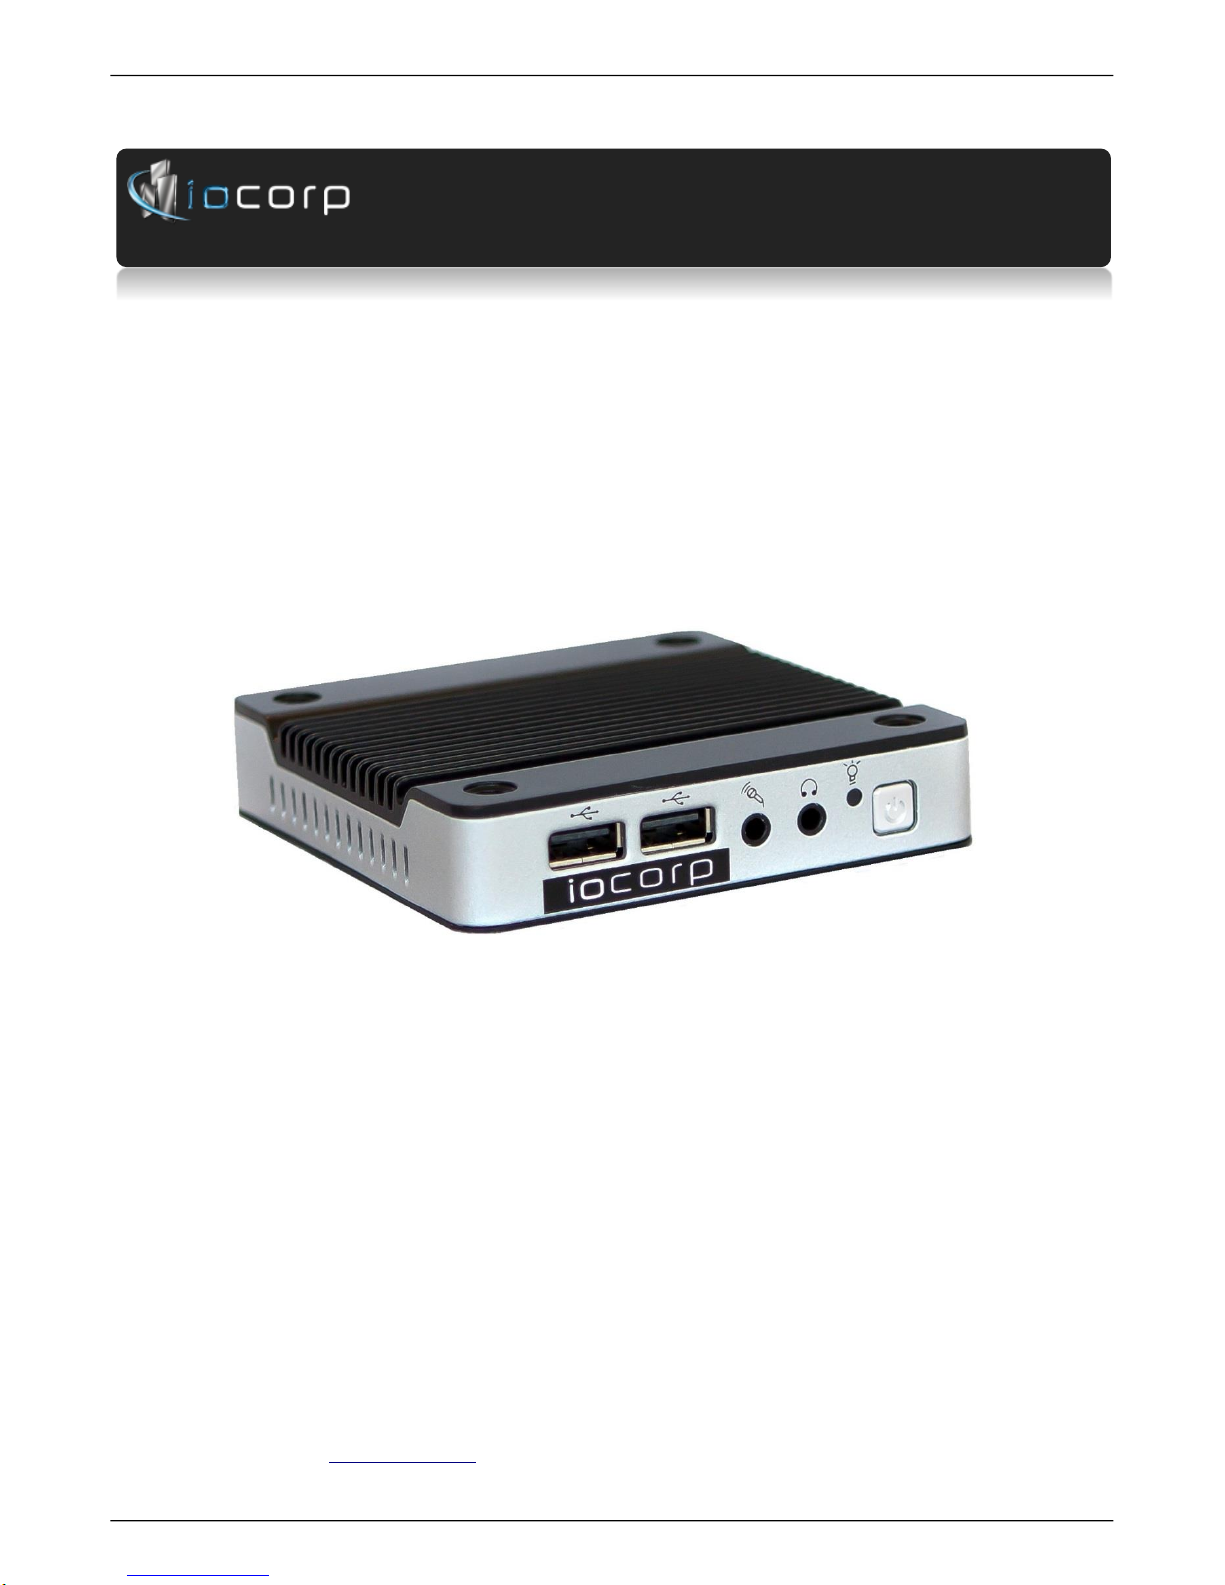
About the 2677e Ethernet Display
I-O 2677e Ethernet Display User s Guide
Printer Operation 7
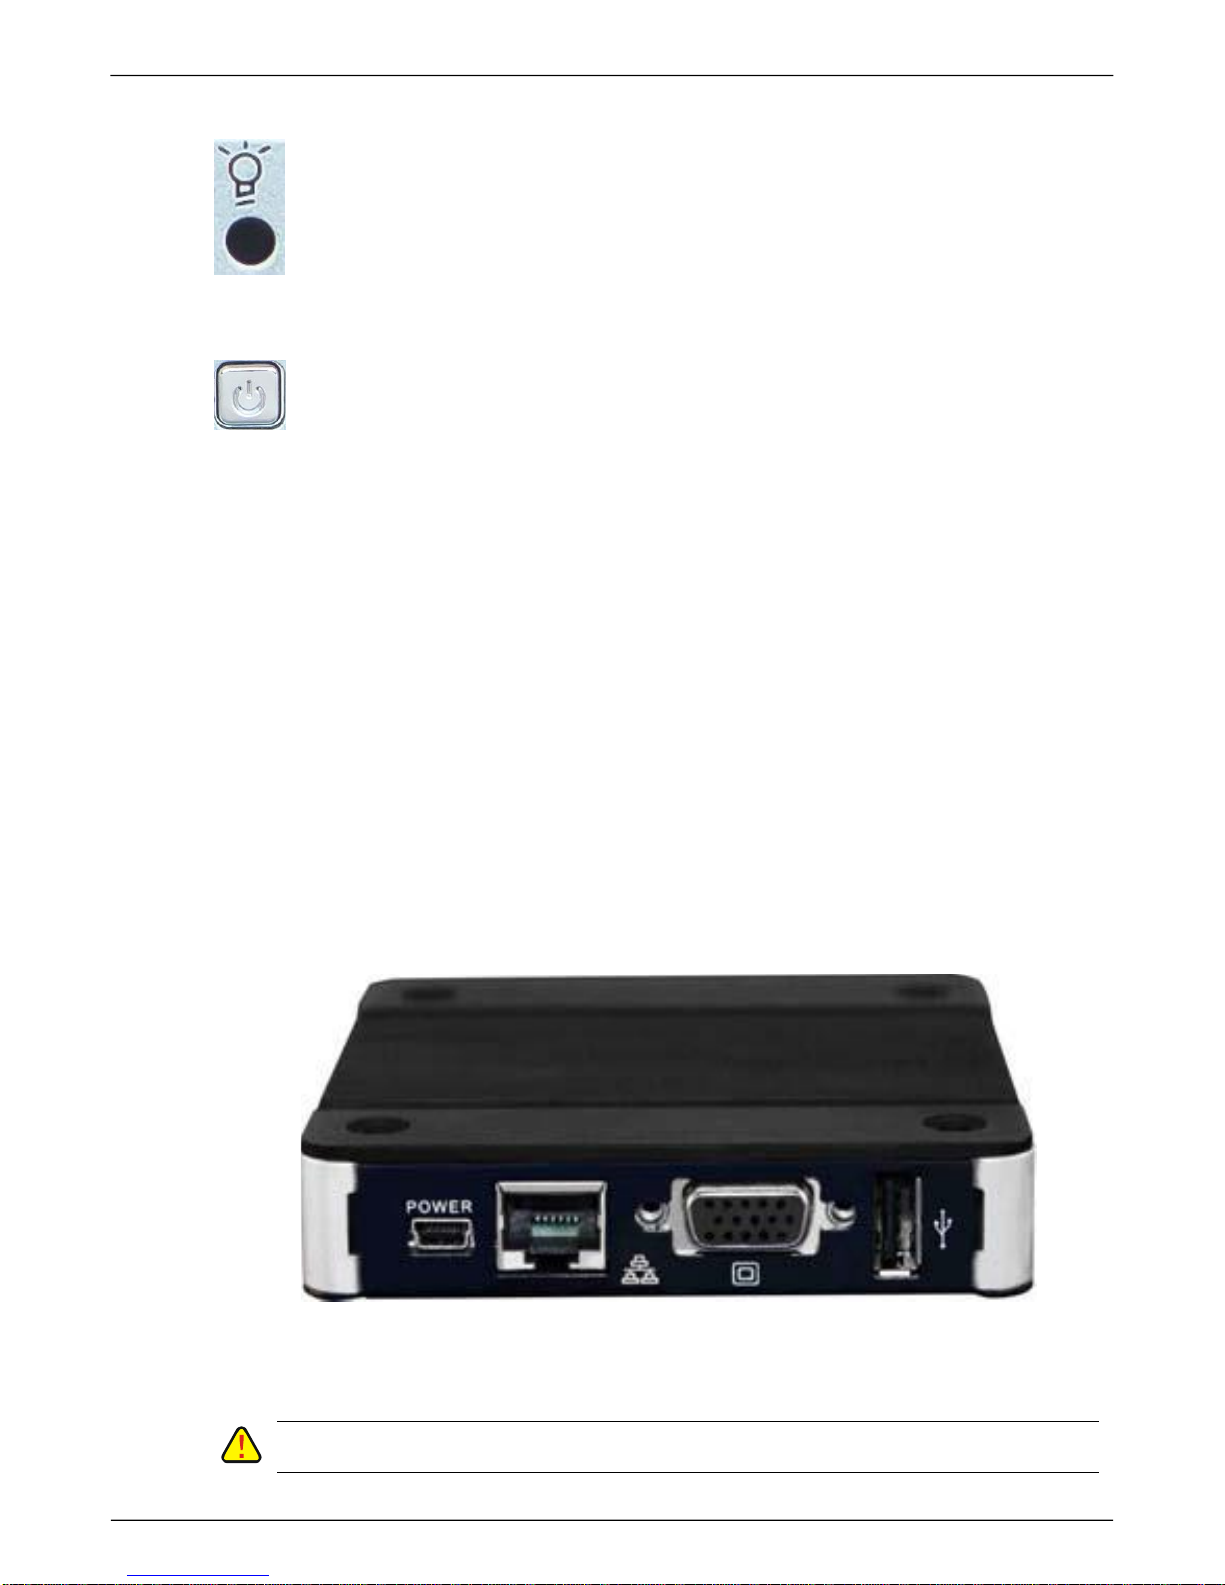
LED Indicator
This LED will be on indicating that the 2677e is up and running.
Power Button
This button is used to power the 2677e on and off. To power off, press
and hold the button for at least 4 seconds. Any less and the unit will not
power off.
Physical Connectors
USB There are two USB ports on the front of the 2677e and one on the back.
These are used for a Keyboard, Mouse and USB attached Printer.
Microphone and The Microphone jack is non-functional as TeemTalk does not support audio,
Headphone jacks however the Headphone jack can be used with external speakers if
keyboard click and sounds for Events, Applications and Notifications are
desired.
Power The power connector is used for the 5.0VDC 2.0A power adapter shipped
with the 2677e.
CAUTION: USING A POWER SUPPLY OTHER THAN THE SPECIFIED MAY CAUSE DAMAGE TO THE LOGIC
UNIT.

I-O 2677e Ethernet Display User s Guide
Printer Operation 8
10/100 Base T The RJ45 connector is where the Ethernet cable is attached for network
connectivity. The 2677e will automatically link at the speed of the network.
DB-15 Connector The DB-15 connector is used for connecting your LCD Display. The 2677e
Outputs VGA with Resolution up to 1600 x 1200 High Colors and supports
80-132 column full screen.
USB The USB 2.0 connector on the back is used for a keyboard, mouse or printer.
Installation
No special training is needed to install the I-O 2677e. Simply follow the steps outlined under Hardware
Installation, then configure the display station and the AS/400.
Hardware Installation
1. Inspect the package for damage.
2. Connect the monitor
3. Connect the keyboard
4. Connect the Ethernet cable
5. Connect the printer (optional)
6. Connect the power supply and power up the monitor.
Configure the 2677e Ethernet Display
The 2677e can be configured locally, using the on-screen setup process, or remotely using the I-O
Configuration Utility found on the Utility CD. (The I-O Configuration Utility is not required to configure
the 2677e, but must be used whenever a firmware update is to be applied.) Both methods are
described in the following pages.
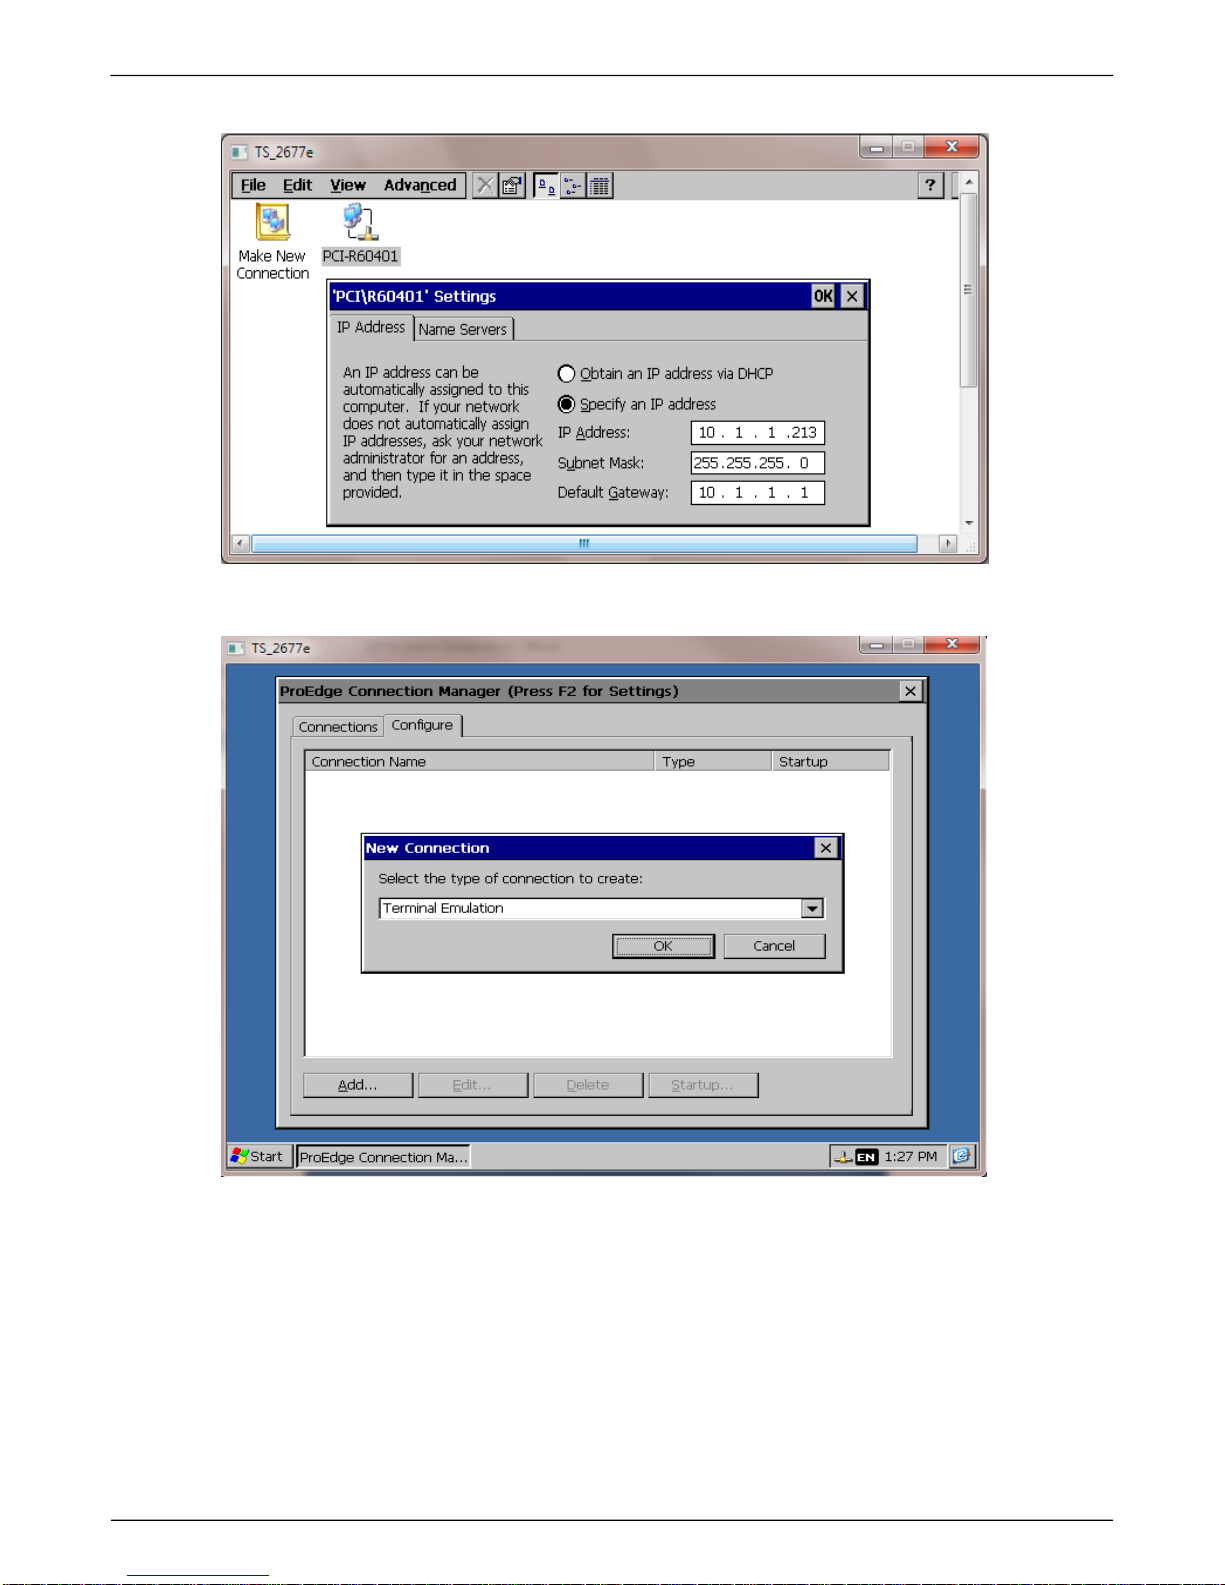
Configuring the 2677e using Local Setup with the Connection Manager
1. After applying power, the 2677e will go through a Windows CE boot process and display a
Connection Manager window. If the Connection Manager window doesn’t show, click on Start,
Programs, and Connection Manager.
By default, the 2677e is set with Dhcp enabled, so the unit will connect to the network through a
Dhcp assigned address. If you do not have a Dhcp server, or the unit does not pick up an address,
you can manually assign a static IP address by going into the Network Setup.
a. From the Connection Manager screen, press F2 to open the Control Panel.
b. Select Network and Dial-up Connections.
c. Double click on the PCI-R60401 connection and select Specify an IP address.
d. Enter a static IP Address, Subnet Mask, and Default Gateway. OK and close the Control Panel.
I-O 2677e Ethernet Display User s Guide
Printer Operation 9
2. Click on the Configure tab and Add. From the dropdown, select Terminal Emulation.
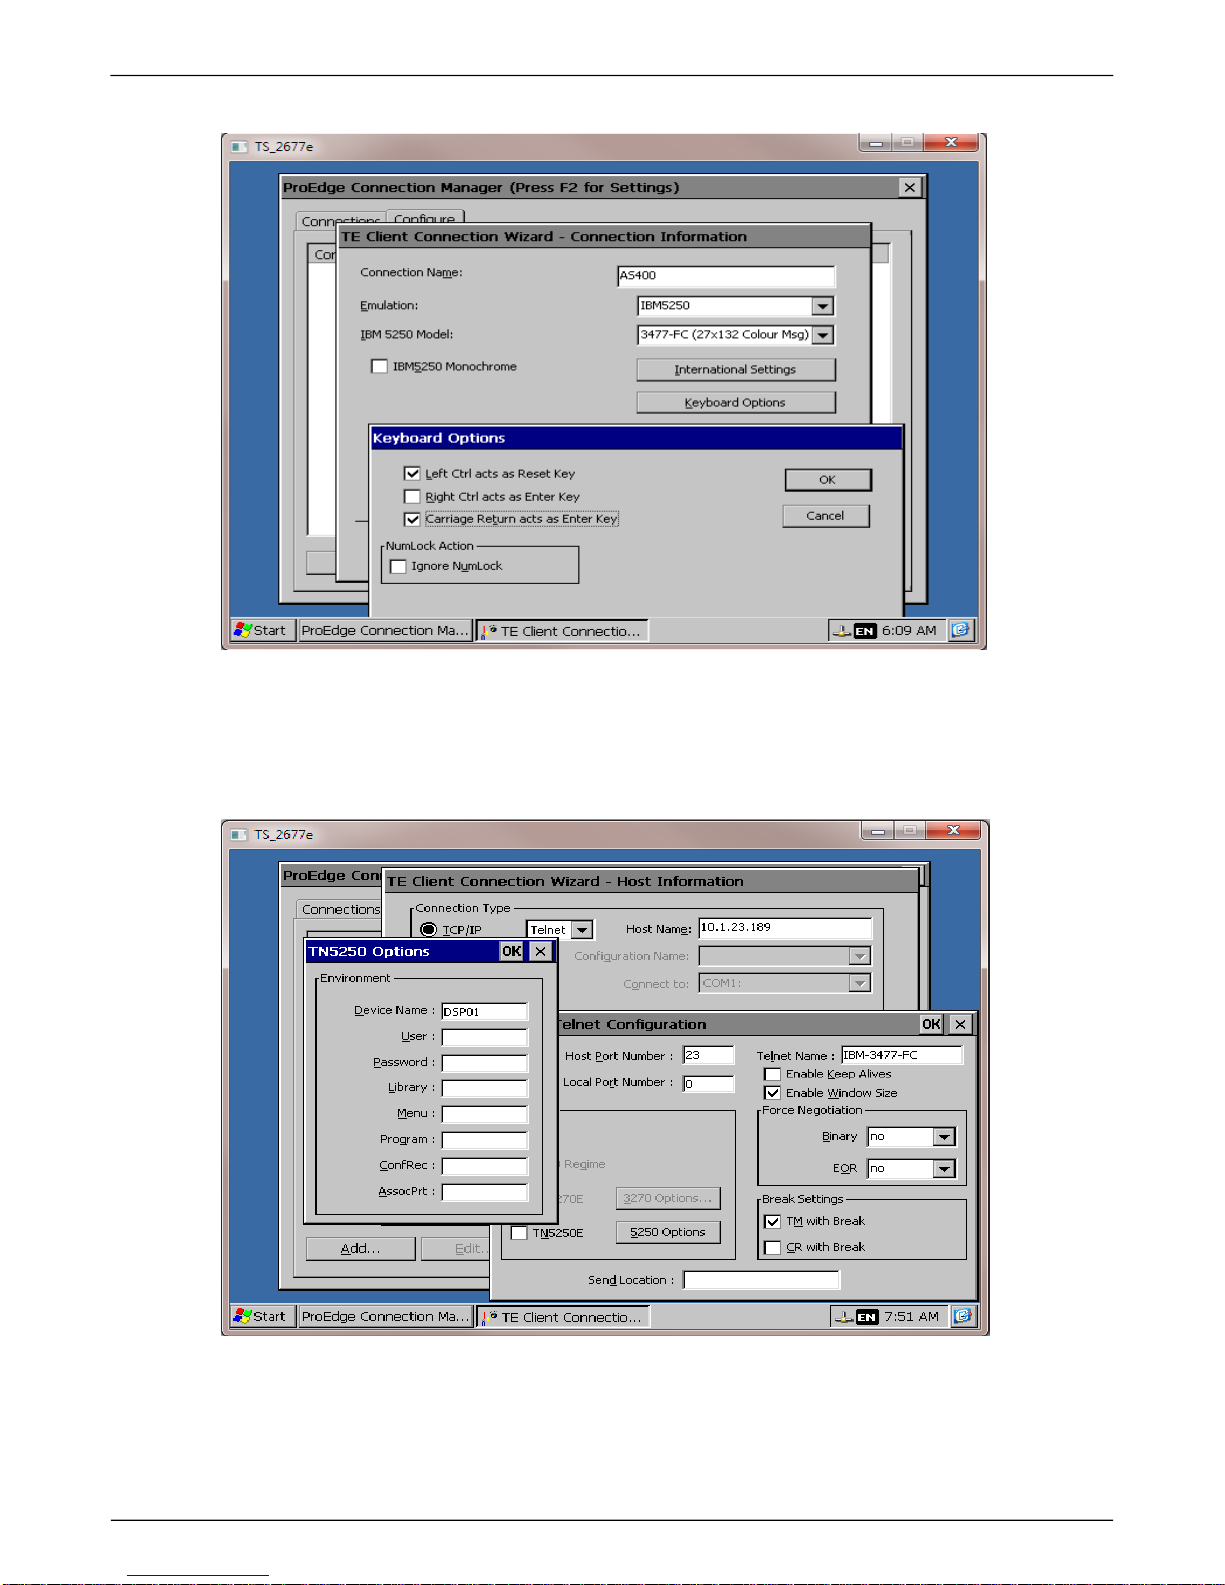
3. Enter a Connection Name (this will be the name of the icon showing on the desktop). Click on the
dropdown and select the Emulation, IBM 5250 for an AS/400 or IBM 3270 for a Mainframe.
• Click on the dropdown for the IBM Model and select the model you desire.
• Click on International Settings if you desire to change the National Character set or Keyboard
Type.
• Click on Keyboard Options and select the desired function for the Reset and Enter keys.
I-O 2677e Ethernet Display User s Guide
Printer Operation 10
4. Enter the Host Name which is the Host’s IP Address. Click Advanced and 5250 Options if you would
like to specify the device name that will be created on the AS/400.
• If you want the host to auto login when the session is started, you can set the User Name and
Password.
• The Telnet Host Port Number defaults to 23 (may be changed if required for firewall access).
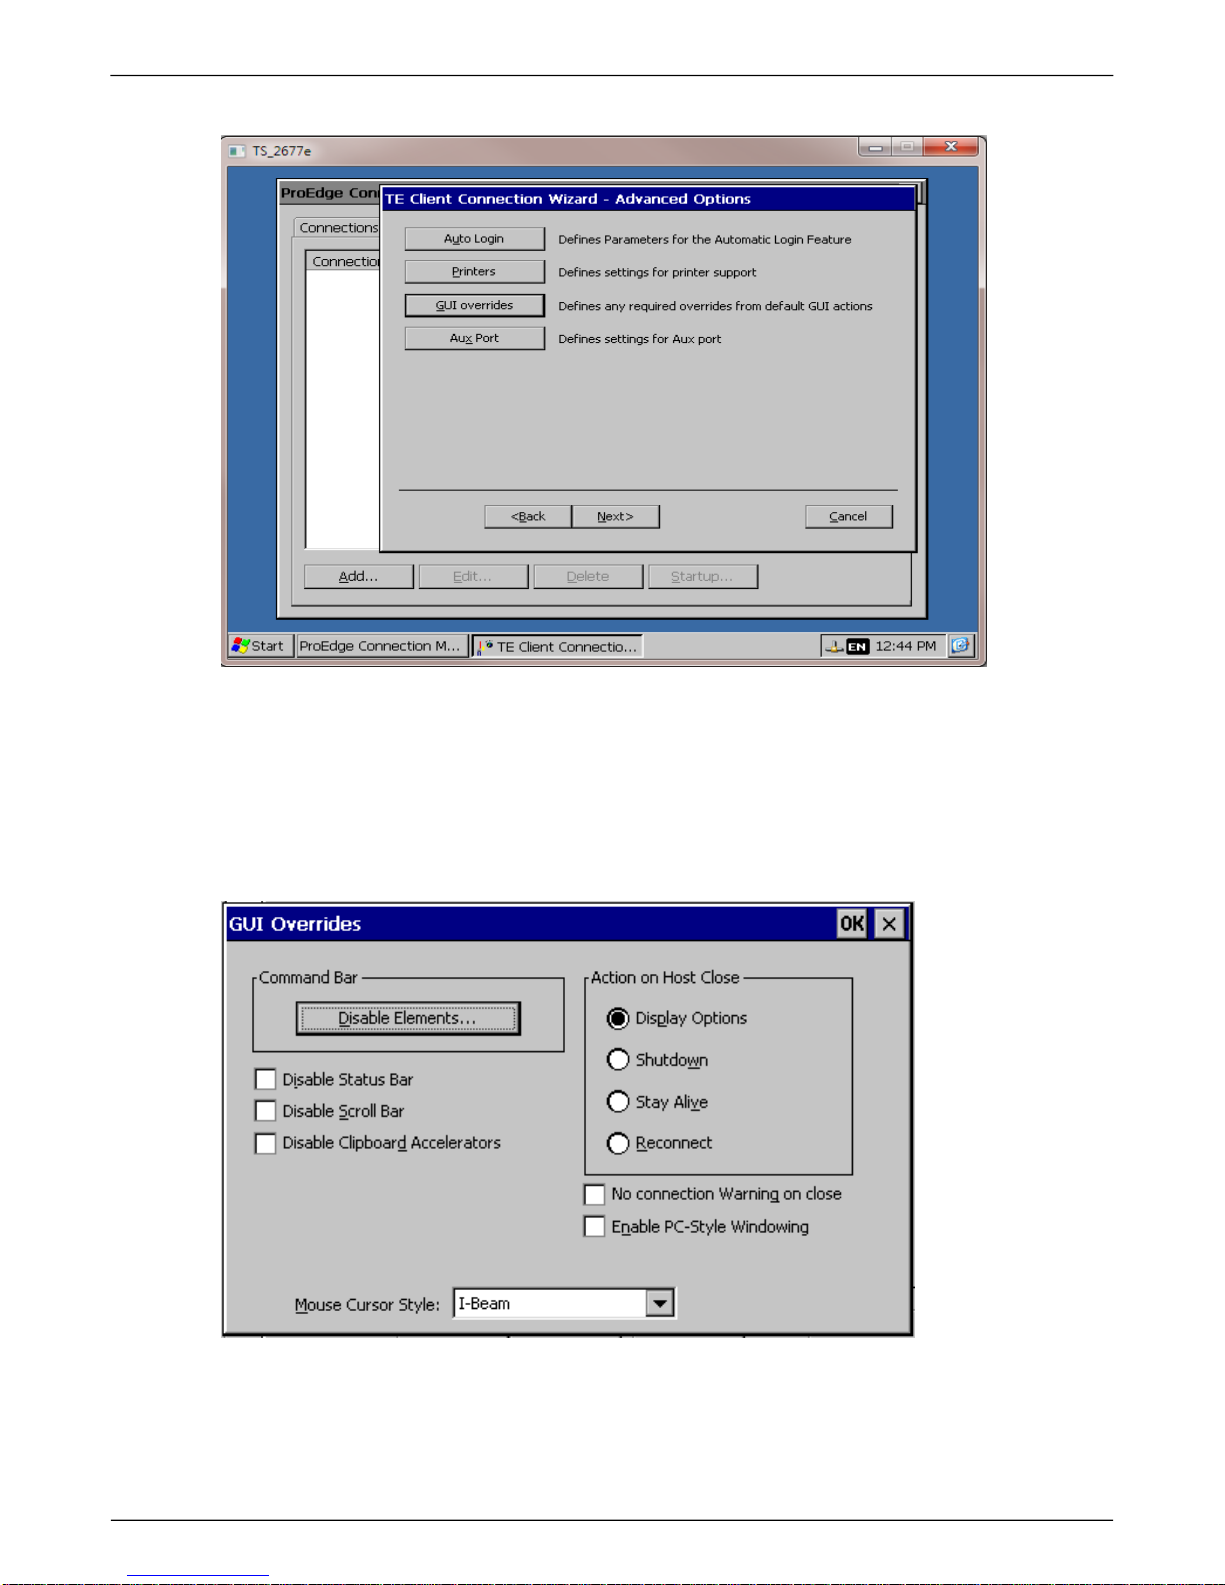
5. From Advanced Options, you can Finish adding the Display session or further modify some of the
other parameters in the GUI Overrides. After creating the session, select the Connections tab and
either double click on the Display session or highlight and click on Connect.
I-O 2677e Ethernet Display User s Guide
Printer Operation 11
GUI Overrides
The GUI Overrides dialog box enables you to disable various GUI items and also enables you to
specify how the emulator responds when the host closes the connection.
The Disable Status Bar and Disable Scroll Bar options allow you to disable the status bar and scroll
bar, respectively. The Disable Clipboard Accelerators option will disable the Ctrl + C (copy) and Ctrl
+ V (paste) keyboard commands.
I-O 2677e Ethernet Display User s Guide
Printer Operation 12
The Action on Host Close options enable you to specify how the emulator responds when the host closes
the connection. Selecting Display Options will cause a dialog box to be displayed with the following three
options. Selecting Shutdown will cause the emulator to shut down. Selecting Stay Alive will keep the
emulator running. Selecting Reconnect will cause the emulator to attempt to reconnect to the host.
By default, a warning message will be displayed if you attempt to exit the emulator while a host connection
is still active. You can disable this message by selecting the No connection warning on close option.
If supported, the optional Enable PC-Style Windowing option enables multiple windows to be displayed
when running CE version 4.2 and above.
The dropdown for Mouse Cursor Style option enables you to choose from a range of cursor styles.
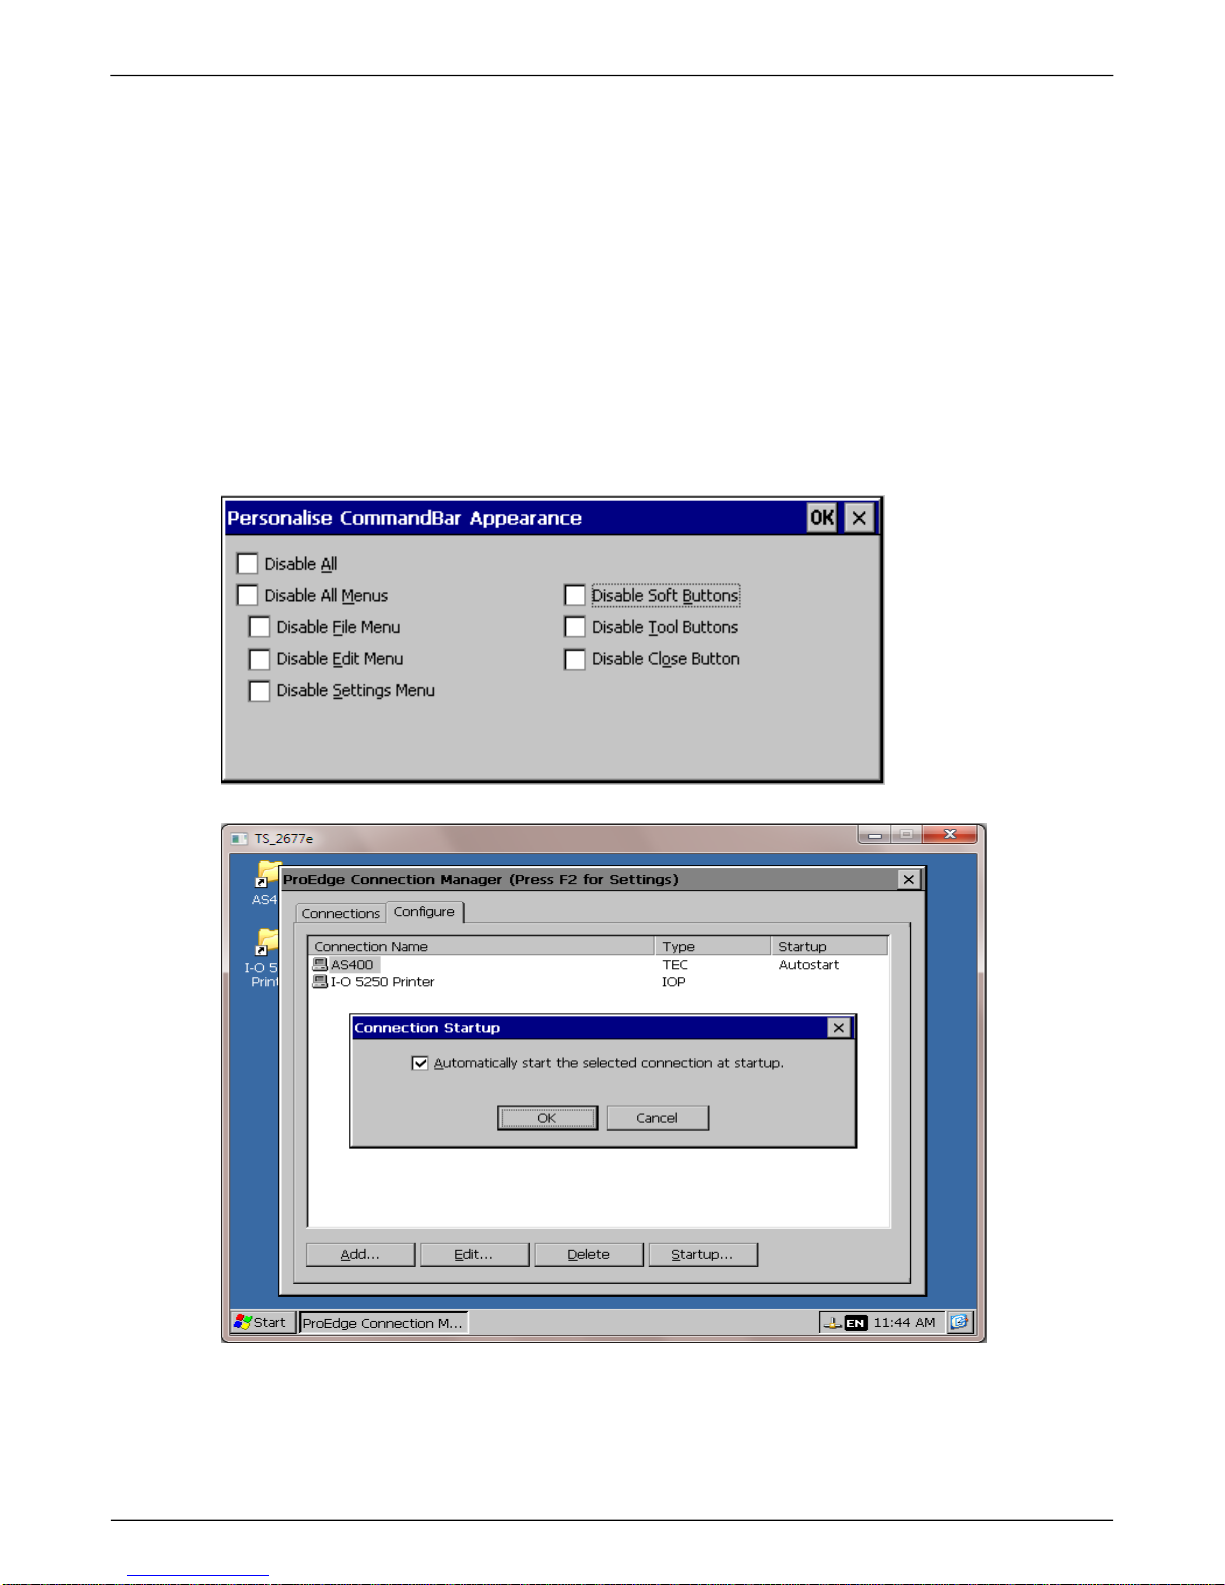
Clicking the Disable Elements button will display another dialog box enabling you to disable any of the
command bar elements.
6. If you wish to have the terminal emulation automatically start upon powering on the unit or by
starting the Connection Manager, select the Configure tab, Startup and check Automatically
start the selected connection at startup. This can be done for each session you want to auto
start.
I-O 2677e Ethernet Display User s Guide
Printer Operation 13
NOTE: MULTIPLE DISPLAY SESSIONS CAN BE CREATED TO SUPPORT THE NUMBER OF SESSIONS YOU
NEED.
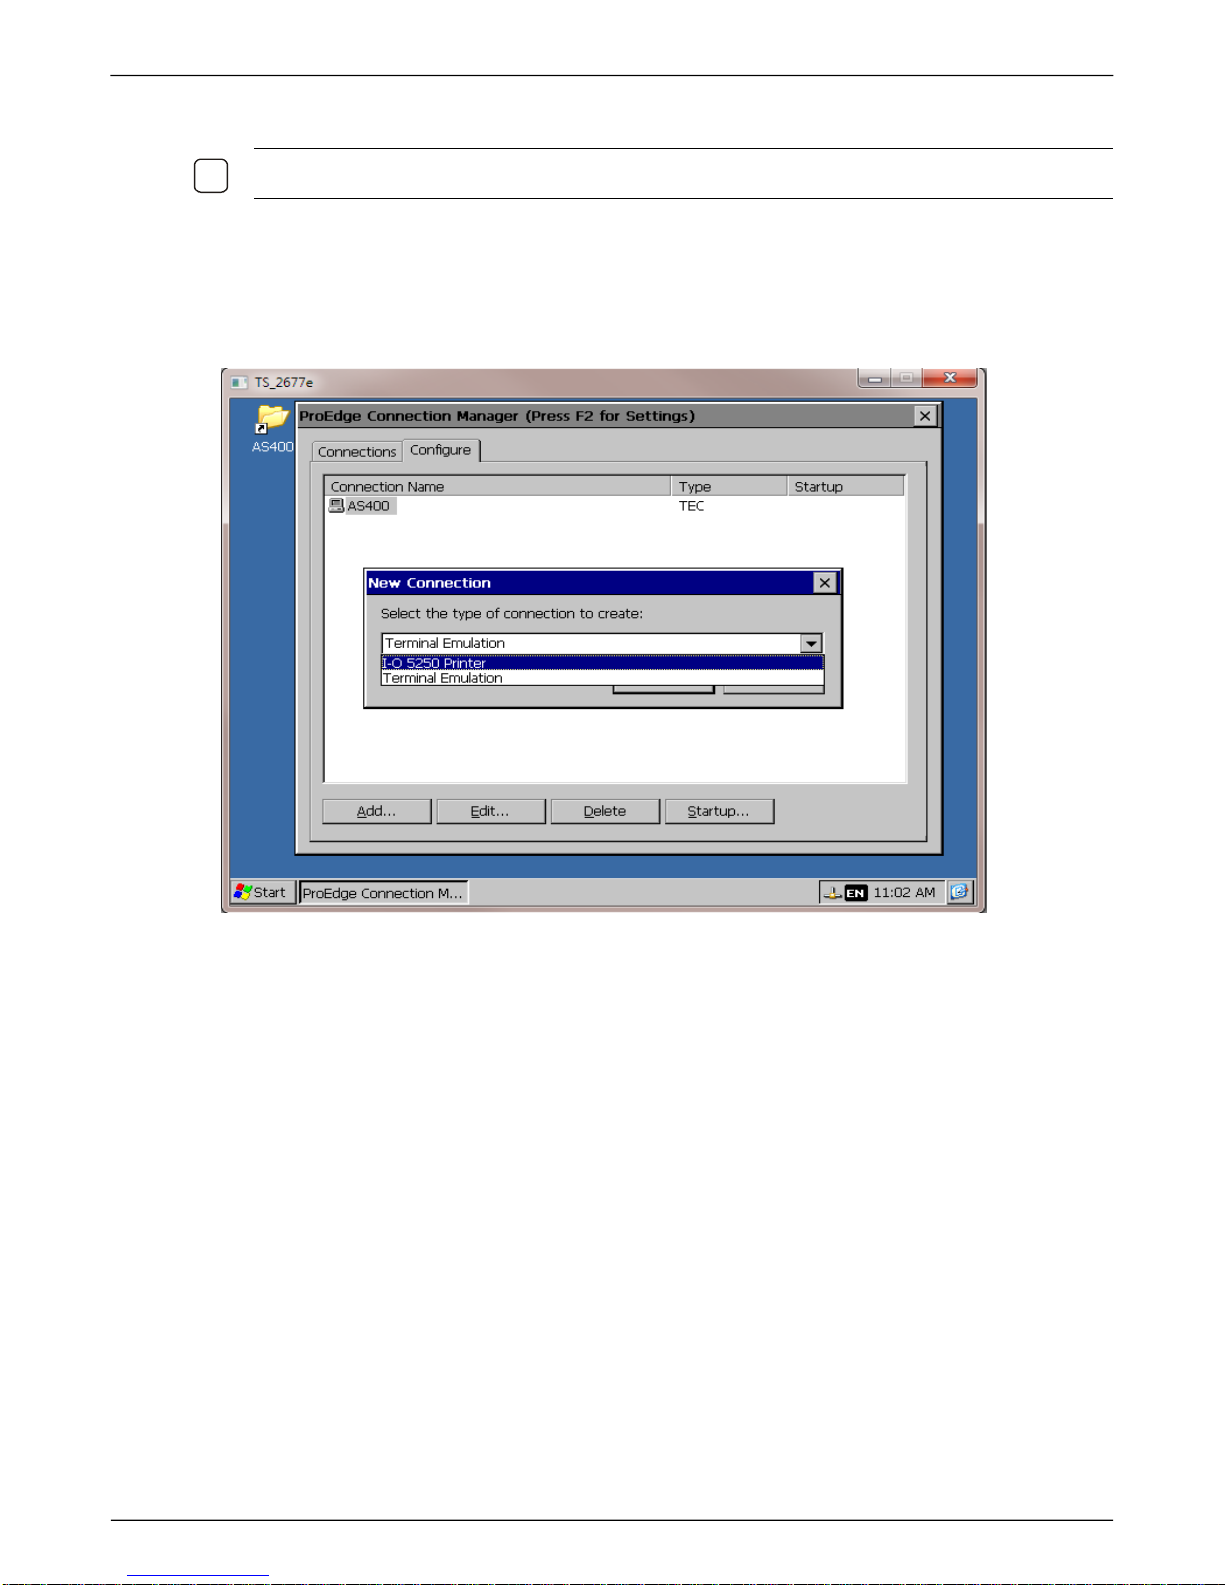
Configuring a 5250 Printer Emulation.
For AS/400 printing, the I-O 5250 Printer emulation is recommended.
1. Click on the Configure tab, Add and select the I-O 5250 Printer option.
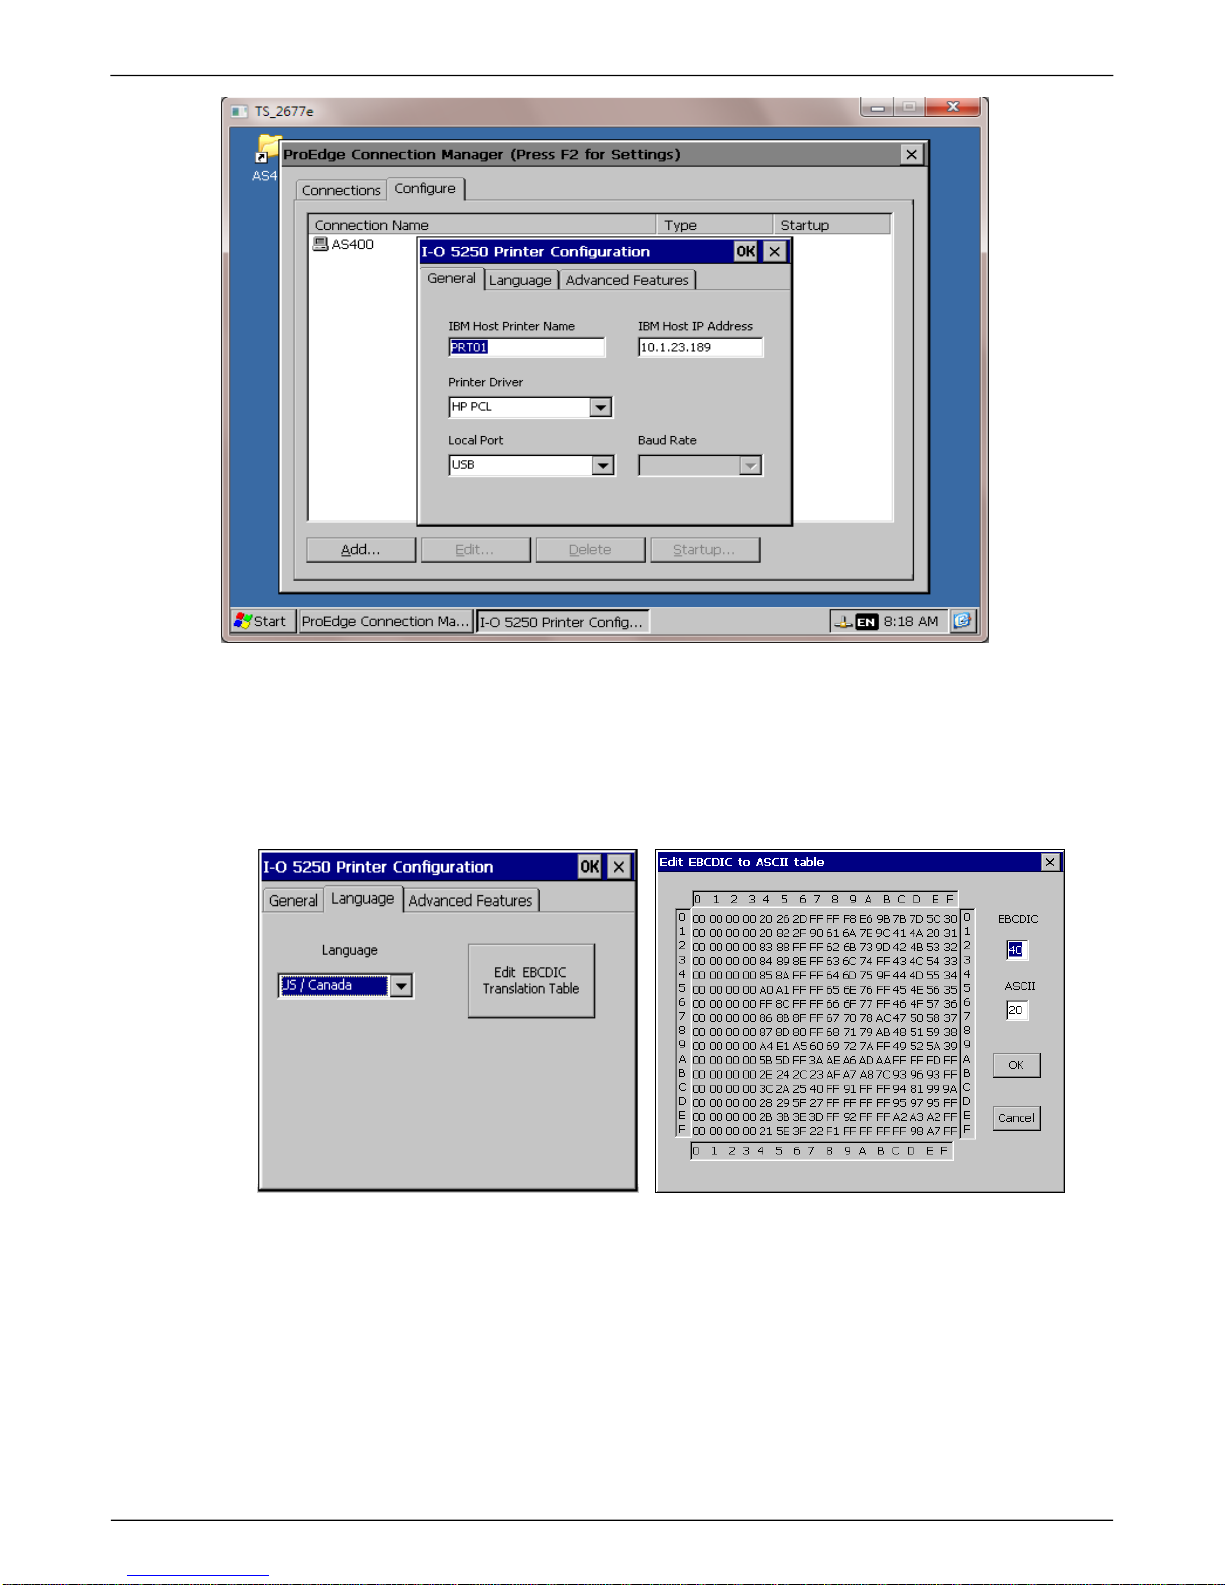
2. Enter the printer name you want configured on the AS/400, the AS/400’s IP Address, the Printer
Driver (PCL, Epson, IBM, or Generic), and the printer port (USB or USB Serial).
I-O 2677e Ethernet Display User s Guide
Printer Operation 14
a. In the Language field, select the language configured on the host (e.g. USB for U.S. base).
Setup screens will continue to be displayed in US/English. Select Multinational only if the host
system is configured for multinational.
b. The EBCDIC Translation Table is editable if you are printing from an IBM 3270 Mainframe host,
but will not change if printing from an IBM AS/400 host.
c. The Telnet port can be changed for firewall access through the Advanced Features tab. Telnet
uses port 23 by default, but this is editable depending on your network restrictions.

I-O 2677e Ethernet Display User s Guide
Printer Operation 15
3. Once you have configured the printer, click on the Connections tab, the Printer and Connect.
The printer session needs to be active for the printer to be varied on and have an active writer.
Run the printer control panel in the background while working with the terminal session.
I-O 2677e Ethernet Display User s Guide
Printer Operation 16
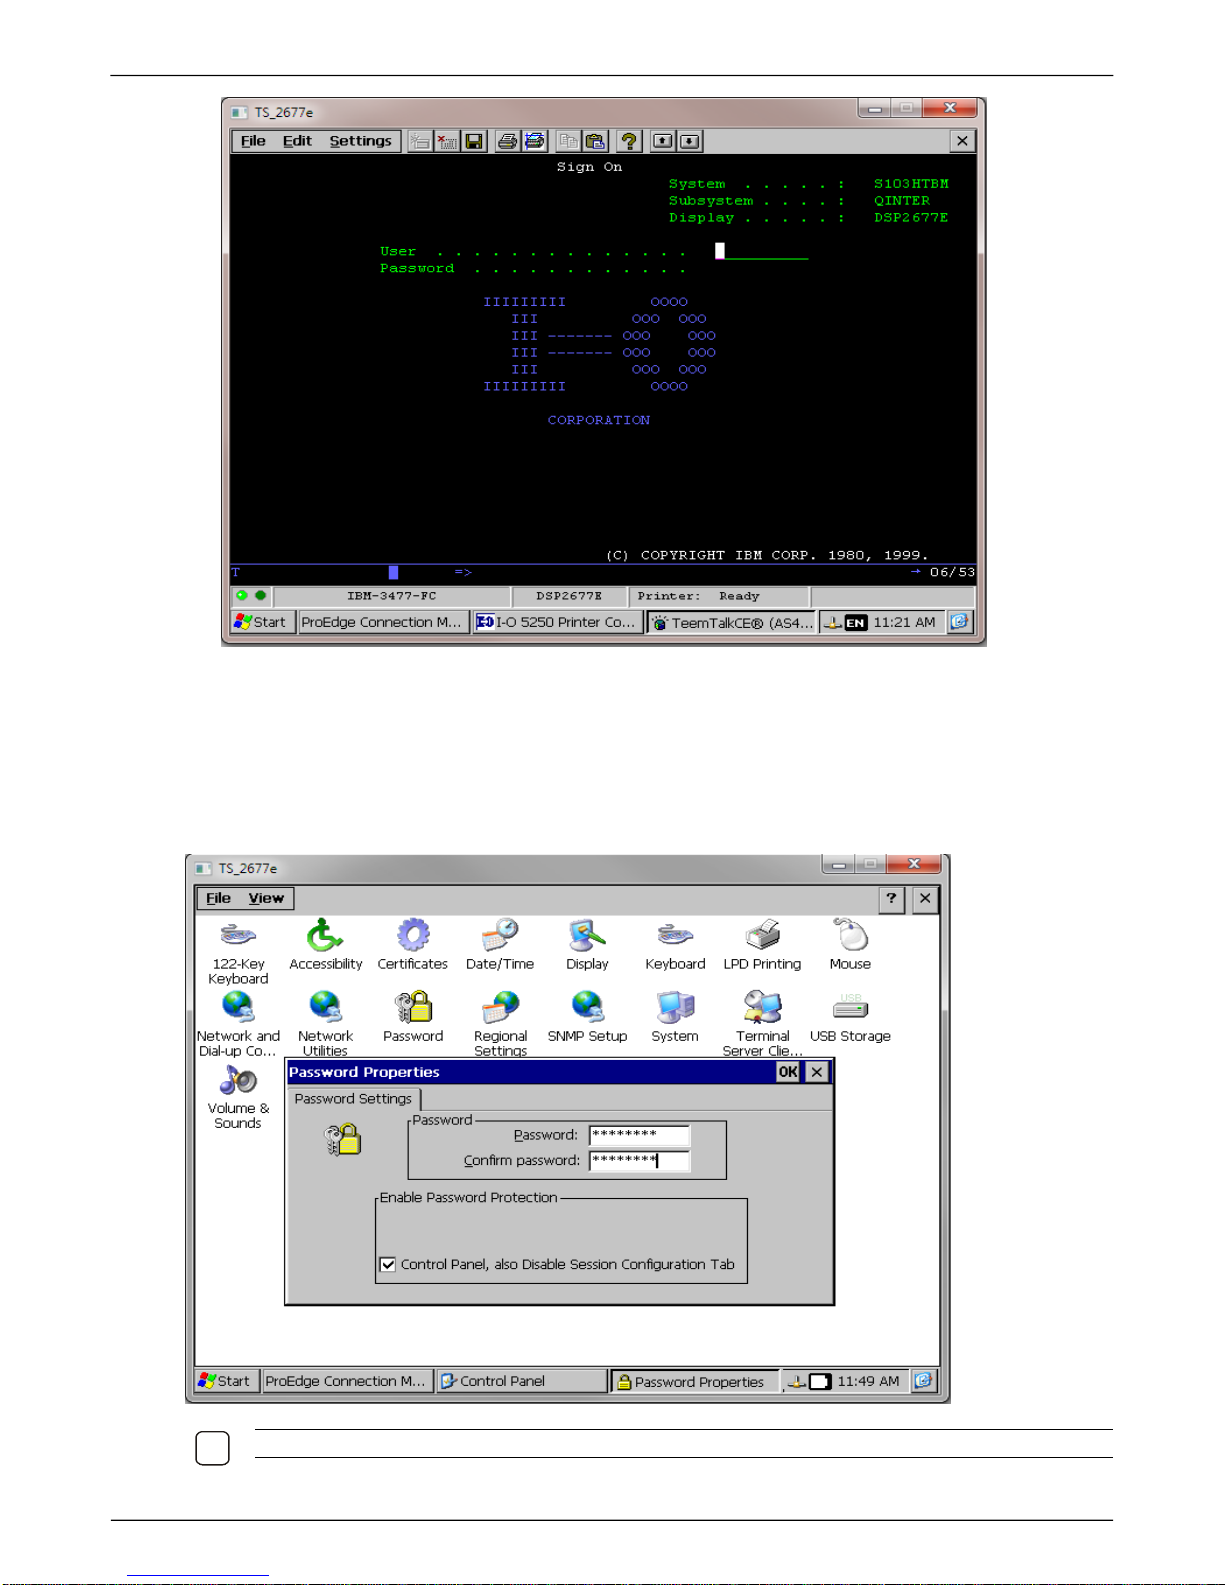
Locking out the Configuration tab
Once you have configured the display and printer sessions, you can prevent users from changing the
configuration or adding sessions by pressing F2 from the Connection Manager to open the Control
Panel. Select Password, enter and confirm your desired password, then check the box for Control
Panel, also Disable Session Configuration Tab. Click OK and exit the Control panel. This will remove the
Configuration tab from the Connection Manager.
NOTE: PASSWORDS ARE NOT CASE SENSITIVE AND CAN BE ANY LENGTH YOU DESIRE.
I-O 2677e Ethernet Display User s Guide
Printer Operation 17
CAUTION: IF THE PASSWORD IS FORGOTTEN, THE ONLY WAY TO RESET THE PASSWORD IS TO
RESTORE FACTORY DEFAULT THROUGH THE CONFIGURATION UTILITY. FROM THE UTILITY, HIGHLIGHT
THE 2677E AND CLICK ON OPTIONS, RESTORE FACTORY DEFAULTS.
NOTE: RESTORING DEFAULTS WILL DELETE ANY SESSIONS YOU HAVE CONFIGURED. YOU WILL NEED
TO RECONFIGURE ANY DISPLAY AND PRINTER SESSIONS YOU HAD PREVIOUSLY SET UP. *FOR THIS
REASON, YOU WILL WANT TO LIMIT ACCESS OF THE CONFIGURATION UTILITY TO THE SYSTEM
ADMINISTRATOR.
Configuring the 2677e using the Configuration Utility
1. Install the I-O Configuration Utility.
a. Insert the I-O Configuration Utility CD in the CD-ROM drive of a Windows 95 or newer PC.
b. Click Start | Run, and enter d:\configuration utility\setup.exe , click OK.
c. Follow the on screen prompts.
NOTE: YOU WILL NEED TO USE VERSION 4.73A OR NEWER CONFIGURATION UTILITY. WHEN INSTALLING
THE UTILITY, YOU WILL NEED TO RIGHT CLICK ON THE PROGRAM AND RUN AS ADMINISTRATOR.
2. At this point the 2677e and monitor should be powered on.
3. Run the I-O Configuration Utility by clicking on Start | Programs, navigate to the I-O Configuration
Utility and click on the Configuration Utility option.
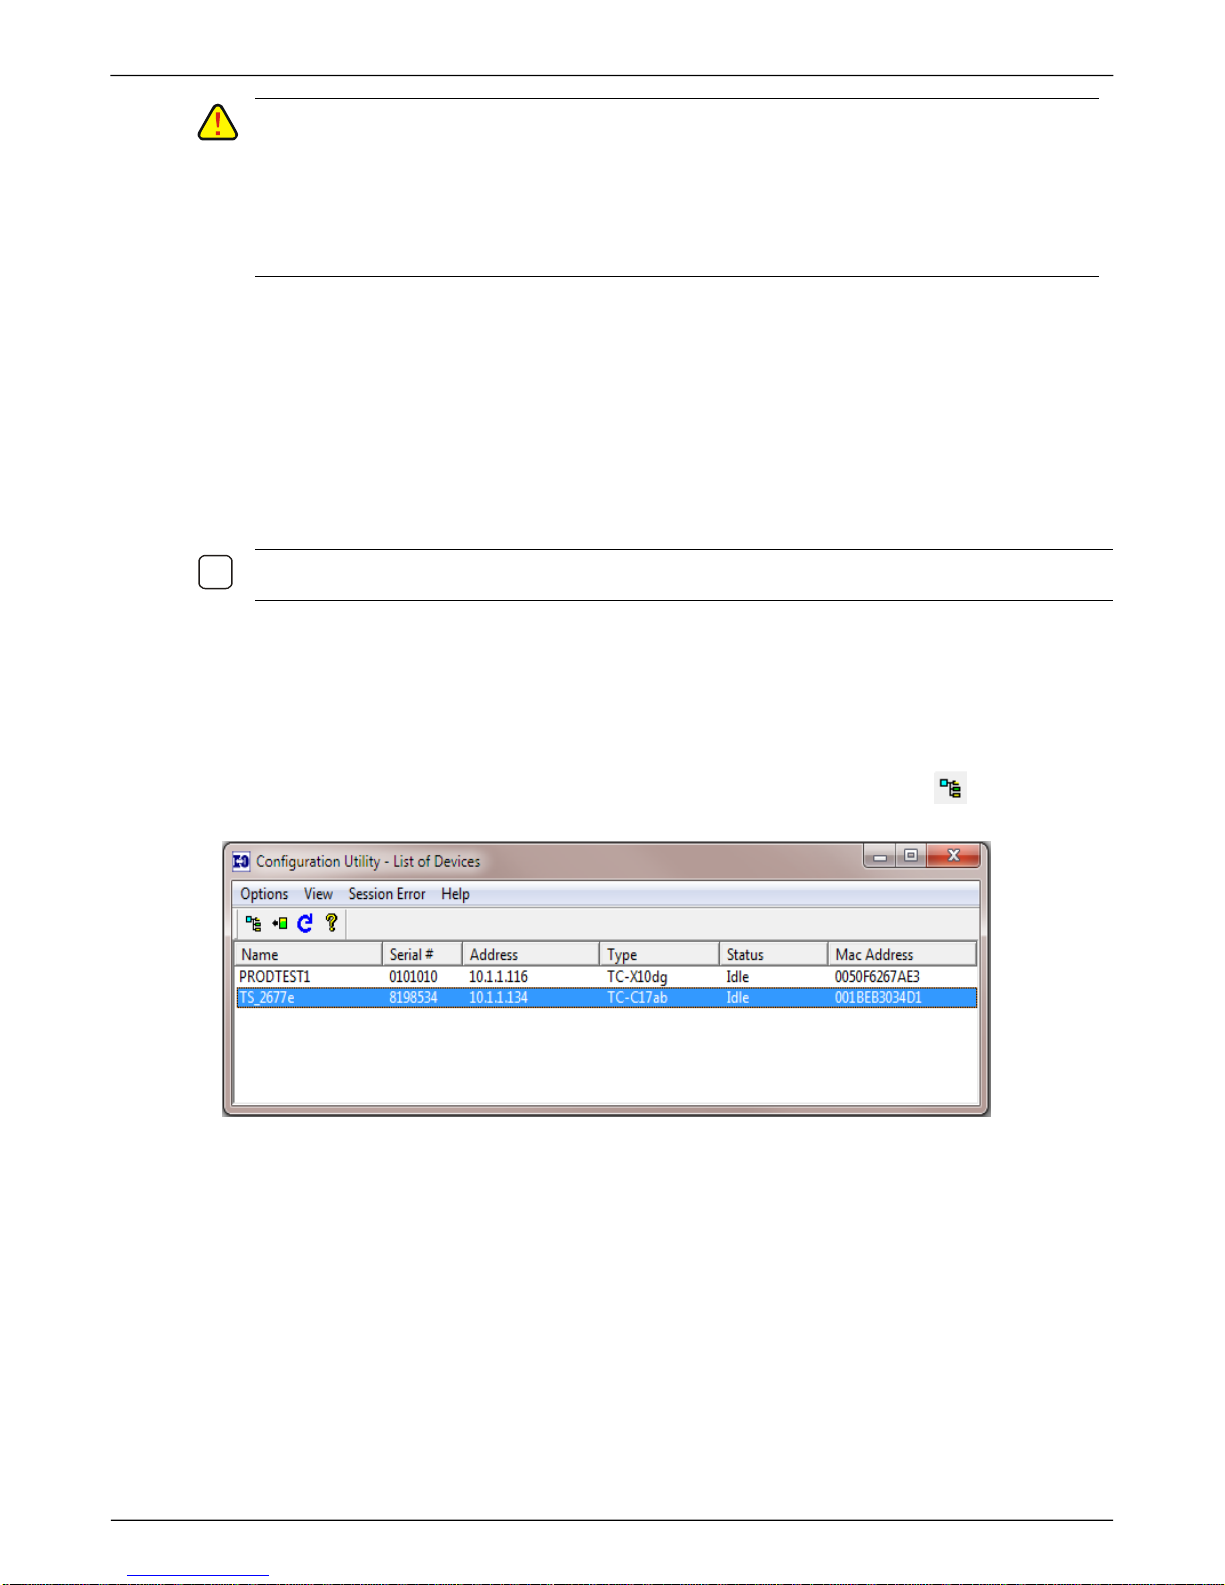
4. In the List of Devices, you will find an entry with a type of TC-C17 with the serial number for the
2677e that you want to configure. If there is no entry, click on the Rescan icon to refresh the
list. Double click on the desired 2677e.
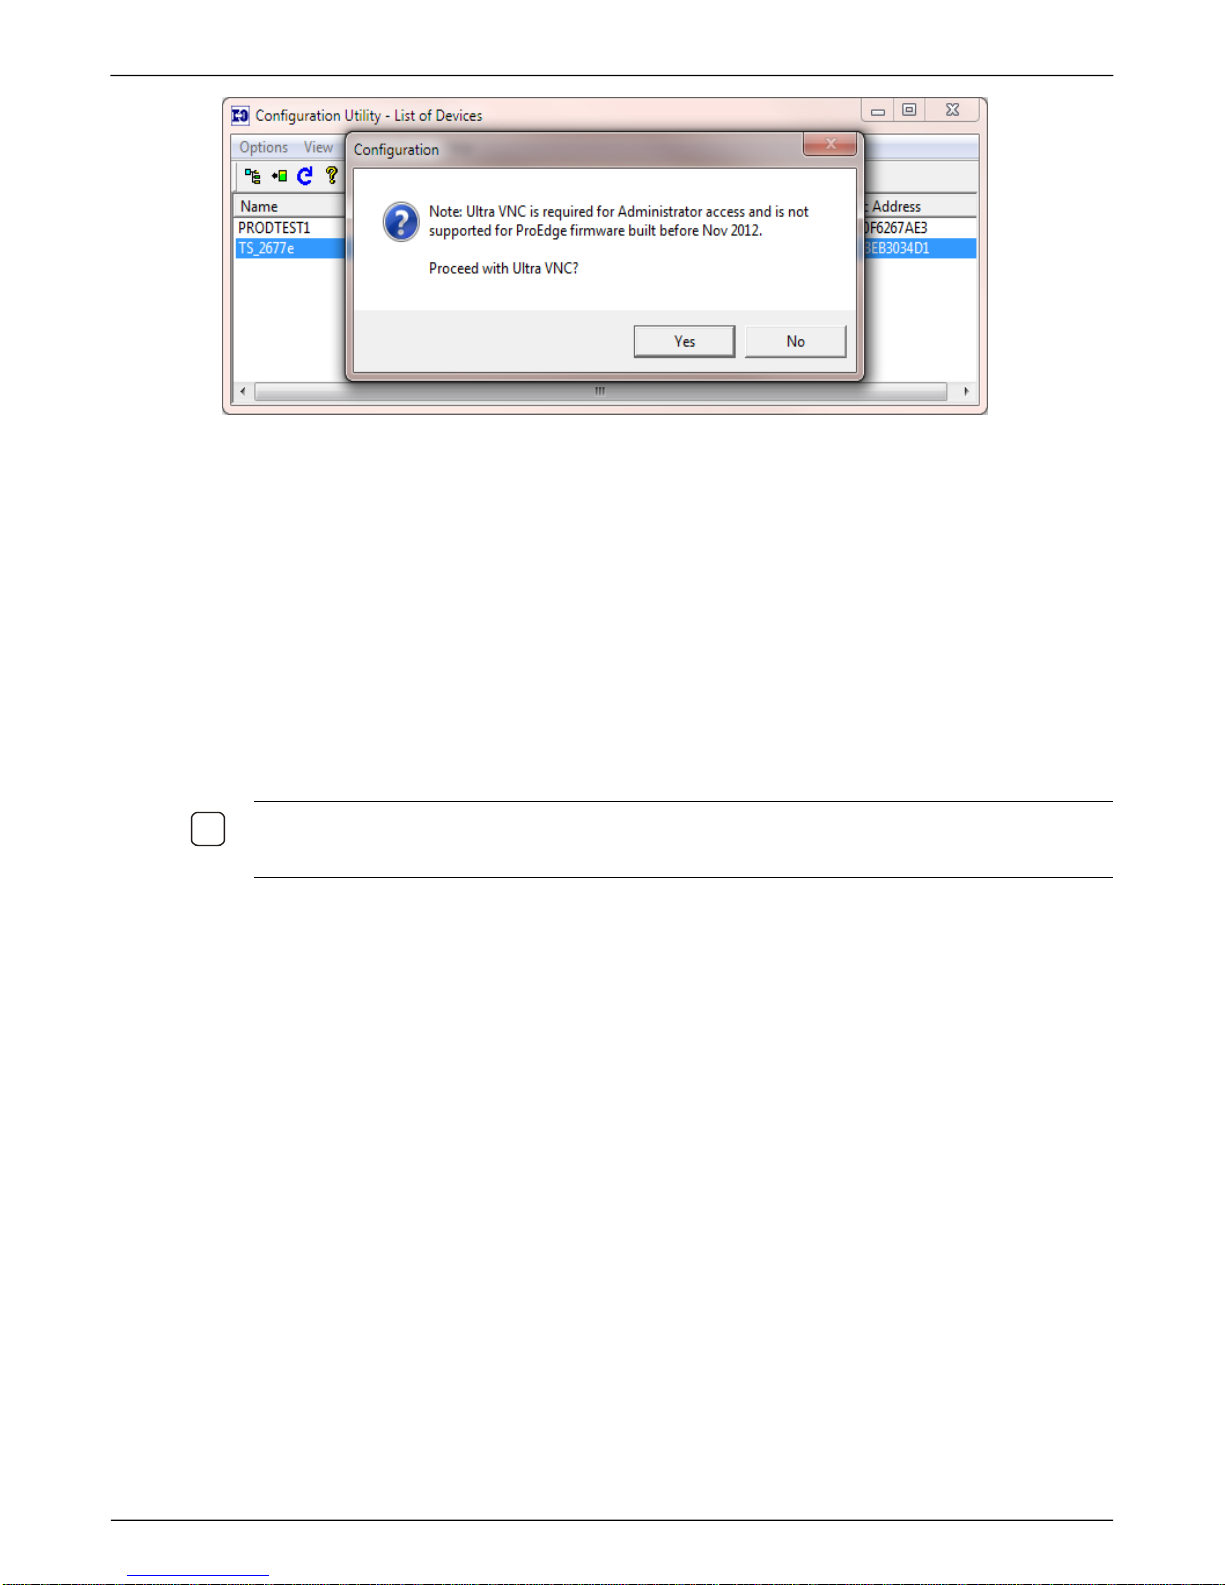
5. When opening up the configuration of the device, you will get a request for VNC. Click on NO to
proceed with the configuration.
I-O 2677e Ethernet Display User s Guide
Printer Operation 18
6. After selecting No on the VNC request, the desktop window of the 2677e will display the Connection
Manager. Follow the instructions for Local Setup beginning on page 9 to configure using remote
access of the 2677e.
Configure the AS/400
TN5250e is an extension of the Telnet display and printer protocol used in the IBM AS/400 systems.
TN5250e is an auto configuring protocol on the AS/400. The 2677e provides you with several display
models for color or monochrome. The host will auto configure the display based on the model selected.
Printers are configured as a 3812-page printer.
I-O has customized their TN5250e printer emulation to include both laser and dot-matrix printer drivers
NOTE: CERTAIN DOT-MATRIX PRINTER FUNCTIONS SUCH AS BACK SPACE, BOLD, UNDERSCORE OR
OVERSTRIKE ARE NOT SUPPORTED THROUGH IBM’S TN5250E. FOR FORMS ALIGNMENT MESSAGES,
CHANGE THE FORM FEED OPTION IN THE HOST PRINTER CONFIGURATION TO *CONT.
To configure your AS/400 to support TN5250e, the AS/400 must meet the following requirements:
• Be running OS/400 V3R2 or newer, with the most recent applicable PTFs applied.
• Have the most recent version of the Telnet server installed on the AS/400.
• Have the AS/400’s auto configuration function turned on.
• Make certain that the AS/400 can create virtual devices and there are a sufficient number of devices
available to be created.
This is done using the AS/400 command:
CHGSYSVAL SYSVAL(QAUTOVRT) + VALUE(?)
The ? is the maximum number of user-created virtual devices that can be created.
• If the OS/400 version is earlier than V4R2, the Telnet server will need to be started using the
AS/400 command:
STRTCPSVR SERVER(*TELNET)
V4R2 and newer versions will automatically start the Telnet server.
After these requirements are met, the AS/400 (referred herein as IBM host or host) will automatically
configure the I-O 5250 display and printer sessions the first time you attempt to make a connection.
The IBM host will create a 3477FC or 3477FG display device or 3812 page printer device and assign
the host device name you entered when configuring the display and printer sessions.

I-O 2677e Ethernet Display User s Guide
Printer Operation 19
Running Display and Printer Sessions
Starting Display Sessions
After the display station has been configured (either locally or remotely), the ProEdge Connection
Manager will show on the display. If you have selected the Connection Startup to automatically start the
display and or the printer, the sessions will be presented on the screen with the printer session running
in the background.
If the auto start option was not selected, from the Connection Manager, select the Connections tab and
either double click on the device or highlight the device and click on Connect to start the session.
If a sign-on screen is not presented, and the cursor is in the upper left hand corner, the host has not
accepted the request to connect. This can be caused by the following conditions:
• Incorrect IP address for the Host Name, reenter the proper IP address.
• Incorrect IP address for the 2677e (another device may have the same address) reenter a valid IP
address in the Control Panel, Network Connections (F2 from the Connection Manager).
• The host may not be set for auto-configuration, the system administrator will need to turn this on, or
manually configure a device.
• The host may not have enough virtual device sessions available, the system administrator will need
to increase the number of available sessions.
• The host may believe there is another device with the same name and IP address already active,
the system administrator will need to vary off the device and end the TCP/IP session (see
Troubleshooting for details on how to handle this issue).
TIP: SEE TROUBLESHOOTING FOR MORE INFORMATION ON CONNECTION ISSUES.
Starting the Printer Session
If the printer session has been configured to start automatically, it will start at the same time the display
sessions are started. Otherwise, manually start the session by selecting the Connections tab, highlight
the printer session and click on Connect to start the session. Leave the printer session running in the
background.
When the printer session has completed the startup process and has established a connection with the
host, the printer will automatically create on the host and start a writer.
NOTE: TELNET CREATES THE PRINTER WITH A 3812 EMULATION, THE 2677E WILL CONVERT THE DATA
FOR NON-PCL PRINTERS TO A 4214 EMULATION.
Re-Connect Sessions
There are three methods of reconnecting the 2677e to the host:
• When configuring the display and printer sessions, you can select Startup and check the
Automatically start the selected connection at startup option. When powering on the 2677e the
Connection Manager will automatically start the selected sessions.
• From the Connection Manager Connections tab, highlight the session and click on Connect to start
the selected session.
• From the Connections tab, double click on the desired session to start the emulation.
I-O 2677e Ethernet Display User s Guide
Printer Operation 20
Disconnect Sessions
Sign off all display sessions, then click on File and Exit, or click on the X in the upper right corner of the
display screen for each display session.
Disconnect from the printer session by clicking on End Session.
NOTE: IF POWER SHUTS DOWN, THE HOST WILL KEEP THE TELNET SESSIONS OPEN FOR A PERIOD OF
ONE TO TWO HOURS AND WILL THEN AUTOMATICALLY END THE TELNET SESSIONS.
IF POWER IS ACCIDENTLY CYCLED WITHOUT SIGNING OFF, THE HOST WILL STILL HAVE OPEN TELNET
SESSIONS AND WILL NOT ALLOW THE DISPLAY STATION TO REESTABLISH THE CONNECTION AGAIN. SEE
TROUBLESHOOTING FOR THE RECOVERY PROCESS.
Display Operation
This chapter describes in detail the operation of the TN5250e display sessions.
The number of display sessions you configure is up to you, each with a different host if desired.
Configuration of the 2677e is accomplished either through the local Connection Manager, or remotely
using the I-O Configuration Utility. For information on using the Configuration Utility, refer to page 17,
Configuring the 2677e using the Configuration Utility.
Multiple Sessions
The display station can have as many display sessions as you desire connected to the same or different
hosts. You can switch from one session to another as needed. This is helpful when a session is
inhibited, as you can change to another session and work on a different application. To switch between
sessions, use the key sequence of ALT- Esc or use the mouse and click on another TeemTalk session
at the bottom of the screen.
The display emulation and display ID of the current session is displayed in the tool bar at the bottom of
the screen, just above the start/ session bar.
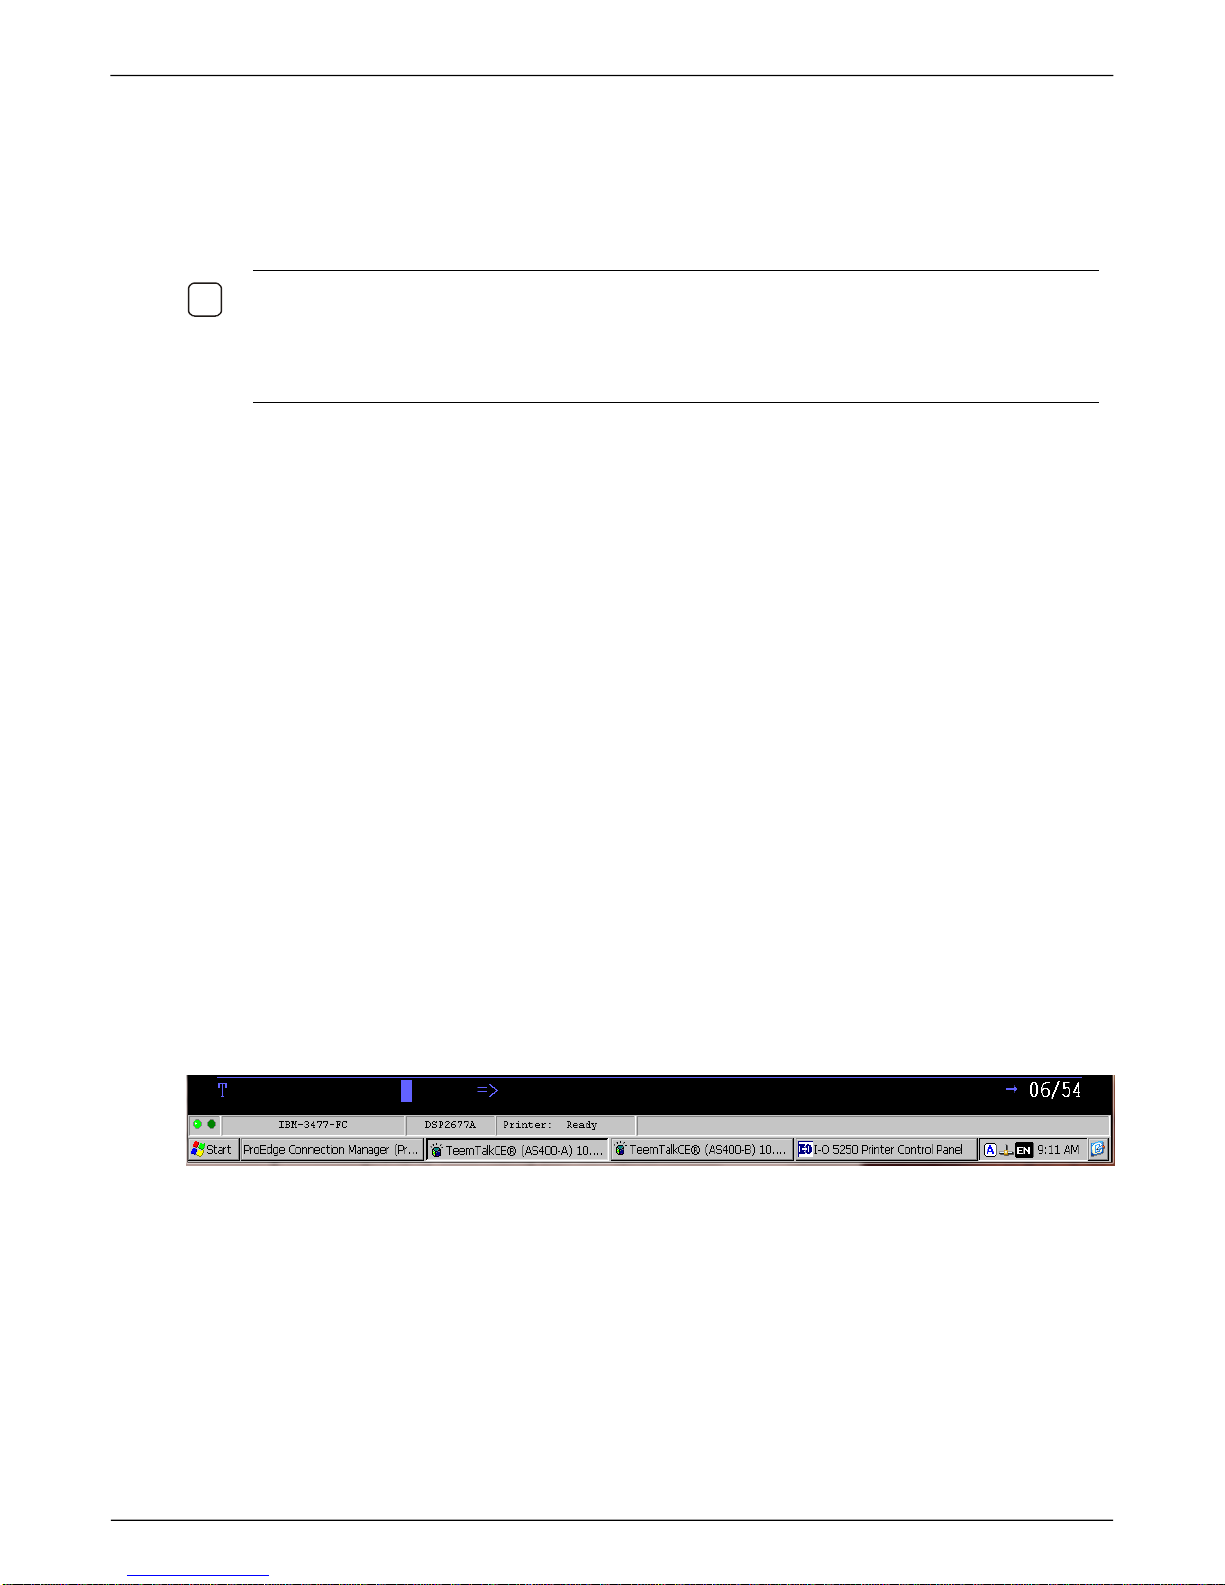
Status Line Indicators
Across the bottom of the screen are a series of indicators that let you know what the status of the
display station and/or current session is. In normal operation the status line will look something like this:
The T indicates a terminal session and along with the solid block indicates the current session is
communicating with its host. The green light on the left indicates the session is active, if red, the session
is not connected. The IBM-3477-FC indicates the display emulation of the selected session. The
DSP2677A is the display ID on the host.
The highlighted TeemTalk button on the bottom row indicates which display session is showing on the
terminal.
The blue A indicates that Caps Lock is On. Clicking on the network connector displays the IP Address,
Subnet Mask and Gateway addresses. EN indicates the English language. Hover the mouse over the
time will display the day and date, clicking on the time will display the Certificates. Clicking the screen
ikon, will display the desktop.
Other indicators that may appear at other locations on the screen are:
I-O 2677e Ethernet Display User s Guide
Printer Operation 21
Indicator
Description
Display communicating with host system
06-053
The cursor position in the currently active
session, row/column.
Input inhibited
Insert mode active
Shift Lock – Shown on the Start Task bar.
Shortcut Key Sequences
There are a number of additional features and functions of the 2677e that can be accessed using the
Setup Menus. Most of these sequences are listed on help screens that may be viewed at any time a
session is active.
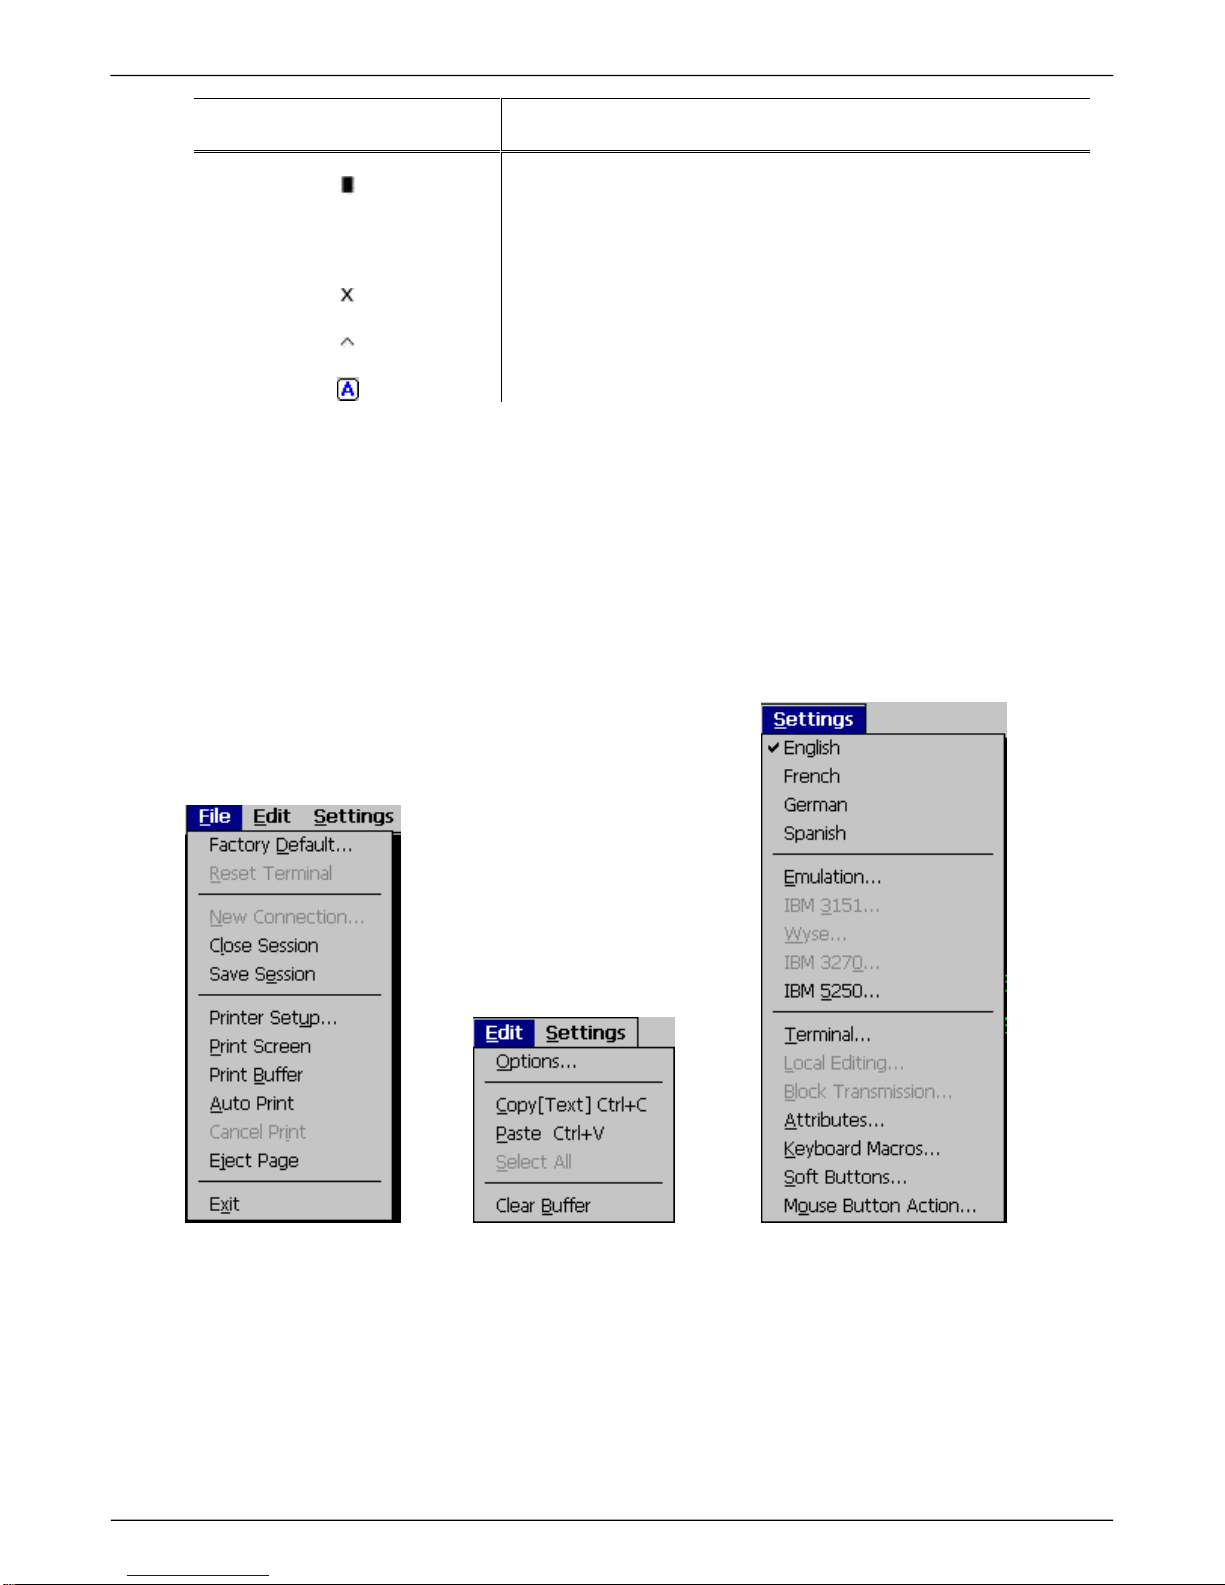
The following Help Screens can be accessed by mouse or by using the key sequence ALT-F, ALT-E or
ALT-S ‘. After making any changes to a session you will need to go to File and Save Session, otherwise
closing the session will clear out any configuration changes that were made.
Jump to another Session
Press the Alt-Esc key sequence to switch from one session to another or use the mouse to click on the
desired session on the Status Bar.
I-O 2677e Ethernet Display User s Guide
Printer Operation 22
Ruler
The ruler feature provides a cursor reference for ease of reading and aligning text on the screen.
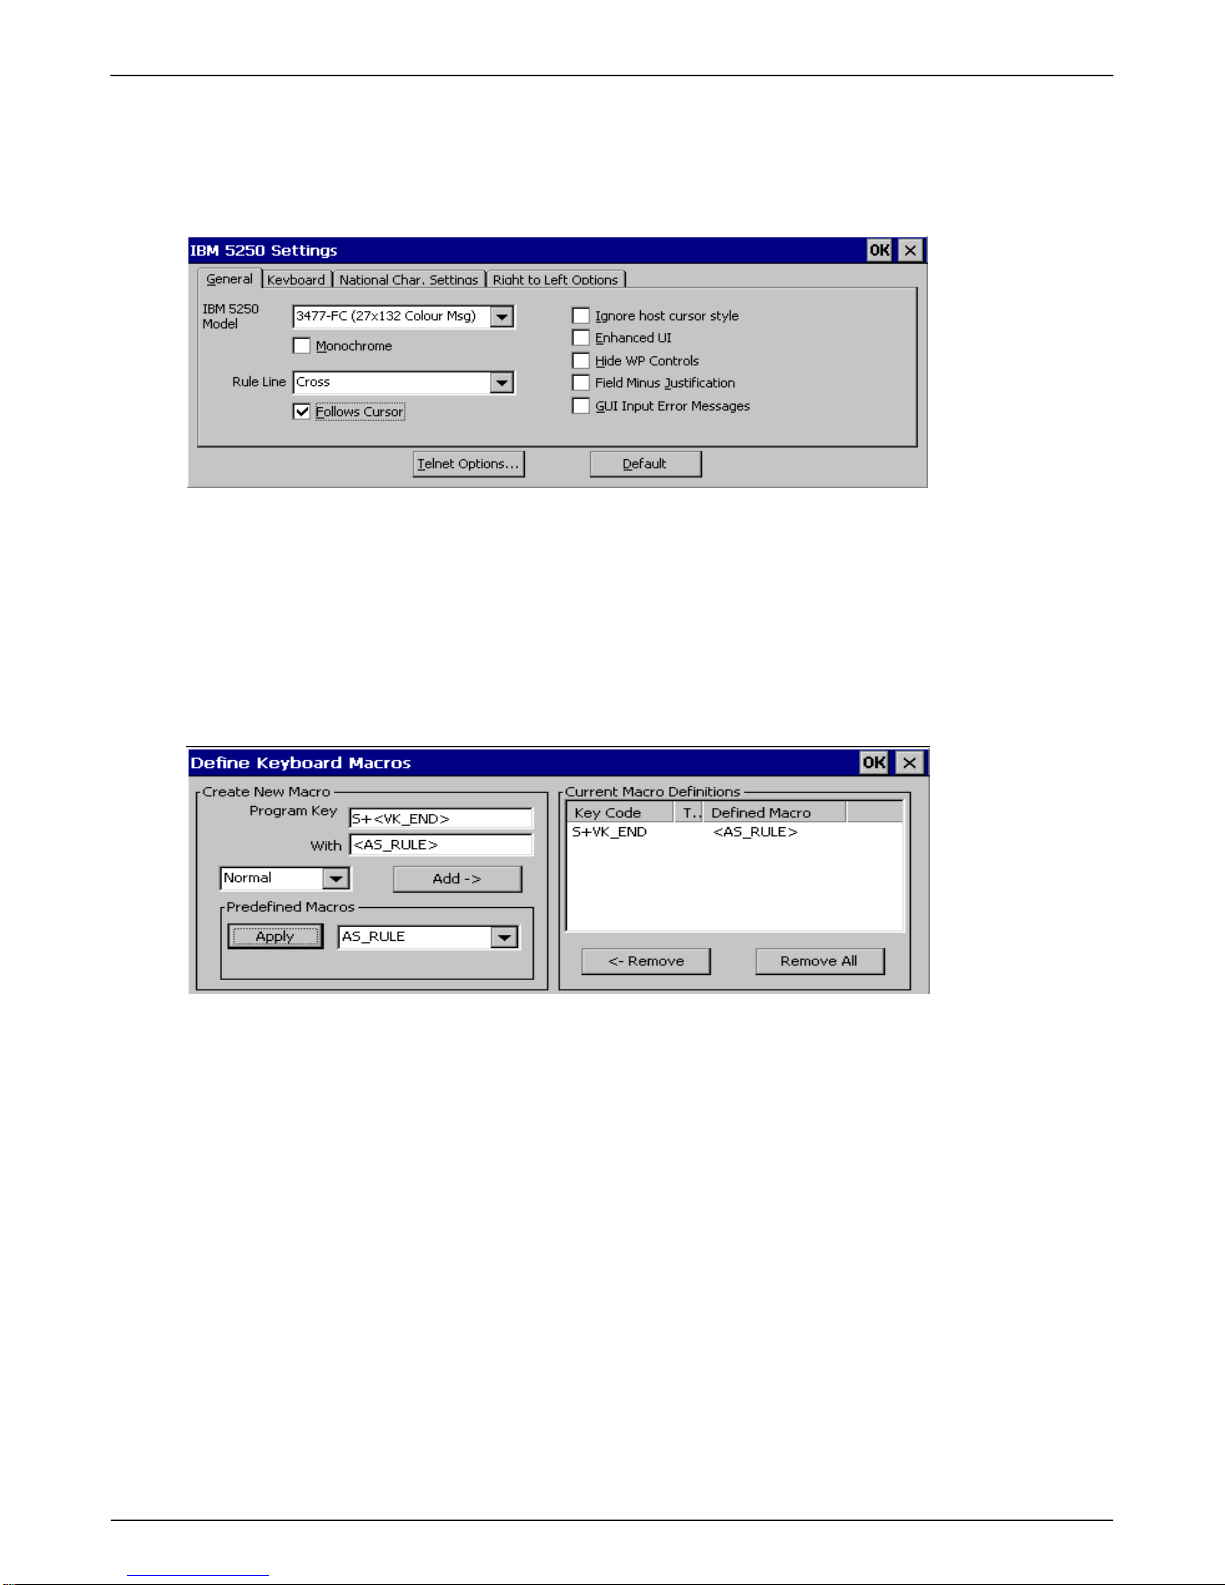
Choose the ruler style in the Settings Menu, IBM 5250. Select the Rule Line style, Horizontal, Vertical,
or Cross and check the box for Follows Cursor.
Keyboard Mapping
The keyboard is mapped as close as possible to the terminal being emulated, however there are key
functions you will want to configure, such as the Rule Key.
You will need to define a key such as ‘Shift + End’ to enable the Rule by selecting Settings, Keyboard
Macros; press the key you want to use which shows in the Program Key field, then select the dropdown
in the Predefined Macros field and select AS_Rule, Apply and Add. This adds the macro to the Current
Macro Definitions. Other key functions not predefined can be set up in this same fashion.
Once your macros and other definitions have been made, you must save those settings by selecting File
and Save Session.
Keyboard Click
If Key Click and other sounds are desired, you will need to have external speakers or a monitor with
built in speakers. From the Connection Manager, press F2 to access the Control Panel. Select Volume
and Sounds, select Enable clicks and taps for Key Clicks and any other applications, set the volume
and save the settings.
Connect All Telnet Sessions
If the connection startup is not set for auto start in the Connection Manager, by highlighting the desired
session and clicking on Connect will cause the display station to attempt to contact the host and
establish a new connection.

I-O 2677e Ethernet Display User s Guide
Printer Operation 23
Disconnect all Telnet Sessions
Before shutting down a display session, signoff the session and either click on the X in the upper right
corner or highlight the session on the Connection Manager and click on End.
CAUTION: IF POWER SHUTS DOWN, THE HOST WILL KEEP THE TELNET SESSIONS OPEN FOR A PERIOD
OF ONE TO TWO HOURS, AND THEN WILL AUTOMATICALLY END THE TELNET SESSIONS.
IF POWER IS ACCIDENTLY CYCLED ON THE 2677E, THE HOST WILL STILL HAVE OPEN TELNET SESSIONS
AND WILL NOT ALLOW THE DISPLAY STATION TO REESTABLISH THE CONNECTIONS AGAIN. SEE
TROUBLESHOOTING FOR THE RECOVERY PROCESS.
Local Screen Print
Causes the currently active screen to be printed on the locally attached printer.
Printer Test
Causes a two-page configuration report to be printed on the locally attached printer.
Using the Keyboard
Two different styles of keyboards are available to be used with the I-O 2677e.
• The I-O 122-key 5250 keyboard, a heavy-duty keyboard with 5250 key cap nomenclature laid out
like IBM’s keyboard.
• The I-O 104/105 light-duty PC style keyboard.
Shift and Alt Keys
The shift key is used to type upper case letters. On 104/105-key keyboards, the Shift key also selects
the function shown on the very top of the key. For example, to select F13 – F24 from the 104/105-key
keyboard, press and hold the SHIFT key, then press the desired function key, since the "Setup" legend
is printed on the top half of the key.
There are two ways to use the Alt key:
• Press and hold the ALT key, then press a key to select the function such as the letter underlined in
the menu bar at the top of an emulation screen. Alt – ESC is used to toggle through the active
programs.
Other Keys
Other special function keys are described in the following table.
Keys
Description
DEL
Deletes characters at the cursor location. The character to the
right of the cursor shifts over one position to the left.
DUP
Duplicates the last field entry and display an *. Pressing this key,
when the cursor is not in an input field causes the input inhibited
indicator X to appear on the operating status line. To remove the
symbol and unlock the keyboard, press RESET.
ENTER
Transmits information to the host. This key does not change the
keyboard shift status, but it does cancel the insert mode.

I-O 2677e Ethernet Display User s Guide
Printer Operation 24
ERASE INPUT Erases all input field entries on the screen and moves the cursor to
the beginning of the first input field. If the screen has no input field,
the cursor moves to row 1, column 1 of the screen, this key clears
the screen and moves the cursor to row 1, column 1 of the same
screen.
FIELD - This key’s functions can vary depending on the system. The key
function is the same as the Field +, and Field Exit functions, except it
is allowed only in numeric-only fields. This key inserts a - (minus)
sign in the last position of the field. An error will appear if the field is
not programmed to accept negative numbers as input.
FIELD + Causes the cursor to exit an input field. Null characters are inserted
to the end of the field. When this key is pressed in a right adjust
field, the data to the left of the cursor shifts to the right and the
cursor advances to the next field.
FIELD EXIT Causes the cursor to exit an input field. Null characters are inserted
to the end of the field. When this key is pressed in a right adjust
field, the data to the left of the cursor shifts to the right and the
cursor advances to the next field.
HOME Moves the cursor to the first input position on the screen, or row 1,
column 1 of the screen. This action is host-dependent.
INSERT Allows a character to be inserted into an existing input field without
writing over existing data. If you attempt to insert more characters
than nulls, the input inhibited indicator X appears in the status line
and the keyboard will lock up. If this happens, simply press RESET.
The following keys also turns off the insert mode: Clear, Enter, and
F1-F24.
QUIT Stops the printing operation and cancels the printing of the remainder of
the file. This key can also be used to abort a record/playback sequence.
RESET This key performs the following functions:
• Exits the insert mode and removes the insert mode symbol (^).
• Ends help/system request functions.
• Clears operator errors.
• Unlocks the keyboard and removes the input-inhibited (X)
symbol.
RULE Toggles the rule cursor on and off.
SYSREQ Varies on the host system. SysReq can do the following:
• Select and start an alternate job.
• Notify the host system that the display station is ready to select
a new program.
• Request that the keyboard be unlocked so data can be entered.
HELP Requests host on-line help to: provide an explanation of current
error conditions; or help from the system.
ROLL
Moves the screen down in the listing.
ROLL Moves the screen up in the listing

I-O 2677e Ethernet Display User s Guide
Printer Operation 25
Record / Playback
The Record/Playback feature allows you to record a sequence of keystrokes for later playback by
pressing one of the 24 command (CMD) keys. This is helpful for entering information used most often. A
maximum of 1500 keystrokes can be recorded between the 24 command keys. The display module will
remember the recorded sequence even when it’s powered off.
Record Past Enter and Play Past Enter are also supported. This feature allows the recording of the
Enter key’s function, which later will be used in the play mode. In the play mode, playback will play past
or beyond Enter, and then continues the playback as soon as the host is uninhibited.
NOTE: RECORD / PLAY PAST ENTER WILL PROCESS ALL KEYSTROKES WHEN USING A 102/103
KEYBOARD, HOWEVER THE 5250 STYLE 122 KEYBOARD WILL TERMINATE THE RECORDED SEQUENCE
WHEN THE FIRST ‘ENTER’ KEY IS PROCESSED.
Recording Keystroke Sequences
Record a sequence of keystrokes with the following steps:
1. Press the RECRD key (122-key keyboard) or ALT- F4 (102/103-key keyboard) to activate the record
mode. A Record Select screen appears showing the 24 CMD keys and which if any are already in
use, indicated by a dark key. The number showing indicates the number of keystrokes remaining
and will decrease as keys are pressed when in record mode.
NOTE: THE RECORD KEY CAN BE PRESSED AT THIS POINT TO CANCEL AND EXIT THE RECORD MODE.
2. Press one of the CMD keys to assign a sequence of keystrokes to the key. (Press SHIFT with the
CMD key on 102/103-key keyboards to access CMD keys F13 through F24). The record screen will
disappear leaving the Record and Function key indicator ‘R### F#’.
NOTE: IF A 90XX ERROR CODE IS SHOWN, A KEY OTHER THAN A CMD KEY WAS PRESSED. TO CLEAR
THE ERROR CONDITION, PRESS RESET, THEN CONTINUE BY CHOOSING A CMD KEY. (REFER TO
TROUBLESHOOTING FOR A DESCRIPTION OF THE ERROR CODES.)
TIP: YOU MAY RECORD OVER A PREVIOUSLY SAVED CMD KEY SEQUENCE BY SIMPLY SELECTING THAT
CMD KEY. THE REMAINING KEYSTROKE NUMBER WILL INCREASE BY THE NUMBER OF KEYSTROKES
BEING CLEARED FROM THAT CMD KEY.
3. An "R" appears on the status line of the screen. The number to the right of the "R" is the remaining
number of keystrokes available for recording. Type the keystroke sequence to be recorded. As you
type, the number next to the "R" decreases.
NOTE: THE PLAY, RECORD, AND LOCAL FUNCTION KEYS SUCH AS THE ALT-ALT COMMANDS
CANNOT BE RECORDED.
4. When typing is complete, press the RECORD key or ALT-F4 keys to save the keystrokes assigned
to the CMD key and exit the record mode.
5. The recorded keystroke sequence is permanently saved in the memory of the display module (even
when it is turned off), until the sequence is deleted or recorded over.
I-O 2677e Ethernet Display User s Guide
Printer Operation 26
Recording with a Pause
One or more pause(s) can be inserted into the recorded sequence, so that during playback information
or a password can be typed in. For example, to get into a word processing document, you may need to
type in a user code, then a password, then go into a menu and then choose other menu items. All of this
can be recorded on one CMD key by doing the following.
1. During the typing of the sequence to be recorded, press the PAUSE key (or ALT-PAUSE on a
102/103 keyboard). A "^" symbol will appear next to the "R" at the bottom of the screen. This shows
that the pause is in effect.
2. Type keystrokes that are not to be recorded, then press PAUSE (or ALT-PAUSE) to end the pause
function and add it to the recorded sequence.
3. Continue typing the sequence.
Deleting Recorded Sequences
To delete a single keystroke sequence assigned to a CMD key, press RECRD (or ALT-RECRD on a
102/103 keyboard), and then the CMD key. Press Clear, Erinp (Erase Input), or Reset.
To delete all keystroke sequences assigned to all CMD keys, you will need to delete one CMD at a time
due to the nature of TeemTalk. The previous recording will be cleared, however the cmd key will still
indicate it has been recorded. Clearing all the cmd keys will require you to delete the terminal session
and reconfigure.
CAUTION: THERE IS NO RECOVERY OF DELETED SEQUENCES! BE ABSOLUTELY CERTAIN THAT YOU
WANT TO DELETE A SEQUENCE BEFORE PERFORMING EITHER OF THESE TWO PROCESSES.
Playing Sequences
Play back keystroke sequences that have been recorded using the following steps:
1. Position the cursor where the keystroke sequence is to begin.
2. Press the PLAY key or ALT- F5 keys. The Play Select screen appears.
TIP: YOU CAN EXIT PLAY MODE BY PRESSING THE PLAY KEY BEFORE PRESSING A CMD KEY.
3. Press the CMD key with the desired keystroke sequence. The Play Select screen disappears and
the keystroke sequence plays back starting at the location of the cursor. During the play back, a P
appears momentarily in the status line, then disappears.
NOTE: IF A 90XX ERROR CODE IS SHOWN, A KEY OTHER THAN A CMD KEY WAS PRESSED. TO CLEAR
THE ERROR CONDITION, PRESS RESET, THEN CONTINUE BY CHOOSING A CMD KEY. (REFER TO
TROUBLESHOOTING FOR A DESCRIPTION OF THE ERROR CODES.)
Playing a Sequence with a Pause
Play back the keystroke sequence that was recorded with a pause by taking the following steps:
1. During the playing back of the sequence, when the playback reaches the pause, a "^" symbol
appears next to the "P" on the status line. This shows that the pause is in effect.
2. Type in the desired information that was not recorded, and then press the PLAY key (or ALT-PLAY
on a 102/103 keyboard) again. Playback continues to the end of the recorded sequence. If more
than one pause is in the recorded sequence, repeat this step.
 Loading...